Pinia状态管理
- Pinia和Vuex的对比
- Pinia详解
- Pinia基本使用
- 创建pinia
- 创建Store
- 核心概念state
- state基本使用
- sate其他操作
- 核心概念getters
- getters基本使用
- getters其他操作
- 核心概念actions
- actions基本使用
- actions异步操作
Pinia和Vuex的对比
什么是Pinia呢?
Pinia(发音为/piːnjʌ/,如英语中的“peenya”)是最接近pina(西班牙语中的菠萝)的词;
- Pinia开始于大概2019年,最初是作为一个实验为
Vue重新设计状态管理,让它用起来像组合式APl (Composition API)。- 从那时到现在,最初的设计原则依然是相同的,并且目前同时兼容Vue2、Vue3,也并不要求你使用Composition API;
- Pinia本质上依然是一个
状态管理的库,用于跨组件、页面进行状态共享(这点和Vuex、Redux一样);
Pinia和vuex的区别
那么我们不是已经有Vuex了吗?为什么还要用Pinia呢?
- Pinia最初是为了
探索Vuex的下一次迭代会是什么样子,结合了Vuex 5核心团队讨论中的许多想法;- 最终,团队意识到
Pinia已经实现了Vuex5中大部分内容,所以最终决定用Pinia来替代Vuex;- 与vuex相比,Pinia提供了一个
更简单的API,具有更少的仪式,提供了Composition-API风格的APl;- 最重要的是,在
与Typescript一起使用时具有可靠的类型推断支持;
和Vuex相比,Pinia有很多的优势:
- 比如mutations不再存在:
- 他们经常被认为是非常冗长;
- 他们最初带来了devtools集成,但这不再是问题;
- 更友好的TypeScript支持,Vuex之前对Ts的支持很不友好;
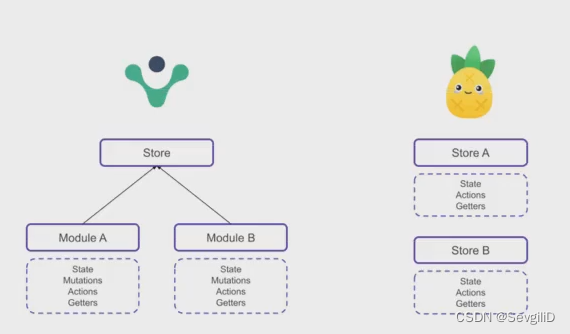
- 不再有modules的嵌套结构:
- 你可以灵活使用每一个store,它们是通过扁平化的方式来相互使用的;
- 也不再有命名空间的概念,不需要记住它们的复杂关系;
Pinia详解
Pinia基本使用
创建pinia
使用Pinia之前,我们需要先对其进行安装:
yarn add pinia
// or with npm
npm install pinia
创建一个pinia并且将其传递给应用程序:
import { createPinia } from "pinia";

// 创建pinia
const pinia = createPinia()

// 导出pinia
export default pinia
import { createApp } from 'vue'
import App from './App.vue'
import  pinia  from "./stores/index";

createApp(App).use(pinia).mount('#app')
创建Store
什么是Store?
- 一个Store (如Pinia)是一个
实体,它会持有为绑定到你组件树的状态和业务逻辑,也就是保存了全局的状态;- 它有点像始终存在,并且
每个人都可以读取和写入的组件;- 你可以在你的应用程序中
定义任意数量的store来管理你的状态;
Store有三个核心概念:
state、getters、actions;- 等同于组件的data、computed、methods;
- 一旦store被实例化,你就可以
直接在store上访问state、getters和actions中定义的任何属性;
定义一个Store:
- 我们需要知道Store是
使用defineStore()定义的,- 并且它需要一个
唯一名称,作为第一个参数传递;
//定义关于counter的store
import { defineStore } from "pinia";

// 一般使用use变量名来接收返回的函数
const useCounter = defineStore("counter", {

    // 1.state
    state: () => ({
        count: 99,
    }),

})

export default useCounter
- 这个name,也称为id,
是必要的,Pinia使用它来将store连接到devtools。- defineStore()返回的函数统一使用
useXXX作为命名方案, 且XXX一般就使用传入的id,这是约定的规范;- 定义完成后导出useXXX
- 调用defineStore()返回的函数才会创建store

Store在它被使用之前是不会创建的,我们可以通过调用use函数来使用Store:
<template>
<!-- 展示counterStore.counter的状态 -->
<h2>{{ counterStore.counter }}</h2>
</template>

<script setup>
// 导入我们自定义关于counter的store
import useCounter from '../stores/counter';
// 调用函数才会创建store, 不调用不会创建
const counterStore = useCounter()
</script>
注意Store获取到后不能被解构,那么会失去响应式:
- 为了从Store 中提取属性同时保持其响应式,需要使用
torRefs或者storeToRefs
<script setup>
  import { toRefs } from 'vue';
  import useCounter from '../stores/counter';

  const counterStore = useCounter()

  const { counter } = toRefs(counterStore)	//不是响应式
  // 包裹一层toRefs
  const { counter2 } = toRefs(counterStore)//是响应式
  // 或者包裹一层storeToRefs
  const { counter3 } = storeToRefs(counterStore)//是响应式

</script>
核心概念state
state基本使用
state 是 store 的核心部分,因为store是用来帮助我们管理状态的。
- 在 Pinia 中,状态被定义为返回初始状态的函数;
前面创建了一个counter.js文件用于定义counter的store, 接下来我们创建一个urse.js文件, 定义一个用户信息的store来演示state:
import { defineStore } from "pinia";

const userUser = defineStore("user", {
    state: () => ({
        name: "sevgilid",
        age: 18,
        height: 1.88
    })

})

export default userUser
在组件中展示Store:
<template>
  <div class="home">
    <!-- 展示userStore中的状态 -->
    <h2>{{ name }}</h2>
    <!-- 不结构的话这样展示 -->
    <h2>age:{{ userStore.age }}</h2>
    <h2>{{ height }}</h2>
  </div>
</template>

<script setup>
  import { storeToRefs } from 'pinia';
  // 导入我们自定义的store
  import useUser from "../stores/user"

  // 调用函数创建store
  const userStore = useUser()

  // 将store中的状态解构出来
  const { name, height } = storeToRefs(userStore)
</script>
sate其他操作
读取和写入state:
- 默认情况下,可以通过store 实例访问状态来直接读取和写入状态;
<template>
  <div class="home">
    <!-- 展示userStore中的状态 -->
    <h2>{{ name }}</h2>
    <h2>{{ age }}</h2>
    <h2>{{ height }}</h2>
    <button @click="changeInfo">修改信息</button>
  </div>
</template>

<script setup>
  import { storeToRefs } from 'pinia';
  import useUser from "../stores/user"

  const userStore = useUser()
  const { name, age, height } = storeToRefs(userStore)

  function changeInfo() {
    // 使用实例访问状态, 进行修改
    userStore.name = "李大嘴"
    userStore.age = 22
    userStore.height = 1.89
  }
</script>
- 当我们对某些状态进行了修改之后, 我们可以通过调用 store 上的 $reset() 方法将状态重置到其初始值;
$reset()方法会将所有的状态重置到初始值- 同时修改多个状态
- 可以调用
$patch方法 , 它允许您使用部分“state”对象同时应用多个更改;- 操作state的数据还有几个方法,替换、订阅等,但都不常见且都是获取过来直接操作就不挨着演示
重置及同时修改多个状态示例:
function changeInfo() {
    userStore.name = "王老五"
    userStore.age = 20
    userStore.height = 1.89
  }

	function resetInfo() {
    // 重置状态
    userStore.$reset()
  }

  function changeInfoo() {
    // $patch一次性修改多个状态
    userStore.$patch({
      name: "陈金刚",
      age: 38,
      height: 1.55
    })
  }
核心概念getters
getters基本使用
Getters相当于Store的计算属性:
- 它们可以用defineStore()中的
getters属性定义;- getters中可以
定义接受一个state作为参数的函数;
在store中定义getters并在其中定义方法:
import { defineStore } from "pinia"

const useCounter = defineStore("counter", {
  state: () => ({
    counter: 125
  }),
  // 定义getters
  getters: {
    doubleCounter(state) {
      return state.counter * 2
    }
  }
})

export default useCounter
直接通过store对象就可以访问当前store的Getters
<template>
  <!-- 访问当前store的Getters -->
  <h2>{{ counterStore.doubleCounter }}</h2>
</template>

<script setup>
  import useCounter from "../stores/counter"

  const counterStore = useCounter()
</script>
getters其他操作
(1)Getters中中访问自己的其他Getters
- 可以
使用this来访问到当前store实例的所有其他属性;- this相当于是绑定的store实例
例如在getter中访问自己的doubleCounter:
getters: {
  doubleCounter(state) {
    return state.counter * 2
  },
  doubleCounterAddOne() {
    return this.doubleCounter + 1
  }
}
(2)Getters也可以返回一个函数
const useCounter = defineStore("counter", {
  state: () => ({
    	counter: 101,
        friend: [
            { id: 111, name: "杨楚龙" },
            { id: 112, name: "大武当" },
            { id: 113, name: "吴师傅" },
        ]
  }),
  getters: {
    // getter可以返回一个函数
    getfriendById() {
      return (id) => {
        return this.friend.find(item => item.id == id)
      }
    }
  }
})
<h2>{{ counterStore.getfriendById(111) }}</h2>
<h2>{{ counterStore.getfriendById(112) }}</h2>
(3)当前Getters访问其他store中的state/getters
// 导入usrUser
import useUser from "./user"

const useCounter = defineStore("counter", {
  state: () => ({
    counter: 101
  }),

  getters: {
        // 当前Getters访问其他store中的state/getters
            // 比如此处:在counter里想拿到user里的数据
        showMessage(state){
            // -导入后获取userUser里的信息
            const userStore = userUser()
            // -通过state获取自己的信息
            // -实现操作数据:如拼接数据
            return `${state.count}-${userStore.name}`
        }
  }

})
<h2>{{ counterStore.showMessage }}</h2>
核心概念actions
actions基本使用
Actions相当于组件中的methods。
- 可以使用defineStore()中
的actions属性定义,并且它们非常适合定义业务逻辑;- 和getters一样,在action中可以
通过this访问整个store实例的所有操作;- 不同的是
getters里有state参数使用,actions中没有,它的括号是用来传递其余参数的
const useCounter = defineStore("counter", {
  state: () => ({
    counter: 101
  }),
  actions: {
    increment() {
      this.counter++
    }
  }
})
<h2>{{ counterStore.counter }}</h2>
<button @click="changeState">+1</button>

<script setup>
  import useCounter from "../stores/counter"

  const counterStore = useCounter()

  function changeState() {
    // 通过store实例调用即可
    counterStore.increment()
  }
</script>
actions异步操作
Actions中是支持异步操作的,并且我们可以编写异步函数,在函数中使用await
例如在Actions发生网络请求
import { defineStore } from 'pinia'

const useHome = defineStore("home", {
  state: () => ({
    // 定义空数组用于接收网络请求数据
    banners: [],
    recommends: []
  }),
  actions: {
    // 支持异步操作
    async fetchHomeMultidata() {
      // 发送网络请求获取数据
      const res = await fetch("http://123.207.32.32:8000/home/multidata")
      const data = await res.json()

      // 将获取的数据添加到state中
      this.banners = data.data.banner.list
      this.recommends = data.data.recommend.list
    }
  }
})

export default useHome
展示网络请求获取到homeStore中的数据
<template>
  <div class="about">
    <ul v-for="item in homeStore.banners" :key="item.acm">
      <li>{{ item.title }}</li>
    </ul>
  </div>
</template>

<script setup>
  import useHome from "../stores/home"

  const homeStore = useHome()

  // 告知发送网络请求
  homeStore.fetchHomeMultidata().then(res => {
    console.log("fetchHomeMultidata的action已经完成了:", res)
    //这是确认获取数据,打印一下  res是异步函数返回的值
  })
</script>
(这里涉及到一些异步函数和promise的前置知识)