序:
Zookeeper最早起源于雅虎研究院的一个研究小组, 在当时, 研究人员发现,在雅虎内部有很大大型的系统都是需要一个依赖一个类似的系统来进行分布式协调,但是在系统往往都存在分布式单点问题,所以雅虎的开发人员就试图开发一个通用的无单点问题的分布式协调框架 , 以便让开发人员将精力集中在处理业务问题上。
关于Zookeeper这个项目的名字,其实也是一段趣闻,在立项之初, 考虑到之前内部很多的项目都在使用动物的名字来命名的(例如著名的Pig项目),雅虎的工程师希望给这个项目也取一个动物的名字,时任研究院的首席科学家Raghu Ramakrishnan开玩笑的说,在这样下去,我们这儿就变成了动物园了, 此话一出, 大家纷纷表示就动物园管理员吧, 因为各种以动物命名的分布式组件放在一起,雅虎的整个分布式系统看上去就像一个大型的动物园了,而Zookeeper正好要用来进行分布式环境的协调,于是ZooKeeper 的名字就由此诞生了。
随着分布式架构的出现,越来越多的分布式应用会面临数据一致性问题,很遗憾的是, 在解决分布式数据一致性上,除了Zookeeper之外,目前还没有一个稳定且被大规模应用的解决方案, Zookeeper无论是从性能,易用性,还是稳定性上来说,都已经达到了一个工业级的标准 , 其次,Zookeeper是开放的源码,所有的人都在关注它的发展 , 都有权利贡献自己的力量, 你可以和全世界成千上万Zookeeper开发者交流使用经验, 共同解决问题,另外,Zookeeper是免费的, 你无须为它支付任何费用,这一点对于小型公司来说, 尤其是初创团队来说, 无疑是非常重要的,。
最后, ZooKeeper 已经得到了广泛的应用,诸如Hadoop , HBase ,Storm 和Solr 等,越多的大型分布式项目都已经将Zookeeper 作为其核心组件,用于分布式协调 。 这也是我为什么研究Zookeeper 源码的原因 。
Zookeeper的启动与关闭脚本
在读取Zookeeper启动也关闭脚本之前,先来了解Zookeeper 的启动脚本 ,在查看启动脚本之前,先来看看脚本中的一些常用的命令。
- -a : 如果 file 存在则为真。
- -b : 如果 file 存在且是一个块特殊文件则为真。
- -c : 如果 file 存在且是一个字特殊文件则为真。
- -d : filename 如果filename为目录,则为真
- -e : filename 如果filename存在,则为真
- -f : filename 如果filename为常规文件,则为真
- -g : 如果 file 存在且已经设置了SGID则为真。
- -h : filename 如果文件是软链接,则为真
- -k : 如果 file 存在且已经设置了粘制位则为真。
- -n : “STRING” 的长度为非零
- -p : 如果 file 存在且是一个名字管道(F如果O)则为真。
- -o OPTIONNAME : 如果 shell选项 “OPTIONNAME” 开启则为真。
- -r : filename 如果 filename 可读,则为真
- -s : filename r如果文件长度不为0,则为真
- -t : 如果文件描述符 FD 打开且指向一个终端则为真。
- -u : 如果 file 存在且设置了SUID (set user ID)则为真。
- -w : filename 如果 filename 可写,则为真
- -x : filename 如果 filename 可执行,则为真
- -z : “STRING” 的长度为零则为真。
- -L : filename 如果 filename 为符号链接 ,则为真
- -O : 如果 file 存在且属有效用户ID则为真。
- -G : 如果 file 存在且属有效用户组则为真。
- -N : 如果 file 存在 and has been mod如果ied since it was last read则为真。
- -S : 如果 FILE 存在且是一个套接字则为真。
- -eq 等于
- -ne 不等于
- -gt 大于
- -ge 大于等于
- -lt 小于
- -le 小于等于
- [ FILE1 -nt FILE2 ] : filename1 -nt filename2 如果filename1 比filename2 新,则为真
- [ FILE1 -ot FILE2 ] : filename1 -ot filename2 如果filename1 比filename2 旧,则为真
- [ FILE1 -ef FILE2 ]: 如果 FILE1 和 FILE2 指向相同的设备和节点号则为真。
- [ -n STRING ] or [ STRING ] “STRING” 的长度为非零 non-zero则为真。
- [ STRING1 == STRING2 ] 如果2个字符串相同。 “=” may be used instead of “==” for strict POSIX compliance则为真。
- [ STRING1 != STRING2 ] 如果字符串不相等则为真。
- [ STRING1 < STRING2 ] 如果 “STRING1” sorts before “STRING2” lexicographically in the current locale则为真。
- [ STRING1 > STRING2 ] 如果 “STRING1” sorts after “STRING2” lexicographically in the current locale则为真。
- $$ : Shell本身的PID(ProcessID),对于 Shell 脚本,就是这些脚本所在的进程 ID。
- $!:Shell最后运行的后台Process的PID
- $?:最后运行的命令的结束代码(返回值),上个命令的退出状态,或函数的返回值
- $-:使用Set命令设定的Flag一览
- $:所有参数列表。如"$“用「”」括起来的情况、以"$1 $2 … $n"的形式输出所有参数。
- $@:所有参数列表。如"$@“用「”」括起来的情况、以"$1" “ 2 " … " 2" … " 2"…"n” 的形式输出所有参数。传给脚本的所有参数的列表
- $#:是传给脚本的参数个数
- $0:脚本本身的名字
- $0~$n:添加到Shell的各参数值。$1是第1参数、$2是第2参数…。
先来看zkServer.sh 脚本
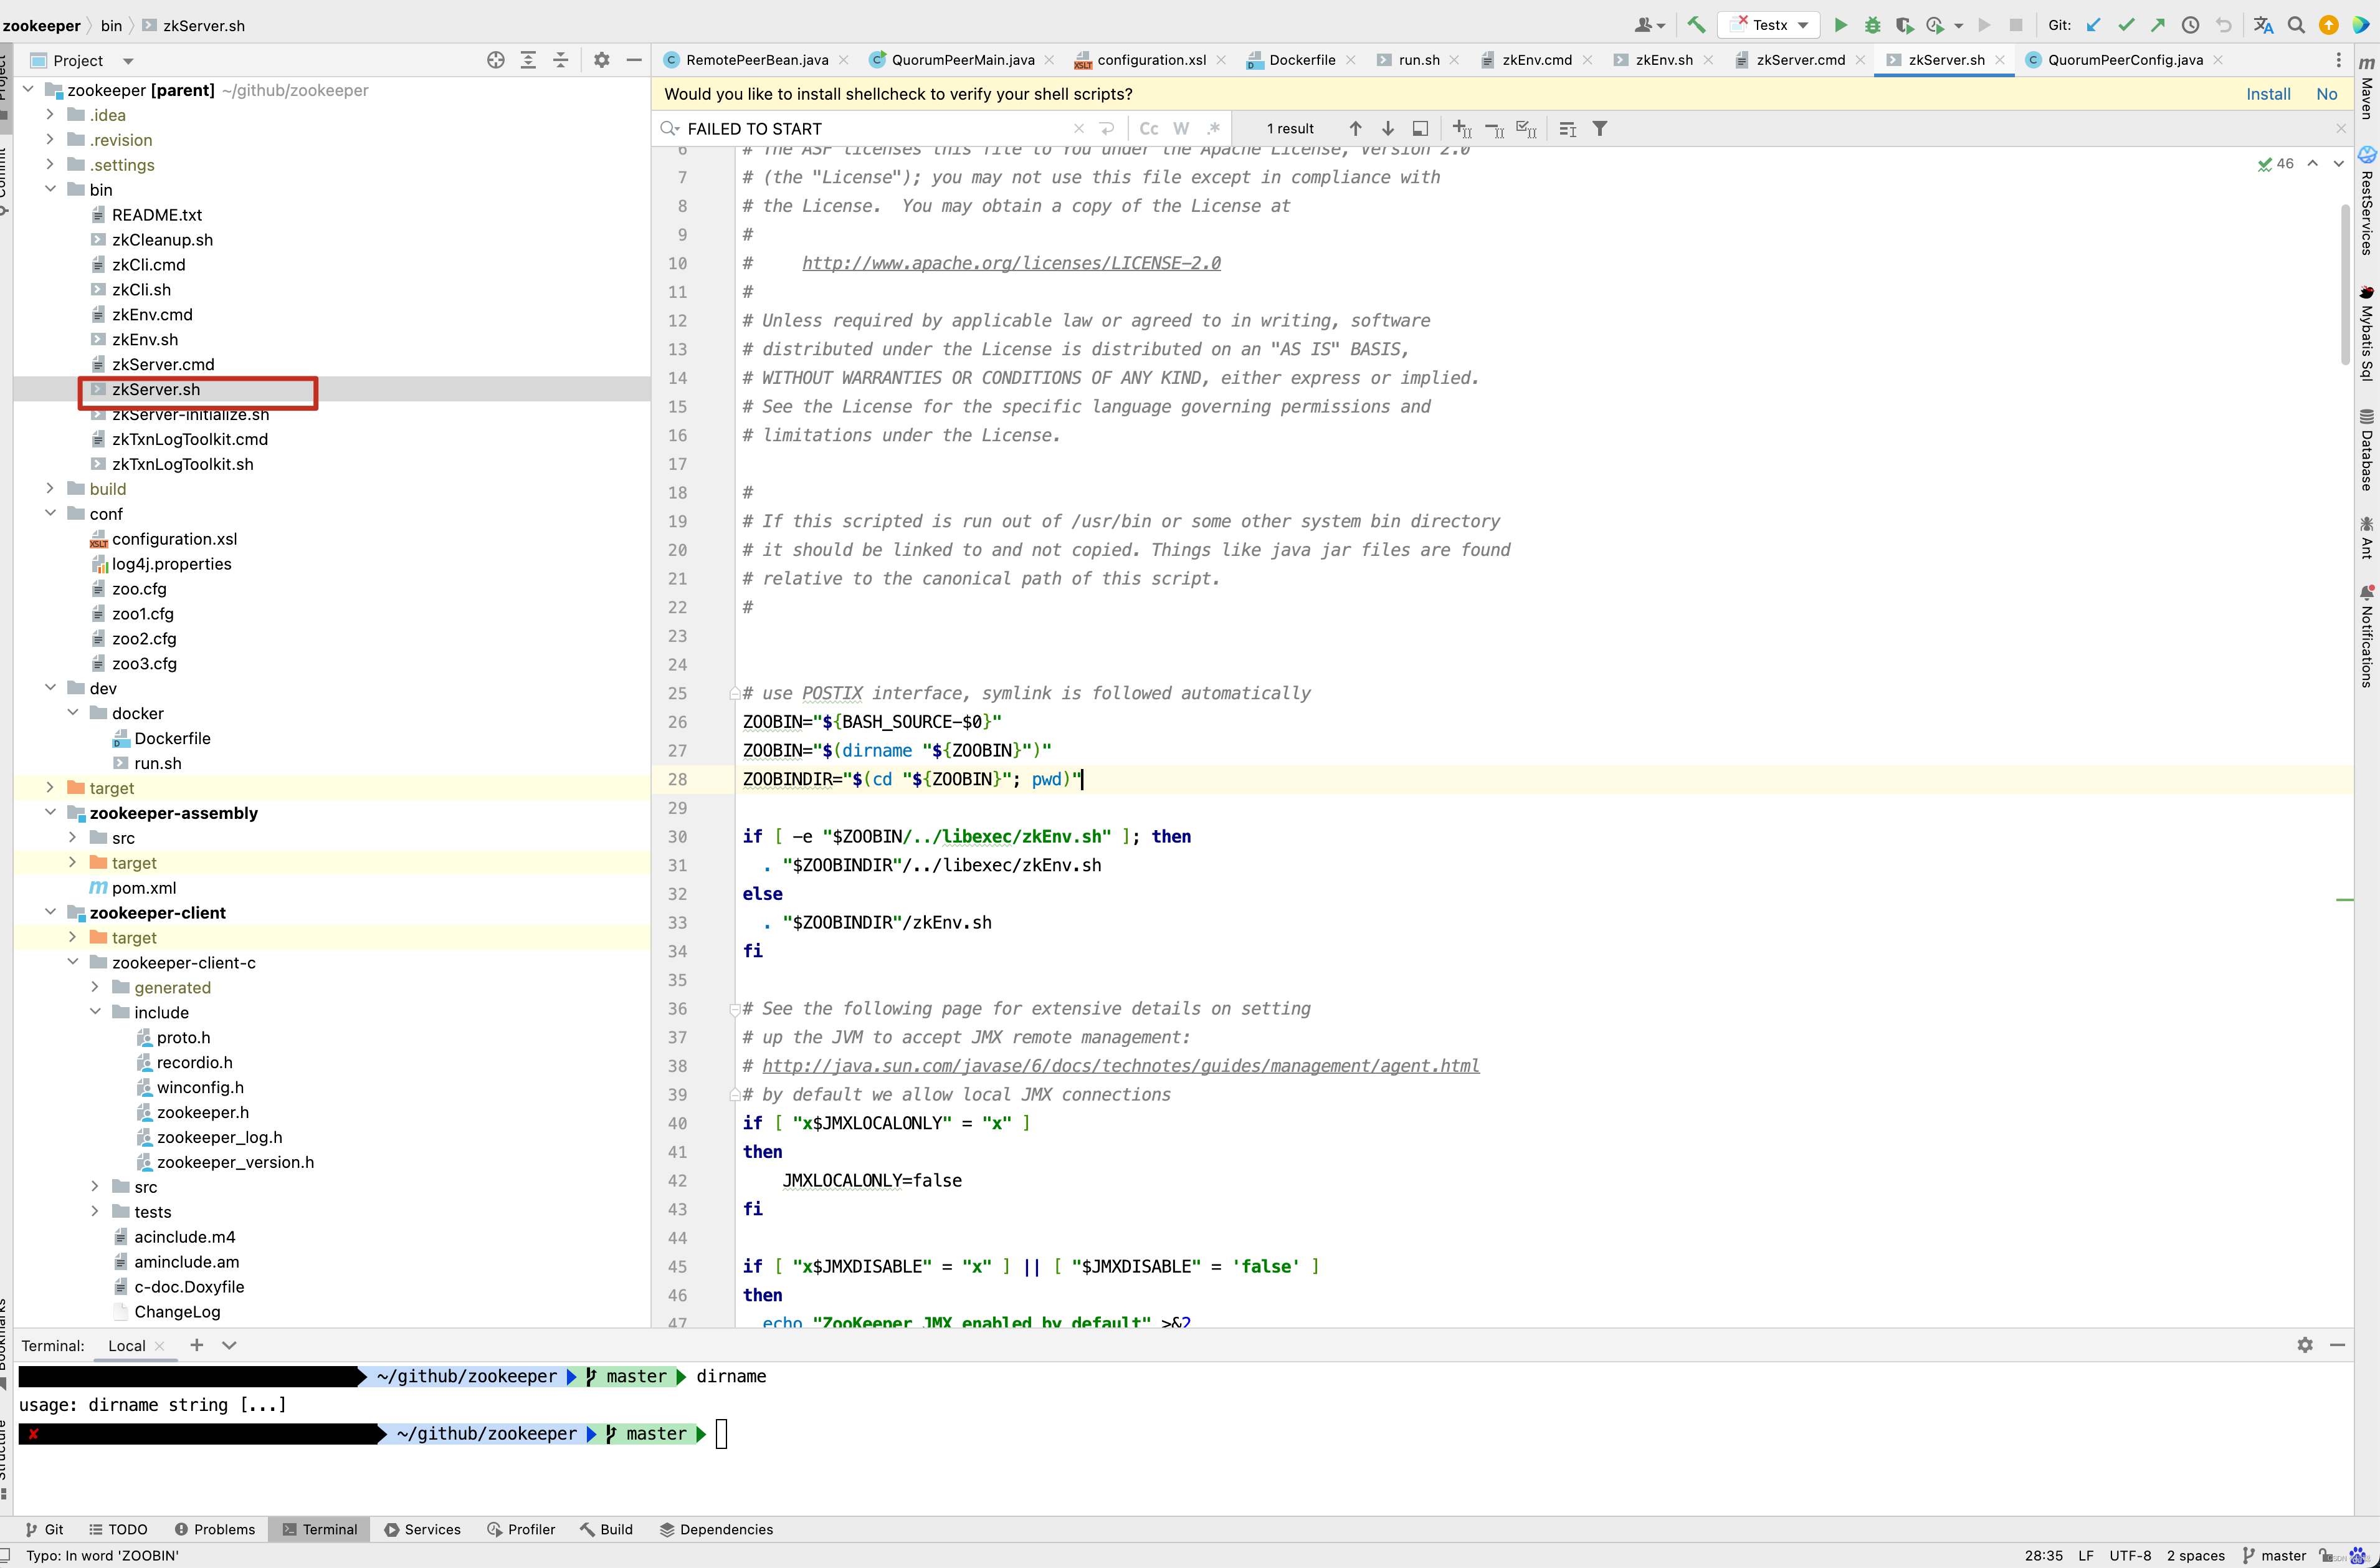
接下来,我们将一行一行的来分析Zookeeper启动脚本的内容 。
# 获取当前脚本的名字
ZOOBIN="${BASH_SOURCE-$0}"

# dirname命令, 获取目录部分,剥掉文件名 ,因此这里ZOOBIN得到的是zkServer.sh文件所在的目录
ZOOBIN="$(dirname "${ZOOBIN}")"

#  zkServer.sh文件的绝对路径,如 /Users/xxx/Documents/software/apache-zookeeper-3.5.8/bin
ZOOBINDIR="$(cd "${ZOOBIN}"; pwd)"


# 判断 /Users/xxx/Documents/software/apache-zookeeper-3.5.8/libexec/zkEnv.sh文件是否存在,如果存在,则执行它
if [ -e "$ZOOBIN/../libexec/zkEnv.sh" ]; then
  . "$ZOOBINDIR"/../libexec/zkEnv.sh
else
	# 如果 /Users/xxx/Documents/software/apache-zookeeper-3.5.8/libexec/zkEnv.sh文件不存在,则执行/Users/xxx/Documents/software/apache-zookeeper-3.5.8/bin/zkEnv.sh 文件。
  . "$ZOOBINDIR"/zkEnv.sh
fi
从上面的分析中得知,如果/Users/xxx/Documents/software/apache-zookeeper-3.5.8/libexec/zkEnv.sh的文件不存在,则执行/Users/xxx/Documents/software/apache-zookeeper-3.5.8/bin/zkEnv.sh ,这里需要注意,我的电脑是mac ,而Zookeeper所放置在/Users/xxx/Documents/software/apache-zookeeper-3.5.8/目录下,接下来看zkEnv.sh 内部又做了哪些事情呢? 进入zkEnv.sh 文件 。
// 得到ZOOBINDIR的目录为 /Users/xxx/Documents/software/apache-zookeeper-3.5.8/bin
ZOOBINDIR="${ZOOBINDIR:-/usr/bin}"

// 而ZOOKEEPER_PREFIX为Users/xxx/Documents/software/apache-zookeeper-3.5.8
ZOOKEEPER_PREFIX="${ZOOBINDIR}/.."

// check to see if the conf dir is given as an optional argument
// 如果启动脚本的参数大于1个
if [ $# -gt 1 ]
then
	# 如果第一个参数是--config
    if [ "--config" = "$1" ]
      then
      	  # 将第一个参数--config移除掉
          shift
          # 并且将--config 之后的第一个参数赋值给confdir
          confdir=$1
          shift
          // 再将第一个参数移除掉 ,后面的元素顶替掉之前的参数 。
          // 假如传入的参数是 --config aaa bbb ccc
          // 第一次shift 移除掉--config,第二次shift移除掉aaa , 则此时 ZOOCFGDIR = confdir = aaa
          // 剩下的参数了 bbb ccc
          ZOOCFGDIR=$confdir
    fi
fi

# 如果在启动zkServer.sh时没有指定--config 参数,
# 此时就需要找默认conf的配置文件路径
if [ "x$ZOOCFGDIR" = "x" ]
then
  # 如果Users/xxx/Documents/software/apache-zookeeper-3.5.8/conf目录存在,则指定配置文件ZOOCFGDIR 路径
  # 为Users/xxx/Documents/software/apache-zookeeper-3.5.8/conf
  if [ -e "${ZOOKEEPER_PREFIX}/conf" ]; then
    ZOOCFGDIR="$ZOOBINDIR/../conf"
  else
  	# 否则指定配置文件路径为Users/xxx/Documents/software/apache-zookeeper-3.5.8/etc/zookeeper
    ZOOCFGDIR="$ZOOBINDIR/../etc/zookeeper"
  fi
fi

# 如果ZOOCFGDIR/zookeeper-env.sh存在,则执行它
if [ -f "${ZOOCFGDIR}/zookeeper-env.sh" ]; then
  . "${ZOOCFGDIR}/zookeeper-env.sh"
fi

# 如果没有指定zookeeper的配置文件名,则使用默认的文件名为 zoo.cfg
if [ "x$ZOOCFG" = "x" ]
then
    ZOOCFG="zoo.cfg"
fi

# 默认情况下 ZOOCFG 为 Users/xxx/Documents/software/apache-zookeeper-3.5.8/conf/zoo.cfg
ZOOCFG="$ZOOCFGDIR/$ZOOCFG"

# 如果ZOOCFGDIR/java.env文件存在,则执行它
if [ -f "$ZOOCFGDIR/java.env" ]
then
    . "$ZOOCFGDIR/java.env"
fi


# 如果/Users/xxx/Documents/software/apache-zookeeper-3.5.8/logs不存在,
# 则以/Users/xxx/Documents/software/apache-zookeeper-3.5.8/logs作为日志目录
if [ "x${ZOO_LOG_DIR}" = "x" ]
then
    ZOO_LOG_DIR="$ZOOKEEPER_PREFIX/logs"
fi


# 如果没有指定日志级别,则默认为INFO 级别
if [ "x${ZOO_LOG4J_PROP}" = "x" ]
then
    ZOO_LOG4J_PROP="INFO,CONSOLE"
fi

# 如果$JAVA_HOME存在,并且$JAVA_HOME/bin/java是一个可执行文件,则JAVA目录为
# $JAVA_HOME/bin/java
if [[ -n "$JAVA_HOME" ]] && [[ -x "$JAVA_HOME/bin/java" ]];  then
    JAVA="$JAVA_HOME/bin/java"
# type -p 外部命令名称 , 可以只显示外部命令的绝对路径
# 获取java 命令的路径
elif type -p java; then
    JAVA=java
else
	# 如果不存在java命令,则抛出异常
    echo "Error: JAVA_HOME is not set and java could not be found in PATH." 1>&2
    exit 1
fi


CLASSPATH="$ZOOCFGDIR:$CLASSPATH"
# 将 /Users/xxx/Documents/software/apache-zookeeper-3.5.8/zookeeper-server//src/main/resources/lib/下的所有jar 包加入到环境变量中
for i in "$ZOOBINDIR"/../zookeeper-server/src/main/resources/lib/*.jar
do
    CLASSPATH="$i:$CLASSPATH"
done

#make it work in the binary package
#(use array for LIBPATH to account for spaces within wildcard expansion)
# 如果/Users/xxx/Documents/software/apache-zookeeper-3.5.8/share/zookeeper/下存在zookeeper-开头的包,则LIBPATH 为
# /Users/xxx/Documents/software/apache-zookeeper-3.5.8/share/zookeeper/ 下所有的包加入到CLASSPATH中
if ls "${ZOOKEEPER_PREFIX}"/share/zookeeper/zookeeper-*.jar > /dev/null 2>&1; then
  LIBPATH=("${ZOOKEEPER_PREFIX}"/share/zookeeper/*.jar)
else
  #release tarball format
  # 将 /Users/xxx/Documents/software/apache-zookeeper-3.5.8 下所有以zookeeper- 开头的包
  for i in "$ZOOBINDIR"/../zookeeper-*.jar
  do
    CLASSPATH="$i:$CLASSPATH"
  done
  # 并且指定/Users/xxx/Documents/software/apache-zookeeper-3.5.8/lib下所有的jar包为LIBPATH
  LIBPATH=("${ZOOBINDIR}"/../lib/*.jar)
fi

# 对LIBPATH进行遍历,并加入到CLASSPATH环境变量中
for i in "${LIBPATH[@]}"
do
    CLASSPATH="$i:$CLASSPATH"
done

#make it work for developers
# 如果/Users/xxx/Documents/software/apache-zookeeper-3.5.8/build/lib/ 目录下也存在jar 包,也添加到环境变量中
for d in "$ZOOBINDIR"/../build/lib/*.jar
do
   CLASSPATH="$d:$CLASSPATH"
done

# 如果/Users/xxx/Documents/software/apache-zookeeper-3.5.8/zookeeper-server/target/lib 下存在jar包,则也添加到环境变量中
for d in "$ZOOBINDIR"/../zookeeper-server/target/lib/*.jar
do
   CLASSPATH="$d:$CLASSPATH"
done

#make it work for developers
# 并且将/Users/xxx/Documents/software/apache-zookeeper-3.5.8/build/classes 添加到环境变量中
CLASSPATH="$ZOOBINDIR/../build/classes:$CLASSPATH"

#make it work for developers
# 将/Users/xxx/Documents/software/apache-zookeeper-3.5.8/zookeeper-server/target/classes 添加到环境变量中
CLASSPATH="$ZOOBINDIR/../zookeeper-server/target/classes:$CLASSPATH"

# 获取操作系统及操作系统相关的信息
case "`uname`" in
    CYGWIN*|MINGW*) cygwin=true ;;
    *) cygwin=false ;;
esac

if $cygwin
then
    CLASSPATH=`cygpath -wp "$CLASSPATH"`
fi

#echo "CLASSPATH=$CLASSPATH"
# default heap for zookeeper server
# 指定ZK_SERVER_HEAP ,默认是1000
ZK_SERVER_HEAP="${ZK_SERVER_HEAP:-1000}"
export SERVER_JVMFLAGS="-Xmx${ZK_SERVER_HEAP}m $SERVER_JVMFLAGS"

# default heap for zookeeper client
# 指定ZK_CLIENT_HEAP 默认是256
ZK_CLIENT_HEAP="${ZK_CLIENT_HEAP:-256}"
export CLIENT_JVMFLAGS="-Xmx${ZK_CLIENT_HEAP}m $CLIENT_JVMFLAGS"
细细来看, 发布zkEnv.sh并不难,只是设置了环境变量,指定了配置文件路径,以及日志目录,加载jar包等。接下来继续看zkServer.sh的实现。
if [ "x$JMXLOCALONLY" = "x" ]
then
    JMXLOCALONLY=false
fi

if [ "x$JMXDISABLE" = "x" ] || [ "$JMXDISABLE" = 'false' ]
then
  echo "ZooKeeper JMX enabled by default" >&2
  if [ "x$JMXPORT" = "x" ]
  then
    # for some reason these two options are necessary on jdk6 on Ubuntu
    #   accord to the docs they are not necessary, but otw jconsole cannot
    #   do a local attach
    ZOOMAIN="-Dcom.sun.management.jmxremote -Dcom.sun.management.jmxremote.local.only=$JMXLOCALONLY org.apache.zookeeper.server.quorum.QuorumPeerMain"
  else
    if [ "x$JMXAUTH" = "x" ]
    then
      JMXAUTH=false
    fi
    if [ "x$JMXSSL" = "x" ]
    then
      JMXSSL=false
    fi
    if [ "x$JMXLOG4J" = "x" ]
    then
      JMXLOG4J=true
    fi
    echo "ZooKeeper remote JMX Port set to $JMXPORT" >&2
    echo "ZooKeeper remote JMX authenticate set to $JMXAUTH" >&2
    echo "ZooKeeper remote JMX ssl set to $JMXSSL" >&2
    echo "ZooKeeper remote JMX log4j set to $JMXLOG4J" >&2
    ZOOMAIN="-Dcom.sun.management.jmxremote -Dcom.sun.management.jmxremote.port=$JMXPORT -Dcom.sun.management.jmxremote.authenticate=$JMXAUTH -Dcom.sun.management.jmxremote.ssl=$JMXSSL -Dzookeeper.jmx.log4j.disable=$JMXLOG4J org.apache.zookeeper.server.quorum.QuorumPeerMain"
  fi
else
    echo "JMX disabled by user request" >&2
    ZOOMAIN="org.apache.zookeeper.server.quorum.QuorumPeerMain"
fi

if [ "x$SERVER_JVMFLAGS" != "x" ]
then
    JVMFLAGS="$SERVER_JVMFLAGS $JVMFLAGS"
fi

# 上面代码写了那么多,主要是对jmx参数的设置,当然,我们也看到了比较重要的一点,
# 关于jmx可以看看https://blog.csdn.net/DH719491759/article/details/116585911这篇博客,
# 最简单的应用,我们可以在控制台打开JConsole,而JConsole能对Zookeeper的类,堆这些进行监控,而JMX默认是开启的
# 就是脚本最终调用了QuorumPeerMain的main方法进行启动
# 如果第二个参数不为空,则ZOOCFG为ZOOCFGDIR和$2的拼接,当然,之前
// 分析过,ZOOCFGDIR的默认路径为/Users/xxx/Documents/software/apache-zookeeper-3.5.8/conf
if [ "x$2" != "x" ]
then
    ZOOCFG="$ZOOCFGDIR/$2"
fi

# if we give a more complicated path to the config, don't screw around in $ZOOCFGDIR
# 如果Zookeeper启动时指定了conf文件目录,和默认的配置文件目录/Users/xxx/Documents/software/apache-zookeeper-3.5.8/conf/
# 不是同一个文件,则使用项目启动时指定的文件
if [ "x$(dirname "$ZOOCFG")" != "x$ZOOCFGDIR" ]
then
    ZOOCFG="$2"
fi

# win环境系统特殊处理
if $cygwin
then
    ZOOCFG=`cygpath -wp "$ZOOCFG"`
    # cygwin has a "kill" in the shell itself, gets confused
    KILL=/bin/kill
else
    KILL=kill
fi


echo "Using config: $ZOOCFG" >&2
# solaris系统特殊grep 命令特殊处理处理
case "$OSTYPE" in
*solaris*)
  GREP=/usr/xpg4/bin/grep
  ;;
*)
  GREP=grep
  ;;
esac

# 从ZOOCFG文件中匹配所有去空格以dataDir开头的行,并且获取dataDir等号后面的内容
ZOO_DATADIR="$($GREP "^[[:space:]]*dataDir" "$ZOOCFG" | sed -e 's/.*=//')"

# 去掉ZOO_DATADIR 字符串的前后空格
ZOO_DATADIR="$(echo -e "${ZOO_DATADIR}" | sed -e 's/^[[:space:]]*//' -e 's/[[:space:]]*$//')"

# 以同样的方式,拿到dataLogDir等号后面的内容
ZOO_DATALOGDIR="$($GREP "^[[:space:]]*dataLogDir" "$ZOOCFG" | sed -e 's/.*=//')"

# iff autocreate is turned off and the datadirs don't exist fail
# immediately as we can't create the PID file, etc..., anyway.
# 如果ZOO_DATADIR_AUTOCREATE_DISABLE字符串长度为非空
if [ -n "$ZOO_DATADIR_AUTOCREATE_DISABLE" ]; then
	#
	# 如果ZOO_DATADIR_AUTOCREATE_DISABLE字符串存在
	// 且ZOO_DATADIR/version-2目录不存在,则打印异常信息, 退出脚本
    if [ ! -d "$ZOO_DATADIR/version-2" ]; then
        echo "ZooKeeper data directory is missing at $ZOO_DATADIR fix the path or run initialize"
        exit 1
    fi

	# 如果ZOO_DATALOGDIR字符串为空,且$ZOO_DATALOGDIR/version-2目录不存在,则抛出异常,退出脚本
    if [ -n "$ZOO_DATALOGDIR" ] && [ ! -d "$ZOO_DATALOGDIR/version-2" ]; then
        echo "ZooKeeper txnlog directory is missing at $ZOO_DATALOGDIR fix the path or run initialize"
        exit 1
    fi
    # 如果ZOO_DATADIR_AUTOCREATE_DISABLE字符串为不为空,且指定了ZOO_DATADIR 和 ZOO_DATALOGDIR目录,
    # 则设置ZOO_DATADIR_AUTOCREATE 为false
    ZOO_DATADIR_AUTOCREATE="-Dzookeeper.datadir.autocreate=false"
fi

# 如果ZOOPIDFILE 字符串长度为0
if [ -z "$ZOOPIDFILE" ]; then
	# ZOO_DATADIR 目录不存在
    if [ ! -d "$ZOO_DATADIR" ]; then
    	# 递归创建ZOO_DATADIR目录
        mkdir -p "$ZOO_DATADIR"
    fi
    # 初始化zookeeper_server.pid 的路径
    ZOOPIDFILE="$ZOO_DATADIR/zookeeper_server.pid"
else
    # ensure it exists, otw stop will fail
    # 如果ZOOPIDFILE 路径不为空,则递归创建ZOOPIDFILE文件
    mkdir -p "$(dirname "$ZOOPIDFILE")"
fi

# 如果ZOO_LOG_DIR 目录不可写,则递归创建ZOO_LOG_DIR目录
if [ ! -w "$ZOO_LOG_DIR" ] ; then
mkdir -p "$ZOO_LOG_DIR"
fi

# 初始化ZOO_LOG_FILE 和 _ZOO_DAEMON_OUT 文件路径
ZOO_LOG_FILE=zookeeper-$USER-server-$HOSTNAME.log
_ZOO_DAEMON_OUT="$ZOO_LOG_DIR/zookeeper-$USER-server-$HOSTNAME.out"

# 接下来看Zookeeper启动做了哪些事情
case $1 in
start)
	# 打印启动信息
    echo  -n "Starting zookeeper ... "
    # 如果ZOOPIDFILE为常规文件
    if [ -f "$ZOOPIDFILE" ]; then
      # kill -0 pid 不发送任何信号,但是系统会进行错误检查。
      # 所以经常用来检查一个进程是否存在,存在则echo $?返回0;不存在返回1
      # 如果返回0则进程、服务在运行中;反之是其他值,则进程死了或者服务已停止。
      if kill -0 `cat "$ZOOPIDFILE"` > /dev/null 2>&1; then
         echo $command already running as process `cat "$ZOOPIDFILE"`.
         exit 1
      fi
    fi
    # 调用jar 命令,调用org.apache.zookeeper.server.quorum.QuorumPeerMain的main
    # 方法启动Zookeeper, 传递了日志目录 , 指定了$CLASSPATH 以及 $ZOOCFG 路径
    nohup "$JAVA" $ZOO_DATADIR_AUTOCREATE "-Dzookeeper.log.dir=${ZOO_LOG_DIR}" \
    "-Dzookeeper.log.file=${ZOO_LOG_FILE}" "-Dzookeeper.root.logger=${ZOO_LOG4J_PROP}" \
    -XX:+HeapDumpOnOutOfMemoryError -XX:OnOutOfMemoryError='kill -9 %p' \
    -cp "$CLASSPATH" $JVMFLAGS $ZOOMAIN "$ZOOCFG" > "$_ZOO_DAEMON_OUT" 2>&1 < /dev/null &
    # 如果调用上述命令,并没有报错,返回0 ,则证明启动成功
    if [ $? -eq 0 ]
    then
      # 如果操作系统类型是solaris
      case "$OSTYPE" in
      *solaris*)
        /bin/echo "${!}\\c" > "$ZOOPIDFILE"
        ;;
      *)
      	# $!很多人解释为后台运行的最后一个进程的id号(我觉得解释为最近一次后台运行的id号更容易理
      	# 将Zookeeper的进程id 写入到ZOOPIDFILE 文件中
        /bin/echo -n $! > "$ZOOPIDFILE"
        ;;
      esac
      # 如果启动QuorumPeerMain成功
      if [ $? -eq 0 ];
      then
        sleep 1
        # 获取pid
        pid=$(cat "${ZOOPIDFILE}")
        # 如果ps -p pid 进程id存在,则打印Zookeeper已经启动
        if ps -p "${pid}" > /dev/null 2>&1; then
          echo STARTED
        else
          # 否则打印启动失败
          echo FAILED TO START
          exit 1
        fi
      else
      	# 如果执行echo -n $! > "$ZOOPIDFILE" 返回值大于0 ,则表明写PID文件失败
        echo FAILED TO WRITE PID
        exit 1
      fi
    else
      # 当然,如果java 启动 QuorumPeerMain 类本身就已经失败 ,则SERVER的并没有启动
      echo SERVER DID NOT START
      exit 1
    fi
    ;;
start-foreground)
    ZOO_CMD=(exec "$JAVA")
    if [ "${ZOO_NOEXEC}" != "" ]; then
      ZOO_CMD=("$JAVA")
    fi
    "${ZOO_CMD[@]}" $ZOO_DATADIR_AUTOCREATE "-Dzookeeper.log.dir=${ZOO_LOG_DIR}" \
    "-Dzookeeper.log.file=${ZOO_LOG_FILE}" "-Dzookeeper.root.logger=${ZOO_LOG4J_PROP}" \
    -XX:+HeapDumpOnOutOfMemoryError -XX:OnOutOfMemoryError='kill -9 %p' \
    -cp "$CLASSPATH" $JVMFLAGS $ZOOMAIN "$ZOOCFG"
    ;;
print-cmd)
    echo "\"$JAVA\" $ZOO_DATADIR_AUTOCREATE -Dzookeeper.log.dir=\"${ZOO_LOG_DIR}\" \
    -Dzookeeper.log.file=\"${ZOO_LOG_FILE}\" -Dzookeeper.root.logger=\"${ZOO_LOG4J_PROP}\" \
    -XX:+HeapDumpOnOutOfMemoryError -XX:OnOutOfMemoryError='kill -9 %p' \
    -cp \"$CLASSPATH\" $JVMFLAGS $ZOOMAIN \"$ZOOCFG\" > \"$_ZOO_DAEMON_OUT\" 2>&1 < /dev/null"
    ;;
stop)
    echo -n "Stopping zookeeper ... "
    # 如果ZOOPIDFILE 不是一个常规文件
    if [ ! -f "$ZOOPIDFILE" ]
    then
      echo "no zookeeper to stop (could not find file $ZOOPIDFILE)"
    else
      # 直接kill 杀死之前启动时存储在ZOOPIDFILE文件中的pid
      $KILL $(cat "$ZOOPIDFILE")
      # 删除掉ZOOPIDFILE文件
      rm "$ZOOPIDFILE"
      sleep 1
      # 打印STOPPED消息
      echo STOPPED
    fi
    exit 0
    ;;
restart)
    shift
    "$0" stop ${@}
    sleep 3
    "$0" start ${@}
    ;;
status)
    # -q is necessary on some versions of linux where nc returns too quickly, and no stat result is output
    # 获取ZOOCFG中配置的clientPortAddress地址,如果没有,则设置clientPortAddress为localhost
    clientPortAddress=`$GREP "^[[:space:]]*clientPortAddress[^[:alpha:]]" "$ZOOCFG" | sed -e 's/.*=//'`
    if ! [ $clientPortAddress ]
    then
	clientPortAddress="localhost"
    fi
    # 获取ZOOCFG配置文件中clientPort配置的地址
    clientPort=`$GREP "^[[:space:]]*clientPort[^[:alpha:]]" "$ZOOCFG" | sed -e 's/.*=//'`
    # 如果clientPort非数字,则证明是zookeeper集群
    if ! [[ "$clientPort"  =~ ^[0-9]+$ ]]
    then
    	# 获取ZOOCFG文件中dataDir配置的内容
       dataDir=`$GREP "^[[:space:]]*dataDir" "$ZOOCFG" | sed -e 's/.*=//'`
       # 获取dataDir目录下myid文件内容
       myid=`cat "$dataDir/myid"`
       # 如果myid非数字,打印提示信息,退出脚本
       if ! [[ "$myid" =~ ^[0-9]+$ ]] ; then
         echo "clientPort not found and myid could not be determined. Terminating."
         exit 1
       fi

       # 如 server.1= 192.168.1.148;2888;3888
       # 则获取到clientPortAndAddress 为 3888
       clientPortAndAddress=`$GREP "^[[:space:]]*server.$myid=.*;.*" "$ZOOCFG" | sed -e 's/.*=//' | sed -e 's/.*;//'`
       if [ ! "$clientPortAndAddress" ] ; then
       	   # 如果clientPortAndAddress不存在,则从$ZOOCFG 中配置的dynamicConfigFile文件中取
           echo "Client port not found in static config file. Looking in dynamic config file."
           dynamicConfigFile=`$GREP "^[[:space:]]*dynamicConfigFile" "$ZOOCFG" | sed -e 's/.*=//'`
           clientPortAndAddress=`$GREP "^[[:space:]]*server.$myid=.*;.*" "$dynamicConfigFile" | sed -e 's/.*=//' | sed -e 's/.*;//'`
       fi
       # 如果clientPortAndAddress为空,则打印异常信息,并退出脚本
       if [ ! "$clientPortAndAddress" ] ; then
          echo "Client port not found. Terminating."
          exit 1
       fi

       if [[ "$clientPortAndAddress" =~ ^.*:[0-9]+ ]] ; then
       	  # 如果clientPortAndAddress为192.168.1.148:2888:3888
       	  # 则 echo "192.168.1.148:2888:3888" | sed -e 's/:.*//' 为
       	  # 192.168.1.148
          clientPortAddress=`echo "$clientPortAndAddress" | sed -e 's/:.*//'`
       fi
       # 如果clientPortAndAddress为 192.168.1.148:2888:3888,则
       # clientPort 为3888
       clientPort=`echo "$clientPortAndAddress" | sed -e 's/.*://'`
       # 如果clientPort 为空,则打印异常信息并且退出
       if [ ! "$clientPort" ] ; then
          echo "Client port not found. Terminating."
          exit 1
       fi
    fi

    # 最终调用FourLetterWordMain类的main方法获取到Zookeeper 的状态信息
    echo "Client port found: $clientPort. Client address: $clientPortAddress."
    STAT=`"$JAVA" "-Dzookeeper.log.dir=${ZOO_LOG_DIR}" "-Dzookeeper.root.logger=${ZOO_LOG4J_PROP}" "-Dzookeeper.log.file=${ZOO_LOG_FILE}" \
             -cp "$CLASSPATH" $JVMFLAGS org.apache.zookeeper.client.FourLetterWordMain \
             $clientPortAddress $clientPort srvr 2> /dev/null    \
          | $GREP Mode`
    if [ "x$STAT" = "x" ]
    then
        echo "Error contacting service. It is probably not running."
        exit 1
    else
        echo $STAT
        exit 0
    fi
    ;;
*)
    echo "Usage: $0 [--config ] {start|start-foreground|stop|restart|status|print-cmd}" >&2

esac
从脚本中来看,ZooKeeper 的启动和Tomcat的启动类似,都是先准备环境信息,然后启动QuorumPeerMain的main方法,其中最重要的当然是下面这一行方法 。 而查看Zookeeper状态,则以同样的方式调用org.apache.zookeeper.client.FourLetterWordMain类的main方法 。
 nohup "$JAVA" $ZOO_DATADIR_AUTOCREATE "-Dzookeeper.log.dir=${ZOO_LOG_DIR}" \
    "-Dzookeeper.log.file=${ZOO_LOG_FILE}" "-Dzookeeper.root.logger=${ZOO_LOG4J_PROP}" \
    -XX:+HeapDumpOnOutOfMemoryError -XX:OnOutOfMemoryError='kill -9 %p' \
    -cp "$CLASSPATH" $JVMFLAGS $ZOOMAIN "$ZOOCFG" > "$_ZOO_DAEMON_OUT" 2>&1 < /dev/null &
接下来,我们就来启动QuorumPeerMain方法,看做了哪些事情 ,在启动QuorumPeerMain类之前,先来看一下我的配置。 当然,zookeeper 代码的git地址为 : https://gitee.com/quyixiao/zookeeper-3.5.8.git 。
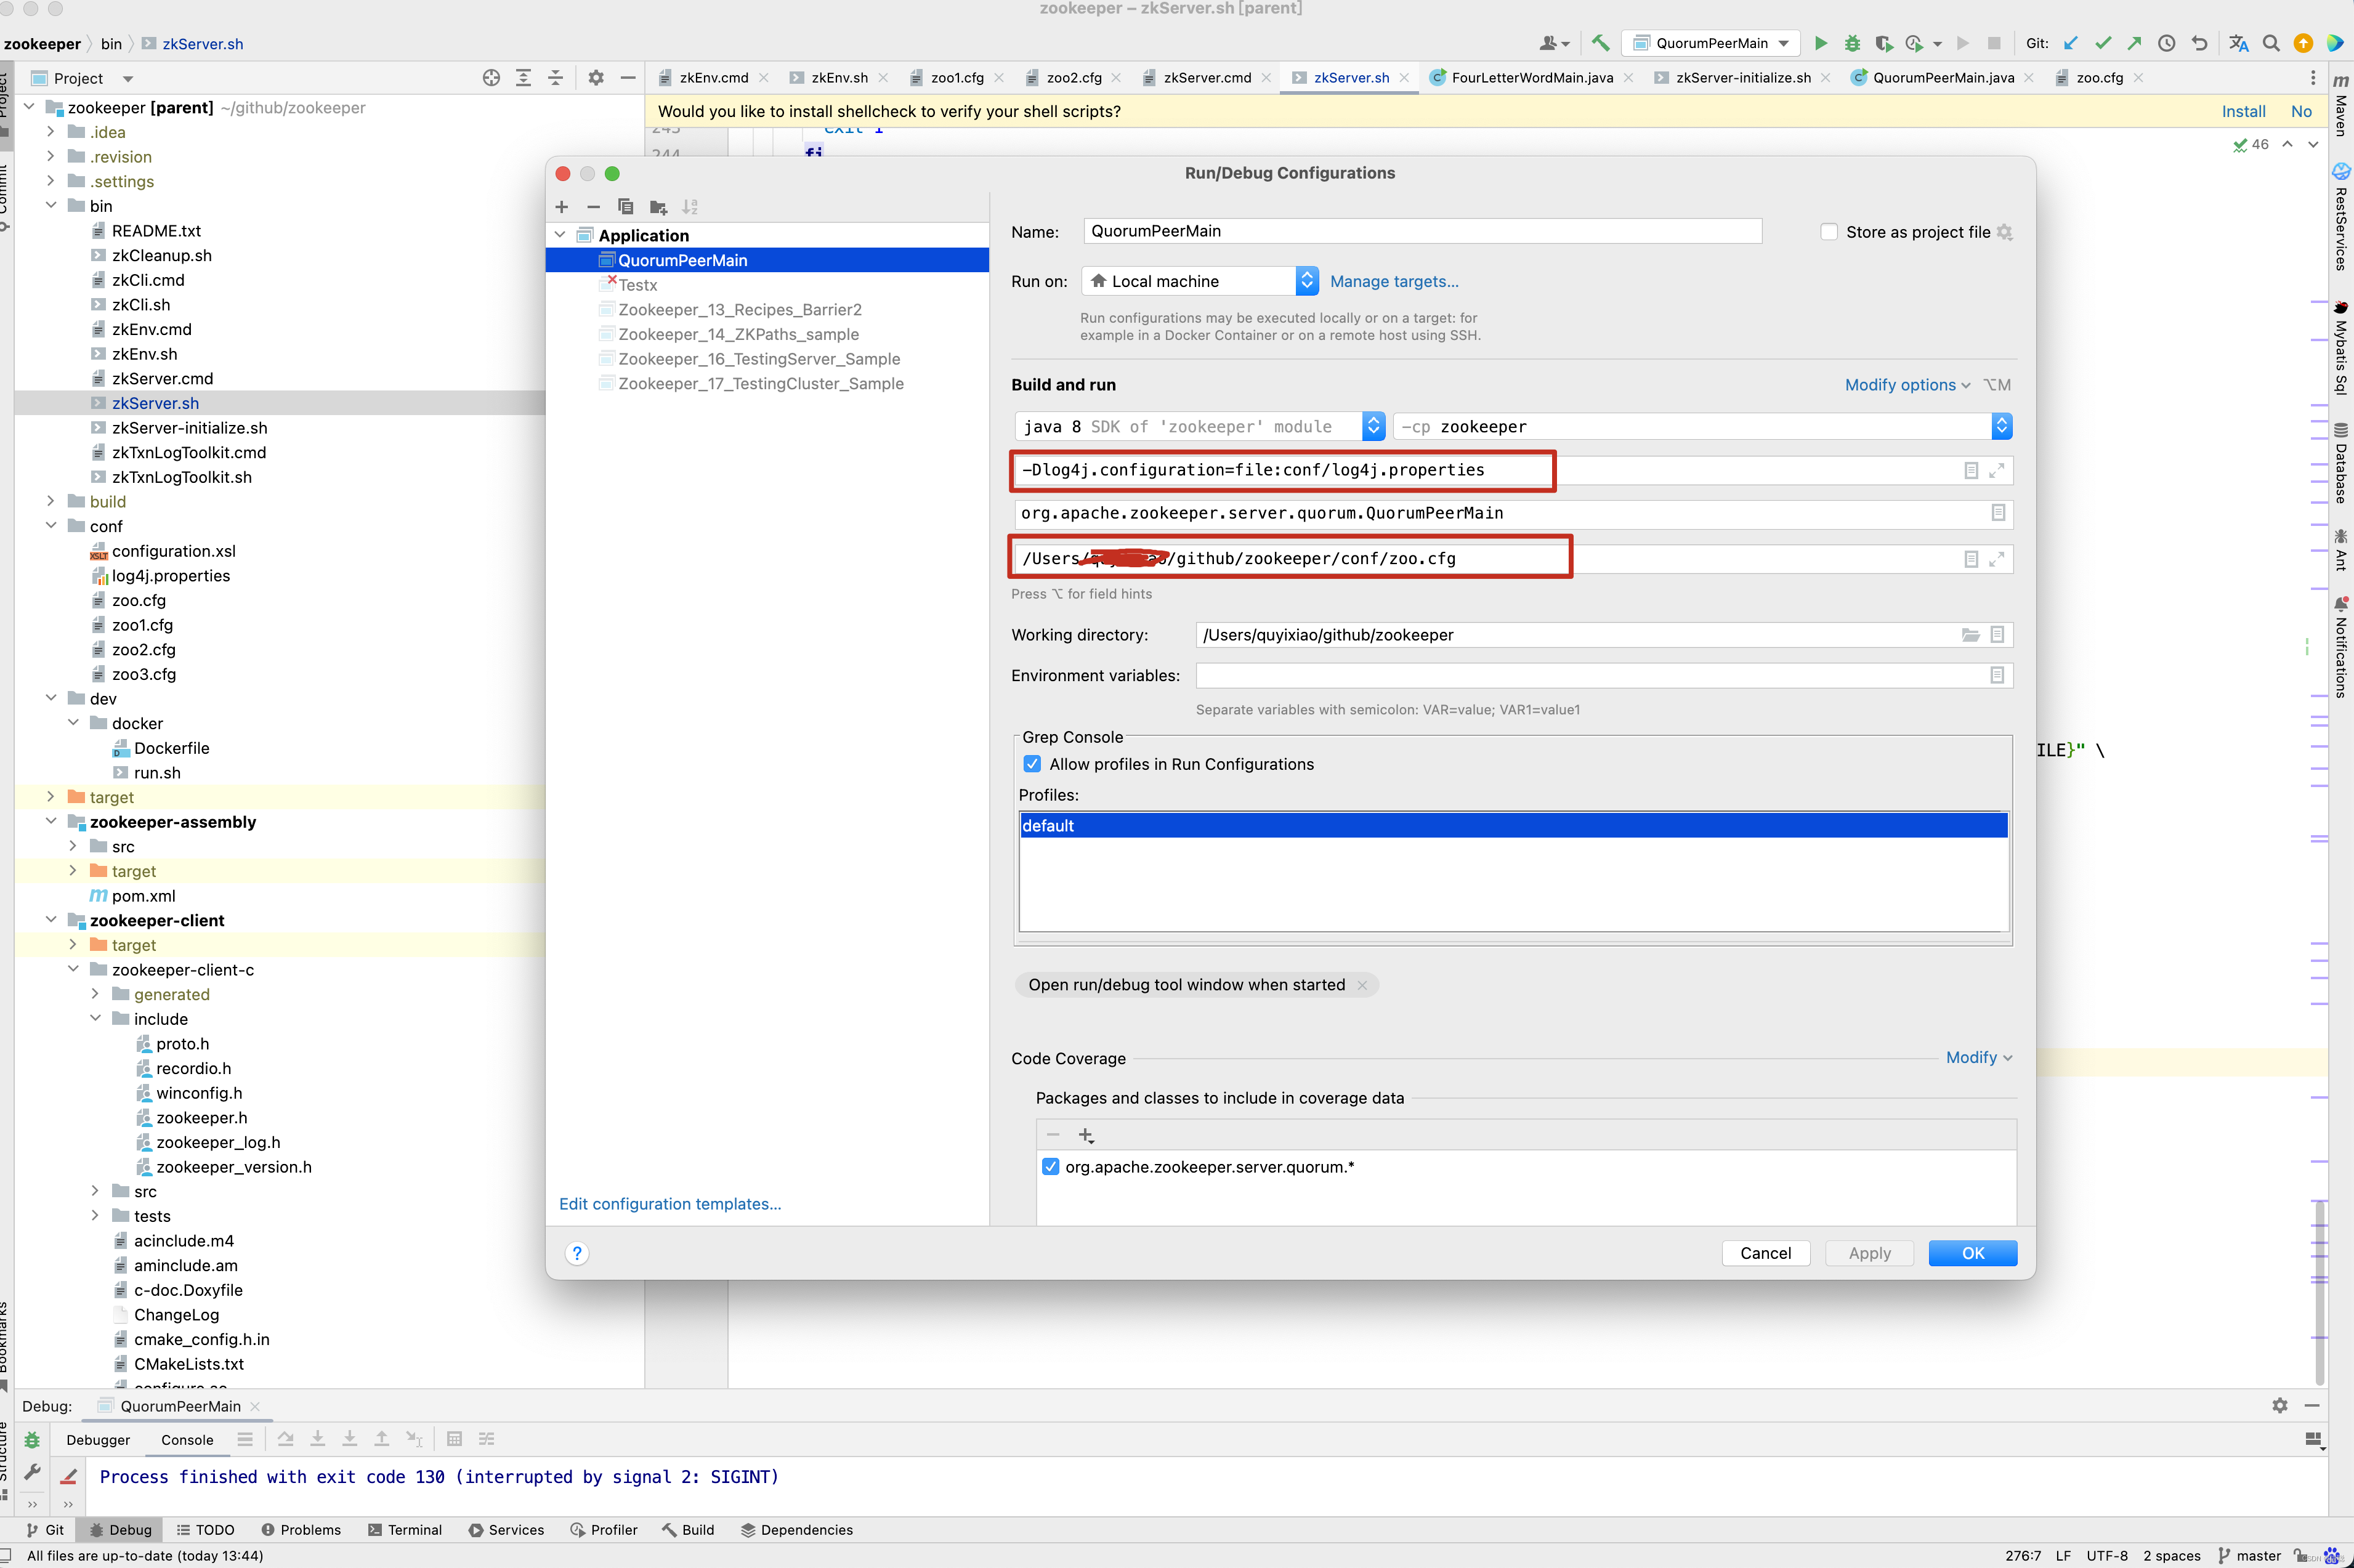 当然,上面两个红框内的内容为-Dlog4j.configuration=file:conf/log4j.properties 和 /Users/xxx/github/zookeeper/conf/zoo.cfg ,大家自行配置即可。 进入QuorumPeerMain的main方法 。
QuorumPeerMain
public static void main(String[] args) {
    // 创建了一个zk节点
    QuorumPeerMain main = new QuorumPeerMain();
    try {
        // 初始化节点并运行,args相当于提交参数中的zoo.cfg
        main.initializeAndRun(args);
    } catch (IllegalArgumentException e) {
        LOG.error("Invalid arguments, exiting abnormally", e);
        LOG.info(USAGE);
        System.err.println(USAGE);
        System.exit(2);
    } catch (ConfigException e) {
        LOG.error("Invalid config, exiting abnormally", e);
        System.err.println("Invalid config, exiting abnormally");
        System.exit(2);
    } catch (DatadirException e) {
        LOG.error("Unable to access datadir, exiting abnormally", e);
        System.err.println("Unable to access datadir, exiting abnormally");
        System.exit(3);
    } catch (AdminServerException e) {
        LOG.error("Unable to start AdminServer, exiting abnormally", e);
        System.err.println("Unable to start AdminServer, exiting abnormally");
        System.exit(4);
    } catch (Exception e) {
        LOG.error("Unexpected exception, exiting abnormally", e);
        System.exit(1);
    }
    LOG.info("Exiting normally");
    System.exit(0);
}
当然,QuorumPeerMain并没有重写构造方法,因此重点就进入了initializeAndRun()方法的分析 。
protected void initializeAndRun(String[] args) throws ConfigException, IOException, AdminServerException {
// 管理zk的配置信息
QuorumPeerConfig config = new QuorumPeerConfig();
if (args.length == 1) {
// 1 解析参数,zoo.cfg 和 myid
config.parse(args[0]);
}
// Start and schedule the the purge task
// 2 启动定时任务,对过期的快照,执行删除(默认该功能关闭)
// 创建并启动历史文件清理器DatadirCleanupManager
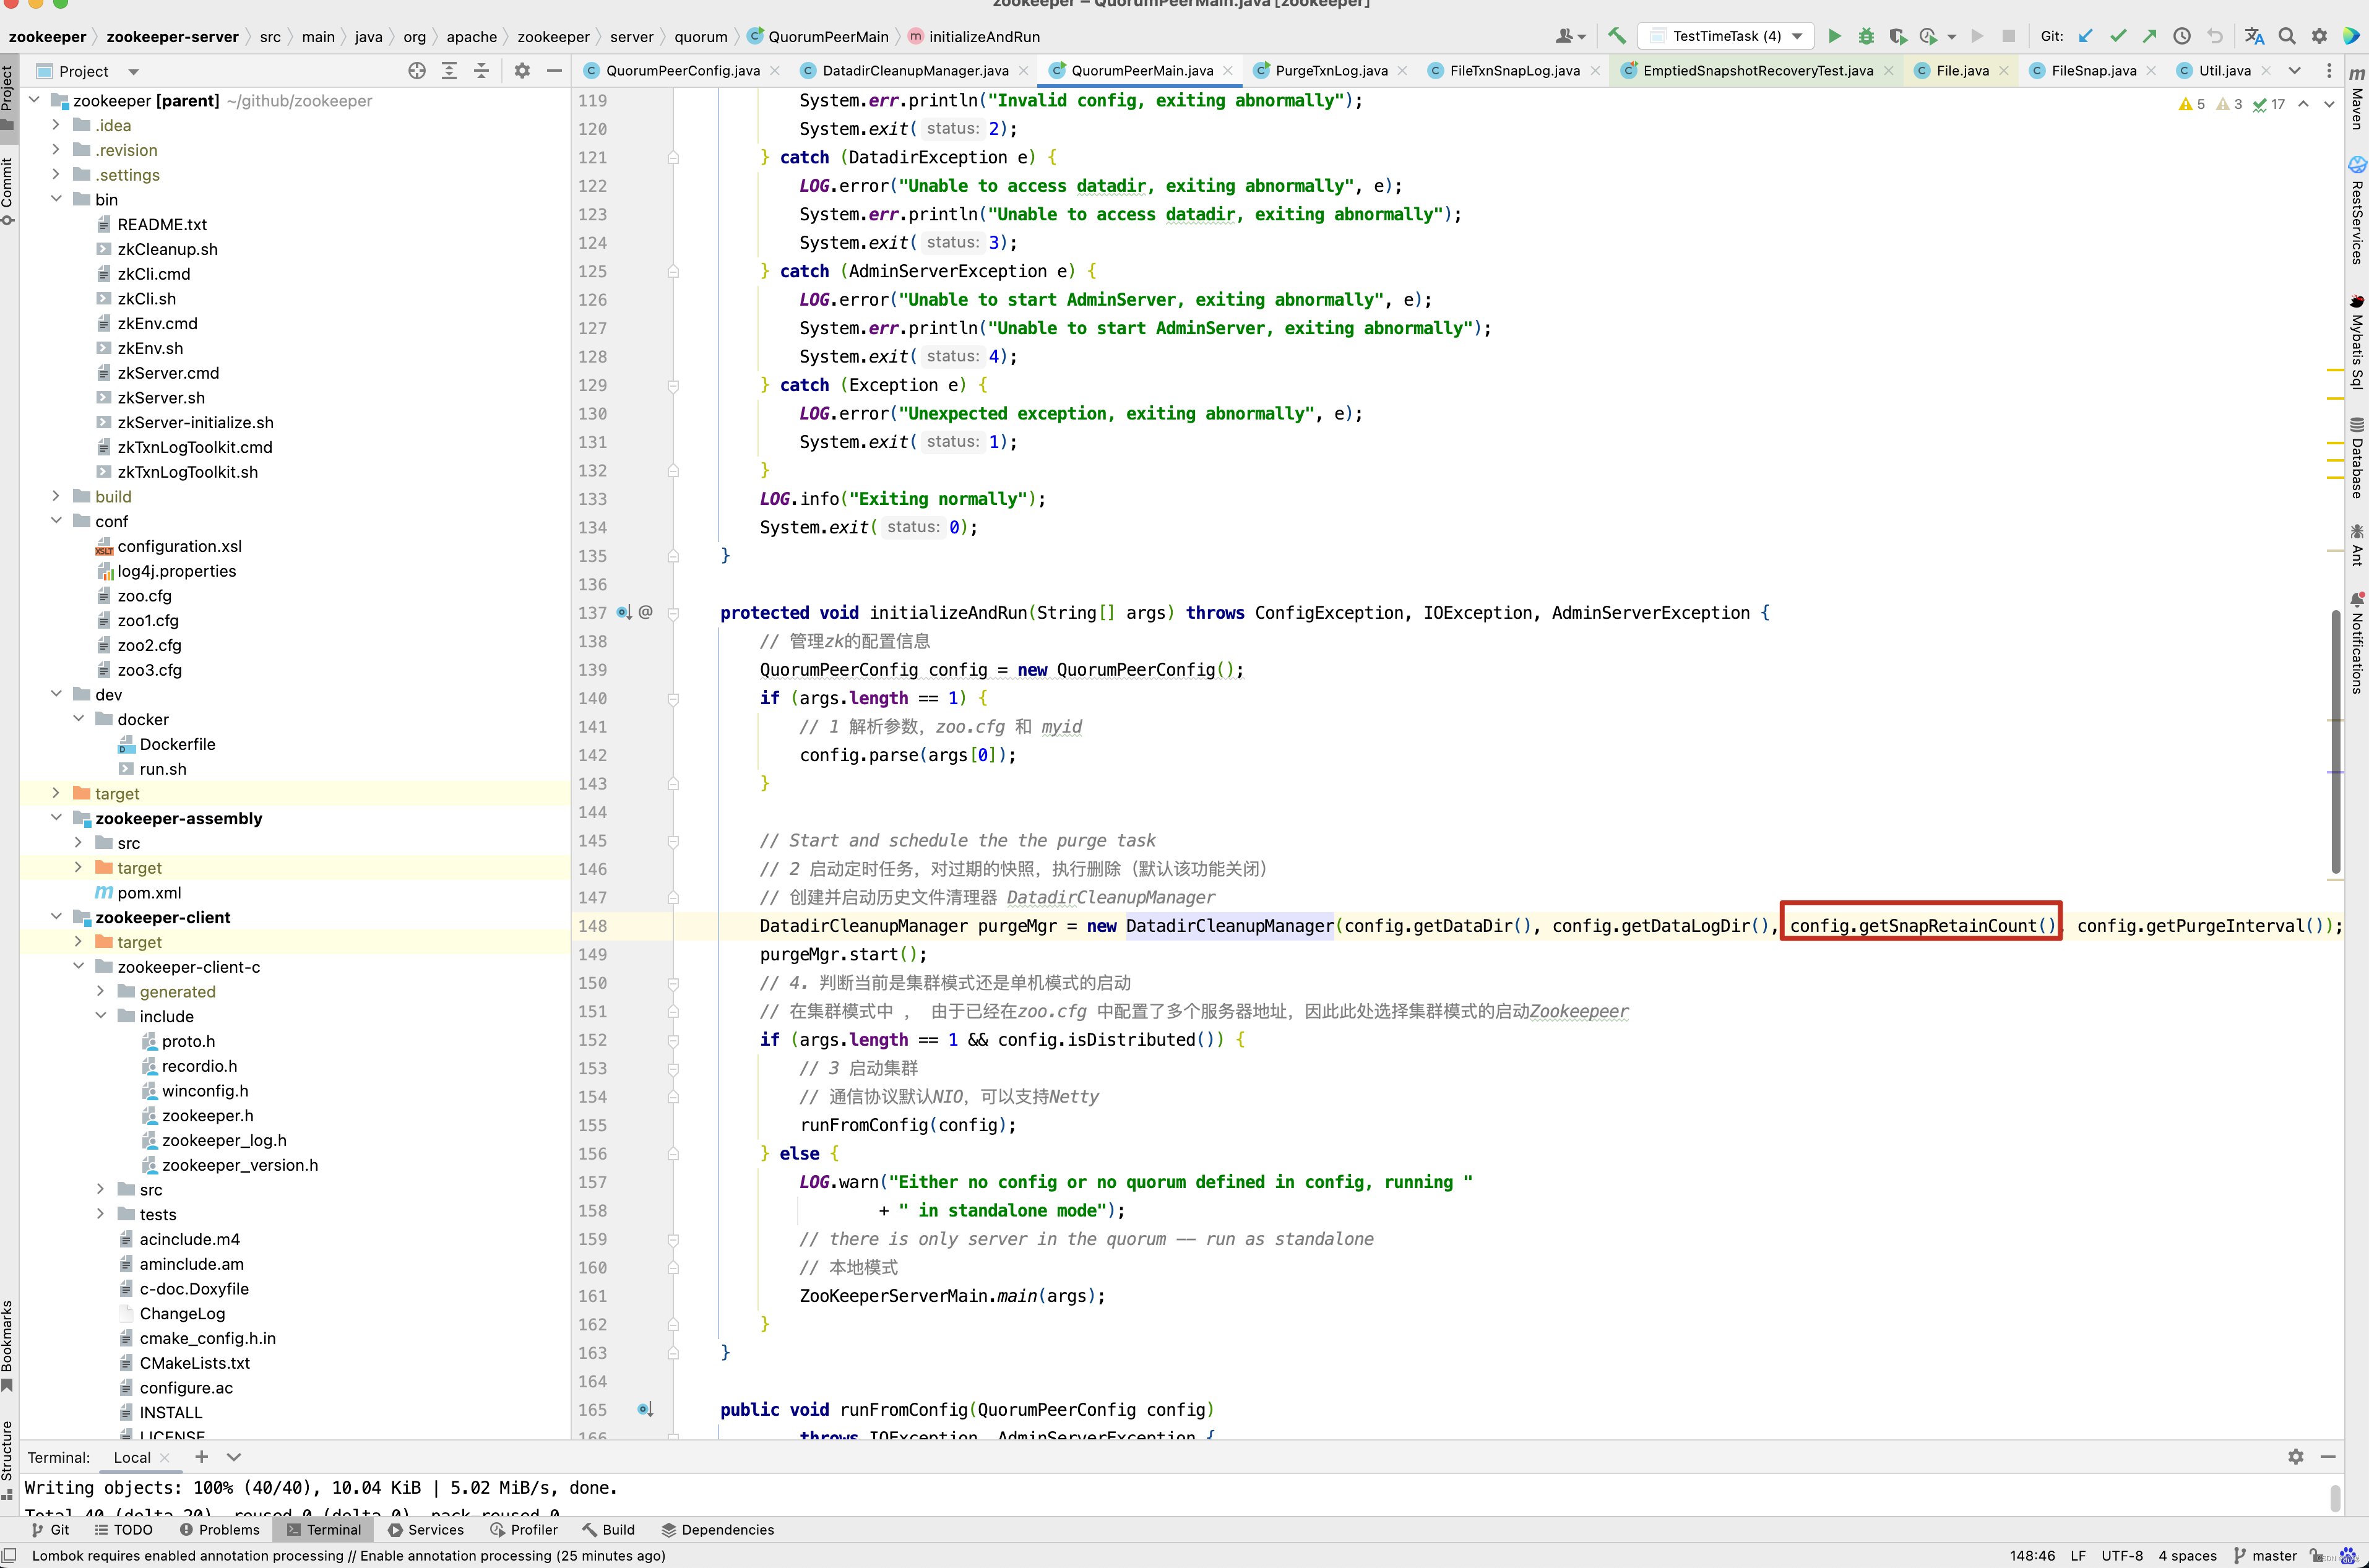
DatadirCleanupManager purgeMgr = new DatadirCleanupManager(config.getDataDir(), config.getDataLogDir(), config.getSnapRetainCount(), config.getPurgeInterval());
purgeMgr.start();
// 4. 判断当前是集群模式还是单机模式的启动
// 在集群模式中 , 由于已经在zoo.cfg 中配置了多个服务器地址,因此此处选择集群模式的启动Zookeepeer
if (args.length == 1 && config.isDistributed()) {
// 3 启动集群
// 通信协议默认NIO,可以支持Netty
runFromConfig(config);
} else {
LOG.warn("Either no config or no quorum defined in config, running "
+ " in standalone mode");
// there is only server in the quorum -- run as standalone
// 本地模式
ZooKeeperServerMain.main(args);
}
}
单机启动
从initializeAndRun()方法中即可看出,所有的配置信息存储在QuorumPeerConfig中,而QuorumPeerConfig结构信息如下,从QuorumPeerConfig中我们看到了zoo.cfg中熟悉的配置。 tickTime,initLimit,syncLimit,dataDir,clientPort 等 。
public class QuorumPeerConfig {
    private static final Logger LOG = LoggerFactory.getLogger(QuorumPeerConfig.class);
    private static final int UNSET_SERVERID = -1;
    public static final String nextDynamicConfigFileSuffix = ".dynamic.next";

    private static boolean standaloneEnabled = true;
    private static boolean reconfigEnabled = false;

    protected InetSocketAddress clientPortAddress;
    protected InetSocketAddress secureClientPortAddress;
    protected boolean sslQuorum = false;
    protected boolean shouldUsePortUnification = false;
    protected boolean sslQuorumReloadCertFiles = false;
    // 顾名思义就是zookeeper保存数据的目录,默认情况下zookeeper将写数据的日志文件也保存在这个目录里;
    protected File dataDir;
    // 这个端口就是客户端连接Zookeeper服务器的端口,Zookeeper会监听这个端口接受客户端的访问请求;
    protected File dataLogDir;
    protected String dynamicConfigFileStr = null;
    protected String configFileStr = null;
    // 这个时间是作为zookeeper服务器之间或客户端与服务器之间维持心跳的时间间隔,也就是说每个tickTime时间就会发送一个心跳。
    protected int tickTime = ZooKeeperServer.DEFAULT_TICK_TIME;
    protected int maxClientCnxns = 60;
    /**
     * defaults to -1 if not set explicitly
     */
    protected int minSessionTimeout = -1;
    /**
     * defaults to -1 if not set explicitly
     */
    protected int maxSessionTimeout = -1;
    protected boolean localSessionsEnabled = false;
    protected boolean localSessionsUpgradingEnabled = false;
    // 这个配置项是用来配置zookeeper接受客户端(这里所说的客户端不是用户连接zookeeper服务器的客户端,而是zookeeper服务器集群中连接到leader的follower 服务器)初始化连接时最长能忍受多少个心跳时间间隔数。
    protected int initLimit;
    // 这个配置项标识leader与follower之间发送消息,请求和应答时间长度,最长不能超过多少个tickTime的时间长度,总的时间长度就是5*2000=10秒。
    protected int syncLimit;
    protected int electionAlg = 3;
    protected int electionPort = 2182;
    protected boolean quorumListenOnAllIPs = false;

    protected long serverId = UNSET_SERVERID;

    protected QuorumVerifier quorumVerifier = null, lastSeenQuorumVerifier = null;
    protected int snapRetainCount = 3;
    protected int purgeInterval = 0;
    protected boolean syncEnabled = true;

    protected LearnerType peerType = LearnerType.PARTICIPANT;

    /**
     * Configurations for the quorumpeer-to-quorumpeer sasl authentication
     */
    protected boolean quorumServerRequireSasl = false;
    protected boolean quorumLearnerRequireSasl = false;
    protected boolean quorumEnableSasl = false;
    protected String quorumServicePrincipal = QuorumAuth.QUORUM_KERBEROS_SERVICE_PRINCIPAL_DEFAULT_VALUE;
    protected String quorumLearnerLoginContext = QuorumAuth.QUORUM_LEARNER_SASL_LOGIN_CONTEXT_DFAULT_VALUE;
    protected String quorumServerLoginContext = QuorumAuth.QUORUM_SERVER_SASL_LOGIN_CONTEXT_DFAULT_VALUE;
    protected int quorumCnxnThreadsSize;

}
接下来看QuorumPeerConfig的parse()方法 。
public void parse(String path) throws ConfigException {
    LOG.info("Reading configuration from: " + path);

    try {
        // 校验文件路径及是否存在
        File configFile = (new VerifyingFileFactory.Builder(LOG)
                .warnForRelativePath()
                .failForNonExistingPath()
                .build()).create(path);

        Properties cfg = new Properties();
        FileInputStream in = new FileInputStream(configFile);
        try {
            // 加载配置文件
            cfg.load(in);
            configFileStr = path;
        } finally {
            in.close();
        }
        // 解析配置文件
        parseProperties(cfg);
    } catch (IOException e) {
        throw new ConfigException("Error processing " + path, e);
    } catch (IllegalArgumentException e) {
        throw new ConfigException("Error processing " + path, e);
    }

    if (dynamicConfigFileStr != null) {
        try {
            Properties dynamicCfg = new Properties();
            FileInputStream inConfig = new FileInputStream(dynamicConfigFileStr);
            try {
                dynamicCfg.load(inConfig);
                if (dynamicCfg.getProperty("version") != null) {
                    throw new ConfigException("dynamic file shouldn't have version inside");
                }

                String version = getVersionFromFilename(dynamicConfigFileStr);
                // If there isn't any version associated with the filename,
                // the default version is 0.
                if (version != null) {
                    dynamicCfg.setProperty("version", version);
                }
            } finally {
                inConfig.close();
            }
            setupQuorumPeerConfig(dynamicCfg, false);

        } catch (IOException e) {
            throw new ConfigException("Error processing " + dynamicConfigFileStr, e);
        } catch (IllegalArgumentException e) {
            throw new ConfigException("Error processing " + dynamicConfigFileStr, e);
        }
        File nextDynamicConfigFile = new File(configFileStr + nextDynamicConfigFileSuffix);
        if (nextDynamicConfigFile.exists()) {
            try {
                Properties dynamicConfigNextCfg = new Properties();
                FileInputStream inConfigNext = new FileInputStream(nextDynamicConfigFile);
                try {
                    dynamicConfigNextCfg.load(inConfigNext);
                } finally {
                    inConfigNext.close();
                }
                boolean isHierarchical = false;
                for (Entry<Object, Object> entry : dynamicConfigNextCfg.entrySet()) {
                    String key = entry.getKey().toString().trim();
                    if (key.startsWith("group") || key.startsWith("weight")) {
                        isHierarchical = true;
                        break;
                    }
                }
                lastSeenQuorumVerifier = createQuorumVerifier(dynamicConfigNextCfg, isHierarchical);
            } catch (IOException e) {
                LOG.warn("NextQuorumVerifier is initiated to null");
            }
        }
    }
}
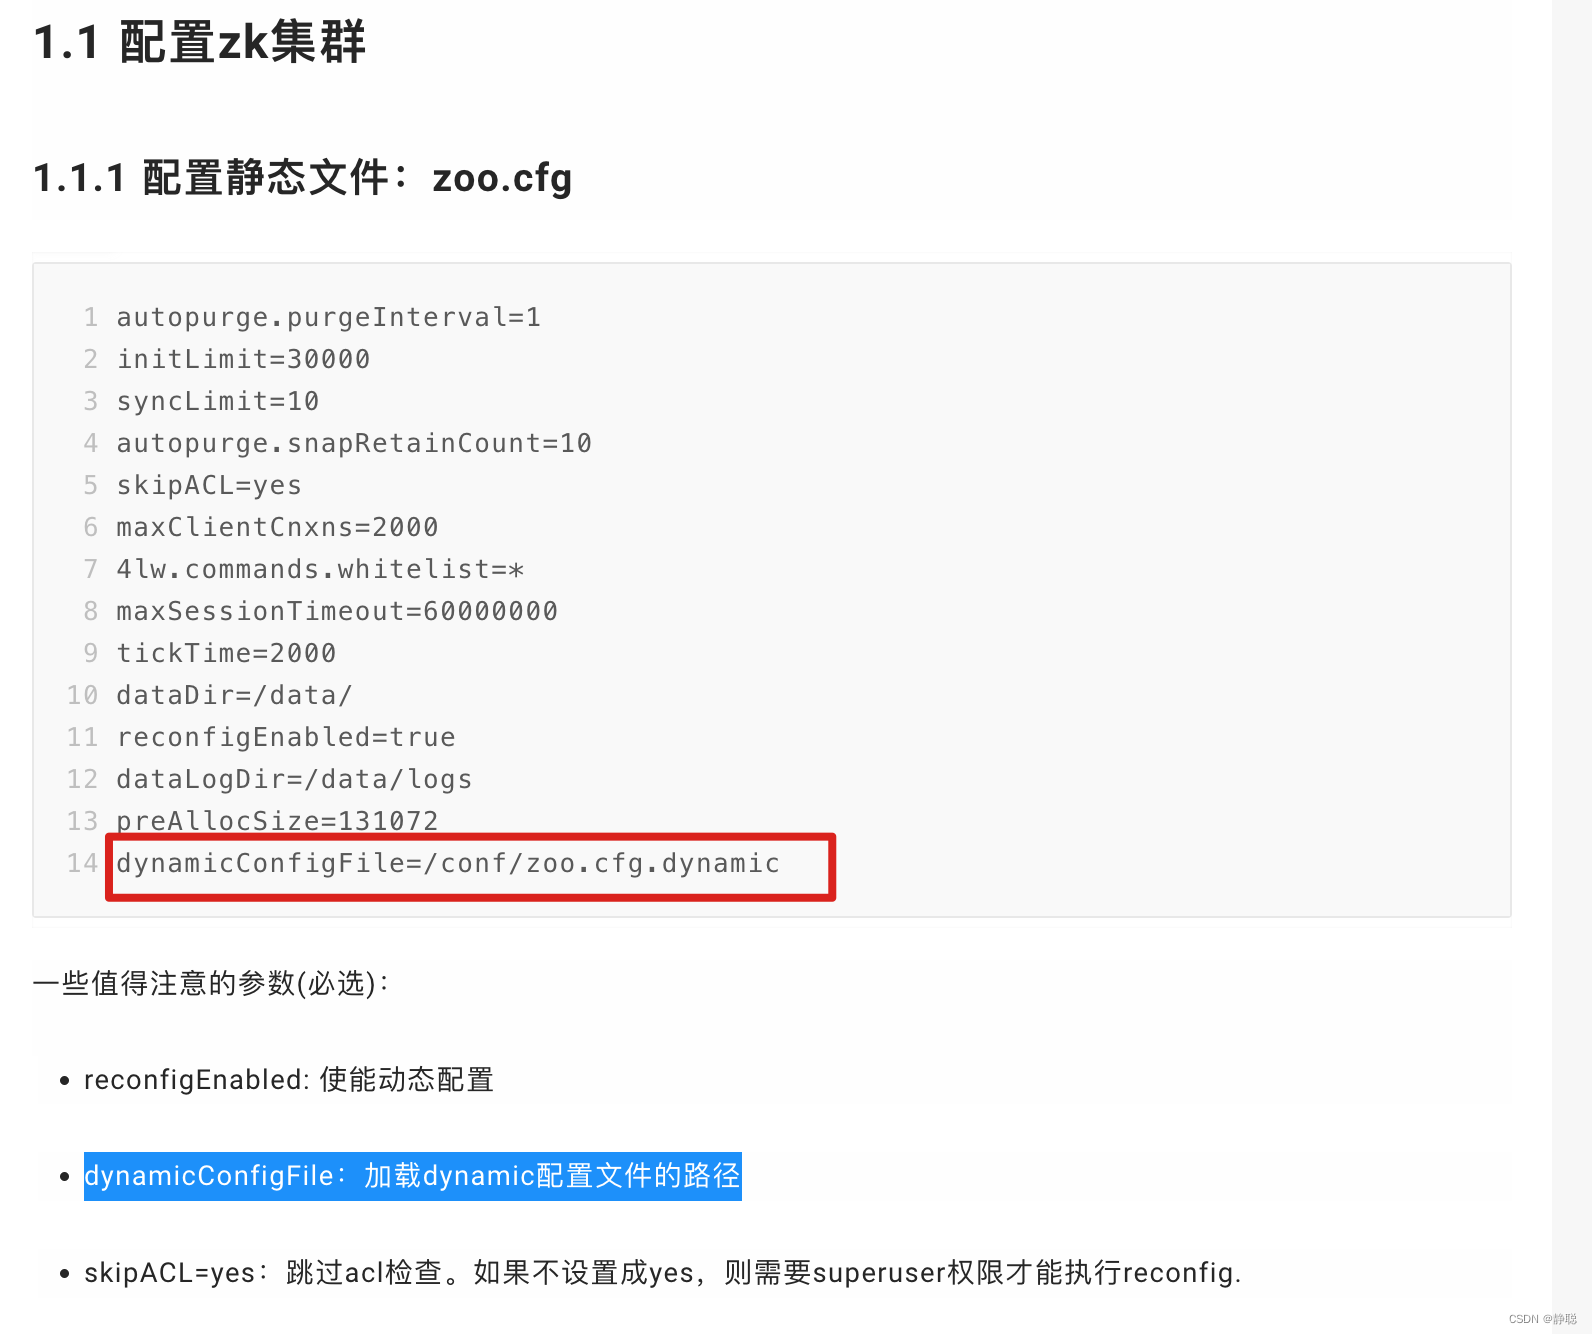
上述中有一行dynamicConfigNextCfg.load(inConfigNext);代码,这一行代码如何配置的呢?
修改配置 zoo1.cfg 注意这里去除了端口号,添加了 reconfigEnabled : 设置为true 开启动态配置
dynamicConfigFile : 指定动态配置文件的路径
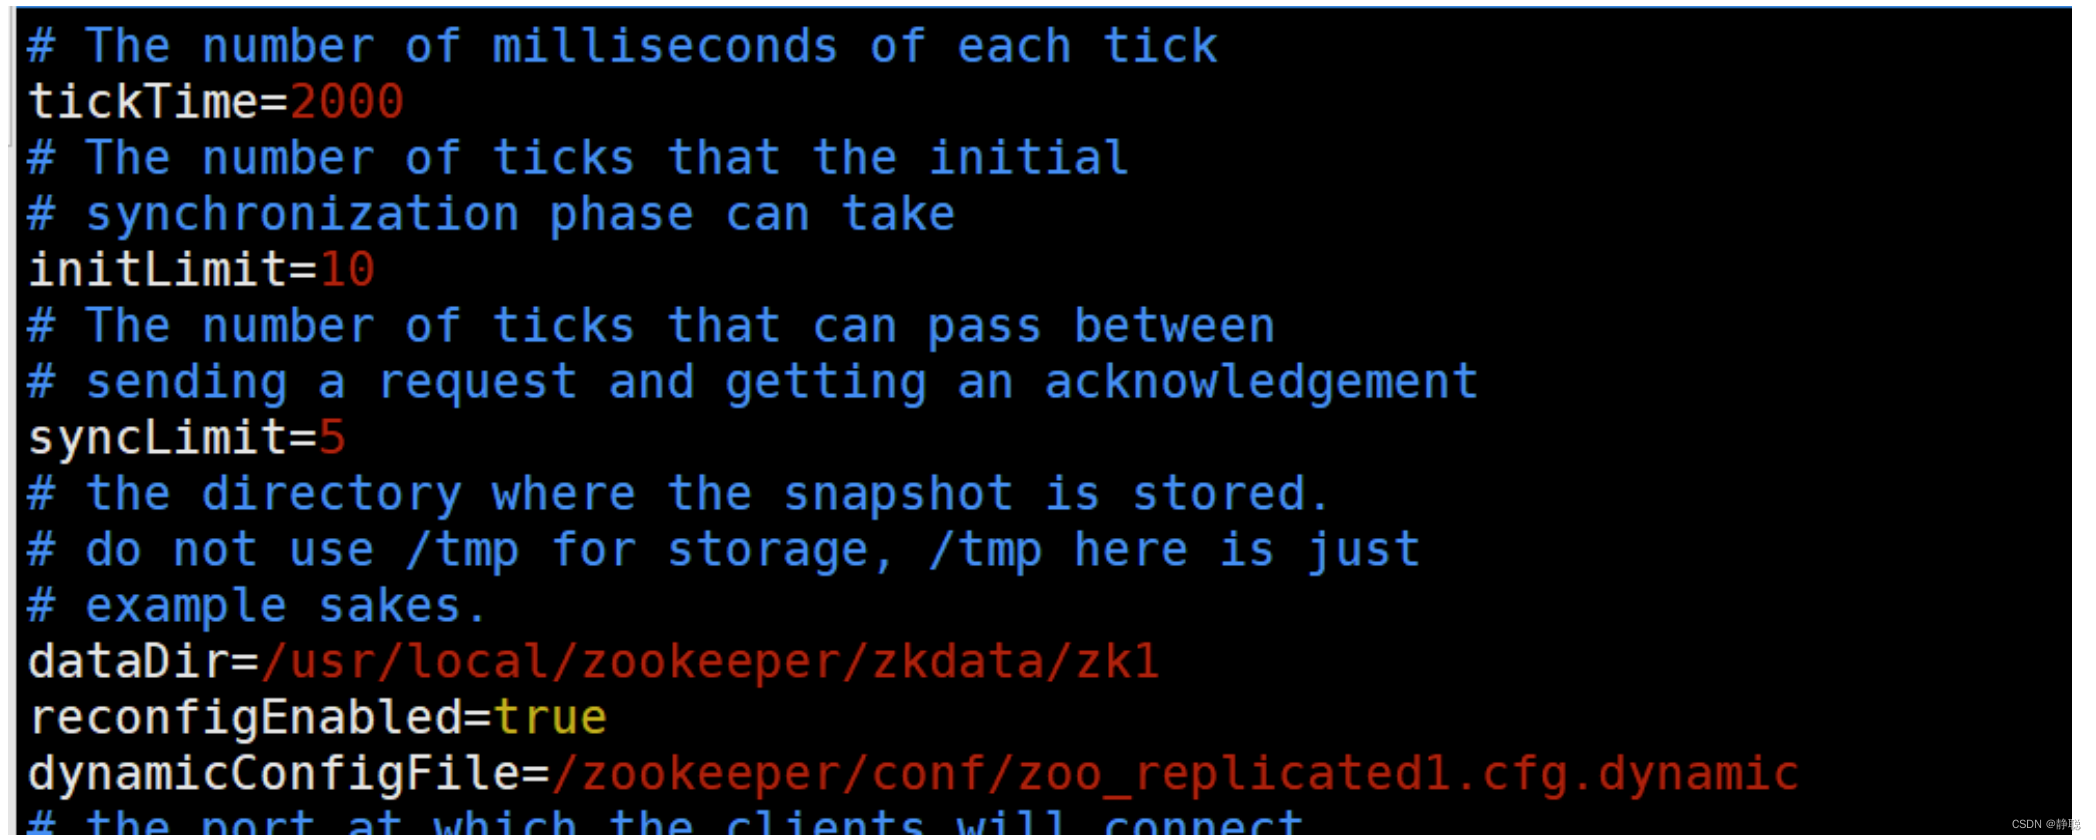
创建文件 zoo_replicated1.cfg.dynamic
动态配置文件,加入集群信息 server.A=B.C.D.E;F
- A: 服务的唯一标识
- B: 服务对应的IP地址,
- C: 集群通信端口
- D: 集群选举端口
- E: 角色, 默认是 participant,即参与过半机制的角色,选举,事务请求过半提交,还有一个是 observer, 观察者,不参与选举以及过半机制。
之后是一个分号,一定是分号, - F:服务IP:端口
server.1=192.168.109.200:2001:3001:participant;192.168.109.200:2181
server.2=192.168.109.200:2002:3002:participant;192.168.109.200:2182
server.3=192.168.109.200:2003:3003:participant;192.168.109.200:2183
依次配置其他服务 zoo2.cfg ,zoo3.cfg注意数据文件的路径
依次启动所有服务 如: ./bin/zkServer.sh start conf/zoo1.cfg 查看集群状态:
./bin/zkServer.sh status conf/zoo1.cfg
连上任意一台服务器:
查看集群配置
config // 将会把动态配置打印出来
也可以直接查看目录
/zookeeper/config 该节点存储了集群信息
如果要修改集群状态,需要授权登录
addauth digest gj:123
reconfig ‐remove 3 // 移除serverId为 3 的机器
// 把对应的机器加进来
reconfig ‐add server.3=192.168.109.200:2003:3003:participant;192.168.109.200:2183
先来看zoo.cfg文件的解析,而zoo.cfg先是通过读取configFile文件,然后再调用cfg.load(in) 方法,将文件中如clientPort=2181加载为键值对的形式,就像HashMap一样,在Spring,Tomcat 都有类似的手法,接下来调用parseProperties()方法,对zoo.cfg配置文件进行解析与校验 。
如果要变更/或者添加新的服务需要将服务加到配置文件 zoo_replicated1.cfg.dynamic 中,启动服务
然后通过reconfig 命令进行添加或者变更服务角色,但是需要保证服务列表中 participant 角色 能够形成集群(过半机制)。
客户端可以通过监听 /zookeeper/confg 节点,来感知集群的变化。从而实现集群的动态变更. Zookeeper 类提供了对应的API 用来更新服务列表 : updateServerList。
public class ReconfigApp {
    private final static String connectString = "127.0.0.1:2181";
    private static int SESSION_TIMEOUT = 5 * 1000;
    private static CountDownLatch countDownLatch = new CountDownLatch(1);
    private static ZooKeeper zookeeper = null;

    private static Watcher watcher = new Watcher() {
        @Override
        public void process(WatchedEvent event) {
            if (event.getType() == Event.EventType.None && event.getState() == Event.KeeperState.SyncConnected) {
                countDownLatch.countDown();
                log.info(" 连接建立");
                // start to watch config
                try {
                    log.info(" 开始监听:{}", ZooDefs.CONFIG_NODE);
                    zookeeper.getConfig(true, null);
                } catch (KeeperException e) {
                    e.printStackTrace();
                } catch (InterruptedException e) {
                    e.printStackTrace();
                }
            } else if (event.getPath() != null && event.getPath().equals(ZooDefs.CONFIG_NODE)) {
                try {
                    byte[] config = zookeeper.getConfig(this, null);
                    String clientConfigStr = ConfigUtils.getClientConfigStr(new String(config));
                    log.info(" 配置发生变更: {}", clientConfigStr);
                    zookeeper.updateServerList(clientConfigStr.split(" ")[1]);
                } catch (KeeperException e) {
                    e.printStackTrace();
                } catch (InterruptedException e) {
                    e.printStackTrace();
                } catch (IOException e) {
                    e.printStackTrace();
                }
            }
        }
    };

    public static void main(String[] args) throws IOException, InterruptedException, KeeperException {
        zookeeper = new ZooKeeper(connectString, SESSION_TIMEOUT, watcher);
        countDownLatch.await();
        Scanner scanner = new Scanner(System.in);
        while (true) {
            byte[] data = zookeeper.getData("/zookeeper/config", true, null);
            scanner.next();
            log.info("DATA: {}", new String(data));
        }
    }
}
Curator 也自带了动态配置的监听,不需要额外的配置和代码实现监听更新;
public void parseProperties(Properties zkProp)
        throws IOException, ConfigException {
    int clientPort = 0;
    int secureClientPort = 0;
    String clientPortAddress = null;
    String secureClientPortAddress = null;
    VerifyingFileFactory vff = new VerifyingFileFactory.Builder(LOG).warnForRelativePath().build();
    // 读取zoo.cfg 文件中的属性值,并赋值给QuorumPeerConfig的类对象
    for (Entry<Object, Object> entry : zkProp.entrySet()) {
        String key = entry.getKey().toString().trim();
        String value = entry.getValue().toString().trim();
        // 存储快照文件snapshot的目录。默认情况下,事务日志也会存储在这里。建议同时配置参数dataLogDir,
        // 事务日志的写性能直接影响zk性能。
        if (key.equals("dataDir")) {
            dataDir = vff.create(value);
        // 事务日志输出目录。尽量给事务日志的输出配置单独的磁盘或是挂载点,这将极大的提升ZK性能。
        // (No Java system property)
        } else if (key.equals("dataLogDir")) {
            dataLogDir = vff.create(value);
        // 客户端连接server的端口,即对外服务端口,一般设置为2181吧。
        } else if (key.equals("clientPort")) {
            clientPort = Integer.parseInt(value);
        } else if (key.equals("localSessionsEnabled")) {
            localSessionsEnabled = Boolean.parseBoolean(value);
        } else if (key.equals("localSessionsUpgradingEnabled")) {
            localSessionsUpgradingEnabled = Boolean.parseBoolean(value);
        // 对于多网卡的机器,可以为每个IP指定不同的监听端口。默认情况是所有IP都监听 clientPort指定的端口。 New in 3.3.0
        } else if (key.equals("clientPortAddress")) {
            clientPortAddress = value.trim();
        } else if (key.equals("secureClientPort")) {
            secureClientPort = Integer.parseInt(value);
        } else if (key.equals("secureClientPortAddress")) {
            secureClientPortAddress = value.trim();
        // ZK中的一个时间单元。ZK中所有时间都是以这个时间单元为基础,进行整数倍配置的。
        // 例如,session的最小超时时间是2*tickTime。
        } else if (key.equals("tickTime")) {
            tickTime = Integer.parseInt(value);
        // 限制由IP地址标识的单个客户机可以对ZooKeeper集合的单个成员进行的并发连接数。默认值是60。如果设置为0,表示不限制。
        } else if (key.equals("maxClientCnxns")) {
            maxClientCnxns = Integer.parseInt(value);
        // zookeeper 3.3.0版本后启动,服务器允许客户端协商的最小会话超时(毫秒)。默认是2个 tickTime 时间。
        } else if (key.equals("minSessionTimeout")) {
            minSessionTimeout = Integer.parseInt(value);
        // zookeeper 3.3.0版本后启动,服务器允许客户端协商的最大会话超时(毫秒)。默认是20个 tickTime 时间。
        } else if (key.equals("maxSessionTimeout")) {
            maxSessionTimeout = Integer.parseInt(value);
        // 这个配置项是用来配置zookeeper接受客户端(这里所说的客户端不是用户连接zookeeper服务器的客户端,而是zookeeper服务器集群中连接到leader的follower 服务器)初始化连接时最长能忍受多少个心跳时间间隔数。
        // 当已经超过10个心跳的时间(也就是tickTime)长度后 zookeeper 服务器还没有收到客户端的返回信息,那么表明这个客户端连接失败。总的时间长度就是 10*2000=20秒。
        } else if (key.equals("initLimit")) {
            initLimit = Integer.parseInt(value);
        // 这个配置项标识leader与follower之间发送消息,请求和应答时间长度,最长不能超过多少个tickTime的时间长度,总的时间长度就是5*2000=10秒。
        } else if (key.equals("syncLimit")) {
            syncLimit = Integer.parseInt(value);
        // 在之前的版本中, 这个参数配置是允许我们选择leader选举算法,但是由于在以后的版本中,只会留下一种“TCP-based version of fast leader election”算法,
        // 所以这个参数目前看来没有用了,这里也不详细展开说了。(No Java system property)
        } else if (key.equals("electionAlg")) {
            electionAlg = Integer.parseInt(value);
        } else if (key.equals("quorumListenOnAllIPs")) {
            quorumListenOnAllIPs = Boolean.parseBoolean(value);
        } else if (key.equals("peerType")) {
            if (value.toLowerCase().equals("observer")) {
                peerType = LearnerType.OBSERVER;
            } else if (value.toLowerCase().equals("participant")) {
                peerType = LearnerType.PARTICIPANT;
            } else {
                throw new ConfigException("Unrecognised peertype: " + value);
            }
        } else if (key.equals("syncEnabled")) {
            syncEnabled = Boolean.parseBoolean(value);
        } else if (key.equals("dynamicConfigFile")) {
            dynamicConfigFileStr = value;
        // 这个参数和上面的参数搭配使用,这个参数指定了需要保留的文件数目。默认是保留3个。(No Java system property) New in 3.4.0
        } else if (key.equals("autopurge.snapRetainCount")) {
            snapRetainCount = Integer.parseInt(value);
        // 在上文中已经提到,3.4.0及之后版本,ZK提供了自动清理事务日志和快照文件的功能,这个参数指定了清理频率,单位是小时,需要配置一个1或更大的整数,
        // 默认是0,表示不开启自动清理功能。(No Java system property) New in 3.4.0
        } else if (key.equals("autopurge.purgeInterval")) {
            purgeInterval = Integer.parseInt(value);
        // 3.5.0版本新增。当设置为false时,单个服务器可以在复制模式下启动,单个参与者可以与观察者一起运行,集群可以向下配置到一个节点,然后从一个节点向上配置。对于向后兼容性,默认值为true。
        } else if (key.equals("standaloneEnabled")) {
            if (value.toLowerCase().equals("true")) {
                setStandaloneEnabled(true);
            } else if (value.toLowerCase().equals("false")) {
                setStandaloneEnabled(false);
            } else {
                throw new ConfigException("Invalid option " + value + " for standalone mode. Choose 'true' or 'false.'");
            }
        // 3.5.3版本新增。这控制动态重新配置功能的启用或禁用。启用该功能后,用户可以通过ZooKeeper客户端API或ZooKeeper命令行工具执行重新配置操作,
        // 前提是用户有权执行此类操作。当功能被禁用时,任何用户(包括超级用户)都不能执行重新配置。任何重新配置的尝试都将返回错误。默认值为false。
        } else if (key.equals("reconfigEnabled")) {
            if (value.toLowerCase().equals("true")) {
                setReconfigEnabled(true);
            } else if (value.toLowerCase().equals("false")) {
                setReconfigEnabled(false);
            } else {
                throw new ConfigException("Invalid option " + value + " for reconfigEnabled flag. Choose 'true' or 'false.'");
            }
        } else if (key.equals("sslQuorum")) {
            sslQuorum = Boolean.parseBoolean(value);
        } else if (key.equals("portUnification")) {
            shouldUsePortUnification = Boolean.parseBoolean(value);
        } else if (key.equals("sslQuorumReloadCertFiles")) {
            sslQuorumReloadCertFiles = Boolean.parseBoolean(value);
        // 这里的x是一个数字,与myid文件中的id是一致的。右边可以配置两个端口,第一个端口用于F和L之间的数据同步和其它通信,第二个端口用于Leader选举过程中投票通信。
		// (No Java system property)
        } else if ((key.startsWith("server.") || key.startsWith("group") || key.startsWith("weight")) && zkProp.containsKey("dynamicConfigFile")) {
            throw new ConfigException("parameter: " + key + " must be in a separate dynamic config file");
        } else if (key.equals(QuorumAuth.QUORUM_SASL_AUTH_ENABLED)) {
            quorumEnableSasl = Boolean.parseBoolean(value);
        } else if (key.equals(QuorumAuth.QUORUM_SERVER_SASL_AUTH_REQUIRED)) {
            quorumServerRequireSasl = Boolean.parseBoolean(value);
        } else if (key.equals(QuorumAuth.QUORUM_LEARNER_SASL_AUTH_REQUIRED)) {
            quorumLearnerRequireSasl = Boolean.parseBoolean(value);
        } else if (key.equals(QuorumAuth.QUORUM_LEARNER_SASL_LOGIN_CONTEXT)) {
            quorumLearnerLoginContext = value;
        } else if (key.equals(QuorumAuth.QUORUM_SERVER_SASL_LOGIN_CONTEXT)) {
            quorumServerLoginContext = value;
        } else if (key.equals(QuorumAuth.QUORUM_KERBEROS_SERVICE_PRINCIPAL)) {
            quorumServicePrincipal = value;
        } else if (key.equals("quorum.cnxn.threads.size")) {
            quorumCnxnThreadsSize = Integer.parseInt(value);
        } else {
            System.setProperty("zookeeper." + key, value);
        }
    }

    if (!quorumEnableSasl && quorumServerRequireSasl) {
        throw new IllegalArgumentException(
                QuorumAuth.QUORUM_SASL_AUTH_ENABLED
                        + " is disabled, so cannot enable "
                        + QuorumAuth.QUORUM_SERVER_SASL_AUTH_REQUIRED);
    }
    if (!quorumEnableSasl && quorumLearnerRequireSasl) {
        throw new IllegalArgumentException(
                QuorumAuth.QUORUM_SASL_AUTH_ENABLED
                        + " is disabled, so cannot enable "
                        + QuorumAuth.QUORUM_LEARNER_SASL_AUTH_REQUIRED);
    }
    // If quorumpeer learner is not auth enabled then self won't be able to
    // join quorum. So this condition is ensuring that the quorumpeer learner
    // is also auth enabled while enabling quorum server require sasl.
    if (!quorumLearnerRequireSasl && quorumServerRequireSasl) {
        throw new IllegalArgumentException(
                QuorumAuth.QUORUM_LEARNER_SASL_AUTH_REQUIRED
                        + " is disabled, so cannot enable "
                        + QuorumAuth.QUORUM_SERVER_SASL_AUTH_REQUIRED);
    }

    // Reset to MIN_SNAP_RETAIN_COUNT if invalid (less than 3)
    // PurgeTxnLog.purge(File, File, int) will not allow to purge less
    // than 3.
    // 这个参数和上面的参数搭配使用,这个参数指定了需要保留的文件数目。默认是保留3个。(No Java system property) New in 3.4.0
    if (snapRetainCount < MIN_SNAP_RETAIN_COUNT) {
        LOG.warn("Invalid autopurge.snapRetainCount: " + snapRetainCount
                + ". Defaulting to " + MIN_SNAP_RETAIN_COUNT);
        snapRetainCount = MIN_SNAP_RETAIN_COUNT;
    }

    if (dataDir == null) {
        throw new IllegalArgumentException("dataDir is not set");
    }
    if (dataLogDir == null) {
    	// 这个端口就是客户端连接Zookeeper服务器的端口,Zookeeper会监听这个端口接受客户端的访问请求;
        dataLogDir = dataDir;
    }

    if (clientPort == 0) {
        LOG.info("clientPort is not set");
        // 对于多网卡的机器,可以为每个IP指定不同的监听端口。默认情况是所有IP都监听 clientPort指定的端口。 New in 3.3.0
        if (clientPortAddress != null) {
            throw new IllegalArgumentException("clientPortAddress is set but clientPort is not set");
        }
    // 对于多网卡的机器,可以为每个IP指定不同的监听端口。默认情况是所有IP都监听 clientPort指定的端口。 New in 3.3.0
    } else if (clientPortAddress != null) {
        this.clientPortAddress = new InetSocketAddress(
                InetAddress.getByName(clientPortAddress), clientPort);
        LOG.info("clientPortAddress is {}", formatInetAddr(this.clientPortAddress));
    } else {
        this.clientPortAddress = new InetSocketAddress(clientPort);
        LOG.info("clientPortAddress is {}", formatInetAddr(this.clientPortAddress));
    }

    if (secureClientPort == 0) {
        LOG.info("secureClientPort is not set");
        if (secureClientPortAddress != null) {
            throw new IllegalArgumentException("secureClientPortAddress is set but secureClientPort is not set");
        }
    } else if (secureClientPortAddress != null) {
        this.secureClientPortAddress = new InetSocketAddress(
                InetAddress.getByName(secureClientPortAddress), secureClientPort);
        LOG.info("secureClientPortAddress is {}", formatInetAddr(this.secureClientPortAddress));
    } else {
        this.secureClientPortAddress = new InetSocketAddress(secureClientPort);
        LOG.info("secureClientPortAddress is {}", formatInetAddr(this.secureClientPortAddress));
    }
    if (this.secureClientPortAddress != null) {
        configureSSLAuth();
    }

	// 这个时间是作为zookeeper服务器之间或客户端与服务器之间维持心跳的时间间隔,也就是说每个tickTime时间就会发送一个心跳。
    if (tickTime == 0) {
        throw new IllegalArgumentException("tickTime is not set");
    }

	// Session超时时间限制,如果客户端设置的超时时间不在这个范围,那么会被强制设置为最大或最小时间。
	// 默认的Session超时时间是在2 tickTime ~ 20 tickTime 这个范围 New in 3.3.0
    minSessionTimeout = minSessionTimeout == -1 ? tickTime * 2 : minSessionTimeout;
    maxSessionTimeout = maxSessionTimeout == -1 ? tickTime * 20 : maxSessionTimeout;

    if (minSessionTimeout > maxSessionTimeout) {
        throw new IllegalArgumentException(
                "minSessionTimeout must not be larger than maxSessionTimeout");
    }

    // backward compatibility - dynamic configuration in the same file as
    // static configuration params see writeDynamicConfig()
    if (dynamicConfigFileStr == null) {
        setupQuorumPeerConfig(zkProp, true);
        if (isDistributed() && isReconfigEnabled()) {
            // we don't backup static config for standalone mode.
            // we also don't backup if reconfig feature is disabled.
            backupOldConfig();
        }
    }
}
先来对ZooKeeper配置文件有一个大概的了解 。
| 参数名 | 说明 |
|---|---|
| dataLogDir | 该参数有默认值:dataDir,可以不配置,不支持系统属性方式配置。参数datalogDir用于配置Zookeeper服务器存储事务日志文件的目录。默认情况下,ZooKeeper会将事务日志文件和快照数据存儲在同一个目录中,读者应尽量將这两者的目录区分开来。另外,如果条件允许,可以将事务日志的存储配置在一个单独的磁盘上。事务日志记最对于磁盘的性能要求非常高,为了保证dataLogDir数据的一致性,Zookeeper在返回客户端事务请求响应之前,必须将本次请求对应的事务日志写人到磁盘中。因此,事务日志写入的性能直接决定了Zookeeper在处理事务请求时的吞吐。针对同一块磁盘的共他并发读写操作(例如Zookeeper运行时日志输出和操作系统自身的读写等),尤共是上文中提到的数据快照操作,会极大地影响事务日志的写性能。因此尽量给事务日志的输出配置一个单独的磁盘或是挂载点,將級大地提升Zookeeper的整体性能。 |
| initLimit | 该参数有默认值:10,即表示是参数tickTime值的10倍,必须配置,且需要配置一个正整数,不支特系统属性方式配置。该参数用于配置Leader服务器等待Follower启动,并完成数据同步的时间。Follower服务器在启动过程中,会与Leader建立连接并完成对数据的同步,从而确定自己对外提供服务的起始状态。Lcader服务器九许Follower在initLimit时间内完成这个工作。通常情况下,运维人员不用太在意这个参数的配置,使用共默认值即可。但如果随着Zookceper集群管理的数据量增大,Follower服务器在启动的时候,从Leader上进行同步数据的时间也会相应变长,于是无法在较短的时间完成数据同步。因此,在这种情况下,有必要适当调大这个参数。 |
| syncLimit | 该参数有跌认位:5,即表示是参数tickTime值的5倍,必须配置,且需要配置一个正整数,不支持系统属性方式配置。该参数用于配置Leader服务器和Follower之间进行心跳检測的最大廷时时间。在Zookeeper集群运行过程中,Leader服务器会与所有的Follower进行心跳检測来确定该服务器是否存活。如果Leader服务器在syncLimit时间内无法获取到Follower的心跳检测响应,那么Leader就会认为该Follower已经脱离了和自己的同步。通常情况下,运维人员使用该参数的默认值即可,但如果部署zookeeper集群的网络环境质量较低(倒如网络延时较大或丢包严重),那么可以适当调大这个参数。 |
| snapCount | 该参数有默认值:100000,可以不配置,仅支特系统属性方式配置:zookeeper.snapcount.参数snapcount用于配置相邻两次数据快照之间的事务操作次数,即Zookeeper会在snapCount次事务操作之后进行一次数据快照 |
| preAllocSize | 该参数有跃认值:65536,单位是KB,即64MB,可以不配置,仅支持系统属性方式配置:zookeeper.preAllocsize。参数preAllocsize用于配蛋Zookeeper事务日志文件预分配的磁盘空间大小。通常情况下,我们使用Zookceper的默认配置65536KB即可,但是如果我们将参数snapCount设置得比默认值更小或更大,那么preAllocsize参数也要随之做出变更。举个倒子来说:如果我们将snapcount的值设置为500,同时預估每次事务操作的数据量大小至多1KB,那么参数preAllocsize设置为500就足够了。 |
| minSessionTimeout,maxSessionTimeout | 这两个参数有默认值,分別是参数tickTime值的2倍和20倍,即默认的会话超时时间在2tickTime~20tickTime范国内,单位毫秒,可以不配置,不支持系统属性方式配置。这两个参数用于服务端对客户端会话的超时时间进行限制,如果容户端设置的超时时问不在该范固内,那么会被服务端强制设置为最大或最小超时时间。 |
| maxClientCnxns | 该参数有默认值:60,可以不配置,不支持系统為性万式配置。从Socket层面限制单个客户端与单台服务器之间的并发连接数,即以IP地址粒度来进行连接数的限制。如果将该参数设置为0。则表示对连接数不作任何限制。读者需要注意该连接数限制选项的使用范国,其仅仅是对单台客户端机器与单台ZooKeeper服务器之问的连接限制,并不能控制所有客户端的连接数总和。如米读者有类似需求的话,可以尝试阿里中间件团队提供的一个简单的补丁:http:/jm-blog.aliapp.lcom/?p=1334。另外,在3.4.0版本以前该参数的默认值都是10,从3.4.0版本开始变成了60,因此运维人员尤其需要注意这个变化,以防ZooKeeper版本变化带未服务端连接数限制变化的隐患。 |
| jute.maxbuffer | 该参数有默认值:1048575,单位是字节,可以不配置,仅支特系统属性方式配置:jute.maxbuffer。该参数用于配置单个数据节点(ZNode)上可以存储的最大数据量大小。通常情况下,远维人员不需要改动该参数,同时考虑到Zookeeper上不适宜存储太多的数据,往往还需要将该参数设置的更小,需要注意的是,在变更该参数的时候,需要在Zookeeper集群的所有机器以及所有的客户端上均设置才能生效 |
| clientPortAddress | 该参数没有默认值:可以不配置,不支特系统属性方式配置。针对那些多网卡的机器,该参数允许为每个IP地址指定不同的监听端口。 |
| server.id=host: port:port | 该参数没有狀认值,在单机模式下可以不配置,不支特系统属性方式配置。该参数用于配置组成Zookeeper集群的机器列表,其中id即ServerID,与每合服务器myid文件中的数宇相对应。同时,在该参数中,会配置两个端口:第一个端又用于指定Follower服务器与Leader进行运行时通信和数据同步时所使用的端口,第二个端口则专门用于进行Leader选举过程中的投票通信。在ZooKeeper服务器启动的时候,其会根据myid文件中配置的ServerID宋确定自己是哪台服务器,并使用对应配置的端又未进行启动。如果在实际使用过程中,需要在同一台服务器上部署多个ZooKeeper实例来构成伪集群的话,那么这些端又都需要配置成不同,例如:jute.maxbuffer clientPortAddress server.id=host:port:port server.1=192.168.0.1:2777:3777 server.2=192.168.0.1:2888:3888 server.3=192.168.0.1:2999:3999 |
| autopurge.snapRetainCount | 该参数有默认值:3,可以不配置,不支村承统属性方式配置。从3.4.0版本开始,ZooKeeper提供了对历史事务日志和快照数据自动清理的支持。参数autopurge.snapRetaincount用于配置Zookeeper在自动清理的时候需妥保留的快照数据文件数量和对应autopurge.snapRetainCount的事务日志文件。需要注意的是,并不是磁盘上的所有事务日志和快照数据文件都可以被清理掉–那样的话将无法恢复数据。因此参数autopurge.snapRetaincount的最小值是了,如果配置autopurge.snapRetaincount值比了小的话,那么会被自动调整到3,即至少需要保留了个快照数据文件和对应的事务日志文件。 |
| autopurge.purgeInterval | 该参数有狀认值:0,单位是小时,可以不配置,不支持系统属性方式配置。参数autopurge.purgeInterval和参数autopurge.snapRetaincount配套使用,用于配置Zookeeper进行历史文件自动清理的频率。如果配置该位为0或负数,那么就表明不需要开启定时清理功能。Zookeeper款认不开启这项功能。关于Zookeeper数据文件和事务日志文件的自动清理, |
| fsync.warningthresholdms | 该参数有跃认值:1000,单位是毫秒,可以不配置,仅支持系统属性方式配置:fsync.warningthresholdms。参数fsync.warningthresholdms用于配置Zookeeper进行事务日志fsync操作时消耗时间的报警阈值。一旦进行一个fsync操作消耗的时间大于参数fsync.warningthresholdms指定的值,那么就在日志中打印出报警日志。 |
| forceSync | 该参数有默认值:yes,可以不配置,可选配置项为“yes”和“no”,仅支持系统属性方式配置:zookecper.forceSync。该参数用于配置ZooKeeper服务器是否在事务提交的时候,将日志写人操作强制刷人磁盘(即调用java.nio.channels.FileChannel.force接又),默认情况下是“yes”,即每次事务日志写入操作都会入磁盘。如果将其设置为“no”,則能一定程度的提高Zokceper的写性能,但同时也会存在类似于机器断电这样的安全风险。 |
| globalOutstandingLimit | 该参数有默认值:1000,可以不配置,仅支持系统属性方式配置:zookeeperglobalOutstandingLimit.参数globalOutstandingLimit用于配置Zookeeper服务器最大请求堆积数量。在Zookeeper服务器运行的过程中,客户端会源源不断的将请求发送到服务端,为了防业服务端资源(包括CPU、内存和网络等)耗尽,服务端必领限制同时处理的请求数,即最大请求堆积数量。 |
| leaderServes | 该参数有默认值:yes,可以不配置,可选配置项为“yes”和“no’仅支特系统属性方式配置:zookeeper.eaderServes.该参数用于配置Leader服务器是否能够接受客户端的连接,即是否允许Leader向客户端提供服务,默认情况下,Leader服务器能够接受并处理客户端的所有读写请求。在ZooKeeper的架构设计中,Leader服务器主要用来进行对事务更新请求的协调以及集群本身的运行时协调,因此,可以设置让Leader服务器不接受客户端的连接,以使其专注于进行分布式协调。 |
| SkipAcl | 该参数有默认值:no,可以不配置,可选配置项为“yes”和“no” 仅支持系統属性方式配置:zookceper.skipACL,该参数用于配置ZooKeeper服务器是否跳过ACL权限检查,默认情况下是“no”,即会对每一个客户端请求进行权限检查。如果将共设置为“yes”,则能一定程度的提高ZooKeeper的读写性能,但同时也将向所有客户端开放ZooKeeper的数据,包括那些之前设置过ACL权限的数据节点,也将不再接受权限限制。 |
| cnxTimeout | 也将不再接受权限限制。该参数有默认值:5000,单位是毫秒,可以不配置,仅支特系统属性方式配置:zookeeper.cnxTimeout。该参数用于配置在Leader选举过程中,各服务器之间进行TCP连接创建的超时时间。 |
| electionAlg | 在之前的版本中,可以使用该参数来配置选择Zookeeper进行Leader选举时所使用的算法,但从3.4.0版本开始,Zookceper废弃了其它选举算法,只留下了FastLeaderElection算法,因此该参数目/前看未没有用了,这里也不详细展开说了 |
parseProperties()方法的主要目的是将zoo.cfg配置文件中的属性解析并保存到QuorumPeerConfig的属性中,以备后用,在方法的后续部分主要是对参数的较验,而参数具体如何使用,在后续的源码分析中再来回顾 。 在parse()方法中还有一分部没有分析,就是dynamicConfigFile配置文件的解析,而dynamicConfigFile有什么用呢?
在zookeeper 3.5.0版本之前,其配置不支持动态加载,只能通过重启加载新配置。因此在老版本中如果要对zk集群进行扩缩容,需要滚动重启集群中所有节点,以使新的配置生效。而在zookeeper 3.5.0版本之后(包含3.5.0),引入了动态配置的特性,即zk节点运行时可动态加载zk成员配置,这样可在保持数据一致性的同时不会中断业务。
总结起来,zk动态配置可解决之前zk集群日常扩缩容过程中的如下痛点:
- zk集群短时间内不可用:zk节点滚动重启导致重新选举,选举周期内zk集群对外不可用;
- 依赖zk client端重连:zk节点滚动重启导致已建立的客户端连接被断开,客户端需主动重连其他节点;
- 扩缩容过程繁琐易出错:在静态配置版本下,扩容操作包括:配置新节点、启动新节点、配置老节点、滚动重启老节点。操作繁琐,步骤冗长,依赖人工容易出错。
这里就不对dynamicConfigFile的使用做更深入的介绍,在真正的解析这一部分源码时再来做分析,如果有兴趣,可以去看看这篇博客 zookeeper动态配置应用 。
接下来看启动定时任务,对过期的快照,执行删除(默认该功能关闭),创建并启动历史文件清理器 DatadirCleanupManager。
	DatadirCleanupManager purgeMgr = new DatadirCleanupManager(config.getDataDir(), config.getDataLogDir(), config.getSnapRetainCount(), config.getPurgeInterval());
    purgeMgr.start();
先来看DatadirCleanupManager的构造方法 。
public DatadirCleanupManager(File snapDir, File dataLogDir, int snapRetainCount,
                             int purgeInterval) {
    // 顾名思义就是zookeeper保存数据的目录,默认情况下zookeeper将写数据的日志文件也保存在这个目录里;
    // zk用于保存内存数据库的快照的目录,除非设置了dataLogDir,否则这个目录也用来保存更新数据库的事务日志。在生产环境使用的zk集群,强烈建议设置dataLogDir,
    // 让dataDir只存放快照,因为写快照的开销很低,这样dataDir就可以和其他日志目录的挂载点放在一起。
    this.snapDir = snapDir;
    // zk的事务日志路径
    this.dataLogDir = dataLogDir;
    // 3.4.0及之后版本zk提供了自动清理快照文件和事务日志文件的功能,该参数指定了保留文件的个数,默认为3,这里我设置为10.
    this.snapRetainCount = snapRetainCount;
    // 和上一个参数配合使用,设置自动清理的频率,单位为小时,默认为0表示不清理,建议设为6或12之类的值。如果设置了48,意思是48小时自动清理一次。
    this.purgeInterval = purgeInterval;
    LOG.info("autopurge.snapRetainCount set to " + snapRetainCount);
    LOG.info("autopurge.purgeInterval set to " + purgeInterval);
}
注意snapDir,dataLogDir,snapRetainCount,purgeInterval四个参数的含义,接下来看DatadirCleanupManager的start()方法的实现逻辑 。
public void start() {
	// 如果purgeTaskStatus被设置为STARTED,则打印Purge 任务已经启动,并返回
    if (PurgeTaskStatus.STARTED == purgeTaskStatus) {
        LOG.warn("Purge task is already running.");
        return;
    }
    // Don't schedule the purge task with zero or negative purge interval.
    // 默认情况下purgeInterval=0 ,该任务关闭, 直接返回
    if (purgeInterval = 0) {
        LOG.info("Purge task is not scheduled.");
        return;
    }
    // 创建一个定时器
    timer = new Timer("PurgeTask", true);
    // 创建一个清理快照任务
    TimerTask task = new PurgeTask(dataLogDir, snapDir, snapRetainCount);
    // 如果purgeInterval设置的值是1 , 表示1小时检查一次,判断是否有过期快照,有则删除
    timer.scheduleAtFixedRate(task, 0, TimeUnit.HOURS.toMillis(purgeInterval));
    purgeTaskStatus = PurgeTaskStatus.STARTED;
}
对于创建一个定时器的使用,如果有小伙伴比较迷惑,请看一个例子。
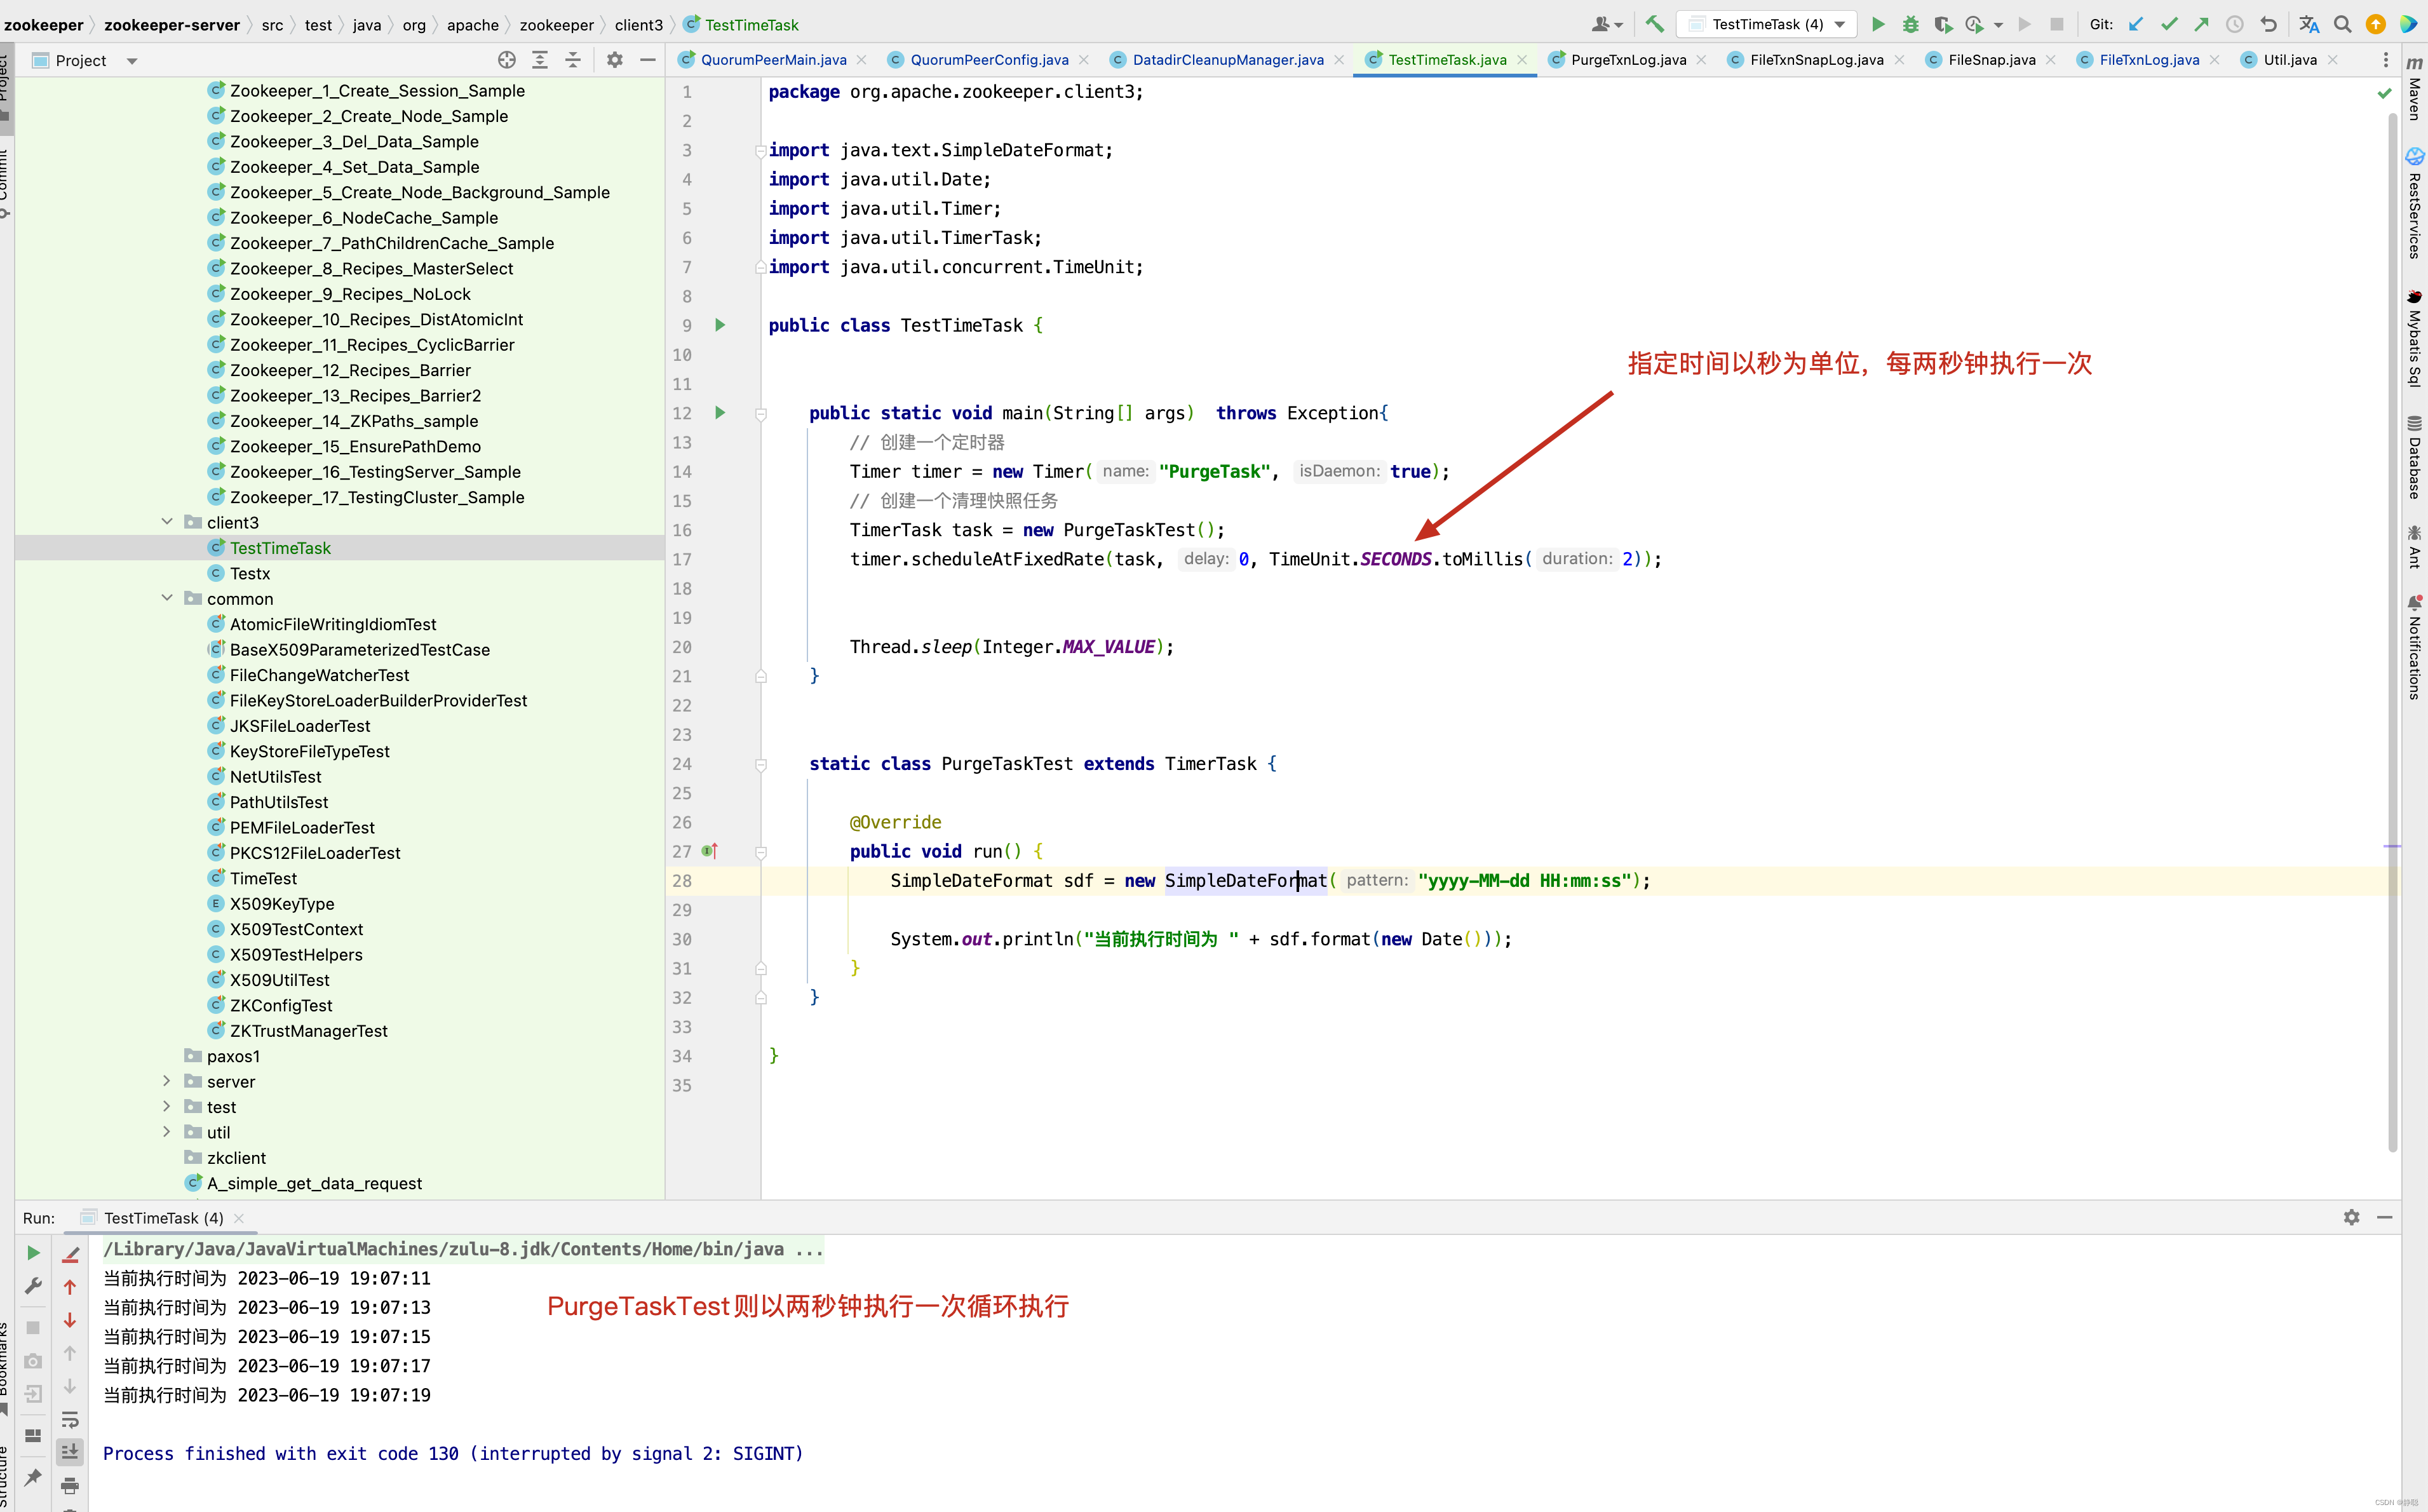
从上面的例子中,我们知道,如果在zoo.cfg文件中指定了autopurge.purgeInterval,则以purgeInterval小时为单位执行PurgeTask的run()方法,接下来进入PurgeTask的run()方法,看它做了哪些事情 。
static class PurgeTask extends TimerTask {
    private File logsDir;
    private File snapsDir;
    private int snapRetainCount;

    public PurgeTask(File dataDir, File snapDir, int count) {
        logsDir = dataDir;
        snapsDir = snapDir;
        snapRetainCount = count;
    }

    @Override
    public void run() {
        LOG.info("Purge task started.");
        try {
            // 清理过期的数据
            PurgeTxnLog.purge(logsDir, snapsDir, snapRetainCount);
        } catch (Exception e) {
            LOG.error("Error occurred while purging.", e);
        }
        LOG.info("Purge task completed.");
    }
}
接下来看清理过期数据的具体实现。
public static void purge(File dataDir, File snapDir, int num) throws IOException {
    if (num < 3) {
        throw new IllegalArgumentException(COUNT_ERR_MSG);
    }
    FileTxnSnapLog txnLog = new FileTxnSnapLog(dataDir, snapDir);
    ListFile> snaps = txnLog.findNRecentSnapshots(num);
    int numSnaps = snaps.size();
    if (numSnaps > 0) {
        purgeOlderSnapshots(txnLog, snaps.get(numSnaps - 1));
    }
}
先看FileTxnSnapLog的构造函数。
public FileTxnSnapLog(File dataDir, File snapDir) throws IOException {
    LOG.debug("Opening datadir:{} snapDir:{}", dataDir, snapDir);

    this.dataDir = new File(dataDir, "version-2");
    this.snapDir = new File(snapDir, "version-2");

    // by default create snap/log dirs, but otherwise complain instead
    // See ZOOKEEPER-1161 for more details
    boolean enableAutocreate = Boolean.valueOf(
            System.getProperty("zookeeper.datadir.autocreate",  true));

    trustEmptySnapshot = Boolean.getBoolean("zookeeper.snapshot.trust.empty");
    LOG.info( "zookeeper.snapshot.trust.empty  : " + trustEmptySnapshot);
	// 如果dataDir不存在,并且不能够自动创建目录,则抛出异常
    if (!this.dataDir.exists()) {
        if (!enableAutocreate) {
            throw new DatadirException("Missing data directory "
                    + this.dataDir
                    + ", automatic data directory creation is disabled ("
                    + ZOOKEEPER_DATADIR_AUTOCREATE
                    + " is false). Please create this directory manually.");
        }

		// 如果创建目录失败,或者创建目录之后,但目录不存在
        if (!this.dataDir.mkdirs() && !this.dataDir.exists()) {
            throw new DatadirException("Unable to create data directory "
                    + this.dataDir);
        }

    }
    // 如果目录不能写,则抛出异常
    if (!this.dataDir.canWrite()) {
        throw new DatadirException("Cannot write to data directory " + this.dataDir);
    }

	// 如果snapDir目录不存在并且不能创建新的目录 ,则抛出异常
    if (!this.snapDir.exists()) {
        // by default create this directory, but otherwise complain instead
        // See ZOOKEEPER-1161 for more details
        if (!enableAutocreate) {
            throw new DatadirException("Missing snap directory "
                    + this.snapDir
                    + ", automatic data directory creation is disabled ("
                    + ZOOKEEPER_DATADIR_AUTOCREATE
                    + " is false). Please create this directory manually.");
        }

		// 如果snapDir目录创建失败,并且 snapDir 目录不存在,则抛出异常
        if (!this.snapDir.mkdirs() && !this.snapDir.exists()) {
            throw new DatadirException("Unable to create snap directory "
                    + this.snapDir);
        }
    }

	// 如果snap目录不能写,则抛出异常
    if (!this.snapDir.canWrite()) {
        throw new DatadirException("Cannot write to snap directory " + this.snapDir);
    }
    // check content of transaction log and snapshot dirs if they are two different directories
    // See ZOOKEEPER-2967 for more details
    // 如果dataDir 目录和 snapDir 的路径不相等
    if (!this.dataDir.getPath().equals(this.snapDir.getPath())) {
    	// 如果dataDir目录下包含以snapshot开头的文件,则抛出异常
        checkLogDir();
        // 如果snapDir目录中包含以log开头的文件,则抛出异常
        checkSnapDir();
    }
    txnLog = new FileTxnLog(this.dataDir);
    snapLog = new FileSnap(this.snapDir);
}

private void checkLogDir() throws LogDirContentCheckException {
    File[] files = this.dataDir.listFiles(new FilenameFilter() {
        @Override
        public boolean accept(File dir, String name) {
            return Util.isSnapshotFileName(name);
        }
    });
    if (files != null && files.length > 0) {
        throw new LogDirContentCheckException("Log directory has snapshot files. Check if dataLogDir and dataDir configuration is correct.");
    }
}

public static boolean isLogFileName(String fileName) {
    return fileName.startsWith(  "log.");
}
接下来看构造函数FileTxnLog和FileSnap的实现。
public FileTxnLog(File logDir) {
    this.logDir = logDir;
}

public FileSnap(File snapDir) {
    this.snapDir = snapDir;
}
接下来看快照查询方法findNRecentSnapshots()。
public List<File> findNRecentSnapshots(int n) throws IOException {
    FileSnap snaplog = new FileSnap(snapDir);
    return snaplog.findNRecentSnapshots(n);
}

public List<File> findNRecentSnapshots(int n) throws IOException {
    List<File> files = Util.sortDataDir(snapDir.listFiles(), "snapshot", false);
    int count = 0;
    List<File> list = new ArrayList<File>();
    for (File f : files) {
        if (count == n)
            break;
        if (Util.getZxidFromName(f.getName(), "snapshot") != -1) {
            count++;
            list.add(f);
        }
    }
    return list;
}
首先排序获取snapDir目录下所有的文件,并且只取前面n个。 而n个又是从哪里来的呢?
来源于QuorumPeerConfig中的snapRetainCount字段,而snapRetainCount我们又可以在zoo.cfg中的autopurge.snapRetainCount这个参数配置,接下来看sortDataDir()方法的内部实现。
public static List<File> sortDataDir(File[] files, String prefix, boolean ascending) {
    if (files == null)
        return new ArrayList<File>(0);
    List<File> filelist = Arrays.asList(files);
    Collections.sort(filelist, new DataDirFileComparator(prefix, ascending));
    return filelist;
}
在sortDataDir()方法中,有一个很重要的方法就是sort(),而sort()方法又是通过DataDirFileComparator比较器来进行比对的。
private static class DataDirFileComparator
        implements Comparator<File>, Serializable {
    private static final long serialVersionUID = -2648639884525140318L;

    private String prefix;
    private boolean ascending;

    public DataDirFileComparator(String prefix, boolean ascending) {
        this.prefix = prefix;
        this.ascending = ascending;
    }

    public int compare(File o1, File o2) {
        long z1 = Util.getZxidFromName(o1.getName(), prefix);
        long z2 = Util.getZxidFromName(o2.getName(), prefix);
        int result = z1 < z2 ? -1 : (z1 > z2 ? 1 : 0);
        return ascending ? result : -result;
    }
}

public static long getZxidFromName(String name, String prefix) {
    long zxid = -1;
    String nameParts[] = name.split("\\.");
    if (nameParts.length == 2 && nameParts[0].equals(prefix)) {
        try {
            zxid = Long.parseLong(nameParts[1], 16);
        } catch (NumberFormatException e) {
        }
    }
    return zxid;
}
从 DataDirFileComparator 排序可以看出,snapDir目录下的文件以 snapshot开头,后面拼接的是一个 . 加一个long类型的时间戳,最终zxid下的文件格式如下 : snapshot.1687340670178 这种数据结构,而有人可能还是对DataDirFileComparator排序的使用有所迷惑,先来看一个例子。
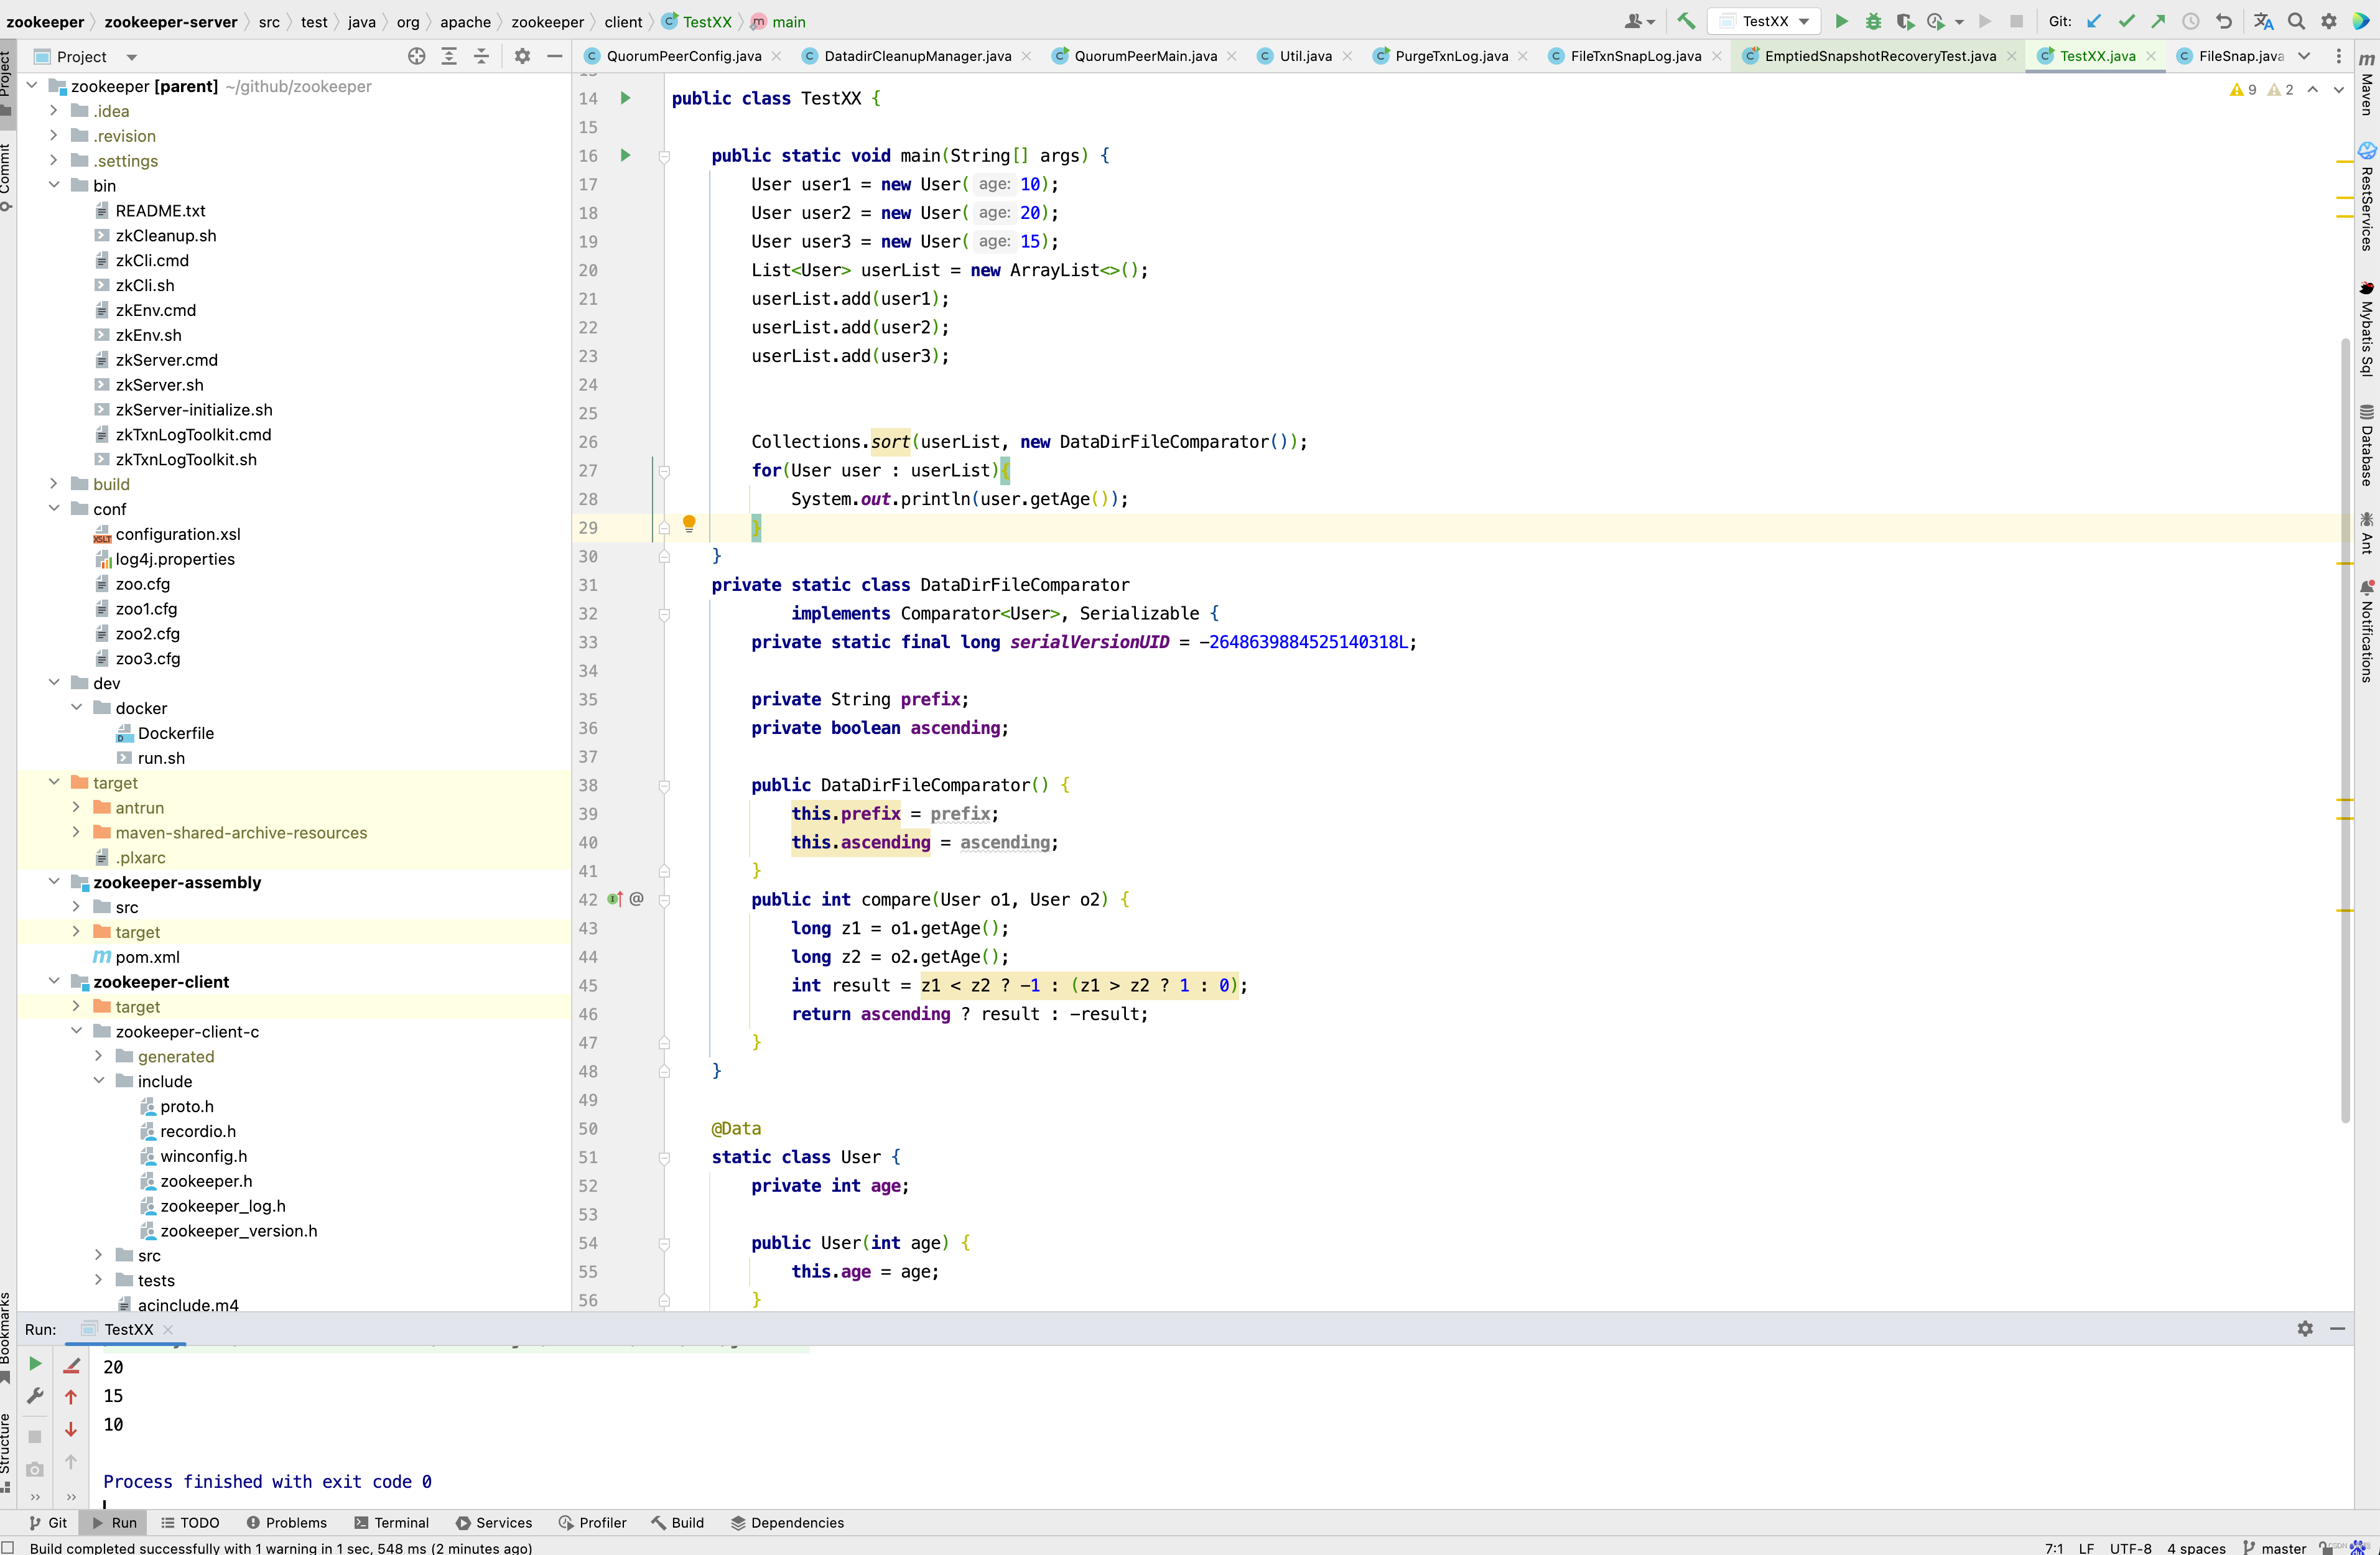
这个例子的意图也很简单,创建一个User 对象,有一个年龄字段,使用DataDirFileComparator比较器,最终排序得到的list结果是以年龄降序排序。 通过这个例子我们知道了findNRecentSnapshots()方法的意图,就是获取snapDir下以时间降序的最新的几个文件 。 如果获取的文件数大于0,则会调用purgeOlderSnapshots()方法进行处理,接下来进入purgeOlderSnapshots()方法 。
static void purgeOlderSnapshots(FileTxnSnapLog txnLog, File snapShot) {
    final long leastZxidToBeRetain = Util.getZxidFromName(    snapShot.getName(), "snapshot");


    final Set<File> retainedTxnLogs = new HashSet<File>();
    retainedTxnLogs.addAll(Arrays.asList(txnLog.getSnapshotLogs(leastZxidToBeRetain)));

    /**
     * Finds all candidates for deletion, which are files with a zxid in their name that is less
     * than leastZxidToBeRetain.  There's an exception to this rule, as noted above.
     */
    class MyFileFilter implements FileFilter {
        private final String prefix;

        MyFileFilter(String prefix) {
            this.prefix = prefix;
        }

        public boolean accept(File f) {
            if (!f.getName().startsWith(prefix + "."))
                return false;
            if (retainedTxnLogs.contains(f)) {
                return false;
            }
            long fZxid = Util.getZxidFromName(f.getName(), prefix);
            if (fZxid >= leastZxidToBeRetain) {
                return false;
            }
            return true;
        }
    }
    // add all non-excluded log files
    File[] logs = txnLog.getDataDir().listFiles(new MyFileFilter(PREFIX_LOG));
    List<File> files = new ArrayList<>();
    if (logs != null) {
        files.addAll(Arrays.asList(logs));
    }

    // add all non-excluded snapshot files to the deletion list
    File[] snapshots = txnLog.getSnapDir().listFiles(new MyFileFilter(PREFIX_SNAPSHOT));
    if (snapshots != null) {
        files.addAll(Arrays.asList(snapshots));
    }

    // remove the old files
    for (File f : files) {
        final String msg = "Removing file: " +
                DateFormat.getDateTimeInstance().format(f.lastModified()) +
                "\t" + f.getPath();
        LOG.info(msg);
        System.out.println(msg);
        if (!f.delete()) {
            System.err.println("Failed to remove " + f.getPath());
        }
    }
}
要弄清楚purgeOlderSnapshots()方法的含义,先弄明白leastZxidToBeRetain这个值的含义,首先来源于purge()方法,snaps的值取的是snapDir目录下,时间降序排序,且前n个文件。
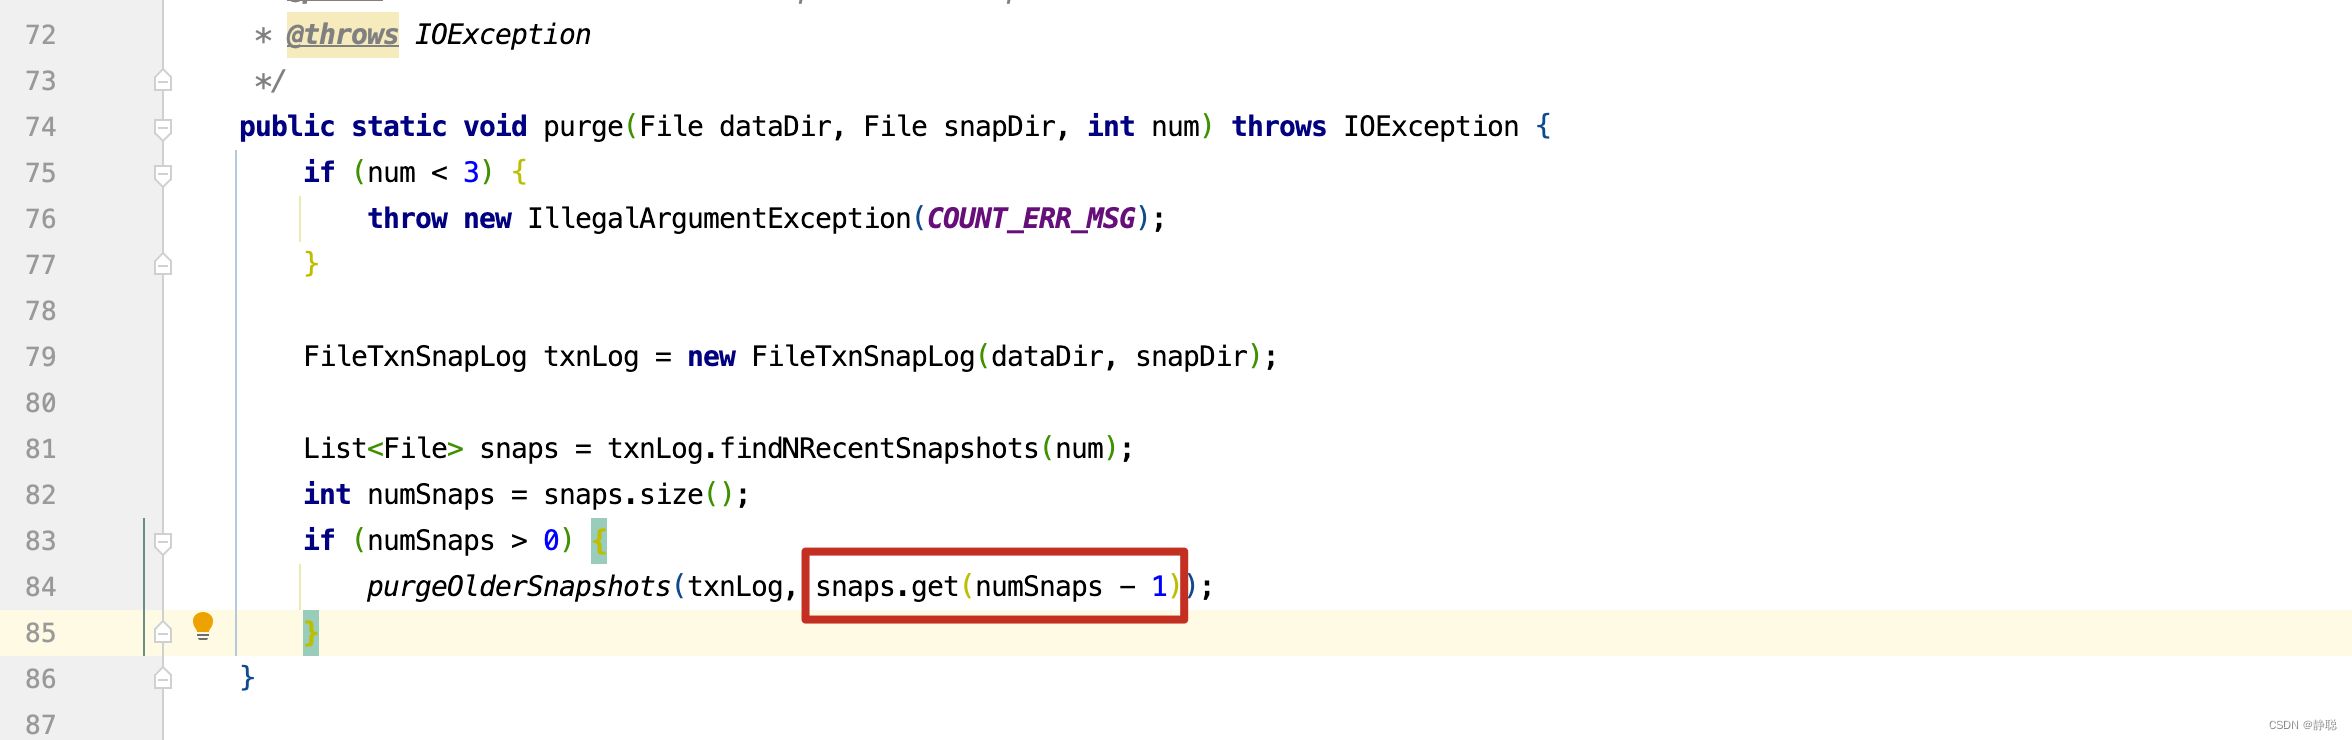
因此snaps.get(numSnaps - 1) 获取的文件为前n个中,创建时间最早的snap文件,因此leastZxidToBeRetain的值为最新的n个snap文件中创建时间最早的那个文件的时间戳,再来看getSnapshotLogs() 。
public File[] getSnapshotLogs(long zxid) {
    return FileTxnLog.getLogFiles(dataDir.listFiles(), zxid);
}

public static File[] getLogFiles(File[] logDirList, long snapshotZxid) {
    List<File> files = Util.sortDataDir(logDirList, "log", true);
    long logZxid = 0;
    // Find the log file that starts before or at the same time as the
    // zxid of the snapshot
    for (File f : files) {
        long fzxid = Util.getZxidFromName(f.getName(), "log");
        if (fzxid > snapshotZxid) {
            continue;
        }
        // the files
        // are sorted with zxid's
        if (fzxid > logZxid) {
            logZxid = fzxid;
        }
    }
    List<File> v = new ArrayList<File>(5);
    for (File f : files) {
        long fzxid = Util.getZxidFromName(f.getName(), "log");
        if (fzxid < logZxid) {
            continue;
        }
        v.add(f);
    }
    return v.toArray(new File[0]);
}
getLogFiles()方法 ,细心的读者看看也很简单,首先logZxid值为在log目录下小于snapshotZxid的最新创建的log文件。 getLogFiles()这个方法的最终目的是将大于snapshotZxid的所有文件以及小于snapshotZxid的最新的一个文件保存到File[]中。 如snapshotZxid文件为11点创建的。 而log 下在 11:01 ,11:02 ,11:03 以及10:59 ,10:58 ,10:57 创始的6个log文件,此时返回的是11:01 ,11:02 ,11:03 ,10:59 这4个文件 。 看懂了getLogFiles()方法,再来看 purgeOlderSnapshots()方法,原理就很简单了,将dataDir和snapDir目录下, 所有的非刚刚筛选出来的文件全部删除掉。 此时再来看snapRetainCount的参数含义就很简单了。 snapRetainCount参数为3.4.0及之后版本zk提供了自动清理快照文件和事务日志文件的功能,该参数指定了保留文件的个数,默认为3,是吧,先筛选出创建时间最近的snapRetainCount个文件,然后将非这些文件全部删除掉。 当然啦。 TimerTask 是一个以小时为单位的定时任务,会定期的执行删除操作。
接下来分两种情况,一种是集群方式的启动,另外一种是单机模式的启动,显然单机模式比集群模式要简单得多,因此我们先来看单机模式,后面再来分析集群模式 。如果分析单机模式,先进入ZooKeeperServerMain的main()方法 。
public static void main(String[] args) {
    //InitLog4jConfig();
    ZooKeeperServerMain main = new ZooKeeperServerMain();
    try {
        main.initializeAndRun(args);
    } catch (IllegalArgumentException e) {
        LOG.error("Invalid arguments, exiting abnormally", e);
        LOG.info(USAGE);
        System.err.println(USAGE);
        System.exit(2);
    } catch (ConfigException e) {
        LOG.error("Invalid config, exiting abnormally", e);
        System.err.println("Invalid config, exiting abnormally");
        System.exit(2);
    } catch (DatadirException e) {
        LOG.error("Unable to access datadir, exiting abnormally", e);
        System.err.println("Unable to access datadir, exiting abnormally");
        System.exit(3);
    } catch (AdminServerException e) {
        LOG.error("Unable to start AdminServer, exiting abnormally", e);
        System.err.println("Unable to start AdminServer, exiting abnormally");
        System.exit(4);
    } catch (Exception e) {
        LOG.error("Unexpected exception, exiting abnormally", e);
        System.exit(1);
    }
    LOG.info("Exiting normally");
    System.exit(0);
}
大家看到没有,ZooKeeperServerMain的main()方法和QuorumPeerMain的main()方法很像,都是调用initializeAndRun()初始化参数并运行。
protected void initializeAndRun(String[] args)
        throws ConfigException, IOException, AdminServerException {
    try {
    	// 注册jmx
        ManagedUtil.registerLog4jMBeans();
    } catch (JMException e) {
        LOG.warn("Unable to register log4j JMX control", e);
    }

    ServerConfig config = new ServerConfig();
    // 和之前的解析方法类似,这里就不深入分析,无非就是
    // dataDir,dataLogDir,maxClientCnxns等参数的解析与设置
    if (args.length == 1) {
        config.parse(args[0]);
    } else {
        config.parse(args);
    }
    runFromConfig(config);
}
接下来进入runFromConfig()方法 ,看其内部实现。
public void runFromConfig(ServerConfig config) throws IOException, AdminServerException {
    LOG.info("Starting server");
    FileTxnSnapLog txnLog = null;
    try {
        // Note that this thread isn't going to be doing anything else,
        // so rather than spawning another thread, we will just call
        // run() in this thread.
        // create a file logger url from the command line args
        // 创建Zookeeper数据管理器FileTxnSnapLog
        // FileTxnSnapLog 是Zookeeper上层服务器和底层数据存储之间的对接层,提供了一系列的操作数据文件的接口,包括事务日志文件和快照数据文件 ,
        // Zookeeper根据zoo.cfg文件中的解析出的快照数据目录dataDir和事务日志目录dataLogDir来创建FileTxnSnapLog

        // 1. 初始化 FileTxnSnapLog
        // FileTxnSnapLog是Zookeeper事务日志和快照数据访问层,用于衔接上层业务与底层数据存储,底层数据包含了事务日志和快照数据两部分
        // 因此 , FileTxnSnapLog 内部又分为FileTxnLog和FileSnap的初始化,分别代表事务日志管理器和快照数据管理器的初始化。
        txnLog = new FileTxnSnapLog(config.dataLogDir, config.dataDir);
        // ZooKeeperServer 是单机版本Zookeeper服务器最为核心的实体类,Zookeeper服务器首先会进行实例的创建,接下去的步骤
        // 则都是对该服务器实例的初始化工作,包括连接器,内存数据库的请求处理等组件的初始化
        final ZooKeeperServer zkServer = new ZooKeeperServer(txnLog,
                //   3. 设置服务器tickTime 和会话超时限制
                config.tickTime, config.minSessionTimeout, config.maxSessionTimeout, null);
        // 1. 创建服务器统计器 ServerStats
        // ServerStats 是Zookeeper服务器运行时统计器,包含了最基本的运行时信息,如表7-8所示 。
        txnLog.setServerStats(zkServer.serverStats());
        // Registers shutdown handler which will be used to know the
        // server error or shutdown state changes.
        final CountDownLatch shutdownLatch = new CountDownLatch(1);
        zkServer.registerServerShutdownHandler(new ZooKeeperServerShutdownHandler(shutdownLatch));

        // Start Admin server
        adminServer = AdminServerFactory.createAdminServer();
        adminServer.setZooKeeperServer(zkServer);
        adminServer.start();

        boolean needStartZKServer = true;
        if (config.getClientPortAddress() != null) {
            // 4. 创建ServerCnxnFactory
            cnxnFactory = ServerCnxnFactory.createFactory();
            // 5. Zookeeper首先会初始化一个Thread ,作为整个ServerCnxnFactory的主线程然后再初始化NIO服务器。
            cnxnFactory.configure(config.getClientPortAddress(), config.getMaxClientCnxns(), false);
            // 6. 启动ServerCnxnFactory
            // 启动步骤5中已经初始化的主线程ServerCnxnFactory的主逻辑run()方法 ,需要注意的一点是,虽然这里Zookeeper的NIO
            // 服务器已经对外开放端口,客户端能够访问到Zookeeper的客户端服务端2181 , 但此时Zookeeper服务器是无法正常处理客户端请求的。
            // 恢复本地数据库 。
            cnxnFactory.startup(zkServer);
            // zkServer has been started. So we don't need to start it again in secureCnxnFactory.
            needStartZKServer = false;
        }
        if (config.getSecureClientPortAddress() != null) {
            secureCnxnFactory = ServerCnxnFactory.createFactory();
            secureCnxnFactory.configure(config.getSecureClientPortAddress(), config.getMaxClientCnxns(), true);
            // 在步骤6中,Zookeeper已经将ServerCnxnFactory 主线程启动,但是同时我们提出到此时Zookeeper依旧无法处理客户端的请求
            // 原因就是此时网络尚不能够访问Zookeeper服务器实例, 在经过后续的步骤的初始化之后,Zookeeper服务器实例已经初始化完毕
            // 只需要注册给ServerCnxnFactory 即可, 之后,Zookeeper就可以对外提供正常的服务了。
            secureCnxnFactory.startup(zkServer, needStartZKServer);
        }

        containerManager = new ContainerManager(zkServer.getZKDatabase(), zkServer.firstProcessor,
                Integer.getInteger("znode.container.checkIntervalMs", (int) TimeUnit.MINUTES.toMillis(1)),
                Integer.getInteger("znode.container.maxPerMinute", 10000)
        );
        containerManager.start();

        // Watch status of ZooKeeper server. It will do a graceful shutdown
        // if the server is not running or hits an internal error.
        shutdownLatch.await();

        shutdown();

        if (cnxnFactory != null) {
            cnxnFactory.join();
        }
        if (secureCnxnFactory != null) {
            secureCnxnFactory.join();
        }
        if (zkServer.canShutdown()) {
            zkServer.shutdown(true);
        }
    } catch (InterruptedException e) {
        // warn, but generally this is ok
        LOG.warn("Server interrupted", e);
    } finally {
        if (txnLog != null) {
            txnLog.close();
        }
    }
}
这个方法很复杂,但我们可以一个一个来分析,首先来看AdminServer 的启动。
public static AdminServer createAdminServer() {
    if (!"false".equals(System.getProperty("zookeeper.admin.enableServer"))) {
        try {
            Class<?> jettyAdminServerC = Class.forName("org.apache.zookeeper.server.admin.JettyAdminServer");
            Object adminServer = jettyAdminServerC.getConstructor().newInstance();
            return (AdminServer) adminServer;
        } catch (ClassNotFoundException e) {
            LOG.warn("Unable to start JettyAdminServer", e);
        } catch (InstantiationException e) {
            LOG.warn("Unable to start JettyAdminServer", e);
        } catch (IllegalAccessException e) {
            LOG.warn("Unable to start JettyAdminServer", e);
        } catch (InvocationTargetException e) {
            LOG.warn("Unable to start JettyAdminServer", e);
        } catch (NoSuchMethodException e) {
            LOG.warn("Unable to start JettyAdminServer", e);
        } catch (NoClassDefFoundError e) {
            LOG.warn("Unable to load jetty, not starting JettyAdminServer", e);
        }
    }
    return new DummyAdminServer();
}
在这里,可以看出,ZooKeeper启动时,默认会调用JettyAdminServer的构造函数 。
public static final int DEFAULT_PORT = 8080;
public static final int DEFAULT_IDLE_TIMEOUT = 30000;
public static final String DEFAULT_COMMAND_URL = "/commands";
private static final String DEFAULT_ADDRESS = "0.0.0.0";

public JettyAdminServer() {
    this(System.getProperty("zookeeper.admin.serverAddress", DEFAULT_ADDRESS),
            Integer.getInteger("zookeeper.admin.serverPort", DEFAULT_PORT),
            Integer.getInteger("zookeeper.admin.idleTimeout", DEFAULT_IDLE_TIMEOUT),
            System.getProperty("zookeeper.admin.commandURL", DEFAULT_COMMAND_URL));
}

public JettyAdminServer(String address, int port, int timeout, String commandUrl) {
    this.port = port;
    this.idleTimeout = timeout;
    this.commandUrl = commandUrl;
    this.address = address;

    server = new Server();
    ServerConnector connector = new ServerConnector(server);
    connector.setHost(address);
    connector.setPort(port);
    connector.setIdleTimeout(idleTimeout);
    server.addConnector(connector);

    ServletContextHandler context = new ServletContextHandler(ServletContextHandler.SESSIONS);
    context.setContextPath("/*");
    server.setHandler(context);

    context.addServlet(new ServletHolder(new CommandServlet()), commandUrl + "/*");
}
从上面的代码来看,会启动一个ServerConnector,默认监听8080端口,对所有http://localhost:8080/commands/*请求由 CommandServlet 来处理。
private class CommandServlet extends HttpServlet {
    private static final long serialVersionUID = 1L;

    protected void doGet(HttpServletRequest request, HttpServletResponse response) throws ServletException, IOException {
        // Capture the command name from the URL
        String cmd = request.getPathInfo();
        if (cmd == null || cmd.equals("/")) {
            // No command specified, print links to all commands instead
            for (String link : commandLinks()) {
                response.getWriter().println(link);
                response.getWriter().println("<br/>");
            }
            return;
        }
        // Strip leading "/"
        cmd = cmd.substring(1);

        // Extract keyword arguments to command from request parameters
        @SuppressWarnings("unchecked")
        Map<String, String[]> parameterMap = request.getParameterMap();
        Map<String, String> kwargs = new HashMap<String, String>();
        for (Map.Entry<String, String[]> entry : parameterMap.entrySet()) {
            kwargs.put(entry.getKey(), entry.getValue()[0]);
        }

        // Run the command
        CommandResponse cmdResponse = Commands.runCommand(cmd, zkServer, kwargs);

        // Format and print the output of the command
        CommandOutputter outputter = new JsonOutputter();
        response.setStatus(HttpServletResponse.SC_OK);
        response.setContentType(outputter.getContentType());
        outputter.output(cmdResponse, response.getWriter());
    }
}
在doGet()处理方法中,从get请求中获取到path,然后再调用Commands的runCommand()方法进行处理。
public static CommandResponse runCommand(String cmdName, ZooKeeperServer zkServer, Map<String, String> kwargs) {
    if (!commands.containsKey(cmdName)) {
        return new CommandResponse(cmdName, "Unknown command: " + cmdName);
    }
    if (zkServer == null || !zkServer.isRunning()) {
        return new CommandResponse(cmdName, "This ZooKeeper instance is not currently serving requests");
    }
    return commands.get(cmdName).run(zkServer, kwargs);
}
而最终调用了根据浏览器输入的path从commands中获取到Command,然后再调用他的run()方法即可,而commands又是从哪里来的呢? 请看Commands中有一个静态代码块。
static {
    registerCommand(new CnxnStatResetCommand());
    registerCommand(new ConfCommand());
    registerCommand(new ConsCommand());
    registerCommand(new DirsCommand());
    registerCommand(new DumpCommand());
    registerCommand(new EnvCommand());
    registerCommand(new GetTraceMaskCommand());
    registerCommand(new IsroCommand());
    registerCommand(new MonitorCommand());
    registerCommand(new RuokCommand());
    registerCommand(new SetTraceMaskCommand());
    registerCommand(new SrvrCommand());
    registerCommand(new StatCommand());
    registerCommand(new StatResetCommand());
    registerCommand(new WatchCommand());
    registerCommand(new WatchesByPathCommand());
    registerCommand(new WatchSummaryCommand());
}
而最终调用了registerCommand()方法注册到commands中。
public static void registerCommand(Command command) {
    for (String name : command.getNames()) {
        Command prev = commands.put(name, command);
        if (prev != null) {
            LOG.warn("Re-registering command %s (primary name = %s)", name, command.getPrimaryName());
        }
    }
    primaryNames.add(command.getPrimaryName());
}
每一个command类中都有一个getNames()方法,而getNames()方法返回的是一个集合,为什么呢? 以ConfCommand命令为例子。
public static class ConfCommand extends CommandBase {
    public ConfCommand() {
        super(Arrays.asList("configuration", "conf", "config"));
    }

    @Override
    public CommandResponse run(ZooKeeperServer zkServer, Map<String, String> kwargs) {
        CommandResponse response = initializeResponse();
        response.putAll(zkServer.getConf().toMap());
        return response;
    }
}
protected CommandBase(List<String> names) {
    this(names, null);
}
他的names 就是configuration,conf,config,因此在浏览器路径中输入http://localhost:8080/commands/config,http://localhost:8080/commands/configuration,http://localhost:8080/commands/conf都是执行ConfCommand的run()方法 。
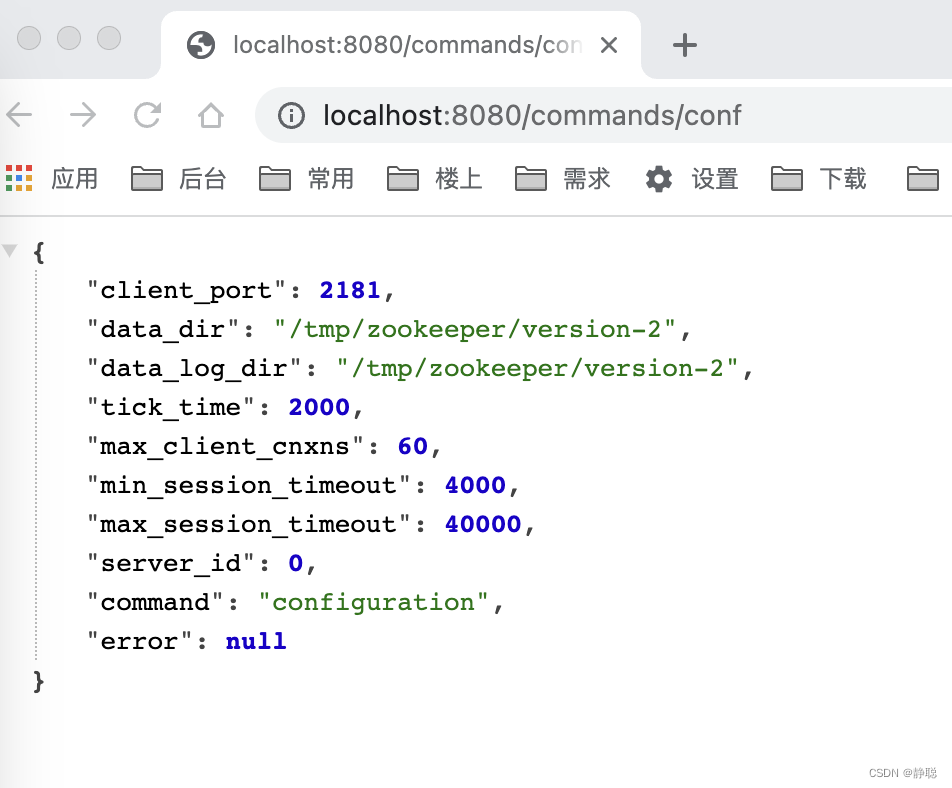
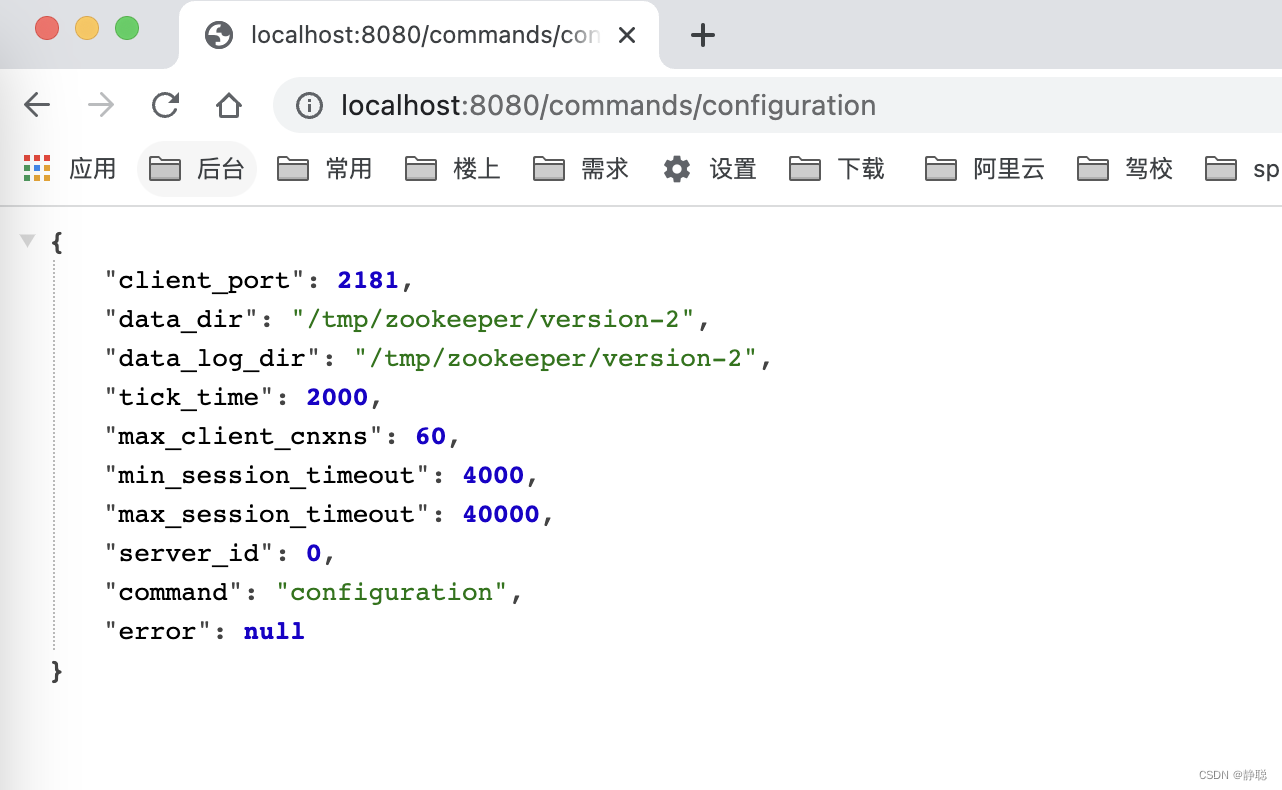
大家好奇,为什么ConfCommand的run()方法返回值是上述内容呢?请看getConf()方法的实现逻辑 。
public ZooKeeperServerConf getConf() {
    return new ZooKeeperServerConf
            (getClientPort(),
                    zkDb.snapLog.getSnapDir().getAbsolutePath(),
                    zkDb.snapLog.getDataDir().getAbsolutePath(),
                    getTickTime(),
                    getMaxClientCnxnsPerHost(),
                    getMinSessionTimeout(),
                    getMaxSessionTimeout(),
                    getServerId());
}
这不就是zoo.cfg中配置的内容不。
而如果我们直接输入http://localhost:8080/commands,则显示我们可以查看的命令 。
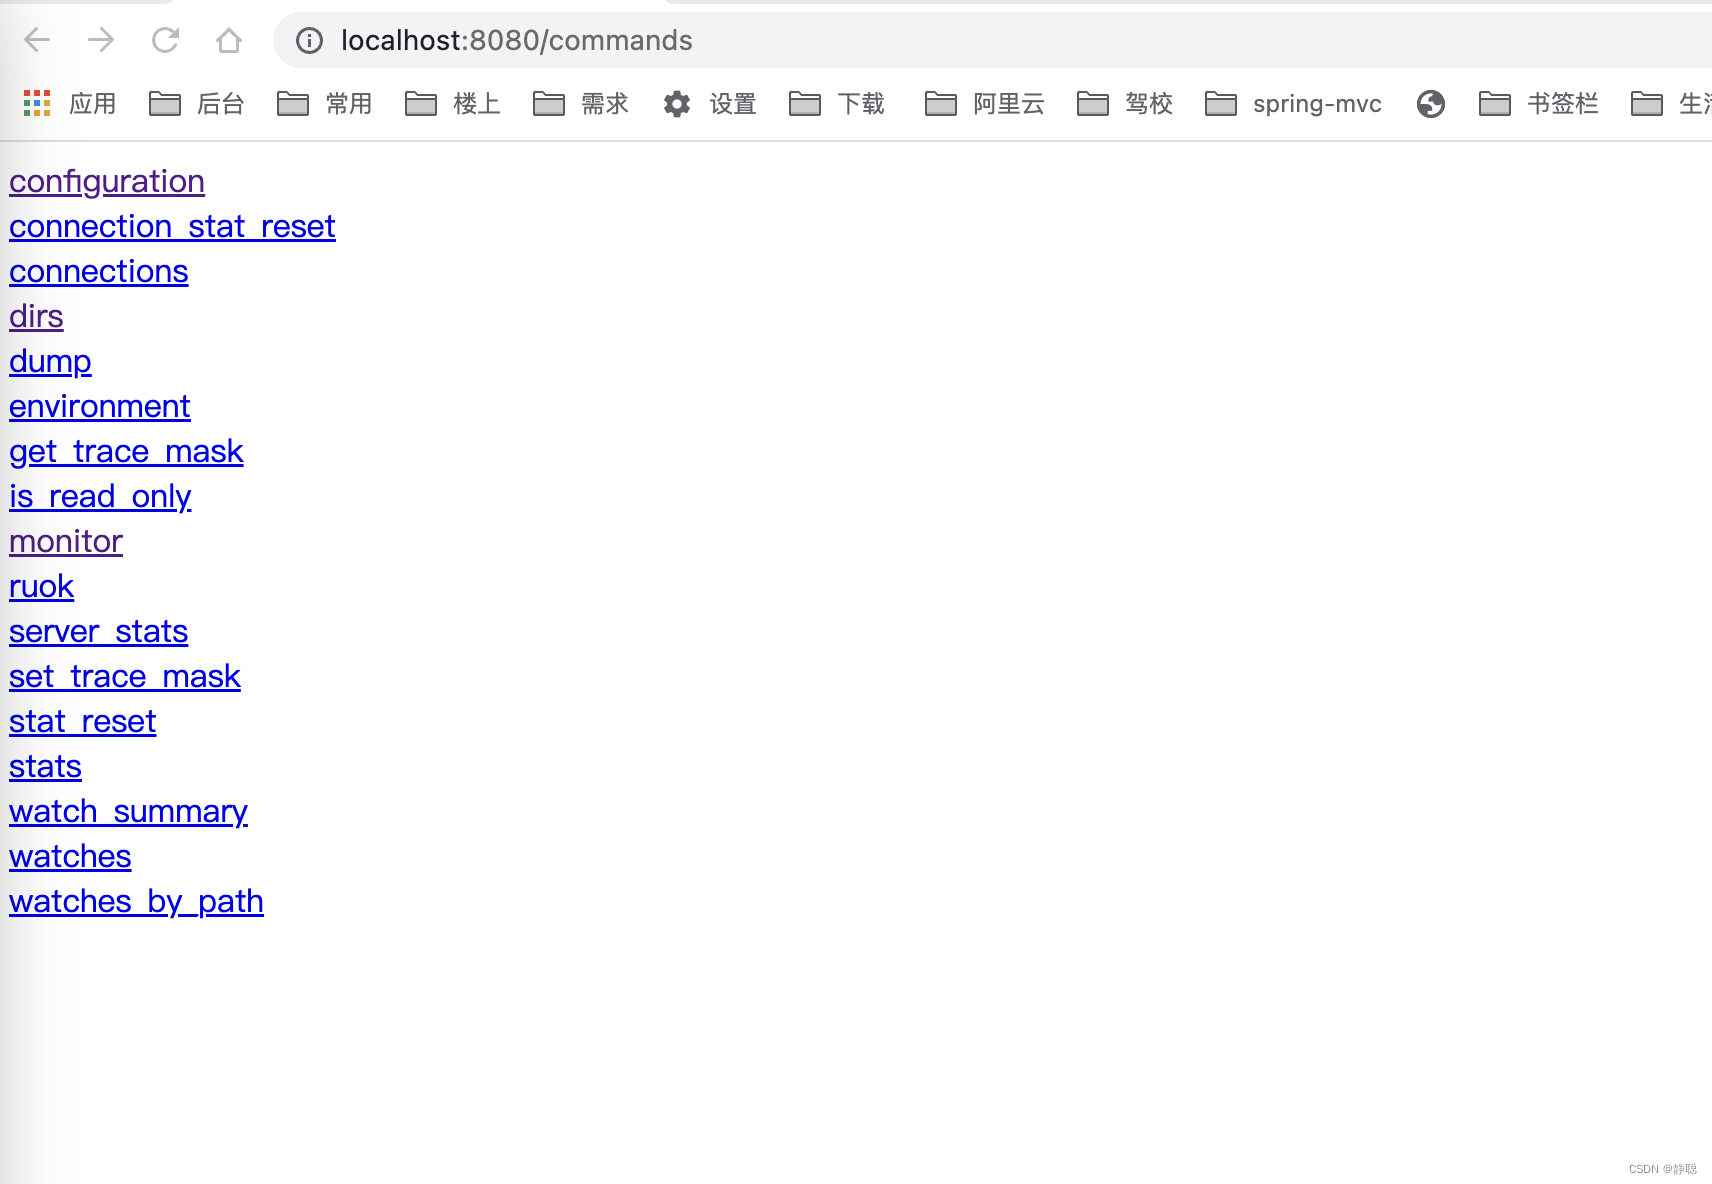
对于AdminServer的源码我们就分析到这里,有兴趣可以自行点开一个一个命令去看里面的源码。接下来重中之重看下面代码块。
if (config.getClientPortAddress() != null) {
    // 4. 创建ServerCnxnFactory
    cnxnFactory = ServerCnxnFactory.createFactory();
    // 5. Zookeeper首先会初始化一个Thread ,作为整个ServerCnxnFactory的主线程然后再初始化NIO服务器。
    cnxnFactory.configure(config.getClientPortAddress(), config.getMaxClientCnxns(), false);
    // 6. 启动ServerCnxnFactory
    // 启动步骤5中已经初始化的主线程ServerCnxnFactory的主逻辑run()方法 ,需要注意的一点是,虽然这里Zookeeper的NIO
    // 服务器已经对外开放端口,客户端能够访问到Zookeeper的客户端服务端2181 , 但此时Zookeeper服务器是无法正常处理客户端请求的。
    // 恢复本地数据库 。
    cnxnFactory.startup(zkServer);
    // zkServer has been started. So we don't need to start it again in secureCnxnFactory.
    needStartZKServer = false;
}
首先看createFactory()方法 。
static public ServerCnxnFactory createFactory() throws IOException {
    String serverCnxnFactoryName = System.getProperty("zookeeper.serverCnxnFactory");
    if (serverCnxnFactoryName == null) {
        serverCnxnFactoryName = NIOServerCnxnFactory.class.getName();
    }
    try {
        ServerCnxnFactory serverCnxnFactory = (ServerCnxnFactory) Class.forName(serverCnxnFactoryName)
                .getDeclaredConstructor().newInstance();
        LOG.info("Using {} as server connection factory", serverCnxnFactoryName);
        return serverCnxnFactory;
    } catch (Exception e) {
        IOException ioe = new IOException("Couldn't instantiate "
                + serverCnxnFactoryName);
        ioe.initCause(e);
        throw ioe;
    }
}
如果我们没有指定zookeeper.serverCnxnFactory,则默认使用NIOServerCnxnFactory作为ServerCnxnFactory,高版本可能会使用NettyServerCnxnFactory作为默认的ServerCnxnFactory,但当前研究的zookeeper版本是3.5.8 ,因此还是以NIOServerCnxnFactory作为默认的ServerCnxnFactory。 然后通过反射调用NIOServerCnxnFactory的构造方法,初始化NIOServerCnxnFactory,接下来看NIOServerCnxnFactory的构造方法中做了哪些事情 。 突然发现NIOServerCnxnFactory的构造方法是一个空实现,什么事情都没有做,而将初始化工作交给了configure()方法,接下来看configure()方法的具体实现。
public void configure(InetSocketAddress addr, int maxcc, boolean secure) throws IOException {
    if (secure) {
        throw new UnsupportedOperationException("SSL isn't supported in NIOServerCnxn");
    }
    configureSaslLogin();

    maxClientCnxns = maxcc;
    sessionlessCnxnTimeout = Integer.getInteger("zookeeper.nio.sessionlessCnxnTimeout", 10000);
    // We also use the sessionlessCnxnTimeout as expiring interval for
    // cnxnExpiryQueue. These don't need to be the same, but the expiring
    // interval passed into the ExpiryQueue() constructor below should be
    // less than or equal to the timeout.
    cnxnExpiryQueue = new ExpiryQueue<NIOServerCnxn>(sessionlessCnxnTimeout);
    expirerThread = new ConnectionExpirerThread();

    int numCores = Runtime.getRuntime().availableProcessors();
    // 32 cores sweet spot seems to be 4 selector threads
    numSelectorThreads = Integer.getInteger("zookeeper.nio.numSelectorThreads", Math.max((int) Math.sqrt((float) numCores / 2), 1));
    if (numSelectorThreads < 1) {
        throw new IOException("numSelectorThreads must be at least 1");
    }

    numWorkerThreads = Integer.getInteger("zookeeper.nio.numSelectorThreads", 2 * numCores);
    workerShutdownTimeoutMS = Long.getLong("zookeeper.nio.shutdownTimeout", 5000);

    LOG.info("Configuring NIO connection handler with "
            + (sessionlessCnxnTimeout / 1000) + "s sessionless connection"
            + " timeout, " + numSelectorThreads + " selector thread(s), "
            + (numWorkerThreads > 0 ? numWorkerThreads : "no")
            + " worker threads, and "
            + (directBufferBytes == 0 ? "gathered writes." :
            ("" + (directBufferBytes / 1024) + " kB direct buffers.")));
    for (int i = 0; i < numSelectorThreads; ++i) {
        selectorThreads.add(new SelectorThread(i));
    }
    // 初始化NIO服务器socket,绑定2181端口,可以接收客户端请求
    this.ss = ServerSocketChannel.open();
    ss.socket().setReuseAddress(true);
    LOG.info("binding to port " + addr);
    // 绑定2181端口
    ss.socket().bind(addr);
    ss.configureBlocking(false);
    acceptThread = new AcceptThread(ss, addr, selectorThreads);
}
这一块代码和Netty很像,首先初始化selectorThreads个线程来接收客户端连接,然后再由numWorkerThreads 创建的工作线程来处理具体的请求, 而selectorThreads 线程只做接收请求处理,最终ServerSocketChannel和selector的绑定又在AcceptThread构造函数中实现。
private class AcceptThread extends AbstractSelectThread {
    private final ServerSocketChannel acceptSocket;
    private final SelectionKey acceptKey;
    private final RateLogger acceptErrorLogger = new RateLogger(LOG);
    private final Collection<SelectorThread> selectorThreads;
    private Iterator<SelectorThread> selectorIterator;
    private volatile boolean reconfiguring = false;

    public AcceptThread(ServerSocketChannel ss, InetSocketAddress addr,
                        Set<SelectorThread> selectorThreads) throws IOException {
        super("NIOServerCxnFactory.AcceptThread:" + addr);
        this.acceptSocket = ss;
        this.acceptKey =
                acceptSocket.register(selector, SelectionKey.OP_ACCEPT);
        this.selectorThreads = Collections.unmodifiableList(
                new ArrayList<SelectorThread>(selectorThreads));
        selectorIterator = this.selectorThreads.iterator();
    }

    public void run() {
        try {
            while (!stopped && !acceptSocket.socket().isClosed()) {
                try {
                    select();
                } catch (RuntimeException e) {
                    LOG.warn("Ignoring unexpected runtime exception", e);
                } catch (Exception e) {
                    LOG.warn("Ignoring unexpected exception", e);
                }
            }
        } finally {
            closeSelector();
            // This will wake up the selector threads, and tell the
            // worker thread pool to begin shutdown.
            if (!reconfiguring) {
                NIOServerCnxnFactory.this.stop();
            }
            LOG.info("accept thread exitted run method");
        }
    }
}
大家可能对Nio这一块的代码逻辑已经忘记了,可以回顾一下之前研究Netty源码时举的例子,请看下面例子。
public class NioSelectorServer {

    public static void main(String[] args) throws IOException {
        // 创建NIO ServerSocketChannel
        ServerSocketChannel serverSocket = ServerSocketChannel.open();
        serverSocket.socket().bind(new InetSocketAddress(9000));
        // 设置ServerSocketChannel为非阻塞
        serverSocket.configureBlocking(false);
        // 打开Selector处理Channel,即创建epoll
        Selector selector = Selector.open();
        // 把ServerSocketChannel注册到selector上,并且selector对客户端accept连接操作感兴趣
        SelectionKey selectionKey = serverSocket.register(selector, SelectionKey.OP_ACCEPT);
        System.out.println("服务启动成功");

        while (true) {
            // 阻塞等待需要处理的事件发生
            selector.select();

            // 获取selector中注册的全部事件的 SelectionKey 实例
            Set<SelectionKey> selectionKeys = selector.selectedKeys();
            Iterator<SelectionKey> iterator = selectionKeys.iterator();
            // 遍历SelectionKey对事件进行处理
            while (iterator.hasNext()) {
                SelectionKey key = iterator.next();
                // 如果是OP_ACCEPT事件,则进行连接获取和事件注册
                if (key.isAcceptable()) {
                    ServerSocketChannel server = (ServerSocketChannel) key.channel();
                    SocketChannel socketChannel = server.accept();
                    socketChannel.configureBlocking(false);
                    // 这里只注册了读事件,如果需要给客户端发送数据可以注册写事件
                    SelectionKey selKey = socketChannel.register(selector, SelectionKey.OP_READ);
                    System.out.println("客户端连接成功");
                } else if (key.isReadable()) {  // 如果是OP_READ事件,则进行读取和打印
                    SocketChannel socketChannel = (SocketChannel) key.channel();
                    ByteBuffer byteBuffer = ByteBuffer.allocateDirect(128);
                    int len = socketChannel.read(byteBuffer);
                    // 如果有数据,把数据打印出来
                    if (len > 0) {
                        System.out.println("接收到消息:" + new String(byteBuffer.array()));
                    } else if (len == -1) { // 如果客户端断开连接,关闭Socket
                        System.out.println("客户端断开连接");
                        socketChannel.close();
                    }
                }
                //从事件集合里删除本次处理的key,防止下次select重复处理
                iterator.remove();
            }
        }
    }
}
接下来看NIOServerCnxnFactory的startup()方法 。
public void startup(ZooKeeperServer zks, boolean startServer)
        throws IOException, InterruptedException {
    start();
    setZooKeeperServer(zks);
    if (startServer) {
        // 7. 恢复本地数据库
        // 每次在Zookeeper启动的时候,都需要从本地数据库快照数据文件和事务日志文件中进行数据恢复,Zookeeper的本地数据恢复比较复杂
        zks.startdata();
        // 8. 创建并启动会话管理器
        // 在Zookeeper启动阶段,会创建一个会话管理器SessionTracker,关于SessionTracker ,它主要负责Zookeeper服务端
        // 会话管理,创建SessionTracker的时候,会初始化expirationInterval, nextExpirationTime和sessionWathTimeout(用于保存每个会话的超时时间)
        // 同时还会计算出一个初始化的sessionID
        zks.startup();
    }
}
首先会调用start()方法,看start()方法做了哪些事情 。
public void start() {
    stopped = false;
    if (workerPool == null) {
    	// 初始化工作线程池
        workerPool = new WorkerService(
                "NIOWorker", numWorkerThreads, false);
    }
    // 调用所有SelectorThread的start方法,启动它,在run()方法中,会select()住,等待客户端链接
    for (SelectorThread thread : selectorThreads) {
        if (thread.getState() == Thread.State.NEW) {
        	// 最终会调用 SelectorThread的run()方法
            thread.start();
        }
    }

    // ensure thread is started once and only once
    if (acceptThread.getState() == Thread.State.NEW) {
        acceptThread.start();
    }
    if (expirerThread.getState() == Thread.State.NEW) {
        expirerThread.start();
    }
}
接下来再看setZooKeeperServer()方法 。
final public void setZooKeeperServer(ZooKeeperServer zks) {
    this.zkServer = zks;
    if (zks != null) {
        if (secure) {
            zks.setSecureServerCnxnFactory(this);
        } else {
        	// 设置ZooKeeperServer的serverCnxnFactory为ServerCnxnFactory
            zks.setServerCnxnFactory(this);
        }
    }
}
接下来看恢复本地数据库的startdata()方法,而这个方法里面需要从本地数据库快照数据文件和事务日志文件中进行数据恢复,那什么是日志文件,什么是数据快照文件呢?先来看日志文件 ,在分析日志文件之前先来看个例子。
public class ZooKeeper_5_GetChildren_API_Sync_Usage implements Watcher {
    private static CountDownLatch connectedSemaphore = new CountDownLatch(1);
    private static ZooKeeper zk = null;

    public static void main(String[] args) throws Exception {
        String path = "/zk-book4";
        ZooKeeper zk = new ZooKeeper(ConfigCenter.CONNECT_STR, 5000,
                new ZooKeeper_5_GetChildren_API_Sync_Usage());

        connectedSemaphore.await();

        zk.create(path, "".getBytes(), ZooDefs.Ids.OPEN_ACL_UNSAFE, CreateMode.PERSISTENT);

        zk.create(path + "/c11", "".getBytes(), ZooDefs.Ids.OPEN_ACL_UNSAFE, CreateMode.EPHEMERAL);

        ListString> childrenList = zk.getChildren(path, true);
        System.out.println(childrenList);

        zk.create(path + "c22", "".getBytes(), ZooDefs.Ids.OPEN_ACL_UNSAFE, CreateMode.EPHEMERAL);

        Thread.sleep(Integer.MAX_VALUE);
    }

    @Override
    public void process(WatchedEvent event) {
        try {
            System.out.println("=======================" + event.getState());
            if(Event.KeeperState.SyncConnected == event.getState()){
                if(Event.EventType.None == event.getType() && null == event.getPath()){
                    connectedSemaphore.countDown();
                }else if (event.getType()== Event.EventType.NodeChildrenChanged){
                    System.out.println("ReGet Child : "+ zk.getChildren(event.getPath() , true ));
                }
            }
        } catch (KeeperException e) {
            throw new RuntimeException(e);
        } catch (InterruptedException e) {
            throw new RuntimeException(e);
        }
    }
}
在上面这个程序中,我们首先创建了一个父节点公hbook,以及一个子节点/book/cl。然后调用getChildren的同步接又来获取/zk-book节点下的所有子节点,同时在接又调用的时候注册了一个Watcher。
之后,我们继续向/zk-book节点创建子节点/zk-book4/c2。由于之前我们对/2h-book节点注册了一个Watcher,因此
一旦此时有子节点被创建,Zookeeper服务端就会向客户端发出一个“子节点变更”的事件通知,于是,客户端在收到这个事件通知之后就可以再次调用getChildren方法来获取新的子节点列表。
另外,从输出结果中我们还可以发现,调用getChildren获取到的节点列表,都是数据节点的相对节点路径,例如上面输出结果中的cl和c2,事实上,完整的ZNode路径应该是/zk-book4/c1和/zk-book4/c2。
关于Watcher,这里简单提一点,Zookeeper服务端在向客户端发送Watcher "NodeChildrenChanged”事件通知的时候,仅仅只会发出一个通知,而不会把节点的变化情况发送给客户端,
需要客户端自己重新获取。另外,由于Watcher通知是一次性的,即一旦触发一次通知后,该Watcher就失效了,因此客户端需要反复注册Watcher,这个例子的意图如此,当执行完之后,因为我指定的dataDir目录为dataDir=/tmp/zookeeper,这个目录是Zookeeper中默认用于存储事务日志文件的,其实在Zookeeper中可以为事务日志单独分配一个文件目录:dataLogDir 。如果指定dataDir为/tmp/zookeeper,那么Zookeeper在运行过程中会在该目录下建立一个名字为version-2 的子目录,关于这个子目录,我们下面的日志格式部分会再次讲解,这里只是简单的提一下,该目录确定了当前Zookeeper使用事务日志格式的版本号,也就是说,等下次某个Zookeeper版本对事务日志格式进行变更时,这个目录会有所变更 。 运行上述例子后会在/tmp/zookeeper/version-2下生成下面的文件 。 
发现没有,日志文件默认大小非常整齐的就是64M 。关于这个事务日志文件名的后缀,这里需要再补充一点的是,该后缀其实是一个事务ID , ZXID ,并且是写入该事务日志文件第一条事务记录的ZXID , 使用ZXID 作为文件后缀,可以帮助我们快速的定位某一个事务操作的所有事务日志。当然,如果是集群下的Zookeeper,高32位代表当前Leader周期(epoch) ,低32位则是真正的操作序号,因此将Zookeeper的Leader周期,例如上述4个事务日志,前两个文件的epoch是44 (十六进制2c对应十进制44 ), 而后面的两个文件的epoch则是45 。
那么使用二进制编辑器打开上述日志文件,日志文件的内容是什么呢? 请看下图 。
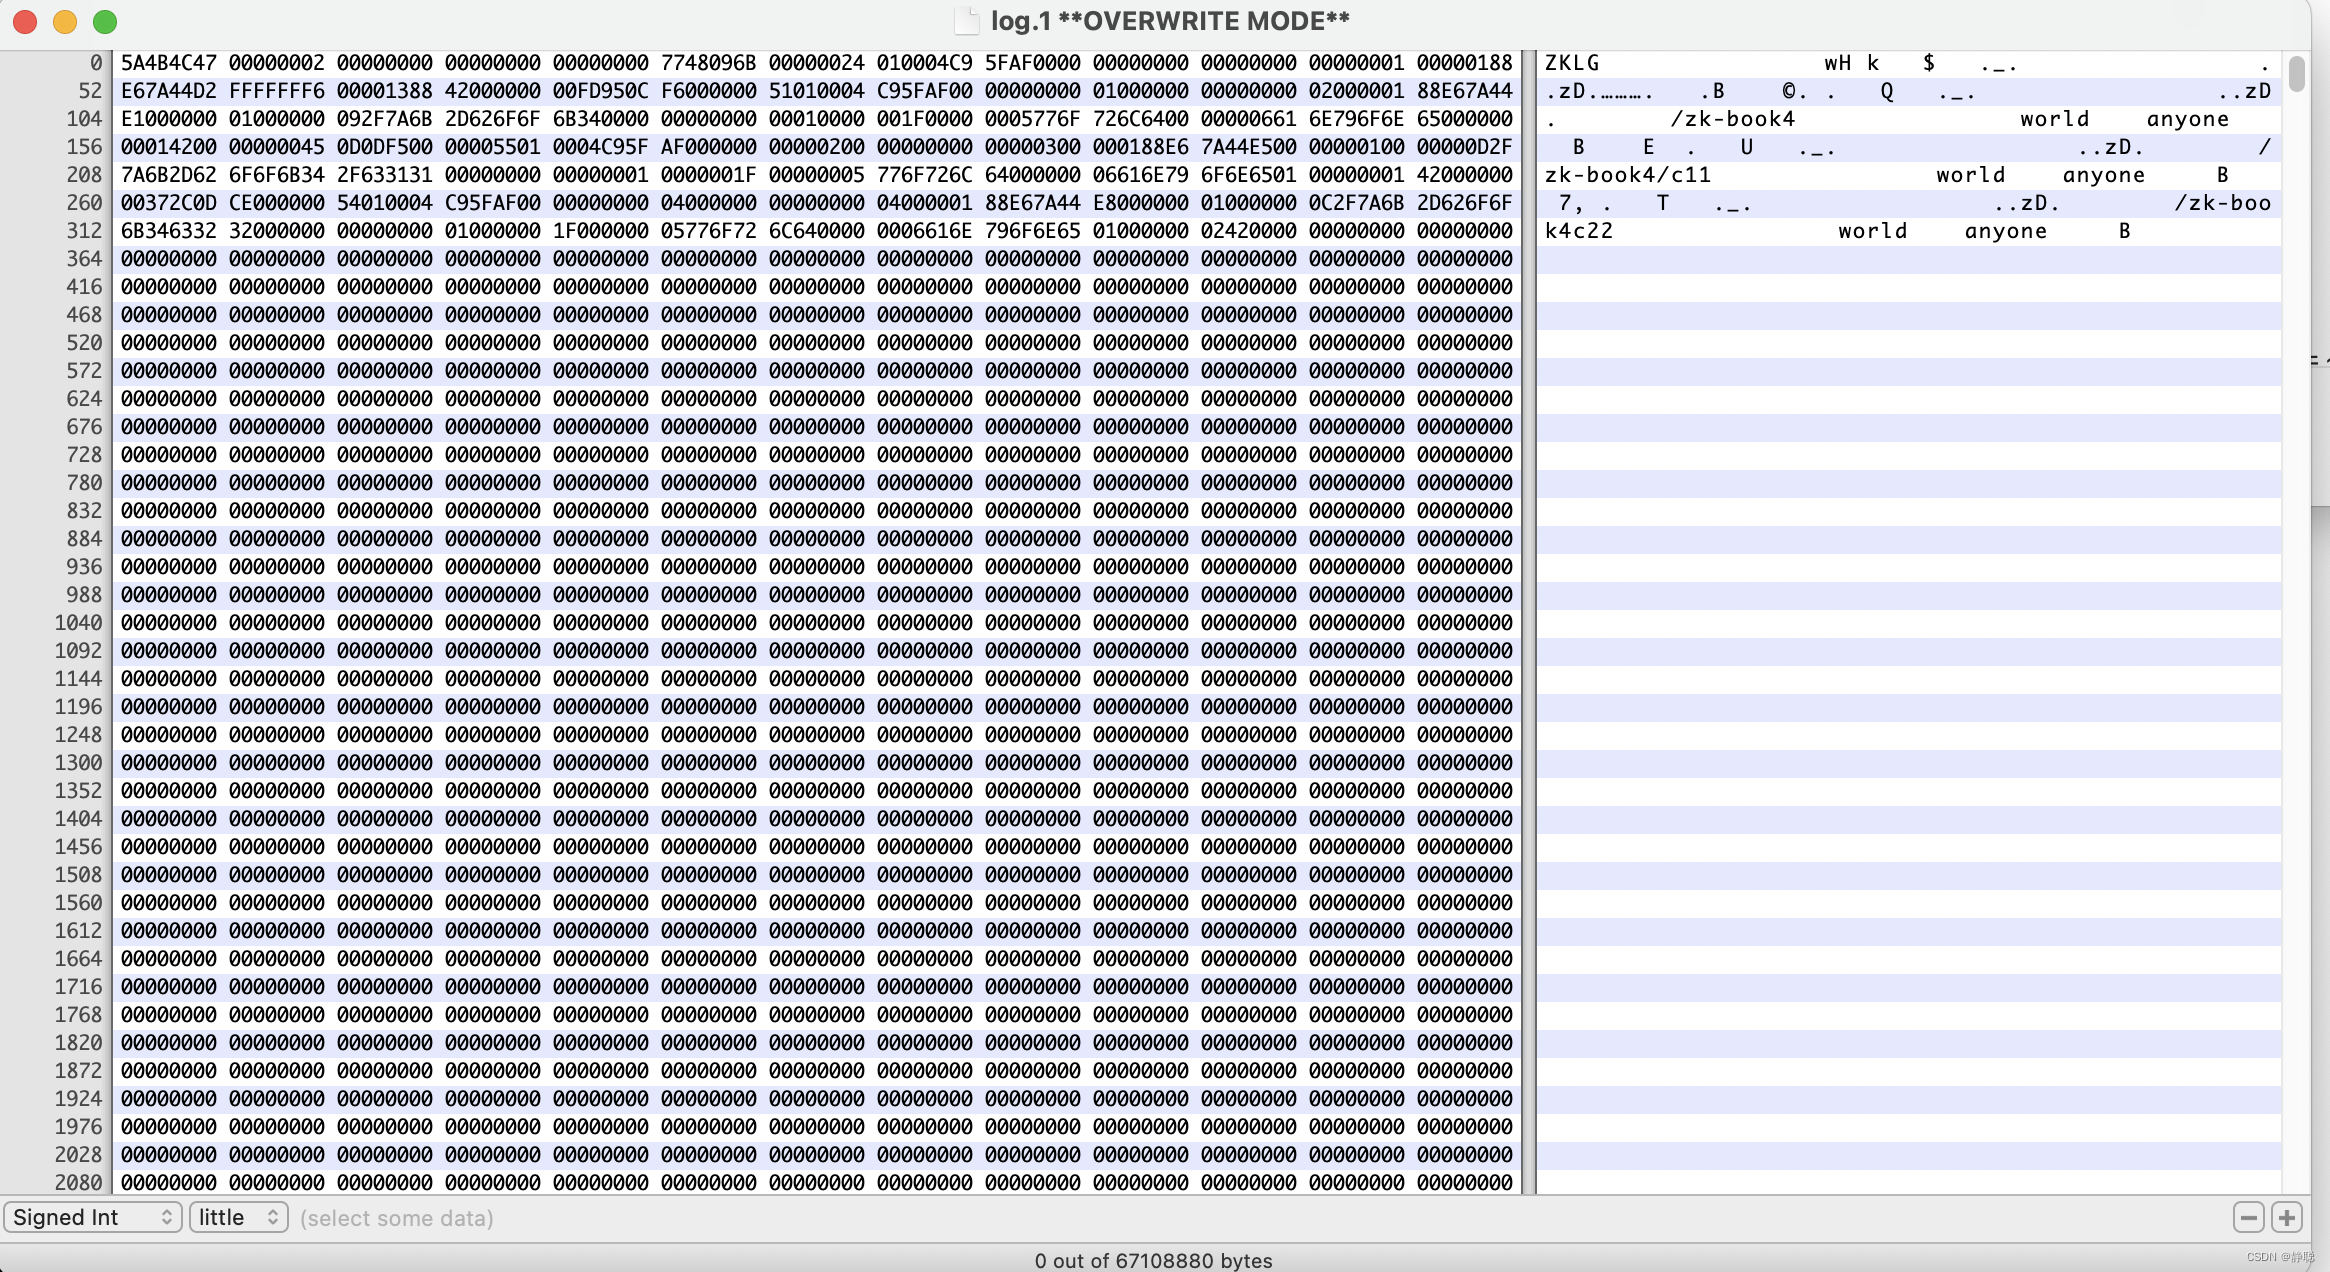
对于这个事务日志,我们无法直接通过肉眼识别出其究竟包含了哪些事务操作,但可以 发现的 一点是,该事务日志中除前面有一些有效的文件内容外,文件后面的绝大部分都 被“0” (10)填充。这个空字符填充和Zookeeper中事务日志在磁盘上的空间预分配有 关,在“日志写人” 部分会重点讲解Zookeeper 事务日志文件的磁盘空间顶分配策路。
在图中我们已经大体上看到了Zookeeper事务日志的模样。显然,在图中,除了一些节点路径我们可以隐约地分辨出来之外,就基本上无法看明白其他内容信息了。那么我们不禁要问,是否有一种方式,可以把这些事务日志转换成正常日志文件,以便让开发与运维人员能够清楚地看明白zookeeper的事务操作呢?答案是肯定的。
ZooKeeper提供了一套简易的事务日志格式化工具org.apache.zookeeper.Server.LogFormatter,用于将这个默认的事务日志文件转换成可视化的事务操作日志,使用方法如下:
java LogFormatter log.1
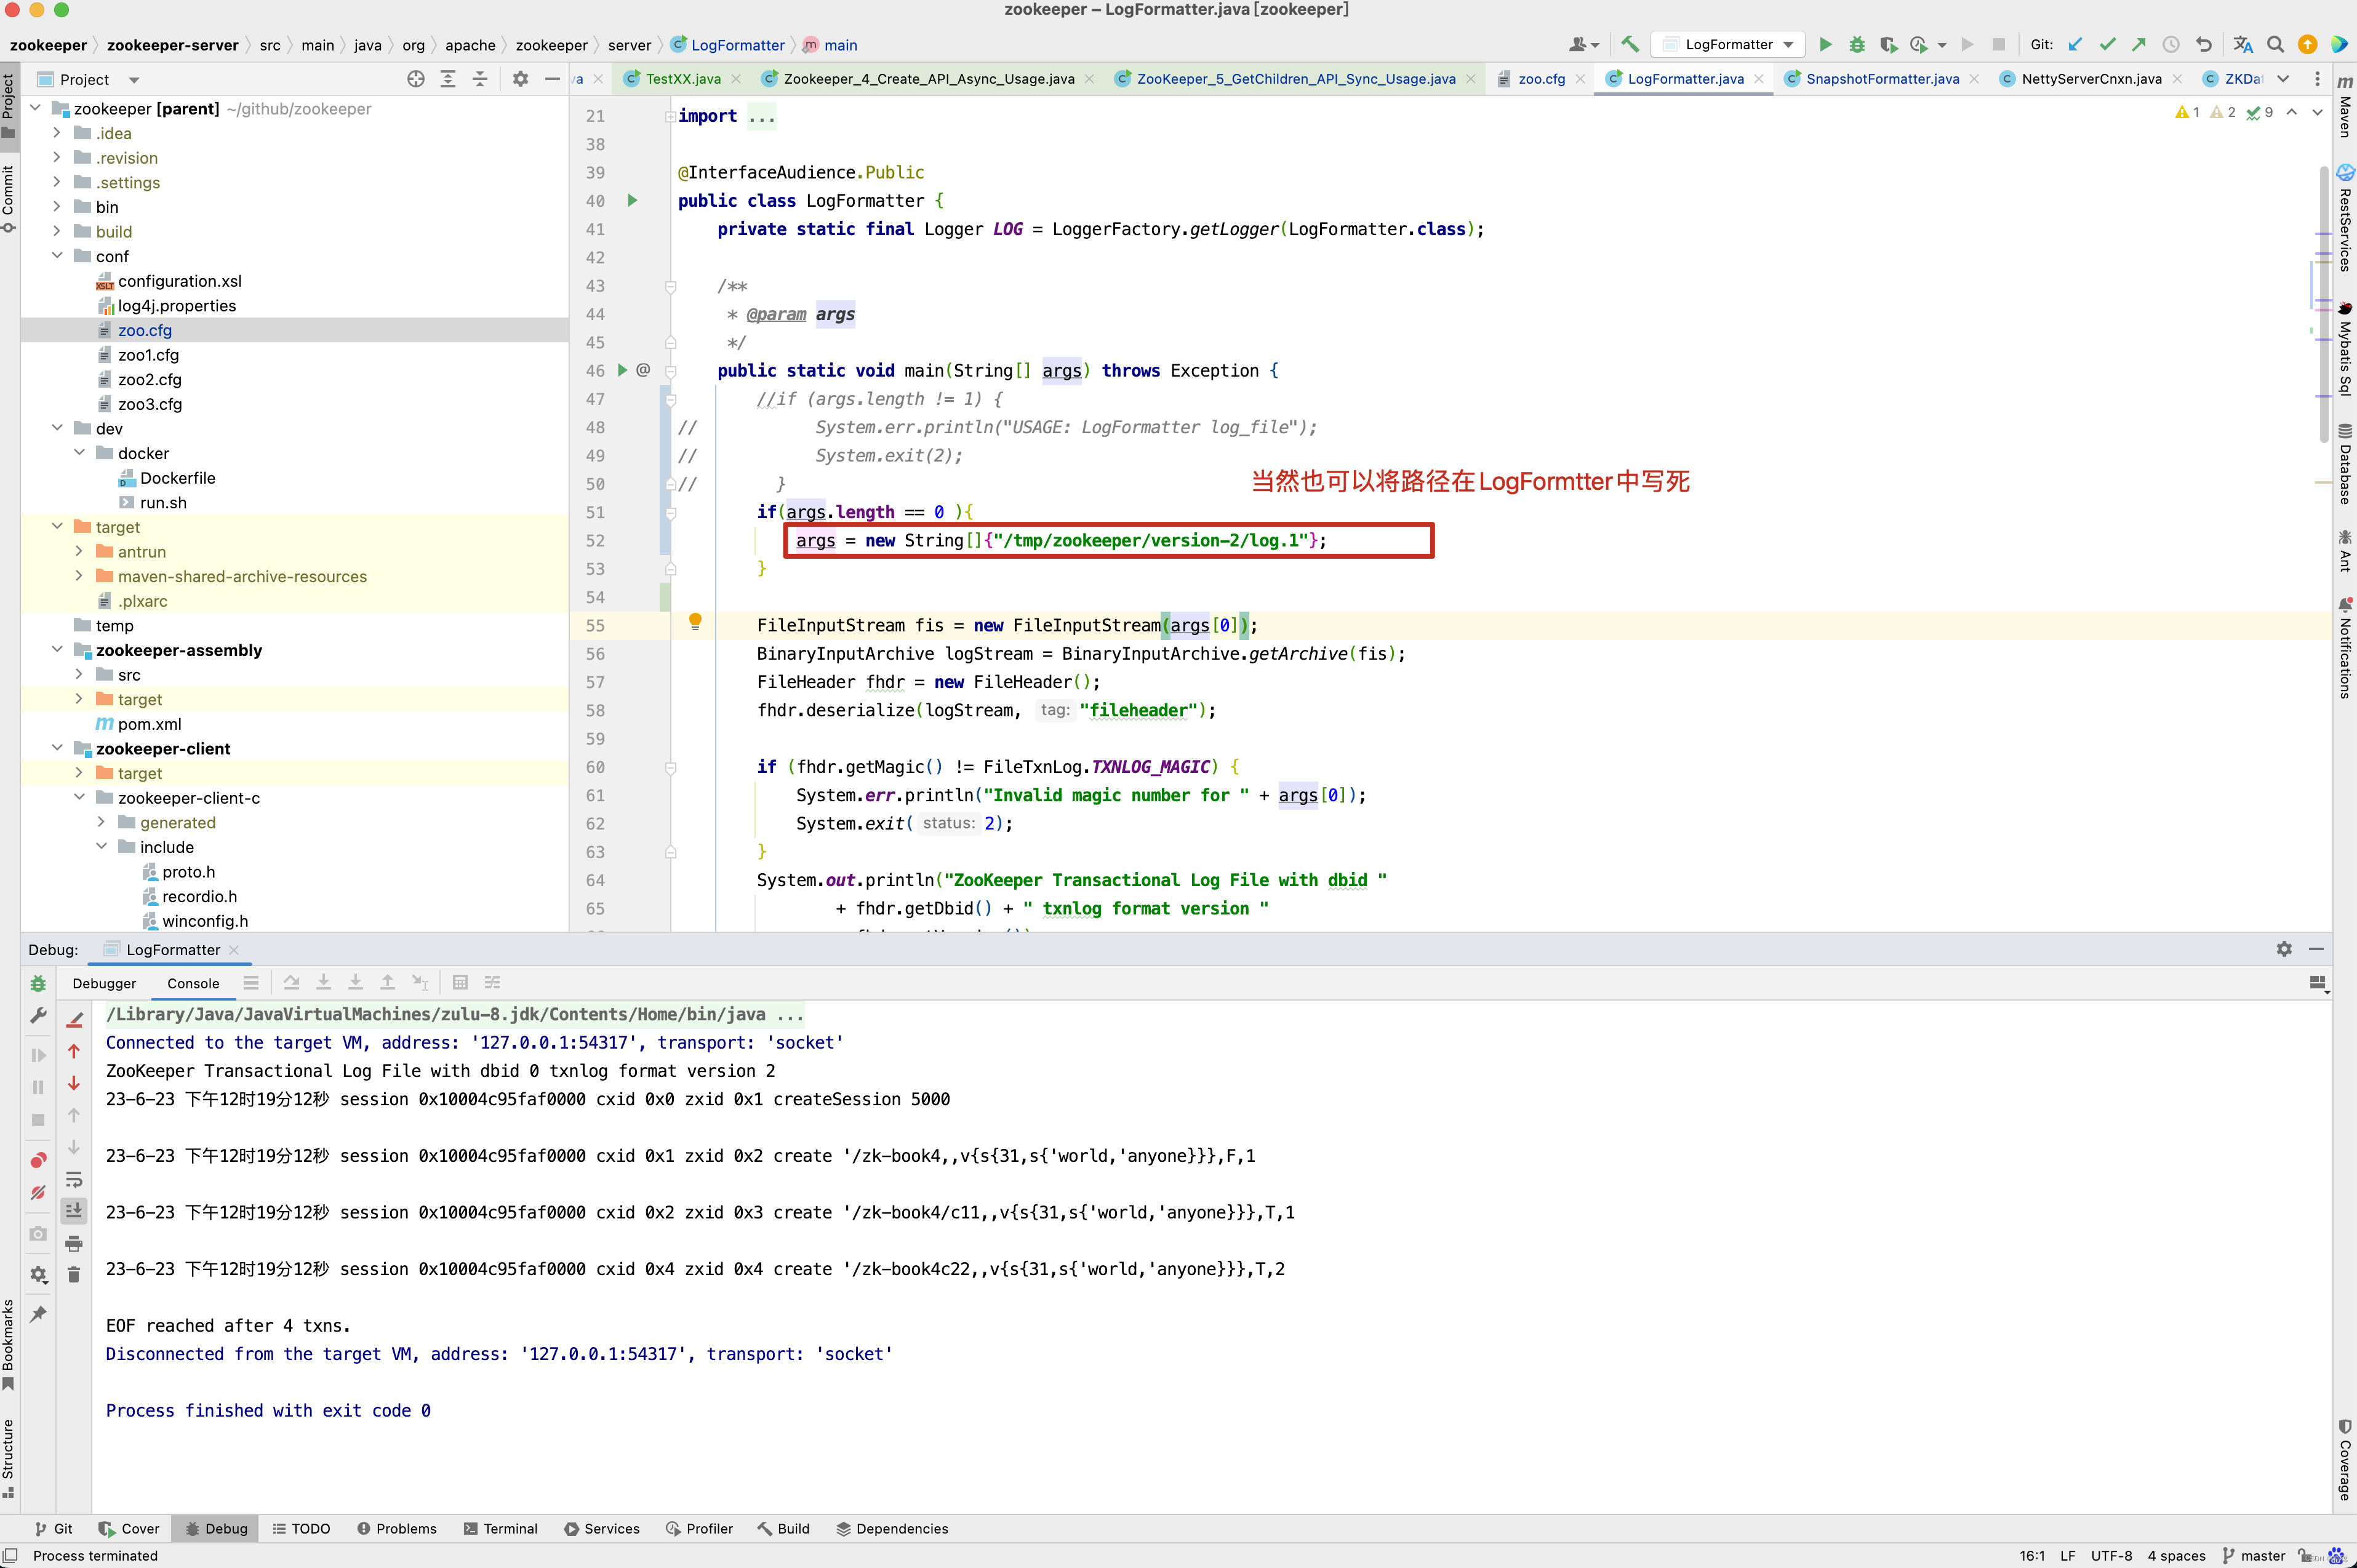
从上图中,可以发现,所有的事务操作都被可视化显示出来,并且每一行都对应一次事务操作,我们可以列举几行事务操作日志来分析下面的这个文件 。
-
第一行
ZooKeeper Transactional Log File with dbid 0 txnlog format version 2
这一行是事务日志的文件头信息,这里输出的主要是事务日志的DBID和日志格式版本号。 -
第二行
23-6-23 下午12时19分12秒 session 0x10004c95faf0000 cxid 0x1 zxid 0x2 create '/zk-book4,v{s{31,s{'world,'anyone}}},F,1
这一行就是一次客户端会话创建的事务操作日志,其中我们不难看出,从左向右分别记录了事务操作时间,客户端会话ID,CXID (客户端操作序列号) , ZXID ,操作类型和会话超时时间 。 -
第三行
23-6-23 下午12时19分12秒 session 0x10004c95faf0000 cxid 0x2 zxid 0x3 create '/zk-book4/c11,v{s{31,s{'world,'anyone}}},T,1
这一行是节点创建操作和事务操作日志,从左向右分别记录了事务操作时间,客户端会话的ID , CXID , ZXID ,操作类型,节点路径,节点数据内容(# 7631 ) 从上下文中我们提到该节点创建时的初始化值是v, 在LogFormatter 中使用了如下的格式输出节点内容, #+ 内容的ASCII的值,节点的ACL 信息, 是否是临时节点 (F 代表持久节点,T 代表临时 节点) ,和父节点的子节点版本号。
其他的几行事务日志的内容和以上两个示例说明了基本上类似,这里就不再赘述,读者对照Zookeeper源码(类 org.apache.zookeeper.server.LogFormatter) 自行分析,通过可视化这个文件,我们还注意到了一点,由于这是一个记录事务操作的日志文件,因此这里面没有任何读操作的日志记录。
日志写入, FileTxnLog 负责维护日志对外的接口,包括事务日志的写入和读取等, 首先来看日志的写入,将事务日志写入事务日志的工作主要由append方法来负责 。
- public synchronized boolean append(TxnHeader hdr, Record txn)
关于事务日志如何写入,我们在后面的源码再来分析,先只是简单的看一个例子。
@Test
public void testPreAllocSizeSmallerThanTxnData() throws IOException {
    File logDir = new File("/tmp/zookeeper/version-2");
    FileTxnLog fileTxnLog = new FileTxnLog(logDir);

    // Create dummy txn larger than preAllocSize
    // Since the file padding inserts a 0, we will fill the data with 0xff to ensure we corrupt the data if we put the 0 in the data
    //byte[] data = new byte[2 * preAllocSize];
    //Arrays.fill(data, (byte) 0xff);
    byte[] data = new String("abcd").getBytes("utf-8");
    // Append and commit 2 transactions to the log
    // Prior to ZOOKEEPER-2249, attempting to pad in association with the second transaction will corrupt the first
    fileTxnLog.append(new TxnHeader(1, 1, 1, 1, ZooDefs.OpCode.create),
            new CreateTxn("/testPreAllocSizeSmallerThanTxnData1", data, ZooDefs.Ids.OPEN_ACL_UNSAFE, false, 0));
    fileTxnLog.commit();
    fileTxnLog.append(new TxnHeader(1, 1, 2, 2, ZooDefs.OpCode.create),
            new CreateTxn("/testPreAllocSizeSmallerThanTxnData2", new byte[]{}, ZooDefs.Ids.OPEN_ACL_UNSAFE, false, 0));
    fileTxnLog.commit();
    fileTxnLog.close();

    // Read the log back from disk, this will throw a java.io.IOException: CRC check failed prior to ZOOKEEPER-2249
    FileTxnLog.FileTxnIterator fileTxnIterator = new FileTxnLog.FileTxnIterator(logDir, 0);

    // Verify the data in the first transaction
    CreateTxn createTxn = (CreateTxn) fileTxnIterator.getTxn();
    Assert.assertTrue(Arrays.equals(createTxn.getData(), data));

    // Verify the data in the second transaction
    fileTxnIterator.next();
    createTxn = (CreateTxn) fileTxnIterator.getTxn();
    Assert.assertTrue(Arrays.equals(createTxn.getData(), new byte[]{}));
}
最终日志文件中记录的内容为

关于在源码中日志如何生成的,在后续的源码分析中再来详尽分析,再来看看snapshot-数据快照 文件结构 。
数据快照是Zookeeper数据存储中另一个非常核心的运行机制,顾名思义, 数据快照用来记录Zookeeper服务器上某一时刻全量内存数据内容,并将其写入到指定的磁盘文件中去。
和事务日志类似,Zookeeper的快照数据也是使用特定的磁盘目录进行存储的,读者可以通过dataDir属性进行配置。
假如我们确定dataDir为/tmp/zookeeper/version-2的目录,该目录确定了当前Zookeeper使用快照数据格式版本号,运行一段时间后, 我们可以在/tmp/zookeeper/version-2 目录下会生成一个类似下面的文件 。

如果是集群状态下,如果在集群模式下, 和事务日志文件的命名规则一致, 快照数据文件也是使用ZXID的十六进制表示来作为文件后缀,该后缀标识了本次数据快照的开始时刻和服务器的最新ZXID , 这个十六进制的文件后缀非常重要,在数据恢复阶段,ZooKeeper 会根据该ZXID 来确定数据恢复的起始点。
和事务日志文件不同的是, ZooKeeper的快照数据文件没有采用“预分配”机制,因此不会像事务日志文件那样内容中可能包含大量的"0" ,每个快照数据文件中的所有内容都是有效的,因此该文件的大小在一定程度上能够反映当前Zookeeper内存中倒是数据的大小。
现在我们来看快照数据文件的内容, 日志格式 ,部分讲解的一样, 也部署了一个全新的ZooKeeper服务器, 并进行了一系列的简单操作, 这个时候就会生成相应的快照数据文件,使用二进制编辑器将这个文件打开后 。
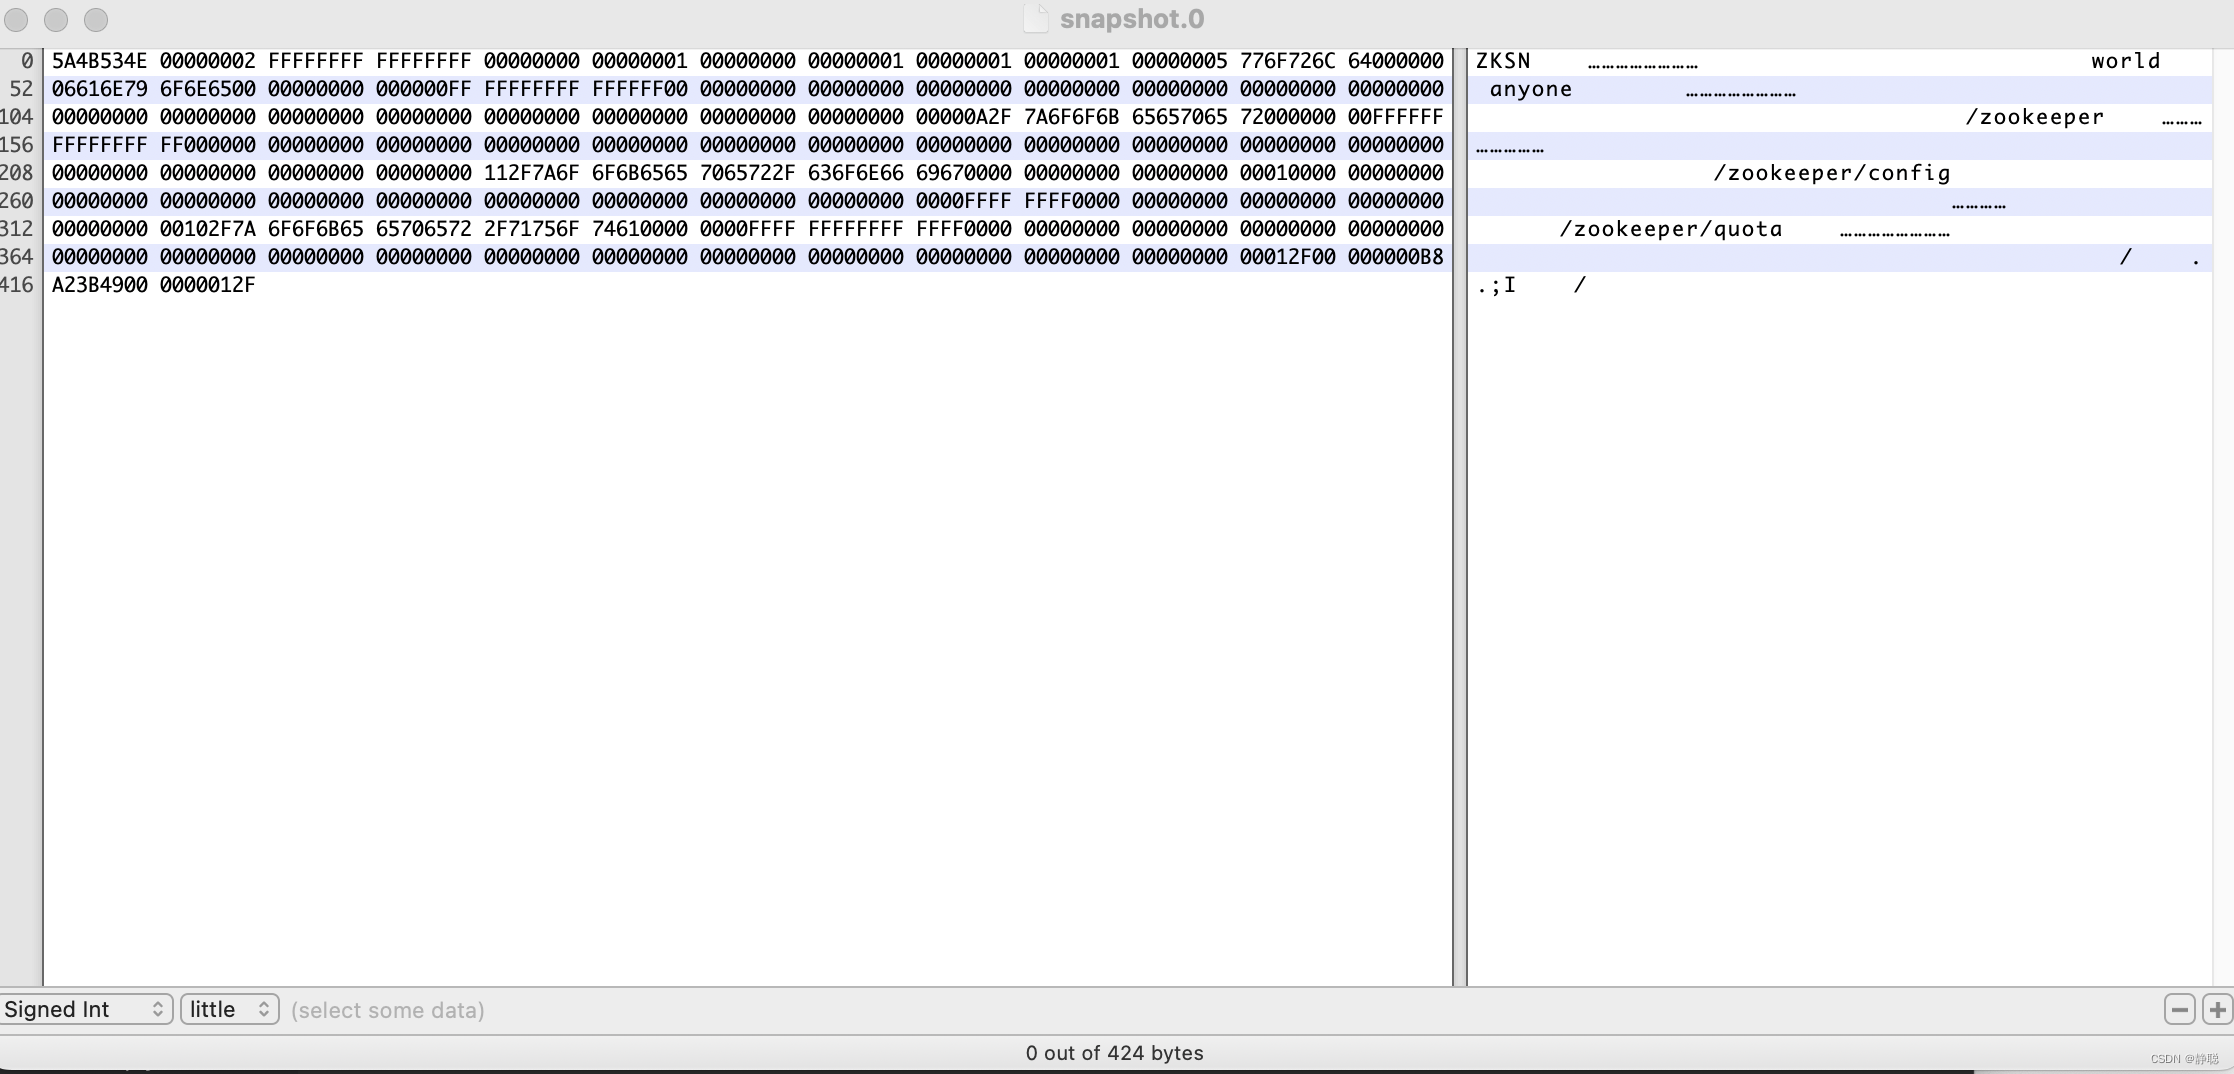
就是一个典型的数据快照文件内容,可以看出,ZooKeeper的数据快照文件同样让人无法看明白究竟文件内容是什么。所幸Zookeeper也提供了一套简易的快照数据格式化工具
- org.apache.zookeeper.server.SnapshotFormatter
用于将这个默认的快照数据文件转换成可视化的数据内容,使用方法如下:
Java SnapshotFormatter 快照数据文件
例如,我们针对执行上述系列操作之后产生的快照数据文件,执行以下代码:
- java SnapshotFormatter snapshot.300000007
执行后的输出结果如图所示。
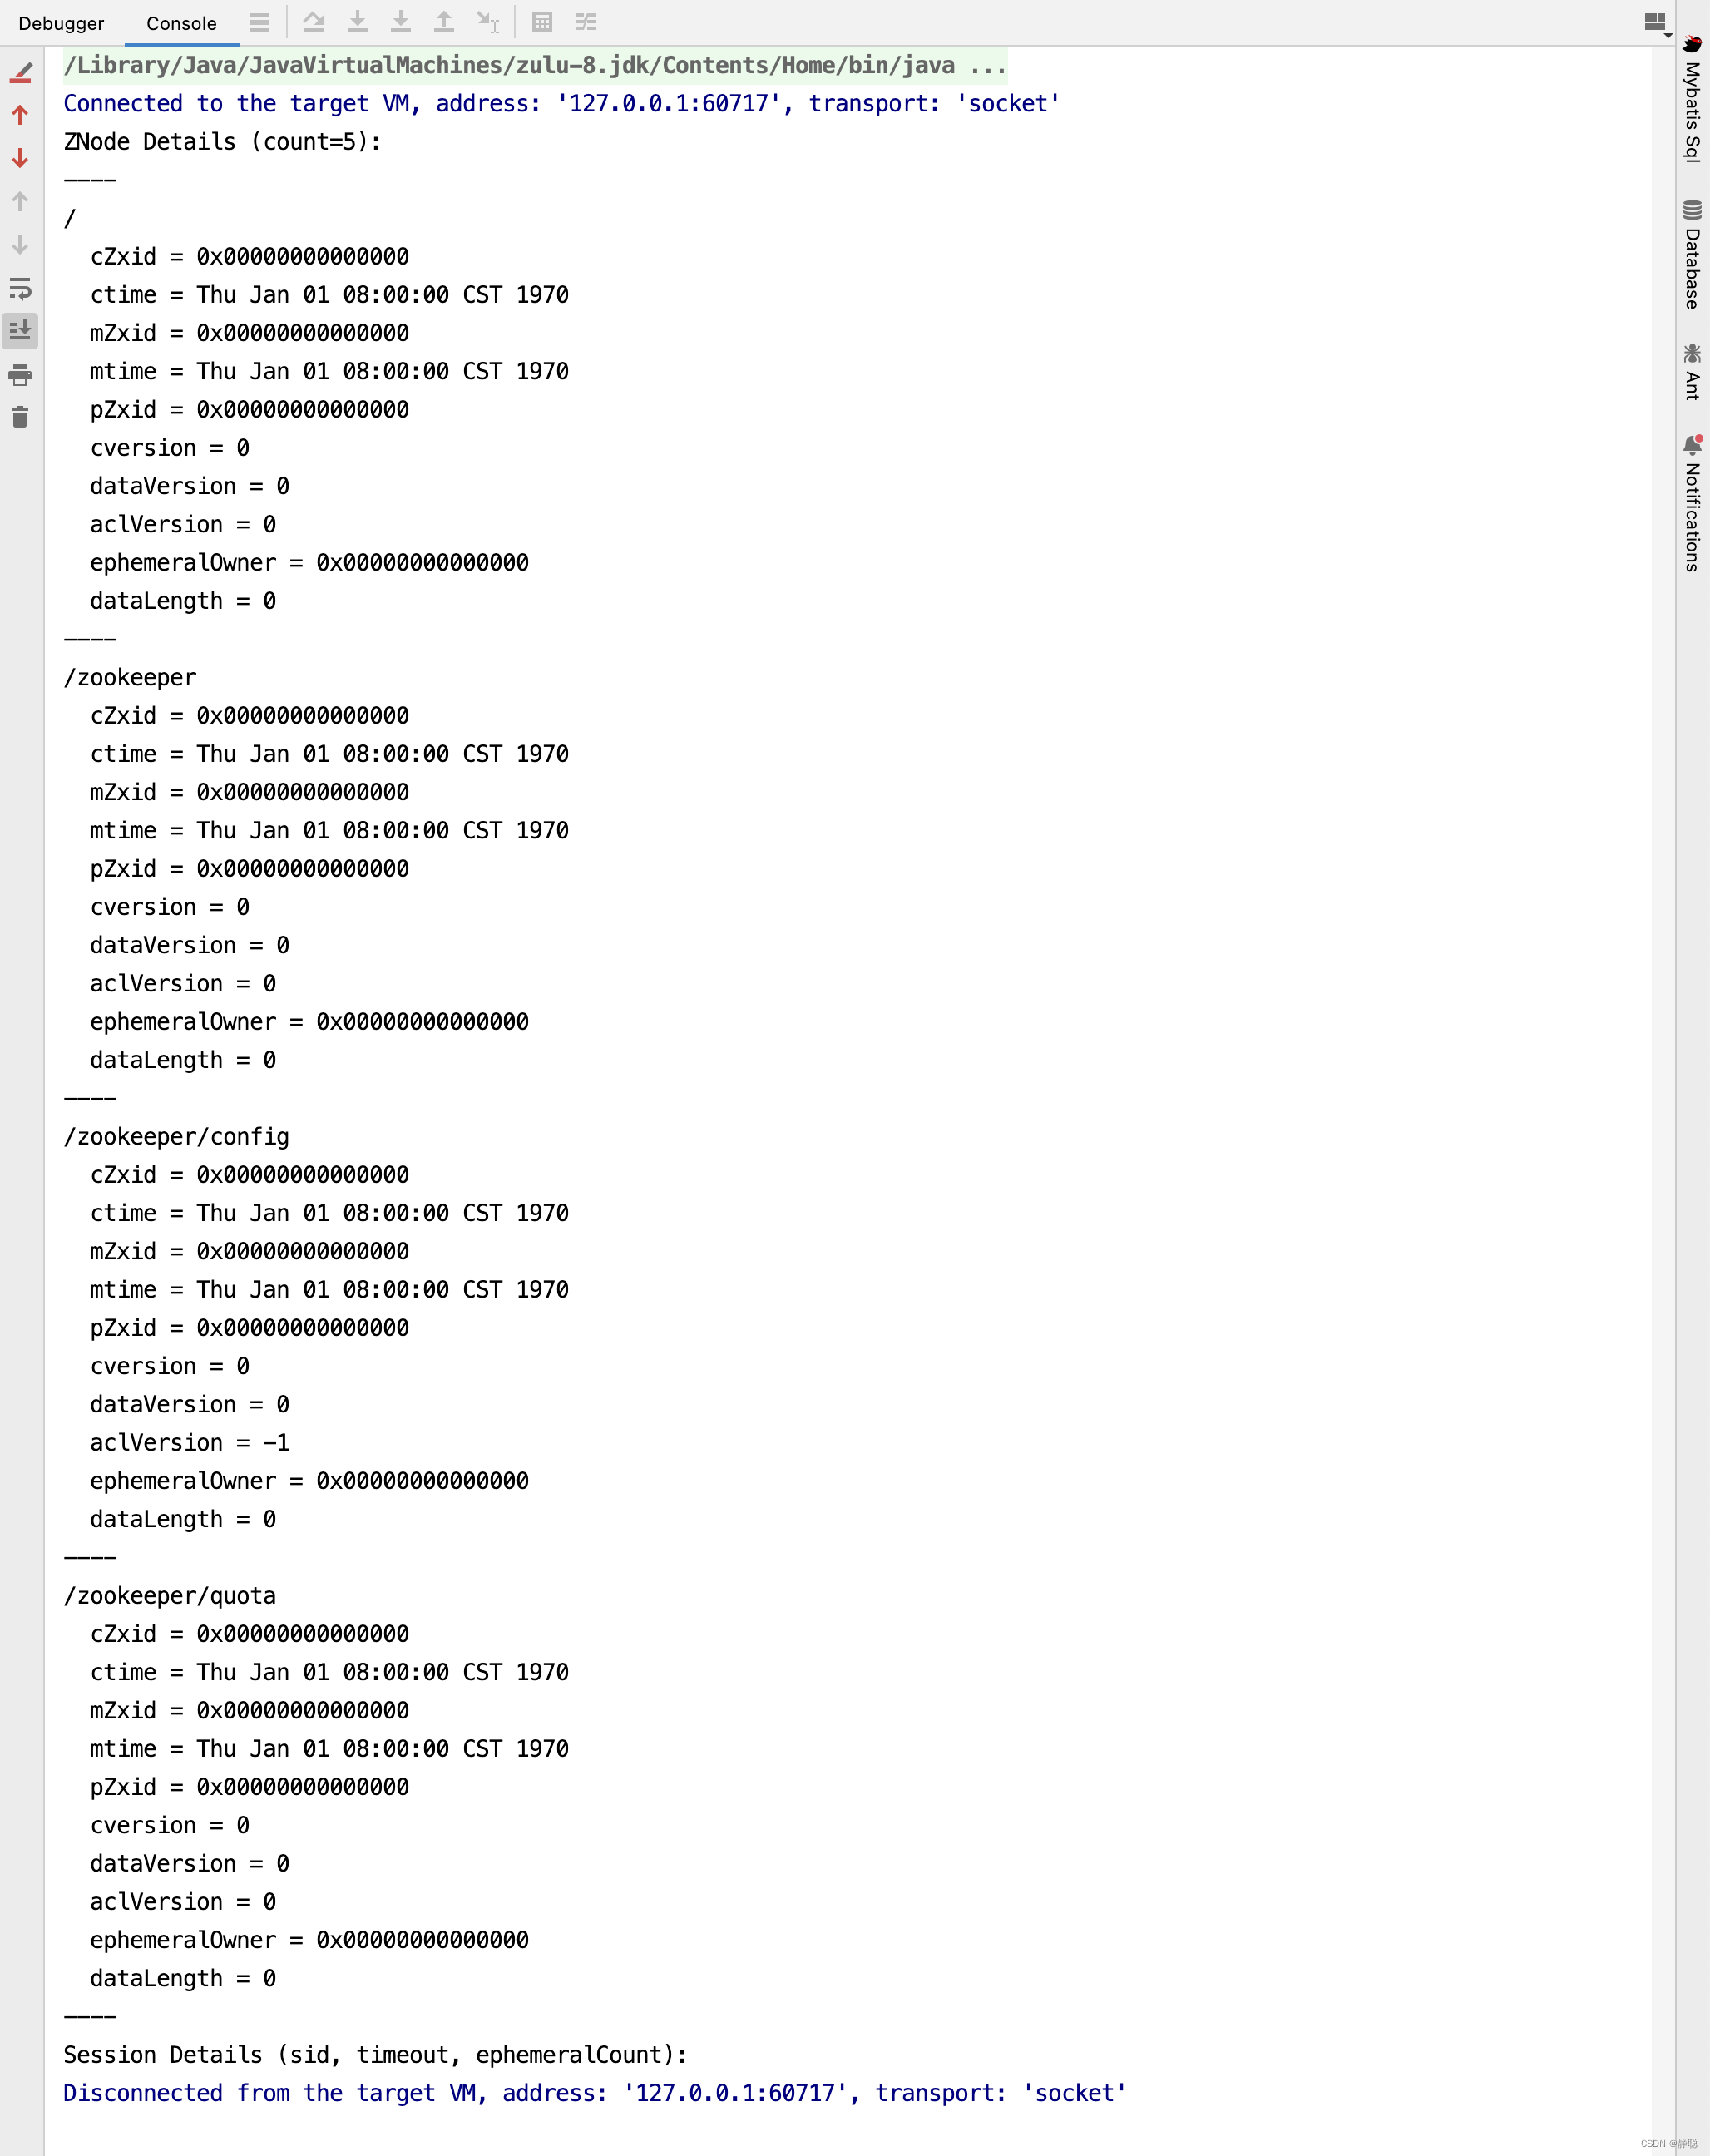
从图中我们可以看到,之前的二进制形式的文件内容已经被格式化输出了:SnapshotFormatter会将Zookeeper上的数据节点逐个依次输出,但是需要注意的一点是,这里输出的仅仅是每个数据节点的元信息,并没有输出每个节点的数据内容,但这已经对运维非常有帮助了。
关于快照的生成逻辑,我也也在后面的源码分析过程中再来具体分析,接下来具体分析Zookeeper启动,数据恢复的过程。
public void startdata() throws IOException, InterruptedException {
    //check to see if zkDb is not null
    if (zkDb == null) {
        // 初始化ZkDatabase
        zkDb = new ZKDatabase(this.txnLogFactory);
    }
    if (!zkDb.isInitialized()) {
        loadData();
    }
}
接下来看ZKDatabase的初始化过程 。
public ZKDatabase(FileTxnSnapLog snapLog) {
    // 1. 首先会构建一个初始化DataTree,DataTree 是Zookeeper内存数据库的核心模型,简而言之就是一棵树, 保存了 Zookeeper上所有的节点信息
    // 在ZKDatabase初始化的时候,DataTree也会进行相应的初始化工作,创建一些Zookeeper的默认节点,包括 / , /zookeeper/quota三个节点的创建
    // 除了Zookeeper的数据节点,在ZKDatabase 的初始化阶段还会创建一个用于保存所有客户端会话超时时间记录器, sessionWithTimeouts我们称为会话超时时间记录器。
    dataTree = createDataTree();
    sessionsWithTimeouts = new ConcurrentHashMapLong, Integer>();
    // 2. 会将之前初始化的FileTxnSnap交给ZKDatabase ,以便于在数据库中能够对事务日志和快照数据进行访问
    this.snapLog = snapLog;
    try {
        snapshotSizeFactor = Double.parseDouble(System.getProperty("zookeeper.snapshotSizeFactor", 0.33));
        if (snapshotSizeFactor > 1) {
            snapshotSizeFactor = DEFAULT_SNAPSHOT_SIZE_FACTOR;
            LOG.warn("The configured {} is invalid, going to use " + "the default {}", SNAPSHOT_SIZE_FACTOR, DEFAULT_SNAPSHOT_SIZE_FACTOR);
        }
    } catch (NumberFormatException e) {
        LOG.error("Error parsing {}, using default value {}", SNAPSHOT_SIZE_FACTOR, DEFAULT_SNAPSHOT_SIZE_FACTOR);
        snapshotSizeFactor = DEFAULT_SNAPSHOT_SIZE_FACTOR;
    }
    LOG.info("{} = {}", SNAPSHOT_SIZE_FACTOR, snapshotSizeFactor);
}
public DataTree createDataTree() {
    return new DataTree();
}

private DataNode root = new DataNode(new byte[0], -1L, new StatPersisted());

private final DataNode procDataNode = new DataNode(new byte[0], -1L, new StatPersisted());

private final DataNode quotaDataNode = new DataNode(new byte[0], -1L, new StatPersisted());

public DataTree() {
    /* Rather than fight it, let root have an alias */
    nodes.put("", root);
    nodes.put(rootZookeeper, root);

    /** add the proc node and quota node */
    root.addChild(procChildZookeeper);
    nodes.put(procZookeeper, procDataNode);

    procDataNode.addChild(quotaChildZookeeper);
    nodes.put(quotaZookeeper, quotaDataNode);

    addConfigNode();
}
在创建DateTree过程中发现两个非常重要的数据结构,一个是DataTree ,另一个是DataNode,接下来分析一下这两个数据结构,先分析DataTree 。
Zookeeper的数据模型是一棵树, 而从使用角度上来看,ZooKeeper就像一个内存数据库一样,这个内存数据库中,存储的整棵树的内容,包括所有的节点路径,节点数据及其ACL信息,ZooKeeper会定时将这个数据存储到磁盘上,接下来我们就一起来看看这一棵树的数据结构。
DataTree 是ZooKeeper内存数据存储的核心, 是一个树的数据结构,代表了内存中的一份完整的数据结构,DataTree不包含任何网络,客户端连接以及请求处理等相关的业务逻辑, 是一个非常独立的ZooKeeper组件 。
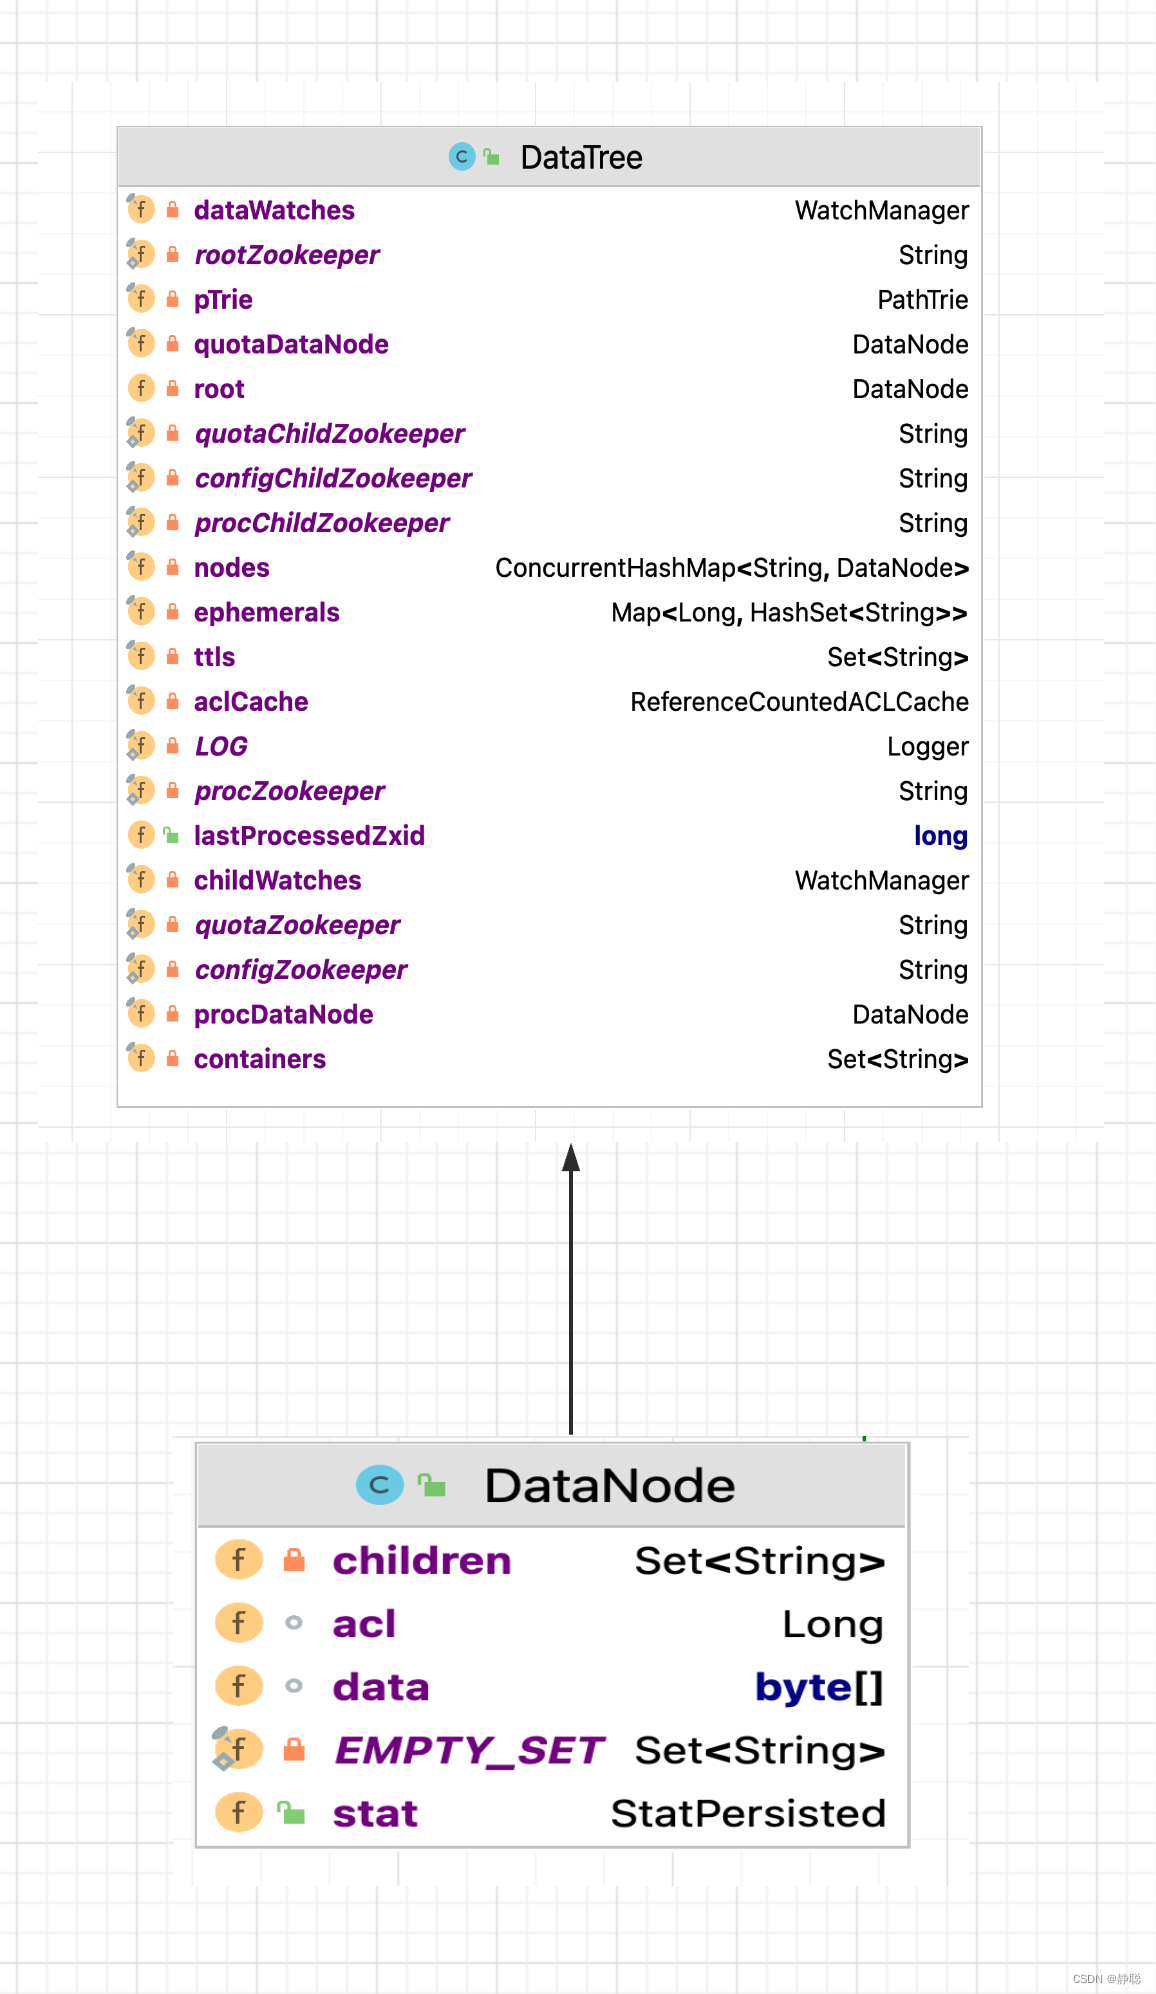
DataNode 是数据存储的最小单元, 其数据结构如上图所示,DataNode内部除了保存了节点的数据内容(data[]) ,ACL列表(acl) 和节点状态(stat)之外,正如最基本的数据结构中对树的描述一样, 还记录了父亲节点的(parent) 的引用和子节点列表(children) 两个属性, 同时DataNode 还提供了对节点列表操作的各个接口。
public synchronized boolean addChild(String child) {
    if (children == null) {
        children = new HashSetString>(8);
    }
    return children.add(child);
}

public synchronized boolean removeChild(String child) {
    if (children == null) {
        return false;
    }
    return children.remove(child);
}

public synchronized void setChildren(HashSetString> children) {
    this.children = children;
}

public synchronized SetString> getChildren() {
    if (children == null) {
        return EMPTY_SET;
    }
    return Collections.unmodifiableSet(children);
}
DataTree用于存储所有的ZooKeeper节点的路径,数据内容及其ACL信息等, 底层的数据结构其实是一个典型的ConcurrentHashMap 键值对结构 :
private final ConcurrentHashMapString, DataNode> nodes = new ConcurrentHashMapString, DataNode>();
在nodes这个Map 中,存放了ZooKeeper服务器上所有的数据节点,可以说,对于 ZooKeeper数据上的所有操作,底层都是对Map结构操作, nodes以数据节点的路径(path) 为key , value则是节点的数据内容:DataNode 。
另外对于所有的临时节点, 为了便于实时访问和及时清理,DataTree 还单独将临时节点保存起来。
private final MapLong, HashSetString>> ephemerals = new ConcurrentHashMapLong, HashSetString>>();
初始化ZkDatabase完毕,接下来看如何从快照和事务日志中恢复数据 。
public void loadData() throws IOException, InterruptedException {
	// 如果zkDb已经完成初始化,则设置Zxid为dataTree最大的lastProcessedZxid
    if (zkDb.isInitialized()) {
        setZxid(zkDb.getDataTreeLastProcessedZxid());
    } else {
        // 4. 处理快照文件
        // 完成内存数据库的初始化之后,Zookeeper就可以开始从磁盘中恢复数据了,在上下文中我们已经提到,每一个快照数据文件中都保存了Zookeeper
        // 服务器近似全量的数据,因此首先从这些快照文件中开始加载
        setZxid(zkDb.loadDataBase());
    }

    // Clean up dead sessions
    LinkedListLong> deadSessions = new LinkedListLong>();
    for (Long session : zkDb.getSessions()) {
        if (zkDb.getSessionWithTimeOuts().get(session) == null) {
            deadSessions.add(session);
        }
    }

    for (long session : deadSessions) {
        // XXX: Is lastProcessedZxid really the best thing to use?
        killSession(session, zkDb.getDataTreeLastProcessedZxid());
    }

    // Make a clean snapshot
    takeSnapshot();
}
接下来,我们来看数据的恢复操作。
public long loadDataBase() throws IOException {
    long zxid = snapLog.restore(dataTree, sessionsWithTimeouts, commitProposalPlaybackListener);
    initialized = true;
    return zxid;
}
最终调用的是restore()方法 。
public long restore(DataTree dt, MapLong, Integer> sessions, PlayBackListener listener) throws IOException {
    // 恢复快照文件到DataTree
    long deserializeResult = snapLog.deserialize(dt, sessions);

    FileTxnLog txnLog = new FileTxnLog(dataDir);

    RestoreFinalizer finalizer = () -> {
        // 恢复编辑日志数据到DataTree
        long highestZxid = fastForwardFromEdits(dt, sessions, listener);
        return highestZxid;
    };

    if (-1L == deserializeResult) {
        /* this means that we couldn't find any snapshot, so we need to
         * initialize an empty database (reported in ZOOKEEPER-2325) */
        if (txnLog.getLastLoggedZxid() != -1) {
            // ZOOKEEPER-3056: provides an escape hatch for users upgrading
            // from old versions of zookeeper (3.4.x, pre 3.5.3).
            if (!trustEmptySnapshot) {
                throw new IOException(EMPTY_SNAPSHOT_WARNING + "Something is broken!");
            } else {
                LOG.warn("{}This should only be allowed during upgrading.", EMPTY_SNAPSHOT_WARNING);
                return finalizer.run();
            }
        }
        /* TODO: (br33d) we should either put a ConcurrentHashMap on restore()
         *       or use Map on save() */
        save(dt, (ConcurrentHashMapLong, Integer>) sessions);
        /* return a zxid of zero, since we the database is empty */
        return 0;
    }

    return finalizer.run();
}
接下来看解析并恢复快照文件到数据库的方法deserialize()。
/**
 * 6.解析快照文件
 */
public long deserialize(DataTree dt, MapLong, Integer> sessions)
        throws IOException {
    // we run through 100 snapshots (not all of them)
    // if we cannot get it running within 100 snapshots
    // we should  give up
    // 5. 获取最新的100个快照文件
    // 另外由于每次数据快照过程中, Zookeeper都会将全量数据Dump到磁盘快照文件中, 因此往往更新时间最晚的那个文件包含了最新的全量数据 。
    // 那么是否我们只需要这个最新的快照文件就可以了呢? 在Zookeeper的实现中, 会获取最新的至少100个快照文件(如果磁盘上仅存在不到100个快照文件)
    // 那么就获取所有的这些快照文件,关于这里为什么会获取到至多100个文件呢? 在接下来的步骤中会讲到。
    ListFile> snapList = findNValidSnapshots(100);
    if (snapList.size() == 0) {
        return -1L;
    }
    File snap = null;
    boolean foundValid = false;
    // 6. 依次遍历每一个快照数据,每个快照文件都是内存数据序列化到磁盘的二进制文件,因此在这里需要对其进行反序列化,生成DataTree
    // 对象和sessionWithTimeouts集合, 同时在这个过程中, 还会进行文件的checkSum校验以确定快照文件的正确性
    for (int i = 0, snapListSize = snapList.size(); i  snapListSize; i++) {
        snap = snapList.get(i);
        LOG.info("Reading snapshot " + snap);
        // 反序列化环境准备
        try (InputStream snapIS = new BufferedInputStream(new FileInputStream(snap));
             CheckedInputStream crcIn = new CheckedInputStream(snapIS, new Adler32())) {
            InputArchive ia = BinaryInputArchive.getArchive(crcIn);
            // 反序列化,恢复数据到DataTree
            deserialize(dt, sessions, ia);
            long checkSum = crcIn.getChecksum().getValue();
            long val = ia.readLong("val");
            if (val != checkSum) {
                throw new IOException("CRC corruption in snapshot :  " + snap);
            }
            foundValid = true;
            // 需要注意的一点是,虽然获取到了100个快照文件,但其实这里的for 循环解析过程中, 如果正确性较验通过的话, 那么
            // 通常只会解析出最新的那个快照文件,换句话说, 只有当最新的快照文件不可用的时候,才会逐个的进行解析,直到将这100
            // 个文件全部解析完, 如果将步骤4中获取的所有快照文件都解析完还是无法成功恢复一个完整的DataTree和sesionWithTimeouts
            // 则认为无法从磁盘中加载数据,服务器启动失败。
            break;
        } catch (IOException e) {
            LOG.warn("problem reading snap file " + snap, e);
        }
    }
    if (!foundValid) {
        throw new IOException("Not able to find valid snapshots in " + snapDir);
    }
    // 7. 获取最新的ZXID
    // 完成步骤6的操作之后,就已经基于快照构造了一个完整的DataTree 实例和sessionWithTimeout集合了, 此时根据这个快照
    // 文件的文件名就可以解析出一个最新的ZXID : zxid_for_snap , 该ZXID 代表了Zookeeper开始进行数据快照的时刻
    dt.lastProcessedZxid = Util.getZxidFromName(snap.getName(), SNAPSHOT_FILE_PREFIX);
    return dt.lastProcessedZxid;
}
在deserialize()方法中,会一次性获取100个快照文件,从创建时间从后向前逐一解析,只要有一个snap文件解析成功,则不再进行解析,而真正的解析方法在deserialize()方法中,接下来进入deserialize()方法 。
public void deserialize(DataTree dt, MapLong, Integer> sessions,
                        InputArchive ia) throws IOException {
    FileHeader header = new FileHeader();
    header.deserialize(ia, "fileheader");
    if (header.getMagic() != SNAP_MAGIC) {
        throw new IOException("mismatching magic headers "
                + header.getMagic() +
                " !=  " + FileSnap.SNAP_MAGIC);
    }
    // 恢复快照数据到DataTree
    SerializeUtils.deserializeSnapshot(dt, ia, sessions);
}

public void deserialize(InputArchive a_, String tag) throws java.io.IOException {
    a_.startRecord(tag);
    magic=a_.readInt("magic"); // 文件头魔数
    version=a_.readInt("version"); // 文件头版本号
    dbid=a_.readLong("dbid"); // 文件头DBID
    a_.endRecord(tag);
}

public static void deserializeSnapshot(DataTree dt, InputArchive ia,
                                       MapLong, Integer> sessions) throws IOException {
    int count = ia.readInt("count");
    while (count > 0) {
    	// 将sessionId 和超时时间恢复到sessions中
        long id = ia.readLong("id");
        int to = ia.readInt("timeout");
        sessions.put(id, to);
        if (LOG.isTraceEnabled()) {
            ZooTrace.logTraceMessage(LOG, ZooTrace.SESSION_TRACE_MASK,
                    "loadData --- session in archive: " + id
                            + " with timeout: " + to);
        }
        count--;
    }
    // 恢复快照数据到DataTree
    dt.deserialize(ia, "tree");
}
接下来看DataTree的恢复 。
public void deserialize(InputArchive ia, String tag) throws IOException {
    aclCache.deserialize(ia);
    nodes.clear();
    pTrie.clear();
    String path = ia.readString("path");
    // 从快照中恢复每一个datanode节点数据到DataTree
    while (!"/".equals(path)) {
        // 每次循环创建一个节点对象
        DataNode node = new DataNode();
        ia.readRecord(node, "node");
        // 将DataNode 恢复到DataTree
        nodes.put(path, node);
        synchronized (node) {
            aclCache.addUsage(node.acl);
        }
        int lastSlash = path.lastIndexOf('/');
        if (lastSlash == -1) {
            root = node;
        } else {
            // 处理父节点
            String parentPath = path.substring(0, lastSlash);
            DataNode parent = nodes.get(parentPath);
            if (parent == null) {
                throw new IOException("Invalid Datatree, unable to find " +
                        "parent " + parentPath + " of path " + path);
            }
            // 处理子节点
            parent.addChild(path.substring(lastSlash + 1));
            // 处理临时节点和永久节点
            long eowner = node.stat.getEphemeralOwner();
            EphemeralType ephemeralType = EphemeralType.get(eowner);
            if (ephemeralType == EphemeralType.CONTAINER) {
                containers.add(path);
            } else if (ephemeralType == EphemeralType.TTL) {
                ttls.add(path);
            } else if (eowner != 0) {
                HashSetString> list = ephemerals.get(eowner);
                if (list == null) {
                    list = new HashSetString>();
                    ephemerals.put(eowner, list);
                }
                list.add(path);
            }
        }
        path = ia.readString("path");
    }
    nodes.put("/", root);
    // we are done with deserializing the
    // the datatree
    // update the quotas - create path trie
    // and also update the stat nodes
    setupQuota();

    aclCache.purgeUnused();
}
先看acl的恢复方法 。
public synchronized void deserialize(InputArchive ia) throws IOException {
    clear();
    int i = ia.readInt("map");
    while (i > 0) {
        Long val = ia.readLong("long");
        if (aclIndex  val) {
            aclIndex = val;
        }
        ListACL> aclList = new ArrayListACL>();
        Index j = ia.startVector("acls");
        if (j == null) {
            throw new RuntimeException("Incorrent format of InputArchive when deserialize DataTree - missing acls");
        }
        while (!j.done()) {
            ACL acl = new ACL();
            acl.deserialize(ia, "acl");
            aclList.add(acl);
            j.incr();
        }
        longKeyMap.put(val, aclList);
        aclKeyMap.put(aclList, val);
        referenceCounter.put(val, new AtomicLongWithEquals(0));
        i--;
    }
}

public void deserialize(InputArchive a_, String tag) throws java.io.IOException {
    a_.startRecord(tag);
    perms=a_.readInt("perms");
    id= new org.apache.zookeeper.data.Id();
    a_.readRecord(id,"id");
    a_.endRecord(tag);
}
对于节点恢复这一块,我相信源码看完了,大家还没有什么直观的感受,因此在这里,来举一个例子。 还是以之前的例子为例 。
public class ZooKeeper_5_GetChildren_API_Sync_Usage implements Watcher {
    private static CountDownLatch connectedSemaphore = new CountDownLatch(1);
    private static ZooKeeper zk = null;

    public static void main(String[] args) throws Exception {
        String path = "/zk-book4";
        ZooKeeper zk = new ZooKeeper(ConfigCenter.CONNECT_STR, 5000,
                new ZooKeeper_5_GetChildren_API_Sync_Usage());

        connectedSemaphore.await();

        zk.create(path, "".getBytes(), ZooDefs.Ids.OPEN_ACL_UNSAFE, CreateMode.PERSISTENT);

        zk.create(path + "/c11", "".getBytes(), ZooDefs.Ids.OPEN_ACL_UNSAFE, CreateMode.PERSISTENT);

        ListString> childrenList = zk.getChildren(path, true);
        System.out.println(childrenList);

        zk.create(path + "/c22", "".getBytes(), ZooDefs.Ids.OPEN_ACL_UNSAFE, CreateMode.PERSISTENT);

        Thread.sleep(Integer.MAX_VALUE);
    }

    @Override
    public void process(WatchedEvent event) {
        try {
            System.out.println("=======================" + event.getState());
            if(Event.KeeperState.SyncConnected == event.getState()){
                if(Event.EventType.None == event.getType() && null == event.getPath()){
                    connectedSemaphore.countDown();
                }else if (event.getType()== Event.EventType.NodeChildrenChanged){
                 //   System.out.println("ReGet Child : "+ zk.getChildren(event.getPath() , true ));
                }
            }
        } catch (Exception e) {
            e.printStackTrace();
        }
    }
}
其实这个例子很简单,就是创建了一个持久节点/zk-book4,并在其节点下创建两个c11,c22 两个子节点 ,我们需要对源码做一定的修改。

我们要做的目的就是每一次事务日志保存后都进行一次快照,这样刚刚创建的/zk-book4 节点以及其子节点c11,c12 都会存储到最后一个快照文件中,在上述ZooKeeper_5_GetChildren_API_Sync_Usage测试方法执行完成后,/tmp/zookeeper/version-2目录下的文件列表如下 。
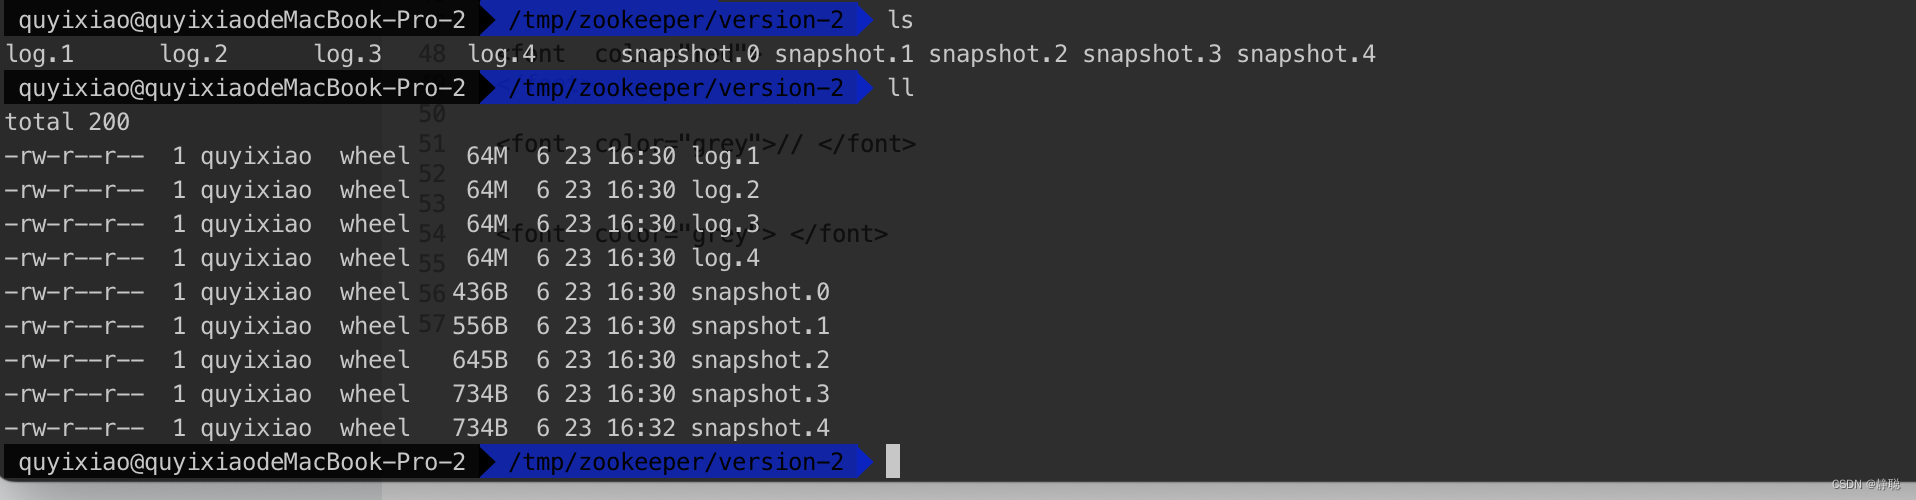
接下来用SnapshotFormatter来看最后一个快照文件snapshot.4文件的内容。
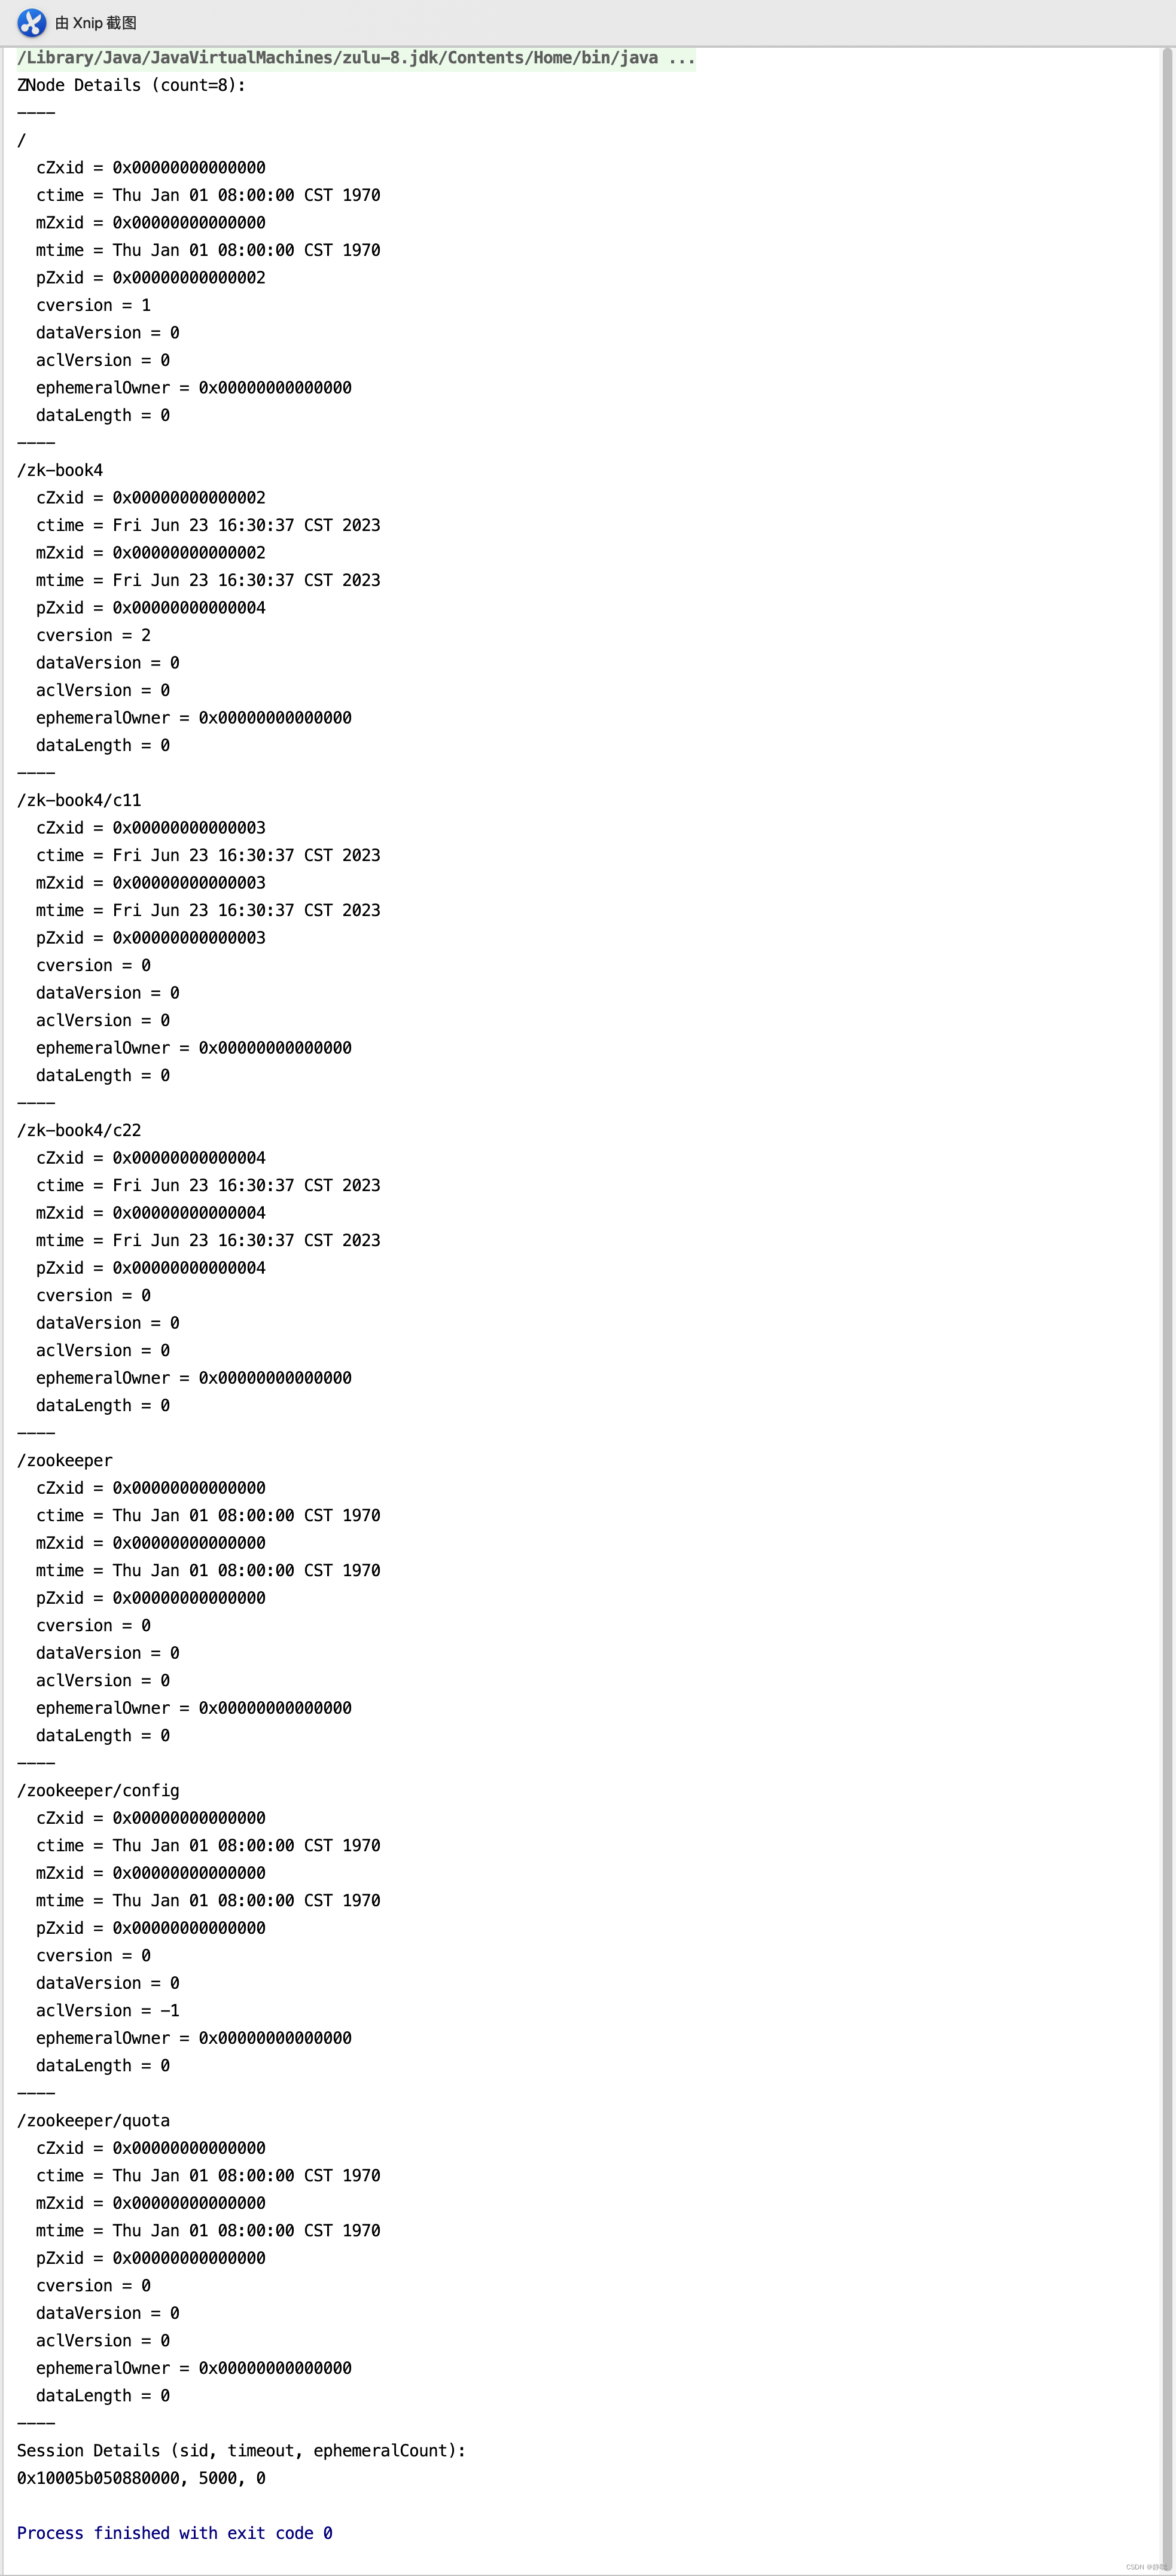
接下来关闭ZooKeeper,重新运行org.apache.zookeeper.server.quorum.QuorumPeerMain的main()方法,并在deserialize()方法内部打断点。 查看运行结果 。
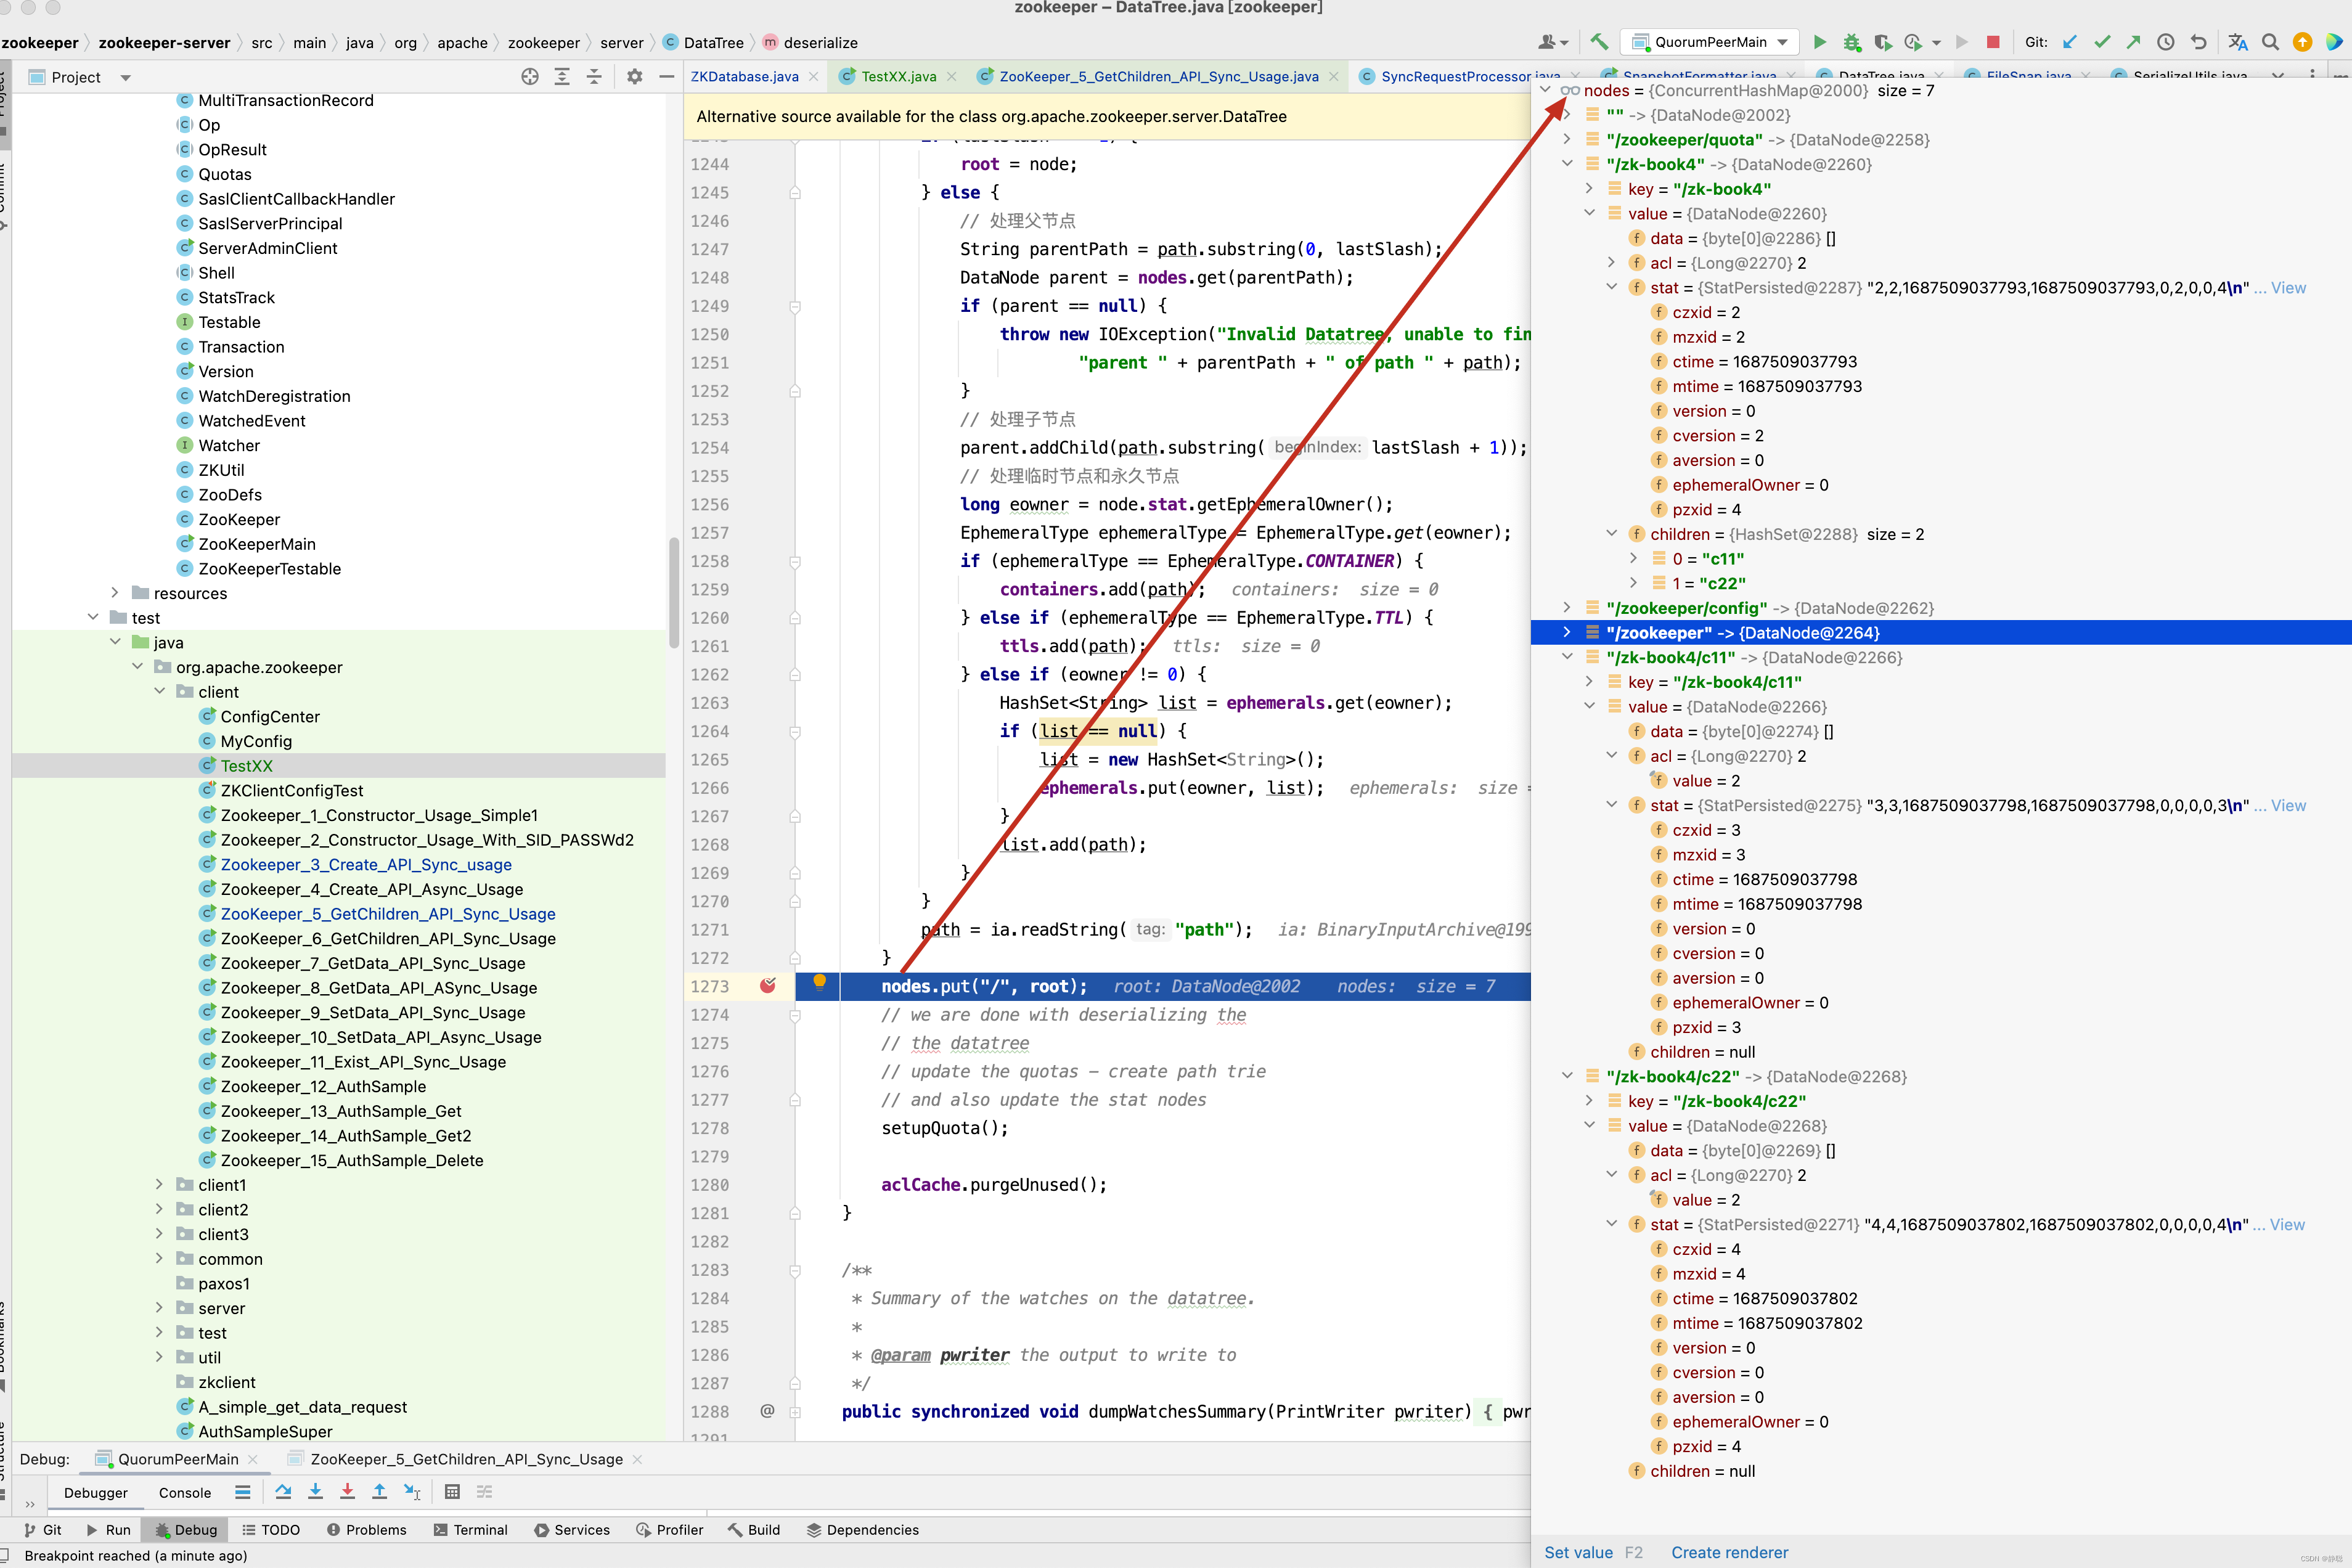
接下来,我们考虑真实情况,真实情况并不像我们上面举例一样,每一次日志产生都会创建一次快照,而是每一次进行事务日志记录之后,Zookeeper都会检测当前是否需要进行数据快照,理论上进行snapCount次事务操作后就会开始数据快照 。但是考虑到数据快照对Zookeeper所在机器的整体性能的影响,需要尽量避免Zookeeper集群中所有的机器在同一时刻进行数据快照 。因此, Zookeeper 在具体的实现中,并不是严格的按照这个策略进行的,而是采用了过半的随机策略, 即符合如下条件就进行数据快照 。
logCount > (snapCount / 2 + randRoll)
其中 logCount 代表了当前已经记录的事务日志数量,randRoll 为 1 ~ snapCount/2 之间的随机数, 因此上面的条件就相当于如果我们配置了snapCount值为默认的100000 ,那么Zookeeper 会在50000~ 100000 次事务日志记录后进行一次数据快照,因为在一定次数的事务操作后才进行快照的保存,因此快照中的数据并不是最终线上数据,还有一部分数据需要通过事务日志进行恢复,只要找到快照中的最后提交的事务日志,并从事务日志中找到大于快照中最大的事务日志记录,重新再执行一遍即可。因此fastForwardFromEdits()方法就是做这一件事情。接下来看fastForwardFromEdits()方法的实现。
public long fastForwardFromEdits(DataTree dt, MapLong, Integer> sessions,
                                 PlayBackListener listener) throws IOException {
    // 9. 获取所有的zxid_for_snap之后提交的事务
    // 到这里,我们已经获取到快照的最新的ZXID, 针对客户端的每一次事务操作,Zookeeper都会将它们记录到事务日志中,当然,Zookeeper同时
    // 也会将数据变更应用到内存数据库中,另外,在Zookeeper 会进行若干次事务日志记录之后,将内存数据库的倒是数据Dump到本地文件中。 这个过程就是数据快照。
    // 但是大家发现没有,需要进行若干次事务之后,才将内存数据库中的数据Dump到本地,证明在Dump后,会存在若干次事务日志并没有Dump,
    // 但此时Zookeeper服务器停止掉了,因此就存在数据订正的过程 ,将Dump之后的事务日志从log文件中捞出来,进行订正。

    // 在此之前,已经从快照文件中恢复了大部分数据,接下来只需要从快照zxid+1位置开始恢复
    TxnIterator itr = txnLog.read(dt.lastProcessedZxid + 1);
    // 快照中最大的zxid,在执行编辑日志时, 这个值会不断更新,直到所有的操作执行完
    long highestZxid = dt.lastProcessedZxid;
    TxnHeader hdr;
    try {
        // 从 lastProcessedZxid 事务编号开始,不断的从编辑日志中恢复剩下的还没有恢复的数据
        while (true) {
            // iterator points to
            // the first valid txn when initialized
            hdr = itr.getHeader();
            if (hdr == null) {
                //empty logs
                return dt.lastProcessedZxid;
            }
            if (hdr.getZxid()  highestZxid && highestZxid != 0) {
                LOG.error("{}(highestZxid) > {}(next log) for type {}", highestZxid, hdr.getZxid(), hdr.getType());
            } else {
                highestZxid = hdr.getZxid();
            }
            try {
                // 10. 事务应用
                // 根据编辑日志恢复数据到DataTree ,每执行一次,对应的事务id, highestZxid + 1
                // 获取到所有的ZXID 大于zxid_for_snap的事务后,将其逐个的应用到基于之前的快照数据文件恢复出来的DataTree和sessionWithTimeouts中去。
                processTransaction(hdr, dt, sessions, itr.getTxn());
            } catch (KeeperException.NoNodeException e) {
                throw new IOException("Failed to process transaction type: " +
                        hdr.getType() + " error: " + e.getMessage(), e);
            }
            // PlayBackListener 监听器主要用来接收事务应用过程中的回调,在Zookeeper数据恢复后期,会有一个事务订正的过程 , 在这个过程中
            // 会回调PlayBackListener监听器来进行对应的数据订正。
            // 10.1  在事务应用过程中, 还有一个细节需要我们注意,每当有一个事务被应用到内存数据库中去后,Zookeeper同时会调用PlayBacklistener监听器。
            // 将这个事务操作记录到转换成Proposal,并保存到ZkDatabase.committedLog中,以便Follower进行快速的同步 。
            listener.onTxnLoaded(hdr, itr.getTxn());
            if (!itr.next())
                break;
        }
    } finally {
        if (itr != null) {
            itr.close();
        }
    }
    // 11. 获取最新的ZXID
    // 待所有的事务都被完整的应用到内存数据库中去后,基本上也就完成了数据的初始化过程,此时再次获取ZXID ,用来标识上次服务器正常运行时提交的最大的事务ID
    return highestZxid;
}
接下来看处理事务日志的方法 processTransaction()。
public void processTransaction(TxnHeader hdr, DataTree dt,
                              MapLong, Integer> sessions, Record txn)
       throws KeeperException.NoNodeException {
   ProcessTxnResult rc;
   switch (hdr.getType()) {
       case OpCode.createSession:
           sessions.put(hdr.getClientId(), ((CreateSessionTxn) txn).getTimeOut());
           if (LOG.isTraceEnabled()) {
               ZooTrace.logTraceMessage(LOG, ZooTrace.SESSION_TRACE_MASK,
                       "playLog --- create session in log: 0x"
                               + Long.toHexString(hdr.getClientId())
                               + " with timeout: "
                               + ((CreateSessionTxn) txn).getTimeOut());
           }
           // give dataTree a chance to sync its lastProcessedZxid
           // 创建节点,删除节点和其他各种事务操作等
           rc = dt.processTxn(hdr, txn);
           break;
       case OpCode.closeSession:
           sessions.remove(hdr.getClientId());
           if (LOG.isTraceEnabled()) {
               ZooTrace.logTraceMessage(LOG, ZooTrace.SESSION_TRACE_MASK, "playLog --- close session in log: 0x"
                               + Long.toHexString(hdr.getClientId()));
           }
           rc = dt.processTxn(hdr, txn);
           break;
       default:
           rc = dt.processTxn(hdr, txn);
   }
}
关于如何处理事务日志这一块,在后面的分析中再来详尽分析。 在事务应用过程中, 还有一个细节需要我们注意,每当有一个事务被应用到内存数据库中去后,Zookeeper同时会调用PlayBackListener监听器。将这个事务操作记录到转换成Proposal,并保存到ZkDatabase.committedLog中,以便Follower进行快速的同步 。
private final PlayBackListener commitProposalPlaybackListener = new PlayBackListener() {
    public void onTxnLoaded(TxnHeader hdr, Record txn) {
        addCommittedProposal(hdr, txn);
    }
};
PlayBackListener是一个事务应用的监听器,用于在事务应用过程中的回调,每当成功将一条事务日志应用到内存数据库中后,就会调用这个监听器,其接口的定义非常简单只有一个方法,就是onTxnLoaded 用于对单条事务进行处理,在完成步骤ZKDatabase的初始化之后,Zookeeper会立即创建一个 PlayBackListener
监听器,将将其置于FileTxnSnapLog中,在之后的事务应用过程中, 会逐条的回调该接口进行事务的二次处理
BlayBackListener 会将这些刚刚被应用到内存数据库中的事务转存到ZKDatabase.commitedLog中,以便集群服务器间进行数据同步
关于ZooKeeper 服务器之间的数据同步 。
private void addCommittedProposal(TxnHeader hdr, Record txn) {
    Request r = new Request(0, hdr.getCxid(), hdr.getType(), hdr, txn, hdr.getZxid());
    addCommittedProposal(r);
}

public void addCommittedProposal(Request request) {
    WriteLock wl = logLock.writeLock();
    try {
        wl.lock();
        if (committedLog.size() > commitLogCount) {
            committedLog.removeFirst();
            // Leader服务器提义缓存队列committedLog 中最小的ZXID
            minCommittedLog = committedLog.getFirst().packet.getZxid();
        }
        if (committedLog.isEmpty()) {
            minCommittedLog = request.zxid;
            maxCommittedLog = request.zxid;
        }

        byte[] data = SerializeUtils.serializeRequest(request);
        QuorumPacket pp = new QuorumPacket(Leader.PROPOSAL, request.zxid, data, null);

        Proposal p = new Proposal();
        p.packet = pp;
        p.request = request;
        committedLog.add(p);
        // Leader 服务器提议缓存队列committedLog 中最大的ZXID
        maxCommittedLog = p.packet.getZxid();
    } finally {
        wl.unlock();
    }
}
我们之前讲解ZooKeeper 集群服务器启动的过程 中提到,整个集群完成Leader 选举之后,Learner 会向Leader 服务器进行注册,当Leader 完成注册后,就进入了数据同步环节 。 简单的讲, 数据同步
关于集群事务同步这一块,我们后面再来分析 。 在完成注册后,进入数据同步的环节,简单的讲, 数据同步过程就是Leader 服务器将那些有在Learner服务器上提交过的事务请求同步给Learner服务器,大体过程如下 。

获取Learner状态 。
在注册Learner的最后阶段,Learner 服务器一个ACKEPOCH 数据包, Learner 会从这个数据包中解析出该Learner的currentEpoch 和lastZxid 。
数据同步初始化
在开始数据同步之前,Leader 服务器会进行数据同步初始化,首先会从Zookeeper 的内存数据库中提取出事务请求对应的提议缓存队列(下面我们用“提议缓存队列” 来指代 该 队 列 ) : proposals , 同 时 完 成 对 以 下 三 个ZXID 值 的 初 始 化 。
- peerLastzxid:该Lcarner服务器最后处理的ZXID。
- minCommittedLog:Leader服务器提议缓存队列committedLog中的最小zXID。
- maxCommittedLog:Leader服务器提议缓存队列committedLog中的最大zxID。
Zookeeper 集群数据同步通常分为四类,分別是直接差异化同步(DIFF同步)、先回滚 再差异化同步 (TRUNC+DIFF 同步)、仅回滚同步 ( TRUNC 同步)和全量同步 (SNAP 同步)。在初始化阶段,Lcader 服务器会优先初始化以全量同步方式来同步数据—一当 然,这并非最终的数据同步方式,在以下步骤中,会根据Leader 和Learner 服务器之间 的数据差异情况来决定最终的数据同步方式。
直接差异化同步(DIFF同步)
场景:peerLastzxid介于minCommittedLog和maxCommittedLog之间。对于这种场景,就使用直接差异化同步(DIFF同步)方式即可。Leader服务器会首先向这个Learner发送一个DIFF指令,用于通知Learner“进人差异化数据同步阶段,Leader服务器即将把一些Proposal同步给自己”。在实际Proposal同步过程中,针对每个Proposal,Leader服务器都会通过发送两个数据包来完成,分别是PROPOSAL内容数据包和COMMIT指令数据包一—这和Zookeeper运行时Leader和Follower之间的事务请求的提交过程是一致的。
举个例子来说,假如某个时刻Leader服务器的提议级存队列对应的ZXID依次是:
0x500000001
0×500000002
0×500000003
0×500000004
0×500000005
而Learner服务器最后处理的ZXID为0x500000003,于是Leader服务器就会依次将0x500000004和0x500000005两个提议同步给Lcarner服务器,同步过程中的数据包发送顺序如表7-16所示。

通过以上四个数据包的发送,Learner服务器就可以接收到自己和Leader服务器的所有差异数据。Leader服务器在发送完差异数据之后,就会将该Learner加人到forwardingFollowers或observingLearners队列中,这两个队列在Zookeeper运行期间的事务请求处理过程中都会使用到。随后Leader还会立即发送一个NEWLEADER指令,用于通知Learner,已经将提议缓存队列中的Proposal都同步给自己了。下面我们再来看Lcarner对Leader发送过来的数据包的处理。根据上面讲解的Leader服务器的数据包发送顺序,Lcarner会首先接收到一个DIFF指令,于是便确定了接下来进人DIFF同步阶段。然后依次收到表7-16中的四个数据包,Learner会依次将其应用到内存数据库中。紧接着,Learner还会接收到来自Lcader的NEWLEADER指令,此时Learner就会反馈给Lcader一个ACK消息,表明自己也确实完成了对提议缓存队列中Proposal的同步。
Leader在接收到来自Learner的这个ACK消息以后,就认为当前Learner已经完成了数据同步,同时进人“过半策略”等待阶段—-Leader会和其他Learner服务器进行上述同样的数据同步流程,直到集群中有过半的Learner机器响应了.Leader这个ACK消息。一旦满足“过半策略”后,Leader服务器就会向所有已经完成数据同步的Learner发送一个UPTODATE指令,用来通知Learner已经完成了数据同步,同时集群中已经有过半机器完成了数据同步,集群已经具备了对外服务的能力了。
Learner在接收到这个来自Leader的UPTODATE指令后,会终止数据同步流程,然后向Leader再次反馈一个ACK消息。
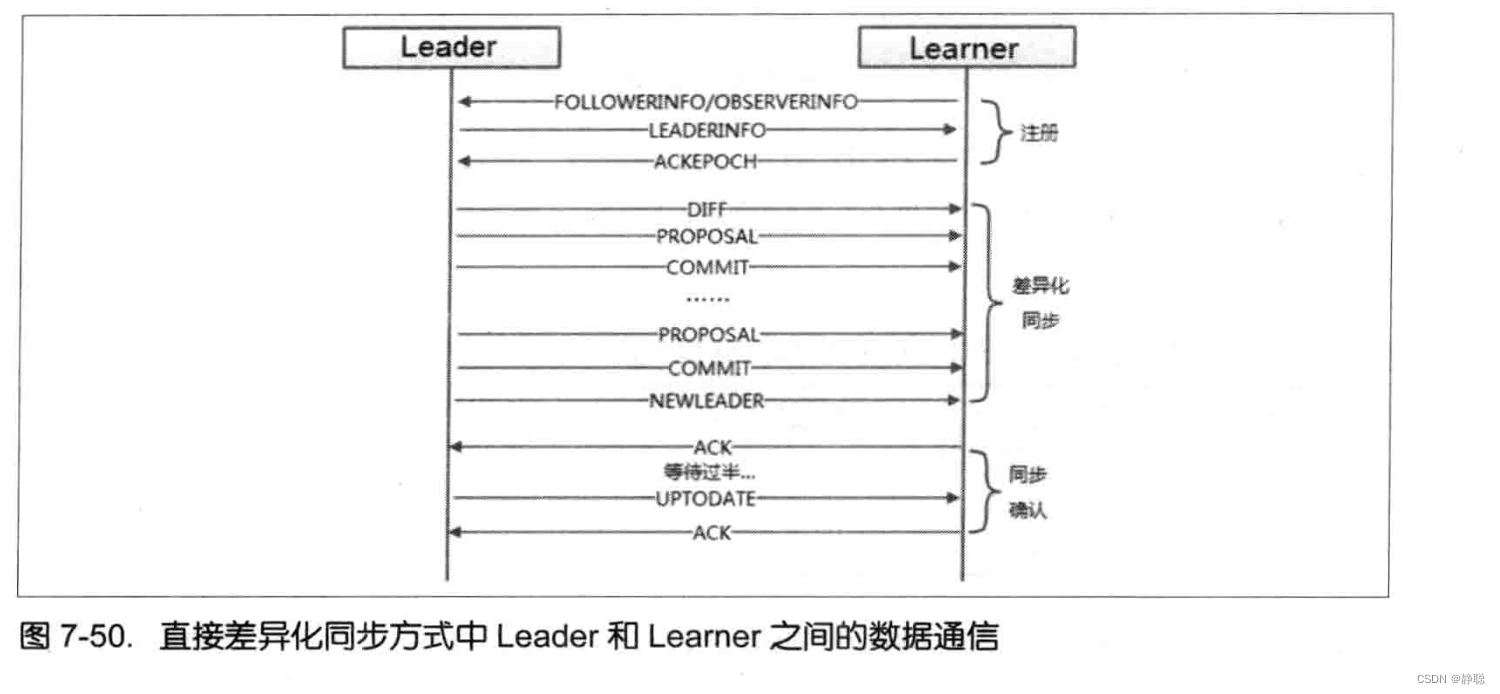
先回滚再差昇化同歩(TRUNC+DIFF同歩)
场景:针对上面的场景,我们已经介绍了直接差异化同步的详细过程。但是在这种场景中,会有一个罕见但是确实存在的特殊场景:设有A、B、C三台机器,假如某一时刻B是Leader服务器,此时的Leader_Epoch为5,同时当前已经被集群中绝大部分机器都提交的ZXID包括:0x500000001和0x500000002。此时,Leader正要处理ZXID:0x500000003,并且己经将该事务写人到了Leader本地的事务日志中去一—就在Leader恰好要将该Proposal发送给其他Follower机器进行投票的时候,Leader服务器挂了,Proposal没有被同步出去。此时Zookeeper集群会进行新一轮的Leader选举,假设此次选举产生的新的Leader是A,同时Leader_Epoch变更为6,之后A和C两合服务器继续对外进行服务,又提交了0x600000001和Ox600000002两个事务。此时,服务器B再次启动,并开始数据同步。
简单地讲,上面这个场景就是Leader服务器在已经将事务记录到了本地事务日志中,但是没有成功发起Proposal流程的时候就挂了。在这个特殊场景中,我们看到,peerLastzxid.minCommitetdLog和maxComittedLog的値分別是Ox500000003、0x500000001和Ox600000002,最然,peerLastZxid介于minCommittedLog和maxCommittedLog之同。
对于这个特殊场景,就使用先回滚再差异化同步(TRUNC+DIFF同步)的方式。当Leader服务器发现某个Learner包含了一条自己没有的事务记录,那么就需要让该Learer进行事务回滚——回滚到Leader服务器上存在的,同时也是最接近于peerLastzxid的ZxID。在上面速个例子中,Leader会需要Learner回滚到ZXID为0x500000002的事务记录。先回滚再差异化同步的数据同步方式在具体实现上和差异化同步是一样的,都是会将差异化的Proposal安送給Learner。同过程中的数据包发送順序如表7-17所示。
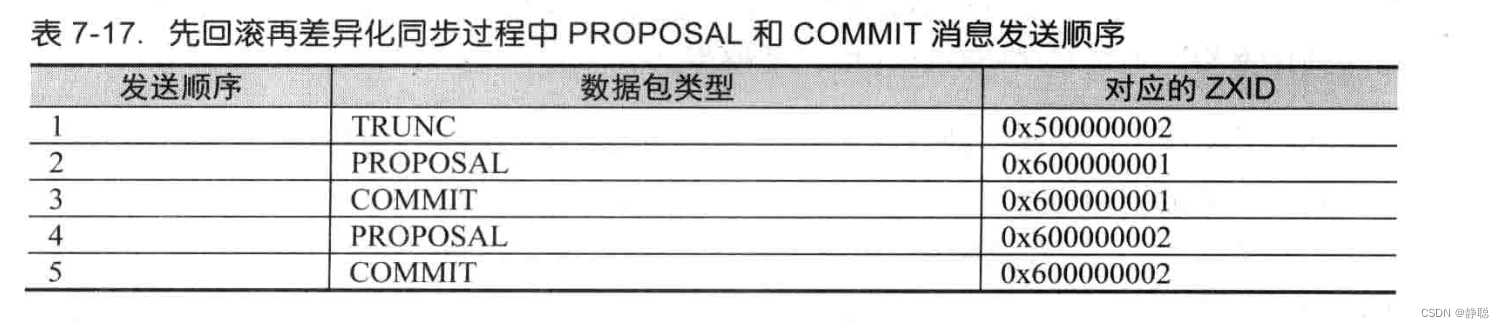
仅回滚同步 (TRUNC 同步)
仅回滚同步(TRUNC同步)场景:peerLastZxid大于 maxCommittedLog。
这种场景其实就是上述先回滚再差异化同步的简化模式,Leader会要求Learner回滚到ZXID值为maxCommitedLog对应的事务操作,这里不再对该过程详细展开讲解。
全量同步 (SNAP 同步)
场景1:peerLastzxid小于minCommittedLog。
场景2:Leader服务器上没有提议缓存队列,peerLastzxid不等于lastProcessedzxid(Leader服务器数据恢复后得到的最大ZXID)。
上述这两个场最非常类似,在这两种场景下,Leader服务器都无法直接使用提议缓存队列和Learner进行数据同步,因此只能进行全量同步(SNAP同步)。
所谓全量同步就是Leader服务器将本机上的全量内存数据都同步给Learner。Leader服务器首先向Learner发送一个SNAP指令,通知Learner即将进行全量数据同步。随后,Lcader会从内存数据库中获取到全量的数据节点和会话超时时间记录器,将它们序列化后传输给Learner。Learner服务器接收到该全量数据后,会对其反序列化后载人到内存数据库中。
以上就是Zookeeper集群间机器的数据同步流程了。整个数据同步流程的代码实现主要在LearnerHandler和Learner两个类中,关于数据同步先分析到这里,后面再来做进行更为深人、详细的了解。
loadData()方法从快照及事务日志文件中恢复数据之后,接下来就是删除掉过期的session,启动完成之后,再做一次事情,就是进行一次数据快照 。
public void takeSnapshot() {
    try {
        //
        txnLogFactory.save(zkDb.getDataTree(), zkDb.getSessionWithTimeOuts());
    } catch (IOException e) {
        LOG.error("Severe unrecoverable error, exiting", e);
        // This is a severe error that we cannot recover from,
        // so we need to exit
        System.exit(10);
    }
}

public void save(DataTree dataTree, ConcurrentHashMapLong, Integer> sessionsWithTimeouts)
        throws IOException {
    // 5. 生成快照数据文件名
    // 在文件存储的部分,我们已经提到了快照数据文件名的命名规则,在这一步中,Zookeeper会根据当前已经提交的最大ZXID 来生成数据快照文件名
    long lastZxid = dataTree.lastProcessedZxid;
    File snapshotFile = new File(snapDir, Util.makeSnapshotName(lastZxid));
    LOG.info("Snapshotting: 0x{} to {}", Long.toHexString(lastZxid), snapshotFile);
    // 6. 数据序列化
    // 接下来就是开始真正的数据序列化了,在序列化时,首先会序列化文件头信息,这里的文件头和事务日志中的一致, 同样也包含了
    // 魔数,版本号和dbid信息, 然后再对会话信息和DataTree分别进行序列化,同时生成一个Checksum,一并写入快照数据文件中去
    snapLog.serialize(dataTree, sessionsWithTimeouts, snapshotFile);
}
到这里初始化流程已经处理完毕,因此来总结一下,请看下图。
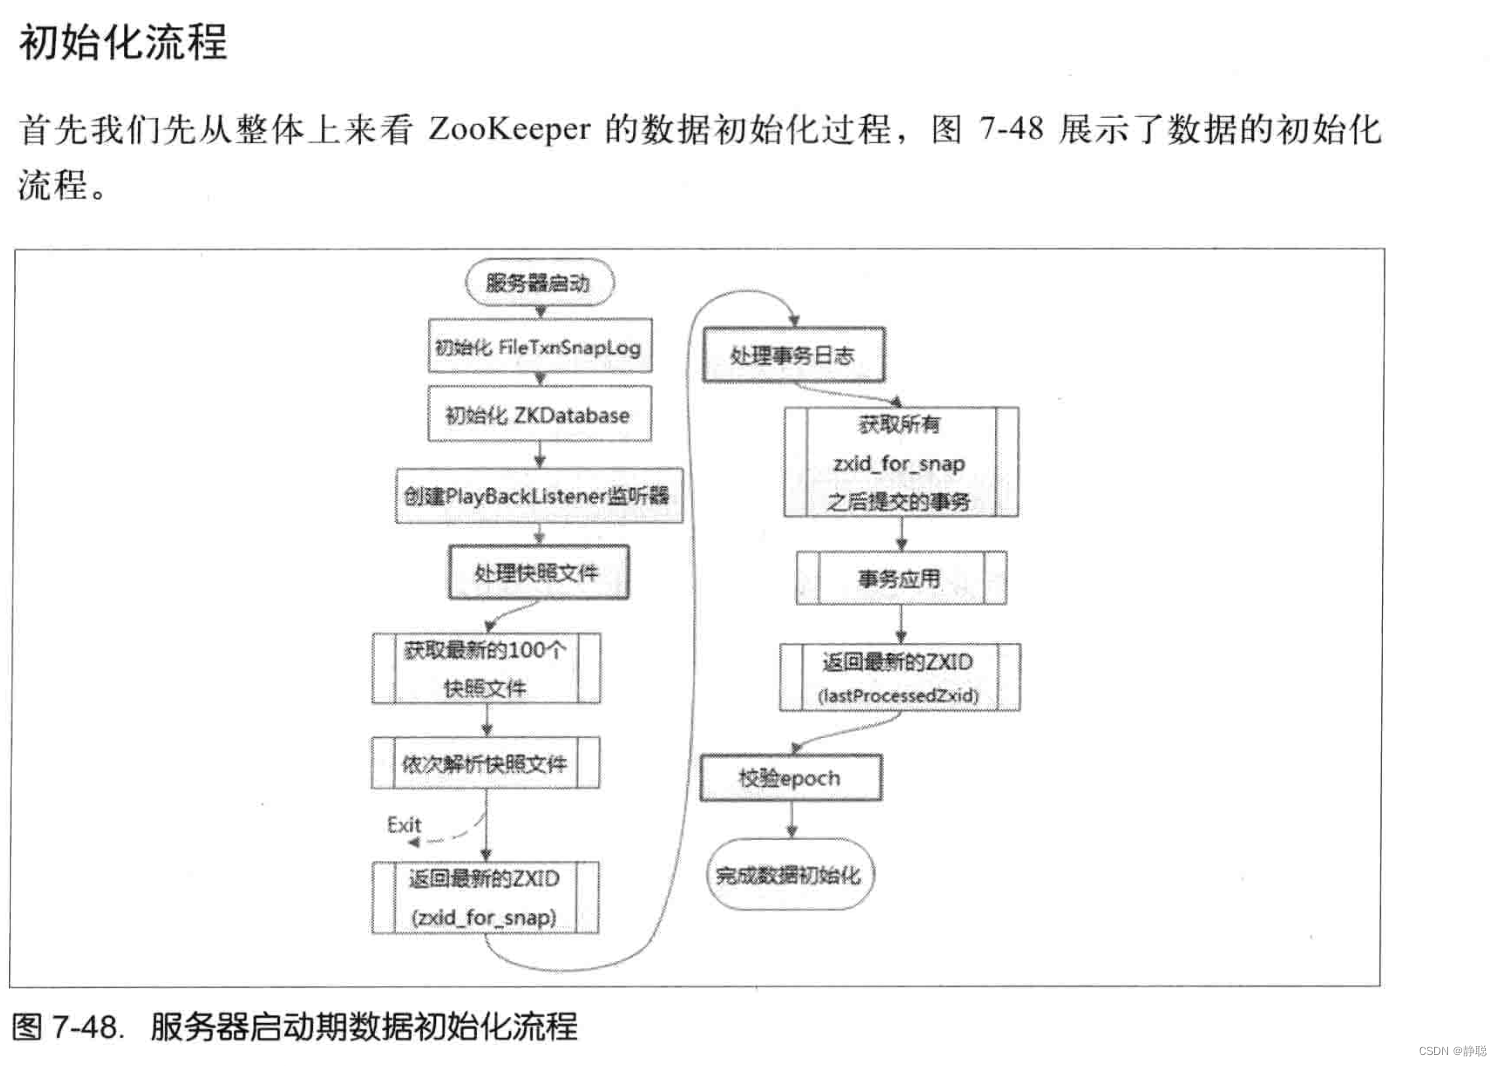
接下来看startup()方法的实现。
public synchronized void startup() {
    if (sessionTracker == null) {
        createSessionTracker();
    }
    // SessionTracker初始化完毕后,Zookeeper就会立即开始会话管理的会话超时检查
    startSessionTracker();
    // 9. 初始化Zookeeper的请求处理链
    // 初始化Zookeeper的请求处理链
    // Zookeeper的请求处理方式是典型的责任链模式的实现,在Zookeeper服务器上,会有多个请求处理依次来处理一个客户端的请求。
    // 在服务器启动的时候,会将这些请求处理串联形成一个请求处理链,单机版本服务器的请求处理链主要包括
    //PrepRequestProcessor ,SyncRequestProcessor ,FinalRequestProcessor 三个请求处理器。
    // 针对每个处理器的详细工作原理
    setupRequestProcessors();
    // 10. 注册JMX 服务
    // Zookeeper会将服务器运行时的一些信息以JMX 的方式暴露给外部
    registerJMX();
    //
    setState(State.RUNNING);
    notifyAll();
}
startSessionTracker()方法调用其实是调用SessionTrackerImpl的start()方法,而SessionTrackerImpl又继承了Thread方法。
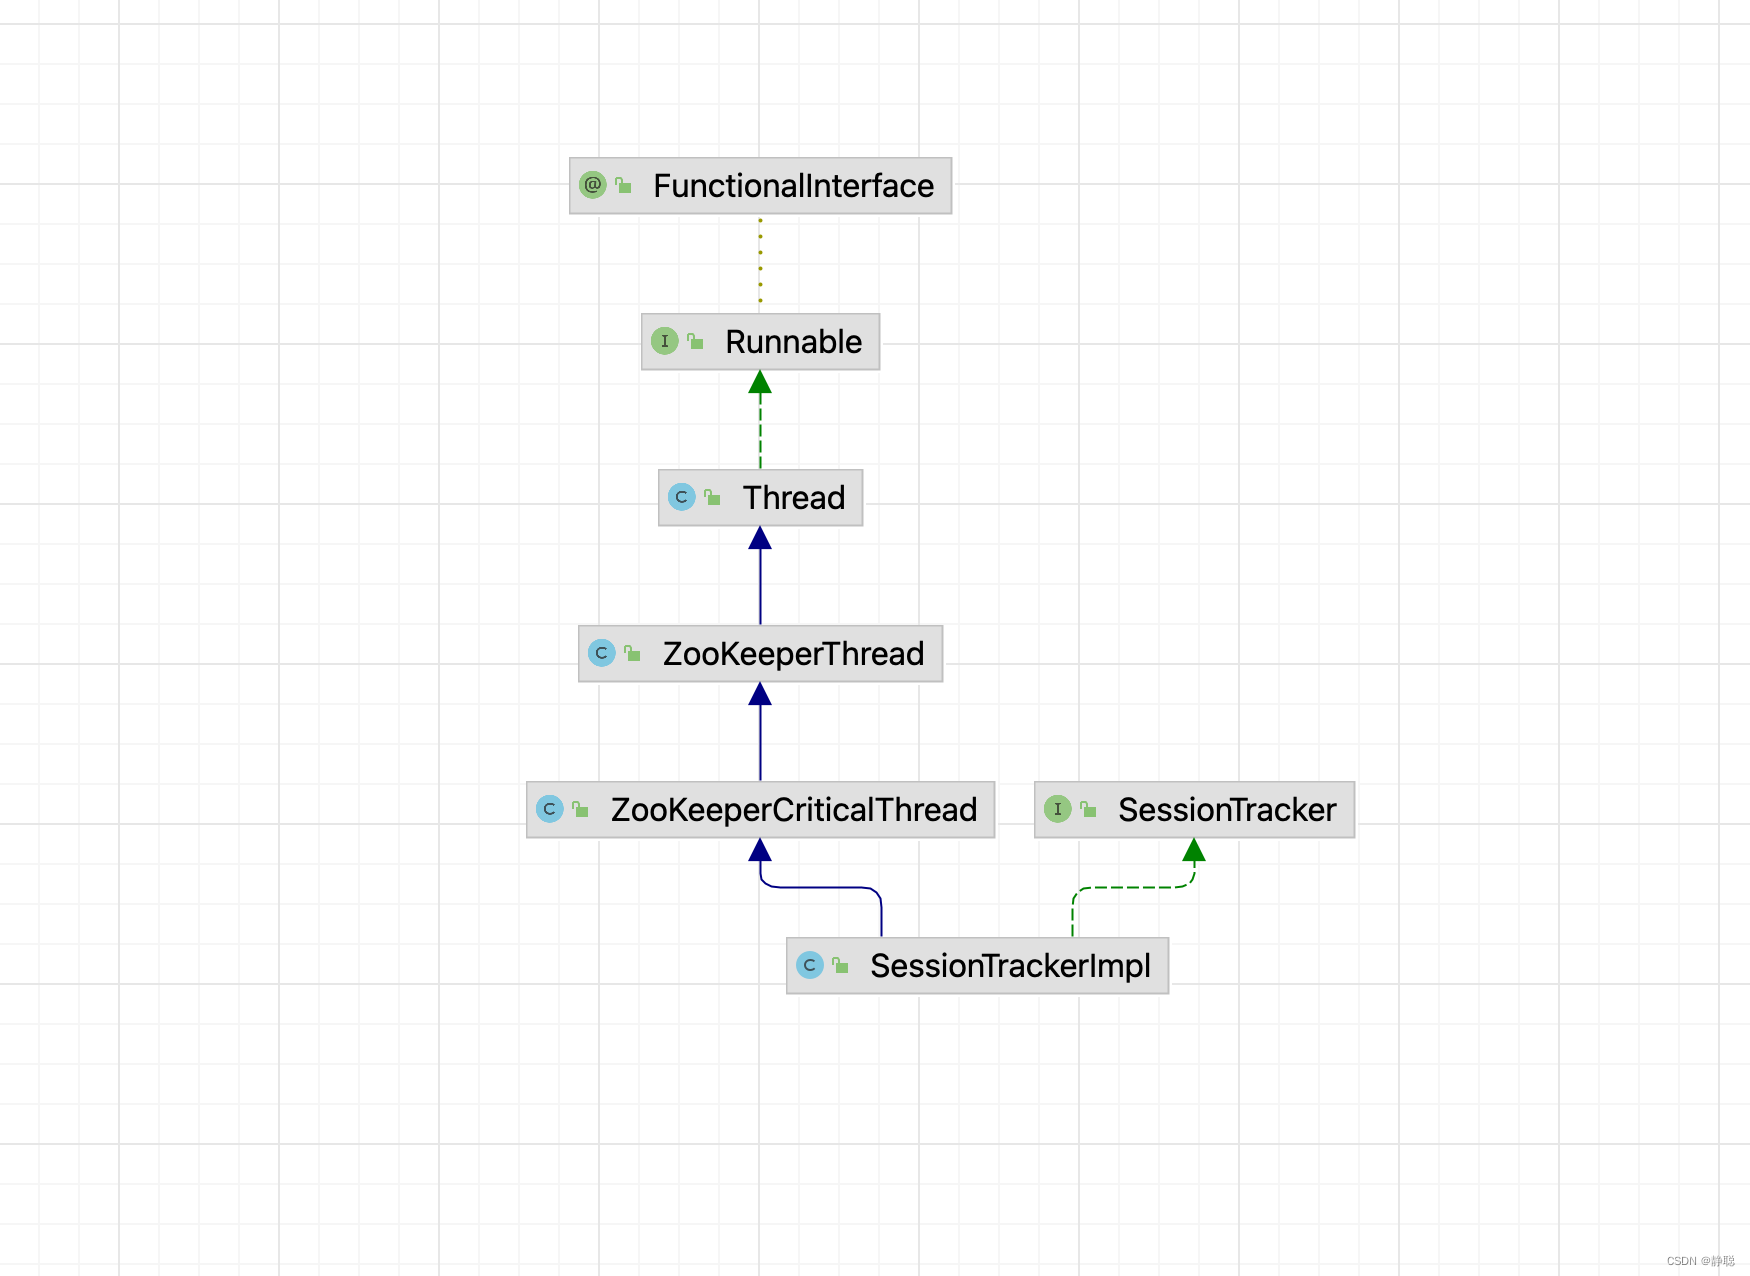
因此最终调用的是SessionTrackerImpl的run()方法 。
public void run() {
    try {
        while (running) {
            long waitTime = sessionExpiryQueue.getWaitTime();
            if (waitTime > 0) {
                Thread.sleep(waitTime);
                continue;
            }
            // 标记会话状态为已经关闭
            // 由于整个会话清理过程中需要一段时间,因此为了保证此期间不再处理来自客户端的新请求, SessionTracker 会首先将该会话的isClosing属性标记为true
            // 这样,即使在会话清理期间接收到该客户端的新请求,也无法再继续处理了。
            for (SessionImpl s : sessionExpiryQueue.poll()) {
                setSessionClosing(s.sessionId);
                expirer.expire(s);
            }
        }
    } catch (InterruptedException e) {
        handleException(this.getName(), e);
    }
    LOG.info("SessionTrackerImpl exited loop!");
}
SessionTracker是ZooKeeper服务端的会话管理器,负责会话的创建,管理和清理等工作,可以说,整个会话的生命周期都离不开SessionTracker的管理,每一个会话在SessionTracker内部都保留了三份, 具体如下 。
- sessionById: 这是一个HashMap<Long,SessionImpl> 类型的数据结构,用于根据sessionID来管理session。
- sessionsWithTimeout: 这是一个ConcurrentHashMap<Long,Integer> 类型的数据结构,用于根据sessionID 来管理会话的超时时间,该数据结构和ZooKeeper内存数据库相连通,会被定期持久化到快照文件中去。
- sessionSets : 这是一个HashMap<Long,SessionSet> 类型的数据结构,用于根据下次会话超时时间来归档会话,便于进行会话管理和超时检查,在下文"分桶策略" 会话管理的介绍中, 我们还会对该数据结构做详细的分析 。
protected void createSessionTracker() {
    sessionTracker = new SessionTrackerImpl(this, zkDb.getSessionWithTimeOuts(),
            tickTime, createSessionTrackerServerId, getZooKeeperServerListener());

}

public SessionTrackerImpl(SessionExpirer expirer,
                          ConcurrentMapLong, Integer> sessionsWithTimeout, int tickTime,
                          long serverId, ZooKeeperServerListener listener) {
    super("SessionTracker", listener);
    this.expirer = expirer;
    // 它主要负责ZooKeeper服务端会话管理,创建SessionTracker 的时候,会初始化expirationInterval, nextExpirationTime
    // 和sessionWithTimeout(用于保存每个会话超时时间)
    // 同时还会计算出一个初始化的sessionID
    this.sessionExpiryQueue = new ExpiryQueueSessionImpl>(tickTime);
    this.sessionsWithTimeout = sessionsWithTimeout;
    this.nextSessionId.set(initializeNextSession(serverId));
    for (EntryLong, Integer> e : sessionsWithTimeout.entrySet()) {
        addSession(e.getKey(), e.getValue());
    }
    EphemeralType.validateServerId(serverId);
}
SessionTracker 初始化完毕后,ZooKeeper就会立即开始会话管理器的会话超时检查。
JMX是一个应用程序,设备 , 系统等植入管理功能的框架,能够非常方便的让Java 系统对外提供运行时数据信息获取和系统管控接口, ZooKeeper也使用标准的JMX方式来对外提供运行时数据信息的便捷的管控接口。
本地启动Jconsole,然后进行连接 ,就可以监控到Zookeeper的相关信息。
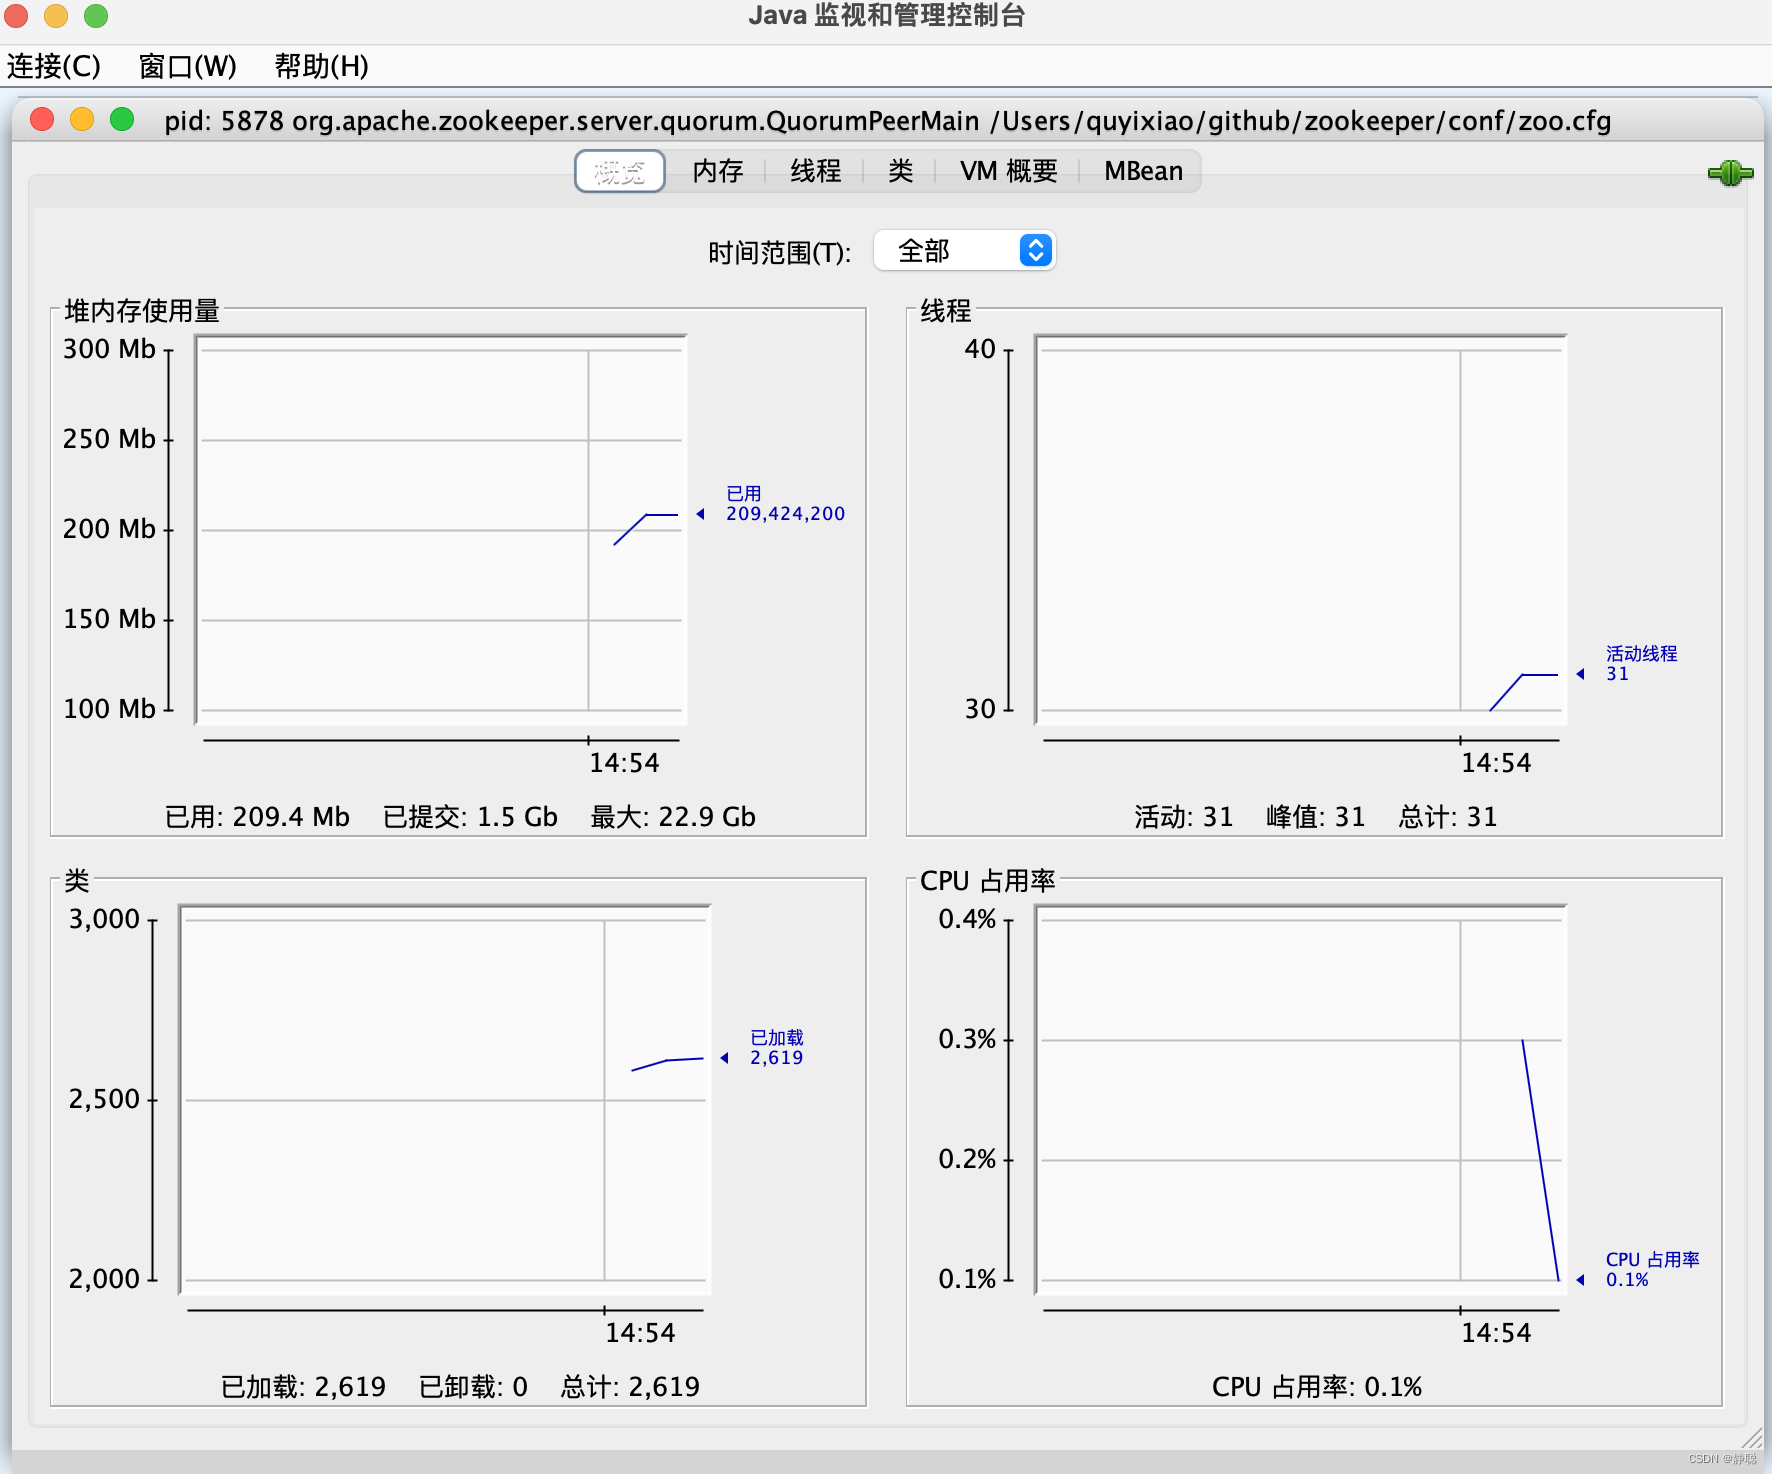
protected void setupRequestProcessors() {
    RequestProcessor finalProcessor = new FinalRequestProcessor(this);
    RequestProcessor prepProcessor = new PrepRequestProcessor(this, finalProcessor);
    ((PrepRequestProcessor) prepProcessor).start();
    firstProcessor = new ReadOnlyRequestProcessor(this, prepProcessor);
    ((ReadOnlyRequestProcessor) firstProcessor).start();
}
Leader服务器是整个ZooKeeper集群工作机制的核心, 其主要工作有以下两个。
-
事务请求的唯 一调度和处理者,保证集群事务处理的顺序性。
-
集群内部各服务器的调度者。
请求处理链
使用责任链模式来处理每一个客户端请求是Zookeeper的一大特色。在每一个服务器启动的时候,都会进行请求处理链的初始化,Leader服务器的请求处理链如图所示。
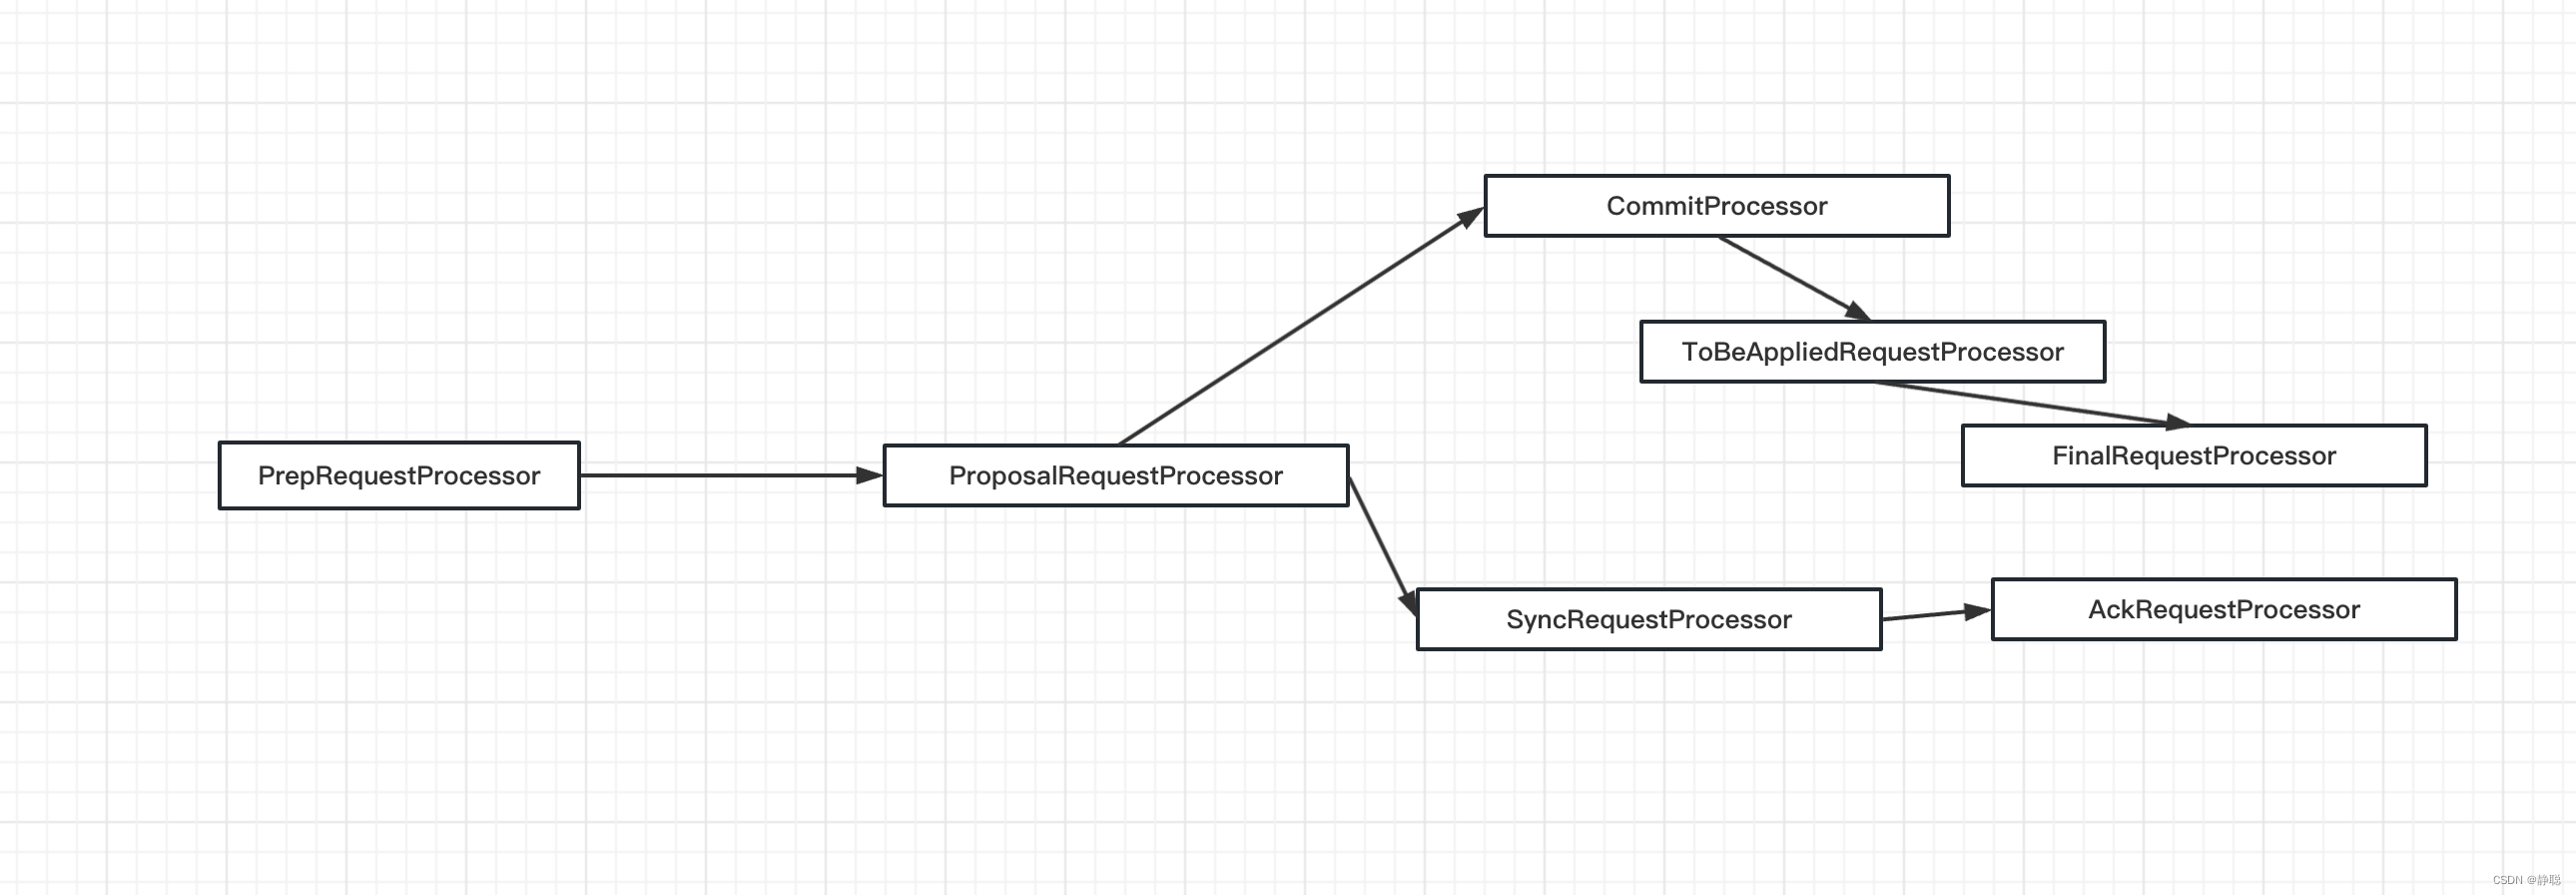
可以图中可以看到,从PrepRequestProcessor到FinalRequestprocessor,前后一共7个请求处理器组成了Leader服务器的请求处理链。
PrepRequestProcessor
PrepRequestProcessor是Lcader服务器的请求预处理器,也是Lcader服务器的第一个请求处理器。在Zookeeper中,我们将那些会改变服务器状态的请求称为“事务请求”——通常指的就是那些创建节点、更新数据、删除节点以及创建会话等请求,PrepRequestProcessor能够识别出当前客户端请求是否是事务请求。对于事务请求,PrepRequestProcessor处理器会对其进行一系列预处理,诸如创建请求事务头、事务体,会话检查、ACL检查和版本检查等。
ProposalRequestProcessor
ProposalRequestProcessor处理器是Leader服务器的事务投票处理器,也是Leader服务器事务处理流程的发起者。对于非事务请求,ProposalRequestProcessor会直接将请求流转到CommitProcessor处理器,不再做其他处理:而对于事务请求,除了将请求交给CommitProcessor处理器外,还会根据请求类型创建对应的Proposal提议,并发送给所有的Follower服务器来发起一次集群内的事务投票。同时,ProposalRequestProcessor还会将事务请求交付给SyncRequestProcessor进行事务日志的记录。
SyncRequestProcessor
SyncRequestProcessor 是事务日志记录处理器,该处理器主要用来将事务请 求记录到事务日志文件中去,同时还会触发Zookeeper 进行数据快照
AckRequestProcessor
AckRequestProcessor处理器是Leader特有的处理器,其主要负责在SyncRequestProcessor处理器完成事务日志记录后,向Proposal的投票收集器发送ACK反馈,以通知投票收集器当前服务器已经完成了对该Proposal的事务日志记录。
ToBeAppliedRequestProcessor
ToBeAppliedRequestProcessor是一个比较特別的处理器,根据其命名,相信读者也已经理解了该处理器的作用。ToBeAppliedRequestProcessor 处理器中有一个toBeApplied队列,专门用来存储那些已经被CommitProcessor处理过的可被提交的Proposal。ToBeAppliedRequestProcessor 处理器将这些请求逐个交付给FinalRequestProcessor处理
器进行处理一一等到FinalRequestProcessor处理器处理完之后,再将其从toBeApplied队列中称除。
FinalRequestProcessor
FinalRequestProcessor是最后一个请求处理器。该处理器主要用来进行客户端请求返回之前的收尾工作,包括创建客户端请求的响应,针对事务请求,该处理器还会负责将事务应用到内存数据库中去。
关于处理器的介绍先分析到这里,后面在具体的实例中再来详细分析 。
集群启动
- 在源码中创建3个QuorumPeerMain1,QuorumPeerMain2,QuorumPeerMain3 。
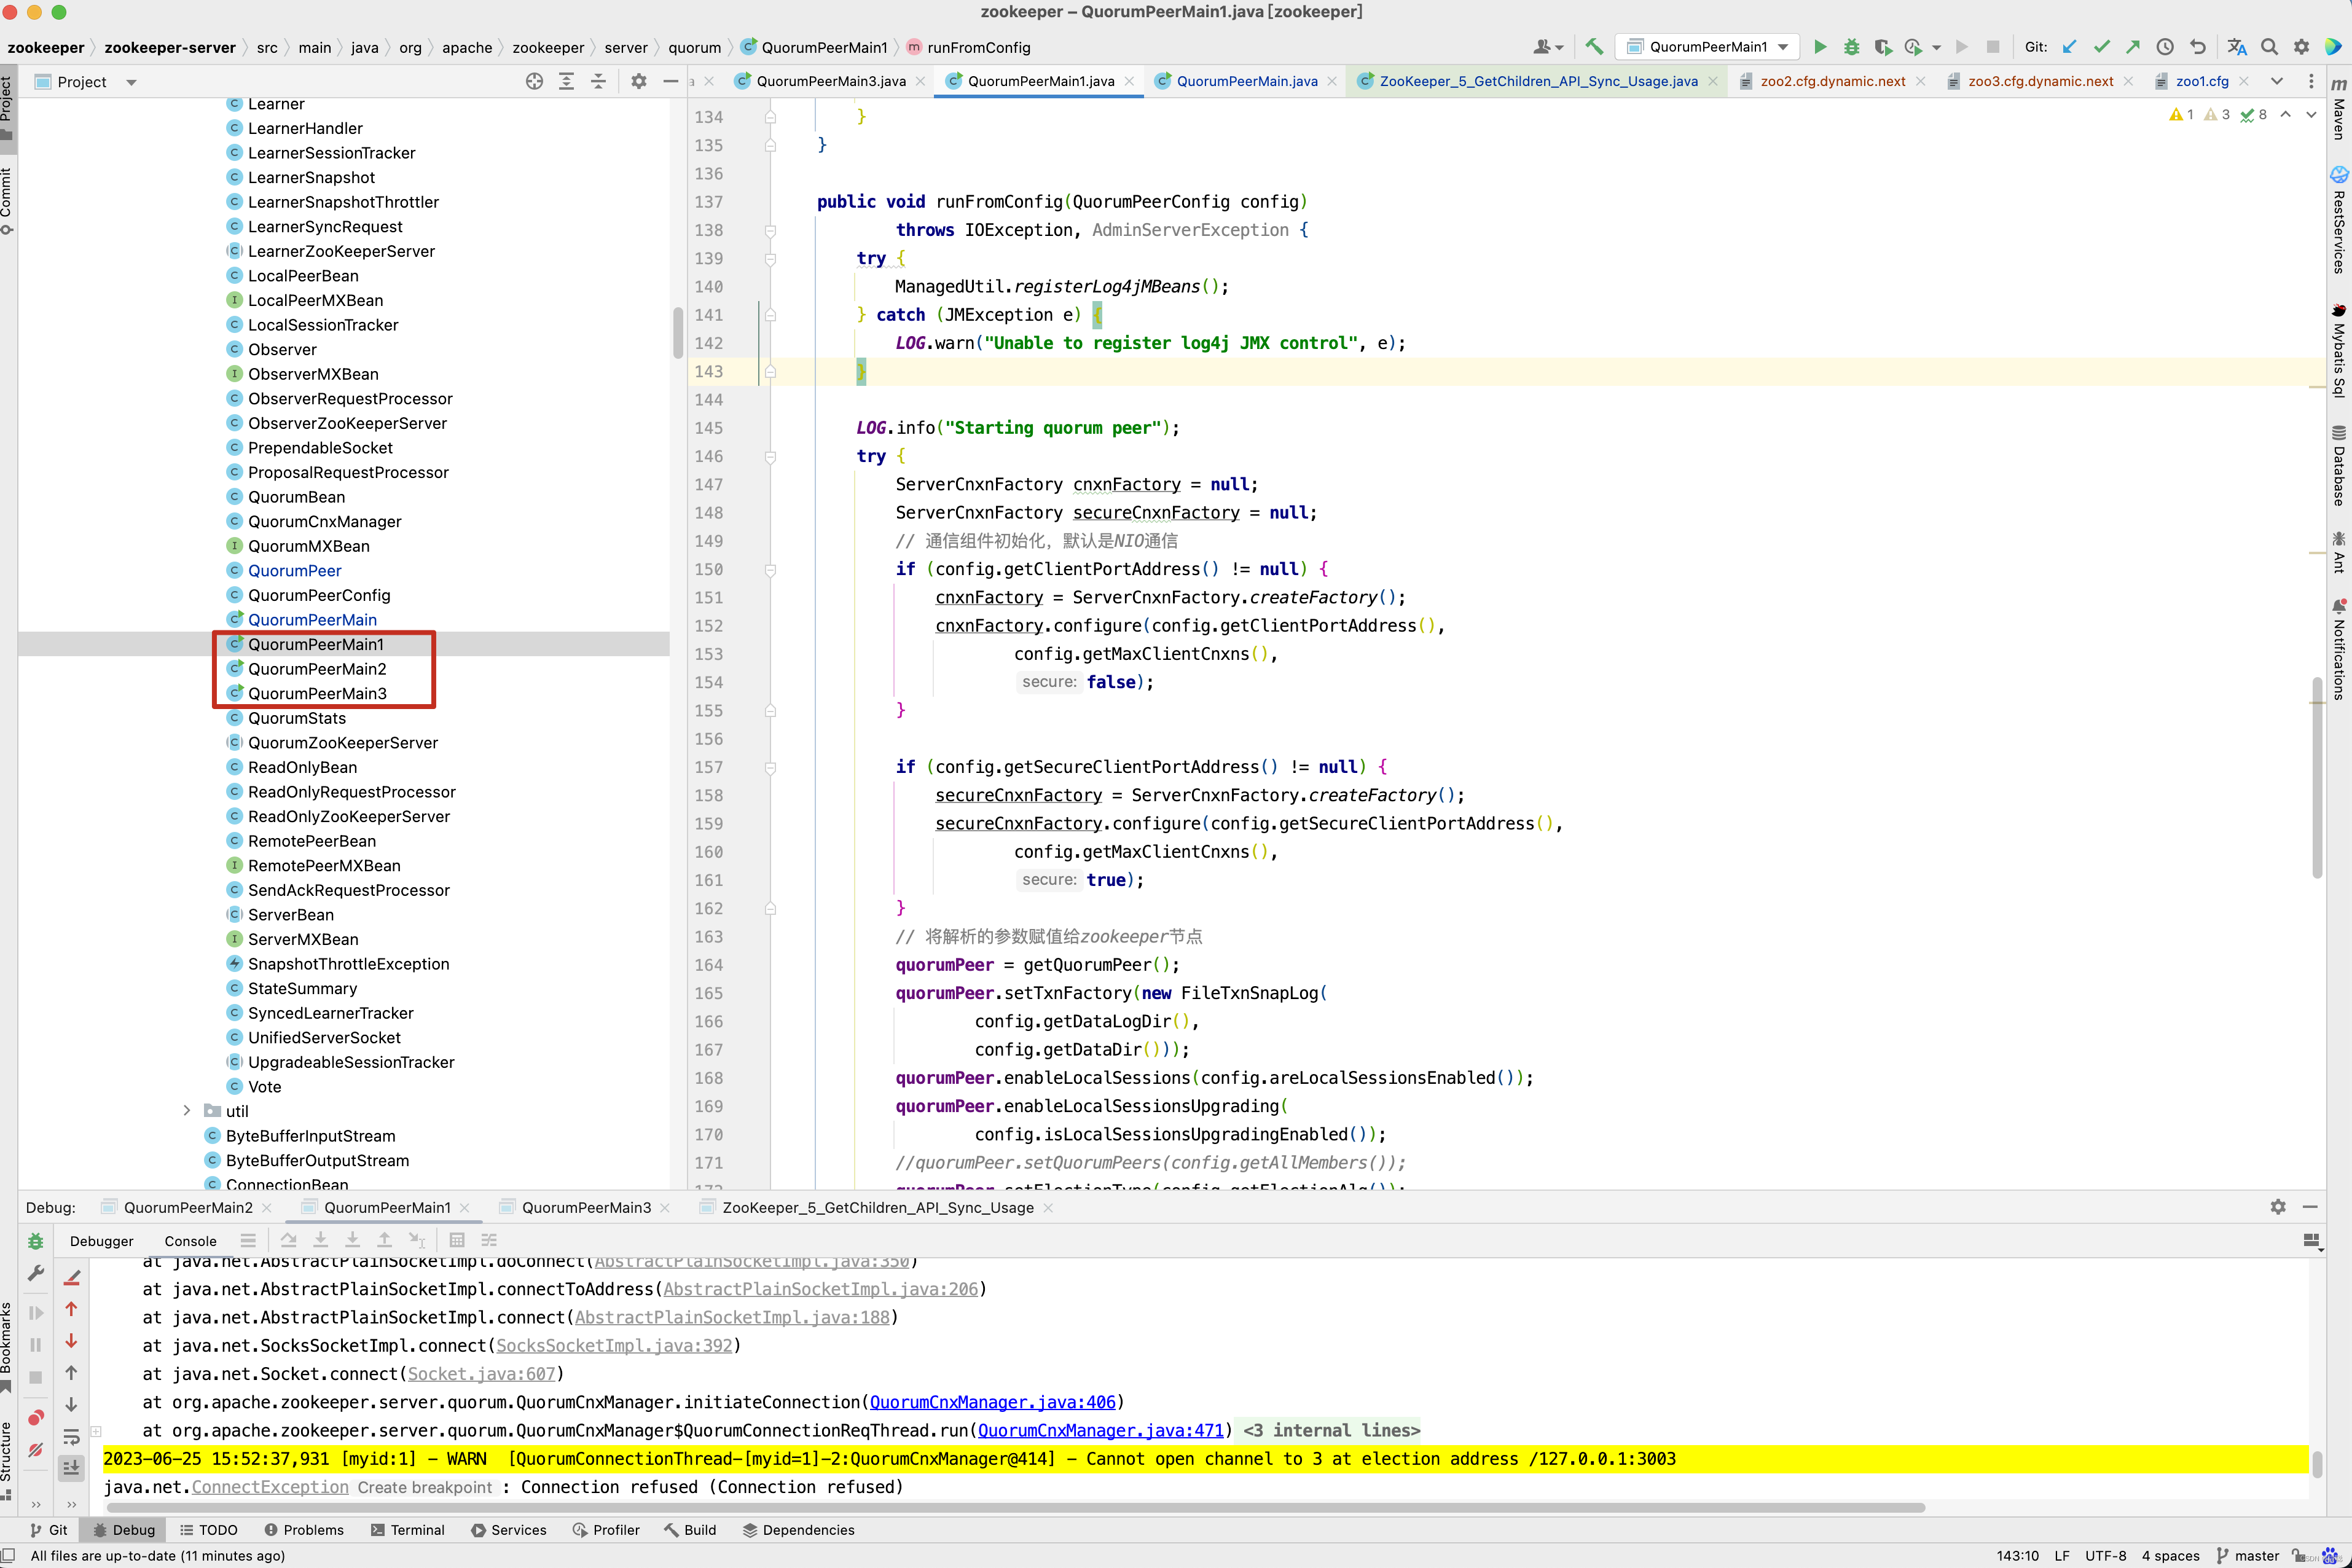
- 因为需要在本地调试,因此做的是伪集群,创建3个zoo 配置文件。
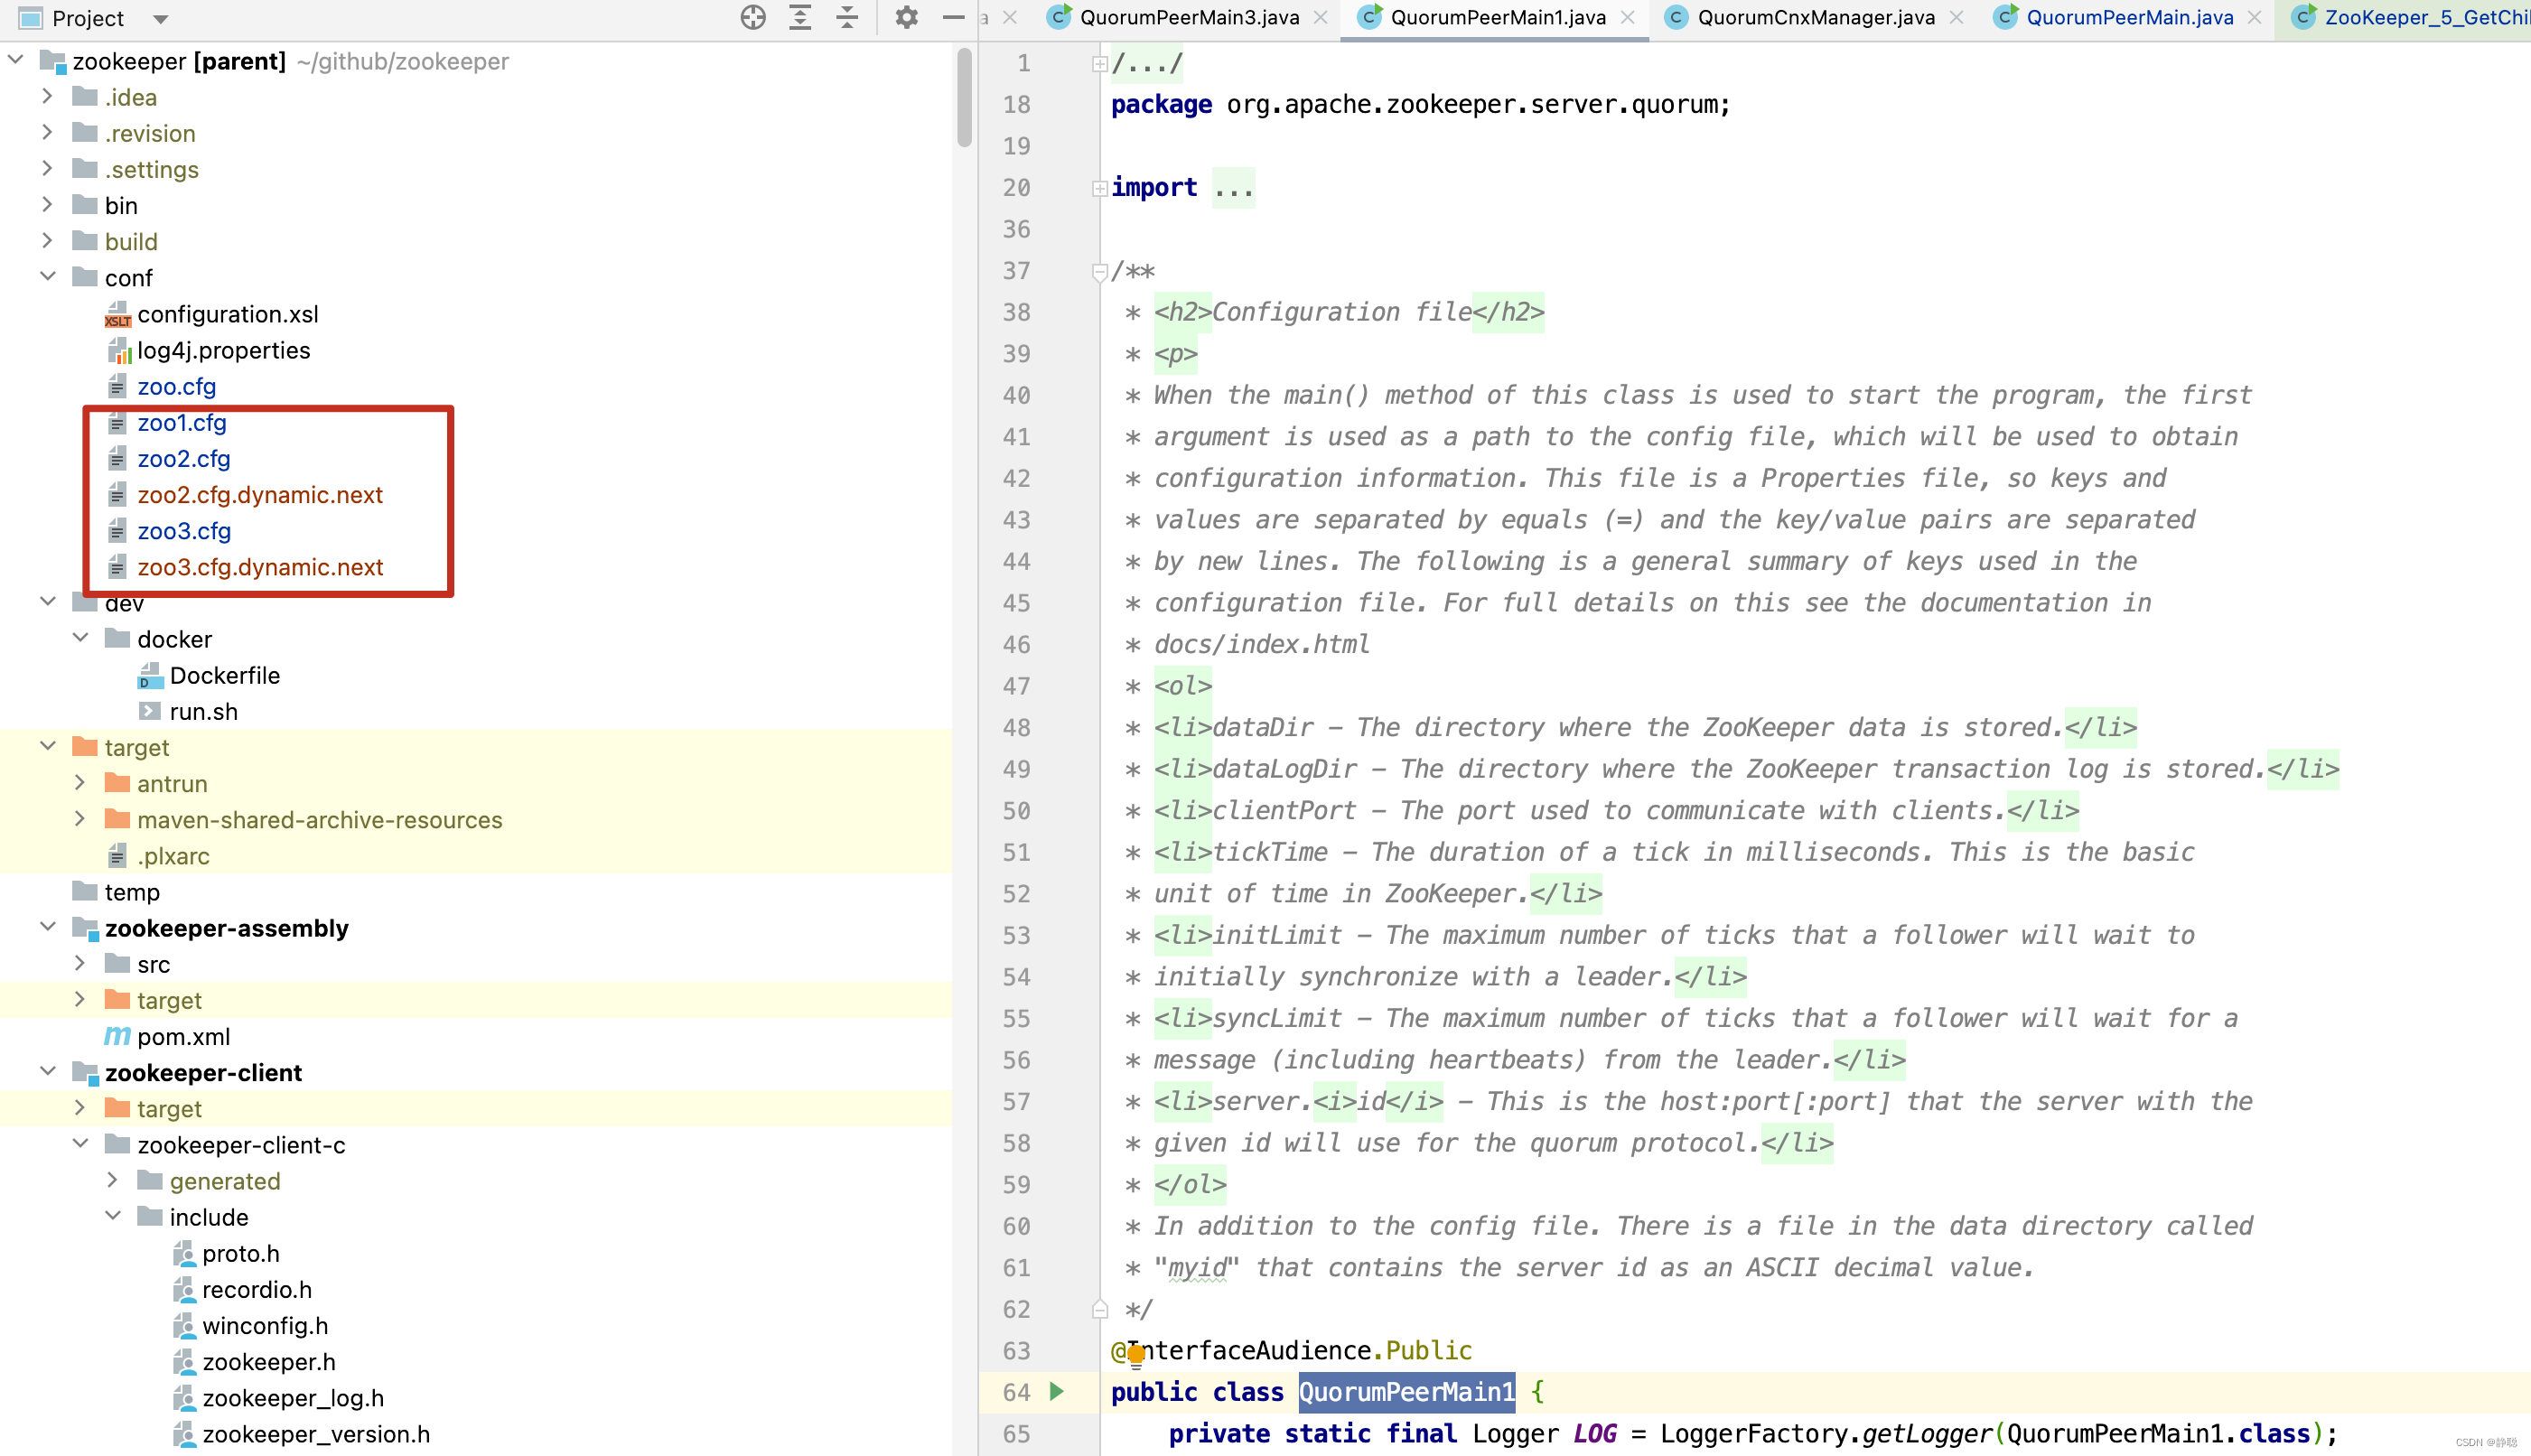
- 启动配置分别指向 zoo1.cfg
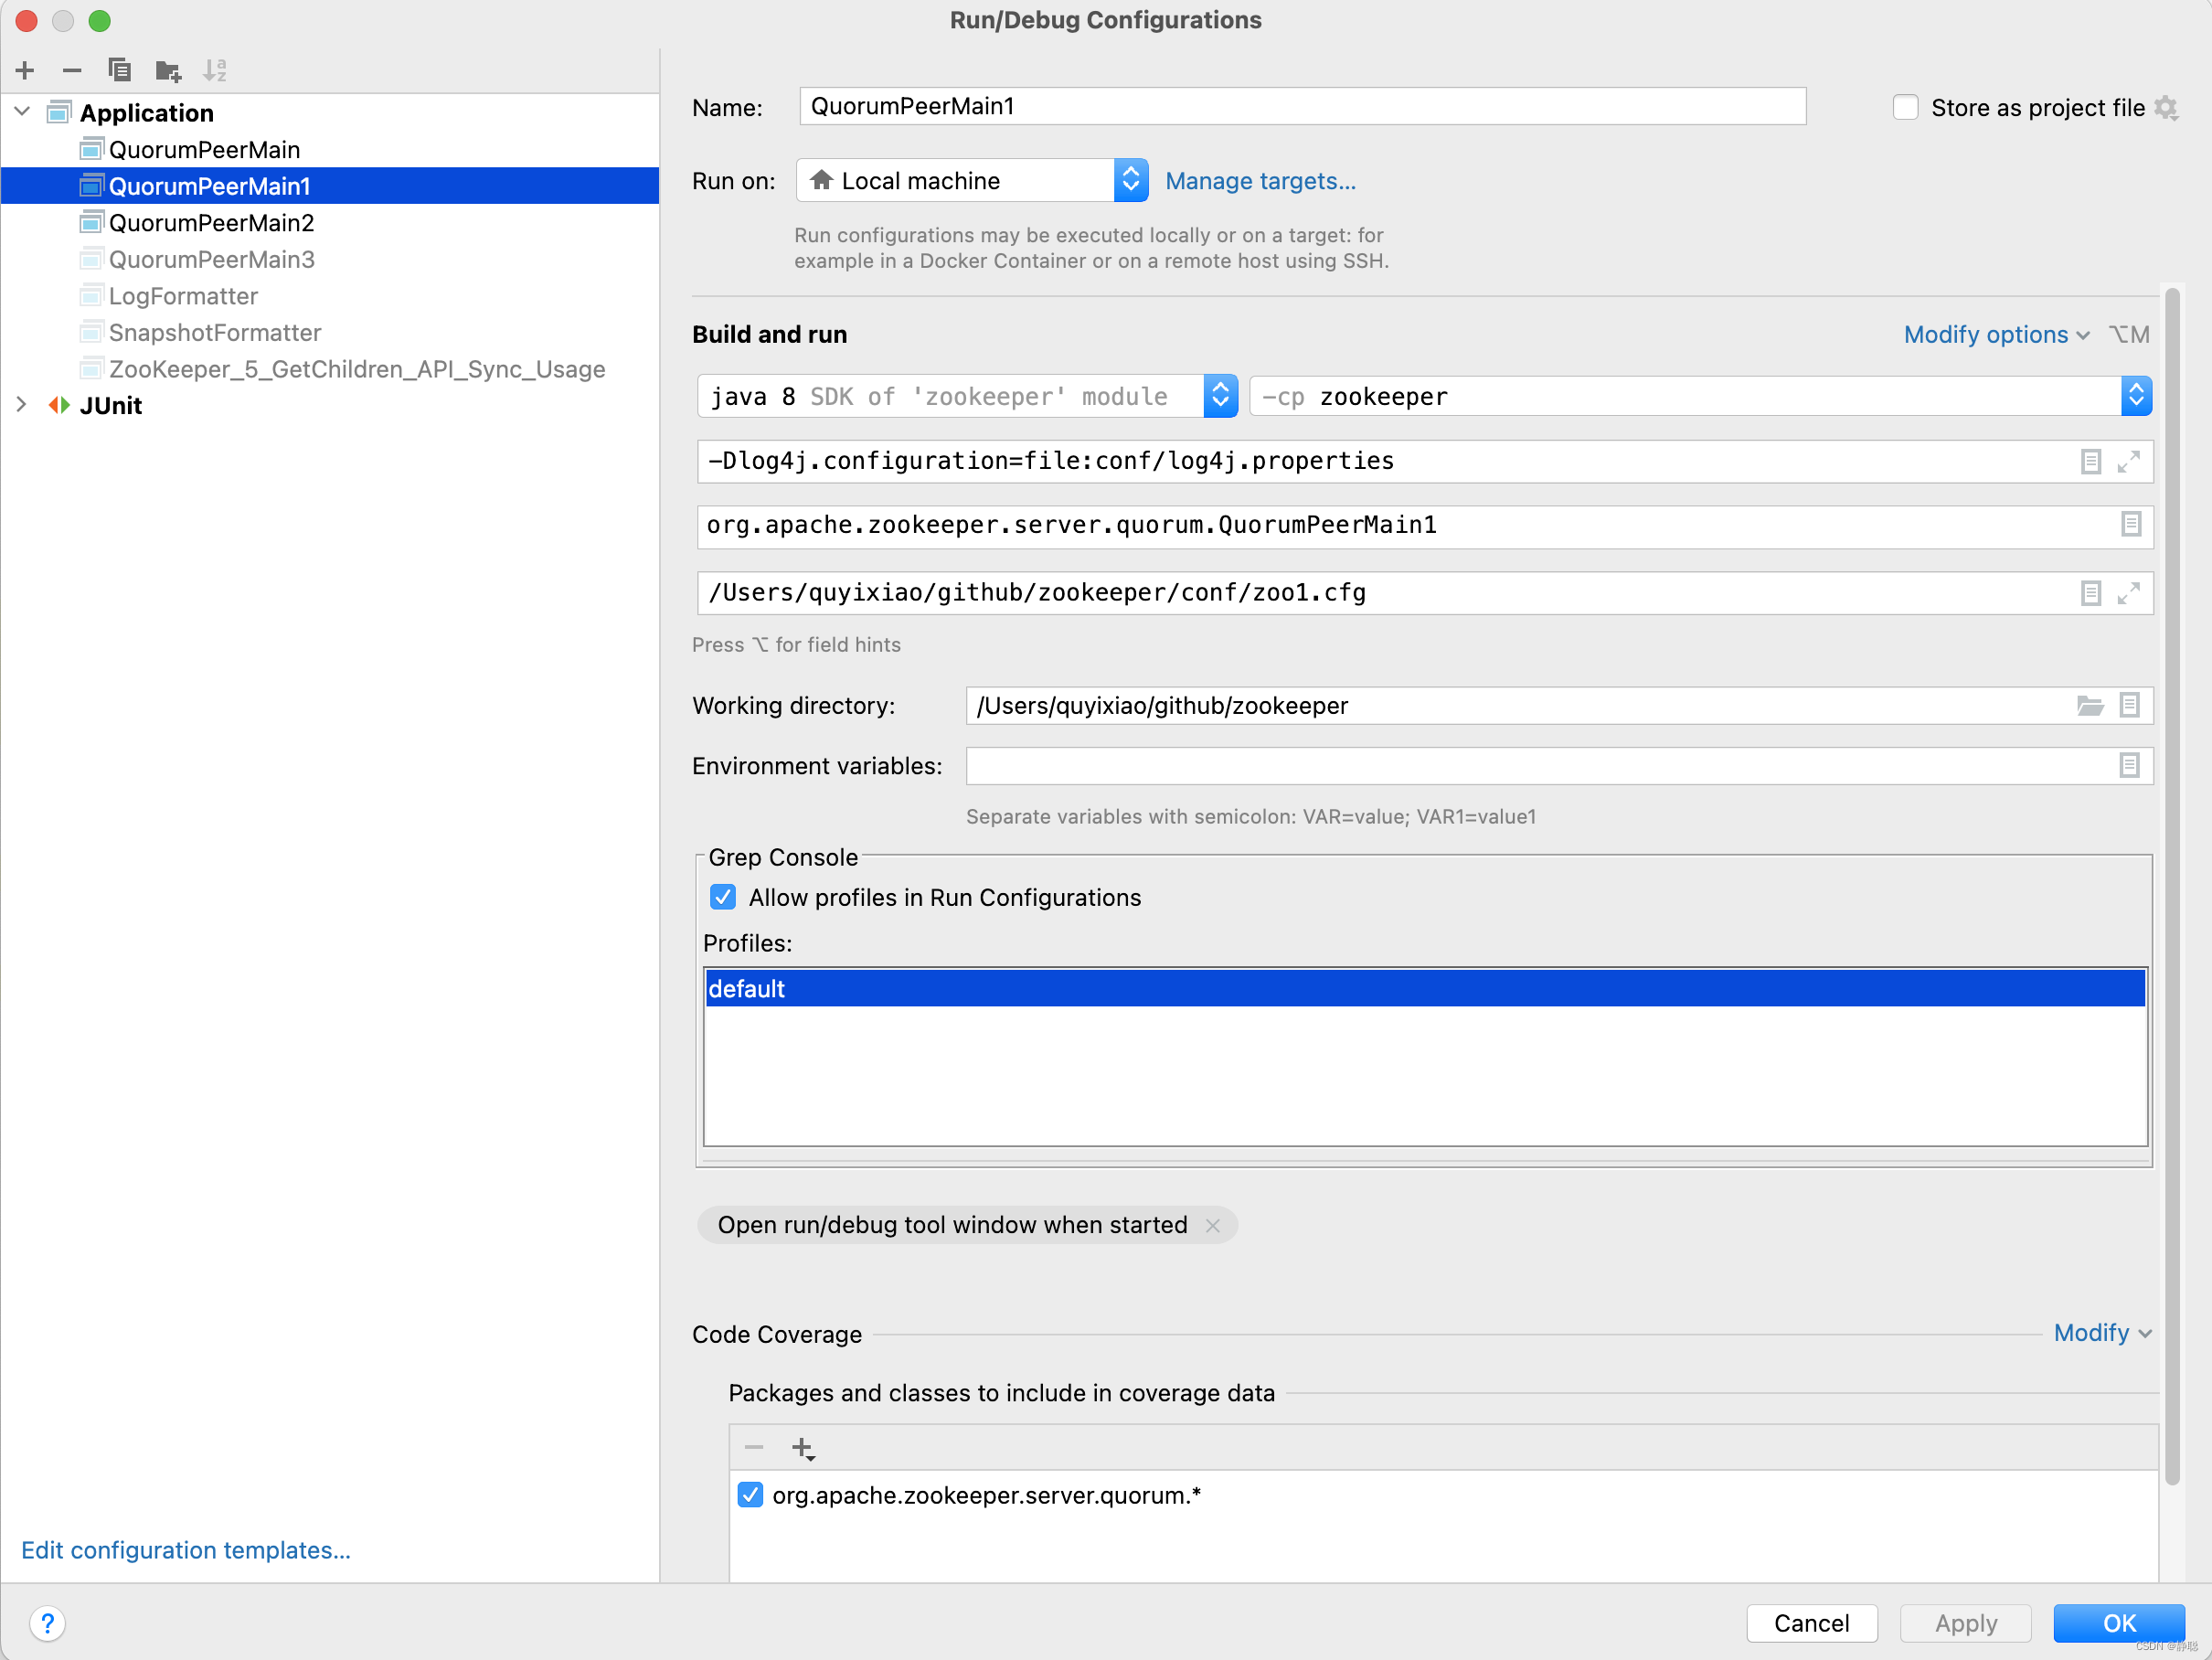
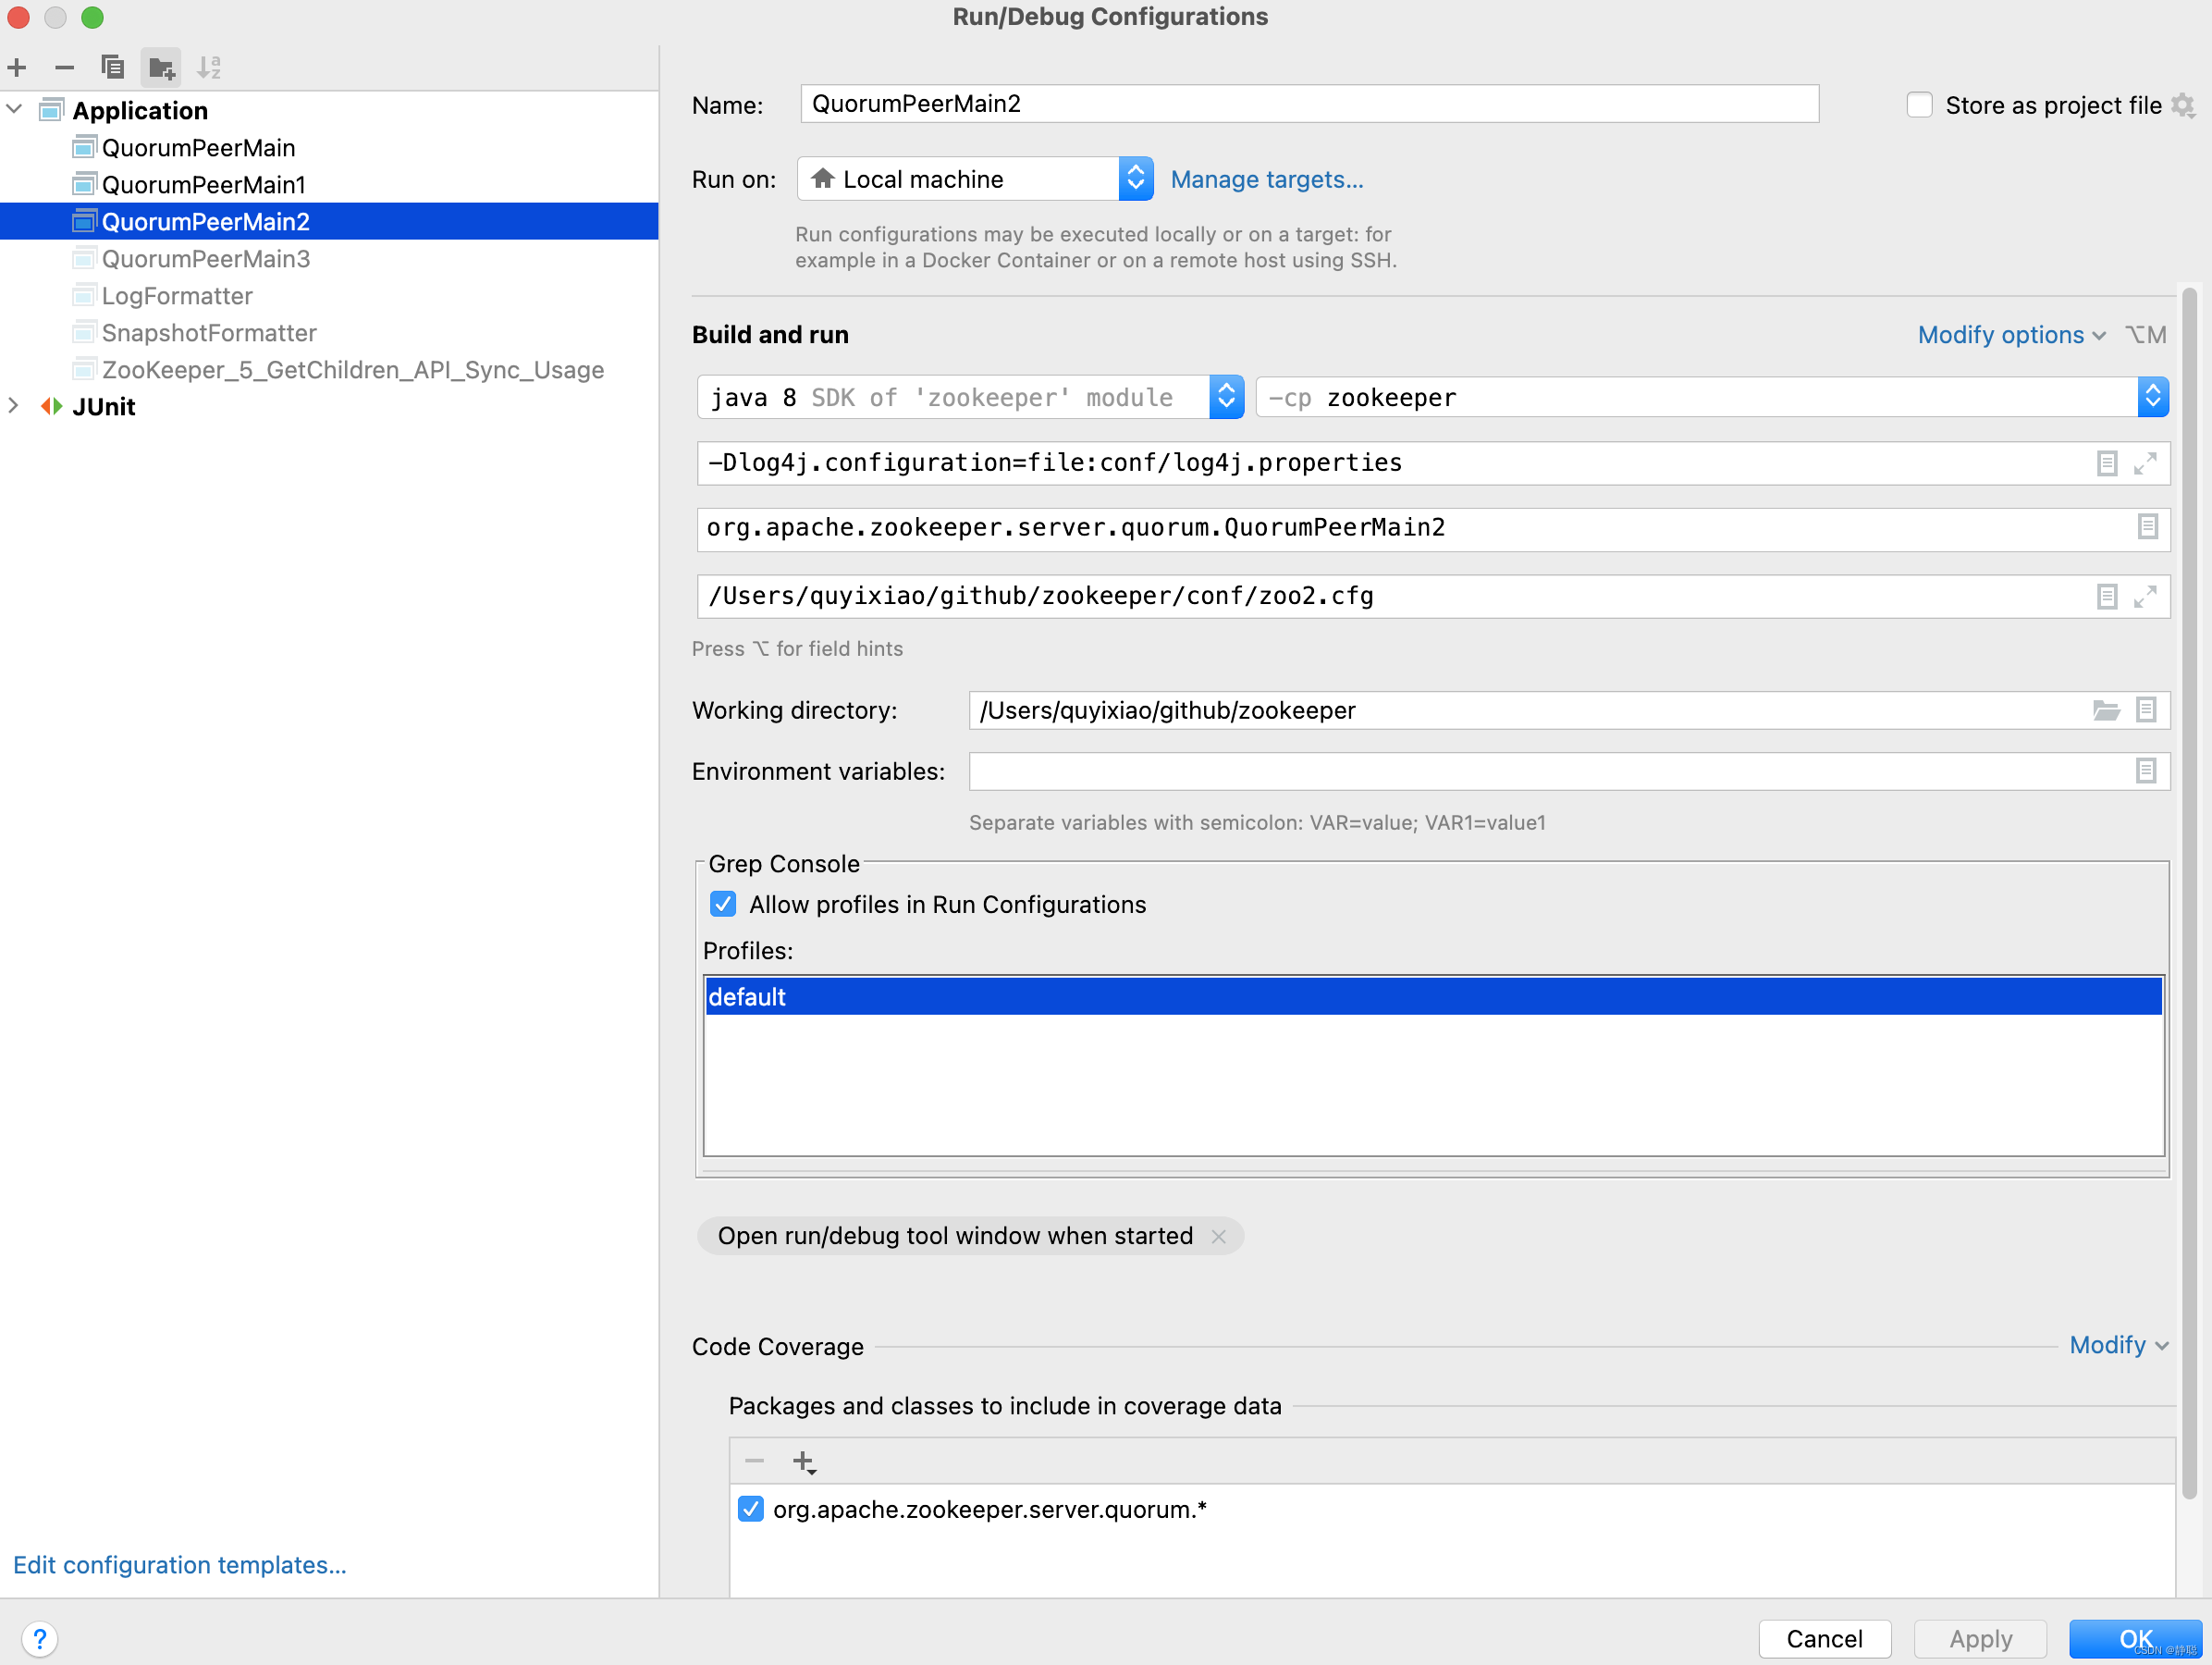
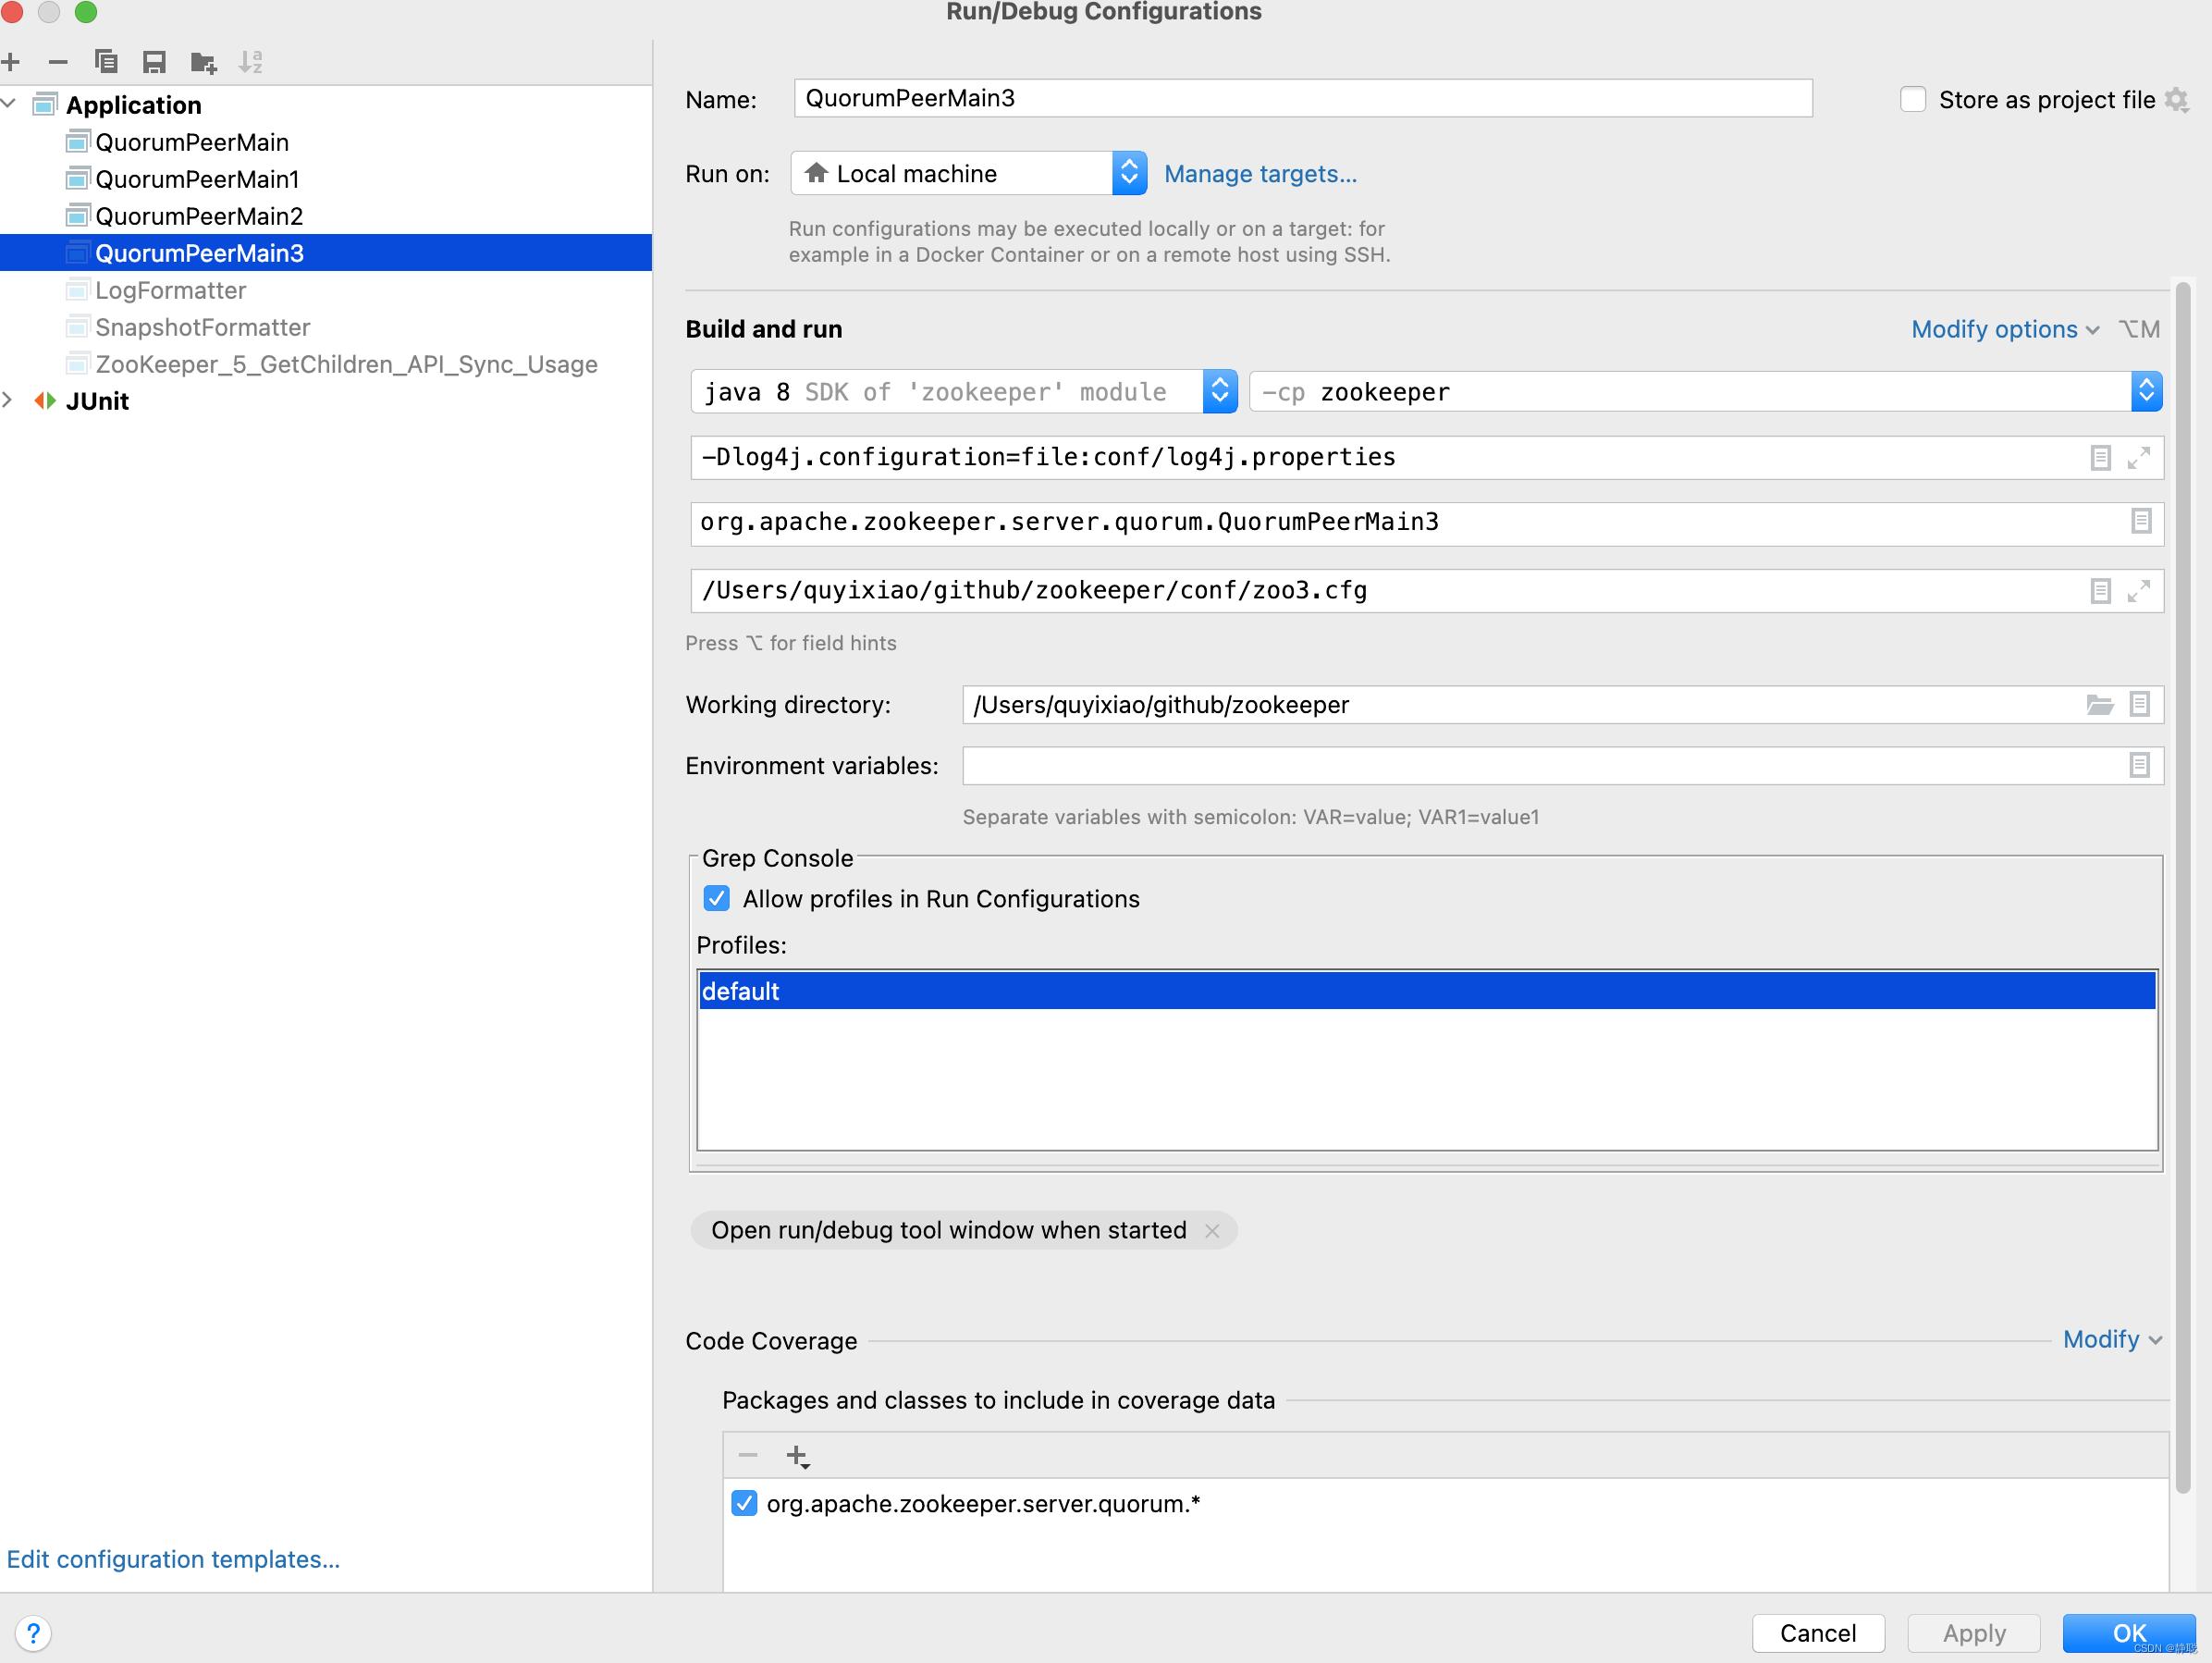
# zoo1.cfg
tickTime=2000
initLimit=10

syncLimit=5

dataLogDir=/tmp/zookeeper/zoo1/logs
dataDir=/tmp/zookeeper/zoo1/data

clientPort=2181
autopurge.snapRetainCount=500
autopurge.purgeInterval=24

server.1=127.0.0.1:2001:3001:participant
server.2=127.0.0.1:2002:3002:participant
server.3=127.0.0.1:2003:3003:participant


# zoo2.cfg
tickTime=2000
initLimit=10

syncLimit=5

dataLogDir=/tmp/zookeeper/zoo2/logs
dataDir=/tmp/zookeeper/zoo2/data

clientPort=2182

autopurge.snapRetainCount=500
autopurge.purgeInterval=24

server.1=127.0.0.1:2001:3001:participant
server.2=127.0.0.1:2002:3002:participant
server.3=127.0.0.1:2003:3003:participant


# zoo3.cfg
tickTime=2000
initLimit=10

syncLimit=5

dataLogDir=/tmp/zookeeper/zoo3/logs
dataDir=/tmp/zookeeper/zoo3/data

clientPort=2183

autopurge.snapRetainCount=500
autopurge.purgeInterval=24

server.1=127.0.0.1:2001:3001:participant
server.2=127.0.0.1:2002:3002:participant
server.3=127.0.0.1:2003:3003:participant

再执行三条命令, 创建myid文件

echo "1" /tmp/zookeeper/zoo3/data/myid
echo "2" /tmp/zookeeper/zoo3/data/myid
echo "3" /tmp/zookeeper/zoo3/data/myid
配置说明
- tickTime:用于配置Zookeeper中最小时间单位的长度,很多运行时的时间间隔都是 使用tickTime的倍数来表示的。
- initLimit:该参数用于配置Leader服务器等待Follower启动,并完成数据同步的时 间。Follower服务器再启动过程中,会与Leader建立连接并完成数据的同步,从而确定自 己对外提供服务的起始状态。Leader服务器允许Follower再initLimit 时间内完成这个工 作。
- syncLimit:Leader 与Follower心跳检测的最大延时时间
dataDir:顾名思义就是 Zookeeper 保存数据的目录,默认情况下,Zookeeper 将 写数据的日志文件也保存在这个目录里。 - clientPort:这个端口就是客户端连接 Zookeeper 服务器的端口,Zookeeper 会监 听这个端口,接受客户端的访问请求。
- server.A=B:C:D:E 其中 A 是一个数字,表示这个是第几号服务器;B 是这个服 务器的 ip 地址;C 表示的是这个服务器与集群中的 Leader 服务器交换信息的端口;D 表示的是万一集群中的 Leader 服务器挂了,需要一个端口来重新进行选举,选出一个新 的 Leader,而这个端口就是用来执行选举时服务器相互通信的端口。如果是伪集群的配 置方式,由于 B 都是一样,所以不同的 Zookeeper 实例通信端口号不能一样,所以要给 它们分配不同的端口号。如果需要通过添加不参与集群选举以及事务请求的过半机制的 Observer节点,可以在E的位置,添加observer标识。
对于单机启动已经分析得差不多了,接下来分析集群启动,先来看集群启动方法 runFromConfig() 。
public void runFromConfig(QuorumPeerConfig config)
        throws IOException, AdminServerException {
    try {
        ManagedUtil.registerLog4jMBeans();
    } catch (JMException e) {
        LOG.warn("Unable to register log4j JMX control", e);
    }

    LOG.info("Starting quorum peer");
    try {
        ServerCnxnFactory cnxnFactory = null;
        ServerCnxnFactory secureCnxnFactory = null;
        // 通信组件初始化,默认是NIO通信
        if (config.getClientPortAddress() != null) {
            // 1. 创建ServerCnxnFactory
            cnxnFactory = ServerCnxnFactory.createFactory();
            // 2. 初始化ServerCnxnFactory
            cnxnFactory.configure(config.getClientPortAddress(), config.getMaxClientCnxns(), false);
        }
        if (config.getSecureClientPortAddress() != null) {
            secureCnxnFactory = ServerCnxnFactory.createFactory();
            secureCnxnFactory.configure(config.getSecureClientPortAddress(), config.getMaxClientCnxns(), true);
        }
        // 将解析的参数赋值给zookeeper节点
        // Quorum 是集群模式下特有的对象,是Zookeeper服务器实例(ZookeeperServer)的托管者, 从集群层面来看,QuorumPeer
        // 代表了Zookeeper集群中的一台机器 ,在运行期间,QuorumPeer 会不断的检测当前服务器实例的运行状态,同时根据情况发起的Leader 选举
        quorumPeer = getQuorumPeer();
        // 3. 创建Zookeeper的数据管理器FileTxnSnapLog
        quorumPeer.setTxnFactory(new FileTxnSnapLog(config.getDataLogDir(), config.getDataDir()));
        // 初始化QuorumPeer
        quorumPeer.enableLocalSessions(config.areLocalSessionsEnabled());
        quorumPeer.enableLocalSessionsUpgrading(config.isLocalSessionsUpgradingEnabled());
        //quorumPeer.setQuorumPeers(config.getAllMembers());
        quorumPeer.setElectionType(config.getElectionAlg());
        quorumPeer.setMyid(config.getServerId());
        quorumPeer.setTickTime(config.getTickTime());
        quorumPeer.setMinSessionTimeout(config.getMinSessionTimeout());
        quorumPeer.setMaxSessionTimeout(config.getMaxSessionTimeout());
        quorumPeer.setInitLimit(config.getInitLimit());
        quorumPeer.setSyncLimit(config.getSyncLimit());
        quorumPeer.setConfigFileName(config.getConfigFilename());
        // 管理zk数据的存储
        // 5. 创建内存数据库ZKDatabase
        // ZKDatabase是Zookeeper的内存数据库,负责管理Zookeeper的所有会话记录以及DataTree 和事务日志的存储
        quorumPeer.setZKDatabase(new ZKDatabase(quorumPeer.getTxnFactory()));
        //
        quorumPeer.setQuorumVerifier(config.getQuorumVerifier(), false);
        if (config.getLastSeenQuorumVerifier() != null) {
            quorumPeer.setLastSeenQuorumVerifier(config.getLastSeenQuorumVerifier(), false);
        }
        // 6.初始化QuorumPeer
        // 在步骤5中,我们已经提到,QuorumPeer是ZookeeperServer的托管者,因此需要将一些核心的组件注册到QuorumPeer中去
        // 包括FileTxnSnapLog ,ServerCnxnFactory 和ZKDatabase ,同时Zookeeper还会对QuorumPeer配置一些参数
        // 包括服务器地址列表, Leader选举算法和会话超时时间限制等。
        quorumPeer.initConfigInZKDatabase();
        // 管理zk的通信
        quorumPeer.setCnxnFactory(cnxnFactory);
        quorumPeer.setSecureCnxnFactory(secureCnxnFactory);
        quorumPeer.setSslQuorum(config.isSslQuorum());
        quorumPeer.setUsePortUnification(config.shouldUsePortUnification());
        quorumPeer.setLearnerType(config.getPeerType());
        quorumPeer.setSyncEnabled(config.getSyncEnabled());
        quorumPeer.setQuorumListenOnAllIPs(config.getQuorumListenOnAllIPs());
        if (config.sslQuorumReloadCertFiles) {
            quorumPeer.getX509Util().enableCertFileReloading();
        }
        // sets quorum sasl authentication configurations
        // 在步骤 5 中我们已经提到,QuorumPeer 是 ZookeeperServer的托管者,因为此将需要将一些核心的组件注册到QuorumPeer
        // 中去, 包括FileTxnSnaplog ,ServerCnxnFactory 和 ZKDatabase ,同时Zookeeper还会对QuorumPeer配置一些参数
        // 包括服务器地址列表 , Leader 选举算法和会话超时时间限制等。
        // 恢复本地数据库
        // 8. 启动ServerCnxnFactory的主线程
        quorumPeer.setQuorumSaslEnabled(config.quorumEnableSasl);
        if (quorumPeer.isQuorumSaslAuthEnabled()) {
            quorumPeer.setQuorumServerSaslRequired(config.quorumServerRequireSasl);
            quorumPeer.setQuorumLearnerSaslRequired(config.quorumLearnerRequireSasl);
            quorumPeer.setQuorumServicePrincipal(config.quorumServicePrincipal);
            quorumPeer.setQuorumServerLoginContext(config.quorumServerLoginContext);
            quorumPeer.setQuorumLearnerLoginContext(config.quorumLearnerLoginContext);
        }
        quorumPeer.setQuorumCnxnThreadsSize(config.quorumCnxnThreadsSize);
        quorumPeer.initialize();
        // 启动zk
        quorumPeer.start();
        quorumPeer.join();
    } catch (InterruptedException e) {
        // warn, but generally this is ok
        LOG.warn("Quorum Peer interrupted", e);
    }
}
接下来看他的start()方法。
public synchronized void start() {
    if (!getView().containsKey(myid)) {
        throw new RuntimeException("My id " + myid + " not in the peer list");
    }
    // 冷启动数据恢复
    loadDataBase();
    startServerCnxnFactory();
    try {
        // 启动通信工厂实例对象
        adminServer.start();
    } catch (AdminServerException e) {
        LOG.warn("Problem starting AdminServer", e);
        System.out.println(e);
    }
    // 准备选举环境
    startLeaderElection();
    // 执行选举
    // 执行 super.start();就相当于执行 QuorumPeer.java 类中的 run()方法
    super.start();
}
接下来看startServerCnxnFactory()方法的启动。
private void startServerCnxnFactory() {
    if (cnxnFactory != null) {
        cnxnFactory.start();
    }
    if (secureCnxnFactory != null) {
        secureCnxnFactory.start();
    }
}
cnxnFactory.start()最终又会调用cnxnFactory的run()方法,同样对于run()方法的执行逻辑在后面再来分析 。
接下来看集群环境准备方法startLeaderElection()。
synchronized public void startLeaderElection() {
    try {
        // 创建选票
        // 1. 选票组件,epoch(leader的任期代号),zid 某个leader当选期间执行的事务编号,myid(serverid)
        // 2. 开始选票时,都是先投自己的
        // Leader选举可以说是集群和单机模式启动ZooKeeper最大的不同点,ZooKeeper首先会根据自身的SID (服务器ID) ,lastLoggedZxid
        // (最新的ZXID)和当前服务器epoch(currentEpoch) 来生成一个初始化的投票-简单地讲, 在初始化过程中,每个服务器都会给自己投票
        if (getPeerState() == ServerState.LOOKING) {
            currentVote = new Vote(myid, getLastLoggedZxid(), getCurrentEpoch());
        }
    } catch (IOException e) {
        RuntimeException re = new RuntimeException(e.getMessage());
        re.setStackTrace(e.getStackTrace());
        throw re;
    }

    // if (!getView().containsKey(myid)) {
    //      throw new RuntimeException("My id " + myid + " not in the peer list");
    //}
    if (electionType == 0) {
        try {
            udpSocket = new DatagramSocket(getQuorumAddress().getPort());
            responder = new ResponderThread();
            responder.start();
        } catch (SocketException e) {
            throw new RuntimeException(e);
        }
    }
    // 创建选举算法实例
    this.electionAlg = createElectionAlgorithm(electionType);
}
服务器状态 。
为了能够清楚的对ZooKeeper集群中每台机器的状态进行标识,在org.apache.zookeeper.quorum.QuorumPeer.ServerState类中列举了4种服务器的状态 , 分别是LOOKING,FOLLOWING,LEADING,OBSERVING。
- 寻找Leader 状态,当服务器处于该状态时,它会认为当前集群中没有Leader,因此需要进入Leader 选举流程。
- 跟随者状态,表明当前服务器角色是Follower
- LEADING:领导者状态 ,表明当前服务器角色是Leader
- OBSERVING:观察者状态,表明当前服务器角色是Observer 。
接下来看投票数据结构。
public class Vote {
    final private int version;
    // 被推举的Leader 的SID的值
    final private long id;
    // 被推举的Leader的事务ID
    final private long zxid;
    // 逻辑时钟,用来判断多个投票是否在同一轮选举周期中,该值在服务端是一个自增序列,每次进入新一轮投票后,都会对该值进行加 1
    final private long electionEpoch;
    // 被推举的Leader的epch
    final private long peerEpoch;
    // 当前服务器的状态
    final private ServerState state;

    public Vote(long id,
                long zxid,
                long peerEpoch) {
        this.version = 0x0;
        this.id = id;
        this.zxid = zxid;
        this.electionEpoch = -1;
        this.peerEpoch = peerEpoch;
        this.state = ServerState.LOOKING;
    }
}
因为electionType是由electionAlg赋值,而 electionAlg默认值为3 。 ZooKeeper会根据zoo.cfg中的配置, 创建相应的Leader选举算法实现, 在ZooKeeper中,默认提供了三种Leader选举算法的实现,分别是LeaderElection, AuthFastLeaderElection和FastLeaderElection,可以通过在配置文件(zoo.cfg ) 中使用electionAlg 属性来指定,分别使用数字0-3来表示,读者可以在后面的选举算法中详细的讲解 。 在3.4.0 版本之后,ZooKeeper 废弃了前两种Leader选举算法, 只支持FastLeaderElection选举算法了。
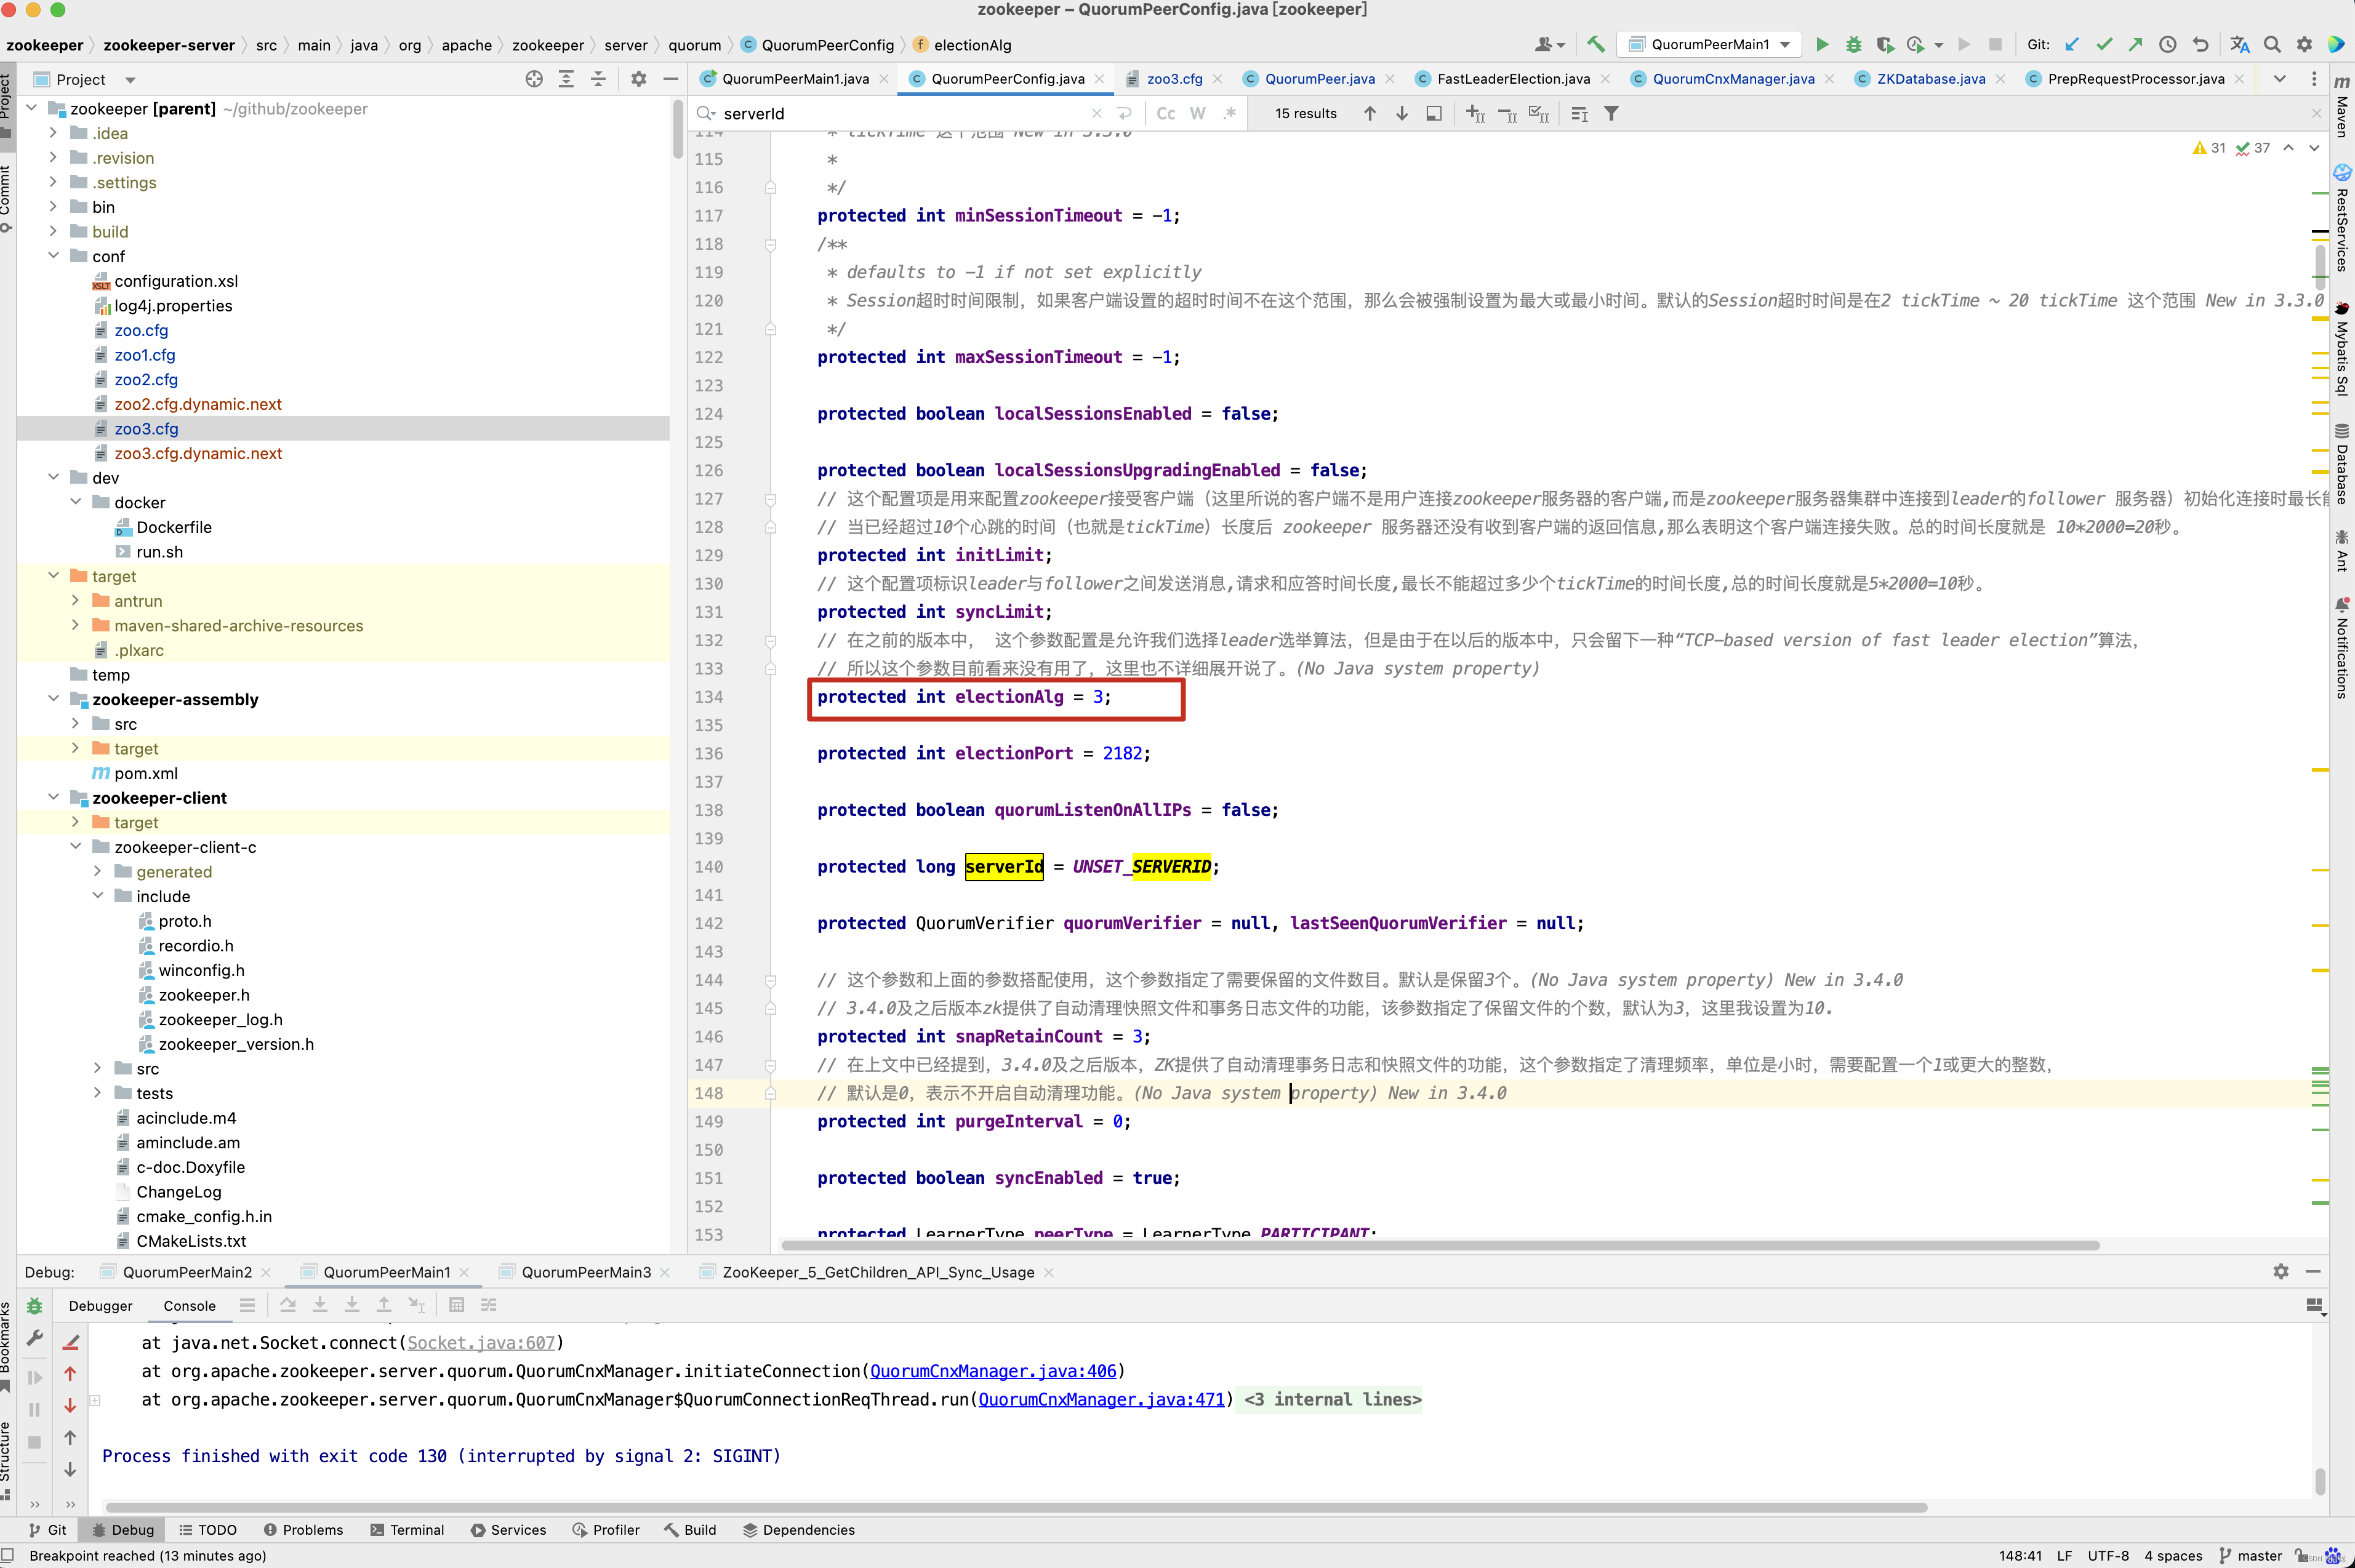
接下来看选举算法实例的创建过程 。
protected Election createElectionAlgorithm(int electionAlgorithm) {
    Election le = null;
    //TODO: use a factory rather than a switch
    switch (electionAlgorithm) {
        case 0:
            le = new LeaderElection(this);
            break;
        case 1:
            le = new AuthFastLeaderElection(this);
            break;
        case 2:
            le = new AuthFastLeaderElection(this, true);
            break;
        case 3:
            // 1 创建QuorumCnxnManager,负责选举过程中的所有网络通信
            QuorumCnxManager qcm = createCnxnManager();
            QuorumCnxManager oldQcm = qcmRef.getAndSet(qcm);
            if (oldQcm != null) {
                LOG.warn("Clobbering already-set QuorumCnxManager (restarting leader election?)");
                oldQcm.halt();
            }
            QuorumCnxManager.Listener listener = qcm.listener;
            if (listener != null) {
                // 2. 启动监听线程
                listener.start();
                // 3. 准备开始选举
                FastLeaderElection fle = new FastLeaderElection(this, qcm);
                fle.start();
                le = fle;
            } else {
                LOG.error("Null listener when initializing cnx manager");
            }
            break;
        default:
            assert false;
    }
    return le;
}
在初始化阶段,ZooKeeper 会首先创建Leader 选举所需要的I/O 层,QuorumCnxManager , 同时启动对Leader选举端口的监听,等待集群中其他服务器创建链接 。
// 网络通信组件初始化
public QuorumCnxManager createCnxnManager() {
    return new QuorumCnxManager(this,
            this.getId(),
            this.getView(),
            this.authServer,
            this.authLearner,
            this.tickTime * this.syncLimit,
            this.getQuorumListenOnAllIPs(),
            this.quorumCnxnThreadsSize,
            this.isQuorumSaslAuthEnabled());
}

public QuorumCnxManager(QuorumPeer self,
                        final long mySid,
                        MapLong, QuorumPeer.QuorumServer> view,
                        QuorumAuthServer authServer,
                        QuorumAuthLearner authLearner,
                        int socketTimeout,
                        boolean listenOnAllIPs,
                        int quorumCnxnThreadsSize,
                        boolean quorumSaslAuthEnabled) {
    // 创建各种队列
    // 消息接收队列,用于存放那些从其他服务器接收到的消息
    this.recvQueue = new ArrayBlockingQueueMessage>(RECV_CAPACITY);
    // 消息发送队列,用于保存那些待发送的消息,queueSendMap是一个Map, 按照SID进行分组,分别为集群中的每台机器分配一个单独的队列 , 从而保证各台机器之间消息发送互不影响
    this.queueSendMap = new ConcurrentHashMapLong, ArrayBlockingQueueByteBuffer>>();
    // 发送器集群,每个SendWorker 消息发送器都对应,都对应一台远程的ZooKeeper服务器, 负责消息的发送,同样,在senderWorkerMap中,也按照SID 进行分组
    this.senderWorkerMap = new ConcurrentHashMapLong, SendWorker>();
    // 最近发送过的消息, 在这个集合中, 为每个SID 保留最近发送过的一个消息
    this.lastMessageSent = new ConcurrentHashMapLong, ByteBuffer>();

    //Leader选举过程中,打开一次连接的超时时间,默认是5s。(Java system property: zookeeper. cnxTimeout)
    //
    //zookeeper.DigestAuthenticationProvider
    //.superDigest
    //
    //ZK权限设置相关,具体参见 《 使用super 身份对有权限的节点进行操作》 和 《 ZooKeeper 权限控制》
    String cnxToValue = System.getProperty("zookeeper.cnxTimeout");
    if (cnxToValue != null) {
        this.cnxTO = Integer.parseInt(cnxToValue);
    }

    this.self = self;

    this.mySid = mySid;
    this.socketTimeout = socketTimeout;
    this.view = view;
    this.listenOnAllIPs = listenOnAllIPs;
    this.authServer = authServer;
    this.authLearner = authLearner;
    this.quorumSaslAuthEnabled = quorumSaslAuthEnabled;

    initializeConnectionExecutor(mySid, quorumCnxnThreadsSize);

    // Starts listener thread that waits for connection requests
    listener = new Listener();
    listener.setName("QuorumPeerListener");
}

private void initializeConnectionExecutor(final long mySid, final int quorumCnxnThreadsSize) {
    final AtomicInteger threadIndex = new AtomicInteger(1);
    SecurityManager s = System.getSecurityManager();
    final ThreadGroup group = (s != null) ? s.getThreadGroup() : Thread.currentThread().getThreadGroup();
    final ThreadFactory daemonThFactory = runnable -> new Thread(group, runnable,
            String.format("QuorumConnectionThread-[myid=%d]-%d", mySid, threadIndex.getAndIncrement()));
    this.connectionExecutor = new ThreadPoolExecutor(3, quorumCnxnThreadsSize, 60, TimeUnit.SECONDS, new SynchronousQueue>(), daemonThFactory);
    this.connectionExecutor.allowCoreThreadTimeOut(true);
}
ClientCnxn是ZooKeeper客户端中用于处理网络I/O的一个管理器, 在Leader选举过程中也有类似的角色,那就是QuorumCnxManager , 每台服务器启动的时候,都会启动一个QuorumCnxManager,负责各台服务器之间的底层Leader 选举过程中的网络通信 。
在QuorumCnxManager这个内部维护了一系列的队列,用于保存接收的, 待发送的消息, 以及消息的发送器, 除了接收队列之外,这里提到的所有队列都有一个共同点,按SID 分组形成队列集合,我们以发送队列为例来说明这个分组的概念,假设集群中除自身外还有4台机器,那么当前服务器会为这4台机器分别创建了一个发送队列,互相不干扰 。
接下来看启动监听线程listener.start() 这一行代码。
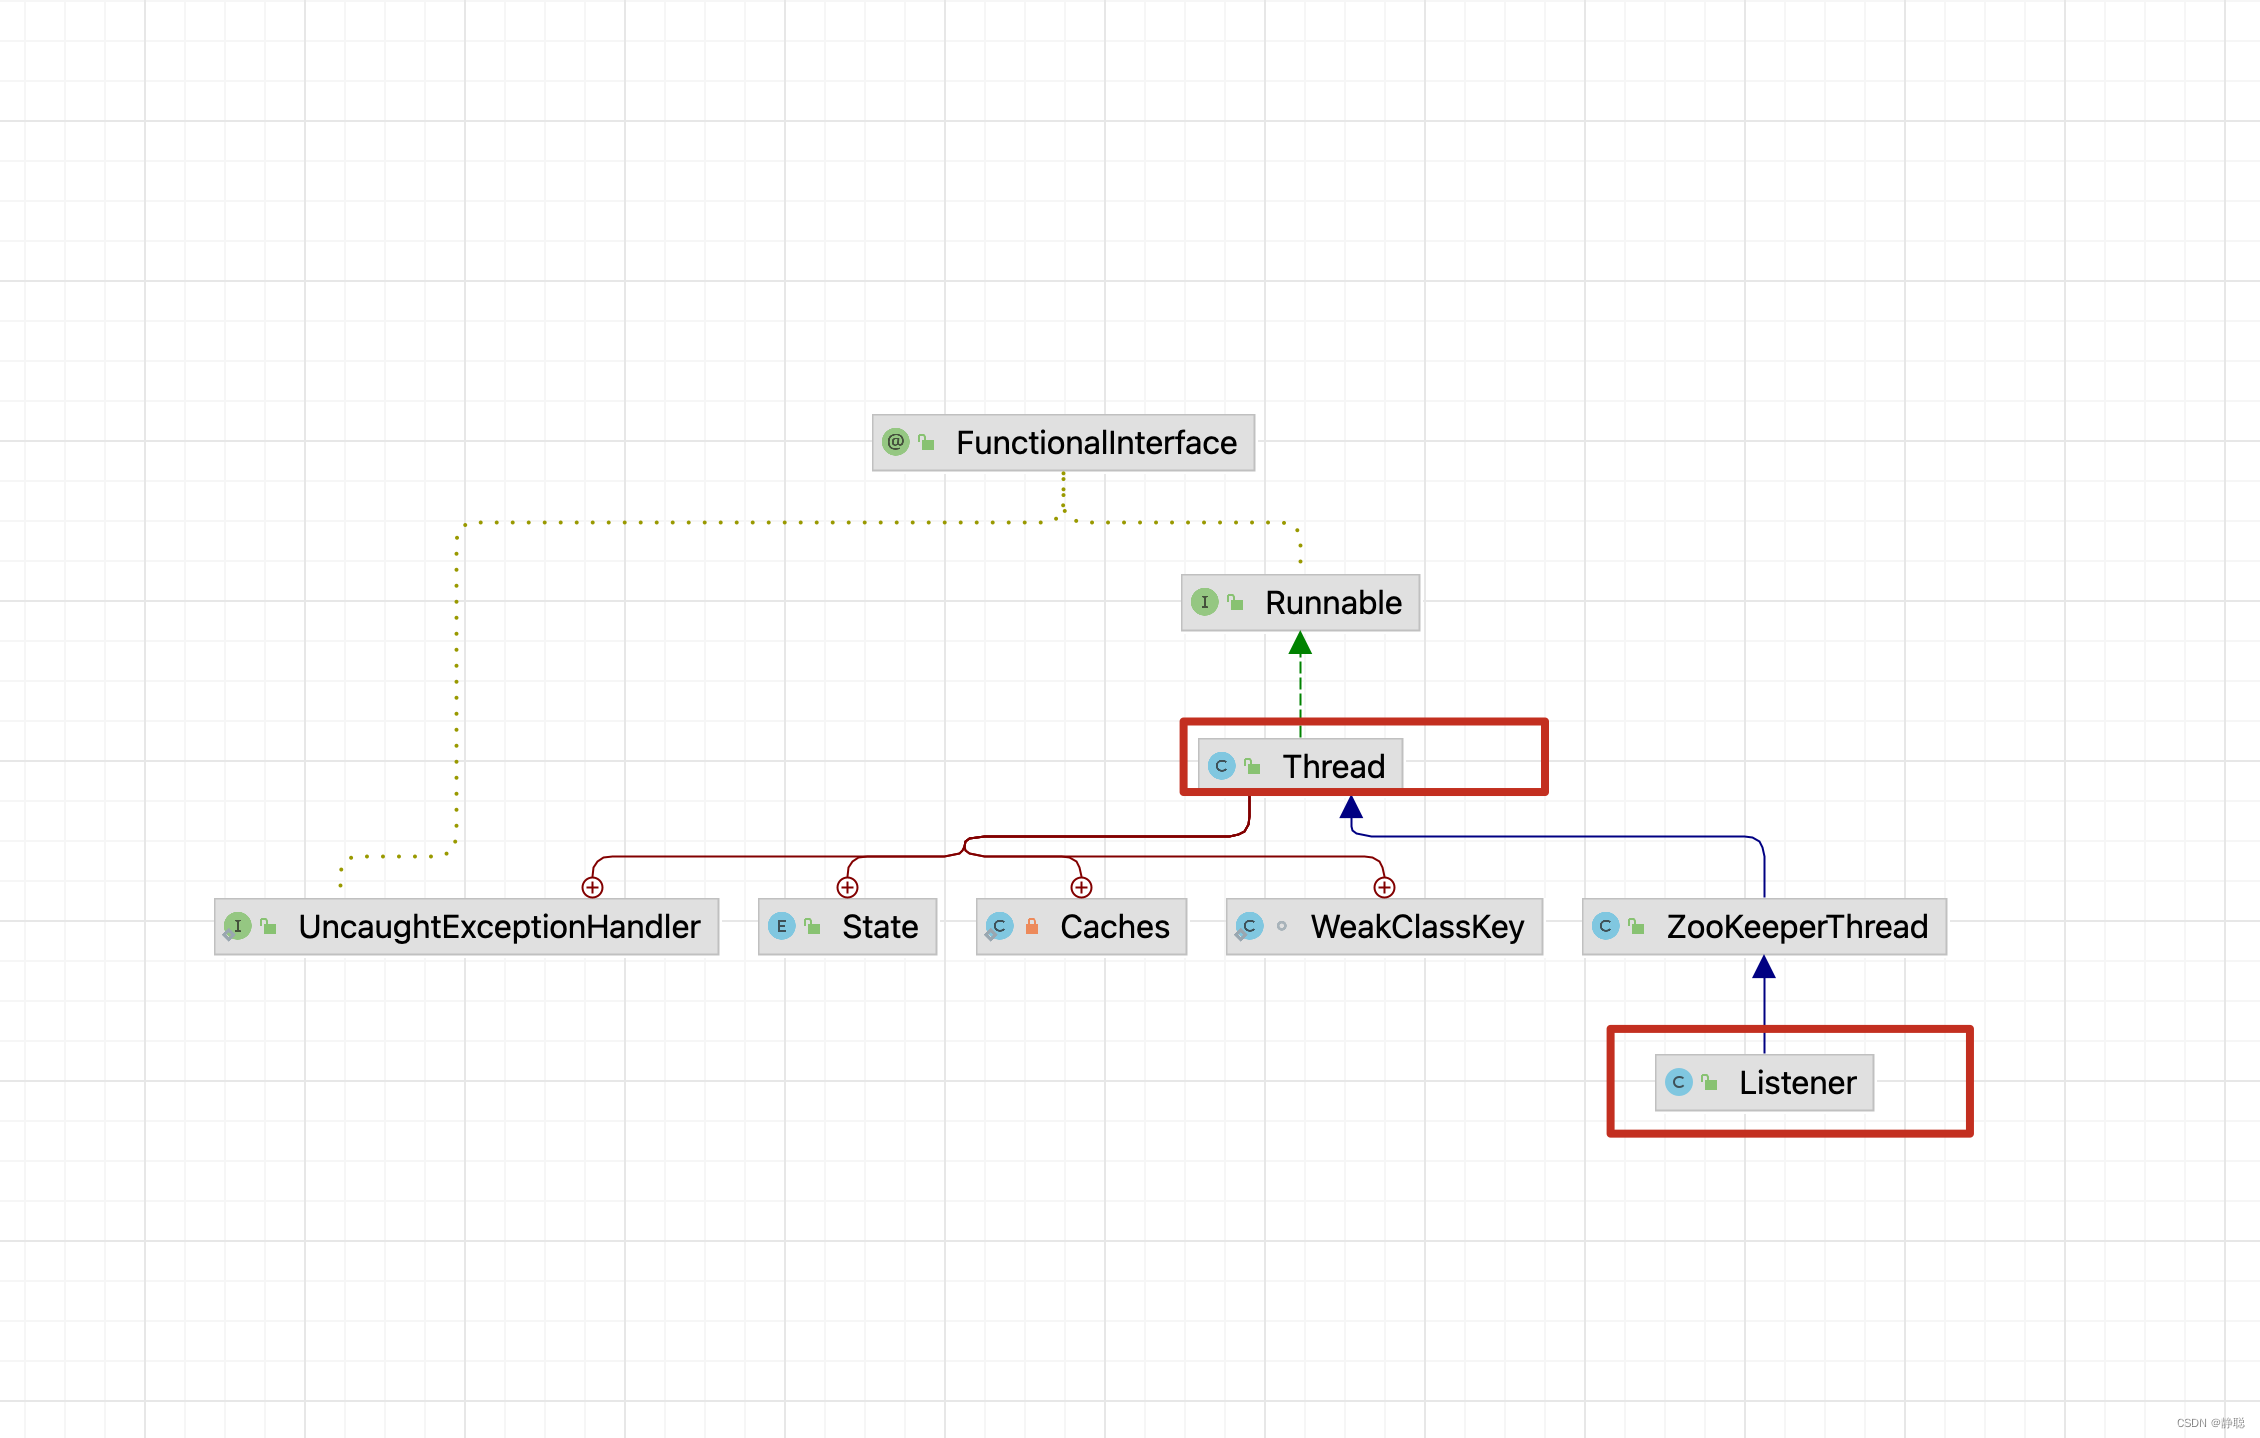
QuorumCnxManager.Listener间接继承了Thread方法,因此调用Listener的start()方法,实际上最终会调用它的run()方法 。
// 点击 QuorumCnxManager.Listener,找到对应的 run 方法
public void run() {
    int numRetries = 0;
    InetSocketAddress addr;
    Socket client = null;
    Exception exitException = null;
    while ((!shutdown) && (portBindMaxRetry == 0 || numRetries  portBindMaxRetry)) {
        LOG.debug("Listener thread started, myId: {}", self.getId());
        try {
            if (self.shouldUsePortUnification()) {
                LOG.info("Creating TLS-enabled quorum server socket");
                ss = new UnifiedServerSocket(self.getX509Util(), true);
            } else if (self.isSslQuorum()) {
                LOG.info("Creating TLS-only quorum server socket");
                ss = new UnifiedServerSocket(self.getX509Util(), false);
            } else {
                // 为了能够进行互相投票,Zookeeper集群中所有的机器都需要两两建立起网络连接,QuorumCnxManager
                // 在启动的时候,会创建一个ServerSocket来监听Leader选举的通信端口(Leader 选举的通信端口默认是3888,  ) ,
                // 开启端口监听后,Zookeeper就能够不断的接收来自其他服务器的创建连接的请求, 在接收到其他服务器的TCP 连接请求时
                // 会交由 receiveConnection
                ss = new ServerSocket();
            }

            ss.setReuseAddress(true);
            if (self.getQuorumListenOnAllIPs()) {
                int port = self.getElectionAddress().getPort();
                addr = new InetSocketAddress(port);
            } else {
                // Resolve hostname for this server in case the
                // underlying ip address has changed.
                self.recreateSocketAddresses(self.getId());
                addr = self.getElectionAddress();
            }
            LOG.info("{} is accepting connections now, my election bind port: {}", QuorumCnxManager.this.mySid, addr.toString());
            setName(addr.toString());
            // 绑定服务器地址
            ss.bind(addr);
            // 死循环
            while (!shutdown) {
                try {
                    // 阻塞,等待处理请求
                    client = ss.accept();
                    setSockOpts(client);
                    LOG.info("Received connection request from {}", client.getRemoteSocketAddress());
                    // Receive and handle the connection request
                    // asynchronously if the quorum sasl authentication is
                    // enabled. This is required because sasl server
                    // authentication process may take few seconds to finish,
                    // this may delay next peer connection requests.
                    if (quorumSaslAuthEnabled) {
                        receiveConnectionAsync(client);
                    } else {
                        receiveConnection(client);
                    }
                    numRetries = 0;
                } catch (SocketTimeoutException e) {
                    LOG.warn("The socket is listening for the election accepted "
                            + "and it timed out unexpectedly, but will retry."
                            + "see ZOOKEEPER-2836");
                }
            }
        } catch (IOException e) {
            if (shutdown) {
                break;
            }
            LOG.error("Exception while listening", e);
            exitException = e;
            numRetries++;
            try {
                ss.close();
                Thread.sleep(1000);
            } catch (IOException ie) {
                LOG.error("Error closing server socket", ie);
            } catch (InterruptedException ie) {
                LOG.error("Interrupted while sleeping. " +
                        "Ignoring exception", ie);
            }
            closeSocket(client);
        }
    }
    LOG.info("Leaving listener");
    if (!shutdown) {
        LOG.error("As I'm leaving the listener thread after "
                + numRetries + " errors. "
                + "I won't be able to participate in leader "
                + "election any longer: "
                + formatInetAddr(self.getElectionAddress())
                + ". Use " + ELECTION_PORT_BIND_RETRY + " property to "
                + "increase retry count.");
        if (exitException instanceof SocketException) {
            // After leaving listener thread, the host cannot join the
            // quorum anymore, this is a severe error that we cannot
            // recover from, so we need to exit
            socketBindErrorHandler.run();
        }
    } else if (ss != null) {
        // Clean up for shutdown.
        try {
            ss.close();
        } catch (IOException ie) {
            // Don't log an error for shutdown.
            LOG.debug("Error closing server socket", ie);
        }
    }
}
为了能够进行互相投票,Zookeeper集群中的所有机器都需要两两建立起网络连接。quorumCnxManager在启动的时候,会创建一个ServerSocket来监听Lcader选举的通信端口(Leader 选举的通信端又默认是3888)。开启端口
监听后,ZooKepr就能够不断地接收到来自其他服务器的“创建连接”请求,在接收到其他服务器的TCP连接请求时,会交由receiveConnection函数来处理。为了避免两台机器之间重复地创建TCP连接,Zookeeper设计了一种建立TCP连接的规则:只SID大的服务器主动和共他服务器建立连接,否则断开连接。在receiveConnection函数中,服务器通过对比自己和远程服务器的SID值,来判断是否接受连接请求。如果当前服务器发现自己的SID值更大,那么会断开当前连接,然后自己主动去和远程服务器建立连接。
public void receiveConnection(final Socket sock) {
    DataInputStream din = null;
    try {
        din = new DataInputStream(new BufferedInputStream(sock.getInputStream()));
        LOG.debug("Sync handling of connection request received from: {}", sock.getRemoteSocketAddress());
        handleConnection(sock, din);
    } catch (IOException e) {
        LOG.error("Exception handling connection, addr: {}, closing server connection",
                sock.getRemoteSocketAddress());
        LOG.debug("Exception details: ", e);
        closeSocket(sock);
    }
}

private void handleConnection(Socket sock, DataInputStream din) throws IOException {
    Long sid = null, protocolVersion = null;
    InetSocketAddress electionAddr = null;
    try {
        protocolVersion = din.readLong();
        if (protocolVersion >= 0) {// this is a server id and not a protocol version
            sid = protocolVersion;
        } else {
            try {
                InitialMessage init = InitialMessage.parse(protocolVersion, din);
                sid = init.sid;
                electionAddr = init.electionAddr;
            } catch (InitialMessage.InitialMessageException ex) {
                LOG.error("Initial message parsing error!", ex);
                closeSocket(sock);
                return;
            }
        }

        if (sid == QuorumPeer.OBSERVER_ID) {
            /*
             * Choose identifier at random. We need a value to identify
             * the connection.
             */
            sid = observerCounter.getAndDecrement();
            LOG.info("Setting arbitrary identifier to observer: " + sid);
        }
    } catch (IOException e) {
        LOG.warn("Exception reading or writing challenge: {}", e);
        closeSocket(sock);
        return;
    }
    // do authenticating learner
    authServer.authenticate(sock, din);
    //If wins the challenge, then close the new connection.
    // 只允许SID大的服务器主动和共他服务器建立连接,否则断开连接。在ReceiveConnection函数中,服务器通过对比自己和远程服务器的SID值,
    // 来判断是否接受连接请求。如果当前服务器发现自己的SID值更大,那么会断开当前连接,然后自己主动去和远程服务器建立连接。
    if (sid < self.getId()) {
        /*
         * This replica might still believe that the connection to sid is
         * up, so we have to shut down the workers before trying to open a
         * new connection.
         */
        SendWorker sw = senderWorkerMap.get(sid);
        if (sw != null) {
            sw.finish();
        }
        /*
         * Now we start a new connection
         */
        LOG.debug("Create new connection to server: {}", sid);
        closeSocket(sock);
        if (electionAddr != null) {
            connectOne(sid, electionAddr);
        } else {
            connectOne(sid);
        }
    } else if (sid == self.getId()) {
        // we saw this case in ZOOKEEPER-2164
        LOG.warn("We got a connection request from a server with our own ID. " + "This should be either a configuration error, or a bug.");
    } else { // Otherwise start worker threads to receive data.
        SendWorker sw = new SendWorker(sock, sid);
        RecvWorker rw = new RecvWorker(sock, din, sid, sw);
        sw.setRecv(rw);
        SendWorker vsw = senderWorkerMap.get(sid);

        if (vsw != null) {
            vsw.finish();
        }
        senderWorkerMap.put(sid, sw);
        queueSendMap.putIfAbsent(sid, new ArrayBlockingQueue<ByteBuffer>(SEND_CAPACITY));
        sw.start();
        rw.start();
    }
}
如果当前服务器发现自己的SID值更大,那么会断开当前连接,然 后自己主动去和远程服务器建立连接。接下来看重新建立链接的逻辑 。
synchronized void connectOne(long sid) {
    if (senderWorkerMap.get(sid) != null) {
        LOG.debug("There is a connection already for server " + sid);
        return;
    }
    synchronized (self.QV_LOCK) {
        boolean knownId = false;
        // Resolve hostname for the remote server before attempting to
        // connect in case the underlying ip address has changed.
        self.recreateSocketAddresses(sid);
        Map<Long, QuorumPeer.QuorumServer> lastCommittedView = self.getView();
        QuorumVerifier lastSeenQV = self.getLastSeenQuorumVerifier();
        Map<Long, QuorumPeer.QuorumServer> lastProposedView = lastSeenQV.getAllMembers();
        if (lastCommittedView.containsKey(sid)) {
            knownId = true;
            LOG.debug("Server {} knows {} already, it is in the lastCommittedView", self.getId(), sid);
            if ((sid, lastCommittedView.get(sid).electionAddr))
                return;
        }
        if (lastSeenQV != null && lastProposedView.containsKey(sid)
                && (!knownId || (lastProposedView.get(sid).electionAddr != lastCommittedView.get(sid).electionAddr))) {
            knownId = true;
            LOG.debug("Server {} knows {} already, it is in the lastProposedView", self.getId(), sid);
            if (connectOne(sid, lastProposedView.get(sid).electionAddr))
                return;
        }
        if (!knownId) {
            LOG.warn("Invalid server id: " + sid);
            return;
        }
    }
}

synchronized private boolean connectOne(long sid, InetSocketAddress electionAddr) {
    if (senderWorkerMap.get(sid) != null) {
        LOG.debug("There is a connection already for server " + sid);
        return true;
    }

    // we are doing connection initiation always asynchronously, since it is possible that
    // the socket connection timeouts or the SSL handshake takes too long and don't want
    // to keep the rest of the connections to wait
    return initiateConnectionAsync(electionAddr, sid);
}

public boolean initiateConnectionAsync(final InetSocketAddress electionAddr, final Long sid) {
    if (!inprogressConnections.add(sid)) {
        // simply return as there is a connection request to
        // server 'sid' already in progress.
        LOG.debug("Connection request to server id: {} is already in progress, so skipping this request", sid);
        return true;
    }
    try {
        connectionExecutor.execute(new QuorumConnectionReqThread(electionAddr, sid));
        connectionThreadCnt.incrementAndGet();
    } catch (Throwable e) {
        // Imp: Safer side catching all type of exceptions and remove 'sid'
        // from inprogress connections. This is to avoid blocking further
        // connection requests from this 'sid' in case of errors.
        inprogressConnections.remove(sid);
        LOG.error("Exception while submitting quorum connection request", e);
        return false;
    }
    return true;
}
看到没有,QuorumCnxManager构造方法中初始化的connectionExecutor,终于派上用场了。
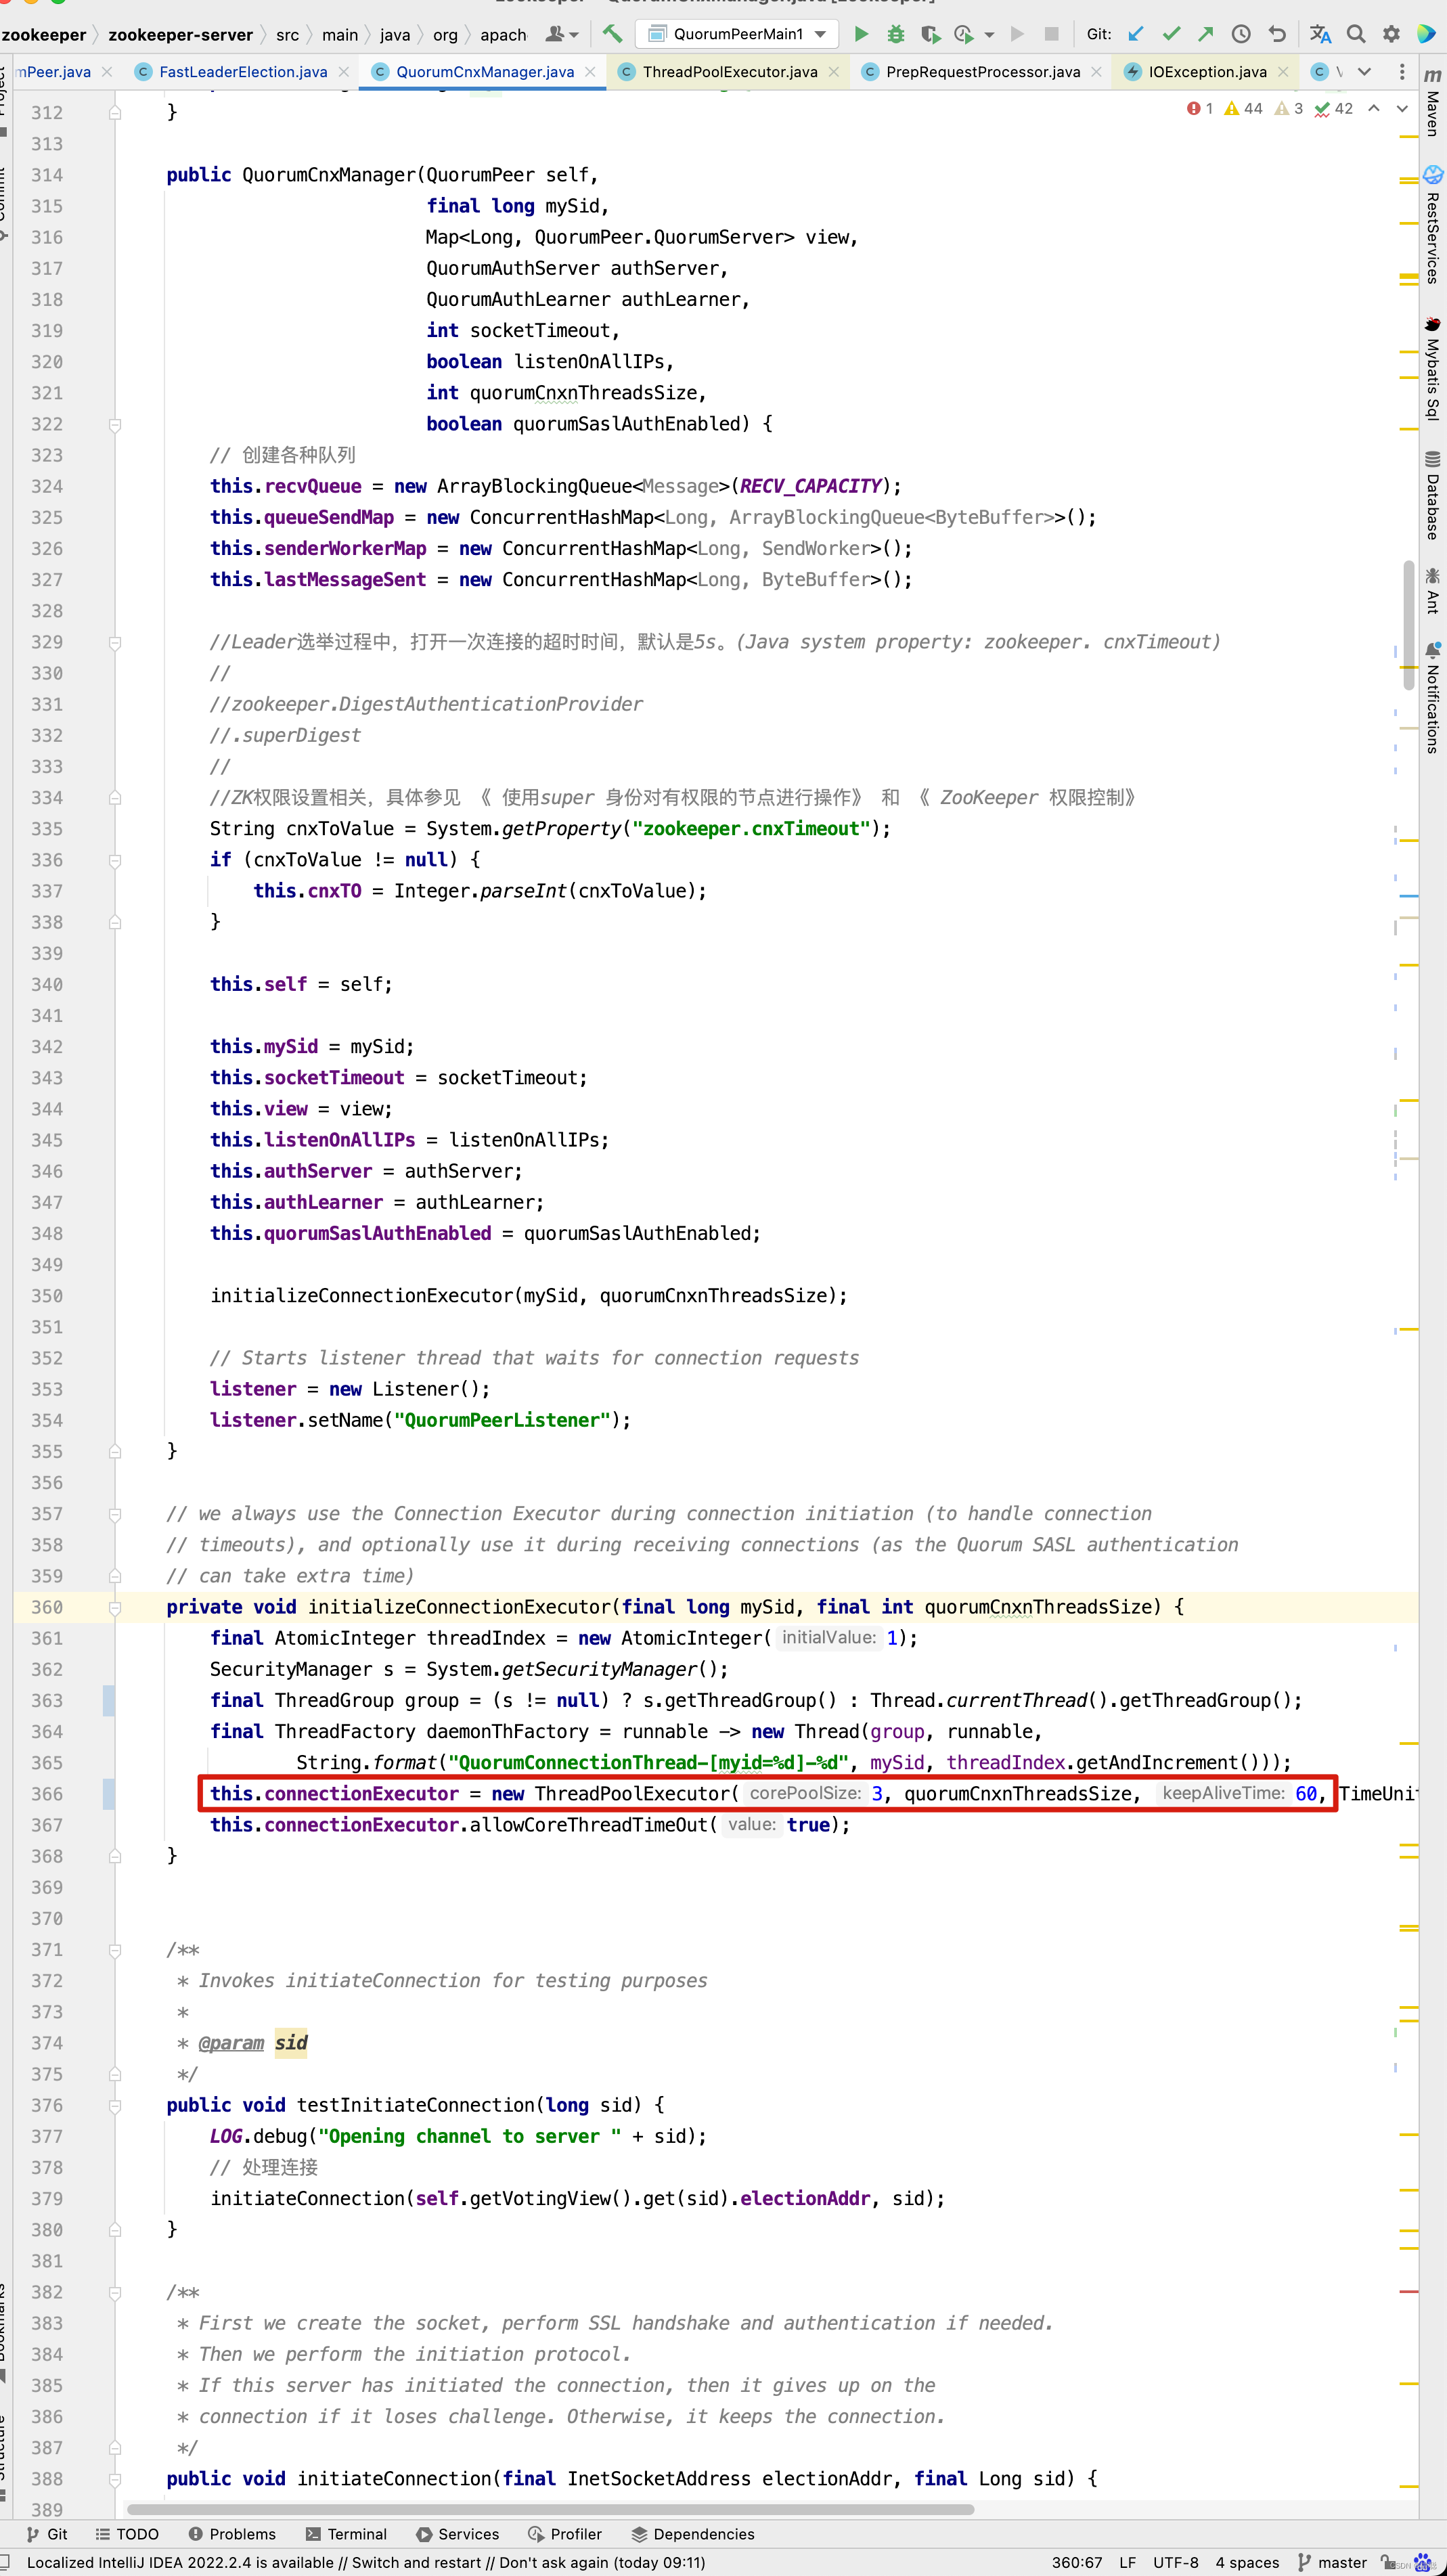
代码执行到这里,我们发现他又用了一个线程来处理连接问题。
这个类QuorumConnectionReqThread又做了哪些事情呢?

private class QuorumConnectionReqThread extends ZooKeeperThread {
    final InetSocketAddress electionAddr;
    final Long sid;

    QuorumConnectionReqThread(final InetSocketAddress electionAddr, final Long sid) {
        super("QuorumConnectionReqThread-" + sid);
        this.electionAddr = electionAddr;
        this.sid = sid;
    }

    @Override
    public void run() {
        try {
            initiateConnection(electionAddr, sid);
        } finally {
            inprogressConnections.remove(sid);
        }
    }
}
public void initiateConnection(final InetSocketAddress electionAddr, final Long sid) {

    Socket sock = null;
    try {
        LOG.debug("Opening channel to server " + sid);
        if (self.isSslQuorum()) {
            SSLSocket sslSock = self.getX509Util().createSSLSocket();
            setSockOpts(sslSock);
            sslSock.connect(electionAddr, cnxTO);
            sslSock.startHandshake();
            sock = sslSock;
            LOG.info("SSL handshake complete with {} - {} - {}", sslSock.getRemoteSocketAddress(), sslSock.getSession().getProtocol(), sslSock.getSession().getCipherSuite());
        } else {
            sock = SOCKET_FACTORY.get();
            setSockOpts(sock);
            sock.connect(electionAddr, cnxTO);
        }
        LOG.debug("Connected to server " + sid);
    } catch (X509Exception e) {
        LOG.warn("Cannot open secure channel to {} at election address {}", sid, electionAddr, e);
        closeSocket(sock);
        return;
    } catch (UnresolvedAddressException | IOException e) {
        LOG.warn("Cannot open channel to {} at election address {}", sid, electionAddr, e);
        closeSocket(sock);
        return;
    }

    try {
        startConnection(sock, sid);
    } catch (IOException e) {
        LOG.error("Exception while connecting, id: {}, addr: {}, closing learner connection", new Object[]{sid, sock.getRemoteSocketAddress()}, e);
        closeSocket(sock);
    }
}
private boolean startConnection(Socket sock, Long sid) throws IOException {
    DataOutputStream dout = null;
    DataInputStream din = null;
    LOG.debug("startConnection (myId:{} --> sid:{})", self.getId(), sid);
    try {
        // Use BufferedOutputStream to reduce the number of IP packets. This is
        // important for x-DC scenarios.
        // 通过输出流 ,向服务器发送数据
        BufferedOutputStream buf = new BufferedOutputStream(sock.getOutputStream());
        dout = new DataOutputStream(buf);

        // Sending id and challenge
        // represents protocol version (in other words - message type)
        dout.writeLong(PROTOCOL_VERSION);
        dout.writeLong(self.getId());
        String addr = formatInetAddr(self.getElectionAddress());
        byte[] addr_bytes = addr.getBytes();
        dout.writeInt(addr_bytes.length);
        dout.write(addr_bytes);
        dout.flush();
        // 通过输入流读取对方发送过来的选票
        din = new DataInputStream(new BufferedInputStream(sock.getInputStream()));
    } catch (IOException e) {
        LOG.warn("Ignoring exception reading or writing challenge: ", e);
        closeSocket(sock);
        return false;
    }

    // authenticate learner

    QuorumPeer.QuorumServer qps = self.getVotingView().get(sid);
    if (qps != null) {
        // TODO - investigate why reconfig makes qps null.
        authLearner.authenticate(sock, qps.hostname);
    }

    // If lost the challenge, then drop the new connection
    // 如果对方发送的id比我大 , 我是没有资格给对方连接请求的, 直接关闭自己的客户端
    if (sid > self.getId()) {
        LOG.info("Have smaller server identifier, so dropping the connection: (myId:{} --> sid:{})", self.getId(), sid);
        closeSocket(sock);
        // Otherwise proceed with the connection
    } else {
        LOG.debug("Have larger server identifier, so keeping the connection: (myId:{} --> sid:{})", self.getId(), sid);
        // 初始化,发送器, 和接收器
        SendWorker sw = new SendWorker(sock, sid);
        RecvWorker rw = new RecvWorker(sock, din, sid, sw);
        sw.setRecv(rw);
        SendWorker vsw = senderWorkerMap.get(sid);
        if (vsw != null)
            vsw.finish();
        senderWorkerMap.put(sid, sw);
        queueSendMap.putIfAbsent(sid, new ArrayBlockingQueue<ByteBuffer>(SEND_CAPACITY));
        // 启动发送器线程和接收器线程
        sw.start();
        rw.start();
        return true;
    }
    return false;
}
一旦建立起连接,就会根据远程服务器的SID来创建相应的消息发送器Sendworker和消息接收器RecvWorker,并启动他们。
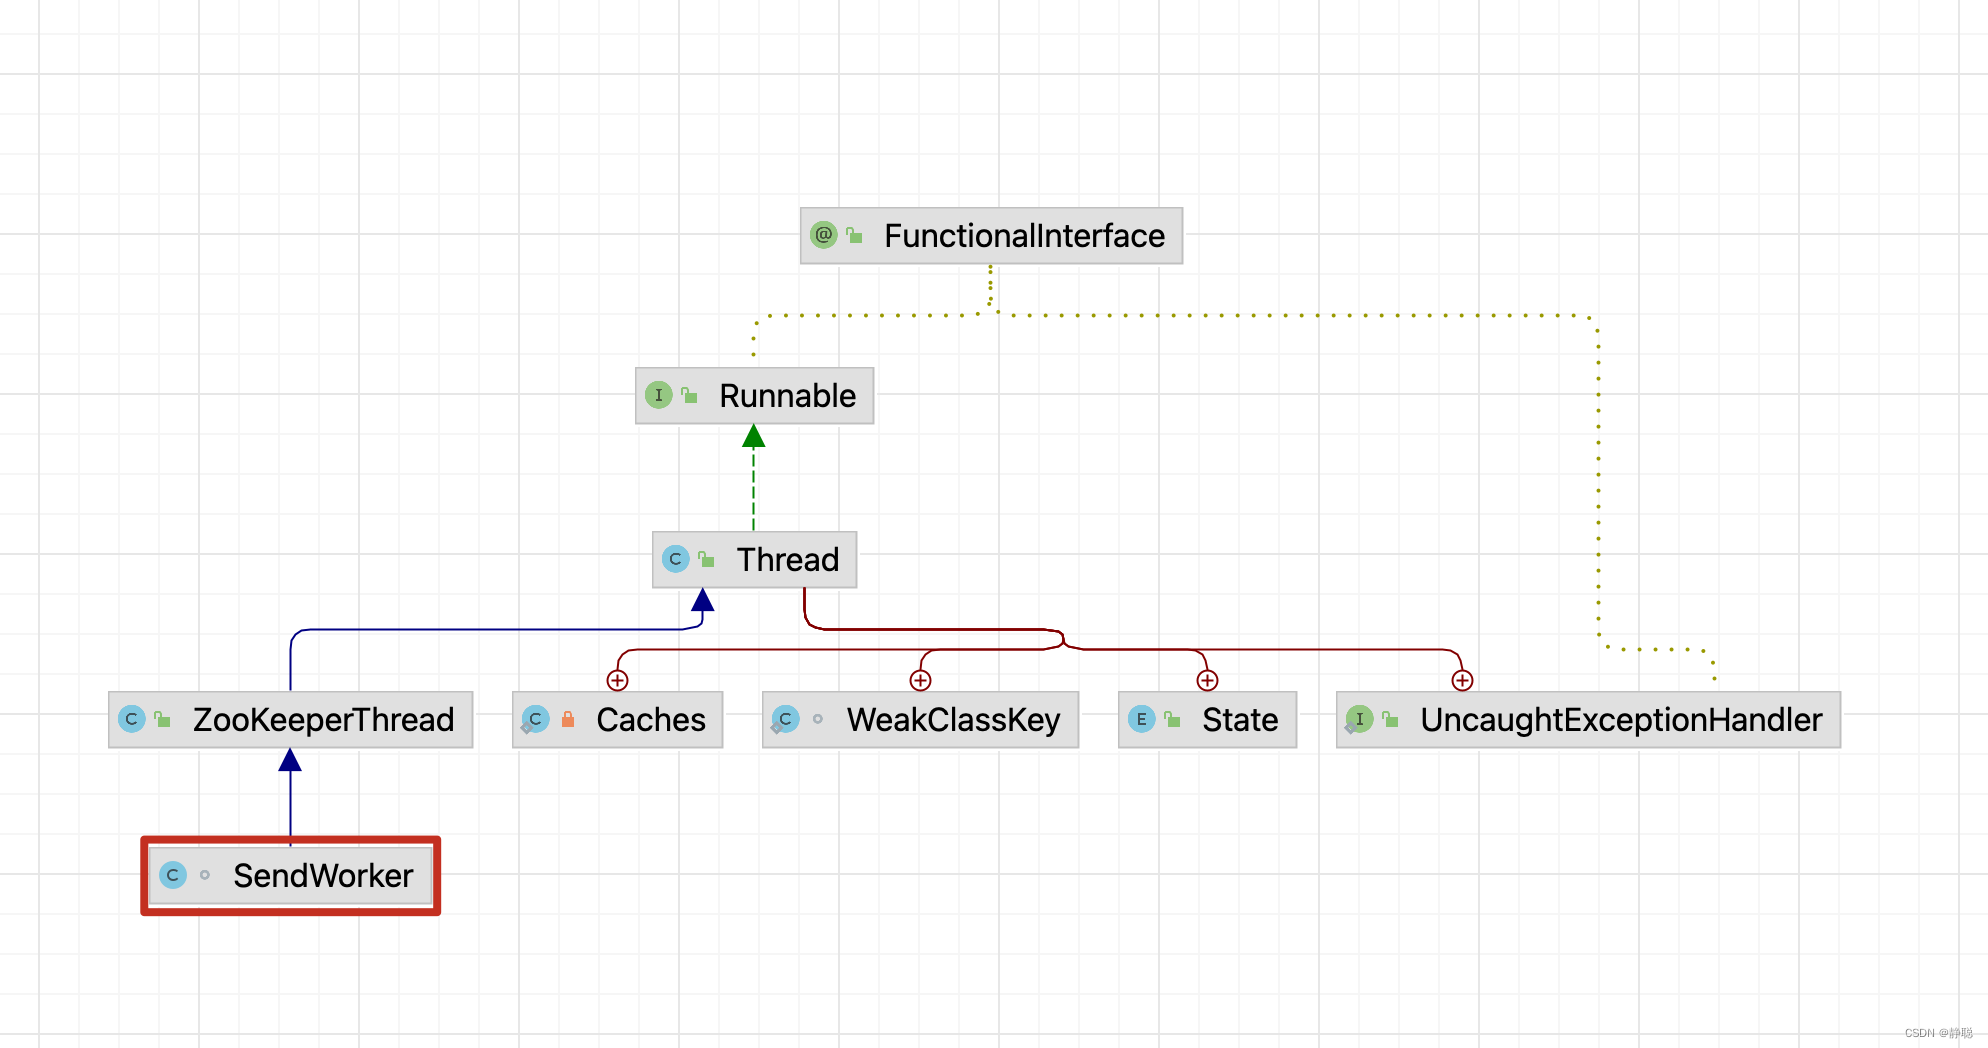
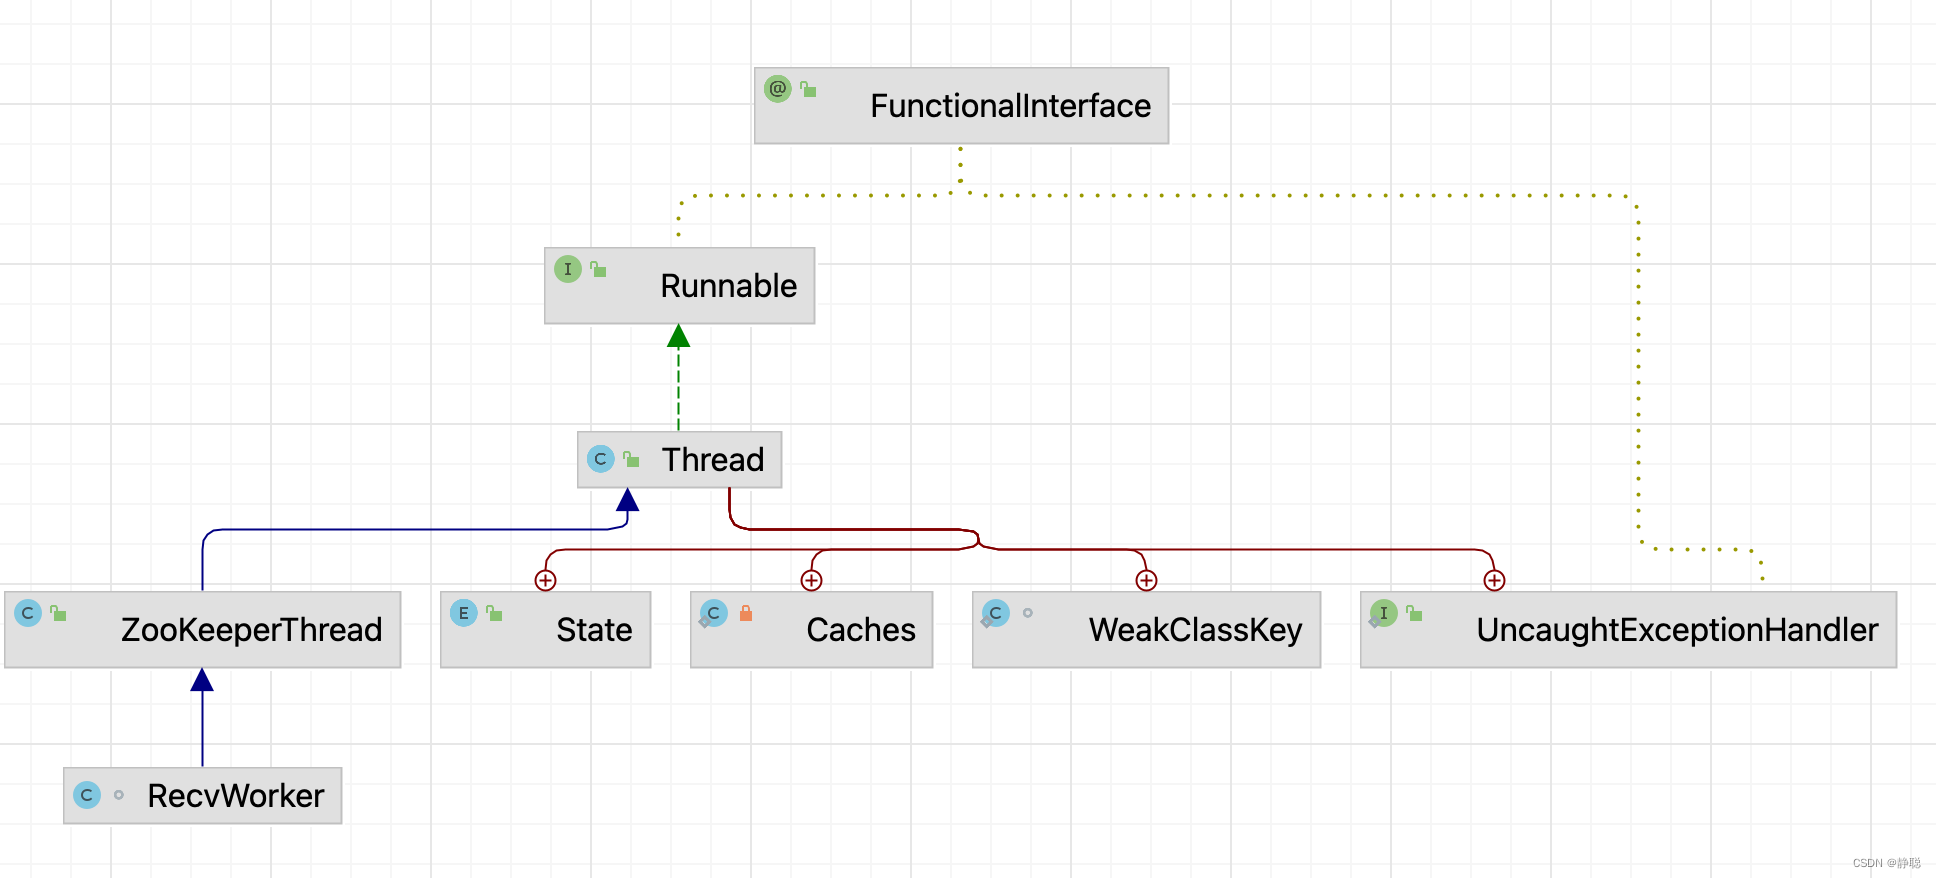
SendWorker(Socket sock, Long sid) {
    super("SendWorker:" + sid);
    this.sid = sid;
    this.sock = sock;
    recvWorker = null;
    try {
        dout = new DataOutputStream(sock.getOutputStream());
    } catch (IOException e) {
        LOG.error("Unable to access socket output stream", e);
        closeSocket(sock);
        running = false;
    }
    LOG.debug("Address of remote peer: " + this.sid);
}

@Override
public void run() {
    threadCnt.incrementAndGet();
    try {
        /**
         * If there is nothing in the queue to send, then we
         * send the lastMessage to ensure that the last message
         * was received by the peer. The message could be dropped
         * in case self or the peer shutdown their connection
         * (and exit the thread) prior to reading/processing
         * the last message. Duplicate messages are handled correctly
         * by the peer.
         *
         * If the send queue is non-empty, then we have a recent
         * message than that stored in lastMessage. To avoid sending
         * stale message, we should send the message in the send queue.
         */
        // 有一个细节需要我们注意一下:一旦zookeeper发现针对当前远程服务器的消息发送队列为空,那幺这个时候就需要从lastMessagesent中取出一个
        // 最近发送过的消息来进行再次发送。这个细节的处理主要是为了解决这样一类分布式问题:接收方在消,息接收前,或者是在接收到消息后服务器挂掉了,
        // 导致消息尚未被正确处理。那么如此重复发送是否会导致其他问题呢?当然,这里可以放心的一点是,Zookeeper能够保证接收方在处理消,息的时候,
        // 会对重复消息进行正确的处理。
        ArrayBlockingQueue<ByteBuffer> bq = queueSendMap.get(sid);
        if (bq == null || isSendQueueEmpty(bq)) {
            ByteBuffer b = lastMessageSent.get(sid);
            if (b != null) {
                LOG.debug("Attempting to send lastMessage to sid=" + sid);
                send(b);
            }
        }
    } catch (IOException e) {
        LOG.error("Failed to send last message. Shutting down thread.", e);
        this.finish();
    }
    LOG.debug("SendWorker thread started towards {}. myId: {}", sid, QuorumCnxManager.this.mySid);
    try {
        // 只要连接没有断开
        while (running && !shutdown && sock != null) {
            ByteBuffer b = null;
            try {
                // 消息的发送过程也比较简单,由于zookeeper同样也已经为每个远程服务器单独分别分配了消息发送器SendWorker,那么每个SendWorker
                // 只需要不断地从对应的消息发送队列中获取出一个消息来发送即可,同时将这个消息放人lastMessageSent中来作为最近发送过的消息。
                ArrayBlockingQueue<ByteBuffer> bq = queueSendMap.get(sid);
                if (bq != null) {
                    //不断的发送队列SendQueue中, 获取发送消息,并执行发送
                    b = pollSendQueue(bq, 1000, TimeUnit.MILLISECONDS);
                } else {
                    LOG.error("No queue of incoming messages for " +  "server " + sid);
                    break;
                }

                if (b != null) {
                    // 更新对于 sid这台服务器的最近一条消息
                    lastMessageSent.put(sid, b);
                    // 执行发送
                    send(b);
                }
            } catch (InterruptedException e) {
                LOG.warn("Interrupted while waiting for message on queue",
                        e);
            }
        }
    } catch (Exception e) {
        LOG.warn("Exception when using channel: for id " + sid
                + " my id = " + QuorumCnxManager.this.mySid
                + " error = " + e);
    }
    this.finish();
    LOG.warn("Send worker leaving thread " + " id " + sid + " my id = " + self.getId());
}


synchronized void send(ByteBuffer b) throws IOException {
    byte[] msgBytes = new byte[b.capacity()];
    try {
        b.position(0);
        b.get(msgBytes);
    } catch (BufferUnderflowException be) {
        LOG.error("BufferUnderflowException ", be);
        return;
    }
    // 输出流向外发送
    dout.writeInt(b.capacity());
    dout.write(b.array());
    dout.flush();
}
消息的发送过程也比较简单,由于ZooKeeper同样也已经为每个远程服务器单独分别分配了消息发送器SendWorker,那么每个SendWorker只需要不断地从对应的消息发送队列中获取出一个消息来发送即可,同时将这个消息放人lastMessagesent中来作为最近发送过的消息。在SendWorker的具体实现中,有一个细节需要我们注意一下:一旦ZooKeeper发现针对当前远程服务器的消息发送队列为空,那幺这个时候就需要从lastMessageSent中取出一个最近发送过的消息来进行再次发送。这个细节的处理主要是为了解决这样一类分布式问题:接收方在消,息接收前,或者是在接收到消息后服务器挂掉了,导致消息尚未被正确处理。那么如此重复发送是否会导致其他问题呢?当然,这里可以放心的一点是,Zookeeper能够保证接收方在处理消,息的时候,会对重复消息进行正确的处理.
接下来看消息的接收处理逻辑 。
class RecvWorker extends ZooKeeperThread {
    Long sid;
    Socket sock;
    volatile boolean running = true;
    final DataInputStream din;
    final SendWorker sw;

    RecvWorker(Socket sock, DataInputStream din, Long sid, SendWorker sw) {
        super("RecvWorker:" + sid);
        this.sid = sid;
        this.sock = sock;
        this.sw = sw;
        this.din = din;
        try {
            // OK to wait until socket disconnects while reading.
            sock.setSoTimeout(0);
        } catch (IOException e) {
            LOG.error("Error while accessing socket for " + sid, e);
            closeSocket(sock);
            running = false;
        }
    }

    public void run() {
        threadCnt.incrementAndGet();
        try {
            LOG.debug("RecvWorker thread towards {} started. myId: {}", sid, QuorumCnxManager.this.mySid);
            // 只要连接没有断开
            while (running && !shutdown && sock != null) {
                /**
                 * Reads the first int to determine the length of the
                 * message
                 */
                int length = din.readInt();
                if (length <= 0 || length > PACKETMAXSIZE) {
                    throw new IOException(  "Received packet with invalid packet: "   + length);
                }
                /**
                 * Allocates a new ByteBuffer to receive the message
                 */
                byte[] msgArray = new byte[length];
                // 输入流接收消息
                din.readFully(msgArray, 0, length);
                ByteBuffer message = ByteBuffer.wrap(msgArray);
                // 接收对方发送过来的选票
                addToRecvQueue(new Message(message.duplicate(), sid));
            }
        } catch (Exception e) {
            LOG.warn("Connection broken for id " + sid + ", my id = "
                    + QuorumCnxManager.this.mySid + ", error = ", e);
        } finally {
            LOG.warn("Interrupting SendWorker thread from RecvWorker. sid: {}. myId: {}", sid, QuorumCnxManager.this.mySid);
            sw.finish();
            closeSocket(sock);
        }
    }
}

public void addToRecvQueue(Message msg) {
    synchronized (recvQLock) {
        if (recvQueue.remainingCapacity() == 0) {
            try {
                recvQueue.remove();
            } catch (NoSuchElementException ne) {
                // element could be removed by poll()
                LOG.debug("Trying to remove from an empty " +  "recvQueue. Ignoring exception " + ne);
            }
        }
        try {
            // 将接收到的消息,放入到接收消息的队列中
            recvQueue.add(msg);
        } catch (IllegalStateException ie) {
            // This should never happen
            LOG.error("Unable to insert element in the recvQueue " + ie);
        }
    }
}
上面的代码写了那么多,核心代码还是很简单的,我将核心代码抽成一个例子。大家可以看看。
public class Recv {

    public static void main(String[] args) throws Exception {
        InetSocketAddress addr = new InetSocketAddress("127.0.0.1", 3322);
        ServerSocket ss = new ServerSocket();
        ss.setReuseAddress(true);
        ss.bind(addr);

        Socket sock  = ss.accept();
        sock.setSoTimeout(0);
        sock.setTcpNoDelay(true);
        sock.setKeepAlive(false);
        sock.setSoTimeout(100000);

        // 通过输入流读取对方发送过来的选票
        DataInputStream din = new DataInputStream(new BufferedInputStream(sock.getInputStream()));
        while (true) {
            /**
             * Reads the first int to determine the length of the
             * message
             */
            int length = din.readInt();
            /**
             * Allocates a new ByteBuffer to receive the message
             */
            byte[] msgArray = new byte[length];
            // 输入流接收消息
            din.readFully(msgArray, 0, length);
            System.out.println(new String(msgArray));
            break;
        }
    }
}

public class Send {
    static final Supplier<Socket> DEFAULT_SOCKET_FACTORY = () -> new Socket();
    public static Supplier<Socket> SOCKET_FACTORY = DEFAULT_SOCKET_FACTORY;

    public static void main(String[] args) throws Exception {
        Socket sock = null;
        sock = SOCKET_FACTORY.get();
        sock.setTcpNoDelay(true);
        sock.setKeepAlive(false);
        sock.setSoTimeout(100000);
        InetSocketAddress electionAddr = new InetSocketAddress("127.0.0.1", 3322);
        sock.connect(electionAddr, 5000);

        DataOutputStream dout = new DataOutputStream(sock.getOutputStream());
        String content = "0123456789abcdefghijk";
        ByteBuffer b = ByteBuffer.allocate(content.length());

        byte data[] = content.getBytes("utf-8");
        b.put(data);
        byte[] msgBytes = new byte[content.length()];
        b.position(0);
        b.get(msgBytes);
        // 输出流向外发送
        dout.writeInt(b.capacity());
        dout.write(b.array());
        dout.flush();
    }
}
结果输出如下 。
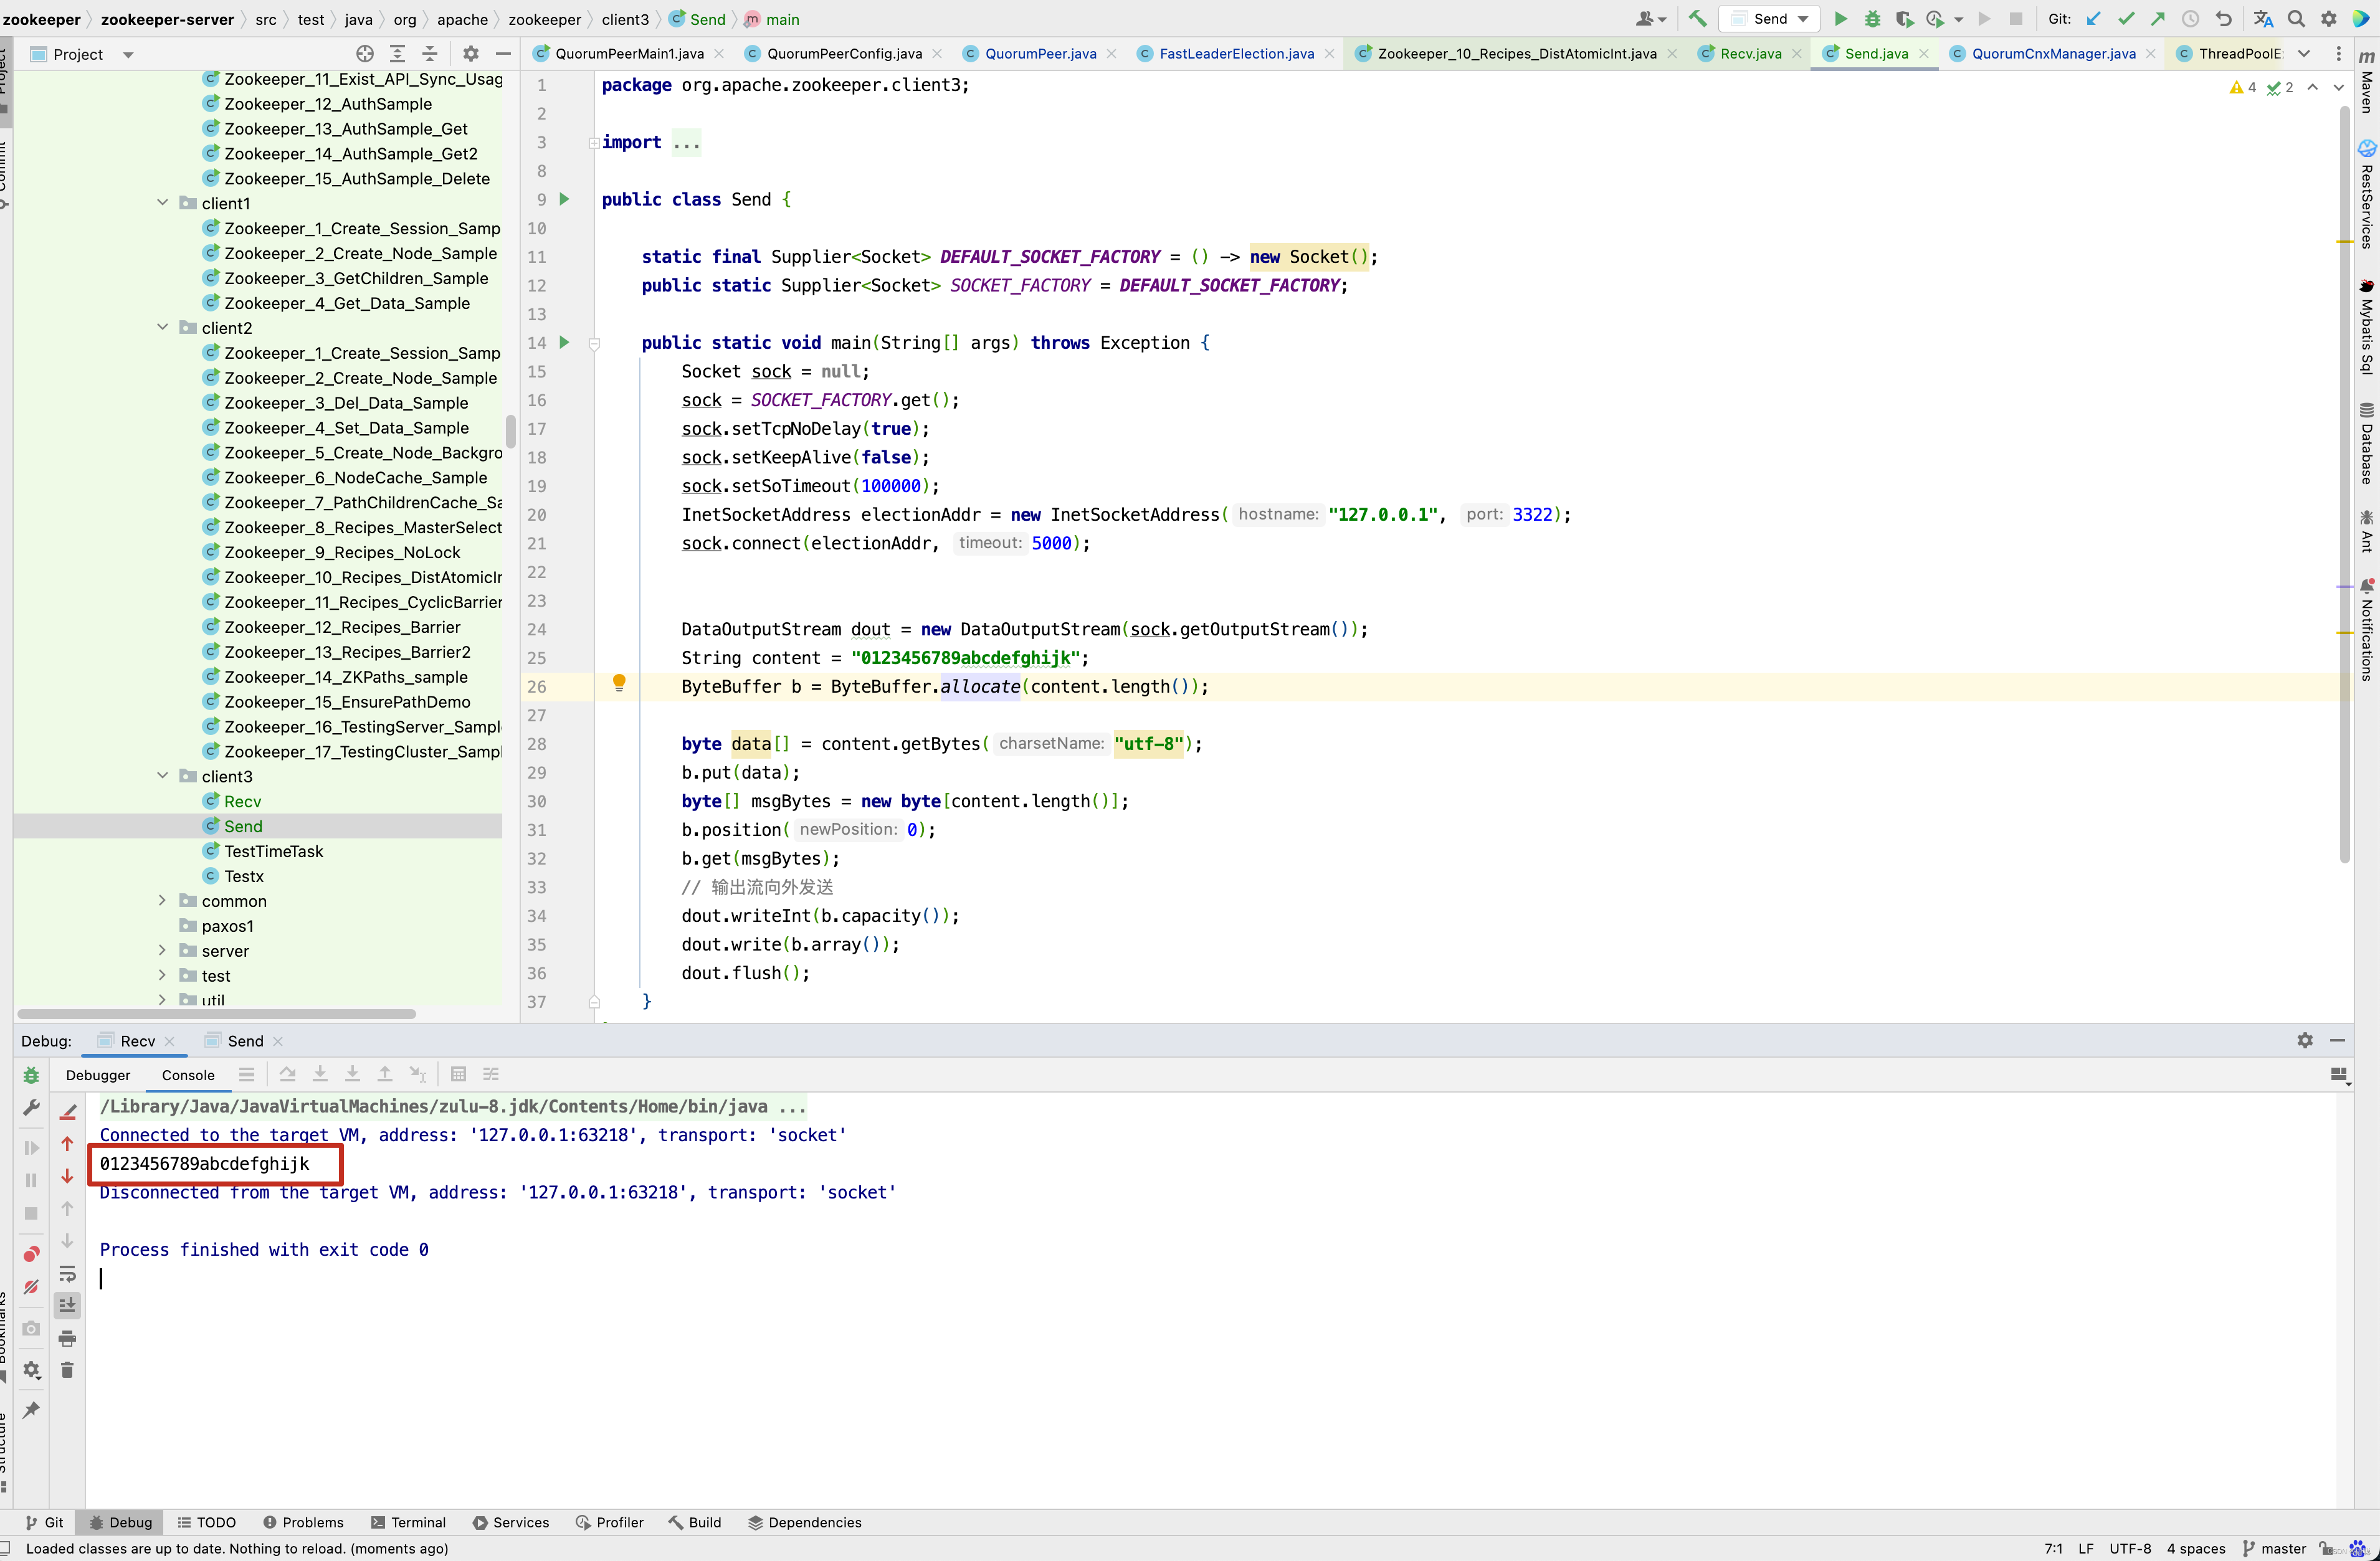
大家发现没有,ZooKeeper数据传输的方式很像Netty中的LengthFieldBasedFrameDecoder解析器。
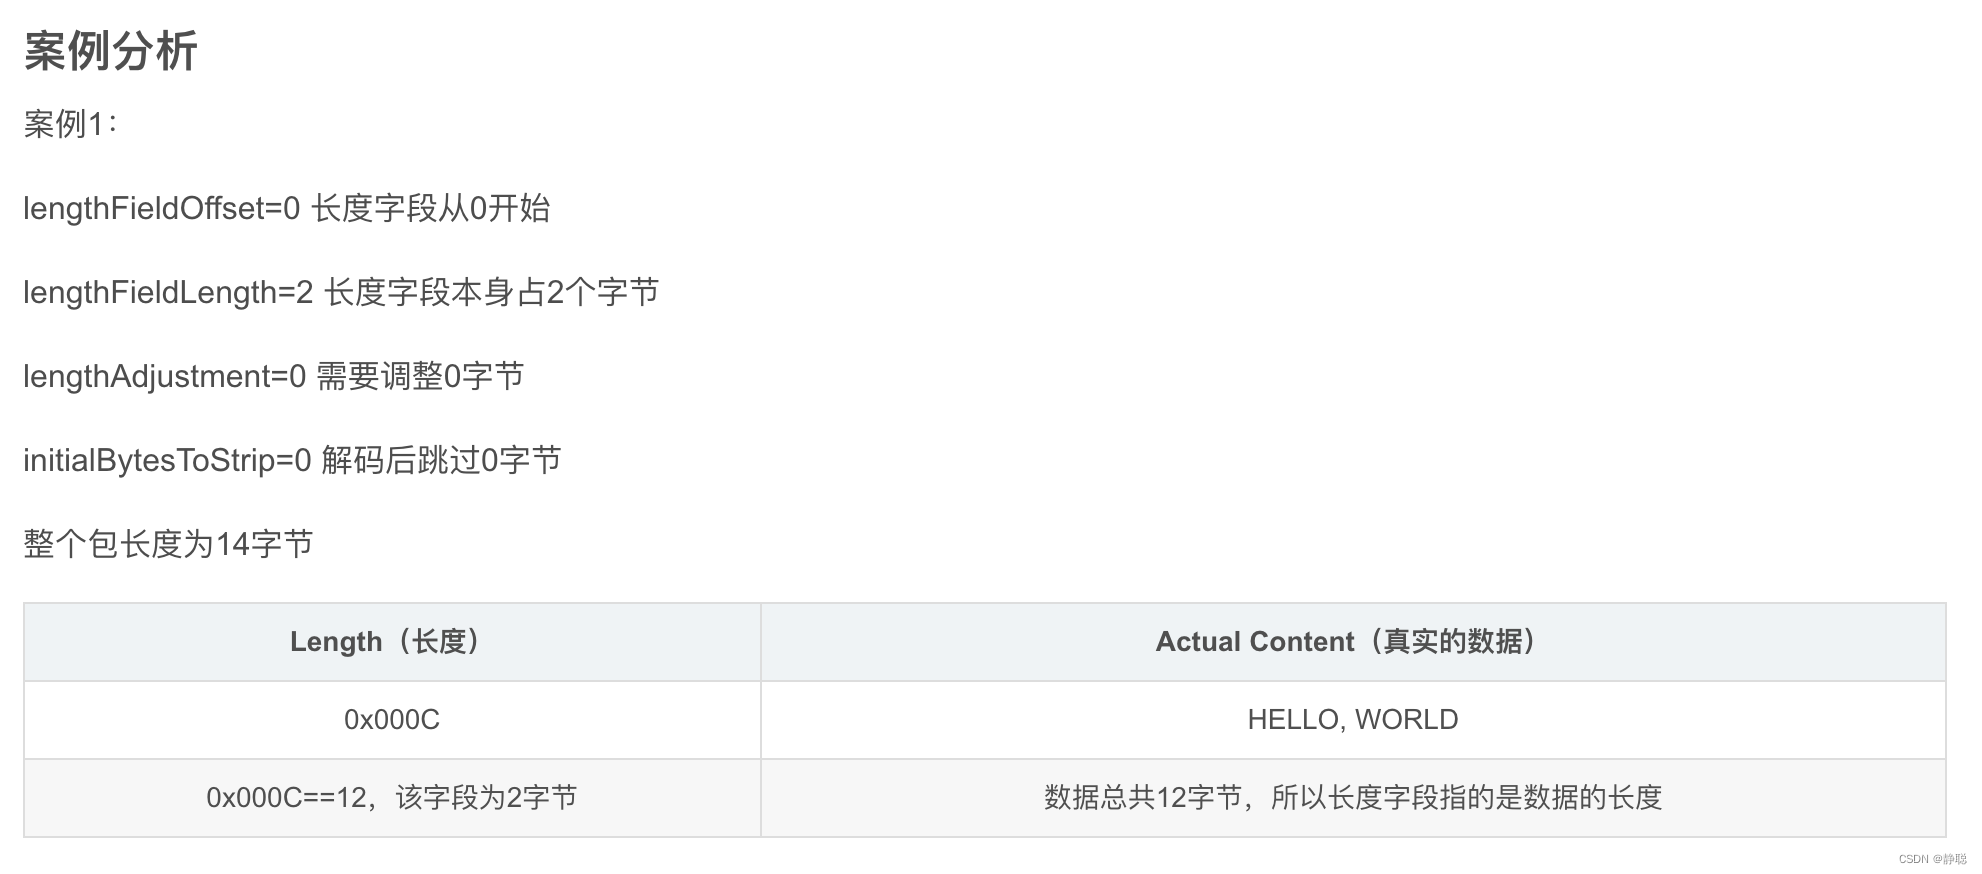
前面是内容的长度,后面是真实内容 。
ZooKeeper源码解析可能还有很长的路要走,这里集群的启动还没有分析完,后面包括集群的选举机制,数据的同步都还没有分析,由于CSDN篇幅长度有限制,因此先分析到这里,下一篇博客再来继续分析 。 如果有兴趣,可以继续看《Zookeeper源码解析(中)》博客。
ZooKeeper-3.5.8 源码:
https://gitee.com/quyixiao/zookeeper-3.5.8.git