Springboot支持Jersey1.x和Jersey2.x,我们这里只介绍Springboot对Jersey2.x的支持。springboot对jersey的集成非常简单。
项目结构:

1、引入Springboot对Jersey的starter包
<dependencies>
        <dependency>
            <groupId>org.springframework.boot</groupId>
            <artifactId>spring-boot-starter</artifactId>
        </dependency>
        <dependency>
            <groupId>org.springframework.boot</groupId>
            <artifactId>spring-boot-starter-jersey</artifactId>
        </dependency>
        <dependency>
            <groupId>org.springframework.boot</groupId>
            <artifactId>spring-boot-starter-test</artifactId>
            <scope>test</scope>
        </dependency>
    </dependencies>
2、配置Jersey配置对象
Springboot需要对Jersey的配置对象,有三种配置方式:
- 创建一个自定义的ResourceConfig
- 返回一个ResourceConfig类型的@Bean
- 配置一组ResourceConfigCustomizer对象
我们分别测试一下这三种配置方式。
实体类 User.java
package com.example.springbootjersey2.bean;

import org.springframework.stereotype.Component;

import javax.xml.bind.annotation.XmlElement;
import javax.xml.bind.annotation.XmlRootElement;
import java.io.Serializable;

@Component
@XmlRootElement(name = "user")
public class User implements Serializable {
    private static final long serialVersionUID = 1L;

    private String id;
    private String name;
    private String profession;

    public String getId() {
        return id;
    }

    @XmlElement
    public void setId(String id) {
        this.id = id;
    }

    public String getName() {
        return name;
    }

    @XmlElement
    public void setName(String name) {
        this.name = name;
    }

    public String getProfession() {
        return profession;
    }

    @XmlElement
    public void setProfession(String profession) {
        this.profession = profession;
    }

    @Override
    public String toString() {
        return "User{" +
                "id='" + id + '\'' +
                ", name='" + name + '\'' +
                ", profession='" + profession + '\'' +
                '}';
    }
}
业务服务类 UserService.java
package com.example.springbootjersey2.service;


import com.example.springbootjersey2.bean.User;
import com.example.springbootjersey2.dao.UserDao;
import org.springframework.stereotype.Service;

import javax.ws.rs.GET;
import javax.ws.rs.Path;
import javax.ws.rs.Produces;
import javax.ws.rs.core.MediaType;
import java.util.List;

@Path("/UserService")
@Service
public class UserService {

    @Path("/users")
    @GET
    @Produces(MediaType.APPLICATION_JSON)
    public List<User> getUsers() {
        System.out.println("success");
        UserDao dao = new UserDao();
        return dao.getAllUsers();
    }
}
数据访问 UserDao.java
package com.example.springbootjersey2.dao;

import com.example.springbootjersey2.bean.User;
import org.springframework.stereotype.Repository;

import java.io.*;
import java.util.ArrayList;
import java.util.List;

@Repository
public class UserDao{

    public List<User> getAllUsers() {
        List<User> userList;
        File file = new File("Users.dat");
        if (!file.exists()) {
            User user = new User();
            user.setId("1");
            user.setName("Tom");
            user.setProfession("Student");
            userList = new ArrayList<>();
            userList.add(user);
            writeUserList(userList, file);
        } else {
            userList = readUserList(file);
        }
        return userList;
    }


    /**
     * 序列化
     *
     * @param userList
     * @param file
     */
    private void writeUserList(List<User> userList, File file) {
        ObjectOutputStream oos = null;
        FileOutputStream fos = null;
        try {
            fos = new FileOutputStream(file);
            oos = new ObjectOutputStream(fos);
            oos.writeObject(userList);
        } catch (IOException e) {
            e.printStackTrace();
        } finally {
            if (oos != null) {
                try {
                    oos.close();
                } catch (IOException e) {
                    e.printStackTrace();
                }
            }
            if (fos != null) {
                try {
                    fos.close();
                } catch (IOException e) {
                    e.printStackTrace();
                }
            }

        }
    }

    /**
     * 反序列化
     *
     * @param file
     * @return
     */
    @SuppressWarnings("unchecked")
    private List<User> readUserList(File file) {
        List<User> userList = null;
        FileInputStream fis = null;
        ObjectInputStream ois = null;
        try {
            fis = new FileInputStream(file);
            ois = new ObjectInputStream(fis);
            userList = (List<User>) ois.readObject();
        } catch (IOException | ClassNotFoundException e) {
            e.printStackTrace();
        } finally {
            if (ois != null) {
                try {
                    ois.close();
                } catch (IOException e) {
                    e.printStackTrace();
                }
            }
            if (fis != null) {
                try {
                    fis.close();
                } catch (IOException e) {
                    e.printStackTrace();
                }
            }
        }
        return userList;
    }
}
启动类
package com.example.springbootjersey2;

import org.glassfish.jersey.server.ResourceConfig;
import org.springframework.boot.SpringApplication;
import org.springframework.boot.autoconfigure.SpringBootApplication;
import org.springframework.context.annotation.Bean;

@SpringBootApplication
public class RestfulDemoApplication  {

    public static void main(String[] args) {
        SpringApplication.run(RestfulDemoApplication.class,args);
    }


}
第1种方式:创建一个自定义的ResourceConfig
package com.example.springbootjersey2.config;


import com.example.springbootjersey2.service.UserService;
import org.glassfish.jersey.server.ResourceConfig;
import org.springframework.stereotype.Component;

@Component
public class JerseyConfig extends ResourceConfig {

    public JerseyConfig() {
        register(UserService.class);
    }
}
只需要保证JerseyConfig在Application类能够扫描的包下即可。
发送测试请求:http://localhost:8080/UserService/users

注意:
- Springboot默认把Jersey的根路径映射在/*上的;这个可以通过几种方式来配置,对于自定义的ResourceConfig方式来说,只需要在类上面添加一个@ApplicationPath注解即可:
@Component
@ApplicationPath("webapi")
public class JerseyConfig extends ResourceConfig {
此时测试地址变为:http://localhost:8080/webapi/UserService/users
第2种方式:ResourceConfig类型的@Bean
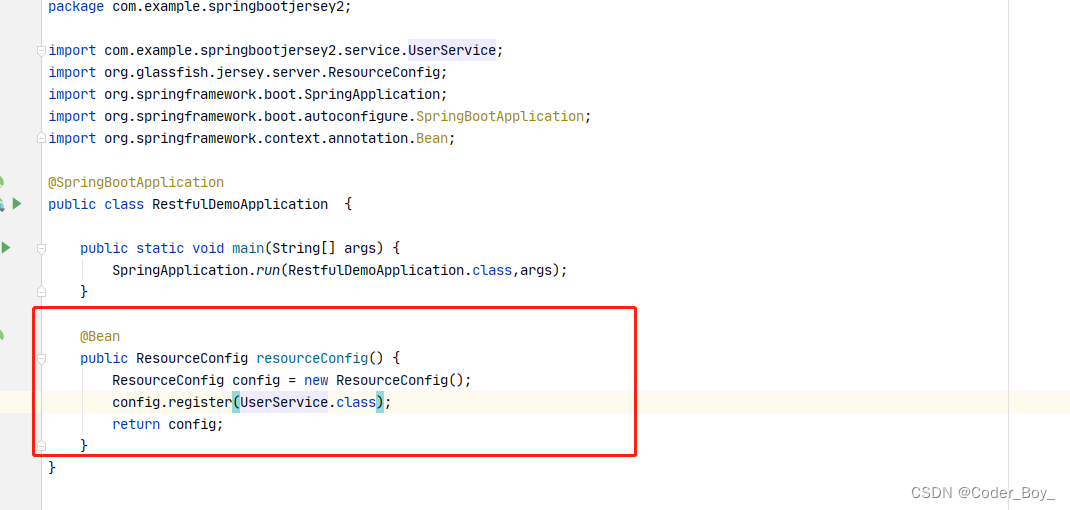
但是在这种情况下,想要配置Jersey的基础路径,就需要在application.properties文件中配置一个
spring.jersey.application-path=webapi
第3种方式: 使用ResourceConfigCustomizer
@Component
public class MyResourceConfigCustomizer implements ResourceConfigCustomizer {
    @Override
    public void customize(ResourceConfig config) {
        config.register(UserService.class);
    }
}
该接口很简单,传入一个ResourceConfig实例,我们就可以针对这个实例进行相关配置。但是要让这个传入的config生效,我们还需要在RestfulDemoApplication类中提供一个基础的ResourceConfig类即可:
@SpringBootApplication
public class RestfulDemoApplication  {

    public static void main(String[] args) {
        SpringApplication.run(RestfulDemoApplication.class,args);
    }

    @Bean
    public ResourceConfig resourceConfig() {
        ResourceConfig config = new ResourceConfig();

        return config;
    }
}
这种方式对比第二种方式的好处在于,我们可以把资源类的注册,过滤器,拦截器,Entity Provider,Feature等不同类型的组件注册从主类中分开,在代码管理上会更加清晰。