创建个人中心页面(下)

news2025/7/9 11:28:39

目录

布局规划前端页面

获取头像+获取Bot列表

对接获取Bot信息+渲染到前端

实现创建一个Bot

前端进行对接插入Bot

实现创建成功关闭和清空

修改时间

实现删除按钮

安装依赖:vue3-ace-editor


布局规划前端页面

使用 bootstrap 的 grids system 进行布局

在 bootstrap 的网址搜索 grids system。

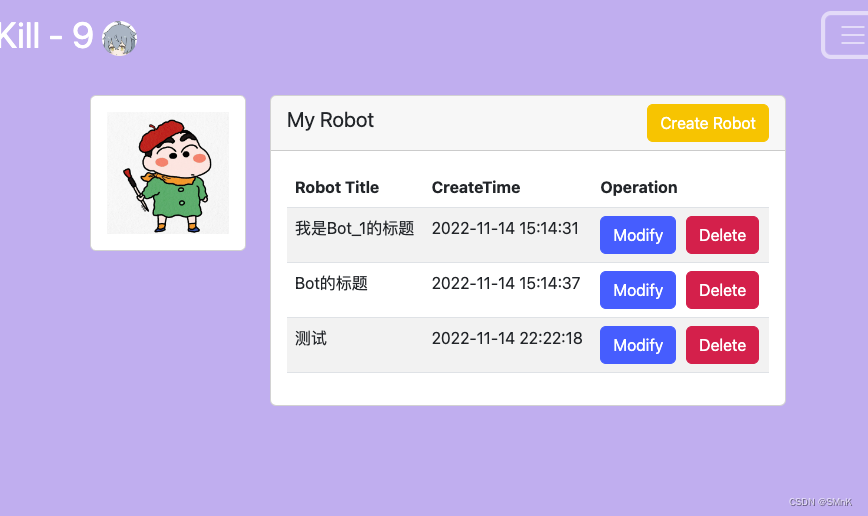
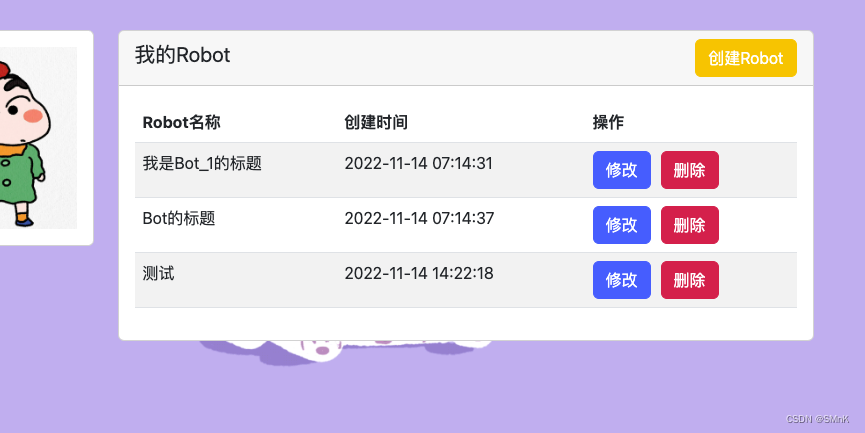
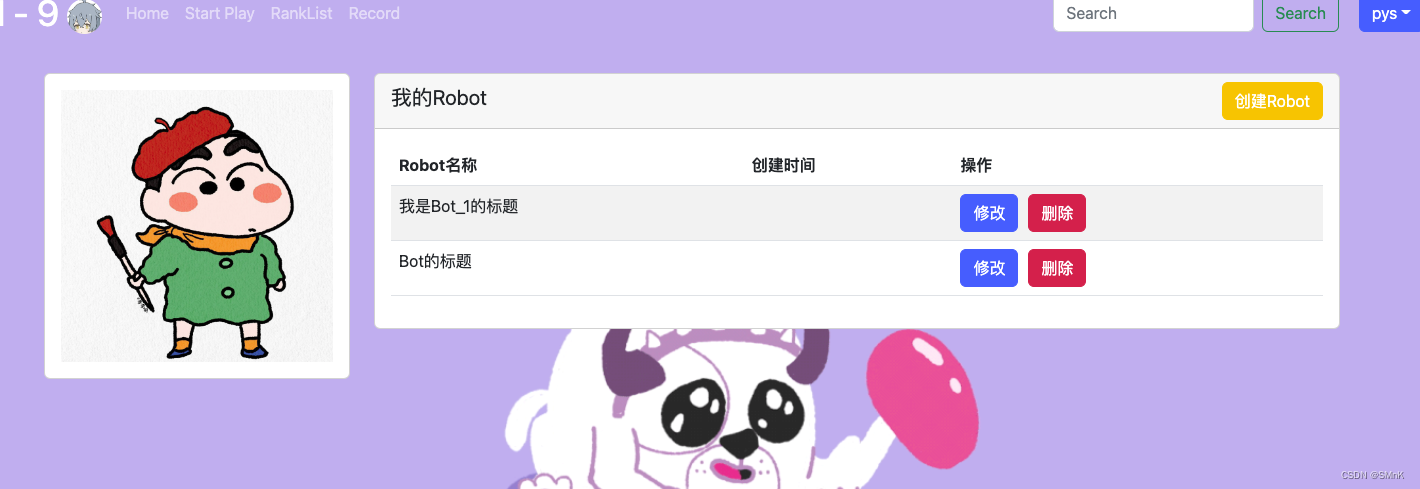
一行分为12份,左边3份,为头像;右边9份,白色区域 cards,加上按钮创建 bot,获取 Bot 列表

在 views.user.bot.UserBotIndexView.vue 下修改,实现基本的个人 bot 信息展示

获取头像+获取Bot列表

对接获取Bot信息+渲染到前端


<template>
    <div class="container">
        <div class="row">
            <div class="col-3">
                <div class="card" style="margin-top:20px;">
                    <div class="card-body" >
                        <img :src="$store.state.user.photo" alt="" style="width:100%;">
                    </div>
                </div>
            </div>
            <div class="col-9">
                <div class="card" style="margin-top:20px;">
                    <div class="card-header">
                        <span style="font-size:130%">我的Robot</span>
                    
                        <button type="button" class="btn btn-warning float-end" style="color:white;" data-bs-toggle="modal" data-bs-target="#add-bot-btn">
                            创建Robot
                        </button>
                        <!--    创建robot 模态框 -->


                    </div>
                    <div class="card-body">
                        <table class="table table-striped table-hover">
                            <thead>
                                <tr>
                                    <th>Robot名称</th>
                                    <th>创建时间</th>
                                    <th>操作</th>
                                </tr>
                            </thead>
                            <tbody>
                                <tr v-for="bot in bots" :key="bot.id">
                                    <td>{{bot.title}}</td>
                                    <td>{{bot.createTime}}</td>
                                    <td>
                                        <button type="button" class="btn btn-primary" style="color:white; margin-right: 10px;" data-bs-toggle="modal" :data-bs-target="'#update-bot-modal-'+bot.id">
                                            修改
                                        </button>
                                        <button type="button" @click="remove_bot(bot)" class="btn btn-danger" style="color:white;">
                                            删除
                                        </button>

                                    <!-- 修改bot模态框 -->
                                    </td>
                                </tr>
                            </tbody>
                        </table>
                    </div>
                </div>
            </div>
        </div>
    </div>
</template>

<script>


import $ from 'jquery'
import { ref } from 'vue'
import { useStore } from 'vuex';

export default{
    components:{

    },
    setup(){
        const store = useStore();
        let bots = ref([]);
        const refresh_bots = () => {
                $.ajax({
                url: "http://127.0.0.1:3000/user/bot/getlist/",
                type: "get",
                headers: {
                    Authorization: "Bearer " + store.state.user.token,
                },
                success(resp) {
                    bots.value = resp;
                }
                });
        }
        refresh_bots();
        return{
            bots,
        }

    }
}
</script>
<style scoped>
</style>

前端页面创建、修改、删除 Bot

实现创建一个Bot

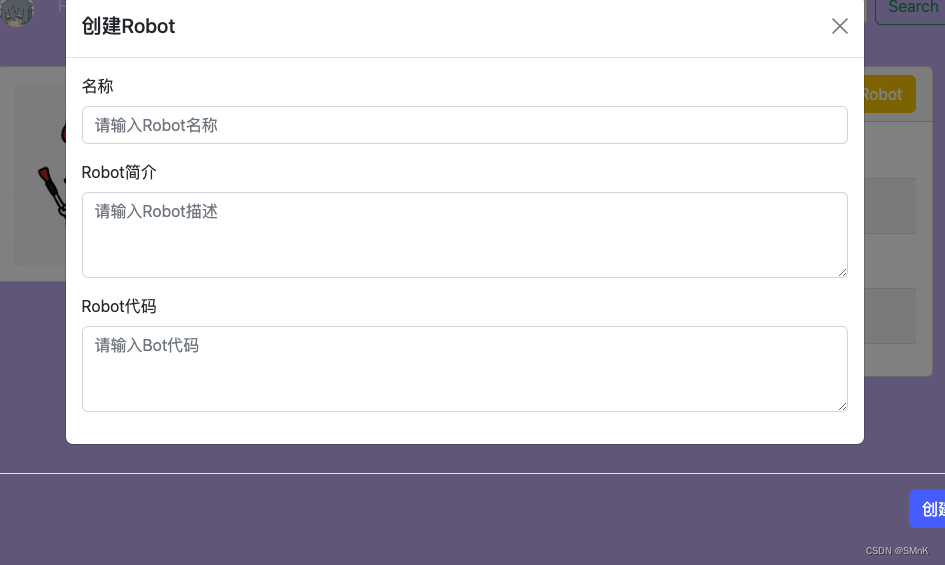
在点击 创建Bot 按钮的时候需要一个弹窗。在 bootstrap 中寻找一个 modals :

在 views.user.bot.UserBotIndexView.vue 下修改,增加一个模态框,然后丰富模态框的内容。

<template>
    <div class="container">
        <div class="row">
            <div class="col-3">
                <div class="card" style="margin-top:20px;">
                    <div class="card-body" >
                        <img :src="$store.state.user.photo" alt="" style="width:100%;">
                    </div>
                </div>
            </div>
            <div class="col-9">
                <div class="card" style="margin-top:20px;">
                    <div class="card-header">
                        <span style="font-size:130%">我的Robot</span>
                    
                        <button type="button" class="btn btn-warning float-end" style="color:white;" data-bs-toggle="modal" data-bs-target="#add-bot-btn">
                            创建Robot
                        </button>
                        <!--    创建robot 模态框 -->
                    

                        <div class="modal fade" id="add-bot-btn" tabindex="-1">
                            <div class="modal-dialog  modal-xl">
                                <div class="modal-content">
                                <div class="modal-header">
                                    <h5 class="modal-title" id="exampleModalLabel">创建Robot</h5>
                                    <button type="button" class="btn-close" data-bs-dismiss="modal" aria-label="Close"></button>
                                </div>
                                <div class="modal-body">
                                        <div class="mb-3">
                                            <label for="add-bot-title" class="form-label">名称</label>
                                            <input v-model="botadd.title" type="text" class="form-control" id="add-bot-title" placeholder="请输入Robot名称">
                                        </div>
                                        <div class="mb-3">
                                            <label for="add-bot-description" class="form-label">Robot简介</label>
                                            <textarea v-model="botadd.description" class="form-control" id="add-bot-description" rows="3" placeholder="请输入Robot描述"></textarea>
                                        </div>
                                        <div class="mb-3">
                                            <label for="add-bot-code" class="form-label">Robot代码</label>
                                            <textarea v-model="botadd.content" class="form-control" id="add-bot-content" rows="3" placeholder="请输入Bot代码"></textarea>
                                        </div>
                                    </div>
                                </div>
                            </div>
                        </div>


                        <div class="modal-footer">
                                    <!-- //增加报错信息 -->
                                    <div class="error-message">{{ botadd.error_message }}</div>
                                    <button type="button" class="btn btn-primary" @click="add_bot">创建</button>
                                    <button type="button" class="btn btn-secondary" data-bs-dismiss="modal">取消</button>
                        </div>


                    </div>
                    <div class="card-body">
                        <table class="table table-striped table-hover ">
                            <thead>
                                <tr>
                                    <th>Robot名称</th>
                                    <th>创建时间</th>
                                    <th>操作</th>
                                </tr>
                            </thead>
                            <tbody>
                                <tr v-for="bot in bots" :key="bot.id">
                                    <td>{{bot.title}}</td>
                                    <td>{{bot.createTime}}</td>
                                    <td>
                                        <button type="button" class="btn btn-primary" style="color:white; margin-right: 10px;" data-bs-toggle="modal" :data-bs-target="'#update-bot-modal-'+bot.id">
                                            修改
                                        </button>
                                        <button type="button" @click="remove_bot(bot)" class="btn btn-danger" style="color:white;">
                                            删除
                                        </button>

                                    <!-- 修改bot模态框 -->
                                    </td>
                                </tr>
                            </tbody>
                        </table>
                    </div>
                </div>
            </div>
        </div>
    </div>
</template>

<script>


import $ from 'jquery'
import { ref } from 'vue'
import { useStore } from 'vuex';

export default{
    components:{

    },
    setup(){
        const store = useStore();
        let bots = ref([]);
        const refresh_bots = () => {
                $.ajax({
                url: "http://127.0.0.1:3000/user/bot/getlist/",
                type: "get",
                headers: {
                    Authorization: "Bearer " + store.state.user.token,
                },
                success(resp) {
                    bots.value = resp;
                }
                });
        }
        refresh_bots();
        return{
            bots,
        }

    }
}
</script>
<style scoped>
</style>

前端进行对接插入Bot

增加一个 add_bot 函数:

<template>
    <div class="container">
        <div class="row">
            <div class="col-3">
                <div class="card" style="margin-top:20px;">
                    <div class="card-body" >
                        <img :src="$store.state.user.photo" alt="" style="width:100%;">
                    </div>
                </div>
            </div>
            <div class="col-9">
                <div class="card" style="margin-top:20px;">
                    <div class="card-header">
                        <span style="font-size:130%">我的Robot</span>
                    
                        <button type="button" class="btn btn-warning float-end" style="color:white;" data-bs-toggle="modal" data-bs-target="#add-bot-btn">
                            创建Robot
                        </button>
                        <!--    创建robot 模态框 -->
                    

                        <div class="modal fade" id="add-bot-btn" tabindex="-1">
                            <div class="modal-dialog  modal-xl">
                                <div class="modal-content">
                                <div class="modal-header">
                                    <h5 class="modal-title" id="exampleModalLabel">创建Robot</h5>
                                    <button type="button" class="btn-close" data-bs-dismiss="modal" aria-label="Close"></button>
                                </div>
                                <div class="modal-body">
                                        <div class="mb-3">
                                            <label for="add-bot-title" class="form-label">名称</label>
                                            <input v-model="botadd.title" type="text" class="form-control" id="add-bot-title" placeholder="请输入Robot名称">
                                        </div>
                                        <div class="mb-3">
                                            <label for="add-bot-description" class="form-label">Robot简介</label>
                                            <textarea v-model="botadd.description" class="form-control" id="add-bot-description" rows="3" placeholder="请输入Robot描述"></textarea>
                                        </div>
                                        <div class="mb-3">
                                            <label for="add-bot-code" class="form-label">Robot代码</label>
                                            <textarea v-model="botadd.content" class="form-control" id="add-bot-content" rows="3" placeholder="请输入Bot代码"></textarea>
                                        </div>
                                    </div>
                                </div>
                            </div>
                        </div>


                        <div class="modal-footer">
                                    <!-- //增加报错信息 -->
                                    <div class="error-message">{{ botadd.error_message }}</div>
                                    <button type="button" class="btn btn-primary" @click="add_bot">创建</button>
                                    <button type="button" class="btn btn-secondary" data-bs-dismiss="modal">取消</button>
                        </div>


                    </div>
                    <div class="card-body">
                        <table class="table table-striped table-hover ">
                            <thead>
                                <tr>
                                    <th>Robot名称</th>
                                    <th>创建时间</th>
                                    <th>操作</th>
                                </tr>
                            </thead>
                            <tbody>
                                <tr v-for="bot in bots" :key="bot.id">
                                    <td>{{bot.title}}</td>
                                    <td>{{bot.createTime}}</td>
                                    <td>
                                        <button type="button" class="btn btn-primary" style="color:white; margin-right: 10px;" data-bs-toggle="modal" :data-bs-target="'#update-bot-modal-'+bot.id">
                                            修改
                                        </button>
                                        <button type="button" @click="remove_bot(bot)" class="btn btn-danger" style="color:white;">
                                            删除
                                        </button>

                                    <!-- 修改bot模态框 -->
                                    </td>
                                </tr>
                            </tbody>
                        </table>
                    </div>
                </div>
            </div>
        </div>
    </div>
</template>

<script>


import $ from 'jquery'
import { ref } from 'vue'
import { useStore } from 'vuex';

export default{
    components:{

    },
    setup(){
        const store = useStore();
        let bots = ref([]);
        const refresh_bots = () => {
                $.ajax({
                url: "http://127.0.0.1:3000/user/bot/getlist/",
                type: "get",
                headers: {
                    Authorization: "Bearer " + store.state.user.token,
                },
                success(resp) {
                    bots.value = resp;
                }
                });
        }
        const botadd = reactive({
            title: "",
            description: "",
            content: "",
            error_message: "",
        });

        //创建一个 bot
        const add_bot = () => {
                    botadd.error_message = "";
                    $.ajax({
                        url: "http://127.0.0.1:3000/user/bot/add/",
                        type: "post",
                        data: {
                            title: botadd.title,
                            description: botadd.description,
                            content: botadd.content,
                        },
                        headers: {
                            Authorization: "Bearer " + store.state.user.token,
                        },
                        success(resp) {
                            if (resp.error_message === "success") {
                                botadd.title = "";
                                botadd.description = "";
                                botadd.content = "";
                                Modal.getInstance("#add-bot-btn").hide();
                                refresh_bots();
                            } else {
                                botadd.error_message = resp.error_message;
                            }
                        }
                    })
                }
        refresh_bots();
        return{
            bots,
            botadd,
            add_bot,
        }

    }
}
</script>
<style scoped>
</style>

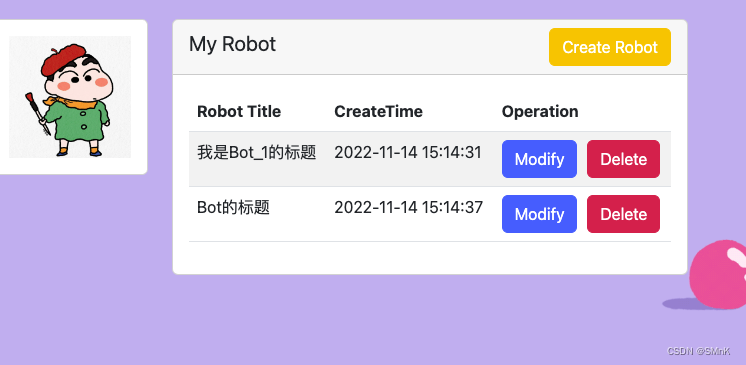
 创建完成后需要绑定前端的信息。在前面的地方加上 v-model,同时增加一个 触发事件。
 

 修改时间

如果创建 Bot 的时候时间出现问题:在后端的 pojo 里修改,加上时区:

package com.kill9.backend.pojo;

import com.baomidou.mybatisplus.annotation.IdType;
import com.baomidou.mybatisplus.annotation.TableId;
import com.fasterxml.jackson.annotation.JsonFormat;
import lombok.AllArgsConstructor;
import lombok.Data;
import lombok.NoArgsConstructor;

import java.util.Date;

@Data
@NoArgsConstructor
@AllArgsConstructor
public class Bot {
    @TableId(type = IdType.AUTO)
    private Integer id;//在pojo里最好用Integer,否则会报警告
    private Integer userId;//pojo里要用驼峰命名法和数据库的下划线对应
    private String title;
    private String description;
    private String content;
    private Integer rating;
    @JsonFormat(pattern = "yyyy-MM-dd HH:mm:ss" ,timezone = "Asia/Shanghai")
    private Date createtime;
    @JsonFormat(pattern = "yyyy-MM-dd HH:mm:ss",timezone = "Asia/Shanghai")
    private Date modifytime;
}

实现创建成功关闭和清空

success(resp) {
                            if (resp.error_message === "success") {
                                botadd.title = "";
                                botadd.description = "";
                                botadd.content = "";
                                Modal.getInstance("#add-bot-btn").hide();
                                refresh_bots();
                            } else {
                                botadd.error_message = resp.error_message;
                            }
                        }

实现删除按钮

 删除一个 Bot

增加一个 删除 bot 的函数:

//删除一个 bot
        const remove_bot = (bot) => {
            $.ajax({
                url: "http://127.0.0.1:3000/user/bot/remove/",
                type: "post",
                data: {
                    bot_id: bot.id,
                },
                headers: {
                    Authorization: "Bearer " + store.state.user.token,
                },
                success(resp) {
                    console.log(resp);
                    if (resp.error_message === "success") {
                        refresh_bots();
                    }
                }
            })
        }

同时需要在上文绑定 删除 按钮。

<button type="button" class="btn btn-danger" @click="remove_bot(bot)">删除</button>

 如果删除的时候提示没有权限,可能是因为后端的 RemoveServiceImpl.java 文件出错,在里面修改即可。
修改一个 Bot

在 views.user.bot.UserBotIndexView.vue 下修改。

const update_bot = (bot) => {
            botadd.error_message = "";
            $.ajax({
                url: "http://127.0.0.1:8080/user/bot/update/",
                type: "post",
                data: {
                    bot_id: bot.id,
                    title: bot.title,
                    description: bot.description,
                    content: bot.content,
                },
                headers: {
                    Authorization: "Bearer " + store.state.user.token,
                },
                success(resp) {
                    if (resp.error_message === "success") {
                        Modal.getInstance('#update-bot-modal-' + bot.id).hide();
                        refresh_bots();
                    } else {
                        botadd.error_message = resp.error_message;
                    }
                }
            })
        }

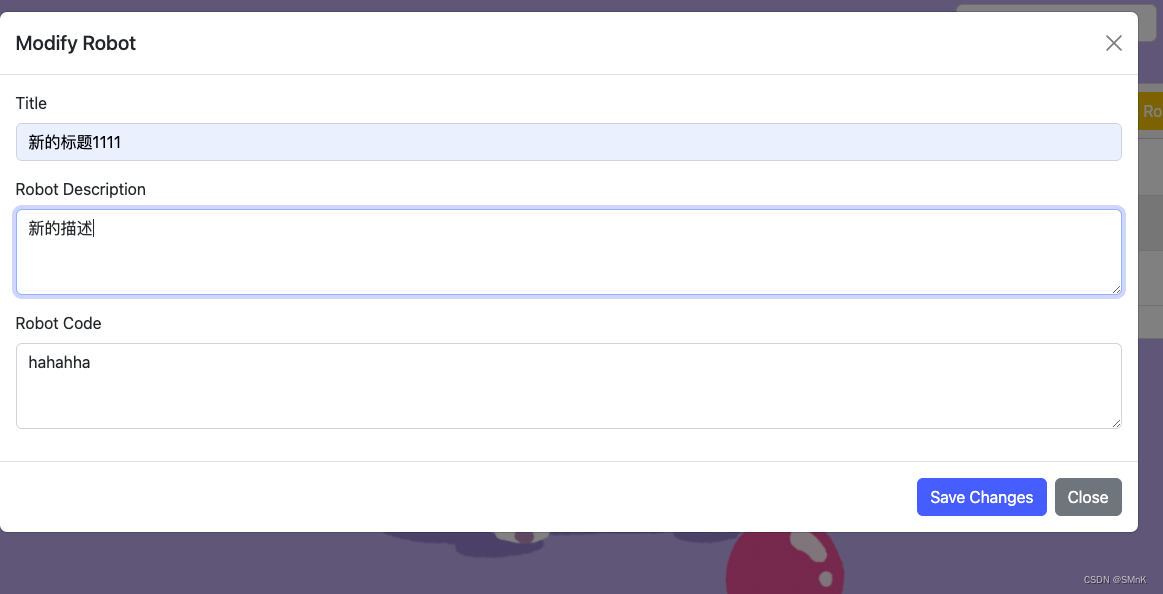
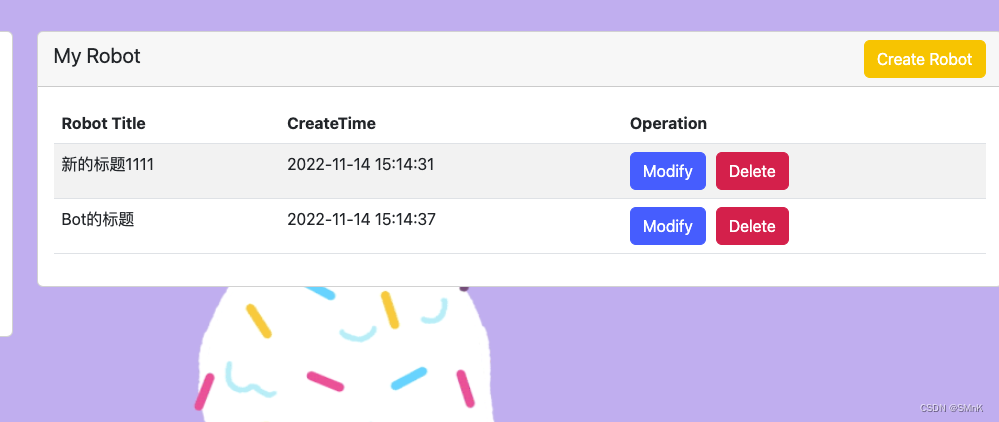
修改每一个 bot 的时候需要有对应单独的一个模态框。


<!-- 修改bot模态框 -->
                                    <div class="modal fade" :id="'update-bot-modal-'+bot.id" tabindex="-1">
                                            <div class="modal-dialog  modal-xl">
                                                <div class="modal-content">
                                                <div class="modal-header">
                                                    <h5 class="modal-title">Modify Robot</h5>
                                                    <button type="button" class="btn-close" data-bs-dismiss="modal" aria-label="Close"></button>
                                                </div>
                                                <div class="modal-body">
                                                        <div class="mb-3">
                                                            <label for="add-bot-title" class="form-label">Title</label>
                                                            <input v-model="bot.title" type="text" class="form-control" id="add-bot-title" placeholder="Input Robot Title">
                                                        </div>
                                                        <div class="mb-3">
                                                            <label for="add-bot-description" class="form-label">Robot Description</label>
                                                            <textarea v-model="bot.description" class="form-control" id="add-bot-description" rows="3" placeholder="Input Robot Description"></textarea>
                                                        </div>
                                                        <div class="mb-3">
                                                            <label for="add-bot-code" class="form-label">Robot Code</label>
                                                            <textarea v-model="bot.content" class="form-control" id="add-bot-content" rows="3" placeholder="Input Bot Code"></textarea>
                                                        </div>
                                                </div>
                                                <div class="modal-footer">
                                                    <div class="error-message">
                                                        {{botadd.error_message}}
                                                    </div>
                                                    <button type="button" class="btn btn-primary" @click="update_bot(bot)">Save Changes</button>
                                                    <button type="button" class="btn btn-secondary" data-bs-dismiss="modal">Close</button>

                                                </div>
                                            </div>
                                            </div>
                                        </div>


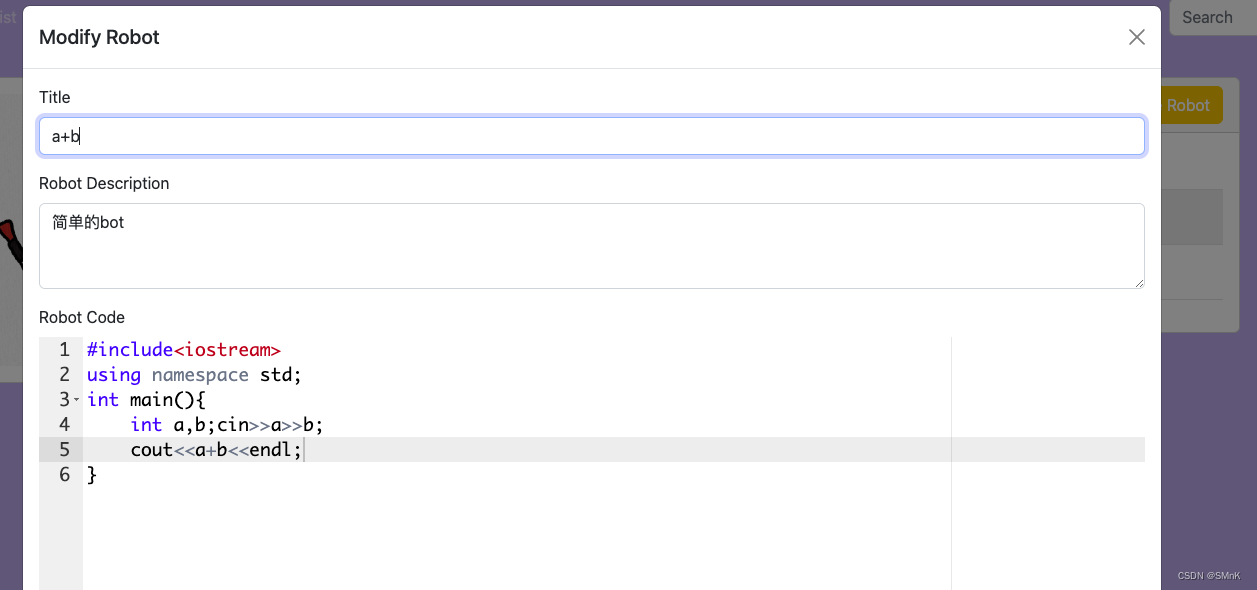
安装依赖:vue3-ace-editor

在 vue 界面添加依赖 vue3-ace-editor
添加组件

import { VAceEditor } from 'vue3-ace-editor';
import ace from 'ace-builds';
ace.config.set(
    "basePath", 
    "https://cdn.jsdelivr.net/npm/ace-builds@" + require('ace-builds').version + "/src-noconflict/")
<VAceEditor
    v-model:value="botadd.content"
    @init="editorInit"
    lang="c_cpp"
    theme="textmate"
    style="height: 300px" />


完成~~ 
本文来自互联网用户投稿,该文观点仅代表作者本人,不代表本站立场。本站仅提供信息存储空间服务,不拥有所有权,不承担相关法律责任。如若转载,请注明出处:http://www.coloradmin.cn/o/6767.html

如若内容造成侵权/违法违规/事实不符,请联系多彩编程网进行投诉反馈,一经查实,立即删除!

相关文章

windows常见的命令操作大全

目录 一、目录文件操作 cd命令 dir命令 md命令 rd命令 move命令 copy命令 del命令 二、文本相关操作 type命令 >命令 findstr命令 |命令 三、网络相关操作 小建议&#xff1a;跟着文章亲手敲一遍是避免忘记的有效方法 一、目录文件操作 cd命令 功能&#xf…

你真的会解决android ANR 问题吗?

前言 ​ 还记得之前写过一篇关于ANR 的介绍&#xff0c;现在看来&#xff0c;那个只是皮毛。现实中遇到应用或系统ANR 的问题&#xff0c;是很难解决的。下面进入正题&#xff0c;来详细了解下如何解决。 一.ANR 关键字 1. event log 中“am_ANR” 关键字&#xff0c;main-l…

27岁Python程序员做独立开发年收入超900万,家中有屋又有田,生活乐无边

他是谁 他叫赖利蔡斯&#xff0c;27岁的Python程序员。现在拥有一家自己的小型软件公司。 他现在的生活 躺赚 每天躺着就可以赚到钱&#xff0c;睡觉时从来不会被闹钟吵醒。 每天干自己的喜欢的事情&#xff0c;读书、编程、讨论公司业务、研究自己感兴趣的事情&#xff0…

Java#4(各类语句和一点小练习)

目录 一.分支语句 1.if语句:和C语言中的没有什么区别 2.switch语句:可以使用C语言的写法,但新增了一种更加简便的写法 二. 循环语句 1.for循环:和C语言没有什么太大区别 2.while循环:和C语言没有什么太大区别 练习:回文数的判断 3.do while(先运行一次再判断):和C语言没…

项目经理如何进行项目汇报才能让项目顺利进行,让领导一看就喜欢?

项目经理如何进行项目工作汇报才能让项目顺利进行&#xff0c;让领导一看就喜欢&#xff1f;领导听工作汇报&#xff0c;就是想知道项目干得怎么样。因此&#xff0c;项目经理事先一定要思考&#xff0c;这次工作汇报应该达到什么目的。 工作汇报要注意这三个问题 简单描述项目…

有关Git(小白一看就懂)入门版

git的使用是在工作中必备的技能&#xff0c;本系列重写自己曾经学习git的过程&#xff0c;按照从创建git仓库开始操作&#xff0c;赋每一步的演示图&#xff0c;让小白跟着文章操作&#xff0c;一步一步入门 目录 git基本概念 git使用基本流程 文件的四种状态 git的使用和基…

Vue3 - this 概念及使用方法(详细教程)

前言 对比 Vue2 &#xff0c;引出并展开 Vue3 。 本文讲述了 this 概念及应用场景&#xff0c;以及使用方法和代码示例详细讲解。 回忆 Vue2 我们在 Vue2 项目中&#xff0c;可能写得最多的单词就是 this 了&#xff0c;咱们无论是拿数据还是调方法&#xff0c;一律 this。 先…

前端学习路线(一)

很多人问我前端学习的路线是怎么样的&#xff0c;css要学多久&#xff0c;js高级要不要学&#xff0c;先学node.js还是先学vue&#xff0c;所以想通过一篇博文来讲一下这个事情 要不要学前端三剑客 这个问题是很多想快速上手前端的同学问的最多的一个问题&#xff0c;因为有很…

同样做软件测试,为什么有人月入3k-5k,有人能拿到17-20k?

同样做软件测试&#xff0c;为什么有人月入3k-5k&#xff0c;有人能拿到17-20k&#xff1f; 虽然各大培训机构一直鼓吹软件测试行业薪资高&#xff0c;但是依旧有一些拿着3-5k薪资&#xff0c;甚至找不到软件测试工作的人。 先来看一些例子&#xff1a; 1、小A在一家培训机构…

微信小程序开发教程一--注册小程序、下载开发工具及新建工程

从本章开始,我们将讲解微信小程序的简单开发流程,我将尽量使用简洁的语言,逐个步骤详细讲解,让大家都能跟得上,也希望和大家交流学习。 注册 首先,开发小程序需要先在微信注册。 打开网页:https://mp.weixin.qq.com/ 在下面找到小程序: 将鼠标移上去之后,就能看到“…

mysql的监控大屏

前言&#xff1a; 一款方便的mysql的监控大屏&#xff0c;使用开源项目实现MySQL的监控&#xff0c;对于想要进行mysql的时候情况监控来说比较重要&#xff0c;并且这款工具是不需要与代码进行结合的&#xff0c;直接运行打开就行了。 具体方式如下&#xff1a; 第一款&…

MySQL数据库期末考试试题及参考答案(03)

版权声明 本文原创作者&#xff1a;谷哥的小弟作者博客地址&#xff1a;http://blog.csdn.net/lfdfhl 一、填空题 插入数据时&#xff0c;如果不指定____&#xff0c;必须为每个字段添加数据。MySQL中使用____语句来更新表中的记录。MySQL提供____语句用于删除表中的数据。在…

Redis数据结构之——sds

写在前面 以下内容是基于Redis 6.2.6 版本整理总结 Redis数据结构 Redis是以k-v形式存储的内存数据库&#xff0c;其中key和value都是以对象&#xff08;object&#xff09;的形式进行存储。对象分为&#xff1a;string、list、hash、set和zet五种对象&#xff0c;这五种对象…

MySql 执行count(1)、count(*) 与 count(列名) 区别

MySql 执行count(1)、count(*) 与 count(列名) 区别 1. 初识 count COUNT(expr) &#xff0c;返回 SELECT 语句检索的行中 expr 的值不为NULL的数量。结果是一个 BIGINT 值。 如果查询结果没有命中任何记录&#xff0c;则返回 0。 COUNT(*) 的统计结果中&#xff0c;会包含值…

一篇文章,带你了解CodeTour与入门指导

CodeTour&#xff08;代码之旅&#xff09;是微软官方开发的 VS Code 扩展&#xff0c;允许记录和回放代码的演练和思路。 简介 CodeTour 是一个 VS Code 插件&#xff0c;允许记录和回放代码库的演练和思路。我们通常都是通过代码注释或者文档来解释某段代码或方法的功能及逻…

【Linux】权限管理-权限的概念,umask,粘滞位

文章目录shell命令以及运行原理Linux权限的概念用户间的权限切换su和su -的区别仅提升当前指令的权限Linux权限管理文件访问者的分类(人)文件类型和访问权限&#xff08;事物属性&#xff09;文件权限值的表示方法字符表示方法8进制数值表示方法文件访问权限的相关设置方法改变…

前端项目中资源请求顺序和dom结构顺序不一致,资源启动器有(索引)解析器和脚本

红色框资源是在组件1中 绿色框资源是在组件2中 在页面 DOM 结构中组件顺序是&#xff0c;从上到下&#xff1a;组件1->组件2 但是查看 chrome调试工具的网络请求&#xff0c;发现绿色资源先请求&#xff0c;并且像是请求完才会去请求红色资源&#xff0c;它们启动器那一栏…

C++语法——make_heap、push_heap、pop_heap、sort_heap使用介绍

目录 一.make_heap(...) 二.push_heap(...) 三.pop_heap(...) 四.sort_heap(...) 这三个函数位于<algorithm>头文件中。 可以看这篇文章了解堆排序&#xff1a;手把手教你堆排序 一.make_heap(...) 这是该函数的官方定义&#xff1a; 这个函数用于建立堆。 前两个…

Linux日志管理logrotate日志轮转

文章目录 前言 日志轮转简介 工作原理 配置文件种类 观察主文件和子文件 主配置文件介绍 yum日志轮转示例 配置轮转规则 rotate 3演示 总结 前言 上篇文章学习了系统日志管理&#xff0c;对于日志来讲他是占内存的&#xff0c;当有大量的日志产生的时候&#xff0c;会…

一个简单HTML5期末考核大作业,学生个人html静态网页制作代码

&#x1f389;精彩专栏推荐 &#x1f4ad;文末获取联系 ✍️ 作者简介: 一个热爱把逻辑思维转变为代码的技术博主 &#x1f482; 作者主页: 【主页——&#x1f680;获取更多优质源码】 &#x1f393; web前端期末大作业&#xff1a; 【&#x1f4da;毕设项目精品实战案例 (10…