wtmp日志介绍
之前遇到一个AIX服务器登录不上,但是能ping通的事情。一开始我怀疑是sshd服务坏掉了,但是使用telnet也无法登录。好在这台机器所在的机房就在我隔壁,于是外接显示器,直接上机操作。好在直接通过物理介质还是能登录得上去的。
上去一看,好家伙,直接提示根目录磁盘不足了。于是就查跟目录下都有哪些东西占用了比较大的空间。
不看不知道,一看吓一跳,根目录下一共3.2G, /var/log下一个wtmp文件就占了2.8G。
那么这个wtmp是啥?能不能删除呢?查了一下资料,才知道这个wtmp是系统记录登录信息的一个日志文件。
不过这个日志文件并不是文本格式,并不能直接查看,而是二进制格式,需要借助一些其他手段。
既然只是记录登录信息的日志,那删了也无妨,于是问题解决。
过了一段时间,另外一台HPUX机器也出现了同样的问题,也是wtmp文件把磁盘占满导致无法远程连接。于是我痛定思痛,决心好好研究一下这个wtmp日志。
刚动这个念头,契机就来了。
正好有一个客户希望可以采集这种二进制的wtmp文件。于是就趁此机会好好研究了一把这个日志。
在/var/log目录下,记录登录信息的日志一共有几类:
/var/log/utmp当前正在登录的用户,相当于who命令的输出/var/log/btmp记录登录失败的信息,可以使用lastb命令查看/var/log/wtmp记录当前正在登录和历史登录系统的用户信息,可以使用last命令查看
使用last命令读取
我们先使用last命令看看读出来的wtmp是什么样的内容:
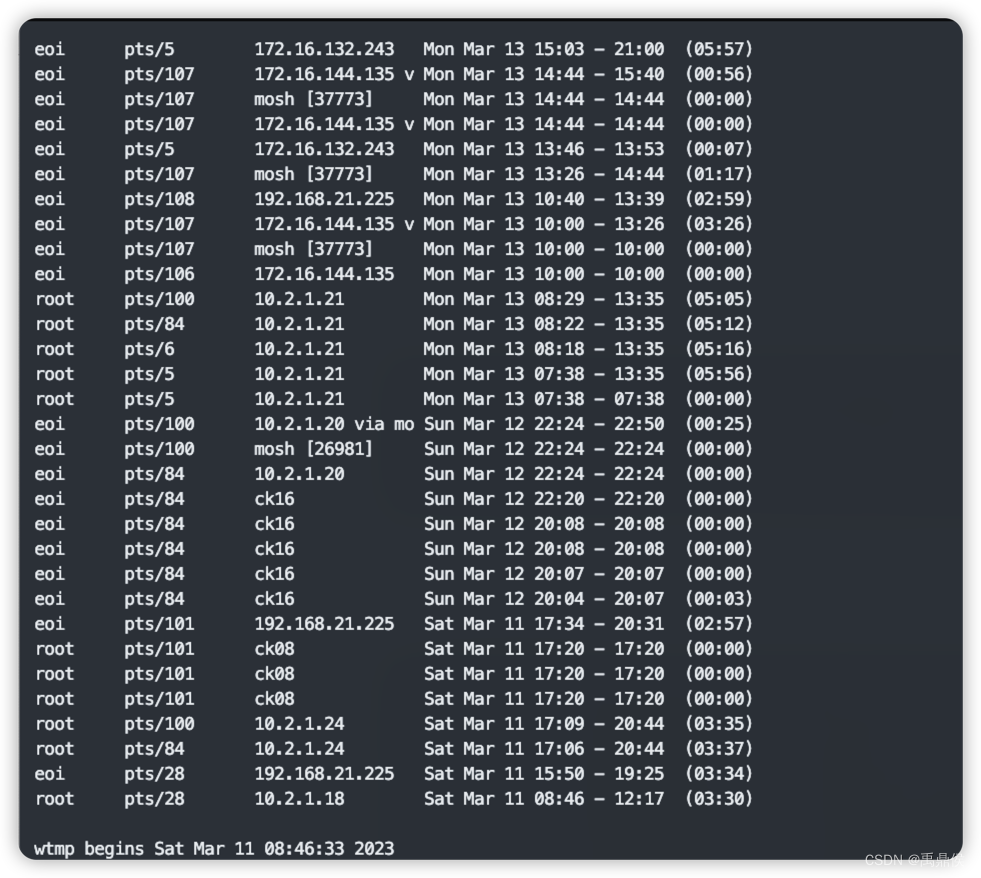
从上图可知,last命令读出的wtmp文件,其内容主要是:
第一列: 用户名
第二列:终端位置
第三列:登录IP或者内核
第四列:开始时间
第五列:结束时间
第六列:持续时间
因此,我们需要有一个程序,能将wtmp日志解析成上述的格式,才是最终的目标。
使用Go语言读取
auditbeat是elastic开源的一款go语言编写的采集器。其中就有涉及到采集wtmp文件的相关实现。
它首先定义了一个utmp的结构体:
type utmpC struct {
	Type UtType

	// Alignment
	_ [2]byte

	Pid      int32
	Device   [UT_LINESIZE]byte
	Terminal [4]byte
	Username [UT_NAMESIZE]byte
	Hostname [UT_HOSTSIZE]byte

	ExitStatusTermination int16
	ExitStatusExit        int16

	SessionID int32

	TimeSeconds      int32
	TimeMicroseconds int32

	IP [4]int32

	Unused [20]byte
}

type Utmp struct {
	UtType   UtType
	UtPid    int
	UtLine   string
	UtUser   string
	UtHost   string
	UtTv     time.Time
	UtAddrV6 [4]uint32
}
然后使用ReadNextUtmp函数来遍历wtmp文件:
func ReadNextUtmp(r io.Reader) (*Utmp, error) {
	utmpC := new(utmpC)

	err := binary.Read(r, byteOrder, utmpC)
	if err != nil {
		return nil, err
	}

	return newUtmp(utmpC), nil
}
newUtmp就是将utmpC转换为utmp格式的一个转换函数。utmpC是wtmp存储登录信息的内部二进制格式。
调用逻辑如下:
func readNewInFile(utmpPath string) error{
		f, err := os.Open(utmpPath)
		if err != nil {
			return fmt.Errorf("error opening file %v: %w", utmpFile.Path, err)
		}

		for {
			utmp, err := ReadNextUtmp(f)
			if err != nil && err != io.EOF {
				return fmt.Errorf("error reading entry in UTMP file %v: %w", utmpFile.Path, err)
			}

			if utmp != nil {
				r.log.Debugf("utmp: (ut_type=%d, ut_pid=%d, ut_line=%v, ut_user=%v, ut_host=%v, ut_tv.tv_sec=%v, ut_addr_v6=%v)",
					utmp.UtType, utmp.UtPid, utmp.UtLine, utmp.UtUser, utmp.UtHost, utmp.UtTv, utmp.UtAddrV6)
			} else {
				// Eventually, we have read all UTMP records in the file.
				break
			}
		}
	}
	return nil
}
当然原始代码比这个复杂,我在这里做了一些精简,原始代码里还有一些判断文件滚动的逻辑。具体代码在utmp_c.go和utmp.go,感兴趣的可以参考。
使用C语言实现
C语言是提供了utmp相关的系统实现的,这些接口在utmp.h中,主要的接口包含以下这些:
//这个函数相当于上面的ReadNextUtmp,每次获取一条登录信息,如果读到了文件末尾,则返回NULL
//第一次使用该函数会打开文件,文件读完之后可以使用endutent()来关闭文件
struct utmp *getutent(void);

//从 utmp 文件中的读写位置逐一往后搜索参数 ut 指定的记录
// 如果ut->ut_type 为RUN_LVL, BOOT_TIME, NEW_TIME, OLD_TIME 其中之一则查找与ut->ut_type 相符的记录
// 若ut->ut_type为INIT_PROCESS, LOGIN_PROCESS, USER_PROCESS 或DEAD_PROCESS 其中之一, 则查找与ut->ut_id相符的记录
struct utmp *getutid(struct utmp *ut);

//从utmp 文件的读写位置逐一往后搜索ut_type 为USER_PROCESS 或LOGIN_PROCESS 的记录, 而且ut_line 和ut->ut_line 相符
struct utmp *getutline(struct utmp *ut);

//将一个struct utmp结构体写进文件utmp中, 也就是手动写入登录信息
struct utmp *pututline(struct utmp *ut);

//打开文件utmp,并且将文件指针指向文件的最开始,相当于fseek到文件开始位置
void setutent(void);

//关闭文件utmp
void endutent(void);

//设定utmp文件所在的路径,默认的路径为宏 _PATH_UTMP,利用该函数,可以控制读哪个文件
int utmpname(const char *file);
上面这些接口中反复出现的结构体struct utmp,其实和上文中go语言实现里的utmpC是一个东西,只不过这里是C语言的定义方式,其结构体如下:
/* The structure describing an entry in the user accounting database.  */
struct utmp
{
  short int ut_type;        /* Type of login.  */
  pid_t ut_pid;         /* Process ID of login process.  */
  char ut_line[UT_LINESIZE];    /* Devicename.  */
  char ut_id[4];        /* Inittab ID.  */
  char ut_user[UT_NAMESIZE];    /* Username.  */
  char ut_host[UT_HOSTSIZE];    /* Hostname for remote login.  */
  struct exit_status ut_exit;   /* Exit status of a process marked
                   as DEAD_PROCESS.  */
/* The ut_session and ut_tv fields must be the same size when compiled
   32- and 64-bit.  This allows data files and shared memory to be
   shared between 32- and 64-bit applications.  */
#ifdef __WORDSIZE_TIME64_COMPAT32
  int32_t ut_session;       /* Session ID, used for windowing.  */
  struct
  {
    int32_t tv_sec;     /* Seconds.  */
    int32_t tv_usec;        /* Microseconds.  */
  } ut_tv;          /* Time entry was made.  */
#else
  long int ut_session;      /* Session ID, used for windowing.  */
  struct timeval ut_tv;     /* Time entry was made.  */
#endif

  int32_t ut_addr_v6[4];    /* Internet address of remote host.  */
  char __unused[20];        /* Reserved for future use.  */
};
这里需要说明的是,ut_type解析出来是数字,它其实是一个enum,对应关系如下:
#define EMPTY       0   /* No valid user accounting information.  */

#define RUN_LVL     1   /* The system's runlevel.  */
#define BOOT_TIME   2   /* Time of system boot.  */
#define NEW_TIME    3   /* Time after system clock changed.  */
#define OLD_TIME    4   /* Time when system clock changed.  */

#define INIT_PROCESS    5   /* Process spawned by the init process.  */
#define LOGIN_PROCESS   6   /* Session leader of a logged in user.  */
#define USER_PROCESS    7   /* Normal process.  */
#define DEAD_PROCESS    8   /* Terminated process.  */

#define ACCOUNTING  9

/* Old Linux name for the EMPTY type.  */
#define UT_UNKNOWN  EMPTY
有了以上知识储备,就可以使用C语言获取wtmp文件内容了:
#include <utmp.h>
#include <stdio.h>
#include <stdlib.h>
#include <string.h>
#include <time.h>

char *ntop(int32_t ip_addr)
{
    int addr_1 = ip_addr % 256;
    ip_addr = ip_addr / 256;
        int addr_2 = ip_addr % 256;
        ip_addr  = ip_addr / 256;
        int addr_3 = ip_addr % 256;
        ip_addr  = ip_addr  / 256;
        int addr_4 = ip_addr % 256;

        char ip[16] = {0};
        sprintf(ip, "%d.%d.%d.%d", addr_1, addr_2, addr_3, addr_4);
        return ip;
}


int main(){
        utmpname("/var/log/wtmp");
        setutent();
        while(1){
                struct utmp *ut = getutent();
                if (ut == NULL){
                        break;
                }
                printf("{\"ut_type\":%d, \"ut_pid\":%d, \"ut_line\":\"%s\", \"ut_id\": \"%s\", \"ut_user\": \"%s\", \"ut_host\":\"%s\",\"ut_exit\":{\"e_termination\":%d, \"e_exit\":%d},\"ut_tv\":%d, \"ut_session\":%d, \"ut_addr6\":\"%s\"}\n",
                                ut->ut_type, ut->ut_pid, ut->ut_line, ut->ut_id, ut->ut_user, ut->ut_host, ut->ut_exit.e_termination, ut->ut_exit.e_exit, ut->ut_tv.tv_sec + ut->ut_tv.tv_usec / 1000,ut->ut_session, ntop(ut->ut_addr_v6[0]));
        }
        endutent();
        return 0;
}
以上程序运行结果如下所示:
[root@ck94 wtmp]# ./a.out
{"ut_type":7, "ut_pid":41857, "ut_line":"pts/84", "ut_id": "s/84root", "ut_user": "root", "ut_host":"10.2.1.24","ut_exit":{"e_termination":0, "e_exit":0},"ut_tv":1678526541, "ut_session":0, "ut_addr6":"10.2.1.24"}
{"ut_type":7, "ut_pid":49088, "ut_line":"pts/100", "ut_id": "/100root", "ut_user": "root", "ut_host":"10.2.1.24","ut_exit":{"e_termination":0, "e_exit":0},"ut_tv":1678526356, "ut_session":0, "ut_addr6":"10.2.1.24"}
{"ut_type":7, "ut_pid":41020, "ut_line":"pts/101", "ut_id": "/101root", "ut_user": "root", "ut_host":"ck08","ut_exit":{"e_termination":0, "e_exit":0},"ut_tv":1678526996, "ut_session":0, "ut_addr6":"192.168.110.8"}
{"ut_type":8, "ut_pid":41018, "ut_line":"pts/101", "ut_id": "", "ut_user": "", "ut_host":"","ut_exit":{"e_termination":0, "e_exit":0},"ut_tv":1678527030, "ut_session":0, "ut_addr6":"0.0.0.0"}
{"ut_type":7, "ut_pid":41068, "ut_line":"pts/101", "ut_id": "/101root", "ut_user": "root", "ut_host":"ck08","ut_exit":{"e_termination":0, "e_exit":0},"ut_tv":1678527173, "ut_session":0, "ut_addr6":"192.168.110.8"}
{"ut_type":8, "ut_pid":41062, "ut_line":"pts/101", "ut_id": "", "ut_user": "", "ut_host":"","ut_exit":{"e_termination":0, "e_exit":0},"ut_tv":1678527208, "ut_session":0, "ut_addr6":"0.0.0.0"}
...
以上使用系统函数获取,看似方便,实则有一个不好的地方,那就是采集wtmp的程序肯定是要长期运行采集的,可是万一采集程序因为某种原因停止了运行,当下次重新启动时,如何断点续采,而不是从头开始?
最好的方式还是采取auditbeat中一样的视线方式,直接从文件读取,并记录下读到的offset,当下次读取时,直接fseek到offset的位置,于是代码如下:
#include <utmp.h>
#include <stdio.h>
#include <stdlib.h>
#include <string.h>
#include <time.h>

char *ntop(int32_t ip_addr)
{
    int addr_1 = ip_addr % 256;
    ip_addr = ip_addr / 256;
        int addr_2 = ip_addr % 256;
        ip_addr  = ip_addr / 256;
        int addr_3 = ip_addr % 256;
        ip_addr  = ip_addr  / 256;
        int addr_4 = ip_addr % 256;

        char ip[16] = {0};
        sprintf(ip, "%d.%d.%d.%d", addr_1, addr_2, addr_3, addr_4);
        return ip;
}


int main(){
        FILE *fp = fopen("/var/log/wtmp", "rb");
        int chunk_size = sizeof(struct utmp);
        void *chunk = calloc(1, chunk_size);
        while(1){
                int rbytes = fread(chunk, chunk_size, 1, fp);

                if (rbytes == 0){
                        break;
                }
                struct utmp *ut = NULL;
                ut = (struct utmp*)chunk;
                printf("{\"ut_type\":%d, \"ut_pid\":%d, \"ut_line\":\"%s\", \"ut_id\": \"%s\", \"ut_user\": \"%s\", \"ut_host\":\"%s\",\"ut_exit\":{\"e_termination\":%d, \"e_exit\":%d},\"ut_tv\":%d, \"ut_session\":%d, \"ut_addr6\":\"%s\"}\n",
                                ut->ut_type, ut->ut_pid, ut->ut_line, ut->ut_id, ut->ut_user, ut->ut_host, ut->ut_exit.e_termination, ut->ut_exit.e_exit, ut->ut_tv.tv_sec + ut->ut_tv.tv_usec / 1000,ut->ut_session, ntop(ut->ut_addr_v6[0]));
        }
        free(chunk);
        return 0;
}
以上代码可以得到同样的运行结果,这里就不演示了。
推荐一个零声学院免费教程,个人觉得老师讲得不错,分享给大家:[Linux,Nginx,ZeroMQ,MySQL,Redis,
fastdfs,MongoDB,ZK,流媒体,CDN,P2P,K8S,Docker,
TCP/IP,协程,DPDK等技术内容,点击立即学习: C/C++Linux服务器开发/高级架构师