前言:
大家好,我是良辰丫,! ! !💌💌💌
🧑个人主页:良辰针不戳
📖所属专栏:javaEE进阶篇之框架学习
🍎励志语句:生活也许会让我们遍体鳞伤,但最终这些伤口会成为我们一辈子的财富。
💦期待大家三连,关注,点赞,收藏。
💌作者能力有限,可能也会出错,欢迎大家指正。
💞愿与君为伴,共探Java汪洋大海。

目录
- 1. 获取 Request 和 Response 对象
- 2. servlet获取cookie
- 3. Spring Boot注解方式获取cookie
- 4. Spring Boot注解方式获取header
- 5. 建立session信息
- 6. 获取session信息
- 7. 关于@ResponseBody注解
- 8. 返回一个json对象
- 9. 简单的前后端交互
- 10. 前后端登录页面
- 11. 请求转发与请求重定向
1. 获取 Request 和 Response 对象
- Spring MVC(Spring Web) 内置了 HttpServletRequest 和 HttpServletResponse,也就是前端不需要传相关的参数.
- 在servlet中我们就接触到了HttpServletRequest 和 HttpServletResponse,那么我们为什么要学习这呢? 我们是要学习网络通信,一切网络通信都基于http协议.
package com.example.demo;

import org.springframework.web.bind.annotation.GetMapping;
import org.springframework.web.bind.annotation.RequestMapping;
import org.springframework.web.bind.annotation.RestController;

import javax.servlet.http.HttpServletRequest;
@RestController
@RequestMapping("/user11")
public class User11 {
    @GetMapping("/getparam")
    public String getParam(HttpServletRequest req) {
        return req.getParameter("username");
    }
}

通过这种方式我们就可以得到相关的参数.
2. servlet获取cookie
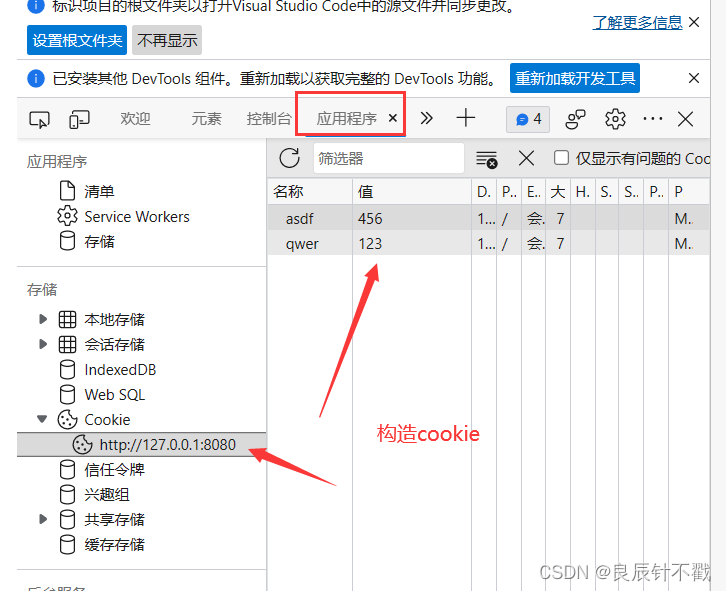
- 虽然是servlet获取cookie,但是我们的Spring MVC项目中依然可以运行,因此呢,我们没有必要专门去创一样maven项目.
- 我们先在我们的浏览器里面构造cookie,这样获取cookie的时候才有一定的效果.
package com.example.demo;

import lombok.extern.slf4j.Slf4j;
import org.springframework.web.bind.annotation.RequestMapping;
import org.springframework.web.bind.annotation.RestController;

import javax.servlet.http.Cookie;
import javax.servlet.http.HttpServletRequest;

@Slf4j
@RequestMapping("/user12")
@RestController
public class User12 {
    @RequestMapping("/getck")
    public String getCookie(HttpServletRequest request) {
        Cookie[] cookies = request.getCookies();
        for (Cookie item : cookies) {
            log.error(item.getName() + ":" + item.getValue());
        }
        return "已经获取到cookie";
    }
}
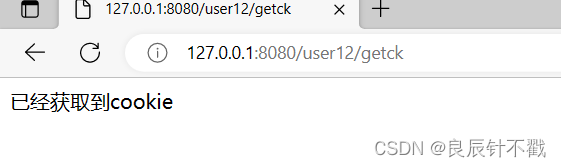
接下来看我们的idea的控制台已经得到了cookie信息.

3. Spring Boot注解方式获取cookie
在这种方式我们中我们可以根据key值获取我们指定的cookie的value值,获取单一的cookie,而不是把所有的cookie都获取出来.
package com.example.demo;
import org.springframework.web.bind.annotation.CookieValue;
import org.springframework.web.bind.annotation.RequestMapping;
import org.springframework.web.bind.annotation.RestController;
@RequestMapping("/user13")
@RestController
public class User13 {
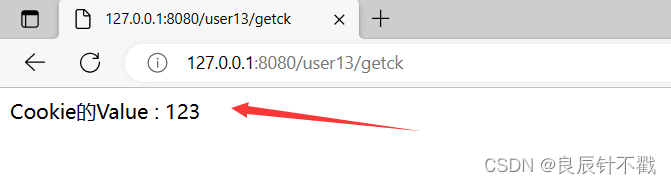
@RequestMapping("/getck")
public String getCookie2(@CookieValue("qwer") String val) {
return "Cookie的Value : " + val;
}
}
4. Spring Boot注解方式获取header
package com.example.demo;

import org.springframework.web.bind.annotation.RequestHeader;
import org.springframework.web.bind.annotation.RequestMapping;
import org.springframework.web.bind.annotation.RestController;

@RestController
@RequestMapping("/getua")
public class GetUA {
    @RequestMapping("/ua")
    public String getUA(@RequestHeader("User-Agent") String userAgent) {
        return userAgent;
    }
}
- UA属于我们的header里面的信息,我们可以获取到UA,什么是UA呢?
- 在javaEE初阶我们已经接触过UA了,大家可以理解为UA用来区分我们的设备信息,这是非常重要的功能.

接下来我们要学习存储session.
5. 建立session信息
package com.example.demo;
import org.springframework.web.bind.annotation.RequestMapping;
import org.springframework.web.bind.annotation.RestController;
import javax.servlet.http.HttpServletRequest;
import javax.servlet.http.HttpSession;
@RequestMapping("/set")
@RestController
public class SetSession {
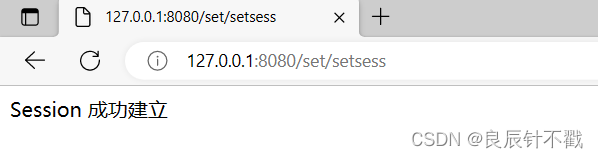
@RequestMapping("/setsess")
public String setSession(HttpServletRequest request) {
HttpSession session = request.getSession();
session.setAttribute("ylc", "123");
return "Session 成功建立";
}
}
6. 获取session信息
package com.example.demo;

import org.springframework.web.bind.annotation.RequestMapping;
import org.springframework.web.bind.annotation.RestController;

import javax.servlet.http.HttpServletRequest;
import javax.servlet.http.HttpSession;

@RestController
@RequestMapping("/get")
public class GetSession {
    @RequestMapping("/getsession")
    public String getSession(HttpServletRequest request) {
        HttpSession session = request.getSession(false); // 切记一定要加 false
        if (session != null && session.getAttribute("ylc") != null) {
            return (String) session.getAttribute("ylc");
        } else {
            return "没有Session 信息";
        }
    }
}

第二种方式获取session :
package com.example.demo;

import org.springframework.web.bind.annotation.RequestMapping;
import org.springframework.web.bind.annotation.RestController;
import org.springframework.web.bind.annotation.SessionAttribute;

import javax.servlet.http.HttpServletRequest;
import javax.servlet.http.HttpSession;

@RestController
@RequestMapping("/get")
public class GetSession {
    @RequestMapping("/getsess2")
    public String getSession2(@SessionAttribute(value = "ylc", required = false) String userinfo) {
        return userinfo;
    }
}

7. 关于@ResponseBody注解
- 我们先构造一个简单的html页面,名字叫做index.html.
- 注意前端页面放在static目录下.
<!doctype html>
<html lang="en">
<head>
    <meta charset="UTF-8">
    <meta name="viewport"
          content="width=device-width, user-scalable=no, initial-scale=1.0, maximum-scale=1.0, minimum-scale=1.0">
    <meta http-equiv="X-UA-Compatible" content="ie=edge">
    <title>Document</title>
</head>
<body>
  <h1>你好,叶良辰</h1>
</body>
</html>
我们先来写一个没有@ResponseBody注解的后端代码.
package com.example.demo;

import org.springframework.stereotype.Controller;
import org.springframework.web.bind.annotation.RequestMapping;
@RequestMapping("/resp")
@Controller
public class Ret {
    @RequestMapping("/func")
    public String func() {
        return "/index.html";
    }
}
随后,我们通过浏览器进行访问,我们会发现访问到了我们的前端页面.

接下来我们在后端代码添加上@ResponseBody注解后.
package com.example.demo;

import org.springframework.stereotype.Controller;
import org.springframework.web.bind.annotation.RequestMapping;
import org.springframework.web.bind.annotation.ResponseBody;

@RequestMapping("/resp")
@Controller
@ResponseBody
public class Ret {
    @RequestMapping("/func")
    public String func() {
        return "/index.html";
    }
}
然后我们再进行页面访问,我们会发现拿到的是后端return的数据.

其实在我们前面已经介绍过这一点,怕大家不熟悉,毕竟是重点,多提及一下还是好的.
- @ResponseBody表示后端代码返回数据,也就是return的数据.
- 没有@ResponseBody注解默认返回的是return的页面,我们在return后面加的是html页面,那么就返回该页面.
8. 返回一个json对象
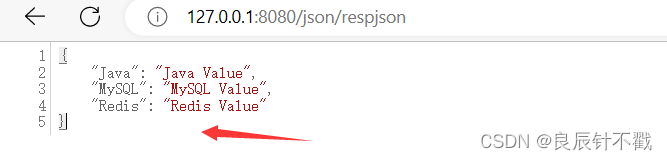
json格式是我们学习前后端交互非常重要的格式,因此我们需要多次学习,我们把json格式的数据存储在哈希表中,然后进行返回.
package com.example.demo;

import org.springframework.web.bind.annotation.RequestMapping;
import org.springframework.web.bind.annotation.RestController;

import java.util.HashMap;
@RequestMapping("/json")
@RestController
public class ResoJson {
    @RequestMapping("/respjson")
    public HashMap<String, String> respJson() {
        HashMap<String, String> map = new HashMap<>();
        map.put("Java", "Java Value");
        map.put("MySQL", "MySQL Value");
        map.put("Redis", "Redis Value");
        return map;
    }
}
9. 简单的前后端交互
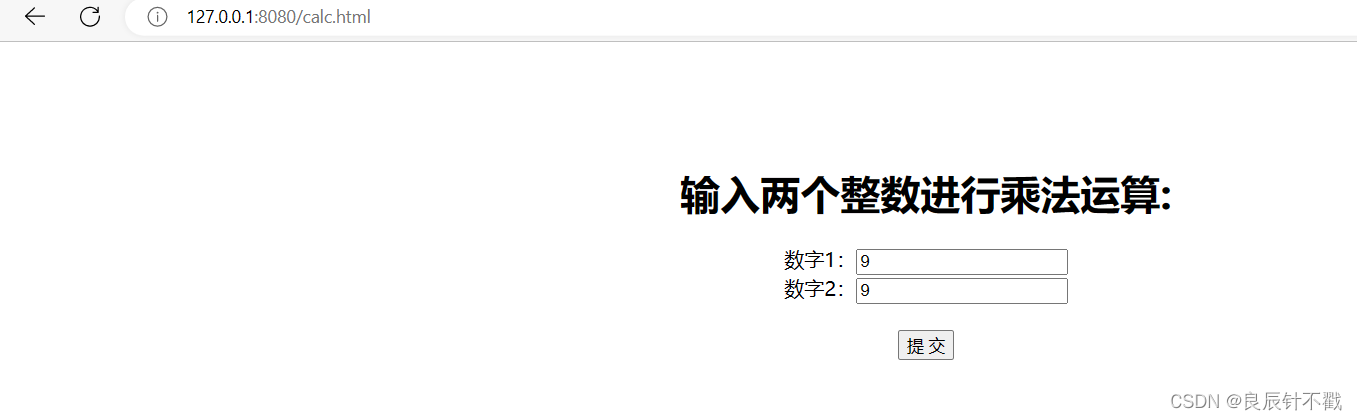
接下来我们实现一个简单的计算机,计算我们的整数乘法.
<!doctype html>
<html lang="en">
<head>
    <meta charset="UTF-8">
    <meta name="viewport"
          content="width=device-width, user-scalable=no, initial-scale=1.0, maximum-scale=1.0, minimum-scale=1.0">
    <meta http-equiv="X-UA-Compatible" content="ie=edge">
    <title>Document</title>
</head>
<body>
<form action="/qwer/calc">
    <div style="margin-top: 100px;text-align: center;">
        <h1>输入两个整数进行乘法运算:</h1>
        数字1:<input name="num1"><br>
        数字2:<input name="num2"><br><br>
        <input value="提 交" type="submit">
    </div>
</form>
</body>
</html>
package com.example.demo;

import org.springframework.stereotype.Controller;
import org.springframework.web.bind.annotation.RequestMapping;
import org.springframework.web.bind.annotation.ResponseBody;

@RequestMapping("qwer")
@ResponseBody
@Controller
public class Calc {
    @RequestMapping("/calc")
    public String calc(Integer num1, Integer num2) {
        if (num1 == null || num2 == null) return "参数错误";
        return "结果为 " + (num1 * num2);
    }
}

10. 前后端登录页面
前后端登录页面让大家更加深刻的了解前后端交互.
<!doctype html>
<html lang="en">
<head>
    <meta charset="UTF-8">
    <meta name="viewport"
          content="width=device-width, user-scalable=no, initial-scale=1.0, maximum-scale=1.0, minimum-scale=1.0">
    <meta http-equiv="X-UA-Compatible" content="ie=edge">
    <script src="https://cdn.bootcdn.net/ajax/libs/jquery/3.6.4/jquery.js"></script>
    <title>Document</title>
    <script>
 function mysub() {
 var username = jQuery("#username").val();
 var password = jQuery("#password").val();
 jQuery.getJSON("/login",
 {
 "username":username,
 "password":password
 },
 function (result) {
 if(result.succ==200){
 alert("返回结果:"+result.msg);
 }else{
 alert("操作失败,请重试。");
 }
 });
 }
 </script>
</head>
<body>
<div style="text-align: center;">
    <h1>登录</h1>
    ⽤户:<input id="username">
    <br>
    密码:<input id="password" type="password">
    <br><br>
    <input type="button" value=" 提交 " onclick="mysub()" style="margin top: 20px ;margin-left: 50px; ">

</div>
</body>
</html>
package com.example.demo;

import org.springframework.web.bind.annotation.RequestMapping;
import org.springframework.web.bind.annotation.ResponseBody;
import org.springframework.web.bind.annotation.RestController;

import java.util.HashMap;
@RestController
public class Login {
    @RequestMapping(value = "/login")
    @ResponseBody
    public HashMap<String,Object> login(String username, String password){
        HashMap<String,Object> res = new HashMap<>();
        int succ = 200;
        if(username!=null && password!=null &&
                username.equals("ylc") && password.equals("123")){
            res.put("msg","登录成功");
        }else{
            res.put("msg","登录失败");
        }
        res.put("succ",succ);
        return res;
    }
}
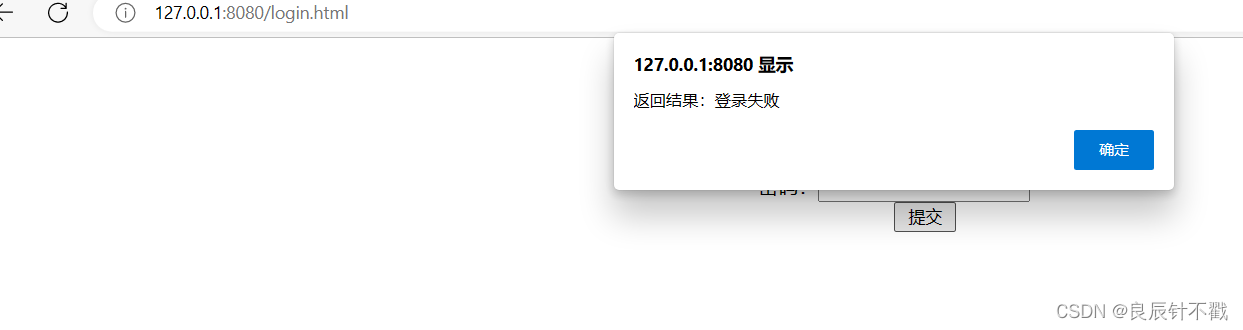
账号密码正确的时候登录成功.

账号密码错误的时候登录失败.
11. 请求转发与请求重定向
请求转发与请求重定向是一个非常重要的面试题,大家要对二者进行区分.
- forward 是请求转发。
- redirect:请求重定向。
接下来我们通过代码进行演示
package com.example.demo;

import org.springframework.stereotype.Controller;
import org.springframework.web.bind.annotation.RequestMapping;
@RequestMapping("/user14")
@Controller
public class User14 {
    // 请求重定向
    @RequestMapping("/index")
    public String index(){
        return "redirect:/index.html";
    }
    // 请求转发
    @RequestMapping("/index2")
    public String index2(){
        return "forward:/index.html";
    }
}
- 请求重定向直接跳转到html页面,相当于我们亲自去买东西.
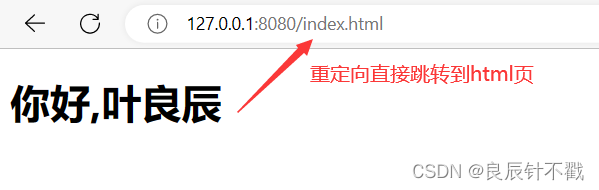
请求转发只是一个代理,我们只是一个跑腿的.

二者区别如下:
- 请求重定向(redirect)将请求重新定位到资源;请求转发(forward)服务器端转发。
- 请求重定向地址发⽣变化,请求转发地址不发⽣变化。
- 请求重定向与直接访问新地址效果一样,不存在原来的外部资源不能访问;请求转发服务器端转发有可能造成原外部资源不能访问。
请求转发的问题?
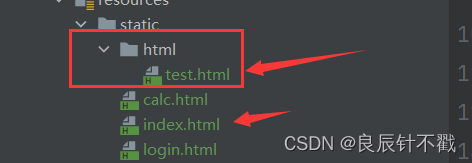
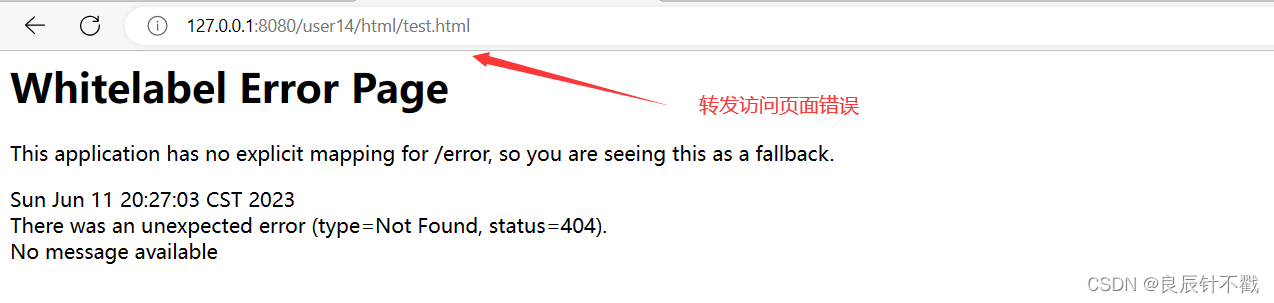
- 请求转发如果资源和转发的⻚⾯不在⼀个⽬录下,会导致外部资源不可访问.
- 什么意思呢,我们的html页面是直接放在static目录下,如果我们在该目录下再创一个目录html目录,在html中再创一个test.html.
- 我们通过index.html跳转test.html页面,观察重定向和转发的效果.
package com.example.demo;

import org.springframework.stereotype.Controller;
import org.springframework.web.bind.annotation.RequestMapping;
@RequestMapping("/user14")
@Controller
public class User14 {
    // 请求重定向
    @RequestMapping("/index")
    public String index(){
        return "redirect:/index.html";
    }
    // 请求转发
    @RequestMapping("/index2")
    public String index2(){
        return "forward:/index.html";
    }
}
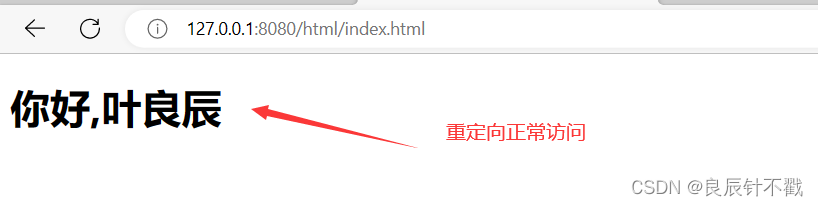
重定向正常访问我们的页面.
转发加载页面信息失败.
看到这里想必大家对重定向和转发有了一定的认识.
后序:
看到这里,我们的Spring MVC就结束了,下一篇文章我们就要开始我们数据库与代码建立连接了,期待与你们一同进步! ! !🍬🍬🍬