参考资料:
《Netty优化》
相关文章:
《Netty:入门(1)》
《Netty:入门(2)》
《Netty:粘包与半包的处理》
《性能优化:TCP连接优化之三次握手》
写在开头:本文为学习后的总结,可能有不到位的地方,错误的地方,欢迎各位指正。
前言
在此前的文章中我们介绍了Netty这一网络编程框架,既然是网络编程,那就必然与网络连接有非常密切的联系。而Netty为了能更好的使用网络连接,提供了一些参数来对网络连接进行设置。
在客户端,可以使用Bootstrap.option()函数来配置参数,配置参数作用于SocketChannel。
在服务器端,可以使用ServerBootstrap来配置参数,但是对于不同的 Channel 需要选择不同的方法。通过 option 来配置 ServerSocketChannel 上的参数,而childOption则是用来配置 SocketChannel上的参数。
目录
前言
一、客户端连接超时设置
1、参数介绍
2、源码分析
二、TCP连接参数
1、连接队列大小设置
1.1、半、全连接队列
1.2、backlog
2、关闭缓冲算法
3、调整滑动窗口大小(不建议使用)
三、buf控制
1、buf类型控制
参数控制
源码分析
2、接收缓冲区大小控制
一、客户端连接超时设置
1、参数介绍
Netty为SocketChannal(客户端连接)提供了一个参数CONNECT_TIMEOUT_MILLIS,用于在客户端建立连接时,如果在指定毫秒内无法连接,会抛出 timeout 异常。
public class TestParam {
    public static void main(String[] args) {
        // SocketChannel 5s内未建立连接就抛出异常
        new Bootstrap().option(ChannelOption.CONNECT_TIMEOUT_MILLIS, 5000);

        // ServerSocketChannel 5s内未建立连接就抛出异常
        new ServerBootstrap().option(ChannelOption.CONNECT_TIMEOUT_MILLIS,5000);
        // SocketChannel 5s内未建立连接就抛出异常
        new ServerBootstrap().childOption(ChannelOption.CONNECT_TIMEOUT_MILLIS, 5000);
    }
}
2、源码分析
首先,我们根据连接超时的报错定位到异常代码

于是,我们定位到AbstractNioChannel.AbstractNioUnsafe.connect方法中。
我们从schedule方法可以看出这是一个定时任务,其中的内容为一个定义了具体任务内容的Runable对象与超时时间connectTimeoutMillis。
另外我们还看到了Promise,于是可得知正是由此对象实现的和主线程之间的交互。
public final void connect(
                final SocketAddress remoteAddress, final SocketAddress localAddress, final ChannelPromise promise) {

    ...

    // Schedule connect timeout.
    // 设置超时时间,通过option方法传入的CONNECT_TIMEOUT_MILLIS参数进行设置
    int connectTimeoutMillis = config().getConnectTimeoutMillis();
    // 如果超时时间大于0
    if (connectTimeoutMillis > 0) {
        // 创建一个定时任务,延时connectTimeoutMillis(设置的超时时间时间)后执行
        // schedule(Runnable command, long delay, TimeUnit unit)
        connectTimeoutFuture = eventLoop().schedule(new Runnable() {
            @Override
            public void run() {
                // 判断是否建立连接,Promise进行NIO线程与主线程之间的通信
                // 如果超时,则通过tryFailure方法将异常放入Promise中
                // 在主线程中抛出
                ChannelPromise connectPromise = AbstractNioChannel.this.connectPromise;
                ConnectTimeoutException cause = new ConnectTimeoutException("connection timed out: " + remoteAddress);
                if (connectPromise != null && connectPromise.tryFailure(cause)) {
                    close(voidPromise());
                }
            }
        }, connectTimeoutMillis, TimeUnit.MILLISECONDS);
    }

   	...

}
总结一下该超时功能就是,通过 Eventloop 的 schedule 方法和 Promise:
- schedule 设置了一个定时任务,延迟connectTimeoutMillis秒后执行该方法。
- 如果指定时间内没有建立连接,则会执行其中的任务,任务负责创建 ConnectTimeoutException 异常,并将异常通过 Pormise 传给主线程并抛出。
二、TCP连接参数
1、连接队列大小设置
下文的内容会涉及到TCP协议的相关内容,因此这里再给不太了解的朋友介绍下TCP的知识点。
1.1、半、全连接队列
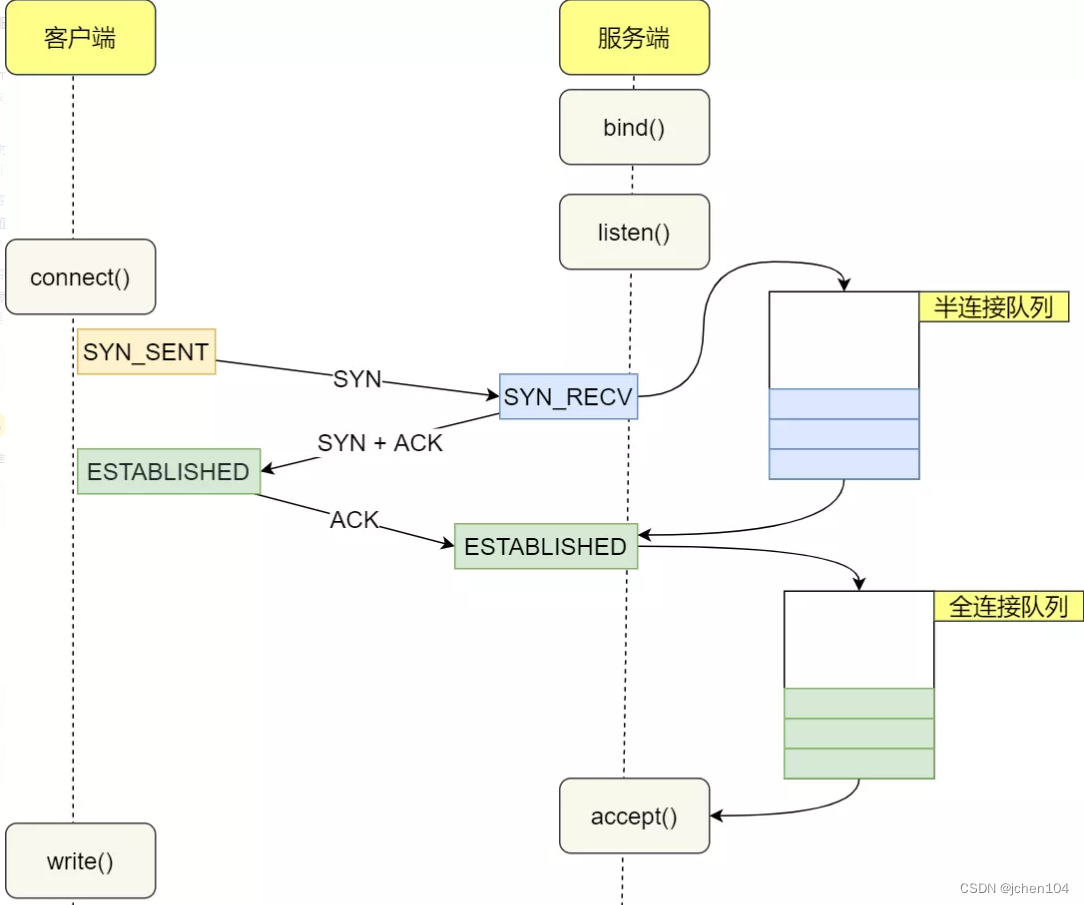
这一部分如果有兴趣的朋友可以看我的这篇文章(《性能优化:TCP连接优化之三次握手》),完整的介绍了三次握手的过程,不过本文主要是介绍Netty提供的优化参数,因此这里只介绍相应涉及的内容。
第一次握手时,因为客户端与服务器之间的连接还未完全建立,Linux内核就会建立一个半连接队列来维护未完成的握手信息,当半连接队列溢出后,服务端就无法再建立新的连接。(若系统开启tcp_syncookies参数则不会丢弃)
当完成三次握手以后,内核会把连接从半连接队列移除,然后创建新的完全的连接(即全连接队列),并将其添加到 accept 队列,等待进程调用 accept 函数时把连接取出来。(全连接队列长度受/proc/sys/net/core/somaxconn参数影响,默认为 128,最终长度为min(backlog, somaxconn),这个backlog就是应用系统传入的参数。)
1.2、backlog
在Netty中,SO_BACKLOG主要用于设置全连接队列的大小。当处理Accept的速率小于连接建立的速率时,全连接队列中堆积的连接数大于SO_BACKLOG设置的值是,便会抛出异常。
可以使用如下方式进行设置
// 设置全连接队列,大小为2
new ServerBootstrap().option(ChannelOption.SO_BACKLOG, 2);
backlog参数在NioSocketChannel.doBind方法被使用
@Override
protected void doBind(SocketAddress localAddress) throws Exception {
    if (PlatformDependent.javaVersion() >= 7) {
        javaChannel().bind(localAddress, config.getBacklog());
    } else {
        javaChannel().socket().bind(localAddress, config.getBacklog());
    }
}
其中backlog被保存在了DefaultServerSocketChannelConfig配置类中
private volatile int backlog = NetUtil.SOMAXCONN;具体的生效步骤如下:
SOMAXCONN = AccessController.doPrivileged(new PrivilegedAction<Integer>() {
    @Override
    public Integer run() {
        // 根据操作系统选择默认somaxconn的大小,Linux默认128
        int somaxconn = PlatformDependent.isWindows() ? 200 : 128;
        File file = new File("/proc/sys/net/core/somaxconn");
        BufferedReader in = null;
        try {
            // 如果配置文件/proc/sys/net/core/somaxconn存在
            // 会读取配置文件中的值,并将backlog的值设置为配置文件中指定的
            if (file.exists()) {
                in = new BufferedReader(new FileReader(file));
                // 将somaxconn设置为Linux配置文件中设置的值
                somaxconn = Integer.parseInt(in.readLine());
                if (logger.isDebugEnabled()) {
                    logger.debug("{}: {}", file, somaxconn);
                }
            } else {
                ...
            }
            ...
        }
        // 返回backlog的值
        return somaxconn;
    }
}
2、关闭缓冲算法
在介绍Nginx的优化与Netty的粘包问题时(《性能优化:Nginx配置优化》、《Netty:粘包与半包的处理》),聊到过Nagle算法,它在一定的时间段,将小数据包暂存,将这些小数据包集合起来,整合为一个数据包发送,在下一个时间段又是如此。这改善了网络传输的效率。
但是,TCP提供的这一优化方案并非总是带来好处,它的一项坏影响便是可能导致数据的发送存在一定的延时。
由于该功能是默认开启的,因此如果想关闭的话可以给SocketChannal将TCP_NODELAY这个参数设置为true。
3、调整滑动窗口大小(不建议使用)
TCP协议使用滑动窗口来动态的协调发送方与接收方的处理速率 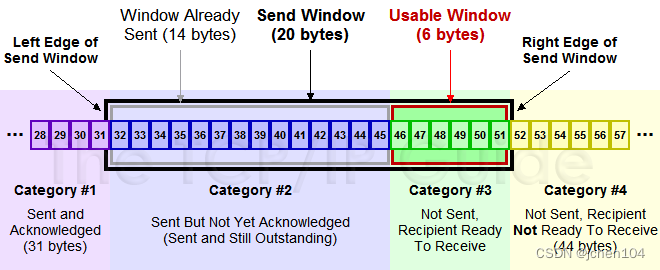
Netty提供了两个参数来指定接收方与发送方的滑动窗口大小:
- SO_SNDBUF 属于 SocketChannal 参数
- SO_RCVBUF 既可用于 SocketChannal 参数,也可以用于 ServerSocketChannal 参数(建议设置到 ServerSocketChannal 上)
不过由于现在的操作系统可以自动的对其进行调整,我们自己再来调整反而有点弄巧成拙,因此不建议对滑动窗口的大小进行调整。
三、buf控制
1、buf类型控制
参数控制
当我们使用ctx.alloc()获取buf时,Netty默认分配的buf为池化的直接内存,如果有特殊需求的话可以进行调整。
// 选择ALLOCATOR参数,设置SocketChannel中分配的ByteBuf类型
// 第二个参数需要传入一个ByteBufAllocator,用于指定生成的 ByteBuf 的类型
new ServerBootstrap().childOption(ChannelOption.ALLOCATOR, new PooledByteBufAllocator());

// true表示使用直接内存
//new PooledByteBufAllocator(true);

// false表示使用堆内存
//new PooledByteBufAllocator(false);

// ture表示使用直接内存
//new UnpooledByteBufAllocator(true);

// false表示使用堆内存
//new UnpooledByteBufAllocator(false);
源码分析
通过默认配置项我们定位到了ByteBufUtil.java类中
// DefaultChannelConfig.java
private volatile ByteBufAllocator allocator = ByteBufAllocator.DEFAULT;

// ByteBufAllocator.java
ByteBufAllocator DEFAULT = ByteBufUtil.DEFAULT_ALLOCATOR;
在ByteBufUtil.java类中,我们看到可以通过启动参数配置默认的buf类型,如果未配置,则再根据是否为安卓系统判断是否使用池化方案。
    // 定义默认类型
    static final ByteBufAllocator DEFAULT_ALLOCATOR;

    static {
        // 从启动参数中获取是否池化的配置类型,如未配置则使用默认值
        String allocType = SystemPropertyUtil.get(
                "io.netty.allocator.type", PlatformDependent.isAndroid() ? "unpooled" : "pooled");
        allocType = allocType.toLowerCase(Locale.US).trim();

        ByteBufAllocator alloc;
        if ("unpooled".equals(allocType)) {
            alloc = UnpooledByteBufAllocator.DEFAULT;
            logger.debug("-Dio.netty.allocator.type: {}", allocType);
        } else if ("pooled".equals(allocType)) {
            alloc = PooledByteBufAllocator.DEFAULT;
            logger.debug("-Dio.netty.allocator.type: {}", allocType);
        } else {
            alloc = PooledByteBufAllocator.DEFAULT;
            logger.debug("-Dio.netty.allocator.type: pooled (unknown: {})", allocType);
        }

        DEFAULT_ALLOCATOR = alloc;

        THREAD_LOCAL_BUFFER_SIZE = SystemPropertyUtil.getInt("io.netty.threadLocalDirectBufferSize", 0);
        logger.debug("-Dio.netty.threadLocalDirectBufferSize: {}", THREAD_LOCAL_BUFFER_SIZE);

        MAX_CHAR_BUFFER_SIZE = SystemPropertyUtil.getInt("io.netty.maxThreadLocalCharBufferSize", 16 * 1024);
        logger.debug("-Dio.netty.maxThreadLocalCharBufferSize: {}", MAX_CHAR_BUFFER_SIZE);
    }
不过,我们看到无论是池化还是非池化依然继续读取了参数,我们接着往下回溯到PlatformDependent.java中,发现依然是采用启动参数来配置是否使用直接内存。
   // UnpooledByteBufAllocator.java
   public static final UnpooledByteBufAllocator DEFAULT =
            new UnpooledByteBufAllocator(PlatformDependent.directBufferPreferred());

    // PlatformDependent.java
    public static boolean directBufferPreferred() {
        return DIRECT_BUFFER_PREFERRED;
    }

    // PlatformDependent.java
    static{
        // 其余代码
        DIRECT_BUFFER_PREFERRED = CLEANER != NOOP
                                  && !SystemPropertyUtil.getBoolean("io.netty.noPreferDirect", false);
        if (logger.isDebugEnabled()) {
            logger.debug("-Dio.netty.noPreferDirect: {}", !DIRECT_BUFFER_PREFERRED);
        }
        // 其余代码
    }
2、接收缓冲区大小控制
对于接受过来的参数所开辟的空间,类型依旧根据上文我们提到的虚拟机参数io.netty.allocator.type=pooled|unpooled来配置!分配空间位置默认是直接内存,这是固定的不能够更改。(netty认为使用直接内存效率更高)。
使用RCVBUF_ALLOCATOR参数可以控制netty的接收缓冲区大小。就是在readchannel事件中读到的ByteBuf。
RCVBUF_ALLOCATOR负责入站数据的分配,决定入站缓冲区的大小(并可动态调整),统一采用 direct 直接内存,但具体池化还是非池化由 allocator 决定。
//设置指定的接收ByteBuf大小为100字节
new ServerBootstrap().childOption(ChannelOption.RCVBUF_ALLOCATOR, new FixedRecvByteBufAllocator(100))
接收区buf分配的源码如下
            final ChannelPipeline pipeline = pipeline();
            // byteBuf的分配器,负责管理池化还是非池化
            final ByteBufAllocator allocator = config.getAllocator();
            // 其余代码
            try {
                do {
                    // RecvByteBufAllocator的内部类,真正决定byte的大小和direct,创建buf的方法
                    byteBuf = allocHandle.allocate(allocator);

                    pipeline.fireChannelRead(byteBuf);
                    byteBuf = null;
                }
            }
allocHandle的初始化则追溯到AdaptiveRecvByteBufAllocator.java类中,可以看到buf的大小默认为DEFAULT_INITIAL(1024),然后动态的调整接收缓冲区的大小,如果数据太多,就逐步扩大,直到DEFAULT_MAXIMUM(65535),反之则会逐步减小,直到DEFAULT_MINIMUM(64)
    // DefaultChannelConfig.java
    public DefaultChannelConfig(Channel channel) {
        this(channel, new AdaptiveRecvByteBufAllocator());
    }

    // AdaptiveRecvByteBufAllocator.java

    static final int DEFAULT_MINIMUM = 64;
    static final int DEFAULT_INITIAL = 1024;
    static final int DEFAULT_MAXIMUM = 65536;
    public AdaptiveRecvByteBufAllocator() {
        this(DEFAULT_MINIMUM, DEFAULT_INITIAL, DEFAULT_MAXIMUM);
    }

    // 动态调整
    public AdaptiveRecvByteBufAllocator(int minimum, int initial, int maximum) {
        checkPositive(minimum, "minimum");
        if (initial < minimum) {
            throw new IllegalArgumentException("initial: " + initial);
        }
        if (maximum < initial) {
            throw new IllegalArgumentException("maximum: " + maximum);
        }

        int minIndex = getSizeTableIndex(minimum);
        if (SIZE_TABLE[minIndex] < minimum) {
            this.minIndex = minIndex + 1;
        } else {
            this.minIndex = minIndex;
        }

        int maxIndex = getSizeTableIndex(maximum);
        if (SIZE_TABLE[maxIndex] > maximum) {
            this.maxIndex = maxIndex - 1;
        } else {
            this.maxIndex = maxIndex;
        }

        this.initial = initial;
    }
![[附源码]计算机毕业设计校园代取快递系统Springboot程序](https://img-blog.csdnimg.cn/42c57f5301f549cdb1d0c89f225c93a1.png)


![[附源码]计算机毕业设计网上鲜花购物系统Springboot程序](https://img-blog.csdnimg.cn/daa309c783fe45439d301c5cefa1c0ee.png)

![[附源码]计算机毕业设计基于SpringBoot的党务管理系统](https://img-blog.csdnimg.cn/ecb6f2d98eb74baf80dc334ede819a74.png)