❤️砥砺前行,不负余光,永远在路上❤️
目录
- 前言
- 一、如何在小程序websocket中使用 Protobuf 发送buffer
- 二、使用过程遇到的坑(版本问题)
- 1、需要注意下Protobuf版本 使用 protobufjs@6.8.6最好,我在使用的时候安装7.多 莫名奇妙 pbjs 用不起
- 2、websocket中发送 buffer
- 三、完整步骤
- 1、下载protoBufferForWechat 导入到项目中
- 2、安装pbjs工具6.8.6
- 3、验证是否安装成功
- 4、转换proto文件
- 5、最后使用
- 6、websocket中发送buffer
- 7、处理服务端返回的buffer
- 四、小程序中的效果
前言
这是一次继前文websocket的一个更新:小程序中使用websocket,区分房间、空间 现在遇到了一个需求是小程序接入 io-game 的websocket 和unity 游戏端同时使用一个websocket,io-game那边收发websocket消息都是采用 Protobuf 处理的。
一、如何在小程序websocket中使用 Protobuf 发送buffer
参考项目:https://github.com/Zhang19910325/protoBufferForWechat/tree/master
二、使用过程遇到的坑(版本问题)
1、需要注意下Protobuf版本 使用 protobufjs@6.8.6最好,我在使用的时候安装7.多 莫名奇妙 pbjs 用不起

cnpm install -g protobufjs@6.8.6
然后执行pbjs即可

2、websocket中发送 buffer
支持string和arraybuffer类型,所以把Uint8Array直接转换为arraybuffer
new Uint8Array([...buffer]).buffer
三、完整步骤
1、下载protoBufferForWechat 导入到项目中
git clone https://github.com/Zhang19910325/protoBufferForWechat.git
2、安装pbjs工具6.8.6
cnpm install -g protobufjs@6.8.6
//or
yarn add globle protobufjs@6.8.6
3、验证是否安装成功
执行pbjs出现如下信息即可
protobuf.js v6.7.0 CLI for JavaScript

Translates between file formats and generates static code.

  -t, --target     Specifies the target format. Also accepts a path to require a custom target.

                   json          JSON representation
                   json-module   JSON representation as a module
                   proto2        Protocol Buffers, Version 2
                   proto3        Protocol Buffers, Version 3
                   static        Static code without reflection (non-functional on its own)
                   static-module Static code without reflection as a module

  -p, --path       Adds a directory to the include path.

  -o, --out        Saves to a file instead of writing to stdout.

  --sparse         Exports only those types referenced from a main file (experimental).

  Module targets only:

  -w, --wrap       Specifies the wrapper to use. Also accepts a path to require a custom wrapper.

                   default   Default wrapper supporting both CommonJS and AMD
                   commonjs  CommonJS wrapper
                   amd       AMD wrapper
                   es6       ES6 wrapper (implies --es6)
                   closure   A closure adding to protobuf.roots where protobuf is a global

  --dependency     Specifies which version of protobuf to require. Accepts any valid module id

  -r, --root       Specifies an alternative protobuf.roots name.

  -l, --lint       Linter configuration. Defaults to protobuf.js-compatible rules:

                   eslint-disable block-scoped-var, no-redeclare, no-control-regex, no-prototype-builtins

  --es6            Enables ES6 syntax (const/let instead of var)

  Proto sources only:

  --keep-case      Keeps field casing instead of converting to camel case.

  Static targets only:

  --no-create      Does not generate create functions used for reflection compatibility.
  --no-encode      Does not generate encode functions.
  --no-decode      Does not generate decode functions.
  --no-verify      Does not generate verify functions.
  --no-convert     Does not generate convert functions like from/toObject
  --no-delimited   Does not generate delimited encode/decode functions.
  --no-beautify    Does not beautify generated code.
  --no-comments    Does not output any JSDoc comments.

  --force-long     Enfores the use of 'Long' for s-/u-/int64 and s-/fixed64 fields.
  --force-number   Enfores the use of 'number' for s-/u-/int64 and s-/fixed64 fields.
  --force-message  Enfores the use of message instances instead of plain objects.

usage: pbjs [options] file1.proto file2.json ...  (or pipe)  other | pbjs [options] -
4、转换proto文件
例如:我的Req_LoginVerify.proto文件
syntax = "proto3";

// {classComment}
message Req_LoginVerify {
  // 用户id
  int64 userId = 1;
  // 场次id
  int64 sessionId = 2;
  // 房间总人数
  int32 roomCountNum = 3;

}
运行之后会生成一个 Req_LoginVerify.json文件
pbjs -t json Req_LoginVerify.proto > Req_LoginVerify.json
内容为:
{
  "nested": {
    "Req_LoginVerify": {
      "fields": {
        "userId": {
          "type": "int64",
          "id": 1
        },
        "sessionId": {
          "type": "int64",
          "id": 2
        },
        "roomCountNum": {
          "type": "int32",
          "id": 3
        }
      }
    }
  }
}
但此时的json文件我们不能直接使用,不过我们可以将json对象取出放到小程序项目当中去,比如在小程序项目中新建一个Req_LoginVerify.js,内容为
module.exports = {
        "nested": {
                "Req_LoginVerify": {
                        "fields": {
                                "userId": {
                                        "type": "int64",
                                        "id": 1
                                },
                                "sessionId": {
                                        "type": "int64",
                                        "id": 2
                                },
                                "roomCountNum": {
                                        "type": "int32",
                                        "id": 3
                                }
                        }
                }
        }
}
5、最后使用
注意我的文件结构:
var protobuf = require('../../weichatPb/protobuf.js');
var loginConfig = require('../../proto/Req_LoginVerify');//加载awesome.proto对应的json
var Login = protobuf.Root.fromJSON(loginConfig);
var LoginMsg = Login.lookupType("Req_LoginVerify");//这就是我们的Message类

6、websocket中发送buffer
sendSocketMessage: function () {
if (this.data.socketOpen) {
var payload = {
userId: 1,
sessionId: 12,
roomCountNum: 6
};
var message = LoginMsg.create(payload);
var buffer = LoginMsg.encode(message).finish();
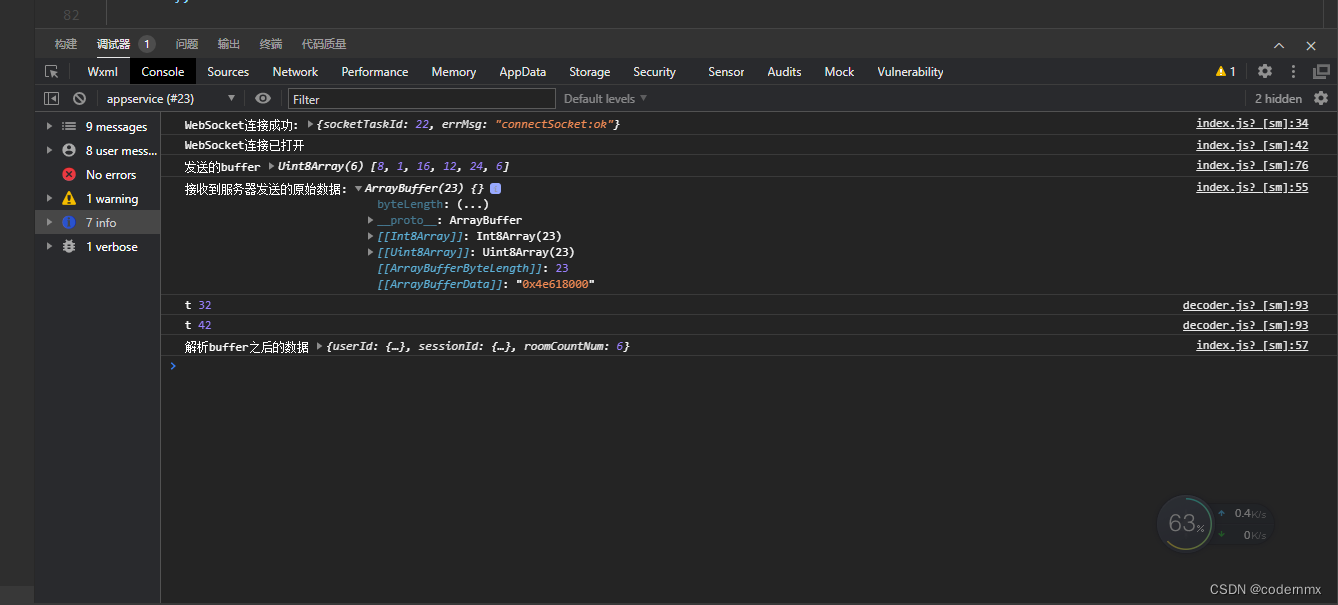
console.log("buffer", buffer);
wx.sendSocketMessage({
data: new Uint8Array([...buffer]).buffer
})
}
},
7、处理服务端返回的buffer
wx.onSocketMessage(function (res) {
        console.log('接收到服务器发送的原始数据:', res.data)
        var deMessage = LoginMsg.decode(res.data);
        console.log("解析buffer之后的数据", deMessage);

})
四、小程序中的效果