apache安装步骤
- 检查是否已经rpm安装httpd服务,已安装则卸载服务。
[root@localhost ~]# rpm -e `rpm -qa | grep httpd` --nodeps- 开发工具安装
如果编译安装无法执行,可能是开发工具没有安装,执行下面命令即可安装。(如已安装则跳过即可)。
[root@localhost ~]# yum -y install make gcc gcc-c++ kernel-devel m4 ncurses-devel openssl-devel- httpd安装
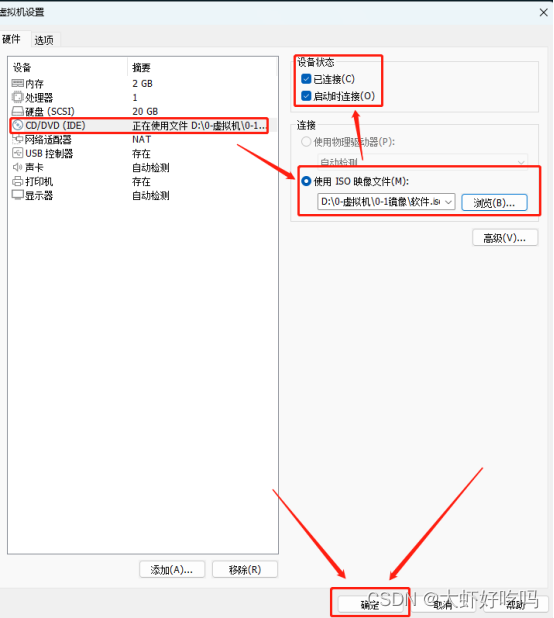
1. 挂载rpm包的iso镜像。
查看虚拟机使用ISO镜像,设备状态勾选已连接和启动时连接后确定即可。
2. 通过脚本解压tar包并编译安装。
[root@localhost ~]# mkdir /sh

 [root@localhost ~]#  cd /sh

 [root@localhost sh]# vim add.sh

#!/bin/bash

mount /dev/cdrom /media/

tar zxf /media/apr-1.5.2.tar.gz -C /usr/src

cd /usr/src/apr-1.5.2

./configure --prefix=/usr/local/apr && make && make install

tar zxf /media/apr-util-1.5.4.tar.gz -C /usr/src

cd /usr/src/apr-util-1.5.4

./configure --prefix=/usr/local/apr-util --with-apr=/usr/local/apr && make && make install

yum -y install zlib-*

tar zxf /media/pcre-8.39.tar.gz -C /usr/src

cd /usr/src/pcre-8.39

./configure --prefix=/usr/local/pcre && make && make install

tar zxf /media/openssl-1.0.1u.tar.gz -C /usr/src

cd /usr/src/openssl-1.0.1u

./config -fPIC --prefix=/usr/local/openssl enable-shared && make && make install
保存退出脚本并执行脚本文件,等待脚本执行完成并确认成功。
[root@localhost sh]# sh add.sh2. 安装Apache主程序。
下面也通过脚本来安装主程序。
[root@localhost sh]# vim httpd.sh

#!/bin/bash

tar zxf /media/httpd-2.4.25.tar.gz -C /usr/src

cd /usr/src/httpd-2.4.25

./configure --prefix=/usr/local/httpd --enable-so --enable-cgi --enable-cgid --enable-ssl --with-ssl=/usr/local/openssl --enable-rewrite --with-pcre=/usr/local/pcre --with-apr=/usr/local/apr --with-apr-util=/usr/local/apr-util --enable-modules=most --enable-mods-shared=most --enable-mpms-shared=all --with-mpm=event --enable-proxy --enable-proxy-fcgi --enable-expires --enable-deflate && make && make install
保存退出脚本并执行脚本文件,等待脚本执行完成并确认成功。
- 优化链接和添加系统服务。
[root@localhost sh]# ln -s /usr/local/httpd/bin/* /usr/local/bin //链接优化

[root@localhost sh]# cp /usr/local/httpd/bin/apachectl /etc/init.d/httpd //添加服务

[root@localhost sh]# vim /etc/init.d/httpd

第二行添加下面两行命令

# chkconfig: 35 85 15     \\声明服务启动级别,开机启动顺序,关机关闭顺序

# description: apache 2.4.25 \\服务声明,简要信息
[root@localhost sh]# chkconfig --add httpd //添加到系统服务
[root@localhost sh]# chkconfig httpd on //设置开机自启
[root@localhost sh]# systemctl start httpd //开启服务- 查看httpd模块
安装后可以通过下面三行命令查看各项模块。
httpd -V \\查看版本和已装模块
httpd -l \\只查看静态编译模块
httpd -M \\查看所有模块
- 查看mpm配置文件
vim /usr/local/httpd/conf/extra/httpd-mpm.conf
<IfModule mpm_event_module>
StartServers 3 #apache 启动时候默认开始的子进程数
MinSpareThreads 75 #最小空闲数量的工作线程
MaxSpareThreads 250 #最大空闲数量的工作线程
ThreadsPerChild 25 #每个子进程产生的线程数量
MaxRequestWorkers 400 #允许同时的最大接入请求数量
MaxConnectionsPerChild 0 #每个子进程可处理的请求数
</IfModule>
#企业推荐参数
<IfModule mpm_worker_module>
StartServers 2 #推荐设置:小=默认 中=3~5 大=5~10
MaxClients 150 #推荐设置:小=500 中=500~1500 大型=1500~3000
MinSpareThreads 25 #推荐设置:小=默认 中=50~100 大=100~200
MaxSpareThreads 75 #推荐设置:小=默认 中=80~160 大=200~400 ThreadsPerChild 25 #推荐设置:小=默认 中=50~100 大型=100~200
MaxRequestsPerChild 0 #推荐设置:小=10000 中或大=10000~50000(此外,如果MaxClients/ThreadsPerChild大于16,还需额外设置ServerLimit参数,ServerLimit必须大于等于 MaxClients/ThreadsPerChild 的值。)
</IfModule>
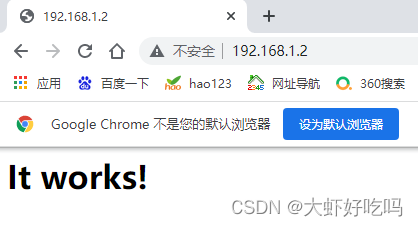
- 查看apache主页
通过访问http://192.168.1.2可以看到apache默认网站。
- 使用ab命令进行压力测试
通过上面命令已经启动httpd服务,通过ab工具测试httpd服务,如未安装通过下面命令安装ab命令工具(打开第二台服务器对第一台httpd服务器进行测试)。
[root@localhost ~]# yum -y install httpd-tools

安装完毕后执行下面命令对服务器进行200人并发访问,发出10000个请求。

[root@localhost ~]# ab -c 200 -n 10000 http://192.168.1.2/index.html

This is ApacheBench, Version 2.3 <$Revision: 1430300 $>

Copyright 1996 Adam Twiss, Zeus Technology Ltd, http://www.zeustech.net/

Licensed to The Apache Software Foundation, http://www.apache.org/


Benchmarking 192.168.1.2 (be patient)

Completed 1000 requests

Completed 2000 requests

Completed 3000 requests

Completed 4000 requests

Completed 5000 requests

Completed 6000 requests

Completed 7000 requests

Completed 8000 requests

Completed 9000 requests

Completed 10000 requests

Finished 10000 requests


Server Software:        Apache/2.4.25

Server Hostname:        192.168.1.2

Server Port:            80


Document Path:          /index.html

Document Length:        45 bytes


Concurrency Level:      200

Time taken for tests:   3.803 seconds

Complete requests:      10000

Failed requests:        0

Write errors:           0

Total transferred:      2890000 bytes

HTML transferred:       450000 bytes

Requests per second:    2629.29 [#/sec] (mean)

Time per request:       76.066 [ms] (mean)

Time per request:       0.380 [ms] (mean, across all concurrent requests)

Transfer rate:          742.06 [Kbytes/sec] received


Connection Times (ms)

              min  mean[+/-sd] median   max

Connect:        0   22 153.7      2    3008

Processing:     8   47  34.1     44     451

Waiting:        4   44  33.0     43     435

Total:         28   69 157.9     46    3057


Percentage of the requests served within a certain time (ms)

  50%     46

  66%     49

  75%     51

  80%     54

  90%     62

  95%     80

  98%    267

  99%   1048

 100%   3057 (longest request)
mysql安装步骤
关于上述已经学会了Apache编译安装,下面将进行MySQL的本地安装。
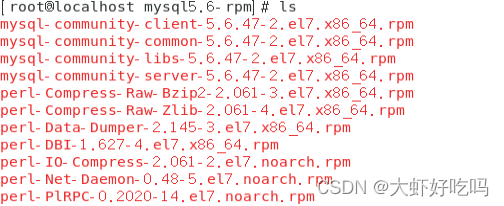
[root@localhost ~]# mount /dev/cdrom /media

[root@localhost ~]# cd /media/mysql5.6-rpm/
检查确认所需rpm包。
通过执行下面命令进行本地安装rpm包。
[root@localhost ~]# cd /media/mysql5.6-rpm/

[root@localhost mysql5.6-rpm]# rpm -ivh --nodeps --force *.rpm

[root@localhost mysql5.6-rpm]# systemctl start mysqld

[root@localhost mysql5.6-rpm]# systemctl enable mysqld
PHP安装步骤
经过上面的操作lam就已经完成了,下面将进行php的安装。
- 安装所需工具
- 下载epel源并下载所需工具。
wget -O /etc/yum.repos.d/epel.repo http://mirrors.aliyun.com/repo/epel-7.repo

[root@localhost ~]# yum -y install libxml2-devel lzip2-devel libcurl-devel libmcrypt-devel openssl-devel bzip2-devel- 安装libmcrypt加密工具
[root@localhost ~]# tar zxf /media/libmcrypt-2.5.7.tar.gz -C /usr/src

[root@localhost ~]# cd /usr/src/libmcrypt-2.5.7/

[root@localhost libmcrypt-2.5.7]# ./configure --prefix=/usr/local/libmcrypt && make && make install- 安装php
[root@localhost ~]# tar zxf /media/php-5.6.27.tar.gz -C /usr/src

[root@localhost ~]# cd /usr/src/php-5.6.27/

[root@localhost php-5.6.27]# ./configure --prefix=/usr/local/php5.6 --with-mysql=mysqlnd --with-pdo-mysql=mysqlnd --with-mysqli=mysqlnd --with-openssl --enable-fpm --enable-sockets --enable-sysvshm --enable-mbstring --with-freetype-dir --with-jpeg-dir --with-png-dir --with-zlib --with-libxml-dir=/usr --enable-xml --with-mhash --with-mcrypt=/usr/local/libmcrypt --with-config-file-path=/etc --with-config-file-scan-dir=/etc/php.d --with-bz2 --enable-maintainer-zts && make && make install- 提供php配置文件
[root@localhost ~]# cp /usr/src/php-5.6.27/php.ini-production /etc/php.ini

cp:是否覆盖"/etc/php.ini"? yes- 为 php-fpm 提供脚本
[root@localhost ~]# cd /usr/src/php-5.6.27/

[root@localhost php-5.6.27]# cp sapi/fpm/init.d.php-fpm /etc/init.d/php-fpm

[root@localhost php-5.6.27]# chmod +x /etc/init.d/php-fpm

[root@localhost php-5.6.27]# chkconfig --add php-fpm

[root@localhost php-5.6.27]# chkconfig php-fpm on- 提供 php-fpm 配置文件并编辑
[root@localhost php-5.6.27]# cp /usr/local/php5.6/etc/php-fpm.conf.default /usr/local/php5.6/etc/php-fpm.conf

[root@localhost php-5.6.27]# systemctl start php-fpm- 测试Apache与php的静/动分离
- 启用Apache服务的代理转发
通过执行脚本来实现对脚本的编辑。
[root@localhost ~]# cd /sh

[root@localhost sh]# vim add.sh

#!/bin/bash

conf=/usr/local/httpd/conf/httpd.conf

sed -i '116s/^#//' $conf

sed -i '120s/^#//' $conf

sed -i '484s/^#//' $conf

sed -i '397aAddType application/x-httpd-php .php\nAddType application/x-httpd-php-source .phps' $conf

sed -i 's/DirectoryIndex index.html/DirectoryIndex index.php index.html/' $conf

[root@localhost sh]# sh add.sh

[root@localhost sh]# systemctl restart httpd- 配置虚拟主机文件
[root@localhost ~]# vim /usr/local/httpd/conf/extra/httpd-vhosts.conf

删除httpd-vhosts.conf文件中的内容复制下面内容保存并退出即可

<VirtualHost *:80>

 ServerAdmin webmaster@benet.com

 DocumentRoot "/var/www/benet"

 ServerName www.benet.com

 ServerAlias benet.com

 ErrorLog "logs/benet.com-error_log"

 CustomLog "logs/benet.com-access_log" common

 ProxyRequests Off

 ProxyPassMatch ^/(.*\.php(/.*)?)$ fcgi://127.0.0.1:9000/var/www/benet/$1


<Directory "/var/www/benet">

 Options FollowSymLinks

 AllowOverride None

 Require all granted

</Directory>

</VirtualHost>- 测试
(1)创建mysql用户密码
[root@localhost ~]# mysqladmin -uroot password

New password:

Confirm new password:

[root@localhost ~]# mysql -uroot -p123

mysql> grant all on *.* to testuser@'%' identified by '123456';

Query OK, 0 rows affected (0.00 sec)


mysql> exit

Bye- 创建php测试网页
[root@localhost ~]# mkdir /var/www/benet

[root@localhost ~]# vim /var/www/benet/index.php

<?php

phpinfo();

?>

[root@localhost ~]# vim /var/www/benet/test1.php

<?php

$link=mysql_connect('192.168.1.3','testuser','123456');

if ($link)echo "connection success......";

mysql_close();

?>
重启服务后,使用客户机访问mysql浏览器就可以看到PHP网页了。
[root@localhost ~]# systemctl restart httpd
部署Discuz论坛
- 解压Discuz包
[root@localhost ~]# mkdir /data

[root@localhost ~]# cd /data

[root@localhost data]# cp -rp /media/Discuz_X3.3_SC_UTF8.zip /data

[root@localhost data]# unzip Discuz_X3.3_SC_UTF8.zip

[root@localhost data]# mv upload/ /var/www/benet/bbs/

[root@localhost data]# chmod -R 777 /var/www/benet/bbs- 修改配置文件并重启服务
[root@localhost ~]# sed -i '202s/Off/On/' /etc/php.ini

[root@localhost ~]# service php-fpm restart- 创建bbs库及用户名
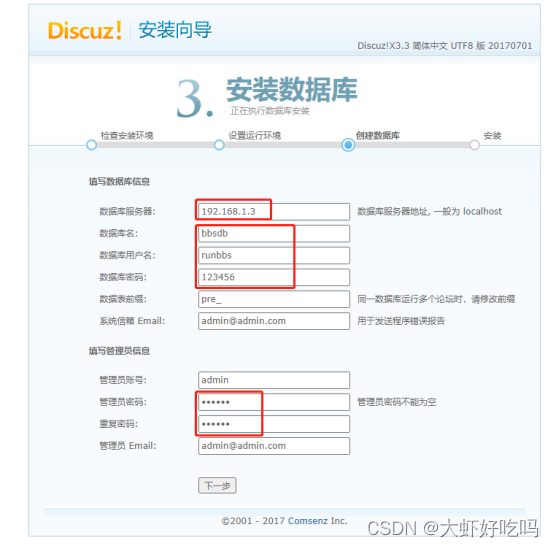
下述命令中,bbsdb为库名,runbbs为用户名,192.168.1.3为服务器IP,用户密码为123456。
[root@localhost ~]# mysql -uroot -p123

mysql> create database bbsdb;

Query OK, 1 row affected (0.00 sec)


mysql> grant all on bbsdb.* to runbbs@'192.168.1.3' identified by '123456';

Query OK, 0 rows affected (0.00 sec)- 安装
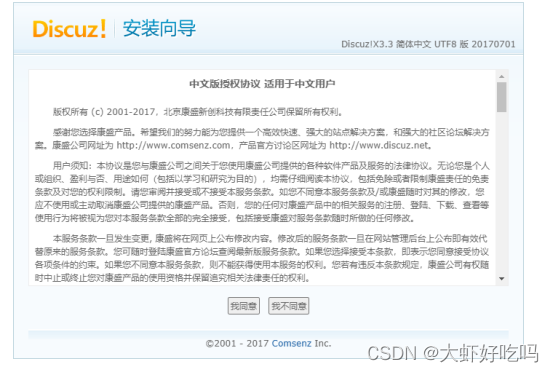
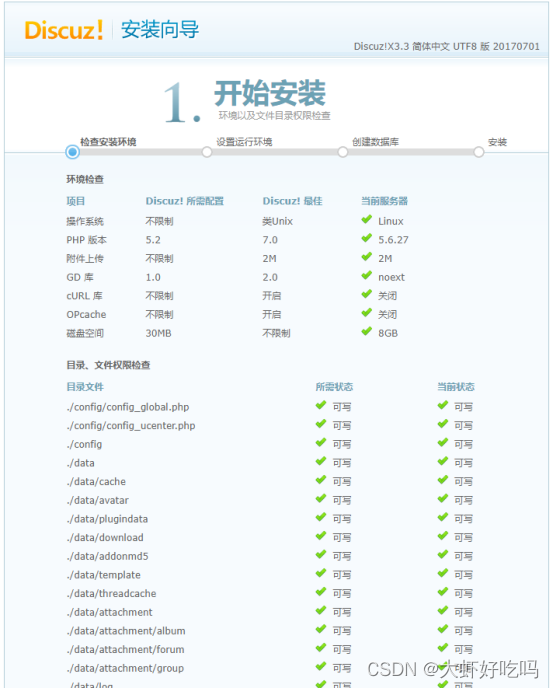
安装discuz论坛,访问http://192.168.1.3/bbs
通过安装向导单击我同意,第二页检查安装环境,如无误点击下方下一步,选择全新安装单击下一步。按照下图填写用户名密码,需要注意的是,如客户端为本机需要把localhost改为服务器IP。

访问http://192.168.1.3/bbs即可登录。
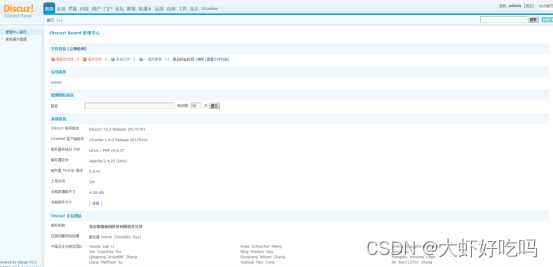
访问http://192.168.1.3/bbs/admin.php可以访问论坛后台。

输入管理员密码后就可以看到后台页面了,管理员可以根据自己的需求修改添加等一系列操作。