文章目录
- Qt
- 一、各文件基本概念
- 1、main.cpp文件
- 2、XXX.pro文件
- 3、XXX.h文件
- 二、基本知识
- 1、命名规范
- 2、快捷键
- 三、入门操作
- 1、添加按钮
- 2、重置窗口大小
- 3、设置窗口标题
- 4、设置固定的窗口大小
- 5、对象树
- 6、添加源文件/头文件
- 7、窗口坐标系
- 四、信号与槽
- 1、让按钮附带功能
- 2、自定义信号和槽
- 3、用按钮结合自定义信号和槽实现触发
- 1、普通型
- 2、点击一个信号,触发另一个信号
- 4、断开信号
- 5、扩展
- 6、Lambda表达式
- 1、基本概念
- 2、用Lambda实现关闭窗口
- 五、QMainWindow
- 1、基本概念
- 2、菜单栏
- 3、工具栏
- 4、状态栏
- 5、铆接部件
- 6、资源文件添加(设置图标)
- 六、对话框
- 1、模态对话框,不可以对其它窗口进行操作。
- 2、非模态对话框,可以对其它窗口进行操作。
- 3、标准对话框(系统提供的)
- 4、消息对话框
- 5、其它对话框
- 七、登录界面
- 八、控件
- 1、Push Button
- 2、ToolButton
- 3、radio Button (单选按钮)
- 4、checkBox(多选按钮)
- 5、TableWidget
- 6、Scroll Area
- 7、Tool Box
- 8、Tab Widget
- 9、Stacked Widget
- 10、Dock Widget(浮动窗口)
- 11、Combo Box(下拉框)
- 12、Text Edit
- 13、Label
- 14、自定义控件
- 九、事件
- 1、鼠标事件
- 2、定时器
- 2.1、第一种方式
- **2.2、第二种方式**
- 3、事件分发器
- 1、通过事件分发器,实现事件拦截(不建议)
- 4、事件过滤器
- 十、绘图
- 1、绘图事件
- 2、绘图高级设置
- 3、手动调用绘图事件
- 4、绘图设备
- 十一、文件读写操作
- 1、读、
- 2、写
- 3、获得文件属性信息
Qt
一、各文件基本概念
1、main.cpp文件
#include "mainwindow.h"

#include <QApplication> //包含一个应用程序类的头文件

//argc 命令行变量的数量,argv命令行变量的数组
int main(int argc, char *argv[])
{
    QApplication a(argc, argv);    //有且仅有一个
    MainWindow w;
    //窗口对象,默认不会显示,必须调用show方法显示窗口
    w.show();
    return a.exec();
}
2、XXX.pro文件
QT       += core gui     //Qt包含的模块

  //版本4以上,加入了widgets模块
greaterThan(QT_MAJOR_VERSION, 4): QT += widgets

CONFIG += c++11

# The following define makes your compiler emit warnings if you use
# any Qt feature that has been marked deprecated (the exact warnings
# depend on your compiler). Please consult the documentation of the
# deprecated API in order to know how to port your code away from it.
DEFINES += QT_DEPRECATED_WARNINGS

# You can also make your code fail to compile if it uses deprecated APIs.
# In order to do so, uncomment the following line.
# You can also select to disable deprecated APIs only up to a certain version of Qt.
#DEFINES += QT_DISABLE_DEPRECATED_BEFORE=0x060000    # disables all the APIs deprecated before Qt 6.0.0

 //源文件
SOURCES += \
    main.cpp \
    mainwindow.cpp

 //头文件
HEADERS += \
    mainwindow.h

FORMS += \
    mainwindow.ui

# Default rules for deployment.
qnx: target.path = /tmp/$${TARGET}/bin
else: unix:!android: target.path = /opt/$${TARGET}/bin
!isEmpty(target.path): INSTALLS += target
3、XXX.h文件
#ifndef MAINWINDOW_H
#define MAINWINDOW_H

#include <QMainWindow>

QT_BEGIN_NAMESPACE
namespace Ui { class MainWindow; }
QT_END_NAMESPACE

class MainWindow : public QMainWindow
{
    Q_OBJECT  //允许类中使用信号和槽机制

public:
    MainWindow(QWidget *parent = nullptr);  //构造函数
    ~MainWindow();                  //析构函数

private:
    Ui::MainWindow *ui;
};
#endif // MAINWINDOW_H
二、基本知识
1、命名规范
- 类名:首字母大写,单词与单词之间首字母大写
- 函数名, 变量名称 :首字母小写,单词与单词之间首字母大写
2、快捷键
- 注释: ctrl+ /
- 运行 : ctrl+r
- 编译: ctrl + b
- 字体缩放: ctrl+ 鼠标滚轮
- 查找:ctrl +f
- 整行移动:
- 整行移动:ctrl +shift+↑ / ↓
- 帮助文档:F1
- 自动对齐:ctrl + i
- 同名之间的.h和.cpp切换:F4
三、入门操作
1、添加按钮
//QPushButton类
//头文件
#include<QPushButton>
#include "mainwindow.h"
#include "ui_mainwindow.h"
#include<QPushButton>

MainWindow::MainWindow(QWidget *parent)
    : QMainWindow(parent)
    , ui(new Ui::MainWindow)
{
    ui->setupUi(this);
    //创建一个按钮
    QPushButton *btn=new QPushButton;
    //让btn依赖在mainwindow窗口中
     btn->setParent(this);
     //显示文本,按钮的名字
     btn->setText("第一个按钮");

    //创建第二个文本,按照控件的大小创建窗口
    QPushButton *btn2=new QPushButton("第二个按钮",this);

    //移动按钮位置,不移动的话,按钮2会覆盖住按钮1
     btn2->move(100,100);
}

MainWindow::~MainWindow()
{
    delete ui;
}
2、重置窗口大小
resize(600,400);
3、设置窗口标题
setWindowTitle("xxx窗口名字");
4、设置固定的窗口大小
setFixedSize(600,400);
5、对象树
![[外链图片转存失败,源站可能有防盗链机制,建议将图片保存下来直接上传(img-eSGy4CJ7-1669961216037)(D:\Photo\typora-user-images\image-20221129212113227.png)]](https://img-blog.csdnimg.cn/82b523ffd5b846c6bc326e22d084c4ac.png)
只要指定了父亲,他父亲析构的时候,会把这个孩子也析构掉。
6、添加源文件/头文件
![[外链图片转存失败,源站可能有防盗链机制,建议将图片保存下来直接上传(img-aWbIdt8q-1669961216038)(D:\Photo\typora-user-images\image-20221129212540703.png)]](https://img-blog.csdnimg.cn/15edc66d38984ee8a5b15f615fda3720.png)
![[外链图片转存失败,源站可能有防盗链机制,建议将图片保存下来直接上传(img-kRa3KcWY-1669961216039)(D:\Photo\typora-user-images\image-20221129212618006.png)]](https://img-blog.csdnimg.cn/6f990482926b4b418ea1c8b13bf02e8f.png)
![[外链图片转存失败,源站可能有防盗链机制,建议将图片保存下来直接上传(img-JiMwaNGJ-1669961216040)(D:\Photo\typora-user-images\image-20221129212504024.png)]](https://img-blog.csdnimg.cn/b0792d7cab254d38bec0beddb21edd3d.png)
7、窗口坐标系
左上角为(0,0)点,x以右为正方向,y以下为正方向。
四、信号与槽
1、让按钮附带功能
1.1、connect( 信号的发送者,发送的具体信号,信号的接受者,信号的处理(槽) )
1.2、信号槽的优点:松散耦合,(信号发送端和接收端,本身没有关联,通过connect连接,将2者联系起来)
//connect(    信号的发送者,发送的具体信号,信号的接受者,信号的处理(槽)   )

//实现按钮关闭界面
connect(btn,&QPushButton::clicked,this,&MainWindow::close);
1.3、Signals
- clicked //点击
- pressed //摁下
- released //松开
- toggled
1.4、槽函数(slots)
![[外链图片转存失败,源站可能有防盗链机制,建议将图片保存下来直接上传(img-BLOtc9XS-1669961216040)(D:\Photo\typora-user-images\Center.png)]](https://img-blog.csdnimg.cn/659c74bfa07e47bc879d63d74715a2c3.png)
2、自定义信号和槽
情景:
老师说:饿了。
学生响应说:请客吃饭。
解析:
老师是信号发送方,学生是信号接收方。
信号:
- 自定义信号 写到signals下
- 返回值是void,只需要声明,不需要实现
- 可以有参数,可以重载
槽:
- 槽函数,返回值也是void,
- 需要声明也需要实现
- 可以有参数,可以发生重载
注意、调用下课函数,必须先连接,然后再执行触发信号
2.1、Teacher.h
#ifndef TEACHER_H
#define TEACHER_H

#include <QObject>

class Teacher : public QObject
{
    Q_OBJECT
public:
    explicit Teacher(QObject *parent = nullptr);

signals:

  //自定义信号 写到signals下
    //返回值是void,只需要声明,不需要实现
    //可以有参数,可以重载

    void hungry();
    //实现重载
     void hungry(QString foodName);
};

#endif // TEACHER_H
2.2、Student.h
#ifndef STUDENT_H
#define STUDENT_H

#include <QObject>

class Student : public QObject
{
    Q_OBJECT
public:
    explicit Student(QObject *parent = nullptr);

    //槽函数,返回值也是void,
    //需要声明也需要实现
    //可以有参数,可以发生重载
   void treat();

    //重载版本
    void treat(QString foodName);


signals:

};

#endif // STUDENT_H
2.3、Student.cpp
#include "student.h"
#include<QDebug>
Student::Student(QObject *parent) : QObject(parent)
{

}
void Student::treat()
{
   qDebug()<<"请老师吃饭";
}
void Student::treat(QString foodName)
{
    //输出效果
    // 请老师吃"鱼香肉丝"
    //想要把""去掉,需要QString->char*
   qDebug()<<"请老师吃"<<foodName;

    //输出效果
    //请老师吃鱼香肉丝
    qDebug()<<"请老师吃"<<foodName.toUtf8().data();


}
2.4、MainWindow.h
#ifndef MAINWINDOW_H
#define MAINWINDOW_H

#include <QMainWindow>
#include "Teacher"
#include "Student"

QT_BEGIN_NAMESPACE
namespace Ui { class MainWindow; }
QT_END_NAMESPACE

class MainWindow : public QMainWindow
{
    Q_OBJECT

public:
    MainWindow(QWidget *parent = nullptr);
    ~MainWindow();

private:
    Ui::MainWindow *ui;

    //添加2个变量
   Teacher *zt;
   Student *st;

   //实现触发信号
   void classIsOver();

};
#endif // MAINWINDOW_H
2.5、MainWindow.cpp
#include "mainwindow.h"
#include "ui_mainwindow.h"


MainWindow::MainWindow(QWidget *parent)
    : QMainWindow(parent)
    , ui(new Ui::MainWindow)
{
    ui->setupUi(this);

   //创建一个老师对象
   this->zt=new Teacher(this);
   //创建一个学生对象
   this->st=new Student(this);

   //建立连接
   connect(zt,&Teacher::hungry,st,&Student::treat);

   //调用下课函数,必须先连接,然后再执行触发信号
   classIsOver();

   //调用带参,这是是因为有重载函数,出现了二义性,所以需要指明要调用哪一个
   void(Teacher:: *teacherSignal)(QString)=&Teacher::hungry;
   void(Student:: *studentSlot)(QString)=&Student::treat;
   connect(zt,teacherSignal,st,studentSlot);
   classIsOver();
}

MainWindow::~MainWindow()
{
    delete ui;
}

void MainWindow::classIsOver()
{
//emit是触发信号的关键字。
 //emit zt->hungry();

 //重载版本
 emit zt->hungry("鱼香肉丝");
}
3、用按钮结合自定义信号和槽实现触发
1、普通型
MainWindow.cpp 其余页面不变
#include "mainwindow.h"
#include "ui_mainwindow.h"


MainWindow::MainWindow(QWidget *parent)
    : QMainWindow(parent)
    , ui(new Ui::MainWindow)
{
    ui->setupUi(this);

   //创建一个老师对象
   this->zt=new Teacher(this);
   //创建一个学生对象
   this->st=new Student(this);

   void(Teacher:: *teacherSignal)(QString)=&Teacher::hungry;
   void(Student:: *studentSlot)(QString)=&Student::treat;
   connect(zt,teacherSignal,st,studentSlot);

   //点击 一个下课的按钮,再触发下课
    QPushButton *btn=new QPushButton("下课",this);
    this->resize(600,400);
        connect(btn,&QPushButton::clicked,this,&MainWindow::classIsOver);

}

MainWindow::~MainWindow()
{
    delete ui;
}

void MainWindow::classIsOver()
{
//emit是触发信号的关键字。

 //重载版本
 emit zt->hungry("鱼香肉丝");
}
2、点击一个信号,触发另一个信号
MainWindow.cpp , 其余页面不变
#include "mainwindow.h"
#include "ui_mainwindow.h"


MainWindow::MainWindow(QWidget *parent)
    : QMainWindow(parent)
    , ui(new Ui::MainWindow)
{
    ui->setupUi(this);

   //创建一个老师对象
   this->zt=new Teacher(this);
   //创建一个学生对象
   this->st=new Student(this);

   void(Teacher:: *teacherSignal2)(void)=&Teacher::hungry;
   void(Student:: *studentSlot2)(void)=&Student::treat;
   connect(zt,teacherSignal2,st,studentSlot2);

   //点击 一个下课的按钮,再触发下课
    QPushButton *btn=new QPushButton("下课",this);
    this->resize(600,400);

        //信号连接信号
    connect(btn,&QPushButton::clicked,
                    zt,teacherSignal2);

}

MainWindow::~MainWindow()
{
    delete ui;
}

void MainWindow::classIsOver()
{
//emit是触发信号的关键字。

 //重载版本
 emit zt->hungry("鱼香肉丝");
}
4、断开信号
  void(Teacher:: *teacherSignal2)(void)=&Teacher::hungry;
  void(Student:: *studentSlot2)(void)=&Student::treat;
  connect(zt,teacherSignal2,st,studentSlot2);

//断开信号
  disconnect(zt,teacherSignal2,st,studentSlot2);
5、扩展
- 一个信号可以关联多个槽函数
- 多个信号可以关联同一个槽函数
- 槽函数与信号函数,参数类型必须一致
- 信号的参数个数可以多于槽的参数个数
6、Lambda表达式
1、基本概念
//声明

//不可修改传入的值
[]()->返回类型{
    //函数体
};
//可以修改传入的值
[]()mutable{};

//调用
[]()->返回类型{
    //函数体
}();
以上是一个Lambda表达式的声明
[]必须有,它表示这是一个Lambda表达式
- [] 表示没有任何函数对象参数
- [=] 表示可以使用Lambda所在作用范围内可见的局部变量(包括this指针),是值传递
- [&]表示可以使用Lambda所在作用范围内可见的局部变量(包括this指针),是引用传递
- [this]表示可以使用Lambda所在类的成员变量
- [一个变量名] 这个变量名值传递,只能看见这个变量
- [&变量名] 这个变量引用传递,只能看见这个变量
 QPushButton *btn=new QPushButton("下课",this);

 connect(btn,&QPushButton::clicked,this,[](){qDebug()<<"测试Lambda表达式"});
2、用Lambda实现关闭窗口
QPushButton *btn=new QPushButton("下课",this);

connect(btn,&QPushButton::clicked,this,
        [](){this->close();});
五、QMainWindow
1、基本概念
![[外链图片转存失败,源站可能有防盗链机制,建议将图片保存下来直接上传(img-I8A5rdBq-1669961216041)(D:\Photo\typora-user-images\image-20221130121817643.png)]](https://img-blog.csdnimg.cn/87a85e7578a349a8be21afa106a1572a.png)
- Menu Bar 菜单栏
- Tool Bar 工具栏
- dock Widget 铆接部件
- status Bar 状态栏
- central Widget 中心部件
2、菜单栏
2.1、创建菜单栏
菜单栏最多只能有一个
MainWindow.cpp
#include<QMenuBar>
//创建菜单栏
QMenuBar *bar=menuBar();
//将菜单栏放入窗口中
setMenuBar(bar);

//创建菜单
QMenu * fileMenu=bar->addMenu("文件");
QMenu * editMenu=bar->addMenu("编辑");

//添加一个菜单项
fileMenu->addAction("新建");
fileMenu->addAction("打开");

//添加分隔线
fileMenu->addSeparator();
3、工具栏
#include<QToolBar>
QToolBar *toolBar=new QToolBar(this);
addToolBar(toolBar);  //默认在上面

//后期只允许左右停靠
toolBar->setAllowedAreas(Qt::LeftToolBarArea | Qt::RightToolBarArea)
//设置浮动
 toolBar->setFloatable(false);
//设置移动
toolBar->setMoveable(false);

//工具栏设置内容
QAction *openAction=fileName->addAction("打开");
toolBar->addAction(openAction);

//工具栏中添加控件
QPushButton *btn=new QPushButton("aa",this);
toolBar->addWidget(btn);
4、状态栏
#include<QLable>
QStatusBar *stBar=statusBar();
//设置到窗口中
setStatusBar(stBar);

//放标签控件
QLable *lable=new QLable("提示信息",this);
stBar->addWidget(lable);
5、铆接部件
QDockWidget *dock=new QDockWidget("浮动",this);
addDockWidget(Qt::BottomDockWidgetArea,dock);

//设置后期停靠区域,具体操作与工具栏操作一样

#include<QTextEdit>
//设置中心部件
QTextEdit *edit=new QTextEdit(this);
setCentralWidget(edit);
6、资源文件添加(设置图标)
![[外链图片转存失败,源站可能有防盗链机制,建议将图片保存下来直接上传(img-HnsK3SyE-1669961216042)(D:\Photo\typora-user-images\image-20221130153806272.png)]](https://img-blog.csdnimg.cn/a8dd8daefd8748eea644fe010fac765a.png)
![[外链图片转存失败,源站可能有防盗链机制,建议将图片保存下来直接上传(img-FmQKjbg6-1669961216046)(D:\Photo\typora-user-images\image-20221130153843395.png)]](https://img-blog.csdnimg.cn/d044b0714db4402fb2e1273ac7a4eca5.png)
![[外链图片转存失败,源站可能有防盗链机制,建议将图片保存下来直接上传(img-FlgmT9Ld-1669961216047)(D:\Photo\typora-user-images\image-20221130154033497.png)]](https://img-blog.csdnimg.cn/082f95cd7f6f40feb35deed1b7b5091c.png)
![[外链图片转存失败,源站可能有防盗链机制,建议将图片保存下来直接上传(img-I4ZmFpL1-1669961216047)(D:\Photo\typora-user-images\image-20221130154302197.png)]](https://img-blog.csdnimg.cn/bc715d36ff314a47a83600fc0c68aba7.png)
前缀类似于包名
再点击添加文件
MainWindow.cpp
#include "mainwindow.h"
#include "ui_mainwindow.h"
#include<QPushButton>

MainWindow::MainWindow(QWidget *parent)
    : QMainWindow(parent)
    , ui(new Ui::MainWindow)
{
    ui->setupUi(this);

    //先使用拖文件的方式创建
   //使用添加Qt资源,":+前缀名+文件名"
    ui->actionNew->setIcon(QIcon(":+前缀名+文件名"));
}

MainWindow::~MainWindow()
{
    delete ui;
}
六、对话框
引入头文件
1、模态对话框,不可以对其它窗口进行操作。
#include "mainwindow.h"
#include "ui_mainwindow.h"
#include<QPushButton>
#include<QDialog>
MainWindow::MainWindow(QWidget *parent)
    : QMainWindow(parent)
    , ui(new Ui::MainWindow)
{
    ui->setupUi(this);
 //点击新建按钮,弹出一个对话框
   connect(ui->actionNew,&QAction::triggered,[=](){

       //模态创建
      QDialog dlg(this);
       dlg.resize(200,100);
     dlg.exec();
   })

}

MainWindow::~MainWindow()
{
    delete ui;
}
2、非模态对话框,可以对其它窗口进行操作。
#include "mainwindow.h"
#include "ui_mainwindow.h"
#include<QPushButton>
#include<QDialog>
MainWindow::MainWindow(QWidget *parent)
    : QMainWindow(parent)
    , ui(new Ui::MainWindow)
{
    ui->setupUi(this);
 //点击新建按钮,弹出一个对话框
   connect(ui->actionNew,&QAction::triggered,[=](){

       //非模态创建
     QDialog *dlg=new QDialog(this);
     dlg->resize(200,100);
     dlg->show();

       //关闭后就释放,防止内存泄露
       dlg->setAttribute(Qt::WA_DeleteOnClose);
   })

}

MainWindow::~MainWindow()
{
    delete ui;
}
3、标准对话框(系统提供的)
![[外链图片转存失败,源站可能有防盗链机制,建议将图片保存下来直接上传(img-Aal6gDcM-1669961216048)(D:\Photo\typora-user-images\image-20221130161224922.png)]](https://img-blog.csdnimg.cn/e2fbde9f2f894ddd998ee6388b618bb6.png)
4、消息对话框
引入头文件
#include "mainwindow.h"
#include "ui_mainwindow.h"
#include<QPushButton>
#include<QDialog>
#include<QMessageBox>
MainWindow::MainWindow(QWidget *parent)
    : QMainWindow(parent)
    , ui(new Ui::MainWindow)
{
    ui->setupUi(this);
 //点击新建按钮,弹出一个对话框
   connect(ui->actionNew,&QAction::triggered,[=](){

  //消息对话框

  //错误对话框
    //critical(父亲,标题,错误提示)
  QMessageBox::critical(this,"critical","错误");

  //信息对话框
  QMessageBox::information(this,"inf","信息");

  //问题对话题(例如显示保存还是退出,默认显示,yes no)
  QMessageBox::question(this,"ques","信息");

  //问题对话框,修改成save,cancel
   QMessageBox::question(this,"ques","信息" Qt::QMessageBox::Save|Qt::QMessageBox::Cancel);

  if(QMessageBox::Save== QMessageBox::question(this,"ques","信息" Qt::QMessageBox::Save|Qt::QMessageBox::Cancel))
  {
      qDebug()<<"选择的是保存";
  }

  //警告对话框
QMessageBox::warning(this,"warning","警告");
  })
}

MainWindow::~MainWindow()
{
    delete ui;
}
5、其它对话框
#include "mainwindow.h"
#include "ui_mainwindow.h"
#include<QPushButton>
#include<QDialog>
#include<QMessageBox>
MainWindow::MainWindow(QWidget *parent)
    : QMainWindow(parent)
    , ui(new Ui::MainWindow)
{
    ui->setupUi(this);
 //点击新建按钮,弹出一个对话框
   connect(ui->actionNew,&QAction::triggered,[=](){


   //颜色对话框,(类似于打开拾色器)
   //返回值为RGB
   QClolor color= QColorDialog::getColor(QColor(255,0,0));

   //文件对话框
    QFileDialog::getOpenFileName(this,"打开文件","默认打开的位置");

   //文件对话框,过滤一下文件,只显示.txt文件
   //返回值是选取的路径
   //参数1 父亲,参数2 标题 ,参数3,默认打开路径,参数4 过滤文件类型
  QString str= QFileDialog::getOpenFileName(this,"打开文件","默认打开的位置","*.txt");


  //字体对话框
   bool flag;
  QFont font= QFontDialog::getFont(&flag,QFont("黑体",16));

   })
}


MainWindow::~MainWindow()
{
    delete ui;
}
七、登录界面
1、步骤:
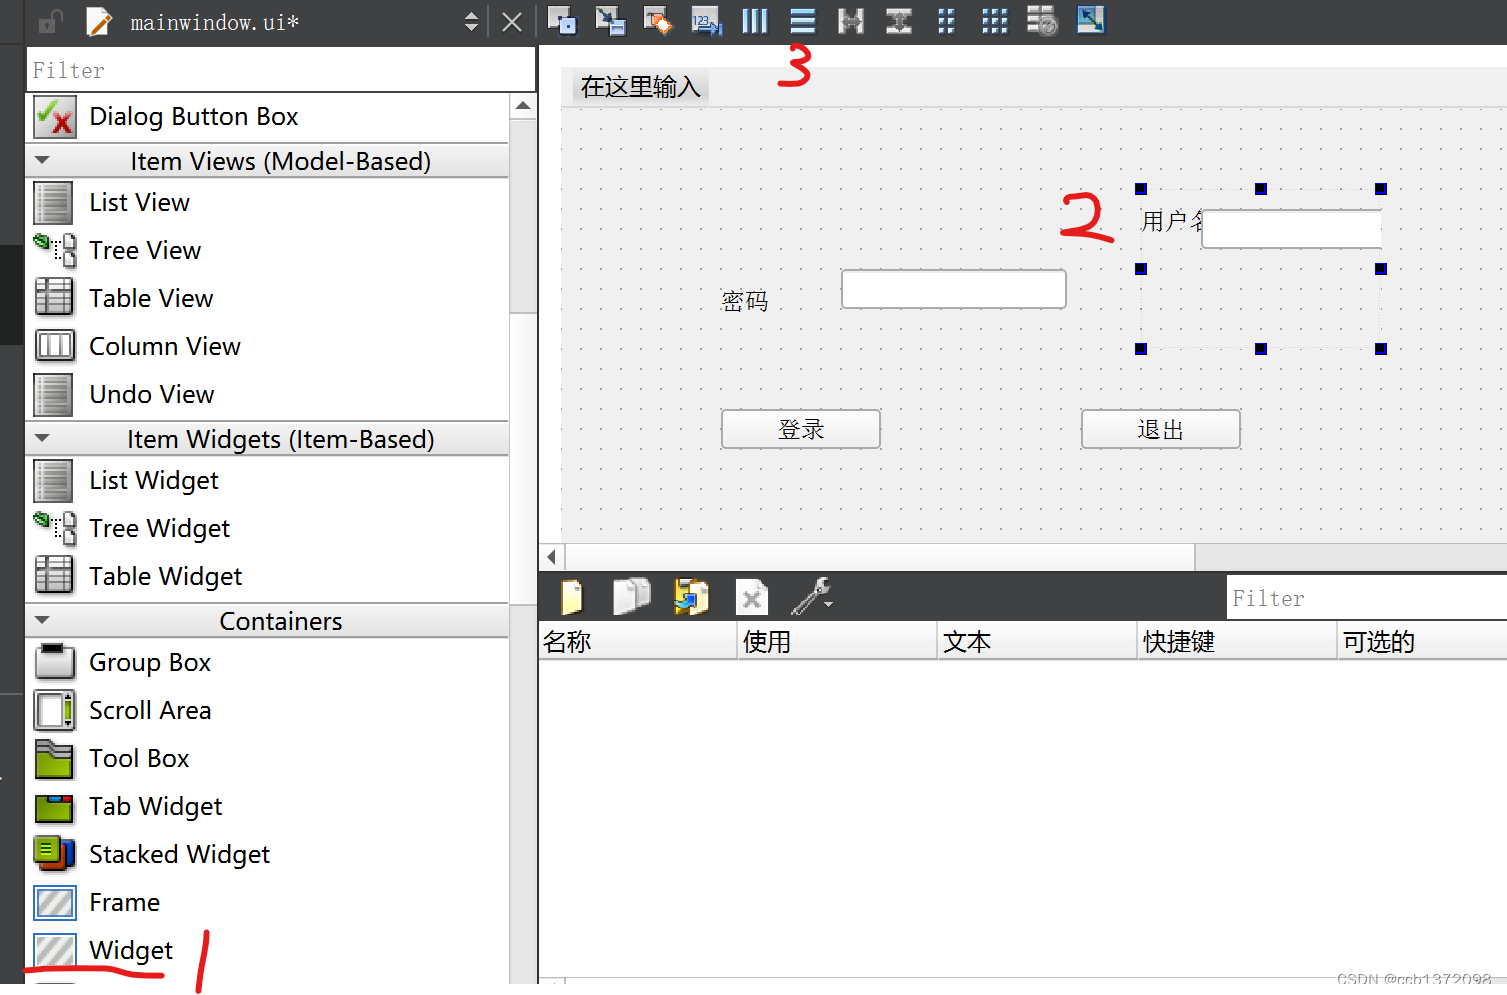
1、在UI布局内拖拽实现
![[外链图片转存失败,源站可能有防盗链机制,建议将图片保存下来直接上传(img-sRBm99oe-1669961216048)(D:\Photo\typora-user-images\image-20221130164705912.png)]](https://img-blog.csdnimg.cn/e183e213cd774d4bbb2bbfb6bef3e2ee.png)
![[外链图片转存失败,源站可能有防盗链机制,建议将图片保存下来直接上传(img-XojqKwJG-1669961216048)(D:\Photo\typora-user-images\image-20221130164753391.png)]](https://img-blog.csdnimg.cn/75a5da8b3e1648efb098a3f72847d893.png)
![[外链图片转存失败,源站可能有防盗链机制,建议将图片保存下来直接上传(img-zTDXdmGb-1669961216049)(D:\Photo\typora-user-images\image-20221130164950790.png)]](https://img-blog.csdnimg.cn/89ca47259d244cfd9094863818c6c07d.png)
2、拖拽Lable,在上面写上用户名
![[外链图片转存失败,源站可能有防盗链机制,建议将图片保存下来直接上传(img-5DzeC6Qj-1669961216049)(D:\Photo\typora-user-images\image-20221130165151020.png)]](https://img-blog.csdnimg.cn/8fbb56e809994710bcdfd7bdc9117f53.png)
3、放到用户名旁边,实现输入
![[外链图片转存失败,源站可能有防盗链机制,建议将图片保存下来直接上传(img-RM61ynll-1669961216049)(D:\Photo\typora-user-images\image-20221130165327893.png)]](https://img-blog.csdnimg.cn/ae11f7a90bfc4c8a9aac7db14c0ef83f.png)
![[外链图片转存失败,源站可能有防盗链机制,建议将图片保存下来直接上传(img-TCXHByjO-1669961216050)(D:\Photo\typora-user-images\image-20221130165435748.png)]](https://img-blog.csdnimg.cn/0088b048feb84265b86d1d57925c40cb.png)
4、再拖拽这个,实现登录和退出。
5、实现水平布局
效果:
![[外链图片转存失败,源站可能有防盗链机制,建议将图片保存下来直接上传(img-uikYl17B-1669961216050)(D:\Photo\typora-user-images\image-20221130165851862.png)]](https://img-blog.csdnimg.cn/d6f5b26eb60e4338b8f5127507ca42b9.png)
6、实现垂直布局
![[外链图片转存失败,源站可能有防盗链机制,建议将图片保存下来直接上传(img-jL5gMlzF-1669961216051)(D:\Photo\typora-user-images\image-20221130170455685.png)]](https://img-blog.csdnimg.cn/a15e1ab0c6884b1aaf1afe0727ecab34.png)
![[外链图片转存失败,源站可能有防盗链机制,建议将图片保存下来直接上传(img-aDpL9hJX-1669961216051)(D:\Photo\typora-user-images\image-20221130170602151.png)]](https://img-blog.csdnimg.cn/0a6784285b4f4f1db5d60e30c7a365bb.png)
添加弹簧,使这些按钮可以随页面大小改变而改变。2个按钮之间的弹簧,设置成固定的,防止窗口改变时,2个按钮距离也会改变。
![[外链图片转存失败,源站可能有防盗链机制,建议将图片保存下来直接上传(img-aecnOVhl-1669961216051)(D:\Photo\typora-user-images\image-20221130170802145.png)]](https://img-blog.csdnimg.cn/831018d970f546d6b435582239ea5554.png)
设置成这样:
![[外链图片转存失败,源站可能有防盗链机制,建议将图片保存下来直接上传(img-0EXrKYxI-1669961216051)(D:\Photo\typora-user-images\image-20221130170814870.png)]](https://img-blog.csdnimg.cn/98de9a72415e42e8b08795f5534f7eac.png)
7、实现用户,密码,输入框,4者对齐
![[外链图片转存失败,源站可能有防盗链机制,建议将图片保存下来直接上传(img-psjfAAGY-1669961216052)(D:\Photo\typora-user-images\image-20221130171511712.png)]](https://img-blog.csdnimg.cn/d88358a96ad64f4cbf8e44a0410ac2ca.png)
![[外链图片转存失败,源站可能有防盗链机制,建议将图片保存下来直接上传(img-bUysheAv-1669961216052)(D:\Photo\typora-user-images\image-20221130171701696.png)]](https://img-blog.csdnimg.cn/2fca2b275e7444f6915bc89d0cc6e690.png)
然后把用户名,密码,输入框都拖进去。
![[外链图片转存失败,源站可能有防盗链机制,建议将图片保存下来直接上传(img-C3Nb91id-1669961216052)(D:\Photo\typora-user-images\image-20221130171615025.png)]](https://img-blog.csdnimg.cn/6b43ce0772b64973bd3456348527df7a.png)
然后再加上弹簧
![[外链图片转存失败,源站可能有防盗链机制,建议将图片保存下来直接上传(img-kjY7kTAN-1669961216052)(D:\Photo\typora-user-images\image-20221130172353071.png)]](https://img-blog.csdnimg.cn/5a099161f10145e789644bdab9108114.png)
默认窗口和控件之间有9个空隙,可以调整layoutLeftMargin
八、控件
1、Push Button
2、ToolButton
可以在控件上添加图片
- 在属性栏上,找到icon,Theme可以设置图标。
- text 显示文字
- QToolButton->toolButtonStyle选择ToolButtonTextBesideIcon
这样图片和文字都可以在控件上显示了。
想要变透明,可以在QToolButton选中autoRaise
3、radio Button (单选按钮)
可以用group Box,把同一组的放在一起。
可以设置默认选择状态
ui->那个控件名称->setChecked(true);
4、checkBox(多选按钮)
connect(ui->cBox,&QCheckBox::stateChanged,[=](int state){
//点击一下,打印2,不选择打印0
qDebug()<<state;
})
5、TableWidget
//先设置列数
ui->tableWidget->setColumnCount(具体数字);

//设置水平表头
ui->tableWidget->setHorizontalHeaderLable(QStringList()<<"姓名"<<"性别"<<"年龄");

//设置行数
ui->tableWidget->setRowCount(具体数字);
//设置具体内容
ui->tableWidget->setItem(0,0,new QTalbeWidgetItem("具体名字"));
QStringList nameList;
nameList<<"具体名字1"<<"具体名字2"<<"具体名字3";

for(int i=0;i<3;i++)
{
   ui->tableWidget->setItem(i,0,new QTalbeWidgetItem(nameList[i]));

 //int 转 QString
    QString::number(i+18);
}
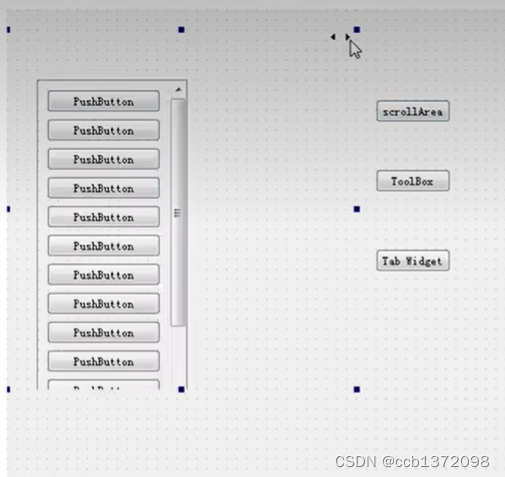
6、Scroll Area
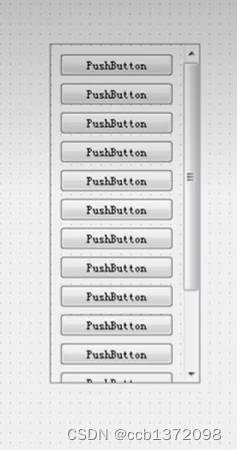
带有滑动的功能
7、Tool Box
类似于QQ里面的那个分组效果。
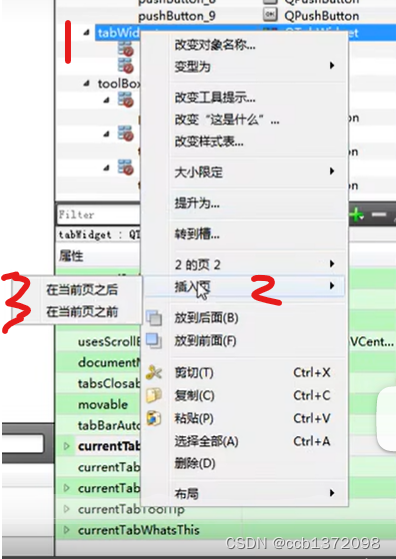
8、Tab Widget
网页效果。
![[外链图片转存失败,源站可能有防盗链机制,建议将图片保存下来直接上传(img-AAQ1IKfx-1669961216053)(D:\Photo\typora-user-images\image-20221201153132809.png)]](https://img-blog.csdnimg.cn/b3c2b182f0644484beee6a8918ccc304.png)
如果觉得页数不够,可以插入新的页
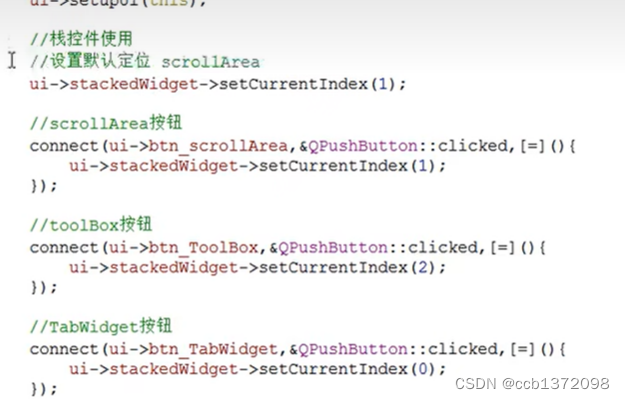
9、Stacked Widget
10、Dock Widget(浮动窗口)
11、Combo Box(下拉框)
ui->comboBox->addItem("具体东西");
![[外链图片转存失败,源站可能有防盗链机制,建议将图片保存下来直接上传(img-YLmBhg6H-1669961216053)(D:\Photo\typora-user-images\image-20221201154435095.png)]](https://img-blog.csdnimg.cn/47aeea6e156f47afab71ad41f7f351f4.png)
12、Text Edit
设置多行文本,类似于记事本。支持倾斜,加粗。
13、Label
显示标签,也可显示图片。
//利用QLabel显示图片
ui->comboBox->setPixmap(QPixmap(":+文件源"));

//显示动态图
#include<QMovie>
QMovie* movie=new QMovie(":+动图路径");
ui->comboBox->setMovie(movie);
//播放动图
movie->start();
14、自定义控件
1、
![[外链图片转存失败,源站可能有防盗链机制,建议将图片保存下来直接上传(img-aWdwnCXI-1669961216053)(D:\Photo\typora-user-images\image-20221201160553738.png)]](https://img-blog.csdnimg.cn/8fdb06fb0667415bbb4e359b47e08596.png)
![[外链图片转存失败,源站可能有防盗链机制,建议将图片保存下来直接上传(img-MQZJFVDX-1669961216053)(D:\Photo\typora-user-images\image-20221201160624851.png)]](https://img-blog.csdnimg.cn/90ffa3815ce547af9e3e2931af2aeaba.png)
![[外链图片转存失败,源站可能有防盗链机制,建议将图片保存下来直接上传(img-1LtKrvnC-1669961216054)(D:\Photo\typora-user-images\image-20221201160708511.png)]](https://img-blog.csdnimg.cn/b3d92f5d693a48c4aa2102d7f69603a8.png)
2、点击完成后,就可以进行设置控件了。
3、先看自己设计的控件,叫什么类型
![[外链图片转存失败,源站可能有防盗链机制,建议将图片保存下来直接上传(img-O2sUq08H-1669961216054)(D:\Photo\typora-user-images\image-20221201161245267.png)]](https://img-blog.csdnimg.cn/f3c9085d0e014ddbbc7288f949021cee.png)
这里就是自己设计的控件类型。
4、然后在原来的ui设计窗口
![[外链图片转存失败,源站可能有防盗链机制,建议将图片保存下来直接上传(img-i35HcS9n-1669961216054)(D:\Photo\typora-user-images\image-20221201161425296.png)]](https://img-blog.csdnimg.cn/de617cea13e64b40b7f796e8c88b0939.png)
选择和自己设计的类型相同的控件,然后右键,选择提升为
![[外链图片转存失败,源站可能有防盗链机制,建议将图片保存下来直接上传(img-cJfVh7Jb-1669961216055)(D:\Photo\typora-user-images\image-20221201161607426.png)]](https://img-blog.csdnimg.cn/8066f13da2cc49768efba8a195e44de9.png)
5、在这里填写你自定义控件的类名称
![[外链图片转存失败,源站可能有防盗链机制,建议将图片保存下来直接上传(img-E3jD6Weh-1669961216055)(D:\Photo\typora-user-images\image-20221201161638672.png)]](https://img-blog.csdnimg.cn/80d4aaca2dbd466d8b3615fcd4532296.png)
6、写完后,选择全局包含,再点击添加,然后再点击提升,就完成了创建。
7、2个部件进行关联
在自定义控件.cpp里面
//spinBox,horizontalSlider 是控件的名称
//控件名称,可以在ui设计界面,点击控件,右下角有属性栏,在里面可以查找名称。

//QSpinBox移动,QSlider跟着移动
void(QSpinBox:: *spSignal)(int)=&QSpinBox::valueChanged;

connect(ui->spinBox,spSignal,ui->horizontalSlider,QSlider::setValue);

//QSlider移动,QSpinBox跟着移动
horizontalSlider
 connect(ui->horizontalSlider,&QSlider::valueChanged
 ,ui->spinBox,QSpinBox::setValue);
九、事件
1、鼠标事件
在进行提升操作之后,才能实现以下方法
xxx.h
//鼠标进入事件
void enterEvent(QEvent *event);
void leaveEvent(QEvent*);
//鼠标摁下
void mousePressEvent(QMouseEvent *ev);
//鼠标释放
void mouseReleaseEvent(QMouseEvent *ev);
//鼠标移动
void mouseMoveEvent(QMouseEvent *ev);
xxx.cpp
void  xxx:: enterEvent(QEvent *event)
{
    qDebug()<<"鼠标进去了";
}
void xxx::leaveEvent(QEvent*)
{
    qDebug()<<"鼠标出去了";
}
//鼠标摁下
void xxx::mousePressEvent(QMouseEvent *ev)
{

  //捕捉摁下信息
    ev->x;  //x坐标
    ev->y;  //y坐标
    QString str=QString("x=1%,y=2%").arg(ev->x()).arg(ev->y())
    qDebug()<<str;

    ev->globalx; //基于屏幕
    ev->globaly;

    //鼠标左键
    if(ev->button==Qt::LeftButton);
    //右键
    if(ev->button==Qt::RightButton);

}
//鼠标释放
void xxx::mouseReleaseEvent(QMouseEvent *ev)
{

}
//鼠标移动
void xxx::mouseMoveEvent(QMouseEvent *ev)
{
    //这是个连续状态,使用buttons

    //摁住左键移动
   if(ev->button & Qt::Leftbutton);

}
2、定时器
2.1、第一种方式
单个计时器
mainWidget.h
//重写定时器
void timerEvent(QTimerEvent * ev);
mainWidget.cpp
void mainWidget::timerEvent(QTimerEvent *ev)
{
    //实现从1开始加
   static int num=1;
    ui->控件名字->setText(QString::number(num++));

}
//启动定时器
MainWindow::MainWindow(QWidget *parent)
    : QMainWindow(parent)
    , ui(new Ui::MainWindow)
{
    ui->setupUi(this);

     startTimer(1000);//参数1 间隔时间,单位是 毫秒

}
2.1.2、有多个定时器时,使用定时器id,来分别操纵各个定时器
mainWidget.h
//重写定时器
void timerEvent(QTimerEvent * ev);
int id1,id2;
mainWidget.cpp
//启动定时器
MainWindow::MainWindow(QWidget *parent)
    : QMainWindow(parent)
    , ui(new Ui::MainWindow)
{
    ui->setupUi(this);

     int id1=startTimer(1000);//参数1 间隔时间,单位是 毫秒
     int id2=startTimer(2000);
}

void mainWidget::timerEvent(QTimerEvent *ev)
{
    //每隔1s加一
    if(ev->timerId()==id1){
    //实现从1开始加
   static int num=1;
    ui->控件名字->setText(QString::number(num++));
    }

    //每隔2s加一
     if(ev->timerId()==id2){
    //实现从1开始加
   static int num2=1;
    ui->控件名字->setText(QString::number(num2++));
    }


}
2.2、第二种方式
1、使用计时器类
mainWidget.cpp
//启动定时器
MainWindow::MainWindow(QWidget *parent)
    : QMainWindow(parent)
    , ui(new Ui::MainWindow)
{
    ui->setupUi(this);
   QTimer* timer=new QTimer(this);

        //每隔0.5s,参数可以更改
        timer->start(500);

     connect(timer,&QTimer::timeout,[=](){
        static int num2=1;
    ui->控件名字->setText(QString::number(num2++));
     })

}
2、点击暂停按钮,实现计时器暂停
mainWidget.cpp
    //启动定时器
MainWindow::MainWindow(QWidget *parent)
    : QMainWindow(parent)
    , ui(new Ui::MainWindow)
{
    ui->setupUi(this);
   QTimer* timer=new QTimer(this);

        //每隔0.5s,参数可以更改
        timer->start(500);

     connect(timer,&QTimer::timeout,[=](){
        static int num2=1;
    ui->控件名字->setText(QString::number(num2++));
     })

    //btn为按钮的位置
connect(ui->btn,&QPushButton::clicked,[=](){
    timer->stop();
})

}
3、事件分发器
1、通过事件分发器,实现事件拦截(不建议)
以鼠标按下为例:
mainWidget.h
bool event(QEvent *ev);
mainWidget.cpp
bool XXX::event(QEvent *ev)
{
    //如果鼠标摁下,做拦截操作
    if(ev->type()==QEvent::MouseButtonPress)
    {
        //具体操作.....

        return true;  //代表用户要处理这个事。不再向下分发
    }

    //其他事件交给父类处理,
    return QWidget::event(ev);
}
4、事件过滤器
可以在事件分发器之前进行拦截
- 给控件安装事件过滤器
- 重写eventfilter事件
以鼠标按下为例
mainWidget.h
bool eventFilter(QObject* obj,QEvent* e);
mainWidget.cpp
//步骤1、给控件安装事件过滤器

ui->控件名字->installEventFilter(this);

//步骤2、重写事件过滤器的事件
bool manWidget::eventFilter(QObject* obj,QEvent* e)
{
    if(obj==ui->控件名)
    {
        if(e->type()==QEvent::MouseButtonPress)
        {
            //具体操作

            return true;
        }
    }
    return  QWidget::event(ev);
}
十、绘图
1、绘图事件
会自动调用这个函数。不需要写调用。
void mainWidget::paintEvent(QPaintEven *)
{
    //实例化画家对象
    //在当前窗口绘画
    QPainter painter(this);  //this,指定的是绘图的设备

    //设置画笔颜色
    QPen pen(QColor(255,0,0));

    //设置画笔宽度
    pen.setWide(2);

    //设置画笔风格
    pen.setStyle(Qt::DoLine);  //虚线

    //让画家使用画笔
    painter.setPen(pen);

    //设置画刷
    QBrush brsh(Qt::red);
    //让画家使用画刷
    painter.setBrush(brsh);


    //画一条线
    painter.drawLine(QPoint(0,0),QPoint(100,100));

    //画圆
    painter.drawEllipse(QPoint(0,0),50,50);

    //画矩形
    //参数1,左上定点x值,参数2,左上顶点y值,参数3,长,参数4,框
    painter.drawRect(QRect(20,20,50,50));

   //画文字
    painter.drawText(QRect(20,20,50,50),"好好学习");


}
2、绘图高级设置
void mainWidget::paintEvent(QPaintEven *)
{
    //实例化画家对象
    //在当前窗口绘画
    QPainter painter(this);  //this,指定的是绘图的设备
    painter.drawEllipse(QPoint(0,0),50,50);

    //设置抗锯齿能力,效率低
    painter.setRenderHint(QPinter::Antialiasing);
    painter.drawEllipse(QPoint(60,70),50,50);


    painter.drawRect(QRect(20,20,50,50));

    painter.translate(100,0);  //让画家移动开始画的位置。

    //保存画家状态
    painter.save();
    //还原画家状态
    painter.restore();

    painter.drawRect(QRect(20,20,50,50));
    //这2个图形不会重合


}
3、手动调用绘图事件
先添加好资源文件
void mainWidget::paintEvent(QPaintEven *)
{
    //实例化画家对象
    //在当前窗口绘画
    QPainter painter(this);  //this,指定的是绘图的设备

    //参数1,在左顶点x值,参数2,左顶点y值,从(x,y)绘画图片
    painter.drawPixmap(20,0,QPixmap(":资源名"));

}
MainWindow::MainWindow(QWidget *parent)
    : QMainWindow(parent)
    , ui(new Ui::MainWindow)
{
    ui->setupUi(this);

    //btn为按钮的位置,点击按钮,移动图片
connect(ui->btn,&QPushButton::clicked,[=](){

   //前提是定义一个变量,x的值或y的值,每次都变换。
   Update();
})

}
4、绘图设备
- QPixmap 专门为图像在屏幕显示做了优化
- QBitmap,QPixmap的一个子类,黑白照
- QImage 专门为图像的像素级访问做了优化
- QPicture 可以记录和重现QPicture 的各条命令
十一、文件读写操作
1、读、
//点击选取文件,弹出文件对话框
connect(ui->btn,&QPushButton::clicked,[=](){
    QString path=QFileDialog::getOpenFileName(this,"打开文件","默认打开路径")

        ui->lineEdit->setText(path);

    //读取内容,放入到textEdit,默认为utf-8
    QFile file(path); //参数是读取文件路径
    file.open(QIODevice::ReaddOnly ) ;  //设置打开方式

    QByteArray arry=file.readAll();

    //将读取的数据,放入textEdit中

    ui->textEdit->setText(arry);

    //编码格式类
    //设置编码格式
    //QTextCodec* codec=QTextCodec::codecForName("utf-8");
  // ui->textEdit->setText(codec->toUnicode(arry));
    file.close();
})
![[外链图片转存失败,源站可能有防盗链机制,建议将图片保存下来直接上传(img-VwB6wHGd-1669961216056)(D:\Photo\typora-user-images\image-20221202134100712.png)]](https://img-blog.csdnimg.cn/1e40bd57d1d94e8e885db582bd2ca1f2.png)
2、写
//点击选取文件,弹出文件对话框
connect(ui->btn,&QPushButton::clicked,[=](){
    QString path=QFileDialog::getOpenFileName(this,"打开文件","默认打开路径")

        ui->lineEdit->setText(path);

    //读取内容,放入到textEdit,默认为utf-8
    QFile file(path); //参数是读取文件路径
    file.open(QIODevice::Append ) ;  //设置打开方式,追加写
    file.write("AAAAAAAAAA");

    file.close();
})
3、获得文件属性信息
//文件信息类
QFileInf info(path);
qDebug()<<"大小"<<info.size()<<"后缀名"<<info.suffix()<<"文件名"<<info.fileName();

qDebug()<<"创建日期"<<info.created().toString("yyyy/MM/dd hh:mm:ss");
参考文献
B站-最新QT从入门到实战完整版|传智教育–传智教育