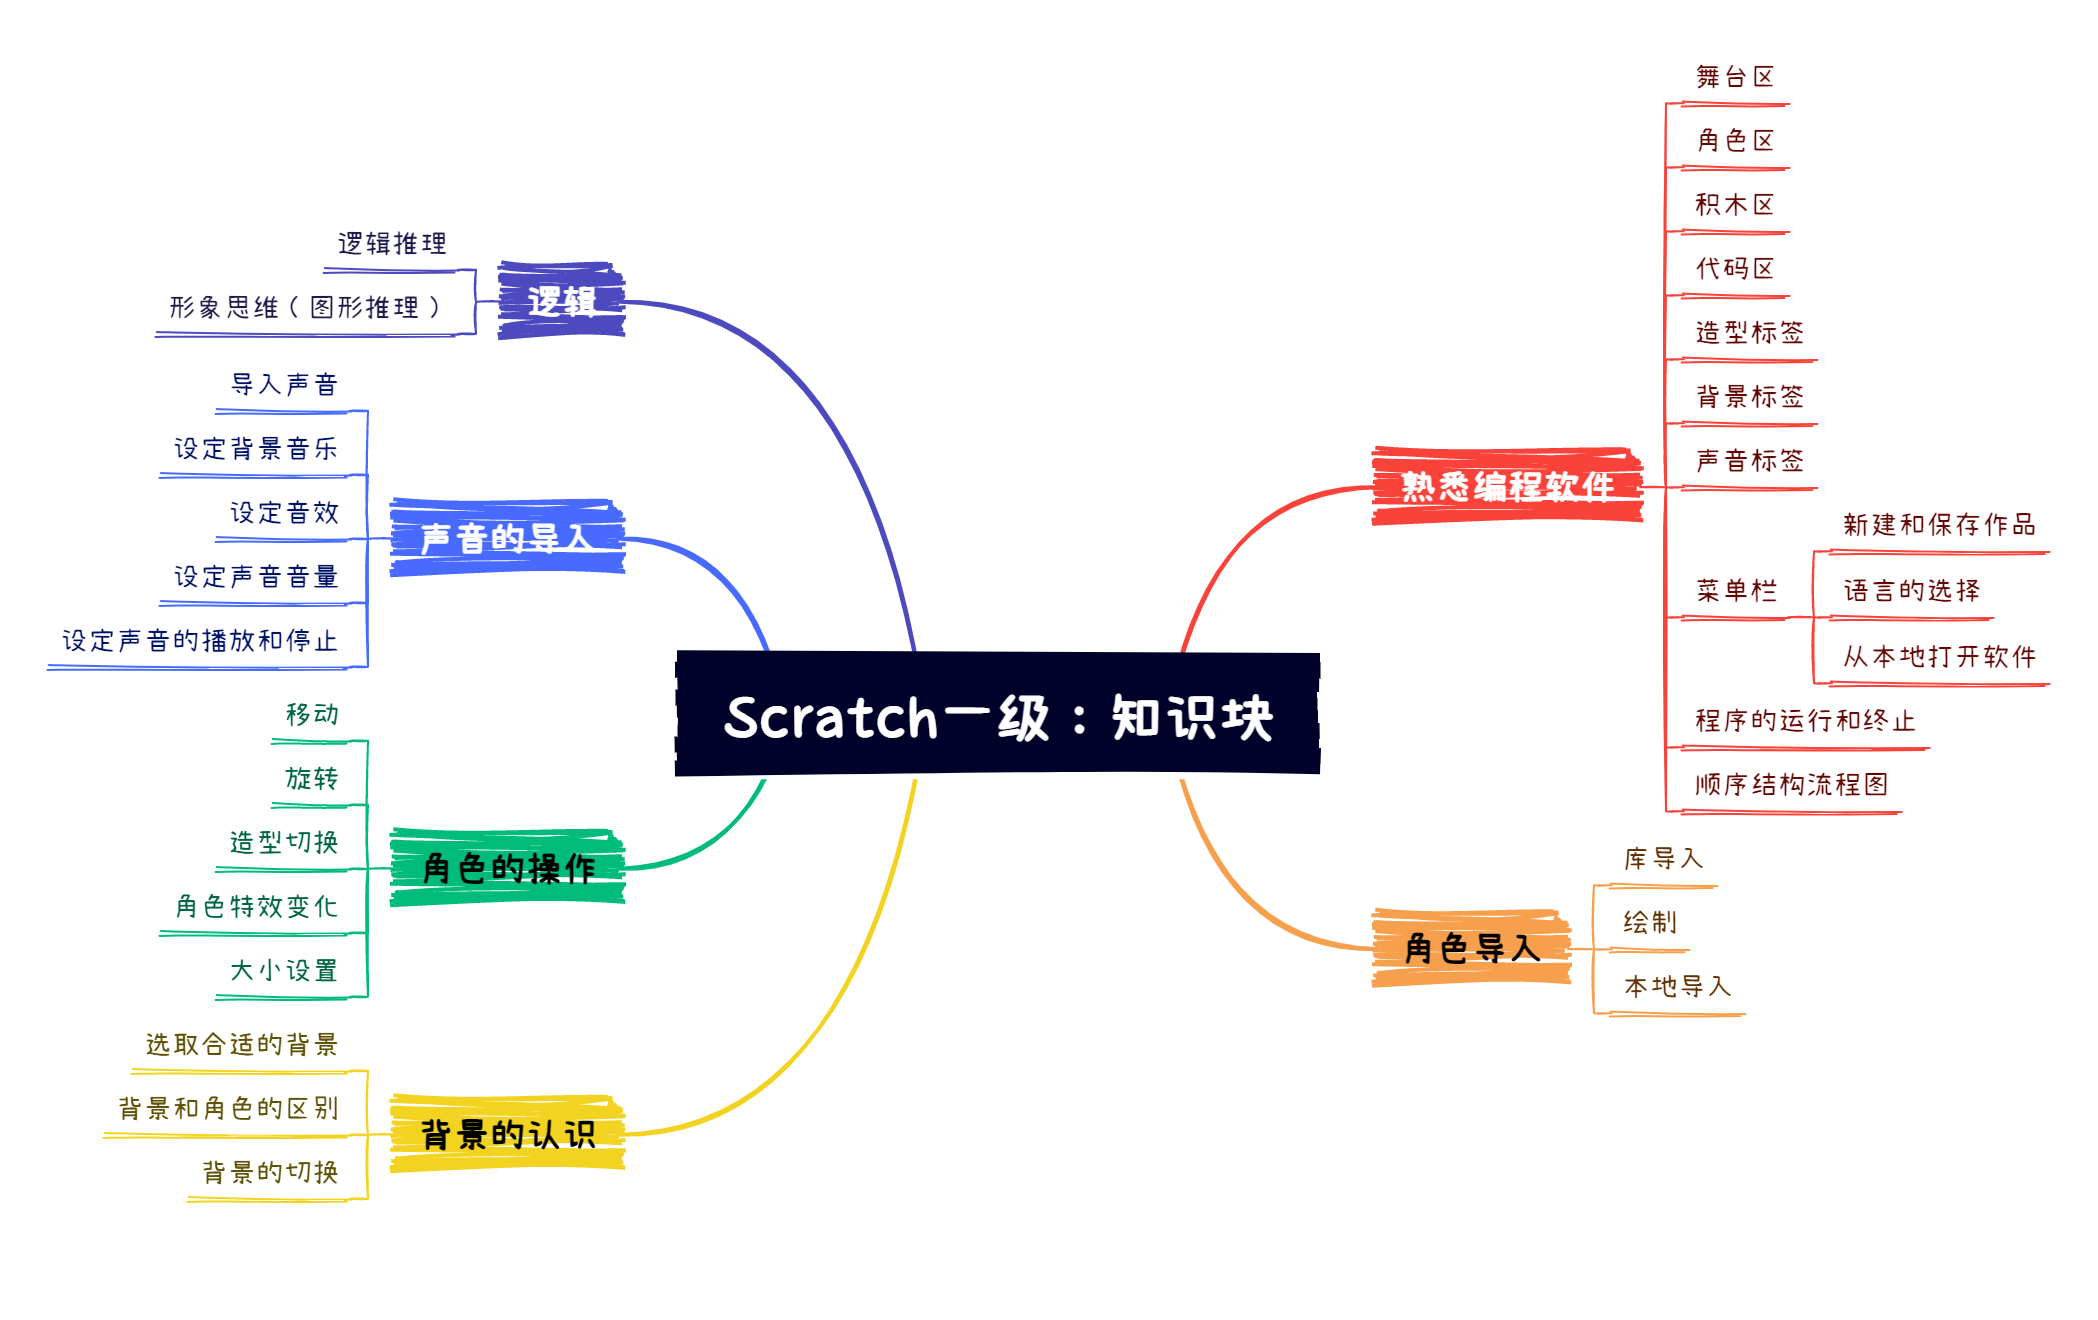
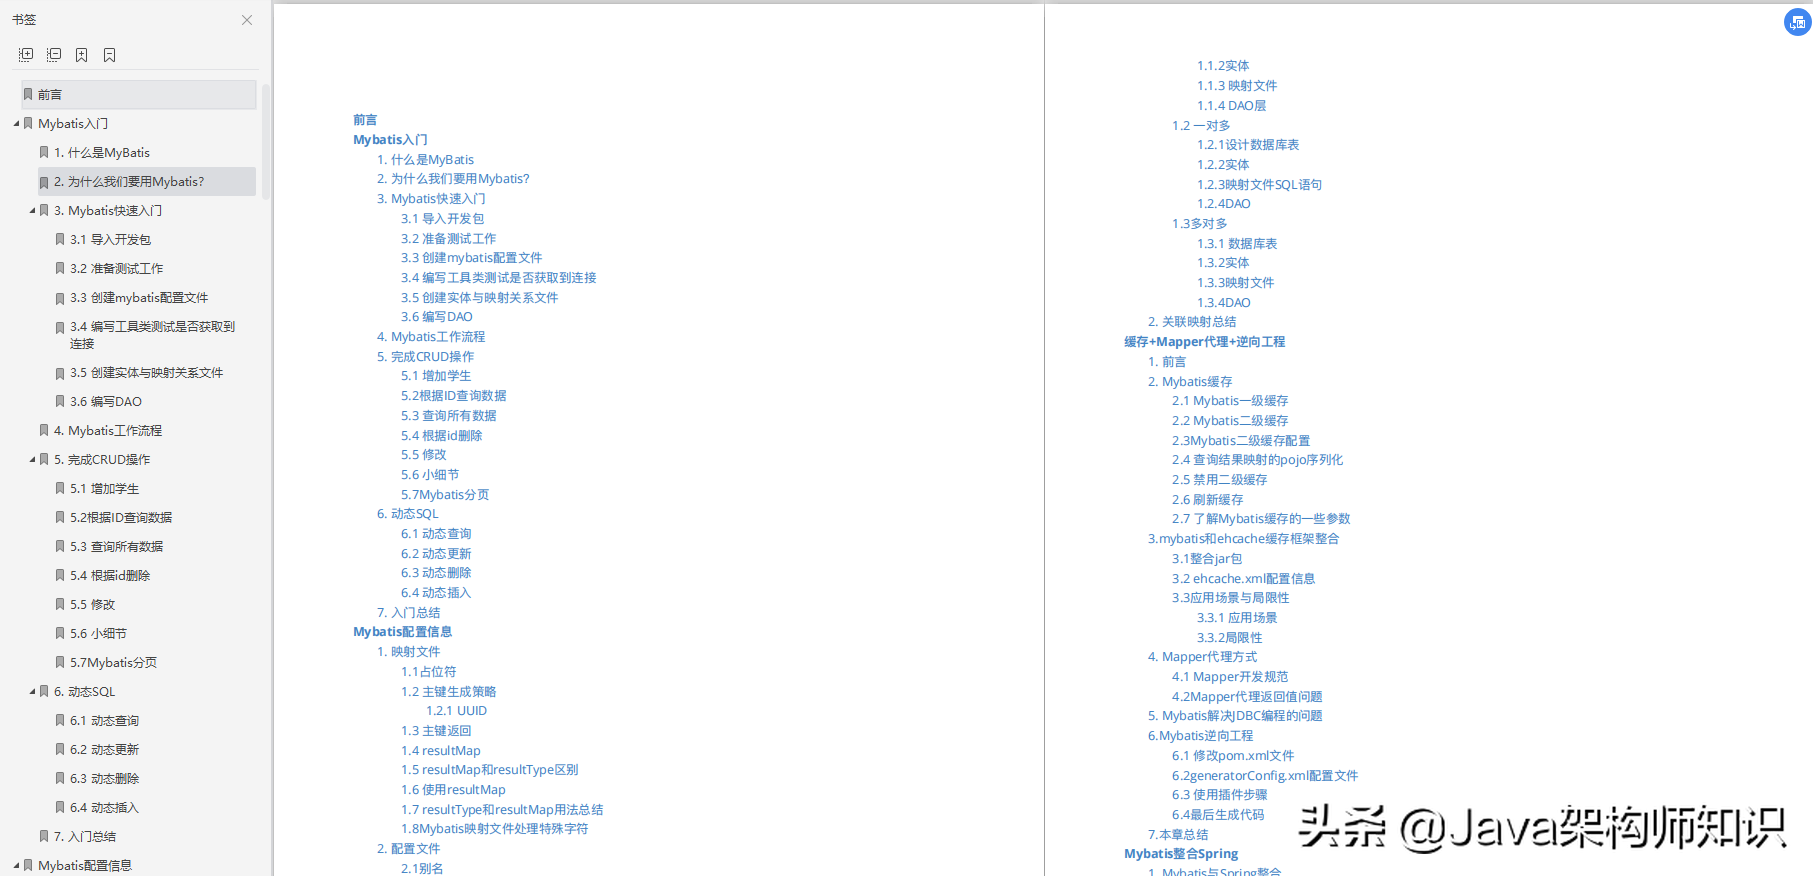
tkinter绘制组件(37)——普通图片
- 引言
- 布局
- 函数结构
- 添加图片
- 图片缩放
- 完整函数代码
- 效果
- 测试代码
- 最终效果
- github项目
- pip下载
- 结语
引言
其实,本来不打算专门为TinUI写图片元素控件的,让编写者自行使用PhotoImage类和画布自带的create_image方法。但是,因为TinUIXml类的使用,使得界面编写不再需要那么多与ui准备操作相关的逻辑代码,所以有必要(虽然我还是觉得没有太大必要)为TinUI添加image元素,来显示图片。
提前声明一下,add_image方法的具体目的:
-
显示tkinter自身能够显示的图片格式(静态gif,png)
-
支持图片缩放(none,fill,uniform三种格式)
-
借鉴了小康2022项目小康2022 / tkintertools · GitCode中的
PhotoImage类
除了方便、总所周知的Canvas添加图片方法,这里主要讲三种缩放类型。
布局
函数结构
    def add_image(self,pos:tuple,width=None,height=None,state='fill',imgfile=None):#绘制静态图片
    '''
    pos-位置
    width-宽度
    height-高度
    state-缩放格式
    imgfile-图片文件
    '''
添加图片
这个就很简单,读者,就默认你已经熟悉了tkinter图片显示功能。
在三种缩放,none模式无疑是最简单的,就是从左上角裁剪。
        state=state.lower()
        if state=='none' and (width!=None or height!=None):#直接左上角裁剪
            image=PhotoImage(file=imgfile,width=width,height=height)
            width,height=None,None
        else:
            image=PhotoImage(file=imgfile)
现在,直接显示图片,方便我们获取图片原本的尺寸:
        self.images.append(image)#存储图片,防止被python垃圾回收
        img=self.create_image(pos,anchor='nw',image=self.images[-1])
        bbox=self.bbox(img)
        rwidth,rheight=bbox[2]-bbox[0],bbox[3]-bbox[1]
因为python传奇的垃圾回收机制,类中对
PhotoImage的实例无法保存,需要使用一些固定的载体,比如BasicTinUI的属性之一:images:list。
图片缩放
我也是借鉴(新学)的,tkinter自身可以实现图片任意比例缩放,不过可能比PIL慢些。
具体步骤:
-
通过
zoom方法设定缩放最小基数(精确度) -
通过
subsample方法按比例缩放图片
翻译成代码就如下:
        if width!=None or height!=None:#缩放
            #缩放系数
            xrate=width/rwidth if width!=None else 1
            yrate=height/rheight if height!=None else 1
            if state=='uniform':#等比缩放
                #取最小值
                if yrate<xrate:
                    xrate=yrate
                else:#yrate>=xrate
                    yrate=xrate
            #else:state=='fill'
            key=round(2)
            image=PhotoImage.zoom(image,key,key)
            image=image.subsample(round(key/xrate),round(key/yrate))
当然咯,因为img元素不可能跟着改变,所以要重新为其指定图片信息,别忘了更改图片列表最后一个元素。
            #...
            self.images[-1]=image
            self.itemconfig(img,image=self.images[-1])
完整函数代码
    def add_image(self,pos:tuple,width=None,height=None,state='fill',imgfile=None):#绘制静态图片
        #这个控件是静态gif或者是png图片
        #state::none裁剪操作,fill填充,uniform等比缩放
        state=state.lower()
        if state=='none' and (width!=None or height!=None):#直接左上角裁剪
            image=PhotoImage(file=imgfile,width=width,height=height)
            width,height=None,None
        else:
            image=PhotoImage(file=imgfile)
        self.images.append(image)#存储图片,防止被python垃圾回收
        img=self.create_image(pos,anchor='nw',image=self.images[-1])
        bbox=self.bbox(img)
        rwidth,rheight=bbox[2]-bbox[0],bbox[3]-bbox[1]
        if width!=None or height!=None:#缩放
            #缩放系数
            xrate=width/rwidth if width!=None else 1
            yrate=height/rheight if height!=None else 1
            if state=='uniform':#等比缩放
                #取最小值
                if yrate<xrate:
                    xrate=yrate
                else:#yrate>=xrate
                    yrate=xrate
            #else:state=='fill'
            key=round(2)
            image=PhotoImage.zoom(image,key,key)
            image=image.subsample(round(key/xrate),round(key/yrate))
            self.images[-1]=image
            self.itemconfig(img,image=self.images[-1])
        return img
效果
测试代码
# 见 test\image.py
最终效果

github项目
TinUI的github项目地址
pip下载
pip install tinui
结语
image在tkinter其实并不是一个单独控件,而是一个参数,不过TinUI把它拎了出来,也就凑合着用吧。以后可能会接受PIL提供的ImageTk。TinUI4.0开始还会随包发布帮助手册应用。
🔆tkinter创新🔆
![[附源码]JAVA毕业设计计算机类课程实验平台(系统+LW)](https://img-blog.csdnimg.cn/f992c6b7359c4a979549c469aec3ec62.png)
![[附源码]Python计算机毕业设计Django公共台账管理系统](https://img-blog.csdnimg.cn/72cc364a63bf49989e0878b09f3c017d.png)