目录
一、文件理解
二、系统级的文件操作
1、打开open
2、关闭close
3、写入write
4、读取read
三、文件描述符
四、重定向
1、dup2函数
2、追加重定向
3、输入重定向
五、缓冲区
1、缓冲区存在的意义
2、缓冲区的刷新策略
一、文件理解
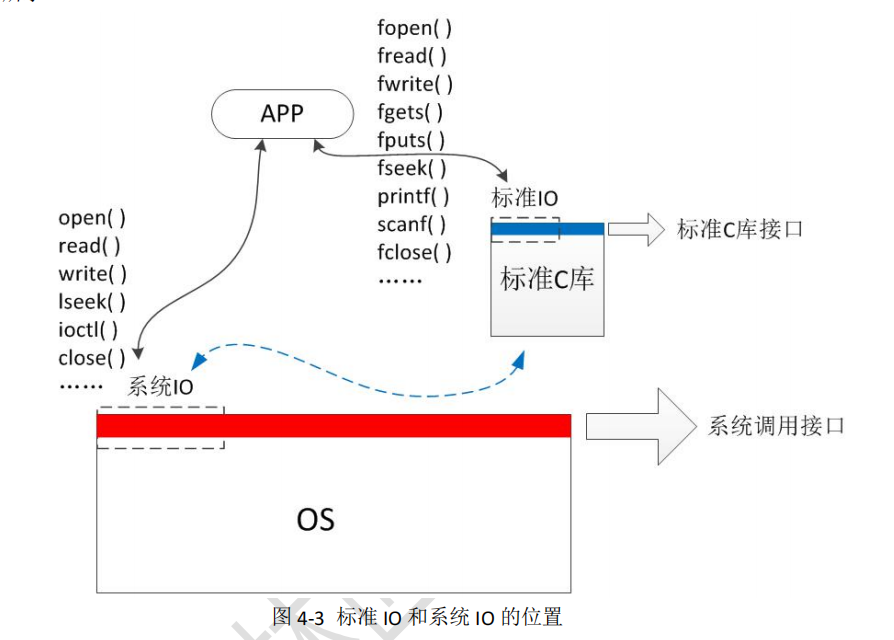
在Linux中,有一句经典的话叫做:一切皆文件。这句话是站在内核的角度说的,因为在内核中所有的设备(除了网络接口)都一律使用 Linux 独有的虚拟文件系统(VFS)。我们还需要清楚知道这些文件如何和硬件进行交互的。

语音层面的文件操作就是直接使用库函数,而事实上,文件操作是系统层面的问题,像进程管理一样,系统也会通过先描述再组织的方式对文件进行管理和操作。
文件由内容加属性构成。未使用的文件位于磁盘,而使用中的文件属性会被加载到内存。
文件可以同时被多次进行使用,OS为了更好的管理文件,会像进程task_struct 管理进程一样,通过struct file存储文件属性进行管理。struct file结构体包含了文件的各种属性与链接关系。
所以,总的来说,Linux下系统级的文件IO的操作,而C语言中的文件操作是OS与进程之间的交互。
二、系统级的文件操作
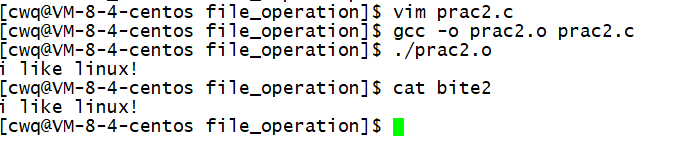
1、打开open
首先学习如何直接调用调用系统级函数 open 打开文件

#include <sys/types.h> #include <sys/stat.h> #include <fcntl.h> int open(const char *pathname, int flags); int open(const char *pathname, int flags, mode_t mode); //可以修改权限
参数解读:
1、open接口的pathname参数表示要打开的文件名,和C语言的fopen一样的,是要带路径的。
2 、flags 参数是打开文件要传递的选项,即 系统传递标记位
3、mode 参数,就是 "文件操作模式" 了。
我们再来看看这个接口的返回值,居然是个 int,而不是我们 fopen 的 FILE* 。
open的返回值是int,返回-1表示error。
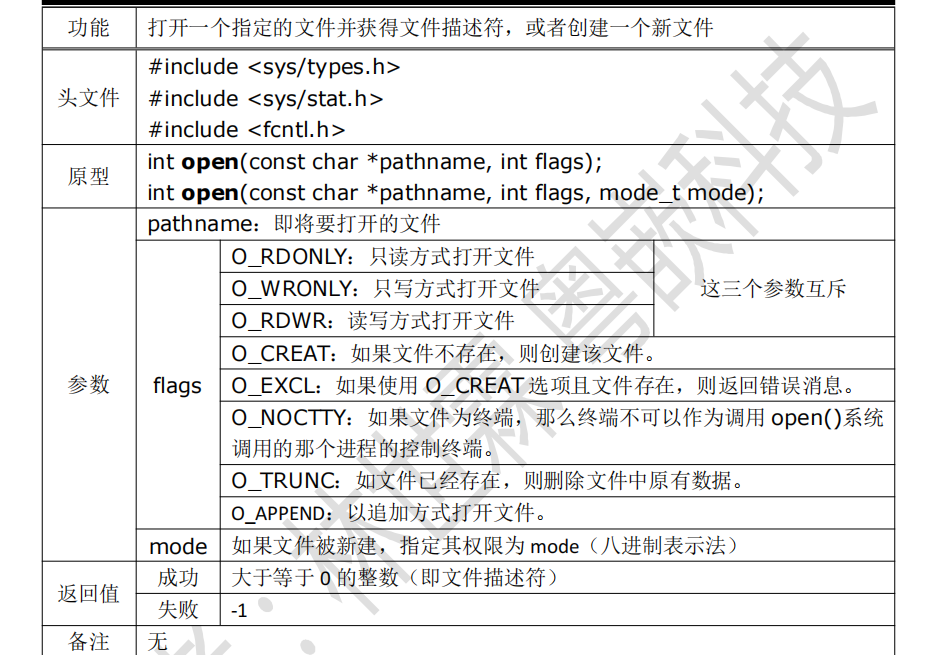
1.1 参数二的解读
 O_RDONLY   //只读
 O_WRONLY   //只写
 O_APPEND   //追加
 O_CREAT    //新建
 O_TRUNC    //清空
使用方法:
//三种参数组合,就构成了 fopen 中的 w
  int fd = open(LOG, O_WRONLY | O_CREAT | O_TRUNC, 0666);   //权限最好设置
  if(fd == -1)
  {
    perror("open file fail1");
    exit(-1);
  }
  .....
 // int fd=open(LOG,O_WRONLY|O_CREAT|O_APPEND) //对应的是fopen中的a
 // int fd=open(LOG,O_RDONLY)  //对应的是fopen中的r
注意:假若文件不存在,open 中的参数3最好进行设置,否则创建出来的文件权限为随机值
2、关闭close
#include <unistd.h> int close(int fildes);

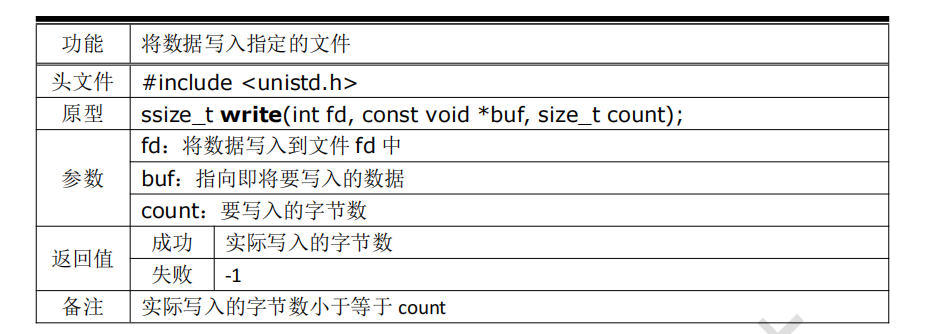
3、写入write
#include <unistd.h>
ssize_t write(int fildes, const void *buf, size_t nbyte);
#include <stdio.h>
#include <stdlib.h>
#include <sys/types.h>
#include <sys/stat.h>
#include <fcntl.h>
#include <string.h>
#include <unistd.h> //write 的头文件
#define LOG "log.txt" //日志文件
#define SIZE 32
int main()
{
//三种参数组合,就构成了 fopen 中的 w
int fd = open(LOG, O_WRONLY | O_CREAT | O_TRUNC, 0666); //权限最好设置
if(fd == -1)
{ perror("open file fail1");
exit(-1);
}
const char* ps = "Hello World!\n";
int cnt = 5;
while(cnt--) {
write(fd, ps, strlen(ps)); //不能将 '\0' 写入文件中
}
close(fd);
return 0;
}
4、读取read
#include <unistd.h>
ssize_t read(int fildes, void *buf, size_t nbyte);

代码如下:
#include <stdio.h>                                                                                #include <stdlib.h>
#include <sys/types.h>
#include <sys/stat.h>
#include <fcntl.h>
#include <string.h>
#include <unistd.h> //write 的头文件


#define LOG "log.txt" //日志文件
#define SIZE 1024

int main()
{
  int fd = open("file_open.c", O_RDONLY);
  if(fd == -1)
  {
    perror("open file fail1");
    exit(-1);
  }
  int n=100; //读取100个字符
  char buff[SIZE];
  int pos=0;
  while(n--){
    read(fd,(char*)buff+pos,1);
    pos++;
  }
  printf("%s\n",buff);
  close(fd);
  return 0;
}
补充:C语言中fseek函数的用法:

功能:根据文件指针的位置和偏移量来定位文件指针。
参数解析: fseek第一个参数为流,第二个参数为偏移量,第三个参数为文件指针定位的位置 /SEEK_SET 以文件开头为中心 SEEK_CUR 文件指针的当前位置为中心 SEEK_END 文件结尾为中心
补充:Linux文件lseek函数的用法:
lseek函数头文件及其使用:
#include <sys/types.h>
#include <unistd.h>
off_t lseek(int filedes, off_t offset, int whence) ;
lessk()函数的参数说明: 第一个参数是文件描述符;第二个参数是偏移量,int型的数,正数是向后偏移,负数向前偏移;第三个参数是有三个选项: 1.SEEK_SET:将文件指针偏移到传入字节数处(文件头开始偏移) 2.SEEK_CUR:将文件指针偏移到当前位置加上传入字节数处;((当前位置开始偏移) 3.SEEK_END:将文件指针偏移到文件末尾加上传入字节数处(作为拓展作用,必须再执行一次写操作)
补充:文件操作题目详解:

三、文件描述符
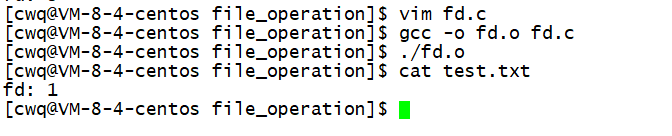
咱们都知道在Linux下一切皆文件。固然设备也不例外,若是要对某个设备进行操做,就不得不打开此设备文件,打开文件就会得到该文件的文件描述符fd( file discriptor), 它就是一个很小的整数,每一个进程在PCB(Process Control Block)中保存着一份文件描述符表,文件描述符就是这个表的索引,每一个表项都有一个指向已打开文件的指针。

文件描述符0,1,2的理解:

代码如下:
#include <stdio.h>
#include <sys/types.h>
#include <sys/stat.h>
#include <fcntl.h>
#include <unistd.h>
#include <string.h>

int main(void)
{
    int fd = open("test.txt", O_WRONLY | O_CREAT | O_TRUNC, 0666);
    if (fd < 0) {
        perror("open");
        return 1;
    }

    printf("fd: %d\n", fd);

    close(fd);
}

如果关闭0或2则会发现:
#include <stdio.h>
#include <sys/types.h>
#include <sys/stat.h>
#include <fcntl.h>
int main()
{
close(0);
//close(2);
int fd = open("test.txt", O_WRONLY | O_CREAT | O_TRUNC, 0666);
if(fd < 0){
perror("open");
return 1;
}
printf("fd: %d\n", fd);
close(fd);
return 0;
}
发现结果是fd: 0 或者fd:2。可见,文件描述符的分配规则:在files_struct数组当中,找到当前没有被使用的最小的一个下标,作为新的文件描述符。
那么关闭了1呢,我们会发现输出到显示器上什么都没有,这是因为把stdout关闭了,所以什么都没有了。
四、重定向
使用fflush函数来变出来:
实际上并不是没有,而是没有刷新,用 fflush 刷新缓冲区后,text.txt 内就有内容了。
int main(void)
{
    close(1);
    int fd = open("log.txt", O_WRONLY | O_CREAT | O_TRUNC, 0666);
    if (fd < 0) {
        perror("open");
        return 1;
    }
    printf("fd: %d\n", fd);

    fflush(stdout);

    close(fd);
}
可以发现,它不往显示器打印内容,而是往文件中打印,方向变了。
再往代码中写上一系列的:
fprintf(stdout, "hello world\n");
可以发现它都是重定向到test.txt文件中去了。

1、dup2函数
首先肯定要man一下dup2函数

int dup2(int oldfd, int newfd);
dup2 可以让 newfd 拷贝 oldfd,如果需要可以将 newfd 先关闭。
newfd 是 oldfd 的一份拷贝,将后者 (newfd) 的内容写入前者 (oldfd),最后只保留 oldfd。

至于参数的传递,比如我们要输出重定向 (stdout) 到文件中:
我们要重定向时,本质是将里面的内容做改变,所以是要把 fd 的内容拷贝到 1 中的:
当我们最后进行输出重定向的时候,所有的内容都和 fd 的内容是一样的了。所以参数在传递时,oldfd 是 fd,所以应该是 dum2(fd, 1);
代码展示:
#include<sys/types.h>
#include<sys/stat.h>
#include<fcntl.h>
#include<string.h>
#include<stdio.h> //perror
#include<unistd.h>
#include<stdlib.h> //exit
int main(){
int fd = open("./log.txt",O_CREAT | O_WRONLY |O_TRUNC,0644 );
if(fd < 0){
perror("open error:");
exit(1);
}
dup2(fd,1); //本应该输出到1的,输出到了fd中
printf("hello 我是printf,我不再输出到屏幕了,我输出到了log.txt\n");
fprintf(stdout,"hello 我是fprintf,我不在输出到屏幕了,我输出到了log.txt\n");
fputs("hello 我是fputs,不再输出到屏幕了,我输出到了log.txt\n",stdout);
close(fd);
return 0;
}

2、追加重定向
追加重定向只需要将我们 open 的方式改为 O_APPEND 就行了。
3、输入重定向
现在我们使用输入重新的,说白了就是将 "以前从我们键盘上去读" 改为 "在文件中读"。
代码展示:
int main(void)
{
    // 输入重定向
    int fd = open("test.txt", O_RDONLY);
    if (fd < 0) {
        perror("open");
        return 0;
    }

    // 将本来从键盘上读 (0),改为从文件里读(3)
    dup2(fd, 0);
    // 读数据
    char line[64];
    while (fgets(line, sizeof(line),stdin) != NULL) {
        printf("%s\n", line);
    }

    fflush(stdout);
    close(fd);

    return 0;
}

五、缓冲区
1、缓冲区存在的意义
理性理解:
CPU 计算速度非常快!而磁盘的读取速度相对于 CPU 来说是非常非常慢的,因此需要先将数据写入缓冲区中,依据不同的刷新策略,将数据刷新至内核缓冲区中,供 CPU 进行使用,这样做的是目的是尽可能的提高效率,节省调用者的时间
语言级缓冲区:
首先,我们要知道:printf 内部就是封装了 write!
printf 里打印的内容 "Hello printf" 实际上是在缓冲区里的,printf 不显示的原因是没有带 \n,数据没有被立即刷新,所以 sleep 时 printf 的内容没有被显示出来。
所以 printf 不带 \n,数据没有被立即刷新,原因是因为它有缓冲区,此时如果我们想让他刷新,可以手动加上 fflush(stdout) 刷新一下缓冲区。这个缓冲区一定不在 write 内部,因为如果这个缓冲区是函数内部提供的,那么直接刷新出来了。
所以这个缓冲区它只能是 C 语言提供的,该缓冲区是一个 语言级缓冲区 (语言级别的缓冲区) 。
这就意味着我们曾经谈论的缓冲区,不是内核级别的缓冲区,而是一个语言级别的缓冲区。
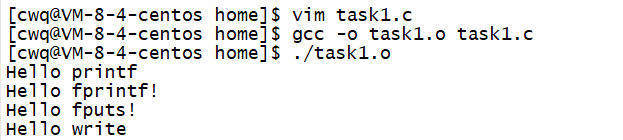
看如下代码:
#include <stdio.h>
#include <string.h>
#include <sys/stat.h>
#include <sys/types.h>
#include <unistd.h>

int main(void)
{
    // 给它们都带上 \n
    printf("Hello printf\n");    // stdout -> 1
    fprintf(stdout, "Hello fprintf!\n");
    fputs("Hello fputs!\n", stdout);

    const char* msg = "Hello write\n";
    write(1, msg, strlen(msg));

    sleep(5);

    return 0;
}
运行结果可以看出可以正常的打印。
再把\0去掉呢?
int main(void)
{
    printf("Hello printf");    // stdout -> 1
    fprintf(stdout, "Hello fprintf!");
    fputs("Hello fputs!", stdout);

    const char* msg = "Hello write";
    write(1, msg, strlen(msg));

    sleep(5);

    return 0;
}

此时结果是只有 write 内容先出,当退出时 printf, fprint, fputs 的东西才显示出来。
然而 write 无论带不带 \n 都会立马刷新,也就是说,只要 printf, fprint, fputs 调了 write 数据就一定显示。
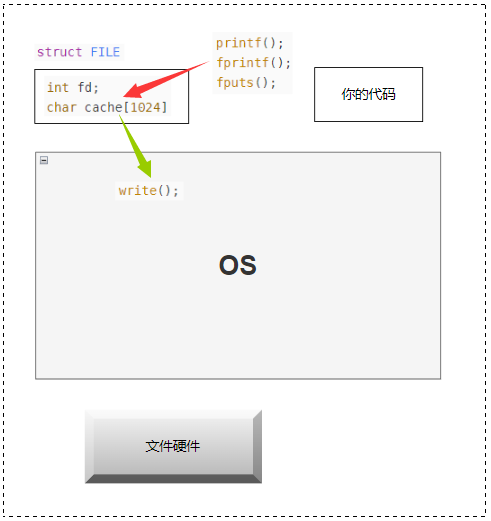
我们继续往下深挖,stdout 的返回值是 FILE,FILE 内部有 struct,封装很多的成员属性,其中就包括 fd,还有该 FILE 对应的语言级缓冲区。
C 库函数 printf, fwrite, fputs... 都会自带缓冲区,但是 write 系统调用没有带缓冲区。
我们现在提及的缓冲区都是用户级别的缓冲区,为提高性能,OS 会提供相关的 内核级缓冲区。
(内核级缓冲区不在本章的探讨范围内,本质我们专注于用户级缓冲区)
库函数在系统调用的上层,是对系统调用做的封装,但是 write 没有缓冲区,这说明了:
该缓冲区是二次加上的,由 C 语言标准库提供,我们来看下 FILE 结构体:
2、缓冲区的刷新策略
缓冲区有多种刷新策略,比如 C语言 中 scanf 的缓冲区刷新策略为:遇到空白字符或换行就刷新,因此在输入时需要按一下回车,缓冲区中的数据才能刷新至内核缓冲区中,而 printf 的刷新策略为 行缓冲,即遇到 \n 才会进行刷新
总体来说,缓冲区的刷新策略分为以下三种:
-
无缓冲 -> 没有缓冲区
-
行缓冲 -> 遇到
\n才进行刷新,一次冲刷一行 -
全缓冲 -> 缓冲区满了才进行刷新
一般而言,显示器的刷新策略为 行缓冲,而普通文件的刷新策略为 全缓冲
看这段代码:
#include <iostream>
#include <cstdio>
#include <cstring>
#include <unistd.h>
using namespace std;
int main()
{
fprintf(stdout, "hello fprintf\n");
const char* str = "hello write\n";
write(1, str, strlen(str));
fork(); //创建子进程
return 0;
}
当我们直接运行程序,结果如下:

当我们进行重定向后,结果如下:


![Prompt learning 教学[基础篇]:prompt基本原则以及使用场景技巧助力你更好使用chatgpt,得到你想要的答案](https://img-blog.csdnimg.cn/img_convert/cd93c27a13c217e61c77559a5d1d0010.png)