总言
主要介绍set和map的基本框架和使用
文章目录
- 总言
- 1、部分接口介绍和使用举例
- 1.1、序列式容器和关联式容器、键值对
- 1.1.2、pair键值对
- 1.2、set基本介绍
- 1.2.1、set::set、遍历
- 1.2.2、set::insert、set::erase、set::find
- 1.2.3、set::count、set::lower_bound、set::upper_bound
- 1.2.4、multiset简单演示
- 1.3、map基本介绍
- 1.3.1、map::insert、遍历
- 1.3.2、K-V模型演示:统计事物出现次数:map:find、map::operator[]
- 1.3.2、map::opeator[ ]基本说明,附operator::at简单介绍
- 1.3.4、multimap简单介绍
- 1.4、例题举例
- 1.4.1、例题一: 两个数组的交集
- 1.4.2、例题二:前K个高频单词
- 1.4.2.1、写法一
- 1.4.2.2、写法二
- 1.4.2.3、写法三
1、部分接口介绍和使用举例
1.1、序列式容器和关联式容器、键值对
1.1.2、pair键值对
概念:用来表示具有一一对应关系的一种结构,该结构中一般只包含两个成员变量key和value。key代表键值,value表示与key对应的信息。
SGI-STL中关于键值对的定义:相关文档链接
template <class T1, class T2>
struct pair
{
	typedef T1 first_type;
	typedef T2 second_type;
	T1 first;
	T2 second;

	pair() : first(T1()), second(T2()){}

	pair(const T1& a, const T2& b) : first(a), second(b){}
};
1.2、set基本介绍
相关参考网址:set
class template
std::set
template < class T,                        // set::key_type/value_type
           class Compare = less<T>,        // set::key_compare/value_compare
           class Alloc = allocator<T>      // set::allocator_type
           > class set;
基本说明: set的底层其实是二叉搜素树,模型运用为K模型。
T: set中存放元素的类型,实际在底层存储<value, value>的键值对。
Compare:set中元素默认按照小于来比较less<Key>
Alloc:set中元素空间的管理方式,实际使用的是STL提供的空间配置器。
PS:less、allocator为默认缺省参数,和之前博文提及一致,这是为了方便我们在所给默认配置不满足时,构建自己的需求。
1.2.1、set::set、遍历
1)、set的构造函数,以下为部分举例:
//C++98
explicit set (const key_compare& comp = key_compare(),
              const allocator_type& alloc = allocator_type());//empty (1)

template <class InputIterator>
  set (InputIterator first, InputIterator last,
       const key_compare& comp = key_compare(),
       const allocator_type& alloc = allocator_type());//range (2)

set (const set& x);//copy (3)


//C++11
set (initializer_list<value_type> il,
     const key_compare& comp = key_compare(),
     const allocator_type& alloc = allocator_type());//initializer list (5)
相关演示如下:
void test_set_01()
{
	//初始化方式一:
	set<int> s1;
	//插入方式一:
	s1.insert(1);
	s1.insert(4);
	s1.insert(2);
	s1.insert(6);
	s1.insert(9);

	//初始化方式二:initializer list初始化,C++11新增
	set<int> s2 = { 3,6,4,5,1,7,3,3,3,4,5,5,5,6,1,7 };


	//插入方式三:迭代区间初始化
	int arr[] = { 6,5,1,3,4,7,0 };
	set<int,greater<int>>s3(arr, arr + sizeof(arr) / sizeof(int));


	//迭代器遍历
	set<int>::iterator it = s1.begin();
	while (it != s1.end())
	{
		cout << *it << " ";
		++it;
	}
	cout << endl;

	//范围for遍历
	for (const auto& e : s2)
	{
		cout << e << " ";
	}
	cout << endl;

	for (const auto& e : s3)
	{
		cout << e << " ";
	}
	cout << endl;

}
需要学习注意的点:
1、set的初始化方式:上述举例了三种写法
2、set中迭代器遍历:上述举例了正向迭代器和范围for
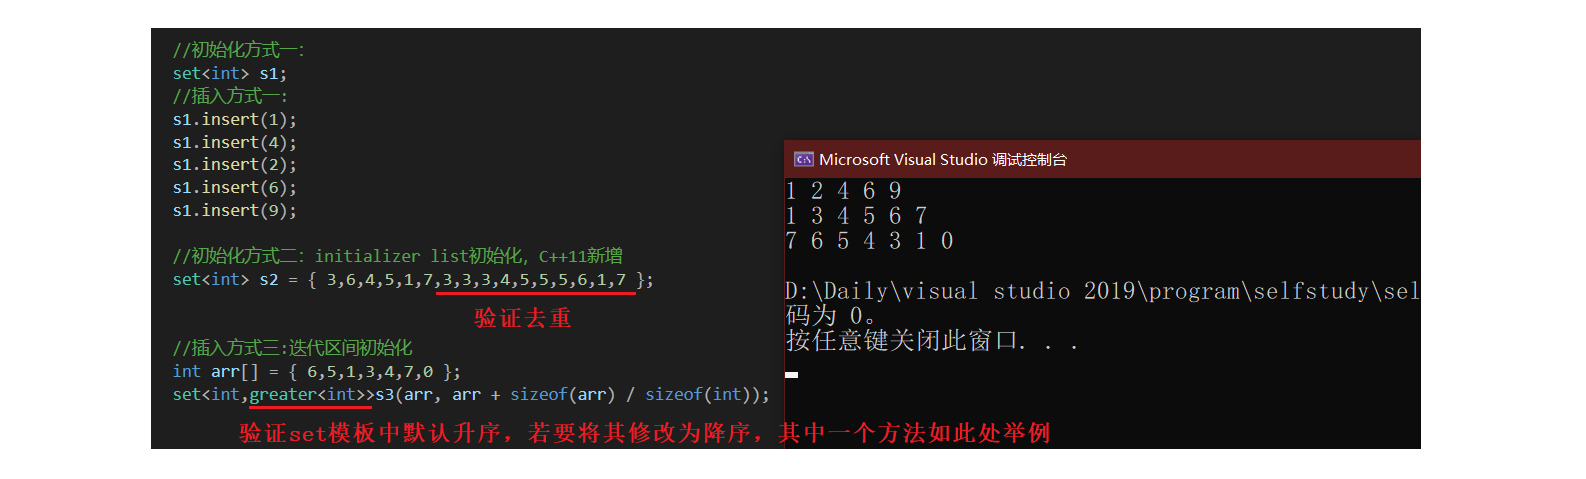
3、为什么set默认得到的结果为有序值,且无重复项?
回答:set底层结构为二叉搜素树,二叉搜索树基本框架我们在之前博文介绍过。其遍历具有排序和去重作用。
4、观察set类,其模板类型class Compare = less<T>中默认为升序,如果要得到降序结果,该如何做?
回答:①可以使用greater<T>,修改Compare值;②可以使用返向迭代器。需要注意二者区别,前者实际作用于set类,后者只是在遍历显示时给出效果。
5、关于set只允许增删查,不允许改,相关演示如下:

1.2.2、set::insert、set::erase、set::find
1)、set::insert
inset中,单个元素的插入我们在上一小节中演示过。其它接口可结合相关文档示例学习。
//C++98

pair<iterator,bool> insert (const value_type& val);//single element (1)

iterator insert (iterator position, const value_type& val);//with hint (2)

template <class InputIterator>
void insert (InputIterator first, InputIterator last);//range (3)
2)、set::erase、set::find
相关链接:set::erase
//C++98

     void erase (iterator position);//(1)

	 size_type erase (const value_type& val);//(2)

     void erase (iterator first, iterator last);//(3)
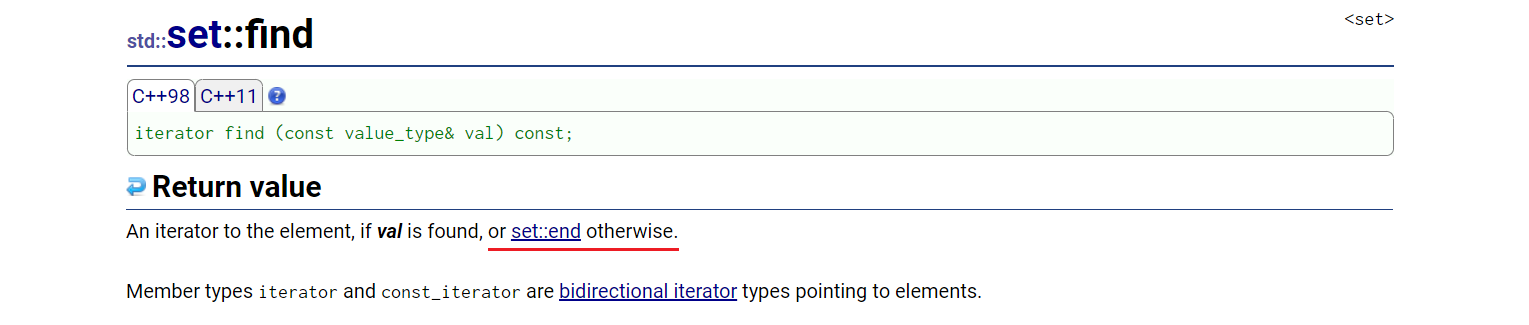
相关链接:set:find
//C++98
iterator find (const value_type& val) const;
演示示例如下:
void test_set_02()
{
set<int> s1 = { 3,6,4,5,1,7,2,8,9,0 };
for (const auto& e : s1)
{
cout << e << " ";
}
cout << endl;
//演示一:给定val值删除
s1.erase(4);
for (const auto& e : s1)
{
cout << e << " ";
}
cout << endl;
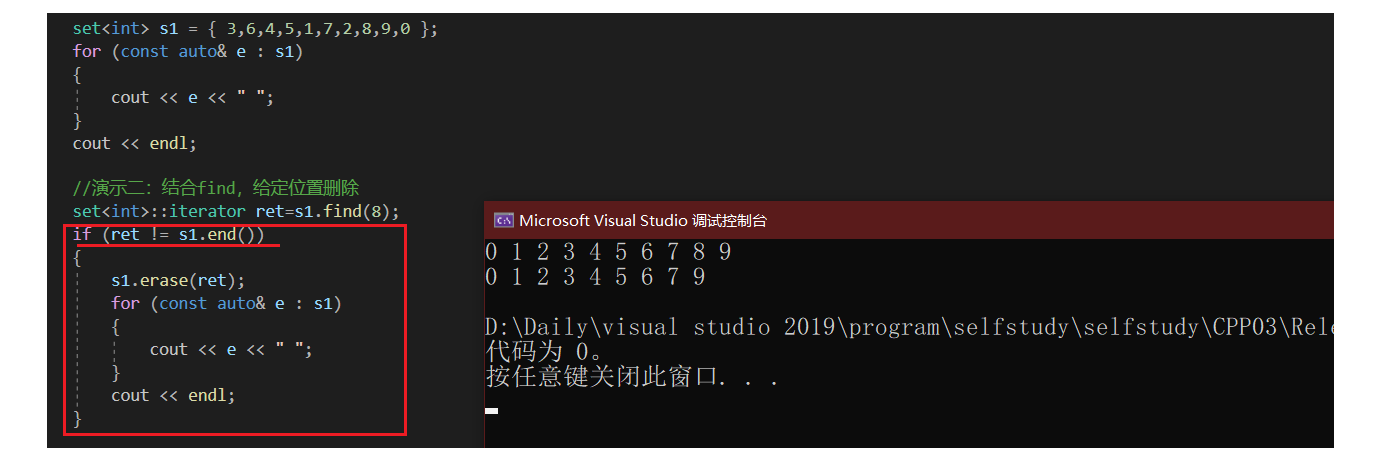
//演示二:结合find,给定位置删除
set<int>::iterator ret=s1.find(8);
s1.erase(ret);
for (const auto& e : s1)
{
cout << e << " ";
}
cout << endl;
}
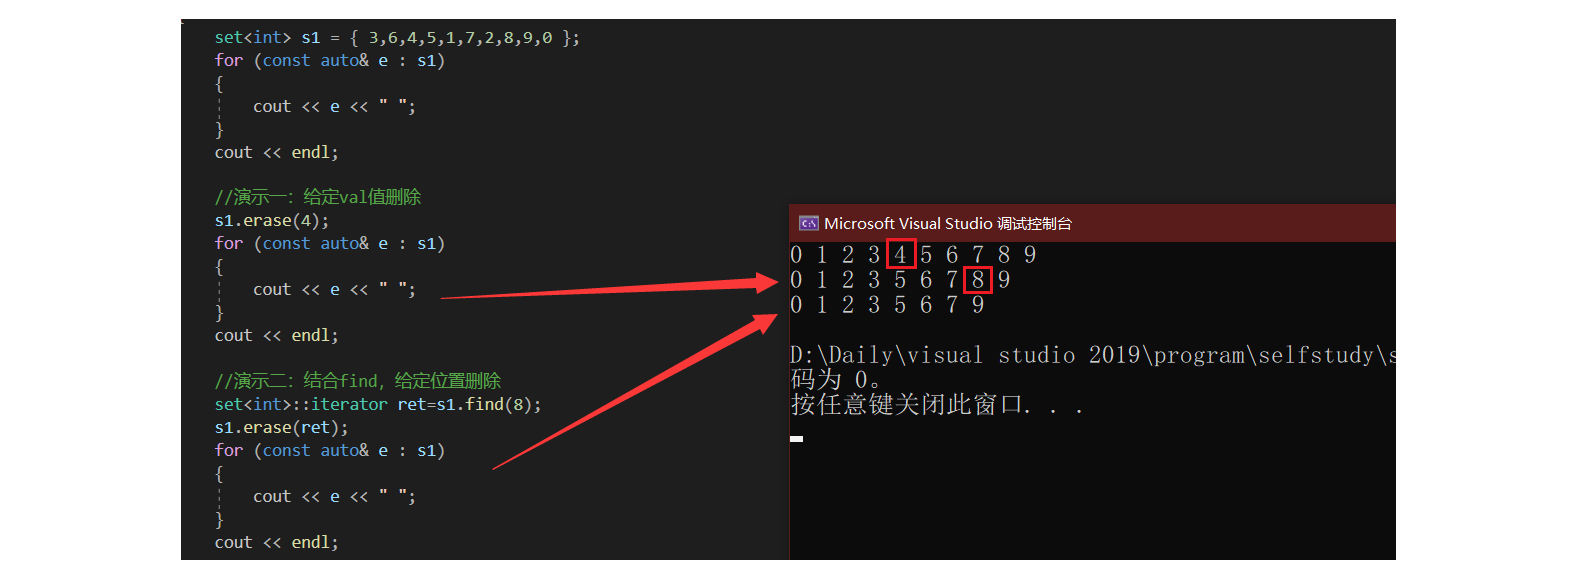
需要学习注意的点:
1、erase、find的基本使用;
2、观察上述两种删除方法,似乎并无区别,但实际上存在如下情况:当我们实参传入一个不存在的值时,在有些编译器下可能存在未定义行为。
	set<int> s1 = { 3,6,4,5,1,7,2,8,9,0 };
	for (const auto& e : s1)
	{
		cout << e << " ";
	}
	cout << endl;

	//演示一:给定val值删除
	s1.erase(44);
	for (const auto& e : s1)
	{
		cout << e << " ";
	}
	cout << endl;
针对上述情况,假如使用set::find,就可以根据其返回值,进行约束判断:
	set<int> s1 = { 3,6,4,5,1,7,2,8,9,0 };
	for (const auto& e : s1)
	{
		cout << e << " ";
	}
	cout << endl;

	//演示二:结合find,给定位置删除
	set<int>::iterator ret=s1.find(8);
	if (ret != s1.end())
	{
		s1.erase(ret);
		for (const auto& e : s1)
		{
			cout << e << " ";
		}
		cout << endl;
	}
1.2.3、set::count、set::lower_bound、set::upper_bound
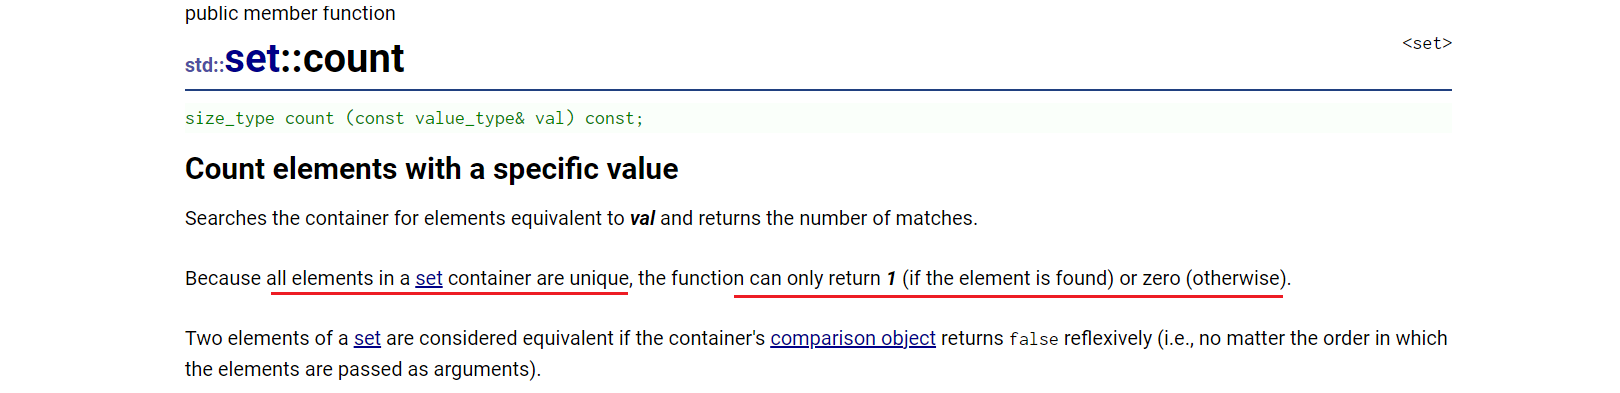
1)、set::count
相比于set,count在multiset中实际作用更大。
此处举例文档样例:
void test_set_03()
{
	std::set<int> myset;

	// set some initial values:
	for (int i = 1; i < 5; ++i)
		myset.insert(i * 3);    // set: 3 6 9 12

	for (int i = 0; i < 10; ++i)
	{
		std::cout << i;
		if (myset.count(i) != 0)
			std::cout << " is an element of myset.\n";
		else
			std::cout << " is not an element of myset.\n";
	}

}
2)、set::lower_bound、set::upper_bound
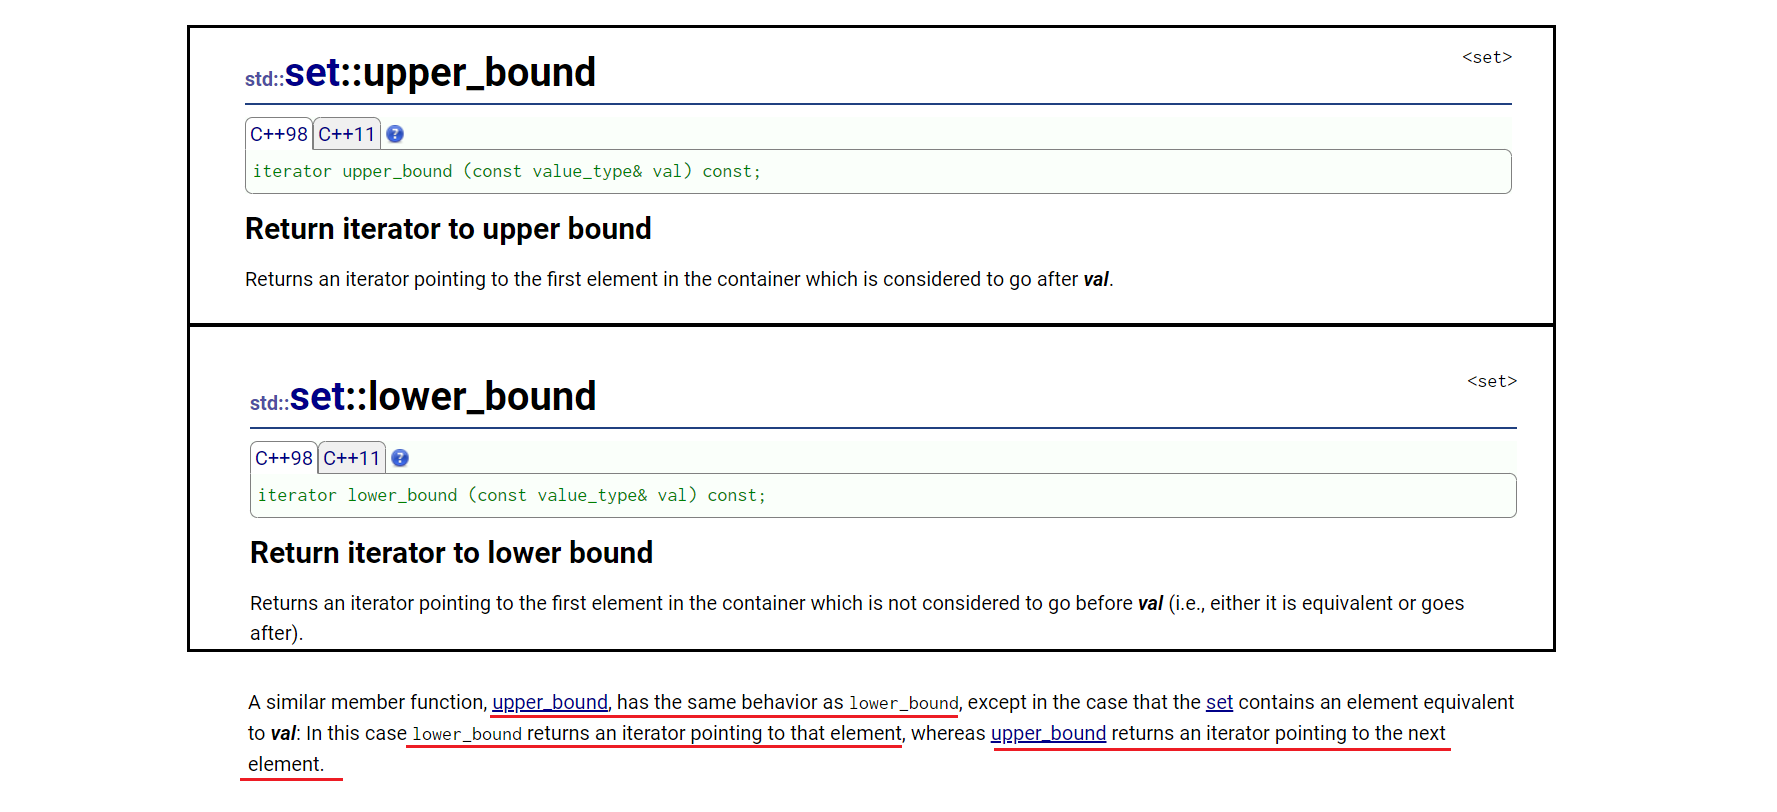
验证代码:
void test_set_04()
{
	std::set<int> myset;
	std::set<int>::iterator itlow, itup;

	for (int i = 1; i < 10; i++) myset.insert(i * 10); // 10 20 30 40 50 60 70 80 90
	std::cout << "myset contains:";
	for (std::set<int>::iterator it = myset.begin(); it != myset.end(); ++it)
		std::cout << ' ' << *it;
	std::cout << '\n';


	itlow = myset.lower_bound(35);
	itup = myset.upper_bound(70);
	printf("ltlow,ltup:[%d,%d)\n", *itlow, *itup);

	myset.erase(itlow, itup);
	std::cout << "myset contains:";
	for (std::set<int>::iterator it = myset.begin(); it != myset.end(); ++it)
		std::cout << ' ' << *it;
	std::cout << '\n';

}
演示结果如下:
lower_bound中,返回值>=val;
upper_bound中,返回值>val;
正因为此,使用erase迭代区间删除,可以满足左闭右开。

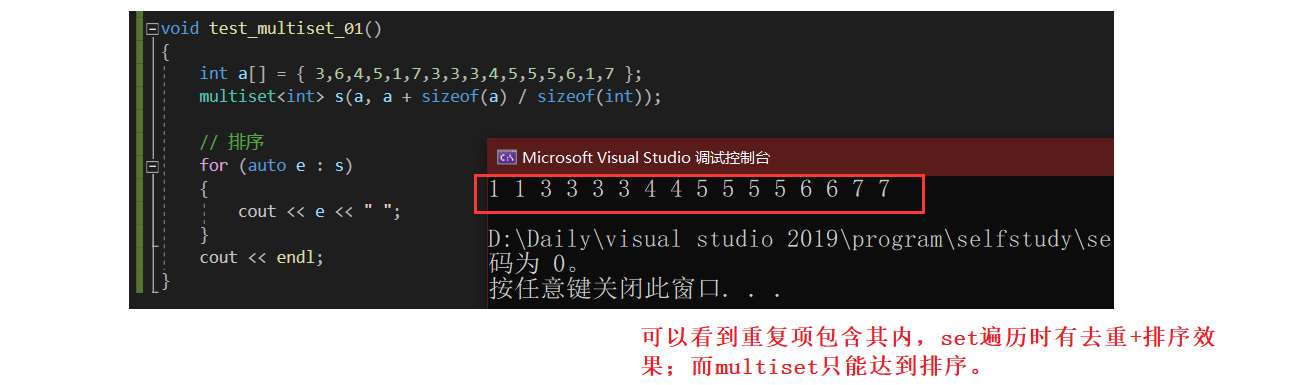
1.2.4、multiset简单演示
相关文档链接:multiset
1)、multiset和set的一些函数区别说明
演示一:键值冗余,重复项验证
验证代码如下:
void test_multiset_01()
{
	int a[] = { 3,6,4,5,1,7,3,3,3,4,5,5,5,6,1,7 };
	multiset<int> s(a, a + sizeof(a) / sizeof(int));

	// 排序
	for (auto e : s)
	{
		cout << e << " ";
	}
	cout << endl;
}
演示结果如下:
验证代码如下:
void test_multiset_01()
{
	int a[] = { 3,6,4,5,1,7,3,3,3,4,5,5,5,6,1,7 };
	multiset<int> s(a, a + sizeof(a) / sizeof(int));
	for (auto e : s)	{		cout << e << " ";	}
	cout << endl;
	cout << "------------------------------------------------" << endl;


	//count:
	printf("count(3):%d   count(7):%d    count(2):%d\n", s.count(3), s.count(7), s.count(2));
	cout << "------------------------------------------------" << endl;


	//find:如果有多个值,返回中序的第一个
	auto pos = s.find(7);
	printf("find(7):");
	while (pos != s.end())
	{
		cout << *pos << " ";
		++pos;
	}
	cout << endl;

	pos = s.find(5);
	printf("find(5):");
	while (pos != s.end())
	{
		cout << *pos << " ";
		++pos;
	}
	cout << endl;
	cout << "------------------------------------------------" << endl;


	//erase:删除所有给定项
	printf("erase(3):");
	s.erase(3);
	for (auto e : s)
	{
		cout << e << " ";
	}
	cout << endl;

	printf("erase(1):");
	pos = s.find(1);
	if (pos != s.end())
	{
		s.erase(pos);
	}
	for (auto e : s) { cout << e << " "; }
	cout << endl;

}
验证count:
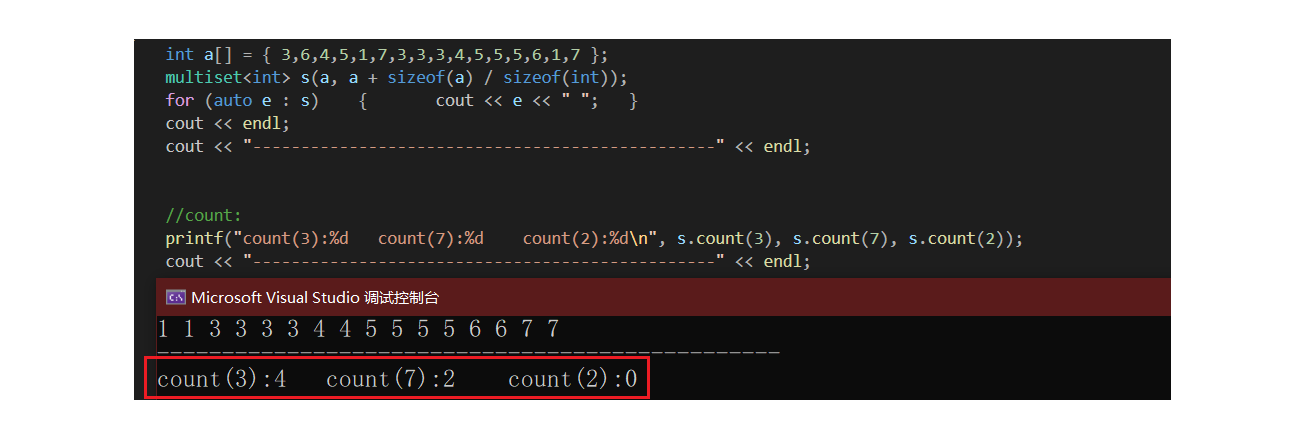
	//count:
	printf("count(3):%d   count(7):%d    count(2):%d\n", s.count(3), s.count(7), s.count(2));
	cout << "------------------------------------------------" << endl;
验证find: 在有多个相同项时,其返回中序的第一个。
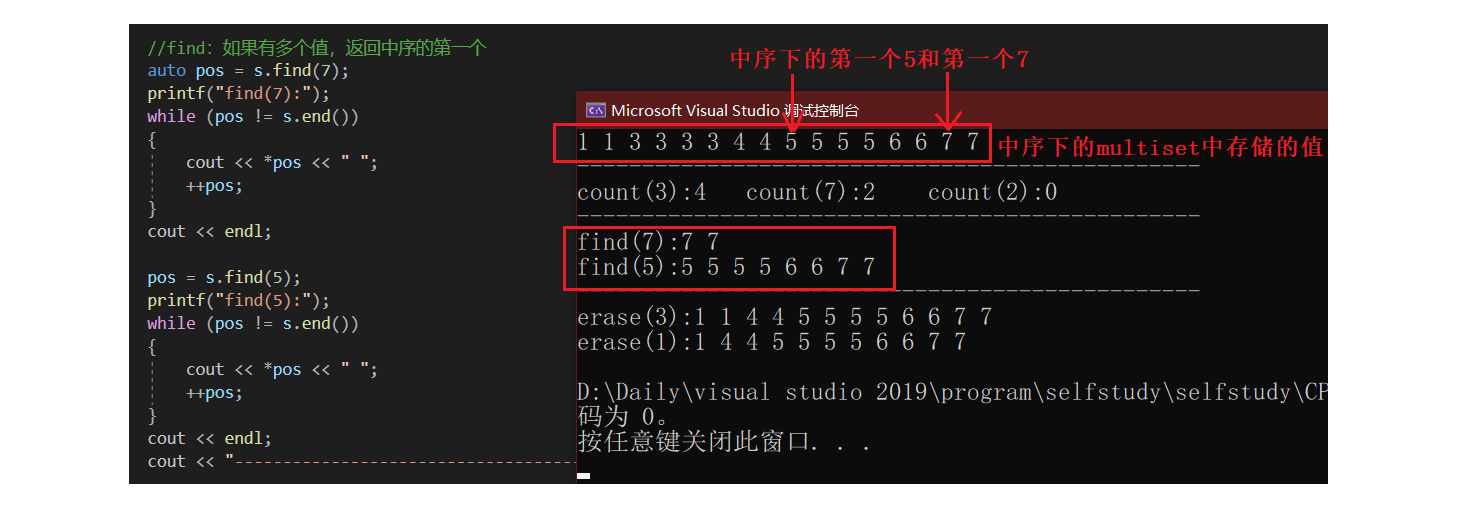
	//find:如果有多个值,返回中序的第一个
	auto pos = s.find(7);
	printf("find(7):");
	while (pos != s.end())
	{
		cout << *pos << " ";
		++pos;
	}
	cout << endl;

	pos = s.find(5);
	printf("find(5):");
	while (pos != s.end())
	{
		cout << *pos << " ";
		++pos;
	}
	cout << endl;
	cout << "------------------------------------------------" << endl;
验证erase: 给迭代器位置和给值,两种删除结果不同。
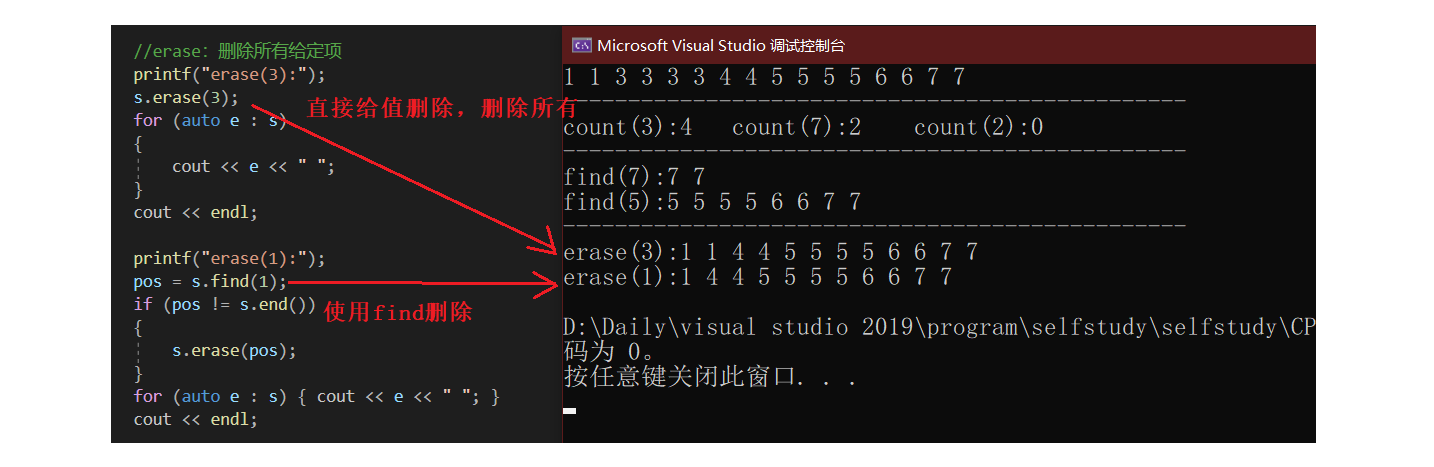
	//erase:删除所有给定项
	printf("erase(3):");
	s.erase(3);
	for (auto e : s)
	{
		cout << e << " ";
	}
	cout << endl;

	printf("erase(1):");
	pos = s.find(1);
	if (pos != s.end())
	{
		s.erase(pos);
	}
	for (auto e : s) { cout << e << " "; }
	cout << endl;
1.3、map基本介绍
相关参考网址:map
class template
std::map
template < class Key,                                     // map::key_type
           class T,                                       // map::mapped_type
           class Compare = less<Key>,                     // map::key_compare
           class Alloc = allocator<pair<const Key,T> >    // map::allocator_type
           > class map;
基本说明:
key: 键值对中key的类型。
T: 键值对中value的类型。
Compare: 比较器的类型,map中的元素是按照key来比较的,缺省情况下按照小于来比较,一般情况下(内置类型元素)该参数不需要传递,如果无法比较时(自定义类型),需要用户自己显式传递比较规则(一般情况下按照函数指针或者仿函数来传递)。
Alloc:通过空间配置器来申请底层空间,不需要用户传递,除非用户不想使用标准库提供的空间配置器。
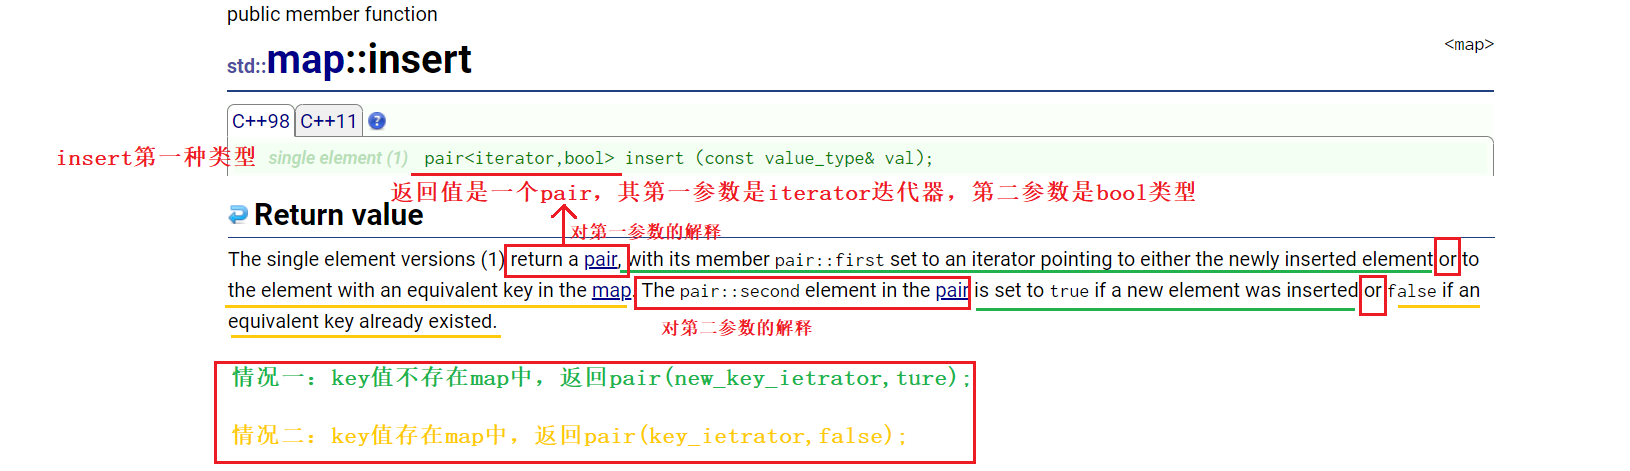
1.3.1、map::insert、遍历
1)、map::insert基本介绍
首先要知道map底层相当于二叉搜索树的KV模型。我们来观察其insert:相关链接
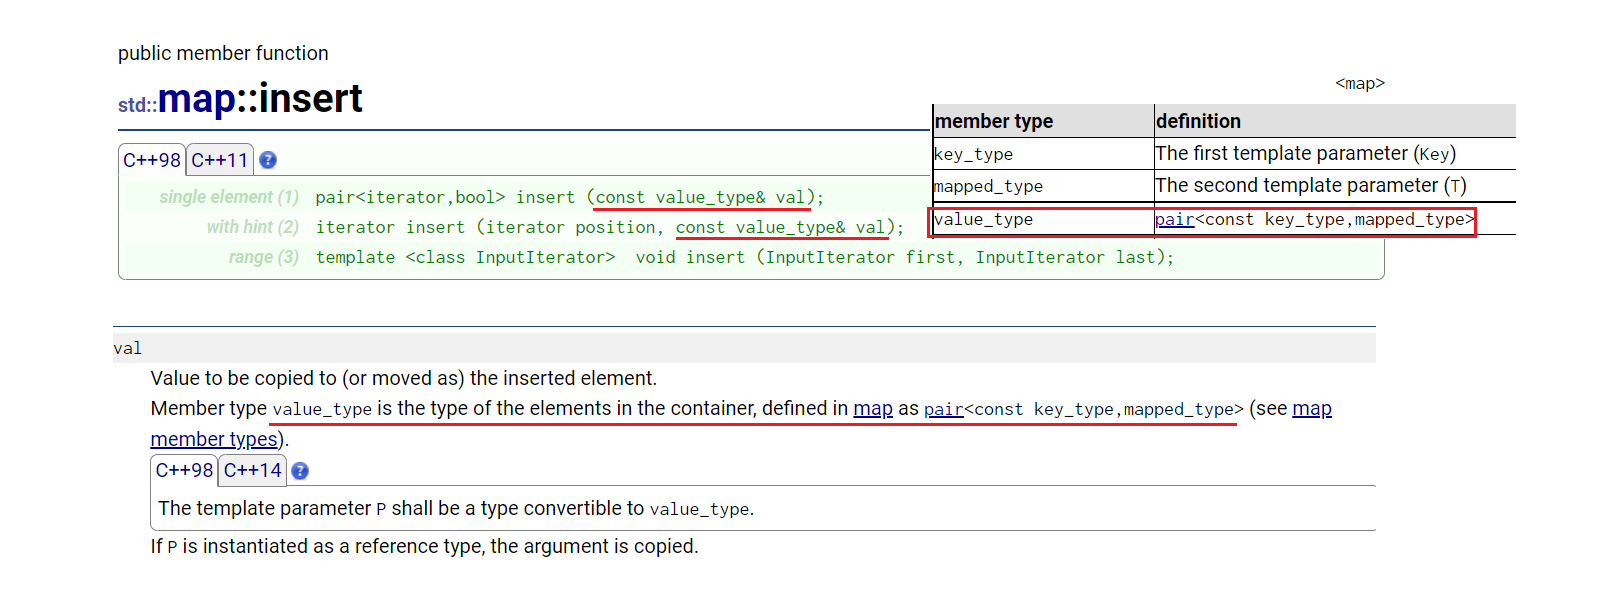
由上图可知,map::insert插入时,我们给定的是键值对,即一个结构体模型。
2)、map::insert 如何插入键值对?
相关演示如下:这里列举两种构造方法,可以先使用pair定义出一个对象,再用其插入;也可以直接使用一个匿名对象。
void test_map_01()
{
map<string, string> dict;
//方法演示一:
pair<string, string> kv1("misery", " n.痛苦");//单参数函数支持隐式类型转换
dict.insert(kv1);
//方法演示二:
dict.insert(pair<string, string>("fondness", " n.爱好"));
dict.insert(pair<string, string>("prosperity", " n.幸运"));
dict.insert(pair<string, string>("dragon", " n.龙"));
typedef pair<string, string> DictKV;//若写起来很长,可重命名
dict.insert(DictKV("dragon", " n.龙"));//验证重复项
dict.insert(DictKV("dragon", " n.凶恶的人"));//验证Key值相同,value不同,会不会插入。
//方法演示三:
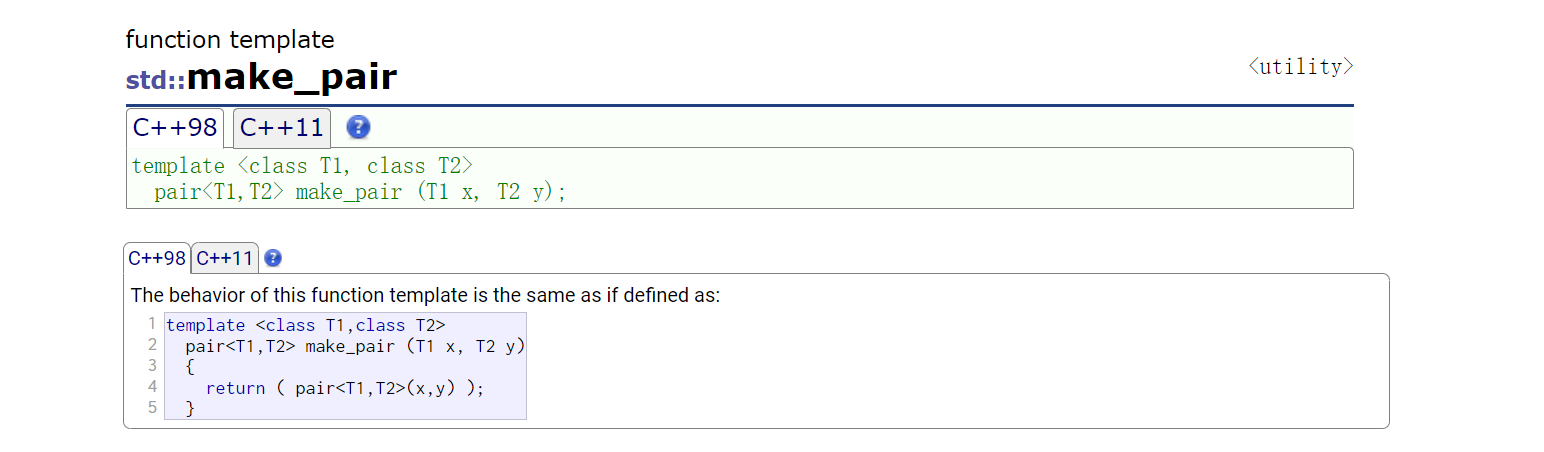
dict.insert(make_pair("learner", " n.学习者"));//make_pair使用
}
1、关于make_pair说明:其底层也在调用pair构造,相对于模板实例化,它写起来更方便些。
2、insert插入是以key作为判断标准的。想验结果验证在后序遍历中。
dict.insert(DictKV("dragon", " n.龙"));//验证重复项
dict.insert(DictKV("dragon", " n.凶恶的人"));//验证Key值相同,value不同,会不会插入。
3)、接上述2)中样例,如何遍历map?
如下,按照往常一样使用下述形式遍历,会发现编译报错:
	map<string, string>::iterator it = dict.begin();
	while (it != dict.end())
	{
		cout << *it << endl;//error
		++it;
	}

因此需要做一些修改:
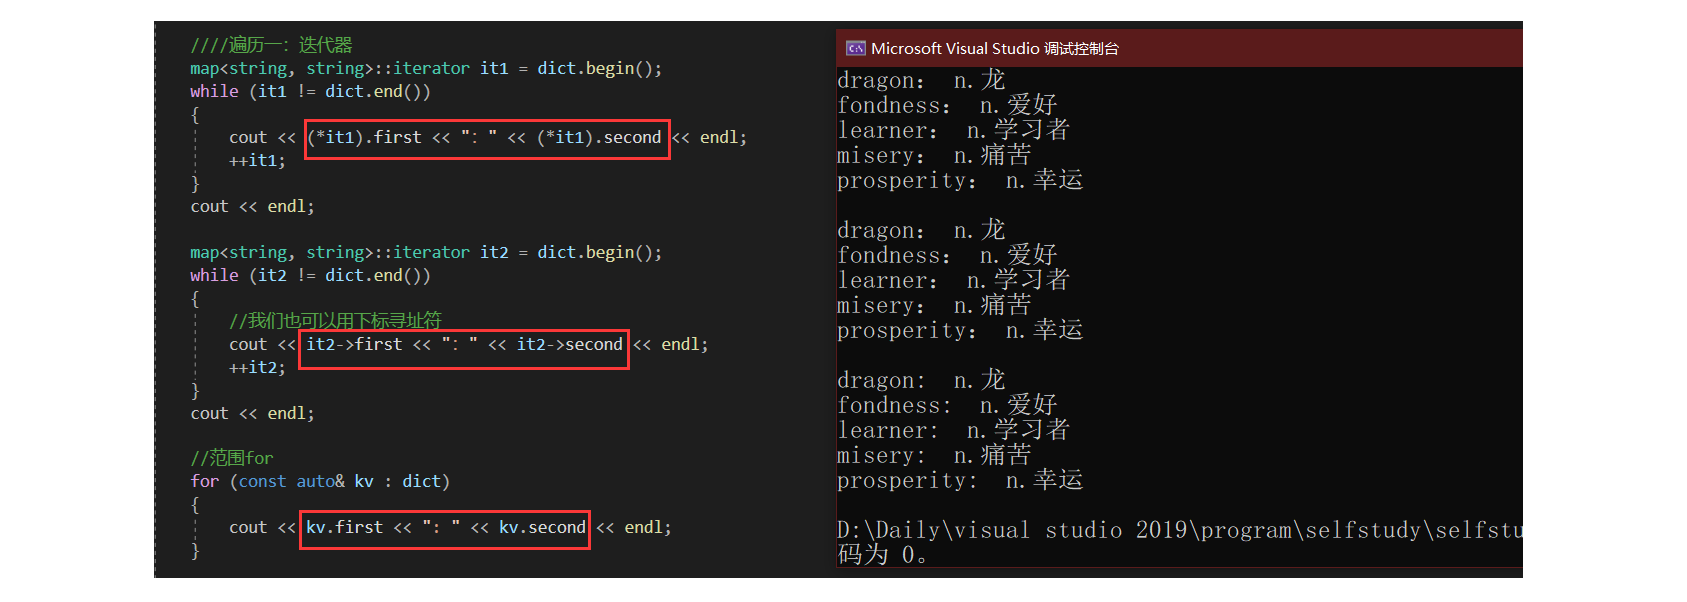
	遍历一:迭代器
	map<string, string>::iterator it1 = dict.begin();
	while (it1 != dict.end())
	{
		cout << (*it1).first << ":" << (*it1).second << endl;
		++it1;
	}
	cout << endl;

	map<string, string>::iterator it2 = dict.begin();
	while (it2 != dict.end())
	{
		//我们也可以用下标寻址符
		cout << it2->first << ":" << it2->second << endl;
		++it2;
	}
	cout << endl;
cout << (*it).first << ":" << (*it).second << endl;
cout << it->first << ":" << it->second << endl;
*it可得pair对象,.可访问结构体成员first、second;实际上我们也能用->来访问。it->first 是it->->first 的优化:第一个->是运算符重载,返回pair*,第二个->是访问。
我们也可以使用范围:const auto& kv ,由于kv获取到的类型为pair是一个类,故此处为了减少拷贝构造的消耗,使用了引用+const。
	//范围for
	for (const auto& kv : dict)
	{
		cout << kv.first << ": " << kv.second << endl;
	}
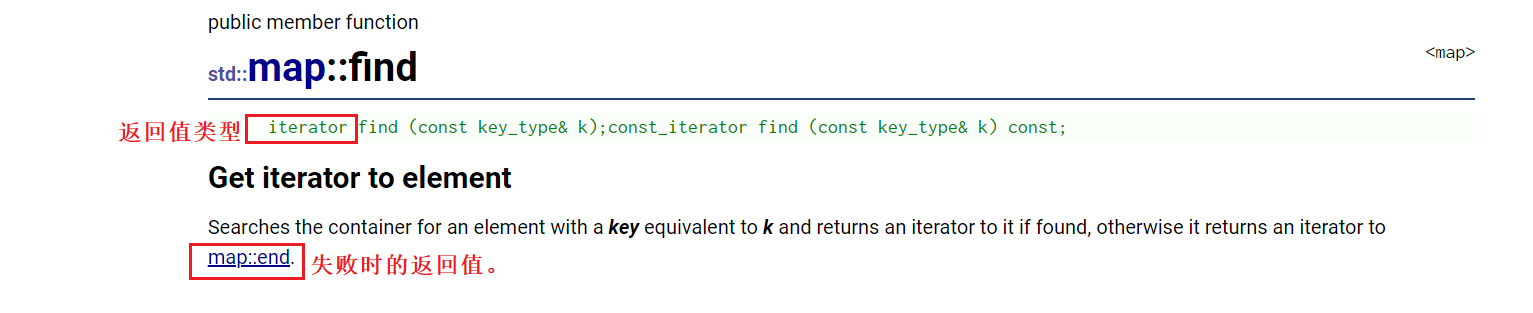
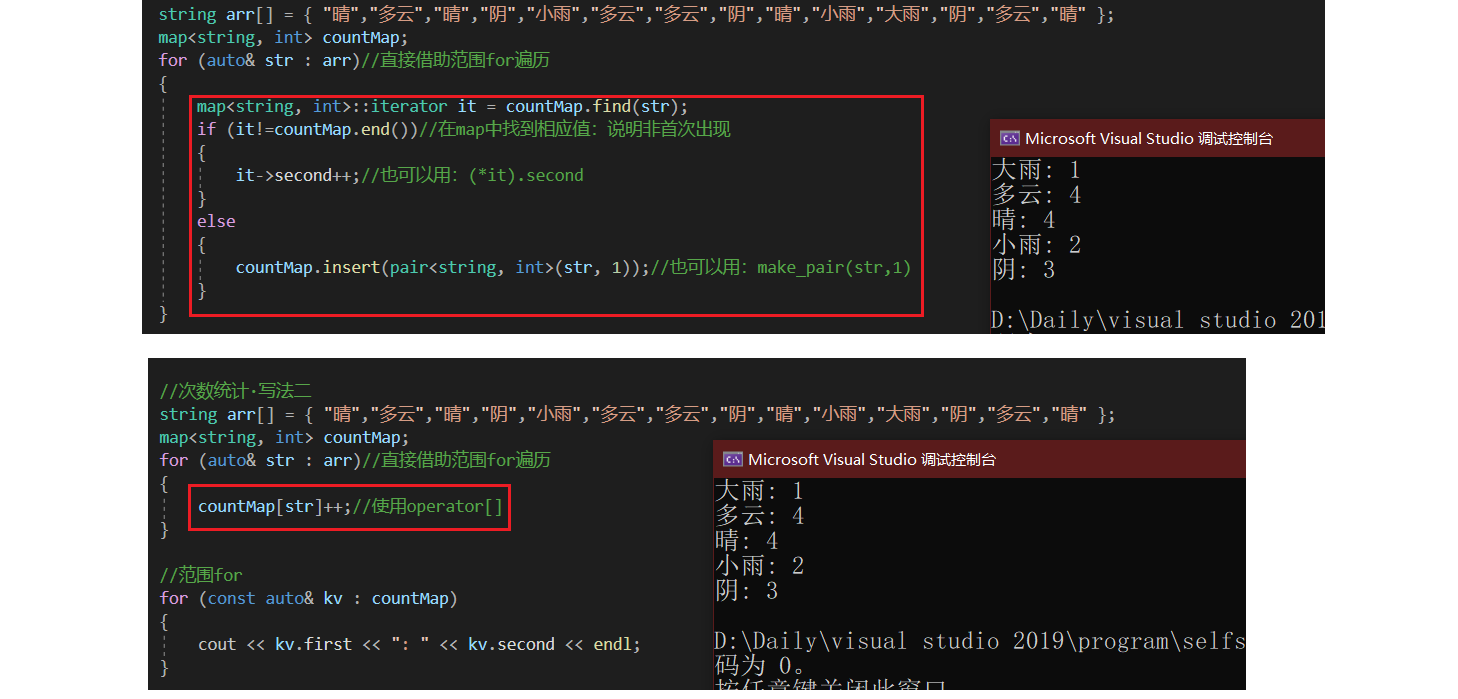
1.3.2、K-V模型演示:统计事物出现次数:map:find、map::operator[]
如下:给定一组天气,如何获取每个天气出现几次?
string arr[] = { "晴","多云","晴","阴","小雨","多云","多云","阴","晴","小雨","大雨","阴","多云","晴" };
1)、方法演示一:同二叉搜索树中学习的写法
	//次数统计:写法一
	string arr[] = { "晴","多云","晴","阴","小雨","多云","多云","阴","晴","小雨","大雨","阴","多云","晴" };
	map<string, int> countMap;
	for (auto& str : arr)//直接借助范围for遍历
	{
		map<string, int>::iterator it = countMap.find(str);
		if (it!=countMap.end())//在map中找到相应值:说明非首次出现
		{
			it->second++;//也可以用:(*it).second
		}
		else
		{
			countMap.insert(pair<string, int>(str, 1));//也可以用:make_pair(str,1)
		}
	}

	//范围for
	for (const auto& kv : countMap)
	{
		cout << kv.first << ": " << kv.second << endl;
	}
说明:
1、map::find,注意观察其参数类型,其余基本逻辑写法保持不变。
2)、方法演示二:使用map::operator[]
vector、string中operator[]是用于连续物理空间下的下标访问,在map这类物理空间不连续的容器中,operator[]该接口的作用是什么?相关文档链接
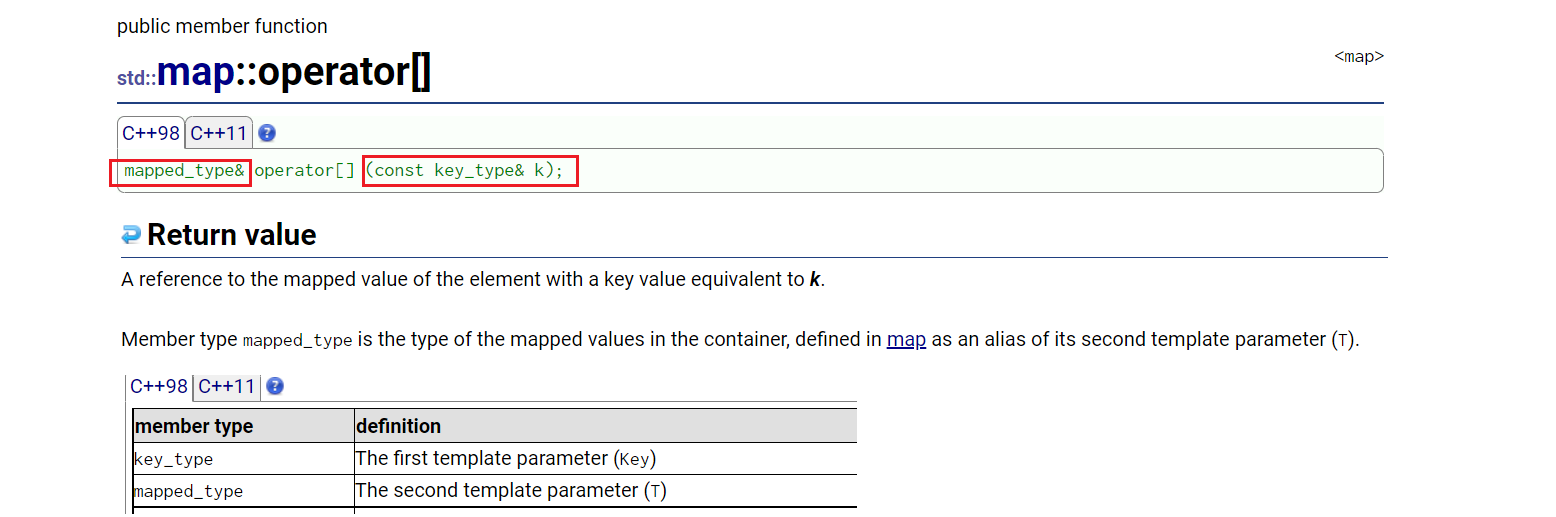
观察其参数和返回类型,可以看到operator[]是给定key值,返回value值。那么,我们也可以利用其达到上述次数统计的作用:
	//次数统计·写法二
	string arr[] = { "晴","多云","晴","阴","小雨","多云","多云","阴","晴","小雨","大雨","阴","多云","晴" };
	map<string, int> countMap;
	for (auto& str : arr)//直接借助范围for遍历
	{
		countMap[str]++;//使用operator[]
	}

	//范围for
	for (const auto& kv : countMap)
	{
		cout << kv.first << ": " << kv.second << endl;
	}
结果如下:
1.3.2、map::opeator[ ]基本说明,附operator::at简单介绍
1)、对于次数统计,map::operator[ ]做了什么?
接上一小节代码进行讲解分析:
	for (auto& str : arr)//直接借助范围for遍历
	{
		countMap[str]++;//使用operator[]
	}
一个问题是:若countMap中,key值已经存在(即,我们的天气已经存入map的情况),使用operator[]能找到它并返回。如果key值不存在countMap中,为什么也能做到次数统计?

根据上述说明,可将operator[]的行为模式分为两类:
情况一:当key值存在时,operator[] 充当查找+返回value值(可修改) 的功效;
情况二:当key值不存在时,operator[]充当插入+返回value值(可修改)的功效。此处插入的是一个pair键值对,即pari(key,V()) (使用的是匿名构造),其返回值是当前插入的value。
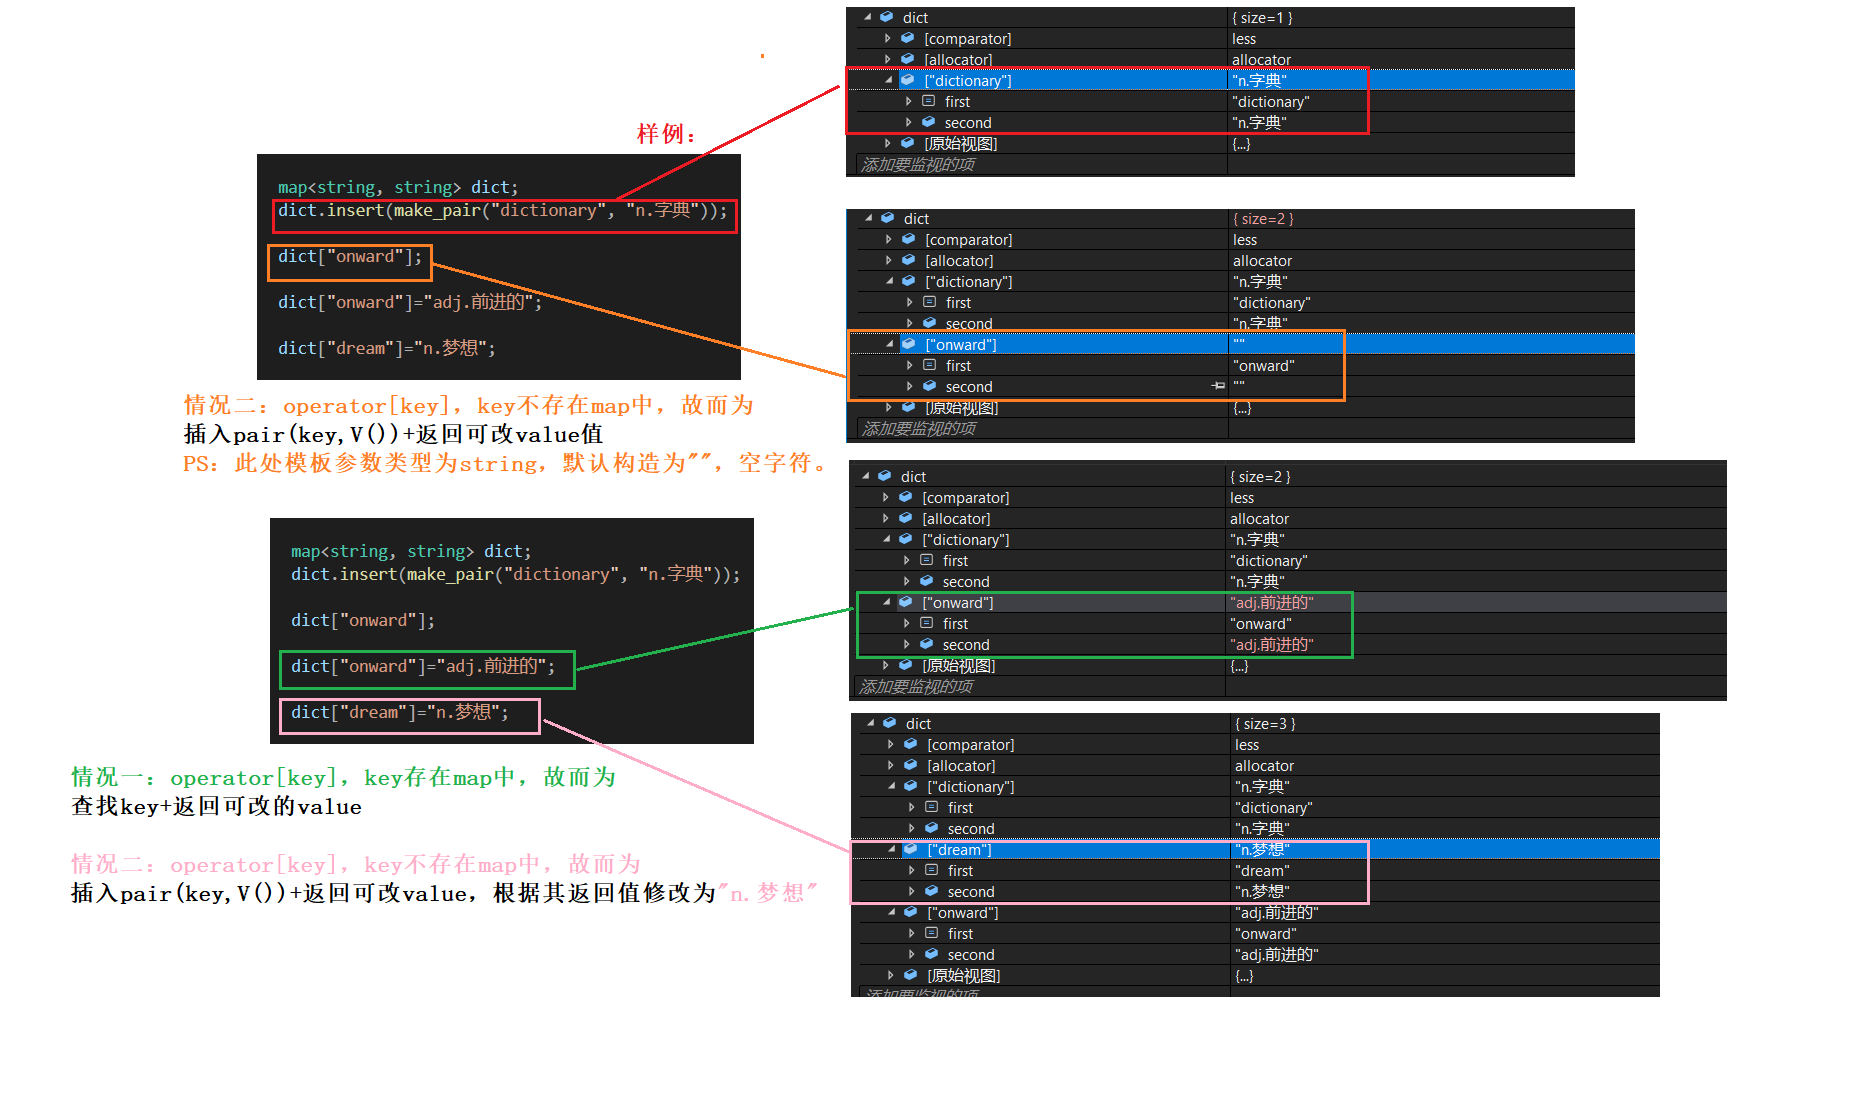
void test_map_03()
{
	map<string, string> dict;
	dict.insert(make_pair("dictionary", "n.字典"));

	dict["onward"];

	dict["onward"]="adj.前进的";

	dict["dream"]="n.梦想";

}
2)、operator[]底层实现分析
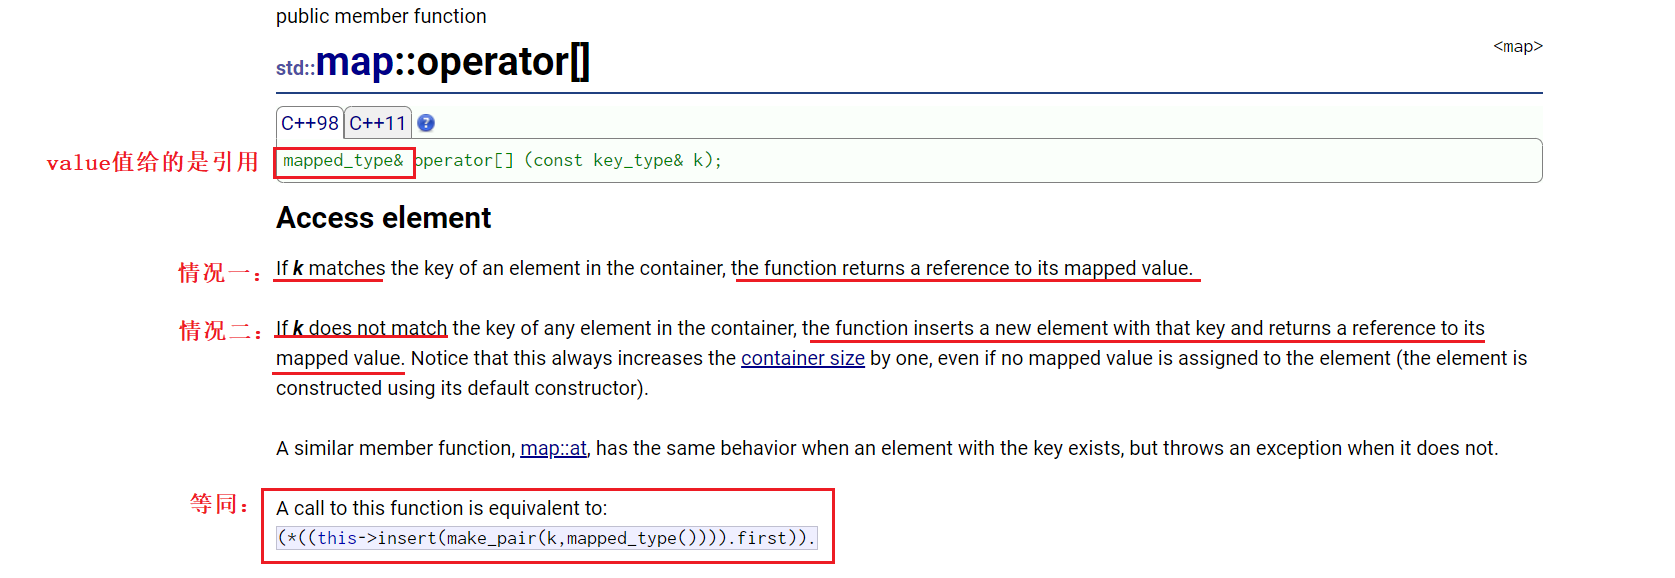
回到上述文档,我们看到文档中说明:
A call to this function is equivalent to:
(*((this->insert(make_pair(k,mapped_type()))).first)).second
那么相当于operator[]底层是调用insert实现的:
	mappde_type& operator[](const key_type& k)
	{
		return (*((this->insert(make_pair(k, mapped_type()))).first)).second;
	}
解析一:先来看看map::insert中返回值说明:相关文档链接
无论成功或失败(key在map中无或有),都返回pair<iterator, bool>,而iterator指向的pair<key,value>是根据当前我们传入key确定的,故而上述代码等价于:
	V& operator[](const K& key)
	{
		pair<iterator, bool> ret = insert(make_pair(key, V()));
		return ret.first->second;
	}
ret.first->second;,①ret.first,得到pair<iterator, bool>的第一参数,即iterator。②->我们之前有说过其是运算符重载,实际上为(operator->)->second,故最终我们得到的是pair<K, V>中的V,即value。
1.3.4、multimap简单介绍
相关文档链接:multimap
注意:
1、相比于map,multimap就没有operator[],因为可以键值冗余。
2、 multimap中的key可以重复。故而不能像map一样能达到次数统计效果。
1.4、例题举例
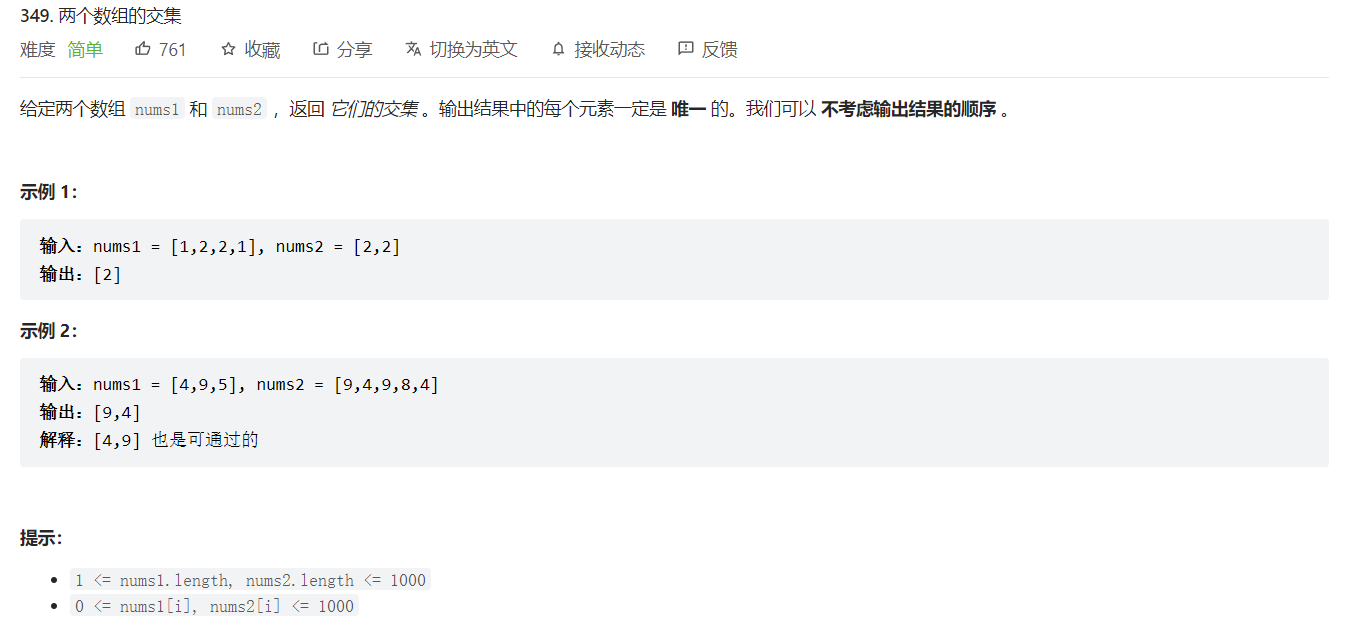
1.4.1、例题一: 两个数组的交集
题目链接
思路一:
将其中一个数组放入set中,另一个数组作为参考查询,依次比较set中是否有匹配的key,此方法需要注意,如果直接使用vector接受交集元素,会存在元素重复问题,如样例中的nums1 = [1,2,2,1], nums2 = [2,2]。因此可以借助另一个set完成去重,或者使用算法库中的unique。
class Solution {
public:
    vector<int> intersection(vector<int>& nums1, vector<int>& nums2) {
        set<int> set1(nums1.begin(),nums1.end());//用nums1构建set1
        set<int> set2;//解决后序找到的交集元素为重复项的问题

        for(int i=0;i<nums2.size();++i)
        {
            set<int>::iterator it=set1.find(nums2[i]);
            if(it!=set1.end())
            {
                set2.insert(*it);
            }
        }
		//经过set2去重,能保证返回的vector中相同交集元素无重复项。
        vector<int> ret(set2.begin(),set2.end());

        return ret;
    }
};
思路二:
在有序的情况下,分别遍历两个集合A、B,取数,对元素小的集合向后遍历,若两集合中当前数相等,则为交集。
其它:若求差集,则相等的同时向后遍历,元素小的就是差集。
class Solution {
public:
    vector<int> intersection(vector<int>& nums1, vector<int>& nums2) {
        vector<int> ret;
        set<int> set1(nums1.begin(),nums1.end());
        set<int> set2(nums2.begin(),nums2.end());

        set<int>::iterator it1,it2;
        it1=set1.begin();it2=set2.begin();
        while(it1!=set1.end()&&it2!=set2.end())
        {
            if(*it1<*it2)
            {
                ++it1;
            }
            else if(*it2<*it1)
            {
                ++it2;
            }
            else
            {
                ret.push_back(*it1);
                ++it1;
                ++it2;
            }
        }
        return ret;
    }
};
1.4.2、例题二:前K个高频单词
题目链接
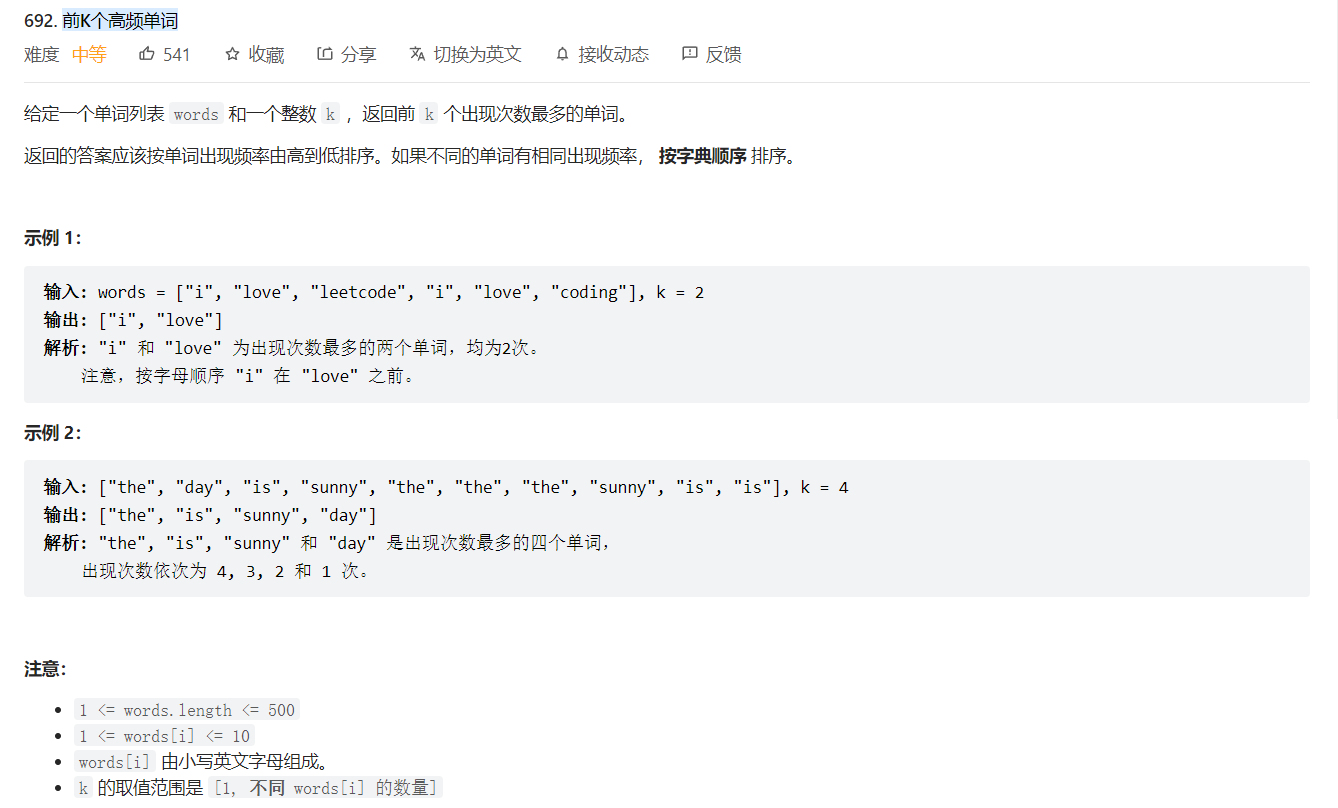
题目分析:这相当于一个top-K 问题,但相比之下其比较排序有两重条件。第一次序看value值,统计单词频率;第二次序看字母大小,字母小的排在前面。
1.4.2.1、写法一
思路说明:
1、使用map统计次数;
2、使用priority_queue排序;
class Solution {
public:

    struct Less
    {
        bool operator()(const pair<string,int>& n1,const pair<string,int>& n2)
        {
            //第一层比较:比较单词出现频率,value
            if(n1.second<n2.second)
                return true;

            //第二层比较:当单词出现频率相同时,以字典顺序排序,ASCII小的在前被取出,大堆,即小的要尽量往堆顶靠
            if(n1.second==n2.second && n1.first>n2.first)
                return true;

            return false;
        }

    };

     vector<string> topKFrequent(vector<string>& words, int k) {
     map<string,int> countMap;
     //次数统计
     for(const auto& str:words)
     {
         countMap[str]++;
     }

     //排序
     typedef priority_queue<pair<string,int>,vector<pair<string,int>>,Less> MaxHeap;
     MaxHeap hp(countMap.begin(),countMap.end());

    //取Top—K个元素返回:此处没有使用Max_K-小堆-降序
     vector<string> ret;
     while(k--)
     {
         ret.push_back(hp.top().first);
         hp.pop();
     }
    return ret;

    }
};
注意事项:
1、使用了多个容器,注意它们各自的参数类型和接口功能。
2、关于排序:由于此处并非大量数据处理,因此我们可以直接将给定的N个数据都用于建大堆,再从堆中取出前K个元素即可。
3、Less仿函数:priority_queue的仿函数相关实现我们之前讲过。这里根据需求,直接使用默认的Compare,所得结果不能满足需求,因此需要我们自己实现。需要注意第二次序的逻辑。
std::priority_queue
template <class T, class Container = vector<T>,  class Compare = less<typename Container::value_type> > class priority_queue;
1.4.2.2、写法二
思路说明:
1、实际上,map中默认以key排序,也就意味着我们创建的map<string,int>,默认得到的string就是字典顺序。
2、此时,假如我们使用一个稳定性好的排序,就可以达到对value值(单词频率)排序,且不改变其字典顺序。
class Solution {
public:

    struct Greater
    {
      bool operator()(const pair<string,int>& n1,const pair<string,int>& n2)
      {
          if(n1.second>n2.second)
              return true;
          if(n1.second==n2.second && n1.first<n2.first)
              return true;
          return false;
      }

    };

    vector<string> topKFrequent(vector<string>& words, int k) {
      //统计次数
      map<string,int> countMap;
      int n=words.size();
      for(const auto& str : words)
      {
        countMap[str]++;
      }

      //排序:需要使用一个稳定的排序算法
      vector<pair<string,int>> countV(countMap.begin(),countMap.end());
      sort(countV.begin(),countV.end(),Greater());

      //取前K个数返回
      vector<string> ret;
      for(int i=0; i<k; ++i)
      {
        ret.push_back(countV[i].first);
      }

      return ret;
    }
};
1.4.2.3、写法三
思路说明:
1、在上述两种情况中,我们创建的是pair<key,value>键值对,map默认排序以pair.first,也就是key排序,这样得到的map默认按照字典顺序。假如我们在此基础上使用pair<value,key>,就能得到以value排序的序列。但需要注意,如果此时容器使用map,会将value值相同的单词去重,但我们可以使用multimap解决。
class Solution {
public:
    vector<string> topKFrequent(vector<string>& words, int k) {
      //统计:此处string已有序
      map<string,int> countMap;
      for(auto& str:words)
      {
        countMap[str]++;
      }

      //使用multimap进行排序:针对value
      multimap<int,string,greater<int>> SortMap;
      for(auto& kv:countMap)
      {
        SortMap.insert(make_pair(kv.second,kv.first));
      }

      //取前K个值
      vector<string> ret;
      multimap<int,string,greater<int>>::iterator it=SortMap.begin();
      for(int i=0;i<k;++i)
      {
        ret.push_back(it->second);
        ++it;
      }
      return ret;
    }
};