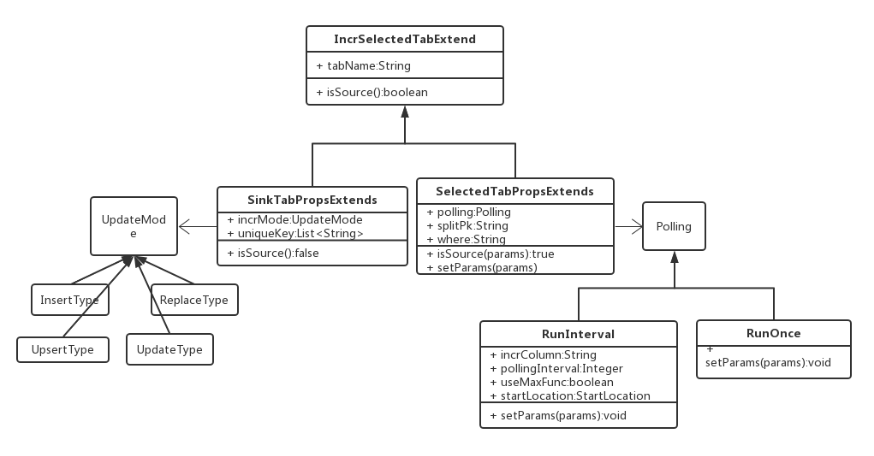
前言
mybatis可以自己带有二级缓存的实现,这里加上redis是想把东西缓存到redis中,而不是mybaits自带的map中。这也就构成了我们看到的springboot + mybatisplus +redis实现二级缓存的题目。
具体步骤如下:
首先加入需要的依赖
 <dependency>
    <groupId>org.springframework.boot</groupId>
    <artifactId>spring-boot-starter-data-redis</artifactId>
 </dependency>

<dependency>
    <groupId>org.springframework.boot</groupId>
    <artifactId>spring-boot-starter-cache</artifactId>
</dependency>
<dependency>
    <groupId>org.projectlombok</groupId>
    <artifactId>lombok</artifactId>
</dependency>
第二步:在application.properties或者yml中配置redis属性和设置开启二级缓存(默认是关闭的)
spring.cache.type=redis
spring.redis.host=192.168.9.82
spring.redis.jedis.pool.max-active=10
spring.redis.jedis.pool.max-idle=10
spring.redis.jedis.pool.max-wait=3000
spring.redis.jedis.pool.min-idle=20
spring.redis.port=6379
spring.redis.timeout=3000

mybatis-plus.configuration.cache-enabled=true  #开启二级缓存
第三步:编写redis缓存的配置类,大体需要如下三个类,先截图在上代码

ApplicationContextHolder.java类主要用于在另外另个类中可以通过context获取spring容器中注入的redisTemplate来操作redis。代码如下:
import org.springframework.context.ApplicationContext;

//@Component
public class ApplicationContextHolder {

    private static ApplicationContext applicationContext = null;

    public static void setApplicationContext(ApplicationContext applicationContext) {
        ApplicationContextHolder.applicationContext = applicationContext;
    }

    public static ApplicationContext getApplicationContext() {
        return applicationContext;
    }

    public static <T> T getBean(String name) {
        return (T)applicationContext.getBean(name);
    }

    public static <T> T getBean(Class clz) {
        return (T)applicationContext.getBean(clz);
    }

}
MybatisRedisCache.java类实现了Mybatis的Cache接口,这样才能在执行数据库操作前调用缓存。代码如下:
import org.apache.ibatis.cache.Cache;
import org.springframework.data.redis.core.RedisCallback;
import org.springframework.data.redis.core.RedisTemplate;
import org.springframework.data.redis.core.ValueOperations;

import java.util.concurrent.TimeUnit;
import java.util.concurrent.locks.ReadWriteLock;
import java.util.concurrent.locks.ReentrantReadWriteLock;

public class MybatisRedisCache implements Cache {
    private final ReadWriteLock readWriteLock = new ReentrantReadWriteLock();
    private final String id; // cache instance id
    private RedisTemplate redisTemplate;

    private static final long EXPIRE_TIME_IN_MINUTES = 30; // redis过期时间

    public MybatisRedisCache(String id) {
        if (id == null) {
            throw new IllegalArgumentException("Cache instances require an ID");
        }
        this.id = id;
    }

    @Override
    public String getId() {
        return id;
    }

    /**
     * Put query result to redis
     *
     * @param key
     * @param value
     */
    @Override
    @SuppressWarnings("unchecked")
    public void putObject(Object key, Object value) {
        try {
            RedisTemplate redisTemplate = getRedisTemplate();
            ValueOperations opsForValue = redisTemplate.opsForValue();
            opsForValue.set(key, value, EXPIRE_TIME_IN_MINUTES, TimeUnit.MINUTES);
        }
        catch (Throwable t) {
            t.printStackTrace();
        }
    }

    /**
     * Get cached query result from redis
     *
     * @param key
     * @return
     */
    @Override
    public Object getObject(Object key) {
        try {
            RedisTemplate redisTemplate = getRedisTemplate();
            ValueOperations opsForValue = redisTemplate.opsForValue();
            return opsForValue.get(key);
        }
        catch (Throwable t) {

            return null;
        }
    }

    /**
     * Remove cached query result from redis
     *
     * @param key
     * @return
     */
    @Override
    @SuppressWarnings("unchecked")
    public Object removeObject(Object key) {
        try {
            RedisTemplate redisTemplate = getRedisTemplate();
            redisTemplate.delete(key);
        }
        catch (Throwable t) {
            t.getMessage();
        }
        return null;
    }

    /**
     * Clears this cache instance
     */
    @Override
    public void clear() {
        RedisTemplate redisTemplate = getRedisTemplate();
        redisTemplate.execute((RedisCallback) connection -> {
            connection.flushDb();
            return null;
        });
    }

    /**
     * This method is not used
     *
     * @return
     */
    @Override
    public int getSize() {
        return 0;
    }

    @Override
    public ReadWriteLock getReadWriteLock() {
        return readWriteLock;
    }

    private RedisTemplate getRedisTemplate() {
        if (redisTemplate == null) {
            // 这里用到了ApplicationContextHolder.java
            redisTemplate = ApplicationContextHolder.getBean("redisTemplate");
        }
        return redisTemplate;
    }
}
RedisCacheConfig.java类主要用来配置redis的一些属性,里面这里主要配置了reids序列化。代码如下:
import org.springframework.beans.factory.annotation.Value;
import org.springframework.cache.CacheManager;
import org.springframework.cache.annotation.CachingConfigurerSupport;
import org.springframework.cache.interceptor.CacheErrorHandler;
import org.springframework.cache.interceptor.CacheResolver;
import org.springframework.cache.interceptor.SimpleCacheErrorHandler;
import org.springframework.cache.interceptor.SimpleCacheResolver;
import org.springframework.context.annotation.Bean;
import org.springframework.context.annotation.Configuration;
import org.springframework.data.redis.cache.RedisCacheConfiguration;
import org.springframework.data.redis.cache.RedisCacheManager;
import org.springframework.data.redis.connection.RedisConnectionFactory;
import org.springframework.data.redis.connection.RedisStandaloneConfiguration;
import org.springframework.data.redis.connection.lettuce.LettuceConnectionFactory;
import org.springframework.data.redis.core.RedisTemplate;
import org.springframework.data.redis.serializer.GenericJackson2JsonRedisSerializer;
import org.springframework.data.redis.serializer.RedisSerializationContext;
import org.springframework.data.redis.serializer.StringRedisSerializer;

import java.time.Duration;
import java.util.HashMap;
import java.util.Map;

/**
 * ignit改redis缓存
 * @author  lhb
 * @since 2022/11/24
 */
@Configuration
public class RedisCacheConfig extends CachingConfigurerSupport {
    @Value("${spring.redis.host}")
    private String redisHost;

    @Value("${spring.redis.port}")
    private int redisPort;

    @Bean
    public RedisTemplate<Object, Object> redisTemplate() {
        RedisTemplate<Object, Object> redisTemplate = new RedisTemplate<>();
        redisTemplate.setConnectionFactory(redisConnectionFactory());
        GenericJackson2JsonRedisSerializer genericJackson2JsonRedisSerializer = new GenericJackson2JsonRedisSerializer();
        redisTemplate.setKeySerializer(genericJackson2JsonRedisSerializer);
        redisTemplate.setValueSerializer(genericJackson2JsonRedisSerializer);
        redisTemplate.setHashKeySerializer(new StringRedisSerializer());
        redisTemplate.setHashValueSerializer(genericJackson2JsonRedisSerializer);
        return redisTemplate;
    }

    @Override
    public CacheResolver cacheResolver() {
        return new SimpleCacheResolver(cacheManager());
    }

    @Override
    public CacheErrorHandler errorHandler() {
        return new SimpleCacheErrorHandler();
    }

    @Override
    public CacheManager cacheManager() {
        Map<String, RedisCacheConfiguration> cacheConfigurationMap = generateCacheConfigMap();
        RedisCacheConfiguration redisCacheConfiguration = RedisCacheConfiguration.defaultCacheConfig()
                .disableCachingNullValues()
                .serializeValuesWith(RedisSerializationContext.SerializationPair.fromSerializer(new GenericJackson2JsonRedisSerializer()));
        return RedisCacheManager.builder(redisConnectionFactory())
                .cacheDefaults(redisCacheConfiguration)
                .withInitialCacheConfigurations(cacheConfigurationMap)
                .build();
    }
     public Map<String, RedisCacheConfiguration> generateCacheConfigMap() {
        Map<String, RedisCacheConfiguration> initialCacheConfiguration = new HashMap<>();
        initialCacheConfiguration.put("hourCache", RedisCacheConfiguration.defaultCacheConfig().entryTtl(Duration.ofHours(1)));//1小时
        initialCacheConfiguration.put("minCache", RedisCacheConfiguration.defaultCacheConfig().entryTtl(Duration.ofMinutes(1)));
        initialCacheConfiguration.put("dayCache", RedisCacheConfiguration.defaultCacheConfig().entryTtl(Duration.ofDays(1)));
        return initialCacheConfiguration;
    }

    public RedisConnectionFactory redisConnectionFactory() {
        RedisStandaloneConfiguration configuration = new RedisStandaloneConfiguration();
        configuration.setHostName(redisHost);
        configuration.setPort(redisPort);
        configuration.setDatabase(0);
        LettuceConnectionFactory factory = new LettuceConnectionFactory(configuration);
        factory.afterPropertiesSet();
        return factory;
    }


}
第四步:在mapper.xml中添加cache标签,来告诉mybtisplus这个mapper中的内容使用二级缓存,这个cache标签放在mapper表中的什么位置都行
<mapper namespace="hisense.HiDevMng.code.hidevConfigManager.web.dao.DevBusRouterelViewDao">
    <!-- 开启基于redis的二级缓存 -->
    <cache type="hisense.HiDevMng.code.base.config.cache.MybatisRedisCache"/>

    <select id="getOrgList" resultType="his.api.dto.OrgDto">
        SELECT * from table1
        WHERE br.BUSID IN
        <foreach collection="ids" index="index" item="item" open="(" separator="," close=")">
            #{item}
        </foreach>
    </select>
</mapper>
第五步:在启动类中实现ApplicationContextAware接口,目的是拿到spring容器的context,然后给ApplicationContextHolder,这样我们的redis缓存的配置类中就可以通过applicationContext来得到容器中中的redisTemplate进行redis操作了。添加如下代码:
public class StartApplication extends SpringBootServletInitializer implements ApplicationContextAware {
    public static void main(String[] args) {
        SpringApplication.run(StartApplication.class, args);
    }

    @Override
    public void setApplicationContext(ApplicationContext applicationContext) throws BeansException {
        //重点在此,通过这个赋值context
        ApplicationContextHolder.setApplicationContext(applicationContext);
    }
}
网上很多帖子给出的方式是自己单独写一个类来实现ApplicationContextAware接口,但是因为我的项目中用到了@PostConstruct注解,那样会导致ApplicationContrext为空,所以我选择了通过上面在启动类给ApplicationContextHolder赋值的方式。
第六步,测试,创建测试类例如
RunWith(SpringRunner.class)
@SpringBootTest(classes = StartApplication.class, webEnvironment = SpringBootTest.WebEnvironment.DEFINED_PORT)
public class test {

    @Autowired
    private MyDao dao;

    @Test
    public void testOne() {
        Set<String> ids = new HashSet<>();
        ids.add("25191027172915794000");
        List<BusOrgDto> busOrgList = dao.getBusOrgList(ids);
        System.out.println(busOrgList.size());
        System.out.println("====================================================");
        List<BusOrgDto> busOrgList1 = dao.getBusOrgList(ids);
        System.out.println(busOrgList1.size());

    }

}
运行2次查询,但是只出现一次如下图的log,就说明第二次执行使用redis缓存中的数据了
![]()
出现一次Preparing:就说明执行的是数据库查询,没走redis缓存。当我们多次执行都不在显示这个Preparing:了就说明缓存成功了。
总结:
这里就不把代码放git上了,直接从上面把代码都拷贝下来,就可以执行了。关于什么是二级缓存网上可以自行百度。
代码中还存在完善的空间,比如多久后自动从缓存删除等,大家可以自行了解下。这里只是为了给初学者使用,写多了怕容易乱。谢谢支持

![[附源码]SSM计算机毕业设计医院仪器设备管理系统JAVA](https://img-blog.csdnimg.cn/8a914466953c40bda7057f121eb92829.png)
![[MySQL]-压力测试_TPCC-MySQL](https://img-blog.csdnimg.cn/92f821b3268a48a79694ea74fcdc1433.png#pic_center)