训练分类模型
1.如何更改模型的类别数nc
根据本地模型配置文件.yaml可以设置nc

但是,这里无法用到预训练模型.pt模型文件,预训练模型的权重参数是在大数据集上训练得到的,泛化性能可能比较好,所以,下载了官方的分类模型yolov8n-cls.pt
由于需要魔改yolov8,所以下载了官方源码,在default.yaml配置文件中是各种超参数,包括data与model路径的设置
将data路径设置为本地路径,或者调用数据配置文件coco128.yaml文件进行更改也可,这里有个问题,由于我也利用pip安装了yolov8的源码库,导致在利用coco128.yaml文件时,代码会在官方下载数据,导致报错,可能与这部分代码有关,目前暂未解释,直接定位本地文件夹更方便。
model路径设置为下载的yolov8n-cls.pt本地路径,或者模型配置文件yolov8n.yaml路径,这里选择前者。
问题来了,官方配置文件的nc是1000,由上图模型配置文件也可看出,先说方法,在task.py文件中找到attempt_load_one_weight这个函数,这个函数是用来下载.pt模型文件的,在train.py文件中的下面函数也可以看到
def setup_model(self):
        """
        load/create/download model for any task
        """
        # classification models require special handling

        if isinstance(self.model, torch.nn.Module):  # if model is loaded beforehand. No setup needed
            return

        model = str(self.model)
        # Load a YOLO model locally, from torchvision, or from Ultralytics assets
        if model.endswith(".pt"):
            self.model, _ = attempt_load_one_weight(model, device='cpu')
            for p in self.model.parameters():
                p.requires_grad = True  # for training
        elif model.endswith(".yaml"):
            self.model = self.get_model(cfg=model)
解决办法:
在attempt_load_one_weight这个函数中添加代码如下,
def attempt_load_one_weight(weight, device=None, inplace=True, fuse=False):
    # Loads a single model weights
    ckpt = torch_safe_load(weight)  # load ckpt
    args = {**DEFAULT_CFG_DICT, **ckpt['train_args']}  # combine model and default args, preferring model args
    model = (ckpt.get('ema') or ckpt['model']).to(device).float()  # FP32 model

    ##########################change_nc###################################
    #方法一:
    nc = 5
    ch = 256
    m = model.model[-1]  # last layer
    #ch = m.conv.in_channels if hasattr(m, 'conv') else m.cv1.conv.in_channels  # ch into module
    c = Classify(ch, nc)  # Classify()
    c.i, c.f, c.type = m.i, m.f, 'models.common.Classify'  # index, from, type
    model.model[-1] = c  # replace
    print("############################################################")
    print(model)
    # print("model.layers:",len(model.layers))
    # for layer in model.layers[:-10]:
    #     layer.trainable = False
    #######################################################################
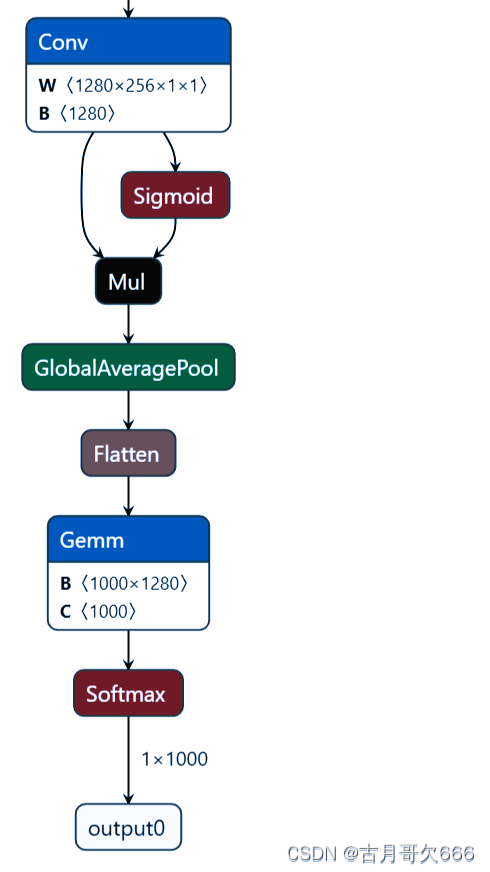
nc为自己数据的类别数,ch为模型最后一层的输入通道层数,这里由于模型没有layers参数,模型中卷积层没有in_channel参数,所以无法直接调用,所以咱不能进行冻结层训练,考虑到模型层数也不多,先暂且这样吧,ch可以将原.pt模型先转为onnx通过netron进行查看
![# YOLOv8.0n head
head:
  - [-1, 1, Classify, [nc]]  # Classify](https://img-blog.csdnimg.cn/9b83d6b87de54c26b044ed4eaac5b1aa.png)
class Classify(nn.Module):
    # YOLOv8 classification head, i.e. x(b,c1,20,20) to x(b,c2)
    def __init__(self, c1, c2, k=1, s=1, p=None, g=1):  # ch_in, ch_out, kernel, stride, padding, groups
        super().__init__()
        c_ = 1280  # efficientnet_b0 size
        self.conv = Conv(c1, c_, k, s, autopad(k, p), g)
        self.pool = nn.AdaptiveAvgPool2d(1)  # to x(b,c_,1,1)
        self.drop = nn.Dropout(p=0.0, inplace=True)
        self.linear = nn.Linear(c_, c2)  # to x(b,c2)

    def forward(self, x):
        if isinstance(x, list):
            x = torch.cat(x, 1)
        x = self.linear(self.drop(self.pool(self.conv(x)).flatten(1)))
        return x if self.training else x.softmax(1)
注意:在训练完之后需要注释掉添加的代码,否则在export,val,predict模型的时候,比如onnx会调用模型下载函数,导致模型破坏。
在进行测试的时候,竟然发现原来没有改动类别数训练之后的模型发现虽然类别数是1000.但是在进行测试的时候,以及转换为onnx之后进行测试发现结果没有变化,甚至高一个点,什么鬼,据我猜测,数据没有发生变化,我直接设置的是本地路径,所以以经是设置为5类了,现在就剩模型最后一层的类别数不一样,也就是说在训练的时候,无论你模型设置多少类,只要数据集类数确定了,那么最后训练的结果是一样的,就好像多余的类别数默认输出为0,但是前面的类别数输出结果不变。
2.如何将pt模型的三通道改为单通道
1.输入层的修改,将模型第一个卷积层的输入通道数从3改为1,权重改为单通道,具体代码如下:
原模型第一层的conv的输入通道数为3,权重通道为[:, :3, :, :]
在attempt_load_one_weight这个函数中添加代码如下,
	#修改输入通道数,权重通道数
    model.model[0].conv.in_channels = 1
    model.model[0].conv.weight = torch.nn.Parameter(model.model[0].conv.weight[:, :1, :, :])
    #model.model[0].conv.weight.data = model.model[0].conv.weight.data[:, :1, :, :]
2.修改数据集图片的维度,将其由三通道rgb转为单通道灰度图
在dataset.py文件中修改def getitem(self, i)函数
def __getitem__(self, i):
        f, j, fn, im = self.samples[i]  # filename, index, filename.with_suffix('.npy'), image
        if self.cache_ram and im is None:
            im = self.samples[i][3] = cv2.imread(f)
        elif self.cache_disk:
            if not fn.exists():  # load npy
                np.save(fn.as_posix(), cv2.imread(f))
            im = np.load(fn)
        else:  # read image
            im = cv2.imread(f)  # BGR
        if self.album_transforms:
            sample = self.album_transforms(image=cv2.cvtColor(im, cv2.COLOR_BGR2RGB))["image"]#源代码
        else:
            #修改为单通道
            import numpy as np
            image=cv2.cvtColor(im, cv2.COLOR_BGR2GRAY)
            sample = self.torch_transforms(image)


            #sample = self.torch_transforms(im)#原代码
然后,torch_transforms函数索引到augment.py函数中的classify_transforms函数,在这个函数中分别修改CenterCrop(size), ToTensor(), T.Normalize(IMAGENET_MEAN, IMAGENET_STD)函数
def classify_transforms(size=224):
    # Transforms to apply if albumentations not installed
    if not isinstance(size, int):
        raise TypeError(f"classify_transforms() size {size} must be integer, not (list, tuple)")
    # T.Compose([T.ToTensor(), T.Resize(size), T.CenterCrop(size), T.Normalize(IMAGENET_MEAN, IMAGENET_STD)])
    return T.Compose([CenterCrop(size), ToTensor(), T.Normalize(IMAGENET_MEAN, IMAGENET_STD)])
CenterCrop(size), ToTensor()两个函数中分别添加im = np.array(im)[ :, :, np.newaxis]代码添加维度,否则会报错
T.Normalize(IMAGENET_MEAN, IMAGENET_STD)修改IMAGENET_MEAN, IMAGENET_STD参数的数值由三个通道改为单个通道数值
如果要进行验证集测试的话会遇到报错RuntimeError: Given groups=1, weight of size [16, 1, 3, 3], expected input[1, 3, 64, 64] to have 1 channels, but got 3 channels instead
将validator.py文件中__call__函数中
model.warmup(imgsz=(1 if pt else self.args.batch, 3, imgsz, imgsz))
修改为
model.warmup(imgsz=(1 if pt else self.args.batch, 1, imgsz, imgsz))