文章目录
- 一、Vue3基础语法
- 1、Vue开发准备
- 2、Vue的模板语法
- 3、条件渲染
- 4、列表渲染
- 5、事件处理
- 6、表单输入绑定
- 二、Components组件
- 1、组件基础
- 2、组件交互
- 3、自定义事件的组件交互
- 4、组件生命周期
- 5、引入第三方组件
- 三、网络请求及路由配置
- 1、Axios网络请求
- 2、Axios网络请求封装
- 3、Vue引入路由配置
- 4、Vue路由传递参数
- 5、Vue路由嵌套
- 四、Vue3状态管理及新特性
- 1、Vue状态管理(Vuex)
- 2、Vue状态管理的核心
- 3、Vue3新特性
- 4、Vue3加载Element-plus
- 总结
一、Vue3基础语法
1、Vue开发准备
Vue CLI Vue.js 开发的标准工具,Vue CLI 是一个基于 Vue.js 进行快速开发的完整系统
- 安装vue工具Vue CLI:
npm install -g @vue/cli - 验证Vue CLI是否安装成功:
vue --version - 通过vue命令创建一个vue项目:
vue create vue-demo
1)此时选择第三个选项,即手动选择特性。
2)然后只选择1和3,即Babel转换器(如ES6语法转ES5语法)和Web项目。
3)选择3.x版本(即vue3)
4)选择存放配置的文件
In dedicated config files 专用配置文件
In package.json在package.json文件
此时选择In dedicated config files,然后输入n,不保存当前配置。
如果输入y的话需要输入文件名字,下次可以直接使用该配置文件,不用手动选择特性。 - 项目创建完成后,运行项目
1)第一步:进入项目根目录:cd vue-demo
2)第二步:启动项目:npm run serve - 安装Vue高亮插件
VSCode中安装插件vetur或者volar都可,前者针对Vue2版本,后者针对Vue3版本。
此时使用vue3,安装Vue Language Features(volar)即可。
还可以安装vscode-icons图标插件。
2、Vue的模板语法
-
项目src根目录下的assets,相当于java的static,都是存放公共资源的,存放类似于js等。
项目src根目录下的components使用来存放组件的,也就是其他的.vue文件。而App.vue是主入口的组件,即所有组件都从该文件开始。
main.js相当java的main方法,即程序的入口文件。 -
文本数据,文本数据绑定最常见的形式就是使用“Mustache” (双大括号{{}}) 语法的文本插值,将components目录下的HelloWorld.vue修改如下
<template>
  <div class="hello">
    <h1>vvvvv</h1>
    <span>{{message}}</span>
  </div>
</template>

<script>
export default {
  name: 'HelloWorld',
  data(){
    return {
      message:"阿里嘎多美羊羊桑"
    }
  }
}
</script>
即通过data(){return }的方式设置message,并将message文本的值传递到双大括号{{}}中。
-
原始HTML数据,需要使用v-html指令
<template> <div class="hello"> <h1>vvvvv</h1> <span>{{message}}</span> <div v-html="rawHTML"></div> </div> </template> <script> export default { name: 'HelloWorld', data(){ return { message:"阿里嘎多美羊羊桑", rawHTML:"<a href='https://www.baidu.com'>百度</a>" } } } </script> -
HTML属性(Attribute)数据,Mustache语法不能在HTML属性中使用,需要使用v-bind指令,
<template>
  <div class="hello">
    <h1>vvvvv</h1>
    <span>{{message}}</span>
    <div v-html="rawHTML"></div>
    <div v-bind:id="dynamicId"></div>
  </div>
</template>

<script>
export default {
  name: 'HelloWorld',
  data(){
    return {
      message: "阿里嘎多美羊羊桑",
      rawHTML: "<a href='https://www.baidu.com'>百度</a>",
      dynamicId: 111
    }
  }
}
</script>
此时v-bind:可以简写成:
并且此时需要按f12进入到开发工具中,进入html中的body标签,查看是否赋值成功。 -
在{{}}Mustache语法中,可以使用JavaScript表达式
<template>
  <div class="hello">
    <h1>vvvvv</h1>
    <span>{{message}}</span>
    <div v-html="rawHTML"></div>
    <div v-bind:id="dynamicId"></div>
    <div>{{ num/2 }}</div>
    <div>{{ flag?"1":"0" }}</div>
    <span>{{message.split("").reverse().join("")}}</span>
  </div>
</template>

<script>
export default {
  name: 'HelloWorld',
  data(){
    return {
      message: "阿里嘎多美羊羊桑",
      rawHTML: "<a href='https://www.baidu.com'>百度</a>",
      dynamicId: 111,
      num: 10,
      flag: true
    }
  }
}
</script>
但是不能使用流程控制等。
3、条件渲染
-
v-if和v-else指令,当指令的表达式为true时被渲染。
<template>
  <div class="hello">
      <p v-if="flag">true</p>
      <p v-else>false</p>
  </div>
</template>

<script>
export default {
  name: 'HelloWorld',
  data(){
    return {
      flag : true,
    }
  }
}
</script>
即跟java中的if和else一样的流程控制。
-
v-show指令,当指令的表达式为true时展示元素。
<template> <div class="hello"> <p v-if="flag">true</p> <p v-else>false</p> <p v-show="flag">true</p> </div> </template> <script> export default { name: 'HelloWorld', data(){ return { flag : true, } } } </script> -
v-if和v-show的区别
1)v-if是真正的条件渲染,因为它会确保在切换过程中,条件块内的事件监听器和子组件适当地被销毁和重建。
2)v-if是惰性的:如果在初始渲染时条件为假,则什么也不做,直到条件第一次变为真时,才会开始渲染条件块。
3)相比之下,v-show 就简单得多,不管初始条件是什么,元素总是会被渲染,并且只是简单地基于 CSS 进行切换。
4)一般来说,v-if 有更高的切换开销,而 v-show 有更高的初始渲染开销。因此,如果需要非常频繁地切换,则使用 v-show 较好;如果在运行时条件很少改变,则使用 v-if 较好
即v-if是条件为真时,才渲染,即可能会进行多次渲染;而v-show是在页面初始化时就渲染,即只渲染一次。
4、列表渲染
-
使用v-for指令进行列表渲染
<template>
  <div class="hello">
    <ul>
      <li v-for="(item,index) in list" :key="item.id">{{ item.name }}</li>
    </ul>
  </div>
</template>

<script>
export default {
  name: 'HelloWorld',
  data(){
    return {
      list:[
        {
          id:1001,
          name:"zzx"
        },
        {
          id:1002,
          name:"zxl"
        },
        {
          id:1003,
          name:"zhs"
        }

      ]
    }
  }
}
</script>
此时v-for后面的item in list即将list遍历,赋值给item,:key即将唯一的item的id属性赋值给key,然后item的name属性展示。
(item,index),index即遍历的下标,如果真的没有唯一key,可以使用Index给:key赋值。 -
维护状态
当 Vue 正在使用 v-for 更新渲染的元素列表时,它默认使用“就地更新”的策略。
如果数据项的顺序被改变(即根据id判断),Vue 将不会移动 DOM 元素来匹配数据项的顺序,而是就地更新每个元素(即列表重新渲染),并且确保它们在每个索引位置正确渲染。
为了给 Vue 一个提示,以便它能跟踪每个节点的身份,从而重用和重新排序现有元素,你需要为每项提供一个唯一的 key attribute:
5、事件处理
使用v-on指令(通常缩写为@符号)来监听DOM事件,并在触发事件时,执行一些JavaScript。
-
通过按钮监听点击事件后,以data传参以及表达式的方式来显示,或者使用事件处理方法,即在事件触发时,调用该方法。
<template>
  <div class="hello">
    <button @click="counter+=1">点击counter={{ counter }}</button>
    <button @click="clickHandle">按钮</button>
  </div>
</template>

<script>
export default {
  name: 'HelloWorld',
  data(){
    return {
      counter:0
    }
  },
  methods:{
    clickHandle(event){
      console.log("点击!");
      console.log(event);
      event.target.innerHTML="被点击过了";
    }
  }
}
</script>
方法可以添加event事件对象参数,对该event对象进行操作。
-
内联处理器中的方法(事件传递参数)
<template>
  <div class="hello">
    <button @click="counter+=1">点击counter={{ counter }}</button>
    <button @click="clickHandle">按钮</button>
    <button @click="say('mother')">say mother</button>
    <button @click="say('fuck')">say fuck</button>
  </div>
</template>

<script>
export default {
  name: 'HelloWorld',
  data(){
    return {
      counter:0
    }
  },
  methods:{
    clickHandle(event){
      console.log("点击!");
      console.log(event);
      event.target.innerHTML="被点击过了";
    },
    say(data){
      console.log(data);
    }
  }
}
</script>
即在点击事件中绑定say方法并设置参数,然后通过say方法传递参数。
-
最后即在给表单遍历添加数据时,绑定一个点击参数clickItemHandle(item),将item或id传入,点击后进行一个处理操作
<template>
  <div class="hello">
    <button @click="counter+=1">点击counter={{ counter }}</button>
    <button @click="clickHandle">按钮</button>
    <button @click="say('mother')">say mother</button>
    <button @click="say('fuck')">say fuck</button>
    <ul>
      <li @click="clickItemHandle(item)" v-for="(item,index) in names" :key="index">{{ item }}</li>
    </ul>
  </div>
</template>

<script>
export default {
  name: 'HelloWorld',
  data(){
    return {
      counter:0,
      names:["zzx","zxl"]
    }
  },
  methods:{
    clickHandle(event){
      console.log("点击!");
      console.log(event);
      event.target.innerHTML="被点击过了";
    },
    say(data){
      console.log(data);
    },
    clickItemHandle(data){
      console.log(data);
    }
  }
}
</script>
6、表单输入绑定
-
表单输入绑定,使用v-model指令来进行双向绑定。
<template>
  <div class="hello">
    <input type="text" v-model="username" />
    <input type="text" v-model="password" />
    <p>{{ username }}:{{ password }}</p>
    <button @click="clickGetUserName">获取用户名</button>
  </div>
</template>

<script>
export default {
  name: 'HelloWorld',
  data(){
    return {
      username:'',
      password:''
    }
  },
  methods:{
    clickGetUserName(){
      console.log(this.username);
    }
  }
}
</script>
双向绑定,即通过将数据源变量与表单输入框进行绑定,使得输入框内改变时,数据源变量也会改变。
-
v-model的修饰符lazy和trim
<template>
  <div class="hello">
    <input type="text" v-model.trim="username" />
    <input type="text" v-model.lazy="password" />
    <p>{{ username }}:{{ password }}</p>
    <button @click="clickGetUserName">获取用户名</button>
  </div>
</template>

<script>
export default {
  name: 'HelloWorld',
  data(){
    return {
      username:'',
      password:''
    }
  },
  methods:{
    clickGetUserName(){
      console.log(this.username);
    }
  }
}
</script>
即在v-model后加.lazy或.trim,使用lazy,会转换成change事件触发之后才同步数据,即当光标不在该输入框内时(即失去焦点),才会同步数据。
而trim则是输入框内前后两端存在空格时,空格不会同步到数据源变量,并且在失去焦点后,输入框内自动去除前后两端的空格。
二、Components组件
1、组件基础
-
在components目录下,创建一个vue组件MyComponent.vue
<template>
    <h3>单文件组件</h3>
</template>

<script>
export default {
  name: 'MyComponent'
}
</script>

<!-- scoped 只在当前组件生效 -->
<style scoped>
h3 {
  color: red;
}

</style>
此时通过export default命令暴露MyComponent组件
-
在App.vue中修改代码如下
<template>
  <img alt="Vue logo" src="./assets/logo.png">
  <MyComponent />
  <my-component />
</template>

<script>
import MyComponent from './components/MyComponent.vue';
export default {
  name: 'App',
  components: {
    MyComponent
  }
}
</script>

<style>
#app {
  font-family: Avenir, Helvetica, Arial, sans-serif;
  -webkit-font-smoothing: antialiased;
  -moz-osx-font-smoothing: grayscale;
  text-align: center;
  color: #2c3e50;
  margin-top: 60px;
}
</style>
即通过import命令引入组件MyComponent.vue;然后在template标签中,通过标签的形式将MyComponent组件进行显示;最后在export default中的components中挂载该组件。
2、组件交互
-
在components中创建一个MyComponent.vue
<template> <h3>prop组件交互</h3> <p>{{ title }}</p> <p>{{ age }}</p> <ul> <li v-for="(name,index) in names" :key="{index}">{{name}}</li> </ul> </template> <script> export default { name : "MyComponent", props:{ title:{ type:String, default:"" },age:{ type:Number, default:0 },names:{ type:Array, //传递数组和对象时,需要使用函数进行返回 default:function(){ return []; } } } } </script> <style scoped> </style>即在props中声明属性名及属性类型type和默认值default;然后在template中通过{{属性名}}的形式进行显示。也可以通过v-for的形式打印数组或对象。
-
在App.vue中修改代码如下
<template>
  <img alt="Vue logo" src="./assets/logo.png">
  <MyComponent :title="title" :age="age" :names="names"/>
</template>

<script>
import MyComponent from './components/MyComponent.vue';
export default {
  name: 'App',
  data(){
    return{
      title:"标题数据",
      age:18,
      names:["lufei","ace","sabo"]
    }
  },
  components: {
    MyComponent
  }

}
</script>

<style>
#app {
  font-family: Avenir, Helvetica, Arial, sans-serif;
  -webkit-font-smoothing: antialiased;
  -moz-osx-font-smoothing: grayscale;
  text-align: center;
  color: #2c3e50;
  margin-top: 60px;
}
</style>
即引入、挂载并显示该MyComponent组件;然后通过data命令初始化指定属性;再通过:属性名="属性值"的形式进行数据的传递。
3、自定义事件的组件交互
-
在components中创建一个MyComponent.vue
<template>
    <h3>自定义事件的组件交互</h3>
    <button @click="sendClickHandle">点击传递</button>
</template>

<script>
export default {
    name : "MyComponent",
    data(){
        return {
            message:"MyComponent组件的数据"
        }
    },
    methods:{
        sendClickHandle(){
            //子组件可以使用 $emit,让父组件监听到自定义事件 。
            //参数1是自定义事件名
            //参数2是传递的数据
            this.$emit("onEvent",this.message);
        }
    }

}
</script>

<style scoped>

</style>
即先创建一个按钮点击事件sendClickHandle,在methods命令中定义该sendClickHandle方法。在方法中使用$emit函数,让父组件监听到自定义事件onEvent,并传入该子组件的数据。
-
在App.vue中修改代码如下
<template>
  <img alt="Vue logo" src="./assets/logo.png">
  <MyComponent @onEvent="getDataHandle"/>
  <p>{{ message }}</p>
</template>

<script>
import MyComponent from './components/MyComponent.vue';
export default {
  name: 'App',
  components: {
    MyComponent
  },
  data(){
    return{
      message:""
    }
  },
  methods:{
    getDataHandle(data){
      this.message = data;
    }
  }
}
</script>

<style>
#app {
  font-family: Avenir, Helvetica, Arial, sans-serif;
  -webkit-font-smoothing: antialiased;
  -moz-osx-font-smoothing: grayscale;
  text-align: center;
  color: #2c3e50;
  margin-top: 60px;
}
</style>
即在父组件中通过
@事件名的形式使用自定义事件onEvent,指定触发该事件时调用的方法getDataHandle。在methods命令中定义该getDataHandle方法,通过参数data接收数据,将参数data赋值给message属性,并且需要通过data初始化message属性。
4、组件生命周期
-
在components中创建一个MyComponent.vue
<template>
    <h3>生命周期</h3>
    {{ message }}
    <button @click="message='更新数据'">更新</button>
</template>

<script>
export default {
    name:"MyComponent",
    data(){
        return {
            message:"111112234"
        }
    },
    beforeCreate(){
        console.log("组件创建前");
    },
    created(){
        console.log("组件创建完成");
    },
    beforeMount(){
        console.log("组件渲染前");
    },
    mounted(){
        console.log("组件渲染完成");
    },
    beforeUpdate(){
        console.log("组件更新前");
    },
    updated(){
        console.log("组件更新完成");
    },
    beforeUnmount(){
        console.log("组件卸载前");
    },
    unmounted(){
        console.log("组件卸载完成");
    }
}
</script>

<style>

</style>
即生命周期一共有8个,分别有8个对应的周期函数用来操作。
-
在App.vue中修改代码如下
<template>
  <img alt="Vue logo" src="./assets/logo.png">
  <MyComponent/>
</template>

<script>
import MyComponent from './components/MyComponent.vue';
export default {
  name: 'App',
  components: {
    MyComponent
  }
}
</script>

<style>
#app {
  font-family: Avenir, Helvetica, Arial, sans-serif;
  -webkit-font-smoothing: antialiased;
  -moz-osx-font-smoothing: grayscale;
  text-align: center;
  color: #2c3e50;
  margin-top: 60px;
}
</style>
即将子组件MyComponent进行引入、挂载、显示。
5、引入第三方组件
-
在项目终端安装第三方组件Swiper:
npm install --save swiper@8.1.6 -
修改HelloWorld.vue的代码如下
<template>
  <div class="hello">
   <swiper class="mySwiper">
    <swiper-slide><img src="../assets/1.png" alt="" /></swiper-slide>
    <swiper-slide><img src="../assets/2.png" alt="" /></swiper-slide>
    <swiper-slide><img src="../assets/3.png" alt="" /></swiper-slide>
   </swiper>
  </div>
 </template>

<script>
import {SwiperSlide,Swiper} from 'swiper/vue'
import 'swiper/css'
export default {
  name: 'HelloWorld',
  components:{
    Swiper,
    SwiperSlide
  }
}
</script>

<style scoped>
img{
  width: 100%;
  height: 720px;
}
</style>
即先从swiper/vue目录中引入SwiperSlide,Swiper以及swiper的css文件,并在components命令中挂载。最后在template标签中显示,用swiper中内嵌多个swiperslide。
-
添加指示器
1)在script标签中引入paginationimport {Pagination} from 'swiper' import 'swiper/css/pagination'2)在export default命令下添加如下
data(){
    return{
      modules: [Pagination]
    }
}
3)在swiper标签中添加如下
<swiper class="mySwiper" :modules="modules" :pagination="{clickable: true}">此时指示器即可生效。
三、网络请求及路由配置
1、Axios网络请求
-
安装Axios:
npm install --save axios -
在vue.config.js配置文件中设置允许跨域:
const { defineConfig } = require('@vue/cli-service')
module.exports = defineConfig({
  transpileDependencies: true
})
module.exports = {
  devServer: {
    open: true,
    host: 'localhost',
    port: 8080,
    https: false,
    //以上的ip和端口是我们本机的;下面为需要跨域的
    proxy: { //配置跨域
      '/api': {
        target: 'https://www.baidu.com', //填写请求的目标地址
        changOrigin: true, //允许跨域
        pathRewrite: {
          '^/api': '' //请求的时候使用这个api即可
        }
      }
    }
  }
}
配置完配置文件需要重新运行项目,否则不生效,即执行npm run serve
-
Axios的get请求
<template>
  <div class="hello">
  </div>
</template>

<script>
import axios from "axios"
export default {
  name: 'HelloWorld',
  mounted(){
    axios.get("/api").then(res=>{
      console.log(res.data);
    })
  }
}
</script>
即先将axios组件引入,然后在钩子函数mounted中(即在网页渲染后)调用axios的get请求。因为配置跨域时将百度的url配置为api,所以在请求路径url那里直接使用/api即可。
-
Axios的post请求
1)post请求需要安装依赖,请求参数需要转换格式:npm install --save querystring
2)引入依赖querystring:import qs from "querystring"
3)配置另一个跨域请求url'/ap2i': { target: 'https://tieba.baidu.com/f/search/res', //填写请求的目标地址 changOrigin: true, //允许跨域 pathRewrite: { '^/ap2i': '' //请求的时候使用这个api就可以 } }4)实现Axios的post请求
axios.post("/ap2i",qs.stringify({
      ie:"utf-8",
      qw:"海贼王"
    })).then(res=>{
      console.log(res.data);
    })
因为前面配置了跨域的别名叫api,另一个前缀不能相同,比如api2的话就会出错。
-
将axios进行全局挂载配置
即在main.js中进行配置import { createApp } from 'vue' import App from './App.vue' import './registerServiceWorker' import axios from "axios" const app = createApp(App) app.config.globalProperties.$axios = axios app.mount('#app')在配置全局后用this.$axios调用axios
2、Axios网络请求封装
-
在src根目录下创建一个utils文件夹,在该文件夹下创建request.js来封装网络请求
import axios from "axios"; import qs from "querystring"; //创建网络请求实例 const instance = axios.create({ timeout:5000 }) //网络请求拦截器拦截网络请求并且对其处理 instance.interceptors.request.use( config =>{ if(config.method === "post"){ config.data = qs.stringify(config.data); } return config; }, error=>Promise.reject(error) ) //网络请求拦截器拦截网络响应并且对其处理 instance.interceptors.response.use( response => response.status === 200?Promise.resolve(response):Promise.reject(response), error=>{ const response = error; errorHandle(response.status,response.info); } ) const errorHandle = (status,info) => { switch(status){ case 400: console.log("语义有误"); break; case 401: console.log("服务器认证失败"); break; case 403: console.log("服务器拒绝访问"); break; case 404: console.log("地址错误"); break; case 500: console.log("服务器遇到意外"); break; case 502: console.log("服务器无响应"); break; default: console.log(info); break; } } export default instance; -
在vue.config.js文件中配置允许跨域
const { defineConfig } = require('@vue/cli-service') module.exports = defineConfig({ transpileDependencies: true }) module.exports = { devServer: { open: true, host: 'localhost', port: 8080, https: false, //以上的ip和端口是我们本机的;下面为需要跨域的 proxy: { //配置跨域 '/api': { target: 'https://www.baidu.com', //填写请求的目标地址 changOrigin: true, //允许跨域 pathRewrite: { '^/api': '' //请求的时候使用这个api就可以 } } } } } -
在src根目录下创建一个api文件夹,在该文件夹下创建path.js来存储网络请求的url
const path = {
    url:"/api",
    suffix:""
}
export default path;
即在path内编写一个项目的根url,以及项目的各种接口url
-
在src根目录下创建一个api文件夹,在该文件夹下创建index.js来存储网络请求的方法
import path from "../api/path" import request from "../utils/request" export default{ getData(){ return request.get(path.url+path.suffix) } } -
最后在HelloWorld.vue中进行调用
<template>
  <div class="hello">

  </div>
</template>

<script>
import api from "../api/index"
export default {
  name: 'HelloWorld',
  props: {
    msg: String
  },
  mounted(){
    api.getData().then(res=>{
      console.log(res.data)
    })
  }
}
</script>
即将index.js引入,然后调用并且操作响应信息即可。
3、Vue引入路由配置
-
安装Vue的路由:
npm install --save vue-router -
在src目录下创建view文件夹,然后在该文件夹下创建HomeView.vue
<template> <h3>Home</h3> </template> -
在src目录下创建view文件夹,然后在该文件夹下创建AboutView.vue
<template> <h3>About</h3> </template> -
在src目录下创建router文件夹,然后在该文件夹下创建index.js
import { createRouter,createWebHashHistory } from "vue-router";
import HomeView from "../view/HomeView"
import AboutView from "../view/AboutView"
const routes=[
    {
        path:"/",
        component:HomeView
    },
    {
        path:"/about",
        component:AboutView
    }
]
const router = createRouter({
    routes,
    history:createWebHashHistory()
    //使用a锚点连接 http://localhost:8080/#/about
	//createWebHistory http://localhost:8080/about 需要后台配合返回指定页面,否则出现404,即访问服务器的形式
})
export default router;
即将vue-router的路由引入,将路由配置和createWebHashHistory作为参数传入到createRouter中。配置信息中指定两个path分别指向HomeView和AboutView中。将router暴露。
-
在main.js中将router进行全局挂载
import { createApp } from 'vue'
import App from './App.vue'
import './registerServiceWorker'
import router from "./router/index"
createApp(App).use(router).mount('#app')
即将/router/index.js引入,最后使用use函数进行全局挂载。
-
修改App.vue代码如下
<template>
  <router-link to="/">首页</router-link> |
  <router-link to="/about">关于</router-link>
  <router-view></router-view>
</template>

<script>

export default {
  name: 'App',
}
</script>

<style>
#app {
  font-family: Avenir, Helvetica, Arial, sans-serif;
  -webkit-font-smoothing: antialiased;
  -moz-osx-font-smoothing: grayscale;
  text-align: center;
  color: #2c3e50;
  margin-top: 60px;
}
</style>
即用标签指定显示的位置,使用a锚点连接的形式进行跳转并在指定位置显示。
4、Vue路由传递参数
-
此时创建vue项目时,需要选择上router路由,即134选项。
-
在view文件夹下,创建NewsView.vue
<template>
    <ul>
        <li><router-link to="/newsdetails/百度">百度新闻</router-link></li>
        <li><router-link to="/newsdetails/网易">网易新闻</router-link></li>
    </ul>
</template>
此时创建新闻的子路由跳转,并且携带参数
-
在App.vue文件中添加新闻页的路由跳转
<router-link to="/news">新闻</router-link> -
在view文件夹下,创建NewsDetailsView.vue
<template>
    <h3>{{ $route.params.name }}新闻详情</h3>
</template>
此时将传递的参数进行调用,然后显示
-
在router文件夹下的index.js中添加如下代码
{
    path: '/news',
    name: 'news',
    component: () => import('../views/NewsView.vue')
  },
  {
    path: '/newsdetails/:name',
    name: 'newsdetails',
    component: () => import('../views/NewsDetailsView.vue')
  }
即添加新闻和新闻详情页的路由配置信息。
5、Vue路由嵌套
-
在view文件夹下创建文件夹aboutsub,创建AboutUsView.vue
<template>
    <h3>关于信息</h3>
</template>
即创建About页面的二级导航
-
创建AboutInfoView.vue
<template>
    <h3>关于信息</h3>
</template>
即创建About页面的二级导航
-
在About.vue中修改如下
<template>
  <div class="about">
    <router-link to="/about/us">关于我们</router-link> |
    <router-link to="/about/info">关于信息</router-link>
    <router-view></router-view>
  </div>
</template>
即创建二级导航跳转,以及显示位置。
-
修改router文件夹下的index.js
import { createRouter, createWebHashHistory } from 'vue-router'
import HomeView from '../views/HomeView.vue'

const routes = [
  {
    path: '/',
    name: 'home',
    component: HomeView
  },
  {
    path: '/about',
    name: 'about',
    component: () => import('../views/AboutView.vue'),
    redirect: '/about/us',
    children:[
      {
        path: 'us',//二级导航不加/
        name: 'us',
        component: () => import('../views/aboutsub/AboutUsView.vue'),
      },
      {
        path: 'info',
        name: 'info',
        component: () => import('../views/aboutsub/AboutInfoView.vue'),
      }

    ]

  }
]

const router = createRouter({
  history: createWebHashHistory(),
  routes
})

export default router
即在children数组中添加About的子路由。
四、Vue3状态管理及新特性
1、Vue状态管理(Vuex)
-
安装vuex:
npm install --save vuex -
在src根目录下创建store文件夹,在该文件夹下创建index.js文件
import {createStore} from 'vuex' //Vuex的核心作用是帮助我们管理组件之间的状态 export default createStore({ //所有状态都放在这里 state:{ counter:0 } }) -
在main.js中进行全局挂载该store(vuex),添加如下代码
import store from './store/index' createApp(App).use(store).mount('#app') -
在App.vue主组件下测试counter是否能读取到
<template>
  <p>counter={{ $store.state.counter }}</p>
  <HelloWorld msg="Welcome to Your Vue.js App"/>
</template>

<script>
import HelloWorld from './components/HelloWorld.vue'

export default {
  name: 'App',
  components: {
    HelloWorld
  }
}
</script>

<style>
#app {
  font-family: Avenir, Helvetica, Arial, sans-serif;
  -webkit-font-smoothing: antialiased;
  -moz-osx-font-smoothing: grayscale;
  text-align: center;
  color: #2c3e50;
  margin-top: 60px;
}
</style>
即使用
{{ $store.state.counter }}的方式进行快速读取。 -
在HelloWord.vue子组件下测试counter是否能读取到
<template>
  <div class="hello">
    <p>counter={{ $store.state.counter }}</p>
  </div>
</template>

<script>
export default {
  name: 'HelloWorld',
  props: {
    msg: String
  }
}
</script>

<!-- Add "scoped" attribute to limit CSS to this component only -->
<style scoped>
h3 {
  margin: 40px 0 0;
}
ul {
  list-style-type: none;
  padding: 0;
}
li {
  display: inline-block;
  margin: 0 10px;
}
a {
  color: #42b983;
}
</style>
即使用
{{ $store.state.counter }}的方式进行快速读取。 -
使用局部挂载的方式进行快速读取
<template> <div class="hello"> <p>counter={{ $store.state.counter }}</p> <p>{{ counter }}</p> </div> </template> <script> import { mapState } from 'vuex'; export default { name: 'HelloWorld', props: { msg: String }, computed:{ ...mapState(["counter"]) } } </script> <!-- Add "scoped" attribute to limit CSS to this component only --> <style scoped> h3 { margin: 40px 0 0; } ul { list-style-type: none; padding: 0; } li { display: inline-block; margin: 0 10px; } a { color: #42b983; } </style>即在局部中进行引入,然后在computed中挂载…mapState([“counter”]),最后使用{{counter}}进行显示。
2、Vue状态管理的核心
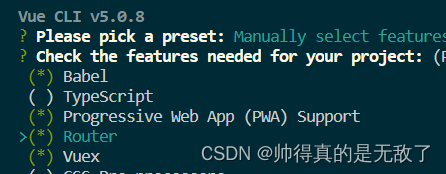
-
创建vue3项目,手动创建时,选择1345
-
修改store文件夹下的index.js
import { createStore } from 'vuex' export default createStore({ state: { counter:10 }, getters: { getCounter(state){ return state.counter>0?state.counter:"counter数据异常" } }, mutations: { }, actions: { }, modules: { } }) -
全局挂载后快速读取,在App.vue或在其他.vue文件中直接读取,即在template标签中添加如下代码
<p>{{ $store.getters.getCounter }}</p> -
局部挂载后,快速读取
1)在HomeView.vue中引入vueimport { mapGetters } from 'vuex';2)然后进行局部挂载
computed:{
	  ...mapGetters(["getCounter"])
}
3)然后在template标签中显示
<p>{{ getCounter }}</p> -
mutations命令,更改 Vuex 的 store 中的状态的唯一方法是提交 mutation。
即只能在该命令中修改状态
1)在store文件夹下的index.js中的mutations中添加一个方法setCounter(state,num){ state.counter+=num; }2)在HomeView.vue文件中的template标签中添加一个增加按钮
<button @click="addClickHandle">增加</button>3)在HomeView.vue文件中的methods命令中,实现上面这个方法
 methods:{
    addClickHandle(){
      this.$store.commit("setCounter",8);
    }
  }
this.$store.commit(“setCounter”,8),即提交调用mutations中的setCounter方法,以及它的参数。
4)在About.vue文件中,再调用它的状态,测试增加后是否一致。<template> <div class="about"> <h1>{{this.$store.getters.getCounter}}</h1> </div> </template> -
mutations用局部挂载的方式实现
1)引入vuex的mapMutationsimport { mapGetters,mapMutations } from 'vuex';2)局部挂载后,进行调用
...mapMutations(["setCounter"]), addClickHandle(){ this.setCounter(8); } -
Actions命令
Action 提交的是 mutation,而不是直接变更状态
Action 可以包含任意异步操作
1)安装axios组件:npm install --save axios
2)在store文件夹下的index.js中,引入axios:import axios from "axios"
3)在actions中添加一个方法asyncSetCounter,提交mutations中对应的方法即可。即在异步的情况下间接提交。actions: { asyncSetCounter({commit}){ axios.get("url").then(res=>{ commit("setCounter",res.data); }) } },在axios.get方法指定url,然后将返回值作为参数,提交该方法。
4)在HomeView.vue中的template标签中添加一个按钮,绑定一个异步方法<button @click="addAsyncClickHandle">异步增加</button>5)然后实现该异步方法
addAsyncClickHandle(){ this.$store.dispatch(asyncSetCounter); } -
Actions使用局部挂载的方法进行调用
1)引入vuex的mapActionsimport { mapGetters,mapMutations,mapActions } from 'vuex';2)局部挂载
...mapActions(["asyncSetCounter"]),3)调用该方法
addAsyncClickHandle(){
      this.asyncSetCounter();
    }
3、Vue3新特性
-
六大亮点
1)Performance:性能比Vue2.0强。
2)Tree shaking support:可以将无用模块“剪辑”,仅打包需要的。
3)Composition API:组合API
4)Fragment,Teleport,Suspense:“碎片”,Teleport即Protal传送门,“悬念”
5)Better TypeScript support:更优秀的Ts支持。
6)Custom Renderer API:暴露了自定义渲染API -
ref或reactive的使用
1)修改HelloWord.vue文件<template> <div class="hello"> <p>{{ message }}</p> <p>{{ msg }}</p> <ul> <li v-for="(item,index) in names.list" :key="index">{{ item }}</li> </ul> <button @click="clickHandle">更新</button> </div> </template> <script> import { ref,reactive } from "vue" export default { name: 'HelloWorld', props:{ msg:String }, setup(props,ctx){ //setup没有this关键字 console.log(ctx) //ref const message = ref("消息") //reactive const names = reactive({ list:["luffy","ace"] }) const msg = props.msg function clickHandle(){ message.value = "新消息" } return { message, names, clickHandle, msg } } } </script> <!-- Add "scoped" attribute to limit CSS to this component only --> <style scoped> h3 { margin: 40px 0 0; } ul { list-style-type: none; padding: 0; } li { display: inline-block; margin: 0 10px; } a { color: #42b983; } </style>vue3有ref,reactive组件可以直接引入,简单的数据对象使用ref,复杂的数据对象使用reactive,例如数组对象。
在按钮上绑定一个方法,并在setup内实现它,更新消息内容,以及从App.vue文件传递过来的数据,需要先在props命令中进行类型的声明,然后再setup中作为参数获取,最后再赋值给msg,以及将context对象作为参数获取。然后将这些变量或数据对象return,最后再进行显示。 -
在setup()中调用生命周期函数
1)先引入生命周期函数import { onMounted } from 'vue';2)在setup中调用生命周期函数onMounted
setup(){ onMounted(()=>{ console.log("mounted1"); }) onMounted(()=>{ console.log("mounted2"); }) } -
provide和inject函数的使用
1)在父组件App.vue中引入import { provide } from 'vue';2)在父组件的setup中通过provide函数给子组件传值
setup(){
    provide("message","yoxi");
  }
3)在子组件HelloWord.vue中引入
import { inject, onMounted } from 'vue';4)在子组件的setup中通过inject接收值,并在setup中将该值返回
const msg = inject("message");
return{
      msg
    }
5)在template标签中进行显示
<p>{{ msg }}</p> -
Fragment,不再限于模板中的单个根节点
即可以在template里面的最外层声明多个标签
4、Vue3加载Element-plus
-
安装Element-plus:
npm install --save element-plus -
安装Element-plus的字体图标插件:
npm install @element-plus/icons-vue -
在main.js中添加如下
import ElementPlus from 'element-plus'
import 'element-plus/dist/index.css'
createApp(App).use(ElementPlus).mount('#app')
即全局挂载Element-plus
-
打开Element-plus网站:
https://element-plus.gitee.io/zh-CN/component/button.html#图标按钮
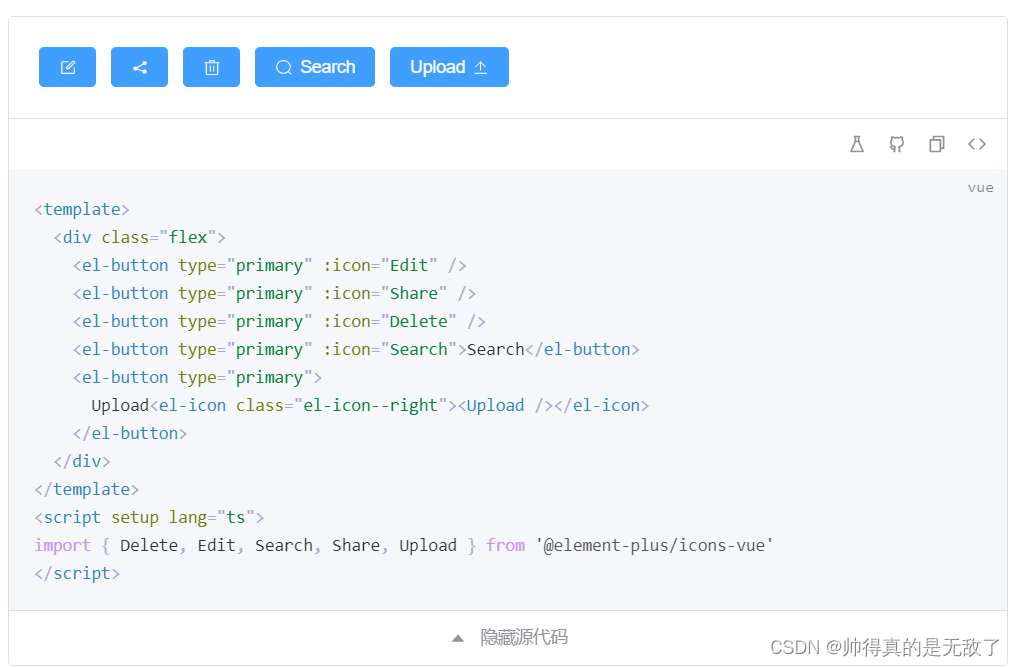
因为使用ts语法,所以需要改成js语法 -
使用Element-plus的组件
<template>
 <div class="flex">
    <el-button type="primary" :icon="Edit" />
    <el-button type="primary" :icon="Share" />
    <el-button type="primary" :icon="Delete" />
    <el-button type="primary" :icon="Search">Search</el-button>
    <el-button type="primary">
      Upload<el-icon class="el-icon--right"><Upload /></el-icon>
    </el-button>
  </div>
</template>

<script>
import { Delete, Edit, Search, Share, Upload } from '@element-plus/icons-vue'
export default {
  name: 'HelloWorld',
  props: {
    msg: String
  },
  setup(){
    return {
      Delete, Edit, Search, Share, Upload
    }
  }
}
</script>

<!-- Add "scoped" attribute to limit CSS to this component only -->
<style scoped>
h3 {
  margin: 40px 0 0;
}
ul {
  list-style-type: none;
  padding: 0;
}
li {
  display: inline-block;
  margin: 0 10px;
}
a {
  color: #42b983;
}
</style>
就是将ts中的语法改成js语法,即引入这些图标后,最后还需要return。
-
使用按需加载
1)安装插件:npm install -D unplugin-vue-components unplugin-auto-import
2)修改vue.config.js配置文件const { defineConfig } = require('@vue/cli-service') const AutoImport = require('unplugin-auto-import/webpack') const Components = require('unplugin-vue-components/webpack') const { ElementPlusResolver } = require('unplugin-vue-components/resolvers') module.exports = defineConfig({ transpileDependencies: true, configureWebpack: { plugins: [ AutoImport({ resolvers: [ElementPlusResolver()] }), Components({ resolvers: [ElementPlusResolver()] }) ] } })3)修改main.js
import { createApp } from 'vue'
import App from './App.vue'
import './registerServiceWorker'
createApp(App).mount('#app')
4)重新运行项目
-
使用Element-plus的字体图标
1)安装Element-plus的字体图标插件:npm install @element-plus/icons-vue
2)在项目根目录src下,创建plugins文件夹,在文件夹下创建icons.js文件import * as components from "@element-plus/icons-vue"; export default { install: (app) => { for (const key in components) { const componentConfig = components[key]; app.component(componentConfig.name, componentConfig); } }, };3)将icons.js引入main.js进行全局挂载
import elementIcon from "./plugins/icons";
createApp(App).use(elementIcon).mount('#app')
4)在.vue文件中使用
<el-icon class="is-loading" :size="100" color="green">
    <Loading />
  </el-icon>
总结
- 1)使用Vue开发前,需要安装Vue CLI,然后使用vue命令创建项目时,根据需求选择对应的配置;选择存放配置的文件时,1是专用配置,2是package.json文件,选择1的话需要输入y/n是否保存当前的配置,如果选择y则需要输入保存的文件名,在下次创建项目时,可直接应用该配置。
启动项目时,cd项目名进入项目,然后使用npm run server运行服务。
vue3的高亮插件为Language Features(volar)。
2)vue的模板语法有{{}}Mustache、v-html、v-bind:属性等。
{{}}Mustache语法,可以绑定文本数据,以及一些js表达式。
v-html指令,绑定原始的html数据,将其输出成html。
v-bind:属性名,即将属性值赋值给属性名。
3)条件渲染,v-if和v-else指令,当指令的表达式为true时才被渲染。
v-show指令,当指令的表达式为true时展示元素。
即v-if是条件为真时,才渲染,即可能会进行多次渲染;而v-show是在页面初始化时就渲染,即只渲染一次。
4)列表渲染,即通过v-for指令对列表进行渲染操作,也就是将集合遍历并渲染,:key就是绑定唯一key,用于给vue做比对,需要根据该唯一key进行判断,如果数据项的顺序被改变,则重新渲染。
5)事件处理,使用v-on指令(通常缩写为@符号)来监听DOM事件,并在触发事件时,执行一些JavaScript。也就是说可以绑定某个方法到该事件中,当该事件触发时可以进行处理。在v-for遍历的列表渲染时,可以为每个元素进行事件绑定。
6)表单输入双向绑定,通过v-model进行双向绑定,使得输入框内改变时,数据源变量也会改变。
v-model的修饰符,即在v-model后加.lazy或.trim,使用lazy,会转换成change事件触发之后才同步数据,即当光标不在该输入框内时(即失去焦点),才会同步数据。
而trim则是输入框内前后两端存在空格时,空格不会同步到数据源变量,并且在失去焦点后,输入框内自动去除前后两端的空格。 - 组件的组织:通常一个应用会以一棵嵌套的组件树的形式来组织。
1)使用组件的流程:组件编写完成后,需要再App.vue中进行import引入;在export default中的components中挂载;在template标签中,通过标签的形式进行显示。
2)组件交互的流程,即引入、挂载并显示该MyComponent组件;然后通过data命令初始化指定属性;再通过:属性名="属性值"的形式进行数据的传递到子组件。子组件通过在props中声明属性名及属性类型type和默认值default;然后在template中通过{{属性名}}的形式进行显示。
但是数组和对象需要使用函数的方式设置默认值,并且通过v-for的形式打印数组或对象。
3)自定义事件的组件交互,即在子组件中通过$emit函数让父组件监听自定义事件,并传入参数。然后父组件可以通过@事件名的形式监听并指定触发事件时调用的方法名。
4)组件的8个生命周期,也叫生命周期钩子函数;项目运行时,会将组件进行创建,然后渲染,一共执行4个生命周期函数,分别是创建前,创建后,渲染前,渲染后。
在触发事件更改数据信息时,会调用组件的更新,分别是更新前,更新后。
最后是组件卸载,在卸载组件时,如果还需要重新加载新的组件,这时候会在新组件渲染完成的前面卸载完旧的组件。也就是在渲染之前和渲染之后的中间卸载完成。
8个生命周期函数可以在组件的各个生命周期进行组件对应的操作。分别是beforeCreate、created、beforeMount、mounted、beforeUpdate、updated、beforeUnmount、unmounted。
5)引入第三方组件,首先通过npm命令安装第三方组件;其次通过import命令引入该组件以及css文件,并且在components命令中挂载,最后进行显示。 - 1)Axios网络请求流程,首先,需要安装第三方组件Axios,然后进行引入,最后使用该Axios的网络请求方法进行网络请求。如果需要跨域,则需要在vue.config.js文件中进行允许跨域的配置。因为一般组件都需要使用到网络请求,所以一般需要对Axios进行全局挂载配置。
2)封装网络请求,即将axios对象的get和post等方法封装到utils目录下的request.js中,将网络请求路径url封装到api目录下的path.js中;最后由index.js将axios对象的方法(request.js)和网络请求路径(path.js)都引入到api目录下的index.js中,调用request.js封装的axios对象的方法,将path.js的路径作为它的参数传入。 - 1)Vue路由,首先需要安装官方路由,然后在router/index.js文件中对路由信息进行配置,并且创建路由,将createWebHashHistory函数和配置信息传入,暴露该路由对象。在main.js中进行引入,然后进行全局挂载。最后在App.vue中指定路由显示位置,以及使用a锚点连接的形式指定路由跳转。
2)Vue路由传递参数,即在路由配置信息的path路径后面加:参数名,而在跳转时的参数,则是path/:加参数值。
3)Vue路由嵌套,即在路由创建它的children路由。 - Vue状态管理Vuex,即该Vuex的状态可以全局使用。
1)它有5个命令state,getters,mutations,actions,modules。
2)其中state用来设置状态;getters用来获取状态;mutations用来更新状态;actions用来异步更新状态,并且actions最后是调用mutations中的方法。
即在store文件夹的index.js中进行处理vue的状态信息,然后在.vue文件中进行调用对应的方法。 - Vue3新特性
1)ref或reactive函数的使用,这两个函数需要写在setup()中。
其中ref用来定义简单数据对象,而reactive用来定义复杂数据对象。
2)在setup中可以声明多个相同的生命周期函数。
3)provide和inject函数只能在setup()中使用,provide只能向下传值,inject只能向上接收值。
4)Fragment可以在template标签里面的最外层声明多个根节点。 - Vue3加载Element-plus
1)需要先安装Element-plus以及它的字体图标,然后再安装按需加载的插件,再修改vue.config.js配置文件信息;最后打开Element-plus的网站,选择需要的组件,然后复制粘贴,最后将script标签部分由ts语法改成js语法即可。
2)如果需要使用Element-plus的字体图标时,才需要下载它的字体图标,然后在icons.js中进行配置,最后在main.js中进行引入,即全局挂载。最后就可以使用Element-plus的字体图标了。
