目录
一、简介
1、使用原因
2、JavaConfig
(1)Configuration注解
(2)Bean注解
(3)ImportResource注解
(4)PropertyResource注解
(5)案例
3、简介
4、特征
5、SpringBoot案例
6、SpringBoot配置文件
二、多环境配置
三、@Value 注解@ConfigurationProperties注解
四、SpringBoot使用jsp
五、SpringBoot使用容器
六、CommandLineRunner接口, ApplicationRunner接口
七、拦截器
八、servlet
九、过滤器
十、SpringBoot字符集过滤器
1、spingmvc自带的
2、根据属性文件
十一、SpringBoot整合Mybatis
1、 @mapper
2、 @MapperScan
十二、SpringBoot事务
1、Spring框架中的事务
2、Springboot中使用事务,
十三、RESTFUL 架构风格
一、简介
1、使用原因
(1、)因为spring,springmvc需要使用的大量的配置文件(xml)
还需要配置各种对象,把使用的对象放入到spring容器中才能使用对象
需要了解其它框架配置规则
(2、)springboot,就相当于不需要配置文件 spring+springmvc.常用的框架和第三方都已经配置好了.直接拿来使用就可以
(3、)Springboot开发效率高,使用方便
2、JavaConfig
JavaConfig: 使用java类作为XML配置文件的替代。
是配置spring容器的纯JAVA的方式
在这个java类这可以创建java对象,把对象放入spring容器中(注入到容器)
(1)Configuration注解
放在一个类的上面,表示这个类是作为配置文件使用的.
(2)Bean注解
声明对象,把对象注入到容器中
(3)ImportResource注解
作用导入其它的xml配置文件
相当于<import resource="文件.xml"/>
(4)PropertyResource注解
作用:读取properties属性配置文件,使用配置文件可以实现外部化配置
在程序代码之外提供数据.
步骤:
<1>resources目录下,创建properties 文件,使用 key =value的格式提供数据
<2>PropertyResource指定 properties文件的位置
<3>使用@Value(value="${key")
(5)案例
package com.iotek.vo;

/**
 * @Author:
 * @CreateTime: 2023-04-03  16:52
 */
public class Car {
    private String name;
    private String color;
    private String brand;

    public Car() {
        super();
    }

    public Car(String name, String color, String brand) {
        this.name = name;
        this.color = color;
        this.brand = brand;
    }

    public String getName() {
        return name;
    }

    public void setName(String name) {
        this.name = name;
    }

    public String getColor() {
        return color;
    }

    public void setColor(String color) {
        this.color = color;
    }

    public String getBrand() {
        return brand;
    }

    public void setBrand(String brand) {
        this.brand = brand;
    }

    @Override
    public String toString() {
        return "Car{" +
                "name='" + name + '\'' +
                ", color='" + color + '\'' +
                ", brand='" + brand + '\'' +
                '}';
    }
}
package com.iotek.vo;

import org.springframework.beans.factory.annotation.Value;
import org.springframework.stereotype.Component;

/**
 * @Author:
 * @CreateTime: 2023-04-03  17:24
 */
@Component("employee")
public class Employee {
    @Value("${employee.name}")
    private String name;
    @Value("${employee.age}")
    private Integer age;

    @Override
    public String toString() {
        return "Employee{" +
                "name='" + name + '\'' +
                ", age=" + age +
                '}';
    }
}
package com.iotek.vo;

/**
 * @Author:
 * @CreateTime: 2023-04-03  16:25
 */
public class Student {
    private String name;
    private Integer age;
    private String address;

    public Student() {
        super();
    }

    public Student(String name, Integer age, String address) {
        this.name = name;
        this.age = age;
        this.address = address;
    }

    public String getName() {
        return name;
    }

    public void setName(String name) {
        this.name = name;
    }

    public Integer getAge() {
        return age;
    }

    public void setAge(Integer age) {
        this.age = age;
    }

    public String getAddress() {
        return address;
    }

    public void setAddress(String address) {
        this.address = address;
    }

    @Override
    public String toString() {
        return "Student{" +
                "name='" + name + '\'' +
                ", age=" + age +
                ", address='" + address + '\'' +
                '}';
    }
}
package com.iotek.config;

import com.iotek.vo.Student;
import org.springframework.context.annotation.*;

/**
 * @Author:
 * @CreateTime: 2023-04-03  16:24
 */
//Configuration 表示当前类是作为配置文件使用的,用来配置容器,位置在类上
//PropertySource  加载配置文件
//@ComponentScan  扫描
@Configuration
@ImportResource(value = "classpath:applicationContext.xml")
@PropertySource(value = "classpath:config.properties")
@ComponentScan(basePackages="com.iotek.vo")
public class SpringConfig {
    /**
     * 创建方法:方法的返回值是对象,在方法的上面加入@Bean
     * 方法的返回值对象就注入到容器中
     *
     * @Bean 把对象注入到Spring容器中  相当于<bean></bean>
     * @Bean 不指定对象的名称,默认是方法名是ID
     **/
    @Bean
    public Student createStudent(){
        Student student = new Student();
        student.setName("蓉儿");
        student.setAge(23);
        student.setAddress("台湾");
        return  student;
    }
    /**
     * 指定对象在容器中的名称<bean>的ID属性
     **/
    @Bean(name = "s2")
    public Student createStudent2(){
        Student student = new Student();
        student.setName("祖儿");
        student.setAge(26);
        student.setAddress("杭州");
        return  student;
    }
}
applicationContext.xml
<?xml version="1.0" encoding="UTF-8"?>
<beans xmlns="http://www.springframework.org/schema/beans"
       xmlns:xsi="http://www.w3.org/2001/XMLSchema-instance"
       xsi:schemaLocation="http://www.springframework.org/schema/beans
        http://www.springframework.org/schema/beans/spring-beans.xsd">
    <bean id="car" class="com.iotek.vo.Car">
        <property name="name" value="奥迪"/>
        <property name="color" value="黑"/>
        <property name="brand" value="大众"/>
    </bean>
</beans>
beans.xml
<?xml version="1.0" encoding="UTF-8"?>
<beans xmlns="http://www.springframework.org/schema/beans"
       xmlns:xsi="http://www.w3.org/2001/XMLSchema-instance"
       xsi:schemaLocation="http://www.springframework.org/schema/beans
        http://www.springframework.org/schema/beans/spring-beans.xsd">
    <bean id="s1" class="com.iotek.vo.Student">
        <property name="name" value="小青"/>
        <property name="age" value="22"/>
        <property name="address" value="上海"/>
    </bean>
</beans>
config.properties
employee.name=小花
employee.age=33
package com.iotek;
import com.iotek.config.SpringConfig;
import com.iotek.vo.Car;
import com.iotek.vo.Employee;
import com.iotek.vo.Student;
import org.junit.Test;
import org.springframework.context.ApplicationContext;
import org.springframework.context.annotation.AnnotationConfigApplicationContext;
import org.springframework.context.support.ClassPathXmlApplicationContext;
/**
* @Author:
* @CreateTime: 2023-04-03 16:30
*/
public class SpringTest {
@Test
public void test1(){
ApplicationContext applicationContext = new ClassPathXmlApplicationContext("beans.xml");
Student student = (Student) applicationContext.getBean("s1");
System.out.println("student容器对象----"+student);//student容器对象----Student{name='小青', age=22, address='上海'}
}
@Test
public void test2(){
ApplicationContext applicationContext = new AnnotationConfigApplicationContext(SpringConfig.class);
Student student = (Student) applicationContext.getBean("createStudent");
System.out.println("JavaConfig容器对象----"+student);//JavaConfig容器对象----Student{name='蓉儿', age=23, address='台湾'}
}
@Test
public void test3(){
ApplicationContext applicationContext = new AnnotationConfigApplicationContext(SpringConfig.class);
Student student = (Student) applicationContext.getBean("s2");
System.out.println("JavaConfig容器对象----"+student);//JavaConfig容器对象----Student{name='祖儿', age=26, address='杭州'}
}
@Test
public void test4(){
ApplicationContext applicationContext = new AnnotationConfigApplicationContext(SpringConfig.class);
Car car = (Car) applicationContext.getBean("car");
System.out.println("JavaConfig容器ImportResource注解对象----"+car);//JavaConfig容器ImportResource注解对象----Car{name='奥迪', color='黑', brand='大众'}
}
@Test
public void test5(){
ApplicationContext applicationContext = new AnnotationConfigApplicationContext(SpringConfig.class);
Employee employee = (Employee) applicationContext.getBean("employee");
System.out.println("JavaConfig容器PropertySource注解对象----"+employee);//JavaConfig容器PropertySource注解对象----Employee{name='小花', age=33}
}
}
3、简介
springboot是spring中的一个成员.可简化 spring,springmvc的使用。它的核心还是lOC容器.
4、特征
-
创建独立的 Spring 应用程序
-
直接嵌入Tomcat,Jetty或Undertow(无需部署WAR文件)
-
提供“starter”依赖项以简化构建配置
比如使用mybatis框架,需要在spring项目中,配置 mybatis的对象sqlsessionFactory, Dao的代理对象,在springboot项目中,在POM.xml里面加入了一个 mybatis spring.boot starter依赖。
-
尽可能自动配置 Spring 和第三方库
-
提供了健康检查,统计,外部化配置.
-
无需生成代码,也无需 XML 配置
5、SpringBoot案例
@SpringBootConfiguration
   注解标注的类,可以作为配置文件使用的,可以使用bean声明对象,并注入容器配置文件
@EnableAutoConfiguration
   启用自动配置,把Java对象配置好,注入到spring容器中
@ComponentScan
   扫描器,找到注解,根据注解的功能创建好,给属性赋值等等.
   默认扫描包:@ComponentScan所在的类所在的包和子包.
package com.iotek.controller;

import org.springframework.stereotype.Controller;
import org.springframework.web.bind.annotation.RequestMapping;
import org.springframework.web.bind.annotation.ResponseBody;

/**
 * @Author:
 * @CreateTime: 2023-04-03  18:17
 */
@Controller
public class HelloSpringboot {
    @RequestMapping(value = "/hello")
    @ResponseBody//响应
    public String helloSpringBoot(){
        return "欢迎使用SpringBoot框架";
    }
}

6、SpringBoot配置文件
配置文件application
扩展名:properties(k=v) yml
使用application.properties application.yml
application.properties
#设置端口号
#server.port=8022
#设置访问应用上下文路径 contextpath
#server.servlet.context-path=/myboot
application.yml
server:
  port: 8044
  servlet:
    context-path: /myboot2
二、多环境配置
有开发环境、测试环境,上线环境
每个环境有不同的配置信息,比如:端口,上下文件,数据库 URL,用户名,密码等等
使用多环境配置文件,可以方便的切换不同的配置
使用方式:创建多个配置文件,名称规则application-环境名称.properties(yml)
创建开发环境的配置文件:applicatio-dev.properties(application-dev.yml)
创建测试环境的配置文件:application-test.properties
application.properties
#激活使用哪个配置文件
spring.profiles.active=test
三、@Value 注解@ConfigurationProperties注解
@ConfigurationProperties把配置文件的数据映射为java对象。
属性: prefix配置文件中的某些key的开头的内容.
package com.iotek.vo;

import org.springframework.boot.context.properties.ConfigurationProperties;
import org.springframework.stereotype.Component;

/**
 * @Author:
 * @CreateTime: 2023-04-03  21:27
 */
@Component
@ConfigurationProperties(prefix = "employee")
public class EmployeeInfo {
    private String name;
    private Integer age;
    private String address;

    public String getName() {
        return name;
    }

    public void setName(String name) {
        this.name = name;
    }

    public Integer getAge() {
        return age;
    }

    public void setAge(Integer age) {
        this.age = age;
    }

    public String getAddress() {
        return address;
    }

    public void setAddress(String address) {
        this.address = address;
    }

    @Override
    public String toString() {
        return "EmployeeInfo{" +
                "name='" + name + '\'' +
                ", age=" + age +
                ", address='" + address + '\'' +
                '}';
    }
}
package com.iotek.controller;

import com.iotek.vo.EmployeeInfo;
import org.springframework.beans.factory.annotation.Value;
import org.springframework.stereotype.Controller;
import org.springframework.web.bind.annotation.RequestMapping;
import org.springframework.web.bind.annotation.ResponseBody;

import javax.annotation.Resource;

/**
 * @Author:
 * @CreateTime: 2023-04-03  21:11
 */
@Controller
public class EmployeeController {
    @Value("${server.port}")
    private Integer port;
    @Value("${server.servlet.context-path}")
    private String contextPath;

    @Value("${employee.name}")
    private String name;
    @Value("${employee.age}")
    private Integer age;
    @Value("${employee.address}")
    private String address;
    @Resource
    private EmployeeInfo info;

    @RequestMapping(value = "/data")
    @ResponseBody
    public String queryData(){
        return "name="+name+" age=" + age +" address=" + address+";访问路径=" + contextPath+" 端口号="+port;
    }
    @RequestMapping(value = "/info")
    @ResponseBody
    public String queryEmployeeInfo(){
        return info.toString();
    }
}
application.properties
server.port=8083
server.servlet.context-path=/mydata
employee.name=蓉儿
employee.age=24
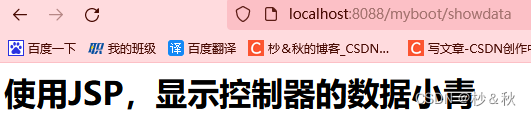
employee.address=台湾四、SpringBoot使用jsp
Springboot不推荐使用jsp,而是使用模板技术代替 jsp
<!-- 编译jsp -->
        <dependency>
            <groupId>org.apache.tomcat.embed</groupId>
            <artifactId>tomcat-embed-jasper</artifactId>
        </dependency>
        <dependency>
            <groupId>javax.servlet</groupId>
            <artifactId>servlet-api</artifactId>
            <version>2.5</version>
        </dependency>
        <dependency>
            <groupId>javax.servlet.jsp</groupId>
            <artifactId>javax.servlet.jsp-api</artifactId>
            <version>2.2.1</version>
        </dependency>
        <dependency>
            <groupId>javax.servlet</groupId>
            <artifactId>jstl</artifactId>
        </dependency>


<!-- 指定jsp编译后存放的路径 -->
        <resources>
            <resource>
                <!-- jsp原来的路径 -->
                <directory>src/main/webapp</directory>
                <!-- 指定编译后的存放路径 -->
                <targetPath>META-INF/resources</targetPath>
                <!-- 指定处理的目录文件 -->
                <includes>
                    <include>**/*.*</include>
                </includes>
            </resource>
        </resources>
server.port=8088
server.servlet.context-path=/myboot
#视图解析器
#前缀 后缀
spring.mvc.view.prefix=/
spring.mvc.view.suffix=.jsp
<%--
  Created by IntelliJ IDEA.
  User: 杪&秋
  Date: 2023/4/4
  Time: 10:39
  To change this template use File | Settings | File Templates.
--%>
<%@ page contentType="text/html;charset=UTF-8" language="java" %>
<html>
<head>
    <title>Title</title>
</head>
<body>
    <h1>使用JSP,显示控制器的数据${data}</h1>
</body>
</html>
package com.iotek.controller;

import org.springframework.stereotype.Controller;
import org.springframework.ui.Model;
import org.springframework.web.bind.annotation.RequestMapping;

import javax.servlet.http.HttpServletRequest;

/**
 * @Author:
 * @CreateTime: 2023-04-04  10:41
 */
@Controller
public class ShowDataController {
    @RequestMapping(value ="showdata")
    public String showData(Model model){
        model.addAttribute("data","小青");
        return "index";//逻辑视图名
    }
}
五、SpringBoot使用容器
想在通过代码,从容器获取对象
SpringApplication.run(Application.class args);返回值获取容器.
public interface ConfigurableApplicationContext extends ApplicationContext, Lifecycle, Closeable {
package com.iotek.service;

/**
 * @Author:
 * @CreateTime: 2023-04-04  11:48
 */
public interface UserService {
    void sayHello(String name);
}
package com.iotek.service.impl;

import com.iotek.service.UserService;
import org.springframework.stereotype.Service;

/**
 * @Author:
 * @CreateTime: 2023-04-04  11:49
 */
@Service(value = "userService")
public class UserServiceImpl implements UserService {
    @Override
    public void sayHello(String name) {
        System.out.println("say hello" + name);//say hello小花
    }
}
package com.iotek;

import com.iotek.service.UserService;
import org.springframework.boot.SpringApplication;
import org.springframework.boot.autoconfigure.SpringBootApplication;
import org.springframework.context.ConfigurableApplicationContext;

@SpringBootApplication
public class Application {

    public static void main(String[] args) {
        //手动获取容器对象
        ConfigurableApplicationContext context = SpringApplication.run(Application.class, args);
        UserService userService = (UserService)context.getBean("userService");
        userService.sayHello("小花");
    }

}
六、CommandLineRunner接口, ApplicationRunner接口
这两个接口都有一个run方法,执行时间在容器对象创建好后,自动执行run()方法
可以完成自定义的在容器对象创建好的一些操作
public interface CommandLineRunner {
    void run(String... args) throws Exception;
}
public interface ApplicationRunner {
void run(ApplicationArguments args) throws Exception;
}案例:
package com.iotek.service;

public interface UserService {
    String sayHello(String name);
}
package com.iotek.service.impl;

import com.iotek.service.UserService;
import org.springframework.stereotype.Service;

/**
 * @Author:
 * @CreateTime: 2023-04-04  12:18
 */
@Service(value = "userService")
public class UserServiceImpl implements UserService {
    @Override
    public String sayHello(String name) {
        return "say hello---"+name;
    }
}
package com.iotek;
import com.iotek.service.UserService;
import org.springframework.beans.factory.annotation.Autowired;
import org.springframework.boot.CommandLineRunner;
import org.springframework.boot.SpringApplication;
import org.springframework.boot.autoconfigure.SpringBootApplication;
import javax.annotation.Resource;
@SpringBootApplication
public class Application implements CommandLineRunner {
@Autowired
private UserService userService;
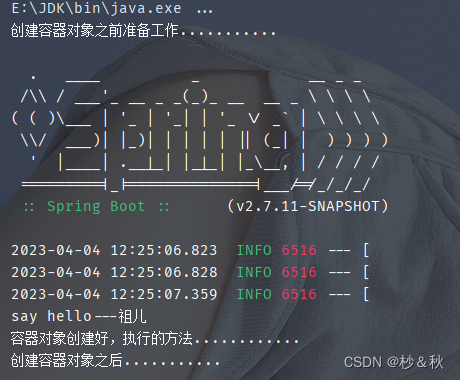
public static void main(String[] args) {
System.out.println("创建容器对象之前准备工作...........");
SpringApplication.run(Application.class, args);
System.out.println("创建容器对象之后...........");
}
@Override
public void run(String... args) throws Exception {
//自定义的操作,读取文件、数据库等等。。。。。。。。。。
String message = userService.sayHello("祖儿");
System.out.println(message);
System.out.println("容器对象创建好,执行的方法............");
}
}
七、拦截器
拦截器是spirngmvc中一种对象,能拦截对controller的请求.
自定义拦截器:
1、创建springmvc框架的handlerlnterceptor接口
//请求方法处理前执行
    @Override
    public boolean preHandle(HttpServletRequest request, HttpServletResponse response, Object handler) throws Exception {

        return true;
    }
    //请求方法处理后执行
    @Override
    public void postHandle(HttpServletRequest request, HttpServletResponse response, Object handler, ModelAndView modelAndView) throws Exception {

    }
    //处理后执行
    @Override
    public void afterCompletion(HttpServletRequest request, HttpServletResponse response, Object handler, Exception ex) throws Exception {
        HandlerInterceptor.super.afterCompletion(request, response, handler, ex);
    }
package com.iotek.web;
import org.springframework.web.servlet.HandlerInterceptor;
import org.springframework.web.servlet.ModelAndView;
import javax.servlet.http.HttpServletRequest;
import javax.servlet.http.HttpServletResponse;
/**
* @Author:
* @CreateTime: 2023-04-04 14:48
*/
public class LoginInterceptor implements HandlerInterceptor {
@Override
public boolean preHandle(HttpServletRequest request, HttpServletResponse response, Object handler) throws Exception {
System.out.println("执行拦截器..........preHandle");
return true;
}
}
package com.iotek.config;

import com.iotek.web.LoginInterceptor;
import org.springframework.context.annotation.Bean;
import org.springframework.context.annotation.Configuration;
import org.springframework.web.servlet.HandlerInterceptor;
import org.springframework.web.servlet.config.annotation.InterceptorRegistry;
import org.springframework.web.servlet.config.annotation.WebMvcConfigurer;

/**
 * @Author:
 * @CreateTime: 2023-04-04  15:01
 */
@Configuration
public class WebMcvConfig implements WebMvcConfigurer {
    //添加拦截器对象,注入到容器中
    @Override
    public void addInterceptors(InterceptorRegistry registry) {
        //创建拦截器对象
        HandlerInterceptor interceptor = new LoginInterceptor();
        //指定拦截的请求URL地址
        String path[]={"/user/**"};
        //指定不拦截的地址
        String excludePath[] = {"/user/login"};
        registry.addInterceptor(interceptor).addPathPatterns(path).excludePathPatterns(excludePath);
    }
}
package com.iotek.controller;

import org.springframework.stereotype.Controller;
import org.springframework.web.bind.annotation.RequestMapping;
import org.springframework.web.bind.annotation.ResponseBody;

/**
 * @Author:
 * @CreateTime: 2023-04-04  15:06
 */
@Controller
public class BootController {
    @RequestMapping(value = "/user/account")
    @ResponseBody
    public String userAccount(){
        return "访问user/account地址";
    }

    @RequestMapping(value = "/user/login")
    @ResponseBody
    public String userLogin(){
        return "访问user/login地址";
    }
}
八、servlet
package com.iotek.web;

import javax.servlet.ServletException;
import javax.servlet.http.HttpServlet;
import javax.servlet.http.HttpServletRequest;
import javax.servlet.http.HttpServletResponse;
import java.io.IOException;
import java.io.PrintWriter;

/**
 * @Author:
 * @CreateTime: 2023-04-04  16:06
 */
public class MyServlet extends HttpServlet {
    @Override
    protected void doGet(HttpServletRequest req, HttpServletResponse resp) throws ServletException, IOException {
        doPost(req,resp);
    }

    @Override
    protected void doPost(HttpServletRequest req, HttpServletResponse resp) throws ServletException, IOException {
        resp.setContentType("text/html;charset=utf-8");
        PrintWriter out = resp.getWriter();
        out.println("执行servlet。。。。。。。。。。。。。");
        out.flush();
        out.close();
    }
}
package com.iotek.config;

import com.iotek.web.MyServlet;
import org.springframework.boot.web.servlet.ServletRegistrationBean;
import org.springframework.context.annotation.Bean;
import org.springframework.context.annotation.Configuration;

/**
 * @Author:
 * @CreateTime: 2023-04-04  16:10
 */
@Configuration
public class WebApplicationConfig {
    @Bean
    public ServletRegistrationBean servletRegistrationBean(){
        /*ServletRegistrationBean bean = new ServletRegistrationBean(new MyServlet(),"/myServlet");*/
        ServletRegistrationBean bean = new ServletRegistrationBean();
        bean.setServlet(new MyServlet());
        bean.addUrlMappings("/login","/test");
        return bean;
    }
}
九、过滤器
package com.iotek.web;

import javax.servlet.*;
import java.io.IOException;

/**
 * @Author:
 * @CreateTime: 2023-04-04  16:27
 */
public class MyFilter implements Filter {
    @Override
    public void doFilter(ServletRequest servletRequest, ServletResponse servletResponse, FilterChain filterChain) throws IOException, ServletException {
        System.out.println("执行了过滤器");
        filterChain.doFilter(servletRequest,servletResponse);
    }
}
package com.iotek.config;

import com.iotek.web.MyFilter;
import org.springframework.boot.web.servlet.FilterRegistrationBean;
import org.springframework.context.annotation.Bean;
import org.springframework.context.annotation.Configuration;
import org.springframework.web.servlet.config.annotation.WebMvcConfigurer;

/**
 * @Author:
 * @CreateTime: 2023-04-04  16:28
 */
@Configuration
public class WebAppConfig{
    @Bean
    public FilterRegistrationBean filterRegistrationBean(){
        FilterRegistrationBean bean = new FilterRegistrationBean();
        bean.setFilter(new MyFilter());
        bean.addUrlPatterns("/user/*");
        return bean;
    }
}
package com.iotek.controller;

import org.springframework.stereotype.Controller;
import org.springframework.web.bind.annotation.RequestMapping;
import org.springframework.web.bind.annotation.ResponseBody;

/**
 * @Author:
 * @CreateTime: 2023-04-04  16:31
 */
@Controller
public class FilterController {
    @RequestMapping(value = "/user/account")
    @ResponseBody
    public String userAccount(){
        return "user/account";
    }

    @RequestMapping(value = "/query")
    @ResponseBody
    public String queryAccount(){
        return "/query";
    }
}
十、SpringBoot字符集过滤器
1、spingmvc自带的
CharacterEncodingFilter:解决post 请求中文乱码的问题
package com.iotek.web;

import javax.servlet.ServletException;
import javax.servlet.http.HttpServlet;
import javax.servlet.http.HttpServletRequest;
import javax.servlet.http.HttpServletResponse;
import java.io.IOException;
import java.io.PrintWriter;

/**
 * @Author:
 * @CreateTime: 2023-04-07  11:45
 */
public class MyServlet extends HttpServlet {
    @Override
    protected void doPost(HttpServletRequest req, HttpServletResponse resp) throws ServletException, IOException {
        resp.setContentType("text/html");
        PrintWriter pw = resp.getWriter();
        pw.println("人生如梦");
        pw.flush();
        pw.close();
    }

    @Override
    protected void doGet(HttpServletRequest req, HttpServletResponse resp) throws ServletException, IOException {
        doPost(req, resp);
    }
}
package com.iotek.config;

import com.iotek.web.MyServlet;
import org.springframework.boot.web.servlet.FilterRegistrationBean;
import org.springframework.boot.web.servlet.ServletRegistrationBean;
import org.springframework.context.annotation.Bean;
import org.springframework.context.annotation.Configuration;
import org.springframework.web.filter.CharacterEncodingFilter;

import java.nio.charset.CharacterCodingException;

/**
 * @Author:
 * @CreateTime: 2023-04-11  19:30
 */
@Configuration
public class WebConfig {
    @Bean
    public ServletRegistrationBean servletRegistrationBean(){
        MyServlet myServlet = new MyServlet();
        ServletRegistrationBean bean = new ServletRegistrationBean(myServlet,"/myServlet");
        return bean;
    }
    //注册过滤器
    @Bean
    public FilterRegistrationBean filterRegistrationBean(){
        FilterRegistrationBean bean = new FilterRegistrationBean();
        //使用springMVC框架的自带的过滤器
        CharacterEncodingFilter filter = new CharacterEncodingFilter();
        filter.setEncoding("utf-8");//指定编码
        filter.setForceEncoding(true);//指定request,response请求都使用Encoding的值

        bean.setFilter(filter);
        bean.addUrlPatterns("/*");
        return bean;
    }
}
server.servlet.encoding.enabled=false
2、根据属性文件
package com.iotek.web;

import javax.servlet.ServletException;
import javax.servlet.http.HttpServlet;
import javax.servlet.http.HttpServletRequest;
import javax.servlet.http.HttpServletResponse;
import java.io.IOException;
import java.io.PrintWriter;

/**
 * @Author:
 * @CreateTime: 2023-04-11  20:25
 */
public class MyServlet extends HttpServlet {
    @Override
    protected void doPost(HttpServletRequest req, HttpServletResponse resp) throws ServletException, IOException {
        resp.setContentType("text/html");
        PrintWriter pw = resp.getWriter();
        pw.println("人生如梦");
        pw.flush();
        pw.close();
    }

    @Override
    protected void doGet(HttpServletRequest req, HttpServletResponse resp) throws ServletException, IOException {
        doPost(req, resp);
    }
}
package com.iotek.config;

import com.iotek.web.MyServlet;
import org.springframework.boot.web.servlet.ServletRegistrationBean;
import org.springframework.context.annotation.Bean;
import org.springframework.context.annotation.Configuration;

/**
 * @Author:
 * @CreateTime: 2023-04-11  20:26
 */
@Configuration
public class WebConfig {
    @Bean
    public ServletRegistrationBean servletRegistrationBean(){
        MyServlet myServlet = new MyServlet();
        ServletRegistrationBean bean = new ServletRegistrationBean(myServlet,"/myServlet");
        return bean;
    }
}
server.port=8082
server.servlet.context-path=/myboot

#开启默认的过滤器
server.servlet.encoding.enabled=true
server.servlet.encoding.charset=utf-8

#强制request、response使用charset
server.servlet.encoding.force=true
十一、SpringBoot整合Mybatis
1、 @mapper
mapper:放在dao,接口上面,每个接口都需要使用这个注解。
package com.iotek.pojo;

/**
 * @Author:
 * @CreateTime: 2023-04-11  20:51
 */
public class User {
    private Integer id;
    private String name;
    private Integer age;
    private String email;

    public User() {
        super();
    }

    public User(Integer id, String name, Integer age, String email) {
        this.id = id;
        this.name = name;
        this.age = age;
        this.email = email;
    }

    public Integer getId() {
        return id;
    }

    public void setId(Integer id) {
        this.id = id;
    }

    public String getName() {
        return name;
    }

    public void setName(String name) {
        this.name = name;
    }

    public Integer getAge() {
        return age;
    }

    public void setAge(Integer age) {
        this.age = age;
    }

    public String getEmail() {
        return email;
    }

    public void setEmail(String email) {
        this.email = email;
    }

    @Override
    public String toString() {
        return "User{" +
                "id=" + id +
                ", name='" + name + '\'' +
                ", age=" + age +
                ", email='" + email + '\'' +
                '}';
    }
}
package com.iotek.dao;

import com.iotek.pojo.User;
import org.apache.ibatis.annotations.Mapper;
import org.apache.ibatis.annotations.Param;
import org.springframework.stereotype.Repository;

@Mapper//mybatis是dao接口,创建此接口前代理对象
@Repository
public interface UserDao {
    User selectUserById(@Param("userId") Integer id);
}
<?xml version="1.0" encoding="UTF-8" ?>
<!DOCTYPE mapper PUBLIC "-//mybatis.org//DTD Mapper 3.0//EN"
        "http://mybatis.org/dtd/mybatis-3-mapper.dtd">
<mapper namespace="com.iotek.dao.UserDao">
    <select id="selectUserById" resultType="com.iotek.pojo.User">
        select * from user where id=#{userId}
    </select>
</mapper>
package com.iotek.server;
import com.iotek.pojo.User;
/**
* @Author:
* @CreateTime: 2023-04-11 21:00
*/
public interface UserServer {
User queryUser(Integer id);
}
package com.iotek.server.impl;

import com.iotek.dao.UserDao;
import com.iotek.pojo.User;
import com.iotek.server.UserServer;
import org.springframework.beans.factory.annotation.Autowired;
import org.springframework.stereotype.Service;

/**
 * @Author:
 * @CreateTime: 2023-04-11  21:01
 */
@Service(value = "userServer")
public class UserServerImpl implements UserServer {
    @Autowired
    private UserDao userDao;
    @Override
    public User queryUser(Integer id) {
        return userDao.selectUserById(id);
    }
}
package com.iotek.controller;

import com.iotek.pojo.User;
import com.iotek.server.UserServer;
import org.springframework.beans.factory.annotation.Autowired;
import org.springframework.stereotype.Controller;
import org.springframework.web.bind.annotation.RequestMapping;
import org.springframework.web.bind.annotation.ResponseBody;

/**
 * @Author:
 * @CreateTime: 2023-04-11  21:03
 */
@Controller
public class UserController {
    @Autowired
    private UserServer userServer;

    @RequestMapping(value = "/user/query")
    @ResponseBody
    public String queryUser(Integer id){
        User user = userServer.queryUser(id);
        return user.toString();
    }
}
server.port=8088
server.servlet.context-path=/myboot

#连接数据库相关信息
spring.datasource.driver-class-name=com.mysql.cj.jdbc.Driver
spring.datasource.url=jdbc:mysql://localhost:3306/mybatis_plus?characterEncoding=utf-8
spring.datasource.username=root
spring.datasource.password=123456
<!-- resources插件 -->
        <resources>
            <resource>
                <directory>src/main/java</directory>
                <includes>
                    <include>**/*.xml</include>
                </includes>
            </resource>
        </resources>
2、 @MapperScan
找到dao接口和 mapper文件
basePackages: dao接口所在的包名.
十二、SpringBoot事务
1、Spring框架中的事务
1)管理事务的对象,事务管理器(接口,接口有很多的实现类)
JDBC和 mybatis,访问数据库,使用事务管理器DataSourceTranscationManager
2)声明式事务:在 xml配置文件或者使用注解说明事务控制的内容.
控制事务,隔离级别,传播行为,超时时间
3)事务处理方式
<1>Spring框架中的@Transactional
<2>Aspectl框架可以在XML 配置文件中,声明事务控制的内容
2、Springboot中使用事务,
(1、)在业务方法的上面加@Transactional ,加入注解后,方法有事务功能了
(2、)明确在主启动类上面加入@EnableTransationManager
<resources>
            <resource>
                <directory>src/main/resources</directory>
                <includes>
                    <include>**/*.*</include>
                </includes>
            </resource>
        </resources>
server.port=8088
server.servlet.context-path=/myboot
spring.datasource.driver-class-name=com.mysql.cj.jdbc.Driver
spring.datasource.url=jdbc:mysql://localhost:3306/mybatis_plus?characterEncoding=utf8&useSSL=false&serverTimezone=UTC&rewriteBatchedStatements=true
spring.datasource.username=root
spring.datasource.password=123456
mybatis.mapper-locations=classpath:mapper/*.xml
mybatis.configuration.log-impl=org.apache.ibatis.logging.stdout.StdOutImpl
package com.iotek.service.impl;

import com.iotek.dao.UserDao;
import com.iotek.pojo.User;
import com.iotek.service.UserService;
import org.springframework.beans.factory.annotation.Autowired;
import org.springframework.stereotype.Service;
import org.springframework.transaction.annotation.Transactional;

/**
 * @Author:
 * @CreateTime: 2023-04-12  10:52
 */
@Service
public class UserServiceImpl implements UserService {
    @Autowired
    private UserDao userDao;
    @Transactional//事务表示方法有事务支持,默认使用库的隔离级别REQUIREO 传播行为超时时间 -1  抛出运行时异常,事务回退
    @Override
    public int insertUser(User user) {
        System.out.println("添加用户");
        int row = userDao.insertUser(user);
        System.out.println("影响了"+row);
        int rs = 100 / 0;
        return row;
    }
}
package com.iotek.controller;

import com.iotek.pojo.User;
import com.iotek.service.UserService;
import org.springframework.beans.factory.annotation.Autowired;
import org.springframework.stereotype.Controller;
import org.springframework.web.bind.annotation.RequestMapping;
import org.springframework.web.bind.annotation.ResponseBody;

/**
 * @Author:
 * @CreateTime: 2023-04-12  10:56
 */
@Controller
public class UserController {
    @Autowired
    private UserService userService;

    @RequestMapping("addUser")
    @ResponseBody
    public String UserService(String name,Integer age,String email){
        User user = new User();
        user.setName(name);
        user.setAge(age);
        user.setEmail(email);
        int row = userService.insertUser(user);
        return "添加用户"+row;
    }
}
package com.iotek;

import org.mybatis.spring.annotation.MapperScan;
import org.springframework.boot.SpringApplication;
import org.springframework.boot.autoconfigure.SpringBootApplication;
import org.springframework.transaction.annotation.EnableTransactionManagement;

@SpringBootApplication
@EnableTransactionManagement
@MapperScan(basePackages = {"com.iotek.dao"})
public class Application {

    public static void main(String[] args) {
        SpringApplication.run(Application.class, args);
    }

}
十三、RESTFUL 架构风格
Rest(Representational state transfer)表现层状态转移Rest是一种接口的架构风格和设计理念,不
是标准.优点:更简洁,更有层次
表现层就是视图层,显示资源的,通过视图页面,jsp等等为示操作资源的结果.状态:资源变化.
转移:资源可以变化的,资源能创建,查询资源,修改资源,删除资源
在url中,使用名词表示资源,以及访问资源的信息,在URL中,使用/分隔对资源的信息
比如:http://localhost:8088/myboot/user/1001
在使用http中的动作请求方式;表示对资源的操作 CRUD
GET查询资源 /post创建资源 /put更新资源 /DELETE删除资源
Rest :使用URL表示资源,使用HITP动作操作资源
注解:
@PathVariable从URL中获取资源
@GetMapping:支持get 请求-->@RequestMapping(method=RequestMethod.Get)
@PostMapping:支持post请求-->@RequestMapping(method=RequestMethod.Post)
@PutMapping:支持put请求-->@RequestMapping(method=RequestMethod.PUT)
@DeleteMapping:支持delete请求--> @RequestMapping(method=RequestMethod.Delete)
@RestController复合注解(@controller 和@ResponseBody)
在 springmvc中有一个过滤器 HiddenHttpMethodFilter
作用把请求post请求转换成put,delete
Springboot application.properties开启使用HiddenHttpMethodFilter过滤器
package com.iotek.controller;

import org.springframework.web.bind.annotation.*;

/**
 * @Author:
 * @CreateTime: 2023-04-12  20:59
 */
@RestController
public class MyRestController {
    /**
     * @description: @PathVariablec从URL中获取资源
     * value路径变量名
     * userId   定义路径变量名
     * http://localhost:8080/user/1001
     **/
    @GetMapping("/user/{userId}")
    public String queryUser(@PathVariable(value = "userId") Integer uid){
        return "查询用户"+uid;//查询用户1001
    }

    @PostMapping("/user/{name}/{age}")
    public String insertUser(@PathVariable(value = "name") String uname,@PathVariable(value = "age") Integer uage){
        return "创建资源---"+"uname=="+uname+"uage=="+uage;
    }

    @PutMapping("/put/{id}/{name}")
    public String modifyUser(@PathVariable(value = "id") String uid,@PathVariable(value = "name") String uname){
        return "更新资源---"+"uid=="+uid+"uname=="+uname;
    }

    @DeleteMapping("/delete/{id}")
    public String deleteUser(@PathVariable(value = "id") Integer uid){
        return "删除资源---"+"uid=="+uid;
    }
}
<!DOCTYPE html>
<html lang="en">
<head>
    <meta charset="UTF-8">
    <title>Title</title>
</head>
<body>
<form action="user/aaaa/12345" method="post">
    <input type="submit" value="添加用户">
</form>
<form action="put/999/aaa" method="post">
    <input type="hidden" name="_method" value="put">
    <input type="submit" value="修改用户">
</form>
<form action="delete/999" method="post">
    <input type="hidden" name="_method" value="delete">
    <input type="submit" value="删除用户">
</form>
</body>
</html>
#启用支持put、delete
spring.mvc.hiddenmethod.filter.enabled=true