json-server
- json-server使用教程
- 修改json-server端口号启动
- 1、全局安装json-server
- 2、在根目录生成一个db.json
- 3、启动 访问
- react中进行使用
- react中修改json-server启动端口号
- 1、 第一步也是安装,和第一种一样
- 2、在根路径下定义一个__json_server_mock__文件夹
- 3、在react中进行编辑
- 4、启动 运行
- 增删改查
- 1.接口规则-RESTful
- 2.以axios作为增删改查请求
- **实例代码**
- **如有问题请联系小编,及时进行更改**
json-server使用教程
修改json-server端口号启动
json-server --watch db.json --port 3004
1、全局安装json-server
安装:npm i json-server -g
2、在根目录生成一个db.json
在json文件中定义以下类型
{
    "list": [
        {
            "id": 1,
            "name": "吃饭",
            "flag": false
        },
        {
            "id": 2,
            "name": "睡觉",
            "flag": true
        },
        {
            "id": 3,
            "name": "打豆豆",
            "flag": true
        }
    ],
    "login":{
        "username":"admin",
        "password":"123456"
    }
}
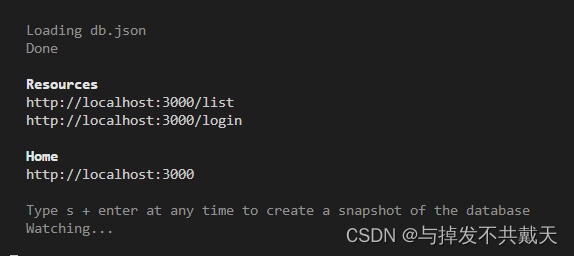
3、启动 访问
启动json-server: json-server --watch db.json
访问抛出的接口就能够在浏览器中获取
react中进行使用
react中修改json-server启动端口号
yarn run json-server --port 3004
1、 第一步也是安装,和第一种一样
2、在根路径下定义一个__json_server_mock__文件夹
在该文件夹下定义db.json文件

3、在react中进行编辑
在package.json中的script 添加"json-server":
"json-server __json_server_mock__/db.json --watch"
4、启动 运行
npm run json-server \ yarn run json-server
增删改查
1.接口规则-RESTful
目标:了解一种接口定义规范resetful
接口规范:如何定义接口地址,请求方式,传参方式,对应不同的请求操作行为。
具体规则:
| 接口地址 | 请求方式 | 操作行为 |
|---|---|---|
| /list | GET | 查询所有列表 |
| /list/:id | GET | 查询单个详情 /list/1 |
| /list | POST | 添加,提交的参数在请求体 |
| /list/:id | DELETE | 删除 /list/1 |
| /list/:id | PUT | 修改 /list/1 + 请求体{name,cTime} 全部修改 |
| /brands/:id | PATCH | 修改 /brands/1 + 请求体{name} 个别修改 |
查询的时候还有一下规则:
- 1、http://localhost:3000/db 访问的是db.json文件下的所有内容;
- 2、http://localhost:3000/layoutList?categoryName= 模拟接口参数可筛选该目录下内容
- 3、分页查询 参数为 _start, _end, _limit,并可添加其它参数筛选条件
如:http://localhost:3000/posts?_start=6&_limit=3
http://localhost:3000/posts?_start=3&_end=6 - 4、排序 参数为_sort, _order
如:http://localhost:3000/posts?_sort=id&_order=asc
http://localhost:3000/posts?_sort=user,views&_order=desc,asc - 5、操作符 _gte, _lte, _ne, _like
_gte大于,_lte小于, _ne非, _like模糊查询 - 6、q全局搜索(模糊查询)
这个表格可以作为接口调用的参考。
2.以axios作为增删改查请求
axios的使用:
-
查询所有
-
查询单个
-
添加操作
-
删除操作
-
修改操作
实例代码
<!DOCTYPE html>
<html lang="en">

<head>
  <meta charset="UTF-8">
  <meta name="viewport" content="width=device-width, initial-scale=1.0">
  <title>Document</title>
</head>

<body>

  <script src="./axios.min.js"></script>
  <script>
      // - 查询所有
     axios.get('http://localhost:3000/list').then(res=>{
         // res 响应报文对象(响应状态行+响应头+响应主体)
        // res.data 就是响应主体(返回的数据)
         console.log(res.data)
       }).catch(err=>{
        // 错误对象
         console.log(err)
       })


      // - 查询单个
     axios.get('http://localhost:3000/list/2').then(res=>{
         console.log(res.data)
      }).catch(err=>{
         console.log(err)
       })


      // - 添加操作
      // 第二个参数:请求体传参对象
      axios.post('http://localhost:3000/list',{
        name: '奥拓',
         flag: '干饭人'
       }).then(res=>{
         console.log('添加成功')
       })


      // - 删除操作
      axios.delete('http://localhost:3000/list/4').then(res=>{
        console.log('删除成功')
      })


      // - 修改操作
      // 第二个参数:请求体传参对象
      axios.patch('http://localhost:3000/list/3',{
         name: '奥拓'
       }).then(res=>{
        console.log('修改成功')
       })

       axios.put('http://localhost:3000/list/3',{
        name: '奥迪'
       }).then(res=>{
         console.log('修改成功')
      })

      // - 带查询参数
      // 1. 自己手动在地址栏拼接?后的键值对  ?id=2&name=宝马
      // 2. 可以传对象提交多个筛选条件
      // 3. get()中第二个参数可以用来提交参数对象  {params:{更多筛选条件}}


      // json-server提供模糊查询  字段_like
      axios.get('http://localhost:3000/list',{
        params:{
          name_like: '奥'
        }
      }).then(res=>{
        console.log(res.data)
      }).catch(err=>{
        console.log(err)
      })

  </script>
</body>

</html>


![[hive]执行计划](https://img-blog.csdnimg.cn/img_convert/99dbc306e66f465483139b6e3348a042.png)


