文章目录
- 前言
- 1、存储 Bean 对象
- 1.1 前置工作
- 1.2 添加注解存储 Bean 对象
- @Controller(控制器存储)
- @Service (服务存储)
- @Repository(仓库存储)
- @Configuration(配置存储)
- @Component(组件存储)
- 为什么需要五大类注解以及它们的关系
- 方法注解 @Bean
- 2、获取 Bean 对象(对象装配)
- 2.1 属性注入
- 2.2 构造方法注入
- 2.3 Setter 注入
- 2.4 三种注入方式的区别
- 2.5 @Autowired 和 @Resource
前言
在 Spring 中想要更简单的存储和读取对象的核心是使用注解
1、存储 Bean 对象
之前我们存储 Bean 时,需要在 spring-config 中添加一行 bean 注册内容才行,并且每个 bean 都要进行注册,例如:

而现在我们只需要⼀个注解就可以替代之前要写一行配置
1.1 前置工作
注意:想要将对象成功的存储到 Spring 中,我们需要配置⼀下存储对象的扫描根路径,只有被配置的包下的所有类,添加了注解才能被正确的识别并保存到 Spring 中
在 spring-config.xml 添加如下配置:
<?xml version="1.0" encoding="UTF-8"?>
<beans xmlns="http://www.springframework.org/schema/beans"
       xmlns:xsi="http://www.w3.org/2001/XMLSchema-instance"
       xmlns:content="http://www.springframework.org/schema/context"
       xsi:schemaLocation="http://www.springframework.org/schema/beans http://www.springframework.org/schema/beans/spring-beans.xsd http://www.springframework.org/schema/context https://www.springframework.org/schema/context/spring-context.xsd">
    <content:component-scan base-package="com.beans"></content:component-scan>
</beans>

Spring会以 com.beans 为根路径,进行递归式的扫描,如果类上添加了注解,就会被存储到Spring中。但是如果类添加了注解,却不在配置的扫描路径下,是不会被存储到Spring中的
1.2 添加注解存储 Bean 对象
想要将对象存储在 Spring 中,有两种注解类型可以实现:
- 五大类注解:@Controller、@Service、@Repository、@Component、@Configuration
- 方法注解:@Bean
@Controller(控制器存储)
使用 @Controller 存储 bean 的代码如下所示:
@Controller
public class UserController {
    public void sayHi() {
        System.out.println("hello Controller");
    }
}
读取 UserController 对象:
public class App {
    public static void main(String[] args) {
        //1.先得到上下文对象
        ApplicationContext context = new ClassPathXmlApplicationContext("spring-config.xml");
        //2.得到 bean
        UserController userController = context.getBean("userController", UserController.class);
        //调用 bean 方法
        userController.sayHi();
    }
}
在 spring-config 中,我们并没有注册 UserController,因此也就没有 UserController 对应的 name(id),此时,我们在得到 UserController 时,如何知道 UserController 的 name(id)呢?
这里的 name 其实就是 UserController 的小驼峰命名,也就是 userController
如果是 APIController,此时的 name 就是 APIController,和原来的类名保持一致,至于为什么是这样的,可以看一下源码

@Service (服务存储)
使用 @Service 存储 bean 的代码如下所示:
@Service
public class UserService {
    public void sayHi() {
        System.out.println("hello Service");
    }
}
读取 UserService 对象:
public class App {
    public static void main(String[] args) {
        //1.先得到上下文对象
        ApplicationContext context = new ClassPathXmlApplicationContext("spring-config.xml");
        //2.得到 bean
        UserService userService = context.getBean("userService", UserService.class);
        //调用 bean 方法
        userService .sayHi();
    }
}
@Repository(仓库存储)
使用 @Repository 存储 bean 的代码如下所示:
@Repository
public class UserRepository {
    public void sayHi() {
        System.out.println("你好 Repository");
    }
}
读取 UserRepository 对象:
public class App {
    public static void main(String[] args) {
        //1.先得到上下文对象
        ApplicationContext context = new ClassPathXmlApplicationContext("spring-config.xml");
        //2.得到 bean
        UserRepository userRepository = context.getBean("userRepository", UserRepository.class);
        //调用 bean 方法
        userRepository.sayHi();
    }
}
@Configuration(配置存储)
使用 @Configuration 存储 bean 的代码如下所示:
@Configuration
public class UserConfig {
    public void sayHi() {
        System.out.println("你好 Configuration");
    }
}
读取 Configuration 对象:
public class App {
    public static void main(String[] args) {
        //1.先得到上下文对象
        ApplicationContext context = new ClassPathXmlApplicationContext("spring-config.xml");
        //2.得到 bean
        UserConfiguration userConfiguration = context.getBean("userConfiguration", UserConfiguration.class);
        //调用 bean 方法
        userConfiguration.sayHi();
    }
}
@Component(组件存储)
使用 @Component 存储 bean 的代码如下所示:
@Component
public class UserComponent {
    public void sayHi() {
        System.out.println("你好 Component");
    }
}
读取 UserComponent 对象:
public class App {
    public static void main(String[] args) {
        //1.先得到上下文对象
        ApplicationContext context = new ClassPathXmlApplicationContext("spring-config.xml");
        //2.得到 bean
        UserComponent userComponent = context.getBean("userComponent", UserComponent.class);
        //调用 bean 方法
        userComponent.sayHi();
    }
}
上述获取 bean 时,除了根据 bean name(id) 和类型获取 bean,还可以根据 bean type 获取 bean,也可以根据 bean name(id) 来获取 bean
为什么需要五大类注解以及它们的关系
通过对这五大类注解的使用,我们发现它们的功能似乎是⼀样的,既然功能是一样的,那为什么需要这么多的类注解呢?
先举个例子:
每个省/市都有自己的车牌号。例如重庆的车牌号就是:渝X:XXXXXX,四川的车牌号是:川X:XXXXXX。甚至⼀个省不同的县区也是不同的,例如重庆,渝A:XXXXXX,表示重庆市区——江南,渝B:XXXXXX,表示重庆市区——江北,渝F:XXXXXX,表示重庆市万州区。
这样做的好处除了可以节约号码之外,更重要的作用是可以直观的标识⼀辆车的归属地
那么为什么需要怎么多的类注解也是相同的原因,让代码的可读性提高,让程序员能够直观的判断当前类的用途。比如:
- @Controller:表示的是业务逻辑层
- @Servie:服务层
- @Repository:持久层
- @Configuration:配置层
程序的工程分层,调用流程如下:

在实际的工程中,分层只会比这四层多,不可能会少
如何知道五大类注解是否有关系,只需要查看它们的源码即可
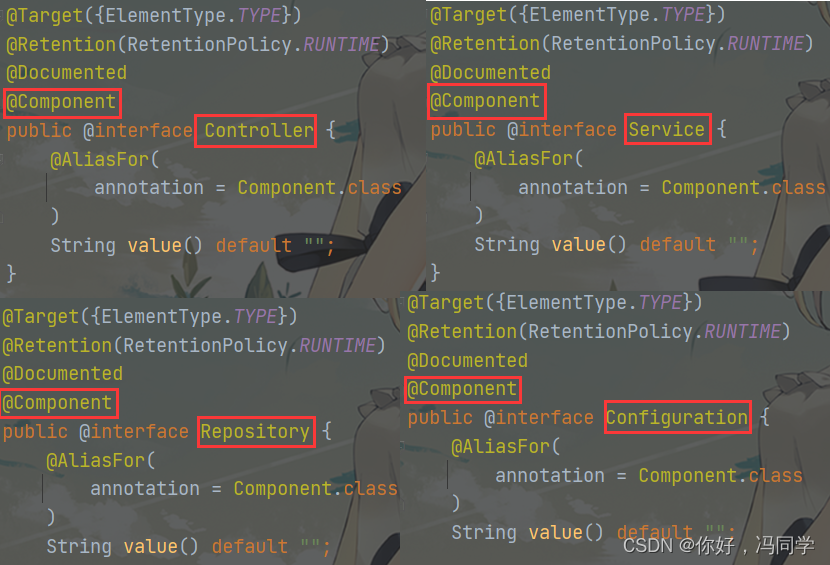
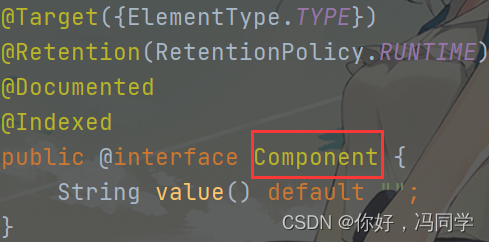
通过源码,我们发现 @Controller,@Service,@Repository,@Configuration 都是基于 @Component 实现的,所以可以认为 @Component 是其它四个注解的父类
方法注解 @Bean
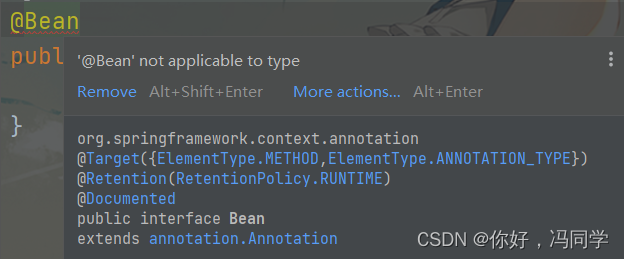
@Bean 只能添加到方法上,如果添加到类上,则会显示的报错
先定义一个User类
public class User {
    private int id;
    private String name;

    public int getId() {
        return id;
    }

    public void setId(int id) {
        this.id = id;
    }

    public String getName() {
        return name;
    }

    public void setName(String name) {
        this.name = name;
    }

    @Override
    public String toString() {
        return "User{" + "id=" + id + ", name=" + name + "}";

    }
}
使用 Bean 注解
@Component
public class UserBeans {
    @Bean
    public User user1() {
        User user = new User();
        user.setId(721);
        user.setName("fl");
        return user;
    }
}
注意:只使用一个 @Bean 是无法将对象存储到容器当中的,必须要还要配合五代类注解才行
获取并使用
public class App {
    public static void main(String[] args) {
        ApplicationContext context = new
        	ClassPathXmlApplicationContext("spring-config.xml");
		User user = context.getBean("user1", User.class);
		System.out.println(user);
	}
}

这里是通过 name 来获取 bean 对象的,也可以使用类型来获取,但需要保证这个类型的对象只被注入一次,否则将会报错

重命名 Bean
可以通过设置 name 属性给 Bean 对象进⾏重命名操作
@Component
public class UserBeans {
    @Bean(name = "u1")
    public User user1() {
        User user = new User();
        user.setId(721);
        user.setName("fl");
        return user;
    }
}
name 属性可以设置多个名字,但需要使用{}括起来,例如:
@Bean(name = {"u1", "u2", "u3"})
此时我们使用 u1 就可以获取到 User 对象了
public class App {
    public static void main(String[] args) {
        //1.先得到上下文对象
        ApplicationContext context = new ClassPathXmlApplicationContext("spring-config.xml");
        //2.得到 bean
		User user = (User) context.getBean("u1");
		//3.掉用 bean 方法
		System.out.println(user);
@Bean 命名规则:
当没有设置name属性时,那么bean默认的名称就是方法名,当设置了name属性之后,只能通过重命名的name属性对应的值来获取,也就是说重命名之后,再使用方法名就获取不到bean对象。
2、获取 Bean 对象(对象装配)
获取 bean 对象也叫做对象装配,是把对象取出来放到某个类中,有时候也叫对象注入
对象装配(对象注入 )的实现方法以下 3 种:
- 属性注入
- 构造方法注入
- Setter注入
2.1 属性注入
属性注⼊是使用 @Autowired 或者 @Resource 实现的,将UserBeans类注入到UserController类中。
UserBeans类代码实现:
@Component
public class UserBeans {
    public User user1() {
        User user = new User();
        user.setId(721);
        user.setName("fl");
        return user;
    }

    @Bean
    public User user2() {
        User user = new User();
        user.setId(127);
        user.setName("lf");
        return user;
    }
}
UserController类的代码实现:
@Controller
public class UserController {
    @Autowired
    private User user;

    public void sayHi() {
        System.out.println("hello Controller");
    }

    @Override
    public String toString() {
        return "UserController{" +
                "user=" + user +
                '}';
    }
}
因为 UserController 类只被注入了一次,因此采用类型来获取 UserController 对象
public class App {
    public static void main(String[] args) {
        //1.先得到上下文对象
        ApplicationContext context = new ClassPathXmlApplicationContext("spring-config.xml");
        //2.得到bean对象
        UserController userController = context.getBean(UserController.class);
        //3.调用bean方法
        System.out.println(userController);
    }
}
结果却报错了,原因就是在 UserController 使用 User 对象,会根据名称 user 去找,没有名称为 user 的对象,就会根据类型去找,但是类型为 User 的对象出现了两次(user1,user2),不知道该用哪一个,所以报错了

只要我们将 user 改为 user1 或者 user2 ,或者将 User 对象只注入一次,就能解决这个问题
还能用 @Resource 设置 name 的方式来重命名注入对象
@Controller
public class UserController {

    @Resource(name = "user1")
    private User user;

    public void sayHi() {
        System.out.println("hello Controller");
    }
}

除此之外, 可以使用@ Autowired + @Qualifier来筛选bean 对象
@Controller
public class UserController {

    @Autowired
    @Qualifier("user1")
    private User user;

    public void sayHi() {
        System.out.println("hello Controller");
    }

    @Override
    public String toString() {
        return "UserController{" +
                "user=" + user +
                '}';
    }
}

@Qualifier中也可以时用键值对的方式来指定对象,例如:@Qualifier(value = “user1”)
2.2 构造方法注入
构造方法注入是在类的构造方法中实现注入,将 Service 类注⼊到 Controller 类中
Service 类的代码实现:
@Service
public class UserService {
    public void sayHi() {
        System.out.println("hello Service");
    }
}
UserController 类的代码实现:
@Controller
public class UserController {
    private UserService userService;
    @Autowired
    public UserController(UserService userService) {
        this.userService = userService;
    }
    public void sayHi() {
        userService.sayHi();
    }
}
调用构造方法时,会直接从 Spring 中取出 userService 对象,赋值给 UserController 类中的userService
构造方法注入,只需要在构造方法前加上 @Autowired 注解即可,如果当前类中只存在一个构造方法,那么 @Autowired 注解可以省略
2.3 Setter 注入
Setter 注入和属性的 Setter 方法实现类似,只不过在设置 set 方法的时候需要加上 @Autowired 注
解
代码如下:
@Controller
public class UserController {
    private UserService userService;

    @Autowired
    public void setUserService(UserService userService) {
        this.userService = userService;
    }

    public void sayHi() {
        userService.sayHi();
    }
}
setter 注入既可以使用 @Autowired 注解,也可以使用 @Resource注解
2.4 三种注入方式的区别
- 属性注入:特点写法简单。但是通用性不好,它只能运行在IoC 容器下,如果是非IoC容器就会出现问题
- Setter注入:早期Spring版本推荐的写法,Setter注入通用性比构造方法注入差
- 构造方法注入:通用性更好、它能确保在使用注入对象之前,此注入对象一定初始化过了。当构造方法注入参数过多时,此时开发者就要检查自己所写的代码是否符合单一设计原则的规范了,此注入方式也是spring 后期版本中推荐的注入方式
2.5 @Autowired 和 @Resource
- 出身不同:@Resource 来自JDK (Java亲儿子),@Autowired 是Spring框架提供的
- 用法不同:@Autowired支持属性注入、构造方法注入和Setter 注入,而@Resource 不支持构造方法注入
- 支持的参数不同:@Resource 支持更多的参数设置,比如name、type 设置,而@Autowired 只支持required参数设置


![[Spring Boot 5]安全管理](https://img-blog.csdnimg.cn/b5117085acbb4d6d811e4de48fa44d78.png)