一、邮件发送
需求不难,传指定的参数给后端,调接口就直接发送了
就是参数里有个正文部分,一定要用h5写
写vue写习惯了,原生的都快忘光了,走了些弯路
二、h5
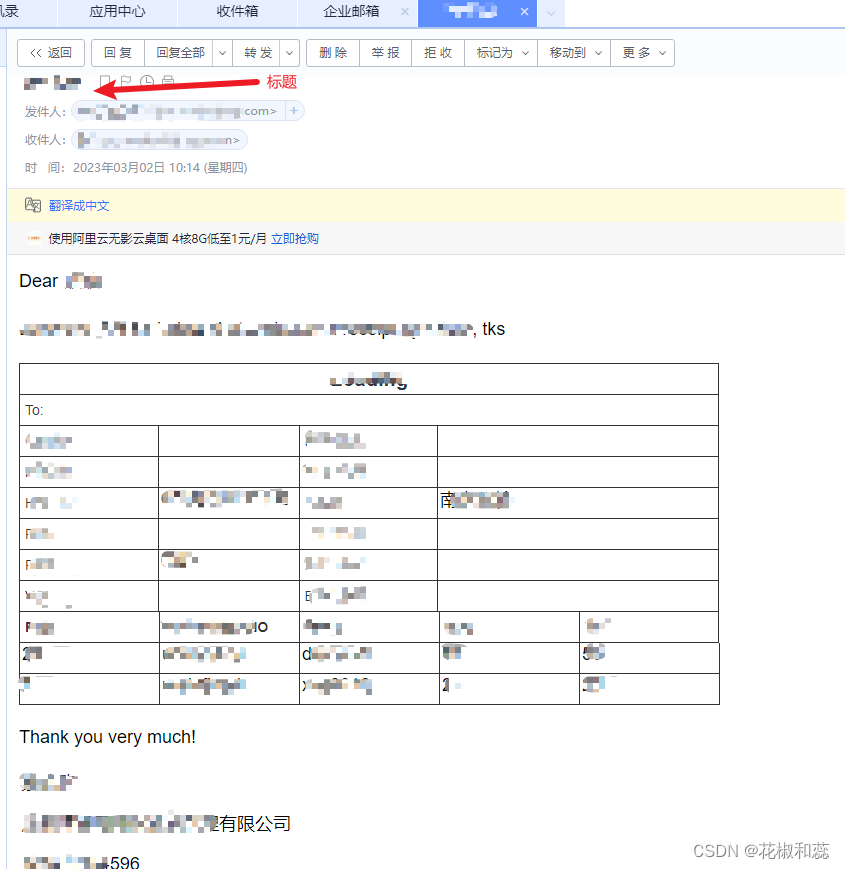
在页面上有个邮件发送的按钮,点击按钮打开弹窗,是一个仿邮箱发送的界面,类似如下:
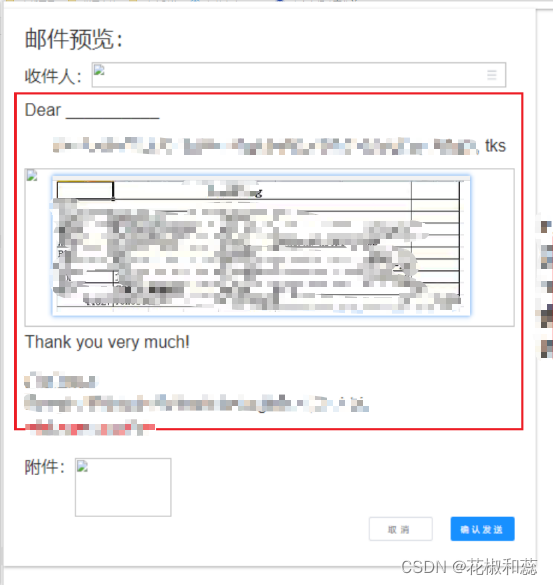
红圈圈起来的部分都要用h5写
也就是说在vue这个单文件里,模板区可以正常用element画,但是给后端的得是h5
我自己是保持一致,两边都是一样的,也方便直接复用
三、模板字符串的处理
正文里有个表格,这个也不难画,div排列布局就可以了
主要说的是如何循环处理数据,以及input如何绑值,以及拼接
在确认发送这个按钮里处理数据
先定义个变量,用来处理循环出来的字符串,数组可以是后端给的 ,也可以是自己定义的,我这里因为表格的字段名都是固定的,所以我写死了,可以参考下,因为列表是一行四格,即a,a的值,b,b的值
模板字符串里有${}包裹的才是变量,不然都是字段串
所以要这样写才行 ${item.leftname}
    this.emailTable = [
        {
          leftname: 'A字段',
          rightname: 'B字段',
          leftValue: this.form.A,
          rightValue: this.form.B,
        },
        {
          leftname: 'C字段',
          rightname: 'D字段',
          leftValue: this.form.C,
          rightValue: this.form.D,
        },
        ]
 var info = ''
   this.emailTable.forEach(function (item) {
        info += ` <div style="display: flex">
                  <div
                    style="
                      height: 30px;
                      width: 140px;
                      line-height: 30px;
                      border-right: 1px solid #333;
                      border-bottom: 1px solid #333;
                      border-left: 1px solid #333;
                    "
                  >
                    <span style="padding-left: 5px">${item.leftname}</span>
                  </div>
                  <div style="height: 30px; line-height: 30px; border-right: 1px solid #333; border-bottom: 1px solid #333">
                    <input
                      type="text"
                      value="${item.leftValue}"
                      style="width: 140px; border: none; outline: none; font-size: 18px; font-weight: 500"
                      autocomplete="off"
                    />
                  </div>
                  <div style="height: 30px; width: 140px; line-height: 30px; border-right: 1px solid #333; border-bottom: 1px solid #333">
                    <span style="padding-left: 5px">${item.rightname}</span>
                  </div>
                  <div style="height: 30px; line-height: 30px; border-bottom: 1px solid #333; border-right: 1px solid #333">
                    <input
                      type="text"
                      value="${item.rightValue}"
                      style="width: 280px; border: none; outline: none; font-size: 18px; font-weight: 500"
                      autocomplete="off"
                    />
                  </div>

                </div>`
      })
不管有多少要循环处理的数据,都像上面这个格式来就行
然后定义一个变量,将全部的内容以模板字符串的格式处理
  let body = `
      <div >
            <p>
              <span style="font-size: 18px; font-weight: 500">Dear</span>
              <input
                type="text"
                id="nickName"
               value="${this.form.nickname}"
                style="border: none; outline: none; font-size: 18px; font-weight: 500"
                autocomplete="off"
              />
            </p>

            <p style="font-size: 18px; font-weight: 500">tks</p>
            <div style="color: #333; width: 700px">
              <div style="height: 30px; text-align: center; line-height: 30px; border: 1px solid #333">
                <span style="font-size: 20px; font-weight: 700">Loading</span>
              </div>
              <div style="height: 30px; text-align: left; line-height: 30px; border: 1px solid #333; border-top: none">
                <span style="padding-left: 5px">To:</span>
              </div>
            ${info}
            <div style="display: flex">
            ${containHead}
            </div>
           ${containBody}
            </div>
            <p style="font-size: 18px; font-weight: 500">Thank you very much!</p>
          </div>`
然后将body作为参数传到接口里,参数格式会是下面这样

然后邮件里收到的内容,如下: