前言:从开机的那一刻,到开机完成后launcher将所有应用进行图标展示的这个过程,大概会有哪一些操作?执行了哪些代码?作为Android开发工程师的我们,有必要好好的梳理一遍。
既然要梳理Android系统的启动流程,那我们不可避免的需要阅读源码。这个过程的代码非常多,我们只需要读一些关键的代码,就可以大概的了解该流程。为了让读者更容易理解,思路更加清晰,可以先看下面的流程图:

上图是打开电源后会开启的进程或者会执行的程序顺序,之后分析的代码流程也是按照这个顺序来进行说明的。在后面的代码说明当中,读者可以回过头来好好体会这个流程图。不同的Android版本的源码代码执行方法或者流程会略有不同,这里的代码讲解是基于Android 8.0的。
电源启动
当电源被按下之后,固化在Rom的指定代码程序会被执行。该代码会将引导程序BootLoader加载到RAM中。
BootLoader引导程序
BootLoader是一个引导程序,该代码被加载到RAM 便开始执行,它的主要作用是将系统拉起变并运行起来。
Linux内核启动
Linux内核启动后,会进行一些系统设置,如缓存设置、计划列表、加载驱动等。在完成这些系统设置之后,它会在系统文件中找到init.rc文件,并且启动init进程。
init进程
4.1 init进程的入口函数
init,顾名思义,就是初始化的意思,init进程主要是做一些系统初始化的工作,我们查看一下init进程的入口函数main()。
system/core/init/init.cpp
int main(int argc, char** argv) {
    if (!strcmp(basename(argv[0]), "ueventd")) {
        return ueventd_main(argc, argv);
    }

    if (!strcmp(basename(argv[0]), "watchdogd")) {
        return watchdogd_main(argc, argv);
    }

 if (REBOOT_BOOTLOADER_ON_PANIC) {
        install_reboot_signal_handlers();
    }

    add_environment("PATH", _PATH_DEFPATH);

    bool is_first_stage = (getenv("INIT_SECOND_STAGE") == nullptr);

    if (is_first_stage) {
        boot_clock::time_point start_time = boot_clock::now();

        // Clear the umask.
        umask(0);

        // Get the basic filesystem setup we need put together in the initramdisk
        // on / and then we'll let the rc file figure out the rest.

        mount("tmpfs", "/dev", "tmpfs", MS_NOSUID, "mode=0755");
        mkdir("/dev/pts", 0755);
        mkdir("/dev/socket", 0755);
        mount("devpts", "/dev/pts", "devpts", 0, NULL);
        #define MAKE_STR(x) __STRING(x)
        mount("proc", "/proc", "proc", 0, "hidepid=2,gid=" MAKE_STR(AID_READPROC));
        // Don't expose the raw commandline to unprivileged processes.
        chmod("/proc/cmdline", 0440);
        gid_t groups[] = { AID_READPROC };
        setgroups(arraysize(groups), groups);
        mount("sysfs", "/sys", "sysfs", 0, NULL);
        mount("selinuxfs", "/sys/fs/selinux", "selinuxfs", 0, NULL);
        mknod("/dev/kmsg", S_IFCHR | 0600, makedev(1, 11));
        mknod("/dev/random", S_IFCHR | 0666, makedev(1, 8));
        mknod("/dev/urandom", S_IFCHR | 0666, makedev(1, 9));

        ......
      }
 ......

 property_init();   //(1)
 ......
 signal_handler_init();   //(2)
 ......
 start_property_service();  //(3)
 set_usb_controller();
 ......

std::string bootscript = GetProperty("ro.boot.init_rc", "");
    if (bootscript.empty()) {
        parser.ParseConfig("/init.rc");        //(4)
        parser.set_is_system_etc_init_loaded(
                parser.ParseConfig("/system/etc/init"));
        parser.set_is_vendor_etc_init_loaded(
                parser.ParseConfig("/vendor/etc/init"));
        parser.set_is_odm_etc_init_loaded(parser.ParseConfig("/odm/etc/init"));
    } else {
        parser.ParseConfig(bootscript);
        parser.set_is_system_etc_init_loaded(true);
        parser.set_is_vendor_etc_init_loaded(true);
        parser.set_is_odm_etc_init_loaded(true);
    }

 ......

   return 0;
}
init的main函数一开始创建和挂载了一些文件目录,其中挂载了tmpfs、devpts、proc、sysfs、selinuxfs。
在注释(1)处调用了property_init()函数,对属性进行初始化,然后在注释(3)处调用了
start_property_service()函数启动属性服务。在注释(2)处调用了signal_handler_init()函数用于设置子进程信号处理函数,它被定义在sysstem/core/init/signal_handler.cpp文件中,该函数是用来处理暂停和终止的子进程的,子进程在暂停或者结束的时候,系统会发出SIGCHLD信号,signal_handler_init()函数是用来接收并且处理这种信号的。
例如在init进程中启动的某个子进程终止了,系统即会发出进程终止的SIGCHLD信号,signal_handler_init()函数接收到了这个信号,会调用signal_handler()函数,然后一层层的函数调用处理,最终找到该子进程,在这个处理中清除所有该子进程相关的信息。(如果该子进程配置有onrestart选项的服务等,将会被清理后重启)。
注释(4)处调用了system/core/init/init_parser.cpp中的ParseConfig()方法解析了init.rc文件。
4.2 init.rc配置文件
init.rc是一个重要的配置文件,文件中使用了一种脚本语言,这种脚本语言为Android初始化语言(Android Init Language), 这种语言主要包含了五种类型语句。
on init  //(1)
    sysclktz 0

    # Mix device-specific information into the entropy pool
    copy /proc/cmdline /dev/urandom   //(2)
    copy /default.prop /dev/urandom

    # Backward compatibility.
    symlink /system/etc /etc
    symlink /sys/kernel/debug /d

    # Link /vendor to /system/vendor for devices without a vendor partition.
    symlink /system/vendor /vendor

    # Mount cgroup mount point for cpu accounting
    mount cgroup none /acct cpuacct
    mkdir /acct/uid
    ......
例如以上截取的init.rc部分代码。on init 是Action 类型语句,他的格式如下所示:
on <trigger> [&& <trigger>]* //设置触发器
<command> //触发动作之后要执行的命令
<command>
......
根据格式,如上面截取的代码,注释(1)的on init 是触发器。而注释(2)处的“copy /proc/cmdline /dev/urandom”是command命令语句,解释为复制/proc/cmdline 到/dev/urandom。
以上我们知道了init.rc文件中Android初始化语言中Action语句的格式和例子,接下来为了了解在init中如何创建Zygote进程的,我们来看看init.rc中的Service类型语句,它的格式如下所示:
service <name> <pathname> [<argument>] * //<service的名字><执行程序的路径><参数>
<option> //option是service的修饰词,例如描述什么时候启动service,使用什么方式启动等
<option>
......
在Android8.0中Zygote进程的启动脚本在init.zygoteXX.rc中定义,在该目录文件夹下有init.zygote32.rc、init.zygote32_64.rc、init.zygote64.rc、init.zygote64_32.rc。init.zygote32_64.rc为既支持32位处理器,又支持64位处理器,但主要为32位处理器。其他三个文件也是类似原理区分。以下我们拿init.zygote64.rc为例讲解。
service zygote /system/bin/app_process64 -Xzygote /system/bin --zygote --start-system-server      //(1)
    class main    //(2)
    priority -20
    user root
    group root readproc
    socket zygote stream 660 root system
    onrestart write /sys/android_power/request_state wake
    onrestart write /sys/power/state on
    onrestart restart audioserver    //(3)
    onrestart restart cameraserver   //(4)
    onrestart restart media
    onrestart restart netd
    onrestart restart wificond
    writepid /dev/cpuset/foreground/tasks
以上是init.zygote64.rc里的内容,根据上面提到的Service类型语句的根式,注释(1)意思为通知init进程创建名为Zygote的进程,这个进程执行程序的路径为/system/bin/app_process64,而后面的“-Xzygote /system/bin --zygote --start-system-server”均为传递的参数,将传给app_process64。注释(2)是该服务的相关描述,意思为classname为main。注释(3)、(4)的意思为当andioserver或者cameraserver等进程终止了,就需要restart、既重启这些进程。其他的onrestart的相关描述语句也是如此。
4.3 解析init.rc中的service语句
上面init.rc中我们提到的Action类型语句和Service类型语句,这两种语句需要不同的类来进行解析。
回到4.1中的注释(4),”parser.ParseConfig("/init.rc");“,调用了system/core/init/init_parser.cpp中的ParseConfig()函数,在ParseConfig()函数中经过层层的调用,最终会找到system/core/init/action.cpp中的ActionParser和system/core/init/service.cpp的ServiceParser分别解析Action类型语句和Service类型语句。
在这里主要是了解zygote的启动,而zygote是通过前面提到的service类型语句启动的,所以我们主要来看ServiceParser。
ServiceParser的实现代码在system/core/init/service.cpp中,ServiceParser对Service类型语句的解析主要用到两个函数,分别是ParseSection()和ParseLineSection()。
bool ServiceParser::ParseSection(const std::vector<std::string>& args,
                                 std::string* err) {
    if (args.size() < 3) {
        *err = "services must have a name and a program";
        return false;
    }

    const std::string& name = args[1];
    if (!IsValidName(name)) {
        *err = StringPrintf("invalid service name '%s'", name.c_str());
        return false;
    }

    std::vector<std::string> str_args(args.begin() + 2, args.end());
    service_ = std::make_unique<Service>(name, str_args);   //(1)
    return true;
}
bool ServiceParser::ParseLineSection(const std::vector<std::string>& args,
                                     const std::string& filename, int line,
                                     std::string* err) const {
    return service_ ? service_->ParseLine(args, err) : false;
}
在注释(1)处会根据参数创造出一个Service对象。当解析完所有的数据之后,会调用system/core/init/service.cpp中的EndSection()函数。
void ServiceParser::EndSection() {
    if (service_) {
        ServiceManager::GetInstance().AddService(std::move(service_)); //(1)
    }
}
在注释(1)处EndSection()函数调用了ServiceManager的AddService函数;
system/core/init/service.cpp
void ServiceManager::AddService(std::unique_ptr<Service> service) {
    Service* old_service = FindServiceByName(service->name());
    if (old_service) {
        LOG(ERROR) << "ignored duplicate definition of service '" << service->name() << "'";
        return;
    }
    services_.emplace_back(std::move(service)); //(1)
}
在AddService()函数中首先根据服务名判断该服务old_service是否已经存在,如果不存在则在注释(1)中将Service对象加入Service链表。
4.4在init进程中启动Zygote进程
我们回到init.rc文件中,有如下代码:
system/core/rootdir/init.rc
......
on nonencrypted
    class_start main                 //(1)
    class_start late_start
......
注释(1)中的class_start是一个command命令,意思为启动classname为main的Service。在上面的4.2中提到的init.zygote64.rc,里面是service语句,其中描述里面说明了service的classname为main,所以这里的class_start main就是启动zygote进程的。
class_start 命令所对应的函数为do_class_start(),该函数的位置在system/core/init/builtins.cpp中。
system/core/init/builtins.cpp
static int do_class_start(const std::vector<std::string>& args) {
        /* Starting a class does not start services
         * which are explicitly disabled.  They must
         * be started individually.
         */
    ServiceManager::GetInstance().
        ForEachServiceInClass(args[1], [] (Service* s) { s->StartIfNotDisabled(); }); //(1)
    return 0;
}
在注释(1)处我们看到调用了ForEachServiceInClass()函数,对于这里对c++语言不熟悉的可能看不太懂,我稍微解释一下。ForEachServiceInClass()函数里面传入了两个参数,一个是”args[1]“,另一个是“ [] (Service* s) { s->StartIfNotDisabled(); }”,对于第二个参数,这里使用了Lambda函数的写法,也就是匿名函数,也可以称为临时函数,所谓临时函数,顾名思义,就是在某一次临时使用,Lambda表达式可作为一个对象,然后可把它作为参数传递,相当于把“[] (Service* s) { s->StartIfNotDisabled(); }”作为一个参数传入到ForEachServiceInClass()函数中,其中这个匿名函数的实现体会进行调用Service的StartIfNotDisabled()函数的操作。
接下来我们来看一下StartIfNotDisabled()函数实现了什么操作:
system/core/init/service.cpp
bool Service::StartIfNotDisabled() {
    if (!(flags_ & SVC_DISABLED)) {  //(1)
        return Start();   //(2)
    } else {
        flags_ |= SVC_DISABLED_START;
    }
    return true;
}
首先会在注释(1)处判断前面提到的init.zygote64.rc是否又设置disabled,如果没有设置则调用
system/core/init/service.cpp里面的Start()函数。
接下来我们来查看一下Start()函数里面进行了什么操作:
system/core/init/service.cpp
bool Service::Start() {
    // Starting a service removes it from the disabled or reset state and
    // immediately takes it out of the restarting state if it was in there.
    flags_ &= (~(SVC_DISABLED|SVC_RESTARTING|SVC_RESET|SVC_RESTART|SVC_DISABLED_START));

    // Running processes require no additional work --- if they're in the
    // process of exiting, we've ensured that they will immediately restart
    // on exit, unless they are ONESHOT.
    if (flags_ & SVC_RUNNING) {    //(1)
        return false;
    }

bool needs_console = (flags_ & SVC_CONSOLE);
    if (needs_console) {
        if (console_.empty()) {
            console_ = default_console;
        }

        // Make sure that open call succeeds to ensure a console driver is
        // properly registered for the device node
        int console_fd = open(console_.c_str(), O_RDWR | O_CLOEXEC);
        if (console_fd < 0) {       //(2)
            PLOG(ERROR) << "service '" << name_ << "' couldn't open console '" << console_ << "'";
            flags_ |= SVC_DISABLED;
            return false;
        }
        close(console_fd);
    }

......

 LOG(INFO) << "starting service '" << name_ << "'...";

    pid_t pid = -1;
    if (namespace_flags_) {
        pid = clone(nullptr, nullptr, namespace_flags_ | SIGCHLD, nullptr);
    } else {
        pid = fork();  //(3)
    }

    if (pid == 0) {   //(4)
        umask(077);

......

        std::vector<char*> strs;
        ExpandArgs(args_, &strs);
        if (execve(strs[0], (char**) &strs[0], (char**) ENV) < 0) {  //(5)
            PLOG(ERROR) << "cannot execve('" << strs[0] << "')";
        }

        _exit(127);
    }

......
    return true;
}
在以上的注释(1)判断service是否已经运行了,如果已经在运行了则不需要重新启动了,在注释(2)处是一些驱动打开准备工作,如果没有正常打开则不启动service。
如果经过前面代码的判断和准备工作均完成了,即会走到了注释(3)处,调用fork()函数创建子进程,且得到pid值,在(4)处判断pid是否为0,为0则说明当前代码正在子进程里面运行。
在注释(5)处子进程里调用了execve()函数,Service被启动,并进入service的main()函数中,如果该service是zygote,根据前面4.2提到的init.zygote64.rc文件里面的内容,根据里面的service语句,zygote的执行程序的路径是/system/bin/app_process64,可以使用adb连接上调试机或者模拟的Android机,在/system/bin目录下有app_process64这个可执行程序,截图如下:

而app_process64这个可执行程序所对应的代码文件路径为frameworks/base/cmds/app_process/app_main.cpp,该程序启动后会进入app_main.cpp的main()函数中,也就是zygote的main()函数,下面我们来看看main()函数
frameworks/base/cmds/app_process/app_main.cpp
  int main(int argc, char* const argv[])
{
......
    // --zygote : Start in zygote mode
    // --start-system-server : Start the system server.
    // --application : Start in application (stand alone, non zygote) mode.
    // --nice-name : The nice name for this process.

......
    bool zygote = false;          //(1)
    bool startSystemServer = false;  //(2)
    bool application = false;     //(3)
    String8 niceName;
    String8 className;

    ++i;
    while (i < argc) {

        const char* arg = argv[i++];
        if (strcmp(arg, "--zygote") == 0) {
            zygote = true;            //(4)
            niceName = ZYGOTE_NICE_NAME;
        } else if (strcmp(arg, "--start-system-server") == 0) {
            startSystemServer = true;
        } else if (strcmp(arg, "--application") == 0) {
            application = true;
        } else if (strncmp(arg, "--nice-name=", 12) == 0) {
            niceName.setTo(arg + 12);
        } else if (strncmp(arg, "--", 2) != 0) {
            className.setTo(arg);
            break;
        } else {
            --i;
            break;
        }
    }

......

    if (zygote) {
        runtime.start("com.android.internal.os.ZygoteInit", args, zygote); //(5)
    } else if (className) {
        runtime.start("com.android.internal.os.RuntimeInit", args, zygote);
    } else {
        fprintf(stderr, "Error: no class name or --zygote supplied.\n");
        app_usage();
        LOG_ALWAYS_FATAL("app_process: no class name or --zygote supplied.");
    }
}
在注释(1)、(2)、(3)中分别声明了三个布尔型的变量,用来标记当前在什么进程中运行,如注释(4)中,若通过strcmp()函数判断arg参数的值为"--zygote",说明当前在zygote进程中,则将标记"zygote"设置为true。在注释(5)处,标记"zygote"为true则调用AppRuntime的start()函数启动zygote,关于zygote的更详细的讲解,我将会放到第5节进行讲解。
4.5 init进程对属性的初始化
现在回到4.1展示的init进程的main的代码(system/core/init/init.cpp),其中标记的注释(1)处调用了property_init()函数,在标记(3)处调用了 start_property_service()函数:
system/core/init/init.cpp
int main(int argc, char** argv) {

 ......
 property_init();   //(1)
 ......
 start_property_service();  //(3)
 ......

}
在property_init()的函数里面对系统属性进行初始化,这些属性也就是我们平时开发的时候通过"adb shell getprop"命令获取到一系列系统参数。
我们先查看一下property_init()函数:
void property_init() {
    if (__system_property_area_init()) {
        LOG(ERROR) << "Failed to initialize property area";
        exit(1);
    }
}
__system_property_area_init()函数用来初始化属性的内存区域。
start_property_service()函数的代码如下:
void start_property_service() {
    property_set("ro.property_service.version", "2");

    property_set_fd = create_socket(PROP_SERVICE_NAME, SOCK_STREAM | SOCK_CLOEXEC | SOCK_NONBLOCK,0666, 0, 0, NULL);             //(1)
    if (property_set_fd == -1) {
        PLOG(ERROR) << "start_property_service socket creation failed";
        exit(1);
    }

    listen(property_set_fd, 8);  //(2)

    register_epoll_handler(property_set_fd, handle_property_set_fd);  //(3)
}
从代码可以看到,在start_property_service()函数里注释(1)处开启了一个socket(套接字),用来等待客户端的属性请求,在注释(2)处进行监听,且在注释(3)处给开启的服务设置相对应的处理函数handle_property_set_fd(),当服务property_set_fd接收到了客户端对系统属性值的修改请求时,就会调用handle_property_set_fd()函数进行处理。
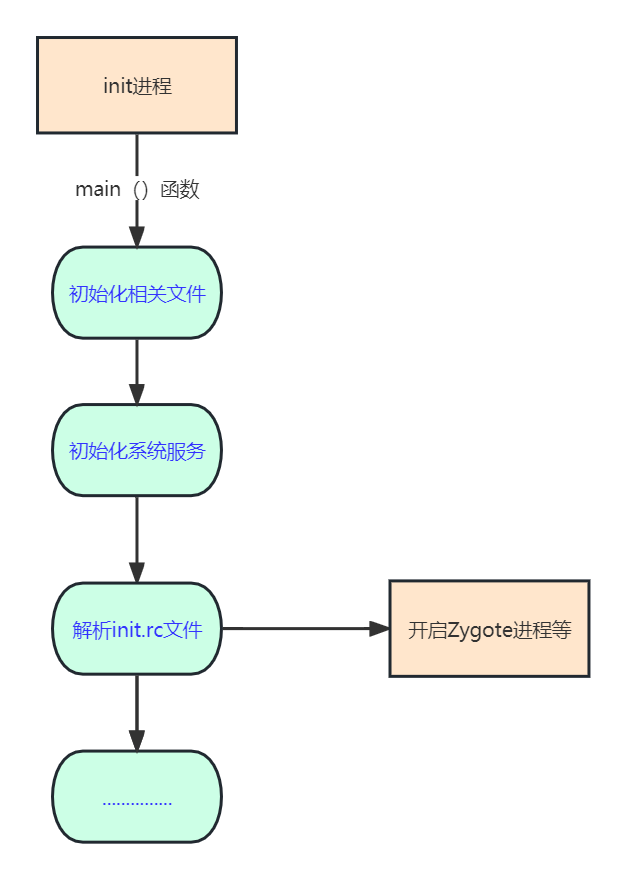
4.6 init进程操作总结
根据以上的几点介绍,我们知道init进程的主要操作流程如下:
Zygote进程
5.1 zygote的执行程序app_process
在4.4节里我们提到,在frameworks/base/cmds/app_process/app_main.cpp里调用了AppRuntime的start()函数启动zygote。
frameworks/base/cmds/app_process/app_main.cpp
  int main(int argc, char* const argv[])
{
......
    // --zygote : Start in zygote mode
    // --start-system-server : Start the system server.
    // --application : Start in application (stand alone, non zygote) mode.
    // --nice-name : The nice name for this process.

......
    bool zygote = false;          //(1)
    bool startSystemServer = false;  //(2)
    bool application = false;     //(3)
    String8 niceName;
    String8 className;

    ++i;
    while (i < argc) {

        const char* arg = argv[i++];
        if (strcmp(arg, "--zygote") == 0) {
            zygote = true;            //(4)
            niceName = ZYGOTE_NICE_NAME;
        } else if (strcmp(arg, "--start-system-server") == 0) {
            startSystemServer = true;
        } else if (strcmp(arg, "--application") == 0) {
            application = true;
        } else if (strncmp(arg, "--nice-name=", 12) == 0) {
            niceName.setTo(arg + 12);
        } else if (strncmp(arg, "--", 2) != 0) {
            className.setTo(arg);
            break;
        } else {
            --i;
            break;
        }
    }

......

    if (zygote) {
        runtime.start("com.android.internal.os.ZygoteInit", args, zygote); //(5)
    } else if (className) {
        runtime.start("com.android.internal.os.RuntimeInit", args, zygote);
    } else {
        fprintf(stderr, "Error: no class name or --zygote supplied.\n");
        app_usage();
        LOG_ALWAYS_FATAL("app_process: no class name or --zygote supplied.");
    }
}
之前我们提到在注释(1)、(2)、(3)中分别声明了三个布尔型的变量,用来标记当前在什么进程中运行。因为到后面zygote进程会通多fork()函数进行复制创建各种其他进程的。例如后面将要提到的systemservicer以及应用程序进程都是通过zygote进程进行复制出来的,创建之后都会走main()函数里的代码逻辑,因此在这里声明了几个标志位,用来判断当前是在什么进程里运行。
在注释(5)里调用了AppRuntime的start()函数启动zygote,我们来查看一下start()函数的内容:
frameworks/base/core/jin/AndroidRuntime.cpp
/*
 * Start the Android runtime.  This involves starting the virtual machine
 * and calling the "static void main(String[] args)" method in the class
 * named by "className".
 *
 * Passes the main function two arguments, the class name and the specified
 * options string.
 */
void AndroidRuntime::start(const char* className, const Vector<String8>& options, bool zygote)
{
    ......
    /* start the virtual machine */
    JniInvocation jni_invocation;
    jni_invocation.Init(NULL);
    JNIEnv* env;
    if (startVm(&mJavaVM, &env, zygote) != 0) {  //(1)
        return;
    }
    onVmCreated(env);

    /*
     * Register android functions.
     */
    if (startReg(env) < 0) {    //(2)
        ALOGE("Unable to register all android natives\n");
        return;
    }

......

    /*
     * Start VM.  This thread becomes the main thread of the VM, and will
     * not return until the VM exits.
     */
    char* slashClassName = toSlashClassName(className); //(3)
    jclass startClass = env->FindClass(slashClassName);//(4)
    if (startClass == NULL) {
        ALOGE("JavaVM unable to locate class '%s'\n", slashClassName);
        /* keep going */
    } else {
        jmethodID startMeth = env->GetStaticMethodID(startClass, "main",
            "([Ljava/lang/String;)V");//(5)
        if (startMeth == NULL) {
            ALOGE("JavaVM unable to find main() in '%s'\n", className);
            /* keep going */
        } else {
            env->CallStaticVoidMethod(startClass, startMeth, strArray);//(6)

#if 0
            if (env->ExceptionCheck())
                threadExitUncaughtException(env);
#endif
        }
    }
    free(slashClassName);

    ALOGD("Shutting down VM\n");
    if (mJavaVM->DetachCurrentThread() != JNI_OK)
        ALOGW("Warning: unable to detach main thread\n");
    if (mJavaVM->DestroyJavaVM() != 0)
        ALOGW("Warning: VM did not shut down cleanly\n");
}
在注释有(1)处调用了startVm()函数来创建java虚拟机,注释(2)处调用startReg()函数为java虚拟机注册jni方法。注释(3)处调用的toSlashClassName()函数很简单,即将className中的“.”替换成“/”。根据4.4里app_main.cpp里面调用的方法“runtime.start("com.android.internal.os.ZygoteInit", args, zygote);" 我们可以知道className的值为"com.android.internal.os.ZygoteInit",因此可知slashClassName的值为”com/android/internal/os/ZygoteInit“,注释(4)处通过这个slashClassName这个路径找到ZygoteInit类,并且将这个类赋值给slashClass,在注释(5)通过方法名”main“找到ZygoteInit类的main()方法,最后在注释(6)处使用类名、方法名,通过JNI方式调用ZygoteInit类的main()方法。
此时就已经从Native层进入了java框架层,对JNI调用不熟悉的同学可自行查询资料。
5.2 java框架层的ZygoteInit
我们来看一下ZygoteInit类中的main()方法:
frameworks/base/core/java/com/android/internal/os/ZygoteInit
public static void main(String argv[])
{
        ZygoteServer zygoteServer = new ZygoteServer();

            ........

            zygoteServer.registerServerSocket(socketName);  //(1)

           ......

            if (startSystemServer) {
                startSystemServer(abiList, socketName, zygoteServer); //(2)
            }

            Log.i(TAG, "Accepting command socket connections");
            zygoteServer.runSelectLoop(abiList);  //(3)

            zygoteServer.closeServerSocket();
        } catch (Zygote.MethodAndArgsCaller caller) {
            caller.run();
        } catch (Throwable ex) {
            Log.e(TAG, "System zygote died with exception", ex);
            zygoteServer.closeServerSocket();
            throw ex;
        }
    }
注释(1)处可以看到main()方法里面通过registerServerSocket()方法创建一个Server端的套接字Socket,这个服务是用来等待ActivityManagerService(AMS)的创建新应用程序进程的请求的,在注释(2)启动了SystemServer系统服务进程,在注释(3)处调用了runSelectLoop()方法便开始等待AMS的请求了。
接下来我们看一下这三个注释分别做了什么。
5.2.1 registerZygoteSocket
frameworks/base/core/java/com/android/internal/os/ZygoteServer.java
void registerServerSocket(String socketName) {
        if (mServerSocket == null) {
            int fileDesc;
            final String fullSocketName = ANDROID_SOCKET_PREFIX + socketName;
            try {
                String env = System.getenv(fullSocketName);
                fileDesc = Integer.parseInt(env);
            } catch (RuntimeException ex) {
                throw new RuntimeException(fullSocketName + " unset or invalid", ex);
            }

            try {
                FileDescriptor fd = new FileDescriptor();
                fd.setInt$(fileDesc);
                mServerSocket = new LocalServerSocket(fd);  //(1)
            } catch (IOException ex) {
                throw new RuntimeException(
                        "Error binding to local socket '" + fileDesc + "'", ex);
            }
        }
    }
注释(1)处创建了服务端的Socket套接字。
5.2.2 startSystemServer
frameworks/base/core/java/com/android/internal/os/ZygoteInit
   private static boolean startSystemServer(String abiList, String socketName, ZygoteServer zygoteServer)
            throws Zygote.MethodAndArgsCaller, RuntimeException {
       ......


        /* Hardcoded command line to start the system server */
        String args[] = {   //(1)
            "--setuid=1000",
            "--setgid=1000",
            "--setgroups=1001,1002,1003,1004,1005,1006,1007,1008,1009,1010,1018,1021,1023,1032,3001,3002,3003,3006,3007,3009,3010",
            "--capabilities=" + capabilities + "," + capabilities,
            "--nice-name=system_server",
            "--runtime-args",
            "com.android.server.SystemServer",
        };
        ZygoteConnection.Arguments parsedArgs = null;

        int pid;


        try {
            parsedArgs = new ZygoteConnection.Arguments(args);  //(2)
            ZygoteConnection.applyDebuggerSystemProperty(parsedArgs);
            ZygoteConnection.applyInvokeWithSystemProperty(parsedArgs);

            /* Request to fork the system server process */
            pid = Zygote.forkSystemServer(  //(3)
                    parsedArgs.uid, parsedArgs.gid,
                    parsedArgs.gids,
                    parsedArgs.debugFlags,
                    null,
                    parsedArgs.permittedCapabilities,
                    parsedArgs.effectiveCapabilities);
        } catch (IllegalArgumentException ex) {
            throw new RuntimeException(ex);
        }

        /* For child process */
        if (pid == 0) {
            if (hasSecondZygote(abiList)) {
                waitForSecondaryZygote(socketName);
            }


            zygoteServer.closeServerSocket();
            handleSystemServerProcess(parsedArgs);  //(4)
        }

        return true;
    }
注释(1)处创建了一个数组,数组中包含uid,gid等,uid的和gid的值都为1000,且数组中的
"com.android.server.SystemServer"值说明启动的类名为"com.android.server.SystemServer"。在注释(2)处将该数组封装成ZygoteConnection.Arguments类型的实例。注释(3)调用了forkSystemServer()方法,并且将封装的Arguments实例的成员值传入。forkSystemServer()方法里会通过JNI调用Native的NativenativeForkSystemServer()方法。而NativenativeForkSystemServer()方法最后会调用fork()函数创建一个子进程,该子进程也就是SystemServer进程。在注释(4)处,如果pid为0,即表示当前代码运行在新创建的子进程中,会调用handleSystemServerProcess来处理SystemServer进程。
5.2.3 runSelectLoop
在5.2的注释(3)中调用了zygoteServer.runSelectLoop()函数,我们来看一下runSelectLoop()函数函数:
frameworks/base/core/java/com/android/internal/os/ZygoteServer.java
    void runSelectLoop(String abiList) throws Zygote.MethodAndArgsCaller {
        ArrayList<FileDescriptor> fds = new ArrayList<FileDescriptor>();
        ArrayList<ZygoteConnection> peers = new ArrayList<ZygoteConnection>();

        fds.add(mServerSocket.getFileDescriptor());
        peers.add(null);

        while (true) { //(1)
            StructPollfd[] pollFds = new StructPollfd[fds.size()];
            for (int i = 0; i < pollFds.length; ++i) {
                pollFds[i] = new StructPollfd();
                pollFds[i].fd = fds.get(i);
                pollFds[i].events = (short) POLLIN;
            }

            try {
                Os.poll(pollFds, -1);
            } catch (ErrnoException ex) {
                throw new RuntimeException("poll failed", ex);
            }
            for (int i = pollFds.length - 1; i >= 0; --i) { //(2)
                if ((pollFds[i].revents & POLLIN) == 0) {
                    continue;
                }
                if (i == 0) {  //(2)
                    ZygoteConnection newPeer = acceptCommandPeer(abiList);
                    peers.add(newPeer);
                    fds.add(newPeer.getFileDesciptor());
                } else {    //(3)
                    boolean done = peers.get(i).runOnce(this);
                    if (done) {
                        peers.remove(i);
                        fds.remove(i);
                    }
                }
            }
        }
    }
注释(1)表明无限循环等待AMS的请求。在注释(2)处i初始化为pollFds里的数据个数,如果
pollFds里面有数据,即不为0,则走到注释(3)处,调用runOnce()方法创建一个新的应用程序进程,创建成功了之后就将该相关的创建请求从连接列表里清除。
5.3 Zygote进程总结
(1)调用了AppRuntime的start()方法,启动Zygote进程;
(2)创建java虚拟机且为其注册JNI方法;
(3)通过JNI调用ZygoteInit的main()方法,此时从native进入了java框架;
(4)创建服务器端socket;
(5)启动systemserver进程;
(6)使服务器端socket循环等待等待AMS的创建新的应用程序进程的请求;
6. SystemServer进程
SystemServer系统服务主要是用来拆功能键系统服务的,AMS、WMS以及PMS都是由它创建的。
接下来我们来看一下zygoteInit是如何启动SystemServer进程的。
6.1 Zygote调用startSystemServer
在5.2.2我们看到ZygoteInit调用了startSystemServer()方法启动了SystemServer,我们来看一下这个过程做了什么处理:
frameworks/base/core/java/com/android/internal/os/ZygoteInit
private static boolean startSystemServer(String abiList, String socketName, ZygoteServer zygoteServer)
            throws Zygote.MethodAndArgsCaller, RuntimeException {
       ......

            pid = Zygote.forkSystemServer(
                    parsedArgs.uid, parsedArgs.gid,
                    parsedArgs.gids,
                    parsedArgs.debugFlags,
                    null,
                    parsedArgs.permittedCapabilities,
                    parsedArgs.effectiveCapabilities);
        } catch (IllegalArgumentException ex) {
            throw new RuntimeException(ex);
        }

        /* For child process */
        if (pid == 0) {
            if (hasSecondZygote(abiList)) {
                waitForSecondaryZygote(socketName);
            }

            zygoteServer.closeServerSocket();
            handleSystemServerProcess(parsedArgs);  //(1)
        }

        return true;
    }
在5.2.2中我们看到启动服务的相关参数存在数组里,而这个数组封装到parsedArgs中,注释(1)调用handleSystemServerProcess()方法,且将parsedArgs参数传给handleSystemServerProcess(),handleSystemServerProcess()方法如下所示:
frameworks/base/core/java/com/android/internal/os/ZygoteInit
    /**
     * Finish remaining work for the newly forked system server process.
     */
    private static void handleSystemServerProcess(
            ZygoteConnection.Arguments parsedArgs)
            throws Zygote.MethodAndArgsCaller {

           ......
            ClassLoader cl = null;
            if (systemServerClasspath != null) {
                cl = createPathClassLoader(systemServerClasspath, parsedArgs.targetSdkVersion);

                Thread.currentThread().setContextClassLoader(cl);
            }

            /*
             * Pass the remaining arguments to SystemServer.
             */
            ZygoteInit.zygoteInit(parsedArgs.targetSdkVersion, parsedArgs.remainingArgs, cl);//(1)
        }

    }
注释(1)处调用了ZygoteInit的zygoteInit()方法,zygoteInit()方法如下所示:
frameworks/base/core/java/com/android/internal/os/ZygoteInit
    public static final void zygoteInit(int targetSdkVersion, String[] argv,
            ClassLoader classLoader) throws Zygote.MethodAndArgsCaller {
        if (RuntimeInit.DEBUG) {
            Slog.d(RuntimeInit.TAG, "RuntimeInit: Starting application from zygote");
        }

        Trace.traceBegin(Trace.TRACE_TAG_ACTIVITY_MANAGER, "ZygoteInit");
        RuntimeInit.redirectLogStreams();

        RuntimeInit.commonInit();
        ZygoteInit.nativeZygoteInit();  //(1)
        RuntimeInit.applicationInit(targetSdkVersion, argv, classLoader);//(2)
    }
在注释(1)处调用了native层的函数nativeZygoteInit(),该方法时用来启动Binder线程池的,通过该线程池,SystemServer进程就可以和其他进程进行通信了。注释(2)处是调用SystemServer的main()方法。下面来看一下注释(1)和注释(2)的方法。
6.1.1 nativeZygoteInit
前面我们提到nativeZygoteInit()是native层的一个方法,那么这个方法是否就是底层里的nativeZygoteInit()?其实并不是,对于这个名字,java层和native层并不是一一对应的,那么我们如何确定调用了native层的哪一个方法呢,此时 我们需要了解它对应的JNI 文件。
frameworks/base/core/jni/AndroidRuntime.cpp
int register_com_android_internal_os_ZygoteInit(JNIEnv* env)
{
    const JNINativeMethod methods[] = { //(1)
        { "nativeZygoteInit", "()V",
            (void*) com_android_internal_os_ZygoteInit_nativeZygoteInit },
    };
    return jniRegisterNativeMethods(env, "com/android/internal/os/ZygoteInit",
        methods, NELEM(methods)); //(2)
}
对应的jni代码在frameworks/base/core/jni/AndroidRuntime.cpp,在看看注释(2)处,已经将com/android/internal/os/ZygoteInit注册,而注释(1)里的数组里面看到对应的nativeZygoteInit方法是com_android_internal_os_ZygoteInit_nativeZygoteInit,com_android_internal_os_ZygoteInit_nativeZygoteInit()方法如下:
frameworks/base/core/jni/AndroidRuntime.cpp
static void com_android_internal_os_ZygoteInit_nativeZygoteInit(JNIEnv* env, jobject clazz)
{
    gCurRuntime->onZygoteInit();//(1)
}
注释(1)处的gCurRuntime()函数指向的是AndroidRuntime的子项AppRuntime,接下来我们看一下onZygoteInit()函数,该函数的位置在framework/base/cmds/app_main.cpp:
framework/base/cmds/app_main.cpp
    virtual void onZygoteInit()
    {
        sp<ProcessState> proc = ProcessState::self();
        ALOGV("App process: starting thread pool.\n");
        proc->startThreadPool();  //(1)
    }
可以看到在注释(1)处这里开启了线程池,此时SystemServer进程就可以通过该Binder线程池和其他进程进行通行了。
6.1.2 applicationInit
6.1中的注释(2)处调用了RuntimeInit的applicationInit()方法,接下来我们查看一下该方法:
frameworks/base/core/java/com/android/internal/os/RuntimeInit.java
    protected static void applicationInit(int targetSdkVersion, String[] argv, ClassLoader classLoader)
            throws Zygote.MethodAndArgsCaller {
       ......
        invokeStaticMain(args.startClass, args.startArgs, classLoader);//(1)
    }
注释(1)处调用了invokeStaticMain()方法:
frameworks/base/core/java/com/android/internal/os/RuntimeInit.java
    private static void invokeStaticMain(String className, String[] argv, ClassLoader classLoader)
            throws Zygote.MethodAndArgsCaller {
        Class<?> cl;

        try {
            cl = Class.forName(className, true, classLoader);   //(1)
        } catch (ClassNotFoundException ex) {
            throw new RuntimeException(
                    "Missing class when invoking static main " + className,
                    ex);
        }

        Method m;
        try {
            m = cl.getMethod("main", new Class[] { String[].class }); //(2)
        } catch (NoSuchMethodException ex) {
            throw new RuntimeException(
                    "Missing static main on " + className, ex);
        } catch (SecurityException ex) {
            throw new RuntimeException(
                    "Problem getting static main on " + className, ex);
        }


        int modifiers = m.getModifiers();
        if (! (Modifier.isStatic(modifiers) && Modifier.isPublic(modifiers))) {
            throw new RuntimeException(
                    "Main method is not public and static on " + className);
        }

        /*
         * This throw gets caught in ZygoteInit.main(), which responds
         * by invoking the exception's run() method. This arrangement
         * clears up all the stack frames that were required in setting
         * up the process.
         */
        throw new Zygote.MethodAndArgsCaller(m, argv);  //(3)
    }
在注释(1)处通过反射得到SystemServer类,注释(2)处找到SystemServer类的main()方法,而在注释(3)处将该main()方法m传给Zygote.MethodAndArgsCaller()然后抛出异常,该异常会向上抛,给ZygoteInit.java的main方法中的try/catch语句捕获,为什么要将该方法向上抛出给会ZygoteInit,然后在ZygoteInit.java的main方法中捕获到然后再调用SystemServer类的main()方法呢,而不是直接在这里调用SystemServer类的main()方法呢?这里源码有中就有解释,因为在这调用SystemServer类的main()方法之前就对SystemServer类有很多初始化的操作,产生了很多栈缓存,因此使用这种抛出异常的方式可以将这些缓存清除掉。接下来我们来看一下,捕获到了异常之后进行了什么操作:
frameworks/base/core/java/com/android/internal/os/ZygoteInit
    public static void main(String argv[]) {
       ........
        } catch (Zygote.MethodAndArgsCaller caller) {
            caller.run();    //(1)
        } catch (Throwable ex) {
            Log.e(TAG, "System zygote died with exception", ex);
            zygoteServer.closeServerSocket();
            throw ex;
        }
    }
在注释(1)处捕获到了抛出的异常之后就调用了Zygote.MethodAndArgsCaller的run()方法:
frameworks/base/core/java/com/android/internal/os/Zygote.java
    public static class MethodAndArgsCaller extends Exception
            implements Runnable {
        /** method to call */
        private final Method mMethod;

        /** argument array */
        private final String[] mArgs;

        public MethodAndArgsCaller(Method method, String[] args) {
            mMethod = method;    //(1)
            mArgs = args;
        }


        public void run() {
            try {
                mMethod.invoke(null, new Object[] { mArgs });  //(2)
            } catch (IllegalAccessException ex) {
                throw new RuntimeException(ex);
            } catch (InvocationTargetException ex) {
                Throwable cause = ex.getCause();
                if (cause instanceof RuntimeException) {
                    throw (RuntimeException) cause;
                } else if (cause instanceof Error) {
                    throw (Error) cause;
                }
                throw new RuntimeException(ex);
            }
        }
    }
我们可以看到注释(1)处的mMethod是传经来的SystemServer的main()方法,因此注释(2)便是启用并进入了SystemServer的main()方法了。
6.2 SystemServer进程
SystemServer的main()方法:
frameworks/base/services/java/com/android/server/SystemServer.java
    /**
     * The main entry point from zygote.
     */
    public static void main(String[] args) {
        new SystemServer().run();//(1)
    }
这里只有一句代码,调用了SystemServer的run方法:
frameworks/base/services/java/com/android/server/SystemServer.java
   private void run()
{
        try {

         ......
            // Initialize native services.
            System.loadLibrary("android_servers");  //(1)

            // Check whether we failed to shut down last time we tried.
            // This call may not return.
            performPendingShutdown();

            // Initialize the system context.
            createSystemContext();   //(2)

            // Create the system service manager.
            mSystemServiceManager = new SystemServiceManager(mSystemContext); //(3)
            mSystemServiceManager.setRuntimeRestarted(mRuntimeRestart);
            LocalServices.addService(SystemServiceManager.class, mSystemServiceManager);
            // Prepare the thread pool for init tasks that can be parallelized
            SystemServerInitThreadPool.get();
        } finally {
            traceEnd();  // InitBeforeStartServices
        }


        // Start services.
        try {
            traceBeginAndSlog("StartServices");
            startBootstrapServices();        //(4)
            startCoreServices();             //(5)
            startOtherServices();            //(6)
            SystemServerInitThreadPool.shutdown();
        } catch (Throwable ex) {
            Slog.e("System", "******************************************");
            Slog.e("System", "************ Failure starting system services", ex);
            throw ex;
        }
       .......
    }
在注释(1)处架子啊了动态库libandroid_servers.so,在注释(2)处创建了系统context,在注释(3)处创建了SystemServiceManager,SystemServiceManager将会对一系列的系统服务进行管理。注释(4)、(5)、(6)分别启动了三类服务,分别是引导服务、核心服务、其他服务。引导服务有:ActivityManagerService、PowerManagerService、PackageManagerService等,核心服务有DropBoxManagerService、BatteryService、UsageStatsService等,其他服务有CameraService、AlarmManagerService等。这些所有的服务的父类都为SystemService。
frameworks/base/services/java/com/android/server/SystemServer.java
  private void startBootstrapServices() {
       ......

        // Power manager needs to be started early because other services need it.
        // Native daemons may be watching for it to be registered so it must be ready
        // to handle incoming binder calls immediately (including being able to verify
        // the permissions for those calls).
        traceBeginAndSlog("StartPowerManager");
        mPowerManagerService = mSystemServiceManager.startService
                       (PowerManagerService.class);//(1)

     ......
          mSystemServiceManager.startService(RecoverySystemService.class);//(2)
     ......
          mSystemServiceManager.startService(LightsService.class);//(3)
     ......
}
这里的注释(1)、(2)、(3)等都是调用了SystemServiceManager的startService()方法启动了一些服务,startBootstrapServices()方法启动了很多服务,我这里没有将所有的启动剩余服务的部分代码一一展示出来。调用的startService()方法如下:
frameworks/base/services/core/java/com/android/server/SystemServeManager.java
    public void startService(@NonNull final SystemService service) {
        // Register it.
        mServices.add(service);   //(1)
        // Start it.
        long time = System.currentTimeMillis();
        try {
            service.onStart();     //(2)
        } catch (RuntimeException ex) {
            throw new RuntimeException("Failed to start service " + service.getClass().getName()
                    + ": onStart threw an exception", ex);
        }
        warnIfTooLong(System.currentTimeMillis() - time, service, "onStart");
    }
在注释(1)中首先将需要启动的系统服务添加到系统服务列表里,然后在注释(2)处调用服务的onStart()方法启动服务。
6.3 SystemServer进程总结
(1)启动Binder线程池
(2)创建SystemServiceManager
(3)启动系统各种服务
7.Launcher
由于篇幅过长,launcher的详细启动流程暂时不在这篇文章里详细描述。我将会在下一篇文章里面说明,感兴趣的同学可以关注一下。
在前面我们较详细的把init进程、Zygote进程以及SystemServer进程的启动流程中主要进行的操作梳理了一遍,这些可以说是Android操作启动到呈现主页给用户的准备工做,直到Launcher,也就是将主页界面展示给大家,Android操作系统就启动完成了。
8.总结
我们在前面将Android系统启动做的主要工作都展示出来了,必要的地方也将代码贴出来了,但是我们阅读源码的时候就发现其实这个过程做的工作远远比我上面提到的要多,我这里只是将“主线”贴出来了,如果需要更加详细的了解各个细节,同学们可以自行查阅源码深究。
总的流程如下:
电源启动
BootLoader引导程序
Linux内核启动
init进程启动
Zygote进程启动
SystemServer进程的启动
启动Launcher