队列的接口实现(附图解和源码)
文章目录
- 队列的接口实现(附图解和源码)
- 前言
- 一、定义结构体
- 二、接口实现(附图解+源码)
- 1.初始化队列
- 2.销毁队列
- 3.队尾入队列
- 4.判断队列是否为空
- 5.队头出队列
- 6.获取队列头部元素
- 7.获取队列尾部元素
- 8.获取队列中有效元素个数
- 三、源代码展示
- 1.test.c(测试+主函数)
- 2.Queue.h(接口函数的声明)
- 3.Queue.c(接口函数的实现)
- 总结
前言
本文主要介绍对列中增删查改等接口实现,结尾附总源码!
一、定义结构体
在这里我们用链表的结构实现队列!(效率比数组高)

这里和单链表不同的是:需要定义两个结构体!一个表示链式结构队列,另一个是队列的结构。
代码如下(示例):
typedef int QDataType;
typedef struct QueueNode
{
	struct QueueNode* next;
	QDataType data;
}QNode;
typedef struct Queue
{
	QNode* head;
	QNode* tail;
	int size;
}Queue;
二、接口实现(附图解+源码)
这里一共8个接口,我会一 一 实现(源码+图解)
1.初始化队列
初始化队列和单链表初始化时一致,详细的可以参考单链表初始化!
代码如下(示例):
void QueueInit(Queue* pq)
{
	assert(pq);
	pq->head = pq->tail = NULL;
	pq->size = 0;
}
2.销毁队列
 最后不要忘了把pq->head和pq->tail置为NULL
代码如下(示例):
void QueueDestroy(Queue* pq)
{
	assert(pq);
	QNode* cur = pq->head;
	while (cur)
	{
		QNode* del = cur;
		cur = cur->next;
		free(del);
	}

	pq->head = pq->tail = NULL;
}
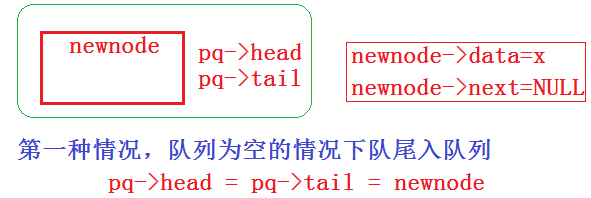
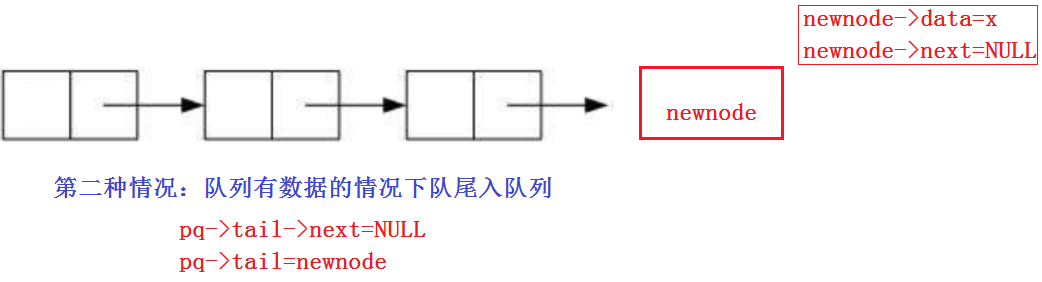
3.队尾入队列
先用 malloc 开辟一个 newnode 空间!
代码如下(示例):
void QueuePush(Queue* pq, QDataType x)
{
	assert(pq);
	QNode* newnode = (QNode*)malloc(sizeof(QNode));
	if (newnode == NULL)
	{
		perror("malloc fail");
		exit(-1);
	}
	else
	{
		newnode->data = x;
		newnode->next = NULL;
	}
	if (pq->tail == NULL)
	{
		pq->head = pq->tail = newnode;
	}
	else
	{
		pq->tail->next = newnode;
		pq->tail = newnode;
	}
	pq->size++;
}
既然要不断判断链表是否为空,我们应该写一个 判断队列是否为空的函数。
4.判断队列是否为空
如果为空返回非零结果,如果非空返回0
代码如下(示例):
bool QueueEmpty(Queue* pq)
{
	assert(pq);
	return pq->head == NULL && pq->tail == NULL;
}
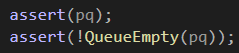
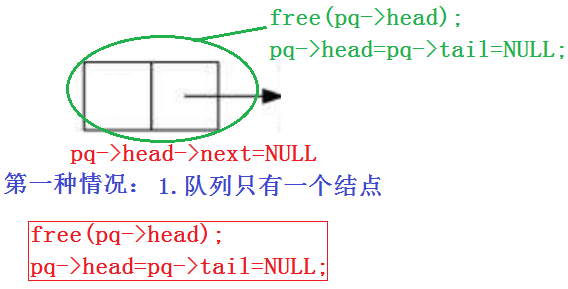
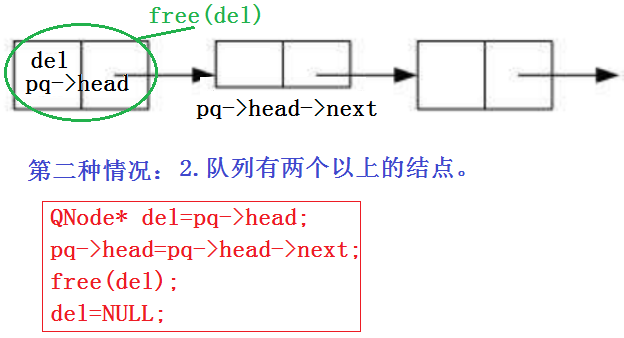
5.队头出队列
注意:删除头对列时要注意队列可以为空,所以用assert进行断言!
这里也分两种情况:1.队列只有一个结点,2.队列有两个以上的结点。
6.获取队列头部元素
直接返回 pq->head->data 即可。
代码如下(示例):
QDataType QueueFront(Queue* pq)
{
	assert(pq);
	assert(!QueueEmpty(pq));
	return pq->head->data;
}
7.获取队列尾部元素
直接返回 pq->tail->data 即可。
代码如下(示例):
QDataType QueueBack(Queue* pq)
{
	assert(pq);
	assert(!QueueEmpty(pq));
	return pq->tail->data;
}
8.获取队列中有效元素个数
直接返回 pq->size 即可
代码如下(示例):
int QueueSize(Queue* pq)
{
	assert(pq);
	return pq->size;
}
如果我们没有在结构体中定义 size 应该怎么做?

代码如下(示例):
int QueueSize(Queue* pq)
{
	assert(pq);
	QNode* cur = pq->head;
	int n = 0;
	while (cur)
	{
		++n;
		cur = cur->next;
	}
	return n;
}
三、源代码展示
1.test.c(测试+主函数)
代码如下(示例):
//#include <stdio.h>
//
//int f(int n)
//{
//	return n == 1 ? 1 : f(n - 1) + n;
//}
//
//int main()
//{
//	printf("%d\n", f(10000));
//
//	return 0;
//}
#include <stdio.h>
#include "Stack.h"
#include "Queue.h"
// 解耦 -- 低耦合 高内聚
// 数据结构建议不要直接访问结构数据,一定要通过函数接口访问
void TestStack()
{
	ST st;
	StackInit(&st);
	StackPush(&st, 1);
	StackPush(&st, 2);
	StackPush(&st, 3);
	printf("%d ", StackTop(&st));
	StackPop(&st);
	printf("%d ", StackTop(&st));
	StackPop(&st);
	StackPush(&st, 4);
	StackPush(&st, 5);
	while (!StackEmpty(&st))
	{
		printf("%d ", StackTop(&st));
		StackPop(&st);
	}
	printf("\n");
}
void TestQueue()
{
	Queue q;
	QueueInit(&q);
	QueuePush(&q, 1);
	QueuePush(&q, 2);
	QueuePush(&q, 3);
	printf("%d ", QueueFront(&q));
	QueuePop(&q);
	printf("%d ", QueueFront(&q));
	QueuePop(&q);
	QueuePush(&q, 4);
	QueuePush(&q, 4);
	QueuePush(&q, 4);
	while (!QueueEmpty(&q))
	{
		printf("%d ", QueueFront(&q));
		QueuePop(&q);
	}
	printf("\n");
	QueueDestroy(&q);
}
int main()
{
	//TestStack();
	TestQueue();
	return 0;
}
2.Queue.h(接口函数的声明)
代码如下(示例):
#pragma once
#include <stdio.h>
#include <stdlib.h>
#include <assert.h>
#include <stdbool.h>
typedef int QDataType;
typedef struct QueueNode
{
struct QueueNode* next;
QDataType data;
}QNode;
typedef struct Queue
{
QNode* head;
QNode* tail;
int size;
}Queue;
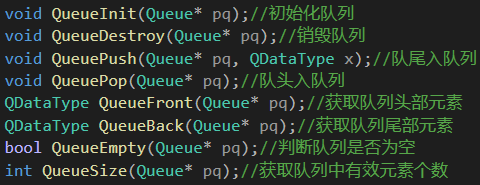
void QueueInit(Queue* pq);//初始化队列
void QueueDestroy(Queue* pq);//销毁队列
void QueuePush(Queue* pq, QDataType x);//队尾入队列
void QueuePop(Queue* pq);//队头入队列
QDataType QueueFront(Queue* pq);//获取队列头部元素
QDataType QueueBack(Queue* pq);//获取队列尾部元素
bool QueueEmpty(Queue* pq);//判断队列是否为空
int QueueSize(Queue* pq);//获取队列中有效元素个数
3.Queue.c(接口函数的实现)
代码如下(示例):
#include "Queue.h"
void QueueInit(Queue* pq)
{
	assert(pq);
	pq->head = pq->tail = NULL;
	pq->size = 0;
}
void QueueDestroy(Queue* pq)
{
	assert(pq);
	QNode* cur = pq->head;
	while (cur)
	{
		QNode* del = cur;
		cur = cur->next;
		free(del);
	}
	pq->head = pq->tail = NULL;
}
void QueuePush(Queue* pq, QDataType x)
{
	assert(pq);
	QNode* newnode = (QNode*)malloc(sizeof(QNode));
	if (newnode == NULL)
	{
		perror("malloc fail");
		exit(-1);
	}
	else
	{
		newnode->data = x;
		newnode->next = NULL;
	}
	if (pq->tail == NULL)
	{
		pq->head = pq->tail = newnode;
	}
	else
	{
		pq->tail->next = newnode;
		pq->tail = newnode;
	}
	pq->size++;
}
void QueuePop(Queue* pq)
{
	assert(pq);
	assert(!QueueEmpty(pq));

	if (pq->head->next == NULL)
	{
		free(pq->head);
		pq->head = pq->tail = NULL;
	}
	else
	{
		QNode* del = pq->head;
		pq->head = pq->head->next;

		free(del);
		del = NULL;
	}

	pq->size--;
}
QDataType QueueFront(Queue* pq)
{
	assert(pq);
	assert(!QueueEmpty(pq));
	return pq->head->data;
}
QDataType QueueBack(Queue* pq)
{
	assert(pq);
	assert(!QueueEmpty(pq));
	return pq->tail->data;
}
bool QueueEmpty(Queue* pq)
{
	assert(pq);
	return pq->head == NULL && pq->tail == NULL;
}
int QueueSize(Queue* pq)
{
	assert(pq);
	/*QNode* cur = pq->head;
	int n = 0;
	while (cur)
	{
		++n;
		cur = cur->next;
	}
	return n;*/
	return pq->size;
}
总结
以上就是今天要讲的内容,本文介绍了队列8种接口的模拟实现的图解+源代码
如果我的博客对你有所帮助记得三连支持一下,感谢大家的支持!


![[C++]string类模拟实现](https://img-blog.csdnimg.cn/c60fc66ba14e48b3837bd944fb19fccd.png)