ESP32 Arduino FAT文件系统详细使用教程
- 📌参考1(在
Linux环境下创建二进制文件):https://github.com/marcmerlin/esp32_fatfsimage - 📌参考2
http://marc.merlins.org/perso/arduino/post_2019-03-30_Using-FatFS-FFat-on-ESP32-Flash-With-Arduino.html - 📌参考3:
https://techtutorialsx.com/2018/10/06/esp32-arduino-fat-file-system/ - 📌参考4:
https://github.com/lorol/arduino-esp32fs-plugin - 📍上传工具(
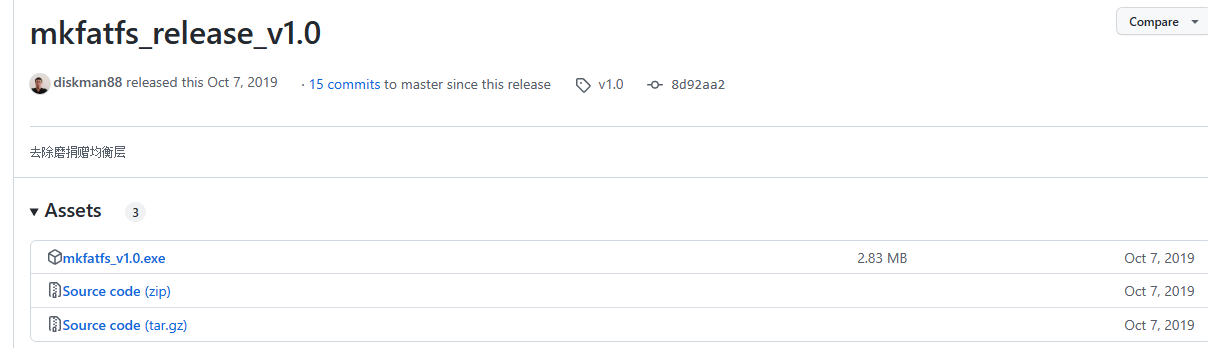
esp32fs)下载地址:https://github.com/lorol/arduino-esp32fs-plugin/releases - 🔨
mkfatfs上传工具包:
https://github.com/labplus-cn/mkfatfs/releases/download/v2.0.1/mkfatfs.rar
🎉上面的资源不好下载,这里提供网盘资源:
//mkfatfs资源
链接: https://pan.baidu.com/s/17IQJNh9dzVH8UCEyBmeZVw
提取码: tf1j
//esp32fs插件
链接: https://pan.baidu.com/s/1o6oYHoMje2fwdm8Jz1QQTg
提取码: 4w4v
- ✨利用核心固件自带的库,不需要加载其他第三方库。
🚩说明:FAT文件系统的使用,应该和
littleFS以及SPIFFS文件系统使用类似,不仅可以通过程序中读写操作还可以通过工具mkfatfs创建FatFS文件上传文件到该文件系统当中。但是一直尝试后面这种方式,并没有实现对于文件打包和上传功能。本文仅对代码中创建文件并写入内容的使用说明。
- 🔖存储结构:

- 🌿在使用Arduino框架下,使用FATFS文件系统文件架构和使用SPIFFS或littleFS一样,将需要上传的文件放置到
data文件夹内。
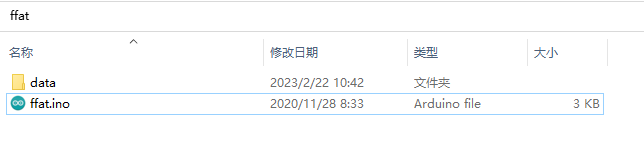
- 🌴项目树结构:
ffat
    │  ffat.ino
    │
    └─data
            ESP32Explorer.html
            fatfsimage
            hello.txt
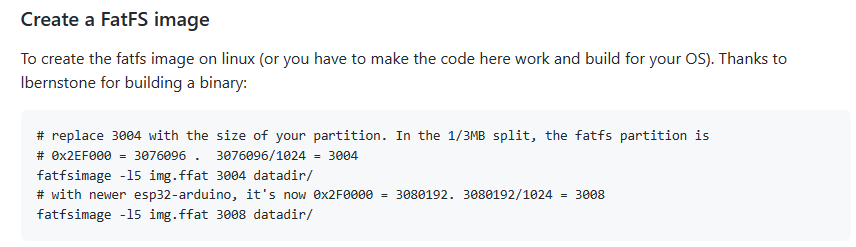
- 在上面的
参考4网页当作有这么一段话,在linux环境下,创建FatFS文件。
✅FATFS文件上传操作说明:
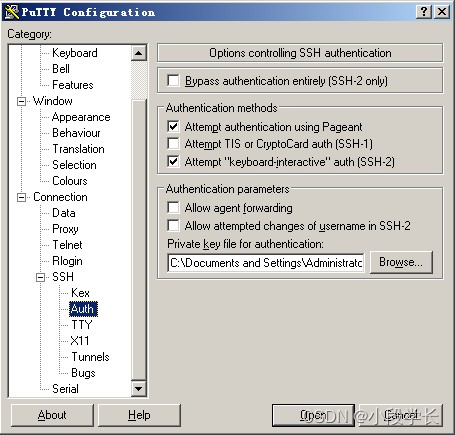
- 上传插件的安装,请下载上面提供的相关链接。
- 安装方法也在
参考4页面有说明:
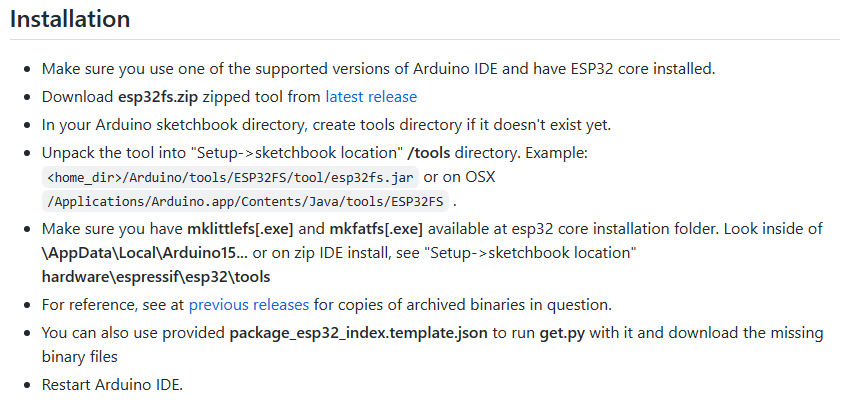
- 🔧将上面的上传工具包下载下来,将文件并放置到下面的目录下:(如果是
1.0.6固件版本那么就放置到对应的1.0.6的tools目录下)
- 🔨上传FATFS文件:
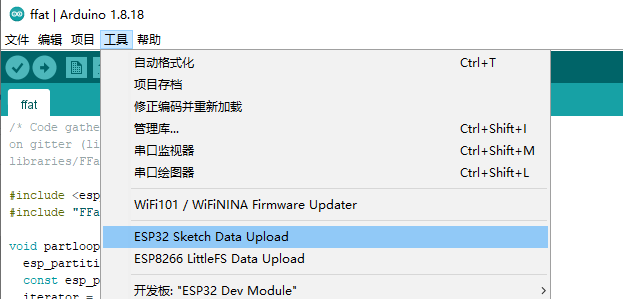
- 🌿选择
FatFS

- ⚡上传时,需要关闭串口,否则上传会失败。
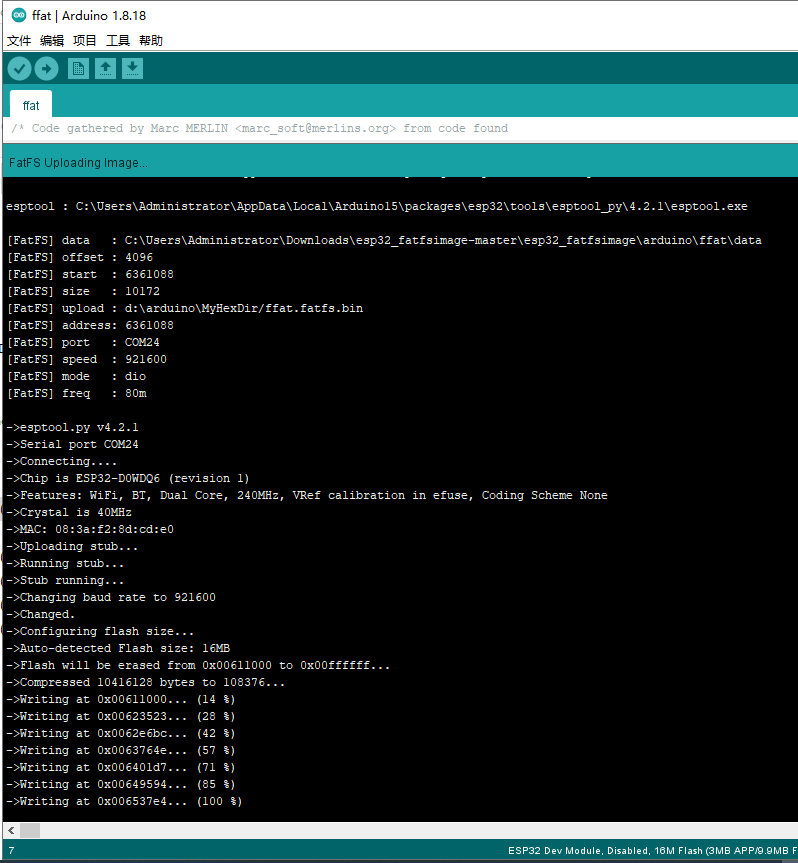
✨如果没有成功,提示:
FatFS Error: mkfatfsnot found!,,该提示信息,应该是说工具没有找到。没有将mkfatfs放置到指定文件夹了。
https://github.com/lorol/arduino-esp32fs-plugin/releaseshttps://github.com/lorol/arduino-esp32fs-plugin/releases/tag/2.0.1
- Universal tool for SPIFFS, LittleFS and FatFS:
https://github.com/lorol/arduino-esp32fs-plugin/releases/tag/2.0.1
🛠配置FAT分区
根据个人开发板的flash容量,选择合适的配置FATFS分区。
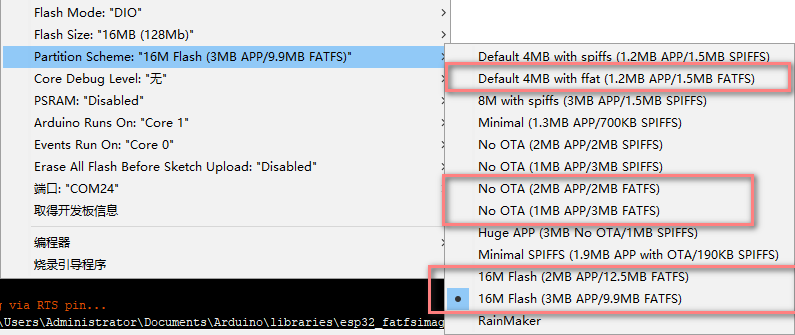
🍁自定义分区表配置
首先确定手上的开发板硬件配置,也就是flash容量大小,需要确定,才能进一步进行分区表配置,可以通过上面的示例代码烧录后,查看串口打印信息,可以看到flash容量,
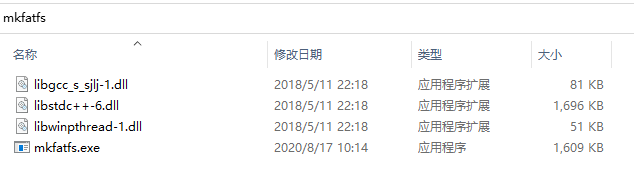
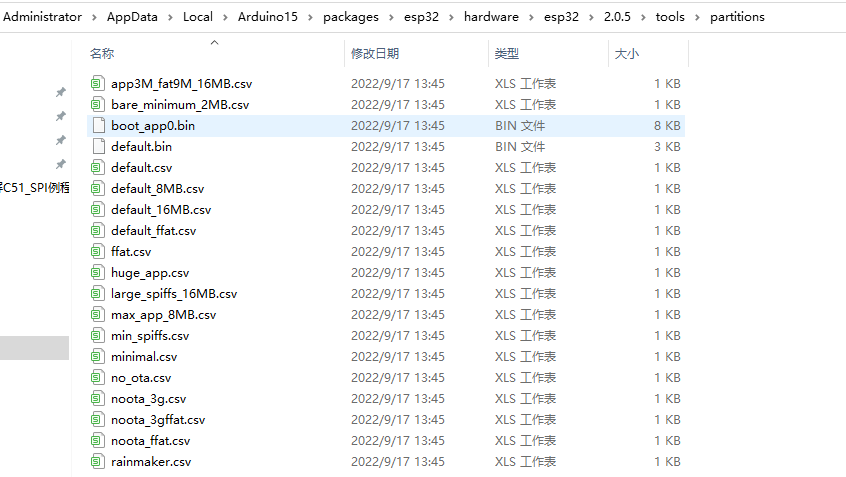
- 找到Arduino框架下的ESP32固件分区表文件位置:(1.0.6固件版本)
C:\Users\Administrator\AppData\Local\Arduino15\packages\esp32\hardware\esp32\1.0.6\tools\partitions
- (2.0.5固件版本)
C:\Users\Administrator\AppData\Local\Arduino15\packages\esp32\hardware\esp32\2.0.5\tools\partitions
- 🔖个人自定义配置的FATFS分区:

📚固件自带例程
- 📍位置:
C:\Users\Administrator\AppData\Local\Arduino15\packages\esp32\hardware\esp32\2.0.5\libraries\FFat\examples
🔖所包含的2个例程几乎涵盖了FFAT所有对文件操作的函数。这里就不将具体代码贴出来了。

📝例程1
📋从程序代码中,创建一个名为
test.txt文件并写入数据.保存到FATFS文件系统当中。
#include "FFat.h"

void setup() {

   Serial.begin(115200);

   if(!FFat.begin(true)){
        Serial.println("An Error has occurred while mounting FFat");
        return;
   }

    //--------- Write to file
    File fileToWrite = FFat.open("/test.txt", FILE_WRITE);

    if(!fileToWrite){
        Serial.println("There was an error opening the file for writing");
        return;
    }

    if(fileToWrite.println("ORIGINAL CONTENT")){
        Serial.println("File was written");;
    } else {
        Serial.println("File write failed");
    }

    fileToWrite.close();

    //--------- Apend content to file
    File fileToAppend = FFat.open("/test.txt", FILE_APPEND);

    if(!fileToAppend){
        Serial.println("There was an error opening the file for appending");
        return;
    }

    if(fileToAppend.println("APPENDED LINE")){
        Serial.println("Content was appended");
    } else {
        Serial.println("File append failed");
    }

    fileToAppend.close();

    //---------- Read file
    File fileToRead = FFat.open("/test.txt");

    if(!fileToRead){
        Serial.println("Failed to open file for reading");
        return;
    }

    Serial.println("Final file Content:");

    while(fileToRead.available()){

        Serial.write(fileToRead.read());
    }

    fileToRead.close();
}

void loop() {}
📝例程2
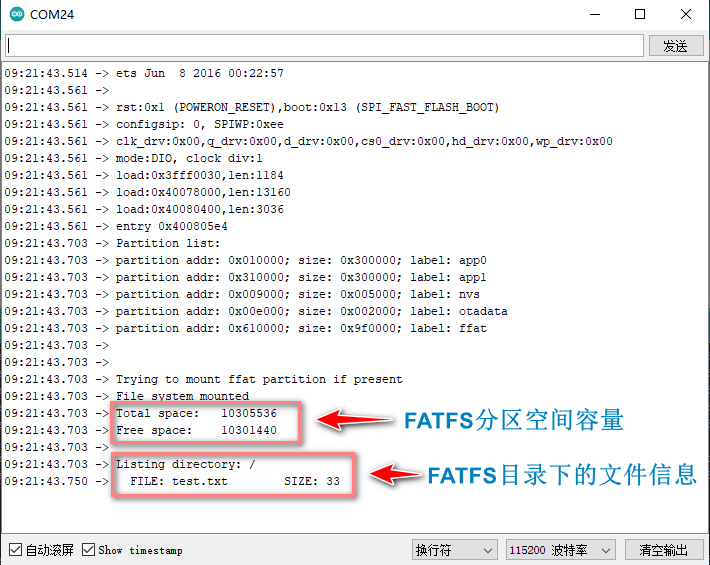
📑读取FATFS文件文件系统中的文件信息,也就是上面串口打印的信息截图。
/* Code gathered by Marc MERLIN <marc_soft@merlins.org> from code found
on gitter (license unknown) and in esp32-arduino's
libraries/FFat/examples/FFat_Test/FFat_Test.ino */

#include <esp_partition.h>
#include "FFat.h"

void partloop(esp_partition_type_t part_type) {
  esp_partition_iterator_t iterator = NULL;
  const esp_partition_t *next_partition = NULL;
  iterator = esp_partition_find(part_type, ESP_PARTITION_SUBTYPE_ANY, NULL);
  while (iterator) {
     next_partition = esp_partition_get(iterator);
     if (next_partition != NULL) {
        Serial.printf("partition addr: 0x%06x; size: 0x%06x; label: %s\n", next_partition->address, next_partition->size, next_partition->label);
     iterator = esp_partition_next(iterator);
    }
  }
}

void listDir(fs::FS &fs, const char * dirname, uint8_t levels){
    Serial.printf("Listing directory: %s\r\n", dirname);

    File root = fs.open(dirname);
    if(!root){
        Serial.println("- failed to open directory");
        return;
    }
    if(!root.isDirectory()){
        Serial.println(" - not a directory");
        return;
    }

    File file = root.openNextFile();
    while(file){
        if(file.isDirectory()){
            Serial.print("  DIR : ");
            Serial.println(file.name());
            if(levels){
                listDir(fs, file.name(), levels -1);
            }
        } else {
            Serial.print("  FILE: ");
            Serial.print(file.name());
            Serial.print("\tSIZE: ");
            Serial.println(file.size());
        }
	file.close();
        file = root.openNextFile();
    }
}

void setup(){
    Serial.begin(115200);
    Serial.setDebugOutput(true);

    Serial.println("Partition list:");
    partloop(ESP_PARTITION_TYPE_APP);
    partloop(ESP_PARTITION_TYPE_DATA);

    Serial.println("\n\nTrying to mount ffat partition if present");

    // Only allow one file to be open at a time instead of 10, saving 9x4 - 36KB of RAM
    if(!FFat.begin( 0, "", 1 )){
        Serial.println("FFat Mount Failed");
        return;
    }

    Serial.println("File system mounted");
    Serial.printf("Total space: %10lu\n", FFat.totalBytes());
    Serial.printf("Free space:  %10lu\n\n", FFat.freeBytes());
    listDir(FFat, "/", 5);
}

void loop(){}


![[MySQL]基本数据类型及表的基本操作](https://img-blog.csdnimg.cn/img_convert/cb75587e0710f47888e68e907eb130f2.gif)