1. 生态简介
介绍PyTorch生态在图像、视频、文本等领域中的发展,针对某个领域选择其中有代表性的一个工具包进行详细介绍
1.1 torchvision
torchvision包含了在计算机视觉中常常用到的数据集,模型和图像处理的方式
| 函数 | 作用 |
| torchvision.datasets * | 计算机视觉中常见的数据集 |
| torchvision.models * | 提供一些预训练好的模型,具体 |
| torchvision.tramsforms* | 数据预处理方法,具体 |
| torchvision.io | 视频、图片和文件的 IO 操作的功能,读取、写入、编解码处理操作 |
| torchvision.ops | 提供许多计算机视觉的特定操作,具体 |
| torchvision.utils | 提供一些可视化的方法,具体 |
1.2 PyTorchVideo
提供了加速视频理解研究所需的模块化和高效的API
1.2.1 亮点
| 亮点 | 说明 |
| 基于 PyTorch | 使用 PyTorch 构建 |
| Model Zoo | 提供了包含I3D、R(2+1)D、SlowFast、X3D、MViT等SOTA模型的高质量model zoo,PyTorch Hub |
| 数据预处理和常见数据 | 主流数据集和相应的数据预处理,数据增强trick |
| 模块化设计 | 提供许多模块方便用户进行调用和读取 |
| 支持多模态 | 支持visual和audio |
| 移动端部署优化 | 模型经过PyTorchVideo优化了最高达7倍的提速,并实现了第一个能实时跑在手机端的X3D模型(Android Demo APP) |
1.2.2 PyTorchVideo的安装
pip install pytorchvideo1.2.3 Model zoo 和 benchmark
(1)Kinetics-400;
(2)Something-Something V2
1.2.4 使用 PyTorchVideo model zoo
(1)TorchHub
(2)PySlowFast
(3)PyTorch Lightning
1.3 torchtext
1.3.1 torchtext的主要组成部分
| 数据处理工具 | torchtext.data.functional、torchtext.data.utils |
| 数据集 | torchtext.data.datasets |
| 词表工具 | torchtext.vocab |
| 评测指标 | torchtext.metrics |
1.3.2 torchtext的安装
pip install torchtext1.3.3 构建数据集
Field函数
tokenize = lambda x: x.split()
TEXT = data.Field(sequential=True, tokenize=tokenize, lower=True, fix_length=200)
LABEL = data.Field(sequential=False, use_vocab=False)
# sequential设置数据是否是顺序表示的;
# tokenize用于设置将字符串标记为顺序实例的函数
# lower设置是否将字符串全部转为小写;
#@ fix_length设置此字段所有实例都将填充到一个固定的长度,方便后续处理;
# use_vocab设置是否引入Vocab object,如果为False,则需要保证之后输入field中的data都是numerical的1.3.4 评价指标
BLEU (bilingual evaluation understudy) score来评价预测文本和标签文本之间的相似程度
from torchtext.data.metrics import bleu_score
candidate_corpus = [['My', 'full', 'pytorch', 'test'], ['Another', 'Sentence']]
references_corpus = [[['My', 'full', 'pytorch', 'test'], ['Completely', 'Different']], [['No', 'Match']]]
bleu_score(candidate_corpus, references_corpus)注:HuggingFace
1.4 transforms实战
1.4.1 观察数据集
from PIL import Image
from torchvision import transforms
import matplotlib.pyplot as plt
%matplotlib inline
# 加载原始图片
img = Image.open("./lenna.jpg")
print(img.size)
plt.imshow(img)
1.4.2 transforms.CenterCrop(size)
# 对给定图片进行沿中心切割
# 对图片沿中心放大切割,超出图片大小的部分填0
img_centercrop1 = transforms.CenterCrop((500,500))(img)
print(img_centercrop1.size)
# 对图片沿中心缩小切割,超出期望大小的部分剔除
img_centercrop2 = transforms.CenterCrop((224,224))(img)
print(img_centercrop2.size)
plt.subplot(1,3,1),plt.imshow(img),plt.title("Original")
plt.subplot(1,3,2),plt.imshow(img_centercrop1),plt.title("500 * 500")
plt.subplot(1,3,3),plt.imshow(img_centercrop2),plt.title("224 * 224")
plt.show()
1.4.3 transforms.ColorJitter(brightness=0, contrast=0, saturation=0, hue=0)
# 对图片的亮度,对比度,饱和度,色调进行改变
img_CJ = transforms.ColorJitter(brightness=1,contrast=0.5,saturation=0.5,hue=0.5)(img)
print(img_CJ.size)
plt.imshow(img_CJ)
1.4.4 transforms.Grayscale(num_output_channels)
img_grey_c3 = transforms.Grayscale(num_output_channels=3)(img)
img_grey_c1 = transforms.Grayscale(num_output_channels=1)(img)
plt.subplot(1,2,1),plt.imshow(img_grey_c3),plt.title("channels=3")
plt.subplot(1,2,2),plt.imshow(img_grey_c1),plt.title("channels=1")
plt.show()
1.4.5 transforms.Resize
# 等比缩放
img_resize = transforms.Resize(224)(img)
print(img_resize.size)
plt.imshow(img_resize)
1.4.6 transforms.Scale
# 等比缩放 不推荐使用此转换以支持调整大小
img_scale = transforms.Scale(224)(img)
print(img_scale.size)
plt.imshow(img_scale)
1.4.7 transforms.RandomCrop
# 随机裁剪成指定大小
# 设立随机种子
import torch
torch.manual_seed(31)
# 随机裁剪
img_randowm_crop1 = transforms.RandomCrop(224)(img)
img_randowm_crop2 = transforms.RandomCrop(224)(img)
print(img_randowm_crop1.size)
plt.subplot(1,2,1),plt.imshow(img_randowm_crop1)
plt.subplot(1,2,2),plt.imshow(img_randowm_crop2)
plt.show()
1.4.8 transforms.RandomHorizontalFlip
# 随机左右旋转
# 设立随机种子,可能不旋转
import torch
torch.manual_seed(31)

img_random_H = transforms.RandomHorizontalFlip()(img)
print(img_random_H.size)
plt.imshow(img_random_H)
1.4.9 transforms.RandomVerticalFlip
# 随机垂直方向旋转
img_random_V = transforms.RandomVerticalFlip()(img)
print(img_random_V.size)
plt.imshow(img_random_V)
1.4.10 transforms.RandomResizedCrop
# 随机裁剪成指定大小
img_random_resizecrop = transforms.RandomResizedCrop(224,scale=(0.5,0.5))(img)
print(img_random_resizecrop.size)
plt.imshow(img_random_resizecrop)
1.4.11 对图片进行组合变化 tranforms.Compose()
# 对一张图片的操作可能是多种的,我们使用transforms.Compose()将他们组装起来
transformer = transforms.Compose([
    transforms.Resize(256),
    transforms.transforms.RandomResizedCrop((224), scale = (0.5,1.0)),
    transforms.RandomVerticalFlip(),
])
img_transform = transformer(img)
plt.imshow(img_transform)
2. 模型部署
(1)使用ONNX进行部署并推理;
(2)将模型部署在手机端、开发板,嵌入式设备;
(3)模型部署pipeline
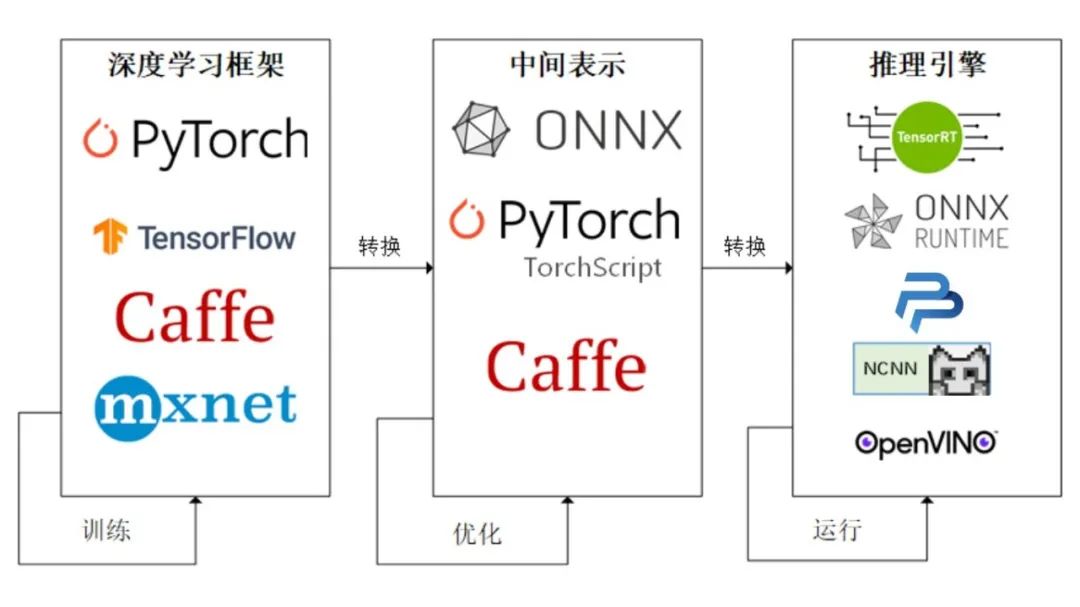
2.1 ONNX和ONNX Runtime简介
2.1.1 ONNX简介
ONNX( Open Neural Network Exchange) 是 Facebook (现Meta) 和微软在2017年共同发布的,用于标准描述计算图的一种格式。
ONNX官网
ONNX GitHub
2.1.2 ONNX Runtime简介
ONNX Runtime 是由微软维护的一个跨平台机器学习推理加速器,它直接对接ONNX,可以直接读取.onnx文件并实现推理,不需要再把 .onnx 格式的文件转换成其他格式的文件。
ONNX Runtime官网
ONNX Runtime GitHub
2.1.3 ONNX和ONNX Runtime的安装
# 激活虚拟环境
conda activate env_name # env_name换成环境名称
# 安装onnx
pip install onnx
# 安装onnx runtime
pip install onnxruntime # 使用CPU进行推理
# pip install onnxruntime-gpu # 使用GPU进行推理
2.2 模型导出为ONNX
2.2.1 模型转换为ONNX格式
import torch.onnx
# 转换的onnx格式的名称,文件后缀需为.onnx
onnx_file_name = "xxxxxx.onnx"
# 我们需要转换的模型,将torch_model设置为自己的模型
model = torch_model
# 加载权重,将model.pth转换为自己的模型权重
# 如果模型的权重是使用多卡训练出来,我们需要去除权重中多的module. 具体操作可以见5.4节
model = model.load_state_dict(torch.load("model.pth"))
# 导出模型前,必须调用model.eval()或者model.train(False)
model.eval()
# dummy_input就是一个输入的实例,仅提供输入shape、type等信息
batch_size = 1 # 随机的取值,当设置dynamic_axes后影响不大
dummy_input = torch.randn(batch_size, 1, 224, 224, requires_grad=True)
# 这组输入对应的模型输出
output = model(dummy_input)
# 导出模型
torch.onnx.export(model,        # 模型的名称
                  dummy_input,   # 一组实例化输入
                  onnx_file_name,   # 文件保存路径/名称
                  export_params=True,        #  如果指定为True或默认, 参数也会被导出. 如果你要导出一个没训练过的就设为 False.
                  opset_version=10,          # ONNX 算子集的版本,当前已更新到15
                  do_constant_folding=True,  # 是否执行常量折叠优化
                  input_names = ['input'],   # 输入模型的张量的名称
                  output_names = ['output'], # 输出模型的张量的名称
                  # dynamic_axes将batch_size的维度指定为动态,
                  # 后续进行推理的数据可以与导出的dummy_input的batch_size不同
                  dynamic_axes={'input' : {0 : 'batch_size'},
                                'output' : {0 : 'batch_size'}})
2.2.2 ONNX模型的检验
import onnx
# 我们可以使用异常处理的方法进行检验
try:
    # 当我们的模型不可用时,将会报出异常
    onnx.checker.check_model(self.onnx_model)
except onnx.checker.ValidationError as e:
    print("The model is invalid: %s"%e)
else:
    # 模型可用时,将不会报出异常,并会输出“The model is valid!”
    print("The model is valid!")
2.2.3 ONNX可视化
Netron
2.3 使用ONNX Runtime进行推理
# 导入onnxruntime
import onnxruntime
# 需要进行推理的onnx模型文件名称
onnx_file_name = "xxxxxx.onnx"

# onnxruntime.InferenceSession用于获取一个 ONNX Runtime 推理器
ort_session = onnxruntime.InferenceSession(onnx_file_name)

# 构建字典的输入数据,字典的key需要与我们构建onnx模型时的input_names相同
# 输入的input_img 也需要改变为ndarray格式
ort_inputs = {'input': input_img}
# 我们更建议使用下面这种方法,因为避免了手动输入key
# ort_inputs = {ort_session.get_inputs()[0].name:input_img}

# run是进行模型的推理,第一个参数为输出张量名的列表,一般情况可以设置为None
# 第二个参数为构建的输入值的字典
# 由于返回的结果被列表嵌套,因此我们需要进行[0]的索引
ort_output = ort_session.run(None,ort_inputs)[0]
# output = {ort_session.get_outputs()[0].name}
# ort_output = ort_session.run([output], ort_inputs)[0]
2.4 代码实战
2.4.1 定义超分辨模型
# 导入相关包
import io
import numpy as np
from torch import nn
import torch.utils.model_zoo as model_zoo
import torch.onnx
import torch.nn as nn
import torch.nn.init as init

# 定义超分辨网络
class SuperResolutionNet(nn.Module):
    def __init__(self, upscale_factor, inplace=False):
        super(SuperResolutionNet, self).__init__()

        self.relu = nn.ReLU(inplace=inplace)
        self.conv1 = nn.Conv2d(1, 64, (5, 5), (1, 1), (2, 2))
        self.conv2 = nn.Conv2d(64, 64, (3, 3), (1, 1), (1, 1))
        self.conv3 = nn.Conv2d(64, 32, (3, 3), (1, 1), (1, 1))
        self.conv4 = nn.Conv2d(32, upscale_factor ** 2, (3, 3), (1, 1), (1, 1))
        self.pixel_shuffle = nn.PixelShuffle(upscale_factor)

        self._initialize_weights()

    def forward(self, x):
        x = self.relu(self.conv1(x))
        x = self.relu(self.conv2(x))
        x = self.relu(self.conv3(x))
        x = self.pixel_shuffle(self.conv4(x))
        return x

	# 模型初始化
    def _initialize_weights(self):
        init.orthogonal_(self.conv1.weight, init.calculate_gain('relu'))
        init.orthogonal_(self.conv2.weight, init.calculate_gain('relu'))
        init.orthogonal_(self.conv3.weight, init.calculate_gain('relu'))
        init.orthogonal_(self.conv4.weight)

# 实例化模型
torch_model = SuperResolutionNet(upscale_factor=3)
2.4.2 模型导出为ONNX格式
model_url = 'https://s3.amazonaws.com/pytorch/test_data/export/superres_epoch100-44c6958e.pth'
batch_size = 1    # just a random number
# 加载预训练得到权重
map_location = lambda storage, loc: storage
if torch.cuda.is_available():
    map_location = None
torch_model.load_state_dict(model_zoo.load_url(model_url, map_location=map_location))

# 将模型设置为推理模式
torch_model.eval()
# Input to the model
x = torch.randn(batch_size, 1, 224, 224, requires_grad=True)
torch_out = torch_model(x)

# 导出模型
torch.onnx.export(torch_model,               # model being run
                  x,             # model input (or a tuple for multiple inputs)
                  "super_resolution.onnx",   # where to save the model (can be a file or file-like object)
                  export_params=True,        # store the trained parameter weights inside the model file
                  opset_version=10,   # the ONNX version to export the model to
                  do_constant_folding=True,  # whether to execute constant folding for optimization
                  input_names = ['input'],   # the model's input names
                  output_names = ['output'], # the model's output names
                  # variable length axes
                  dynamic_axes={'input' : {0 : 'batch_size'},
                                'output' : {0 : 'batch_size'}})
2.4.3 检验ONNX模型
import onnx
# 我们可以使用异常处理的方法进行检验
try:
    # 当我们的模型不可用时,将会报出异常
    onnx.checker.check_model("super_resolution.onnx")
except onnx.checker.ValidationError as e:
    print("The model is invalid: %s"%e)
else:
    # 模型可用时,将不会报出异常,并会输出“The model is valid!”
    print("The model is valid!")
2.4.4 使用ONNX Runtime进行推理
import onnxruntime

ort_session = onnxruntime.InferenceSession("super_resolution.onnx")

# 将张量转化为ndarray格式
def to_numpy(tensor):
    return tensor.detach().cpu().numpy() if tensor.requires_grad else tensor.cpu().numpy()

# 构建输入的字典和计算输出结果
ort_inputs = {ort_session.get_inputs()[0].name: to_numpy(x)}
ort_outs = ort_session.run(None, ort_inputs)

# 比较使用PyTorch和ONNX Runtime得出的精度
np.testing.assert_allclose(to_numpy(torch_out), ort_outs[0], rtol=1e-03, atol=1e-05)

print("Exported model has been tested with ONNXRuntime, and the result looks good!")
2.4.5 进行实际预测并可视化
from PIL import Image
import torchvision.transforms as transforms

# 读取图片
img = Image.open("/cat_224x224.jpg")
# 对图片进行resize操作
resize = transforms.Resize([224, 224])
img = resize(img)

img_ycbcr = img.convert('YCbCr')
img_y, img_cb, img_cr = img_ycbcr.split()

to_tensor = transforms.ToTensor()
img_y = to_tensor(img_y)
img_y.unsqueeze_(0)
# 构建输入的字典并将value转换位array格式
ort_inputs = {ort_session.get_inputs()[0].name: to_numpy(img_y)}
ort_outs = ort_session.run(None, ort_inputs)
img_out_y = ort_outs[0]
img_out_y = Image.fromarray(np.uint8((img_out_y[0] * 255.0).clip(0, 255)[0]), mode='L')

# 保存最后得到的图片
final_img = Image.merge(
    "YCbCr", [
        img_out_y,
        img_cb.resize(img_out_y.size, Image.BICUBIC),
        img_cr.resize(img_out_y.size, Image.BICUBIC),
    ]).convert("RGB")

final_img.save("/cat_superres_with_ort.jpg")
参考:PyTorch生态简介
PyTorch的模型部署