文章目录
- 1 Vuex 简介
- 2 Vuex 用法
- 2.1 安装 vuex
- 2.2 修改 `main.js`,
- 2.3 使用 mutation 改变 Store:
- 2.4 带参数的 mutations:
- 2.5 使用 `getters` 读取 store 数据
- 2.6 使用 `actions` 执行异步代码
- 2.7 总结
- 2.8 使用 mapper 简化代码
- 2.9 使用模块组织 store
- 2.10 模块名字空间
- 2.10.1 `getters` 对应修改如下:
- 2.10.2 `mapGetters` 对应修改如下:
- 2.10.3 `mapActions` 对应修改如下:
- 2.10.4 `dispatch` 对应修改如下:
- 2.11 设计 Vuex 代码与文件的结构
- 2.11.1 将 store 相关代码放到一个单独的文件 `store.js` 中
- 2.11.2 继续重构上述 `store.js` 文件
1 Vuex 简介
Vuex 是一个管理全局状态的库。
状态即数据,即 app 呈现的数据,或 app 需要的数据。
状态分为全局状态和局部状态。局部状态只影响一个组件,全局状态影响若干组件,或者影响整个 app,例如:用户认证数据,购物车等。
Vuex 用于管理全局状态,用于取代 provide, inject 方法。
provide,inject 方法具有以下缺点:
- 容易出现“胖组件”,即某个组件具有庞大的逻辑与数据,
- 不可预测,数据以何种方式被修改并非一目了然。
- 容易出错,比如状态没有更新,或无意中被更新。
使用 Vuex,将状态管理代码从组件中提取出来。
2 Vuex 用法
2.1 安装 vuex
npm install vuex@next
2.2 修改 main.js,
原始代码:
import { createApp } from 'vue';

import App from './App.vue';
const store = createStore();

const app = createApp(App);

app.mount('#app');
增加 vuex:
import { createApp } from 'vue';
import { createStore } from 'vuex';

import App from './App.vue';

const store = createStore({
  state() {
    return {
      counter: 0,
    };
  },
});
const app = createApp(App);
app.use(store);

app.mount('#app');
然后整个 App 的任意组件都能使用此 state 数据, 例如在 App.vue 中:
<template>
  <base-container title="Vuex">
    <h3>{{ $store.state.counter }}</h3>
    <button>Add 1</button>
  </base-container>
</template>

<script>
import BaseContainer from './components/BaseContainer.vue';

export default {
  components: {
    BaseContainer,
  },
};
</script>
$store 指向 Vuex store, 因此可以用 $store.state.counter 访问 counter
2.3 使用 mutation 改变 Store:
以下代码直接在某个组件中修改 store 数据,虽然可行,但不可取,过于灵活则容易出错:
<template>
  <base-container title="Vuex">
    <the-counter></the-counter>
    <button @click="addOne">Add 1</button>
  </base-container>
</template>

<script>
import BaseContainer from './components/BaseContainer.vue';
import TheCounter from './components/TheCounter.vue';

export default {
  components: {
    BaseContainer,
    TheCounter,
  },

  methods: {
    addOne() {
      // bad practice!!
      this.$store.state.counter++;
    },
  },
};
</script>
为了实现代码重用,避免代码混乱,应该将修改状态的代码统一放到 createStore 的 mutations 属性中,
mutations 中的方法自动获得当前 state 为参数:
const store = createStore({
  state() {
    return {
      counter: 0,
    };
  },
  mutations: {
    increment(state) {
      state.counter = state.counter + 2;
    },
  },
});
在其他组件如何使用此 mutation:
<script>
export default {
  methods: {
    addOne() {
      // old way and bad practice
      // this.$store.state.counter = this.$store.state.counter += 2;

      this.$store.commit('increment');
    },
  },
};
2.4 带参数的 mutations:
这里的参数又称为 payload, 可以是任意数据类型,例如数字、字符串或对象等。
  mutations: {
    increment(state) {
      state.counter = state.counter += 2
    },
    increase(state, payload) {
      // 假定这里 payload 是一个具有 myValue 属性的对象:
      state.counter = state.counter + payload.myValue;
    }
  }
对应用法,传递参数给 mutation:
  methods: {
    addTen() {
      this.$store.commit('increase', { myValue: 10 });
    },
  },
上面的写法也可以改成:
  methods: {
    addTen() {
      // 一种写法
      // this.$store.commit('increase', { myValue: 10 });

      // 另一种等价的写法:
      this.$store.commit({
        type: "increase",
        myValue: 10,
      });
    },
  },
对于这种写法,不带 type 属性的对象将作为 payload 传递给 mutation,两种写法等价。
2.5 使用 getters 读取 store 数据
getters 相当于定义在 store 中的计算属性。
getters, mutations, state, 前后顺序任意。
getters 中的任何方法都自动获得两个参数:当前状态 state,以及其他 getters, 这一 getters 中的 getters,如果当前方法需要其他 getter 的结果就可以被用到。
getter 必须返回值。
const store = createStore({
  state() {...},
  mutations: {...},
  getters: {
    // finalCounter(state, getters)
    // state:当前状态,
    // getters: 必要时用于获取其他 getter 的结果
    finalCounter(state) {
      return state.counter * 2;
    },
  },
});
使用 getters:
<script>
export default {
  computed: {
    counter() {
      // return this.$store.state.counter;

      // 仅指向,不能执行,finalCounter 后没有括号。
      return this.$store.getters.finalCounter;
    },
  },
};
</script>
多个 getters 之间可以互相依赖,例如, 下列代码中的 normalizedCounter 将 finalCounter 限定在 0 ~ 100 之间,不需要使用 state.counter * 3 重新计算一遍,因为使用 getters.finalCounter 就可以直接获取结果值:
getters: {
    finalCounter(state) {
      return state.counter * 3;
    },

    // state 参数不会用到,用 _ 代替,同 go 语法
    normalizedCounter(_, getters) {
      const finalCounter = getters.finalCounter;
      if (finalCounter < 0) {
        return 0;
      } else if (finalCounter > 100) {
        return 100
      } else {
        return finalCounter;
      }
    }
  },
2.6 使用 actions 执行异步代码
问题:mutations同步, 不允许包含异步代码。
组件应该先触发 actions,再由 actions commit mutations, actions 可以执行异步代码。
虽然组件可以直接 commit mutations, 但好的写法总是在组件与 mutations 之间使用 actions.
actions 中的方法名可以与 mutations 中的方法名相同, 可以不同,但一般使用相同名称.
actions 中的方法自动获得 context 参数:
 actions: {
    increment(context) {
      // 类似于组件中使用`commit`, 这里可以写成:context.commit("increment", some_payload);
      // 也可以写成 context.commit({type: "increment", someValue: something});
      context.commit("increment");
    }
  }
actions 中的代码改为异步,例如:
  actions: {
    increment(context) {
      setTimeout(() => {
        context.commit('increment');
      }, 3000);
    },
    // 自动获得参数 payload
    increase(context, payload) {

      // 在 commit 之前,payload 可以自行修改,不必完全相同。
      context.commit('increase', payload);
    },
  },
http 请求之类的异步代码可以放在 actions 中,使用 actions,通过 dispatch 调用, 用法举例:
methods: {
    addTen() {
      // 1. 一种传参数写法
      // this.$store.commit('increase', { myValue: 10 });

      // 2. 另一种等价的传参数写法
      // this.$store.commit({ type: 'increase', myValue: 10 });

      // 3. 改为调用 actions, commit 改为 dispatch, 二者调用语法基本相同
      this.$store.dispatch({ type: 'increase', myValue: 10 });
    },
  },
以及
 methods: {
    addTwo() {
      // this.$store.state.counter = this.$store.state.counter += 2;
      this.$store.dispatch('increment');
    },
  },
简单地说,总是使用 dispatch 调用 actions 中的方法就可以,mutations 的方法最好不要直接调用。
对于 actions 的方法中的 context 参数,如果调用 console.log(context):
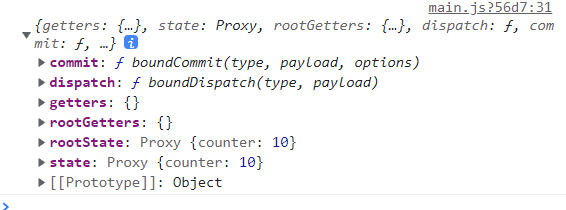
可以在 action 中 dispatch 另一个 action,可以调用 getters.
不应在 actions 中直接修改 state,而应该总是通过 mutations 修改。
2.7 总结
Vuex 由 state, mutations, actions, getters 4 部分组成。
main.js sample code:
import { createApp } from 'vue';
import { createStore } from 'vuex';

import App from './App.vue';

const store = createStore({
  state() {
    return {
      counter: 0,
    };
  },

  mutations: {
    increment(state) {
      state.counter = state.counter += 2;
    },
    increase(state, payload) {
      // 假定这里 payload 是一个具有 myValue 属性的对象:
      state.counter = state.counter + payload.myValue;
    },
  },

  actions: {
    increment(context) {
      setTimeout(function () {
        context.commit('increment');
      }, 3000);
    },
    increase(context, payload) {
      context.commit('increase', payload);
      console.log(context);
    },
  },

  getters: {
    finalCounter(state) {
      return state.counter * 3;
    },

    // state 参数不会用到,用 _ 代替,同 go 语法
    normalizedCounter(_, getters) {
      const finalCounter = getters.finalCounter;
      if (finalCounter < 0) {
        return 0;
      } else if (finalCounter > 100) {
        return 100;
      } else {
        return finalCounter;
      }
    },
  },
});
const app = createApp(App);
app.use(store);

app.mount('#app');
2.8 使用 mapper 简化代码
mapper 是一个 utility feature,使用此工具可以少写一些代码。
例如使用 getters 相关代码:
<template>
  <h3>{{ counter }}</h3>
</template>

<script>
export default {
  computed: {
    counter() {
      return this.$store.getters.finalCounter;
    },
  },
};
</script>
改为使用 mapper:
<template>
  <h3>{{ finalCounter }}</h3>
</template>

<script>
import { mapGetters } from 'vuex';
export default {
  computed: {
    // counter() {
    //   return this.$store.getters.finalCounter;
    // },
    ...mapGetters(['finalCounter']),
  },
};
</script>
state 和 mutations 在组件中不会直接访问,跳过,使用 actions的相关代码:
<template>
  <button @click="addTwo">Add 2</button>
</template>

<script>
export default {
  methods: {
    addTwo() {
      this.$store.dispatch('increment');
    },
  },
};
</script>
改为使用 mapper,仅作为演示,多加了一个 increase,因此也多加了一个 button:
<template>
  <button @click="increment">Add 2</button>
  <button @click="increase({ myValue: 10 })">Add 2</button>
</template>

<script>
import { mapActions } from 'vuex';
export default {
  methods: {
    // addTwo() {
    //   this.$store.dispatch('increment');
    // },

    // 类似于 mapGetters, 获得一个对象,与 methods 对象合并
    ...mapActions(['increment', 'increase']),
  },
};
</script>
还可以将 methods 名称改为自己想要的名称:
...mapActions(['increment', 'increase']),
改为:
 ...mapActions({
      inc:'increment',
      increase: 'increase',
    })
完整代码段:
<template>
  <button @click="inc">Add 2</button>
  <button @click="increase({ myValue: 11 })">Add 11</button>
</template>

<script>
import { mapActions } from 'vuex';
export default {
  methods: {
    // addTwo() {
    //   this.$store.dispatch('increment');
    // },

    // 类似于 mapGetters, 获得一个对象,与 methods 对象合并
    // ...mapActions(['increment', 'increase']),
    ...mapActions({
      inc:'increment',
      increase: 'increase',
    })
  },
};
</script>
这种使用对象修改名称的做法同样适用于 mapGetters,
2.9 使用模块组织 store
为了更好地管理代码,可以将 store 划分成多个模块,store 中数据分两部分,一部分和 counter 有关,一部分和用户认证有关,一开始的代码如下:
import { createApp } from 'vue';
import { createStore } from 'vuex';

import App from './App.vue';

const store = createStore({
  state() {
    return {
      counter: 0,
      isLoggedIn: false,
    };
  },

  mutations: {
    increment(state) {
      state.counter = state.counter += 2;
    },
    increase(state, payload) {
      // 假定这里 payload 是一个具有 myValue 属性的对象:
      state.counter = state.counter + payload.myValue;
    },
    setAuth(state, payload) {
      state.isLoggedIn = payload.isAuth;
    },
  },

  actions: {
    increment(context) {
      setTimeout(function () {
        context.commit('increment');
      }, 3000);
    },
    increase(context, payload) {
      context.commit('increase', payload);
      console.log(context);
    },
    login(context) {
      context.commit('setAuth', { isAuth: true });
    },
    logout(context) {
      context.commit('setAuth', { isAuth: false });
    },
  },

  getters: {
    finalCounter(state) {
      return state.counter * 3;
    },
    userIsAuthenticated(state) {
      return state.isLoggedIn;
    },

    // state 参数不会用到,用 _ 代替,同 go 语法
    normalizedCounter(_, getters) {
      const finalCounter = getters.finalCounter;
      if (finalCounter < 0) {
        return 0;
      } else if (finalCounter > 100) {
        return 100;
      } else {
        return finalCounter;
      }
    },
  },
});
const app = createApp(App);
app.use(store);

app.mount('#app');
这个 store 混合了两部分内容,而实际中文件可能更大。现在将代码重构,将与 counter 相关代码移出来,放到一个常量 counterModule 中:
const counterModule = {
  state() {
    return {
      counter: 0,
    };
  },
  mutations: {
    increment(state) {
      state.counter = state.counter += 2;
    },
    increase(state, payload) {
      // 假定这里 payload 是一个具有 myValue 属性的对象:
      state.counter = state.counter + payload.myValue;
    },
  },
  actions: {
    increment(context) {
      setTimeout(function () {
        context.commit('increment');
      }, 3000);
    },
    increase(context, payload) {
      context.commit('increase', payload);
      console.log(context);
    },
  },
  getters: {
    finalCounter(state) {
      return state.counter * 3;
    },
    // state 参数不会用到,用 _ 代替,同 go 语法
    normalizedCounter(_, getters) {
      const finalCounter = getters.finalCounter;
      if (finalCounter < 0) {
        return 0;
      } else if (finalCounter > 100) {
        return 100;
      } else {
        return finalCounter;
      }
    },
  },
};
然后 createStore 中使用 modules 属性将 counterModule合并到 store 中:
import { createApp } from 'vue';
import { createStore } from 'vuex';

import App from './App.vue';

const counterModule = {
  state() {
    return {
      counter: 0,
    };
  },
  mutations: {
    increment(state) {
      state.counter = state.counter += 2;
    },
    increase(state, payload) {
      state.counter = state.counter + payload.myValue;
    },
  },
  actions: {
    increment(context) {
      setTimeout(function () {
        context.commit('increment');
      }, 3000);
    },
    increase(context, payload) {
      context.commit('increase', payload);
      console.log(context);
    },
  },
  getters: {
    finalCounter(state) {
      return state.counter * 3;
    },
    normalizedCounter(_, getters) {
      const finalCounter = getters.finalCounter;
      if (finalCounter < 0) {
        return 0;
      } else if (finalCounter > 100) {
        return 100;
      } else {
        return finalCounter;
      }
    },
  },
};

const store = createStore({
  // 使用 modules 属性合并其他代码
  modules: {
    // 标识符:模块名
    numbers: counterModule,
  },
  state() {
    return {
      isLoggedIn: false,
    };
  },

  mutations: {
    setAuth(state, payload) {
      state.isLoggedIn = payload.isAuth;
    },
  },

  actions: {
    login(context) {
      context.commit('setAuth', { isAuth: true });
    },
    logout(context) {
      context.commit('setAuth', { isAuth: false });
    },
  },

  getters: {
    userIsAuthenticated(state) {
      return state.isLoggedIn;
    },
  },
});
const app = createApp(App);
app.use(store);
app.mount('#app');
使用 counterModule 模块中的 state 无法访问 isLoggedIn,
如果一定要访问 main store 中的数据,需要使用额外的参数 rootState 和 rootGetters:
getters: {
  // testAuth(state, getters, rootState, rootGetters) {
  testAuth(_, _2_, rootState) {
      return rootState.isLoggedIn;
  }
}
2.10 模块名字空间
使用名字空间明确区分各个单独的模块,以避免命名冲突,例如,名称相同的 getters, actions 方法, 等等。
解决办法是增加 namespaced 属性:
const counterModule = {
  namespaced: true,
  state() {},
};
要访问此模块中的数据,就要使用名字空间,就是加到 main store 里的标识符:
const store = createStore({
  modules: {
    // numbers 将用作 counterModule 的名字空间,
    // 如果该模块的 namespaced 属性被设为 true
    numbers: counterModule,
  },
  state() {},
});
如果使用名字空间,访问此模块数据的方式会发生改变,代码要进行对应修改。
2.10.1 getters 对应修改如下:
computed: {
    counter() {
      // 未使用名字空间
      // return this.$store.getters.normalizedCounter;

      // 使用名字空间
      return this.$store.getters["numbers/normalizedCounter"];
    },
  },
2.10.2 mapGetters 对应修改如下:
  computed: {
    // 未使用名字空间
    // ...mapGetters(['finalCounter']),

    // 使用名字空间
    ...mapGetters('numbers', ['finalCounter']),
  },
2.10.3 mapActions 对应修改如下:
  // 未使用名字空间
  // ...mapActions({
  //     inc:'increment',
  //     increase: 'increase',
  //   });

  // 使用名字空间
  ...mapActions('numbers', {
    inc:'increment',
    increase: 'increase',
  });
2.10.4 dispatch 对应修改如下:
  methods: {
    addTen() {
      // this.$store.commit('increase', { myValue: 10 });

      // 未使用名字空间
      // this.$store.dispatch({ type: 'increase', myValue: 10 });

      // 使用名字空间
      this.$store.dispatch({ type: 'numbers/increase', myValue: 10 });
    },
  },
2.11 设计 Vuex 代码与文件的结构
如果将 store 相关代码全部放在 main.js 中,将使 main.js 文件过于庞大.
2.11.1 将 store 相关代码放到一个单独的文件 store.js 中
main.js 代码:
import { createApp } from 'vue';

import App from './App.vue';
import store from './store.js'

const app = createApp(App);
app.use(store);
app.mount('#app');
store.js 代码:
import { createStore } from 'vuex';

const counterModule = {
  namespaced: true,
  state() {
    return {
      counter: 0,
    };
  },
  mutations: {
    increment(state) {
      state.counter = state.counter += 2;
    },
    increase(state, payload) {
      console.log(state);
      state.counter = state.counter + payload.myValue;
    },
  },
  actions: {
    increment(context) {
      setTimeout(function () {
        context.commit('increment');
      }, 3000);
    },
    increase(context, payload) {
      context.commit('increase', payload);
      console.log(context);
    },
  },
  getters: {
    // testAuth(state, getters, rootState, rootGetters)
    testAuth(_, _2, rootState) {
      return rootState.isLoggedIn;
    },

    finalCounter(state) {
      return state.counter * 3;
    },
    // state 参数不会用到,用 _ 代替,同 go 语法
    normalizedCounter(_, getters) {
      const finalCounter = getters.finalCounter;
      if (finalCounter < 0) {
        return 0;
      } else if (finalCounter > 100) {
        return 100;
      } else {
        return finalCounter;
      }
    },
  },
};

const store = createStore({
  modules: {
    numbers: counterModule,
  },
  state() {
    return {
      isLoggedIn: false,
    };
  },

  mutations: {
    setAuth(state, payload) {
      state.isLoggedIn = payload.isAuth;
    },
  },

  actions: {
    login(context) {
      context.commit('setAuth', { isAuth: true });
    },
    logout(context) {
      context.commit('setAuth', { isAuth: false });
    },
  },

  getters: {
    userIsAuthenticated(state) {
      return state.isLoggedIn;
    },
  },
});

export default store;
2.11.2 继续重构上述 store.js 文件
新建以下文件夹及文件:
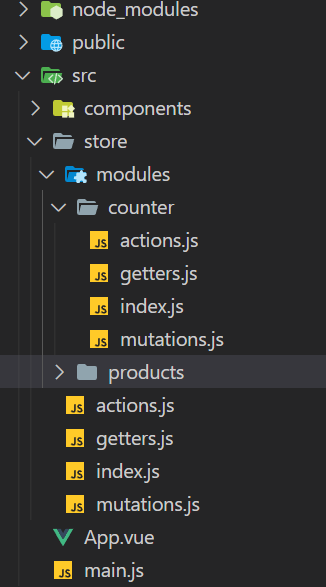
假定,project store 数据分3个部分: authentication, counter, products
可以将 authentiction 数据放到 store root 中,counter 与 products 放到 modules 文件夹中。
将 store.js 代码全部移出,并删除此文件。
store/index.js 代码:
import { createStore } from 'vuex';
import rootMutations from './mutations.js';
import rootActions from './actions.js';
import rootGetters from './getters.js';
import counterModule from './modules/counter/index.js';

const store = createStore({
  modules: {
    numbers: counterModule,
  },
  state() {
    return {
      isLoggedIn: false,
    };
  },

  mutations: rootMutations,
  actions: rootActions,
  getters: rootGetters,
});

export default store;
store/actions.js 代码:
export default {
  login(context) {
    context.commit('setAuth', { isAuth: true });
  },
  logout(context) {
    context.commit('setAuth', { isAuth: false });
  },
};
store/modules/counter/index.js代码:
import counterMutations from './mutations.js';
import counterActions from './actions.js';
import counterGetters from './getters.js';

// const counterModule = {
export default {
  namespaced: true,
  state() {
    return {
      counter: 0,
    };
  },
  mutations: counterMutations,
  actions: counterActions,
  getters: counterGetters,
};
其他文件写法依此类推。
代码:
https://github.com/alice201601/vuex-sample-code


![[附源码]java毕业设计亿上汽车在线销售管理系统](https://img-blog.csdnimg.cn/5dc71827e8f64b98abf017ef908495d1.png)