SpringBoot集成Swagger3(powernode document)(内含源代码)
源代码下载链接地址:https://download.csdn.net/download/weixin_46411355/87449720
目录
- SpringBoot集成Swagger3(powernode document)(内含源代码)
- `源代码下载链接地址:`[https://download.csdn.net/download/weixin_46411355/87449720](https://download.csdn.net/download/weixin_46411355/87449720)
- 一、问题描述
- 二、使用步骤
- 2.1 创建SpringBoot项目加入依赖
- 2.2 application.yml配置文件
- 2.3 创建SwaggerProperties信息配置类
- 2.4 创建SwaggerAutoConfiguration自动配置类
- 2.5 创建Hero类
- 2.6创建Controller
- 2.7 修改application.yml配置文件
- 2.8运行启动类
- 2.9 解决报错
- 2.9.1 报错1
- 2.9.1.1 报错信息
- 2.9.1.2 解决报错办法
- 2.9.2 报错2
- 2.9.2.1 报错信息2
- 2.9.2.2 解决报错方法
- 2.9.3 修改后的application.yml文件
- 2.10 测试访问文档页面
- 2.11 测试接口
- 2.12 补充注解说明
- 三、变式
- 3.1 引入AjaxResult
- 3.2 controller层的改变
一、问题描述
随着互联网技术的发展,现在的网站架构基本都由原来的后端渲染,变成了:前端渲染、前后端分离的形态,而且前端技术和后端技术在各自的道路上越走越远。 前端和后端的唯一联系,变成了API接口;API文档变成了前后端开发人员联系的纽带,变得越来越重要,swagger就是一款让你更好的书写API文档的框架,而且swagger可以完全模拟http请求,入参出参和实际情况差别几乎为零。
没有API文档工具之前,大家都是手写API文档的(维护起来相当困难),在什么地方书写的都有,有在confluence上写的,有在对应的项目目录下readme.md上写的,每个公司都有每个公司的玩法,无所谓好坏。但是能称之为“框架”的,估计也只有swagger了
API接口文档:是根据controller设计的文档
文档的编写方式:
1.手写 使用某个格式文件
2.使用工具 提高编写与维护文档的效率
3.使用文档框架
我们在设计controller后,文档框架自动根据我们设计好的controller生成文档
好处:
1.文档自动生成。提高编写效率
2.我们修改了controller,则文档也会跟着修改。提高维护效率
目前流行的文档框架:swagger
| 接口地址 | 入参说明 | 返回值 | 备注 |
|---|---|---|---|
| http://localhost:8080/doLogin | username:用户名Password:密码 | {code:200,msg:ok,data:null} | 用户登录 |
二、使用步骤
2.1 创建SpringBoot项目加入依赖
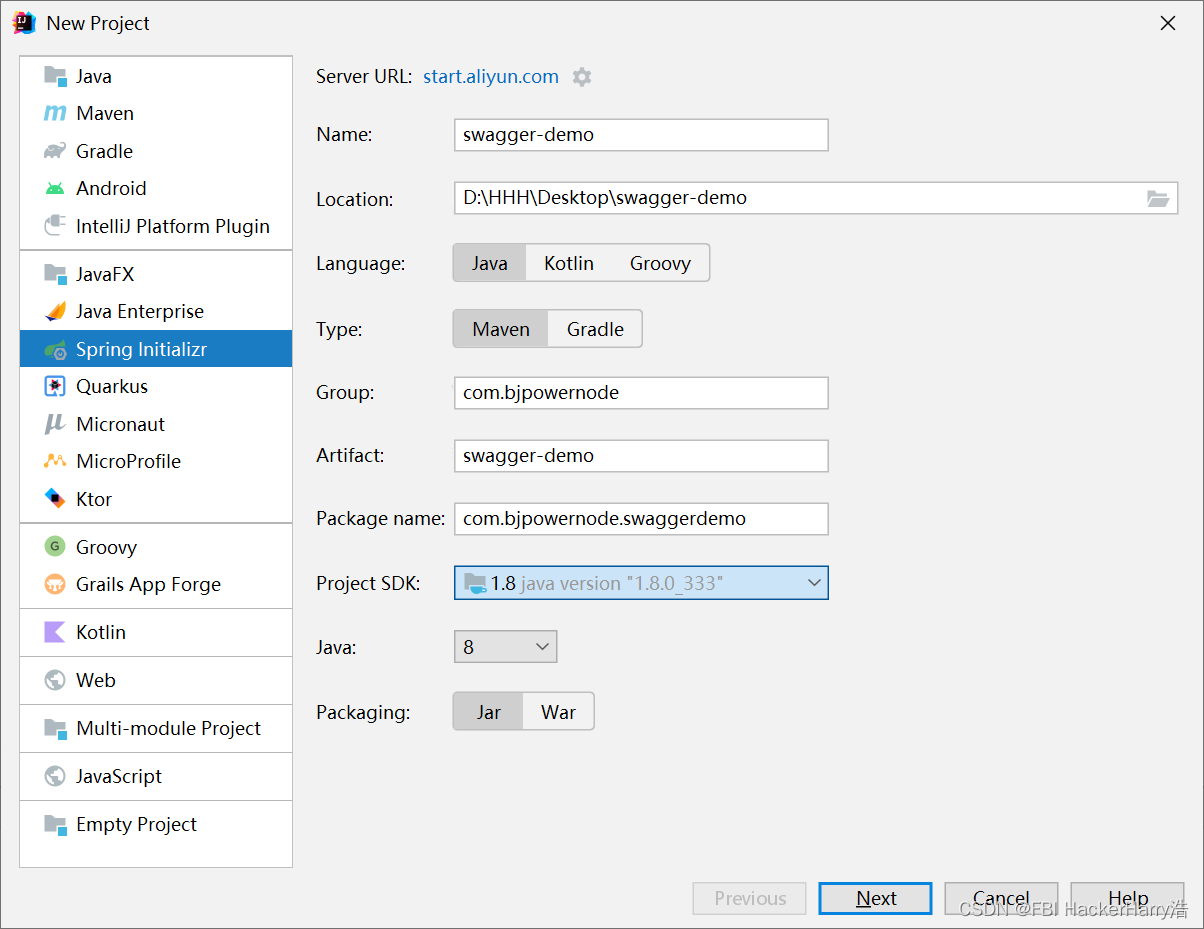
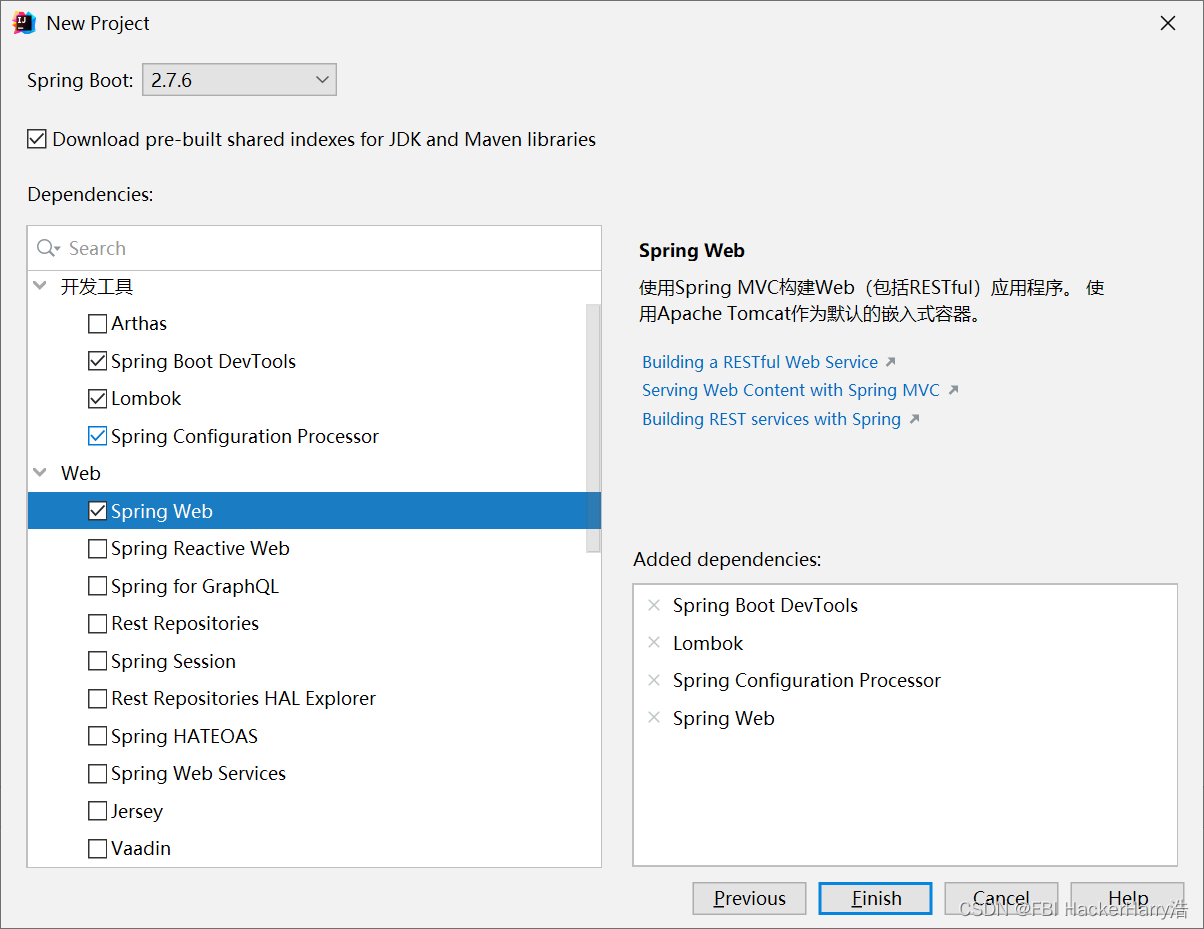
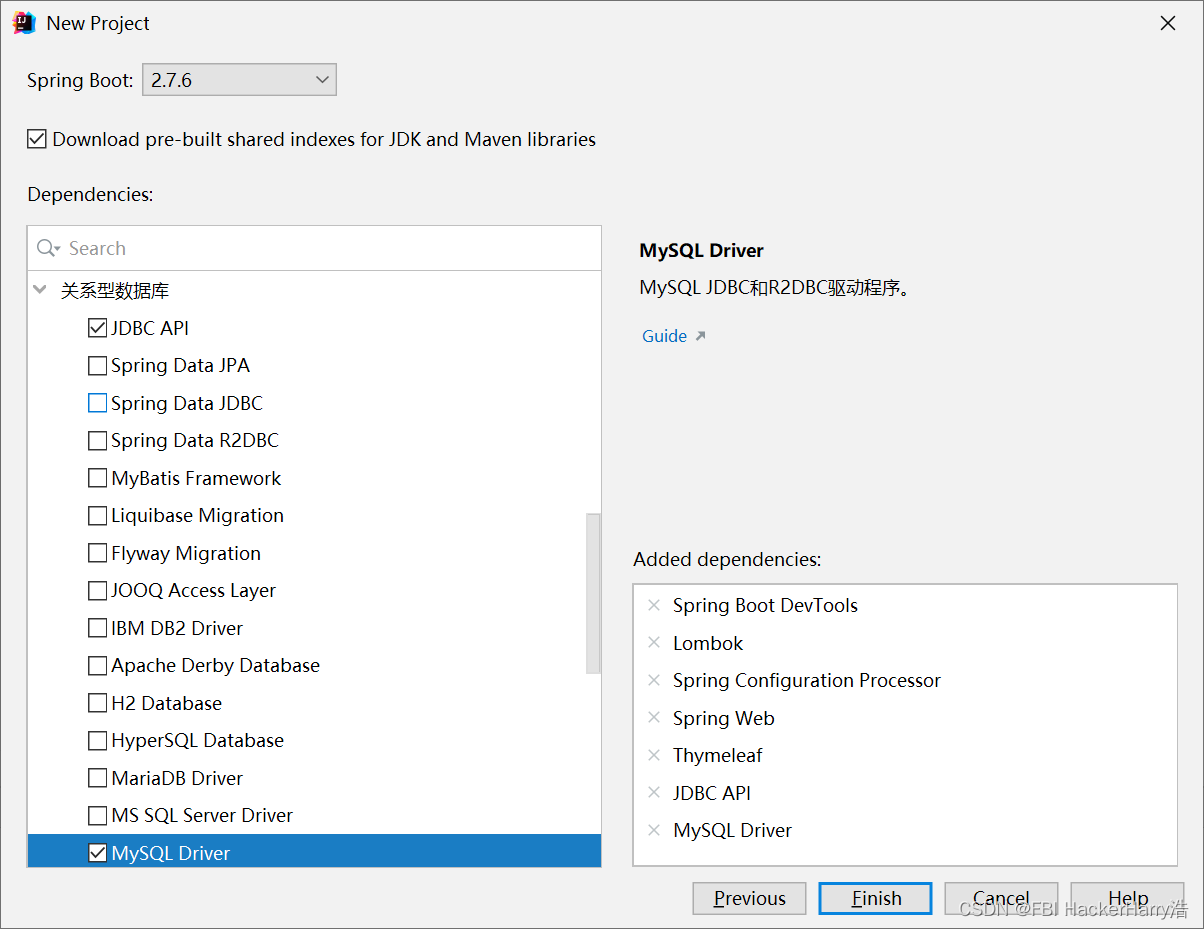
 <!--swagger starter-->
            <dependency>
                <groupId>io.springfox</groupId>
                <artifactId>springfox-boot-starter</artifactId>
                <version>3.0.0</version>
            </dependency>
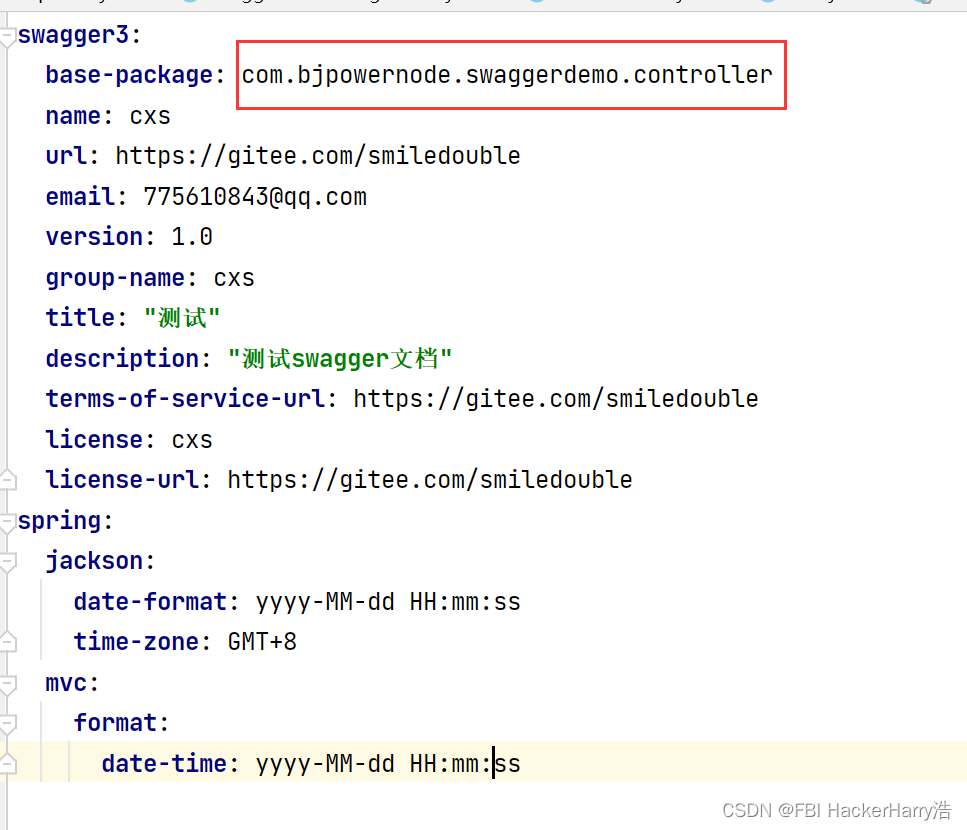
2.2 application.yml配置文件
swagger3:
  base-package: com.bjpowernode.controller
  name: cxs
  url: https://gitee.com/smiledouble
  email: 775610843@qq.com
  version: 1.0
  group-name: cxs
  title: "测试"
  description: "测试swagger文档"
  terms-of-service-url: https://gitee.com/smiledouble
  license: cxs
  license-url: https://gitee.com/smiledouble
spring:
  jackson:
    date-format: yyyy-MM-dd HH:mm:ss
    time-zone: GMT+8
  mvc:
    format:
      date-time: yyyy-MM-dd HH:mm:ss
2.3 创建SwaggerProperties信息配置类
SwaggerProperties.java
package com.bjpowernode.swaggerdemo.config;

import lombok.AllArgsConstructor;
import lombok.Data;
import lombok.NoArgsConstructor;
import org.springframework.boot.context.properties.ConfigurationProperties;
import org.springframework.stereotype.Component;


@Component
@ConfigurationProperties(prefix = "swagger3")
@AllArgsConstructor
@NoArgsConstructor
@Data
public class SwaggerProperties {
    /**
     * 扫描的包
     * 给这个包下面的接口创建文档
     */
    private String basePackage;

    /**
     * 作者姓名
     */
    private String name;


    /**
     * 作者主页链接
     */
    private String url;

    /**
     * 作者邮箱
     */
    private String email;

    /**
     * 版本号
     */
    private String version;

    /*
    * 分组名称
    */
    private String groupName;

    /**
     * 文档标题
     */
    private String title;

    /**
     * 文档描述
     */
    private String description;

    /**
     * 组织地址
     */
    private String termsOfServiceUrl;

    /**
     * 许可证
     */
    private String license;

    /**
     * 许可链接
     */
    private String licenseUrl;
}
2.4 创建SwaggerAutoConfiguration自动配置类
package com.bjpowernode.swaggerdemo.config;

import org.springframework.beans.factory.annotation.Autowired;
import org.springframework.boot.context.properties.EnableConfigurationProperties;
import org.springframework.context.annotation.Bean;
import org.springframework.context.annotation.Configuration;
import springfox.documentation.builders.RequestHandlerSelectors;
import springfox.documentation.oas.annotations.EnableOpenApi;
import springfox.documentation.service.ApiInfo;
import springfox.documentation.service.Contact;
import springfox.documentation.spi.DocumentationType;
import springfox.documentation.spring.web.plugins.Docket;

import java.util.ArrayList;

@EnableConfigurationProperties(SwaggerProperties.class)
@EnableOpenApi//开启swagger的功能 旧版本是@EnableSwagger2
@Configuration
public class SwaggerAutoConfiguration {

    @Autowired
    private SwaggerProperties swaggerProperties;

    @Bean
    public Docket docket(){
        return new Docket(DocumentationType.OAS_30)
                .apiInfo(getApiInfo())
                .groupName(swaggerProperties.getGroupName())
                .select()
                .apis(RequestHandlerSelectors.basePackage(swaggerProperties.getBasePackage()))
                .build();
    }

    private ApiInfo getApiInfo(){
        Contact contact = new Contact(swaggerProperties.getName(),swaggerProperties.getUrl(),swaggerProperties.getEmail());
        return new ApiInfo(swaggerProperties.getTitle(),
                swaggerProperties.getDescription(),
                swaggerProperties.getVersion(),
                swaggerProperties.getTermsOfServiceUrl(),
                contact,
                swaggerProperties.getLicense(),
                swaggerProperties.getLicenseUrl(),
                new ArrayList());
    }

}
2.5 创建Hero类
package com.bjpowernode.swaggerdemo.domain;

import io.swagger.annotations.Api;
import io.swagger.annotations.ApiModel;
import io.swagger.annotations.ApiModelProperty;
import lombok.AllArgsConstructor;
import lombok.Data;
import lombok.NoArgsConstructor;

import java.util.Date;
import java.util.List;
import java.util.Map;

@AllArgsConstructor
@NoArgsConstructor
@Data

@ApiModel("英雄对象")   //描述实体类
public class Hero {
    @ApiModelProperty(value = "英雄的id")
    private Integer id;
    @ApiModelProperty(value = "英雄的名称")
    private String name;
    @ApiModelProperty(value = "英雄的地址")
    private String address;
    @ApiModelProperty(value = "英雄的生日")
    private Date birth;
    @ApiModelProperty(value = "英雄的爱好")
    private List<String> hobby;
    @ApiModelProperty(value = "英雄的map")
    private Map<String,String> mapl;

}
2.6创建Controller
package com.bjpowernode.swaggerdemo.controller;

import com.bjpowernode.swaggerdemo.domain.Hero;
import com.sun.corba.se.spi.ior.ObjectKey;
import io.swagger.annotations.Api;
import io.swagger.annotations.ApiImplicitParam;
import io.swagger.annotations.ApiOperation;
import io.swagger.models.auth.In;
import org.springframework.web.bind.annotation.*;

import java.util.Arrays;
import java.util.Date;
import java.util.HashMap;
import java.util.Map;

@RestController
@Api(tags = "英雄的管理接口")
public class HeroConroller {
    /**
     * @ApiImplicitParam注解 表示单独的请求参数,用在方法上
     *      paramType : 参数放在哪个地方
     *              path : 用于restful接口-->请求参数的获取 : @PathVariable
     * @param id
     * @return
     */
    @ApiOperation("根据id获取英雄")
    @ApiImplicitParam(name = "id",value = "英雄编号(必填)",required = true,dataType = "Integer",paramType = "path")
    @GetMapping("/getHero/{id}")
    public Hero getHeroById(@PathVariable("id") Integer id){
        HashMap<String,String> map = new HashMap<>();
        map.put("技能","射箭");
        return new Hero(id,"后裔","峡谷",new Date(), Arrays.asList("打猎"),map);

    }

    @ApiOperation("添加英雄")
    @PostMapping("/addHero")
    public Map<String,Object> addHero(@RequestBody Hero hero){
        System.out.println(hero);
        HashMap<String, Object> map = new HashMap<>();
        map.put("code",200);
        map.put("msg","ok");
        return map;
    }

    /**
     * @ApiImplicitParam注解 表示单独的请求参数,用在方法上
     *      paramType : 参数放在哪个地方
     *             query : 请求参数的获取 @RequestParam
     * @param id
     * @return
     */
    @DeleteMapping("delHero")
    @ApiOperation("根据id删除一个英雄")
    @ApiImplicitParam(name = "id",value = "英雄编号",required = true,paramType = "query",dataType = "Integer")
    public Map<String,Object> delHero(@RequestParam Integer id){
        System.out.println(id);
        HashMap<String,Object> map = new HashMap<>();
        map.put("code",200);
        map.put("msg","ok");
        return map;
    }

}
2.7 修改application.yml配置文件
2.8运行启动类
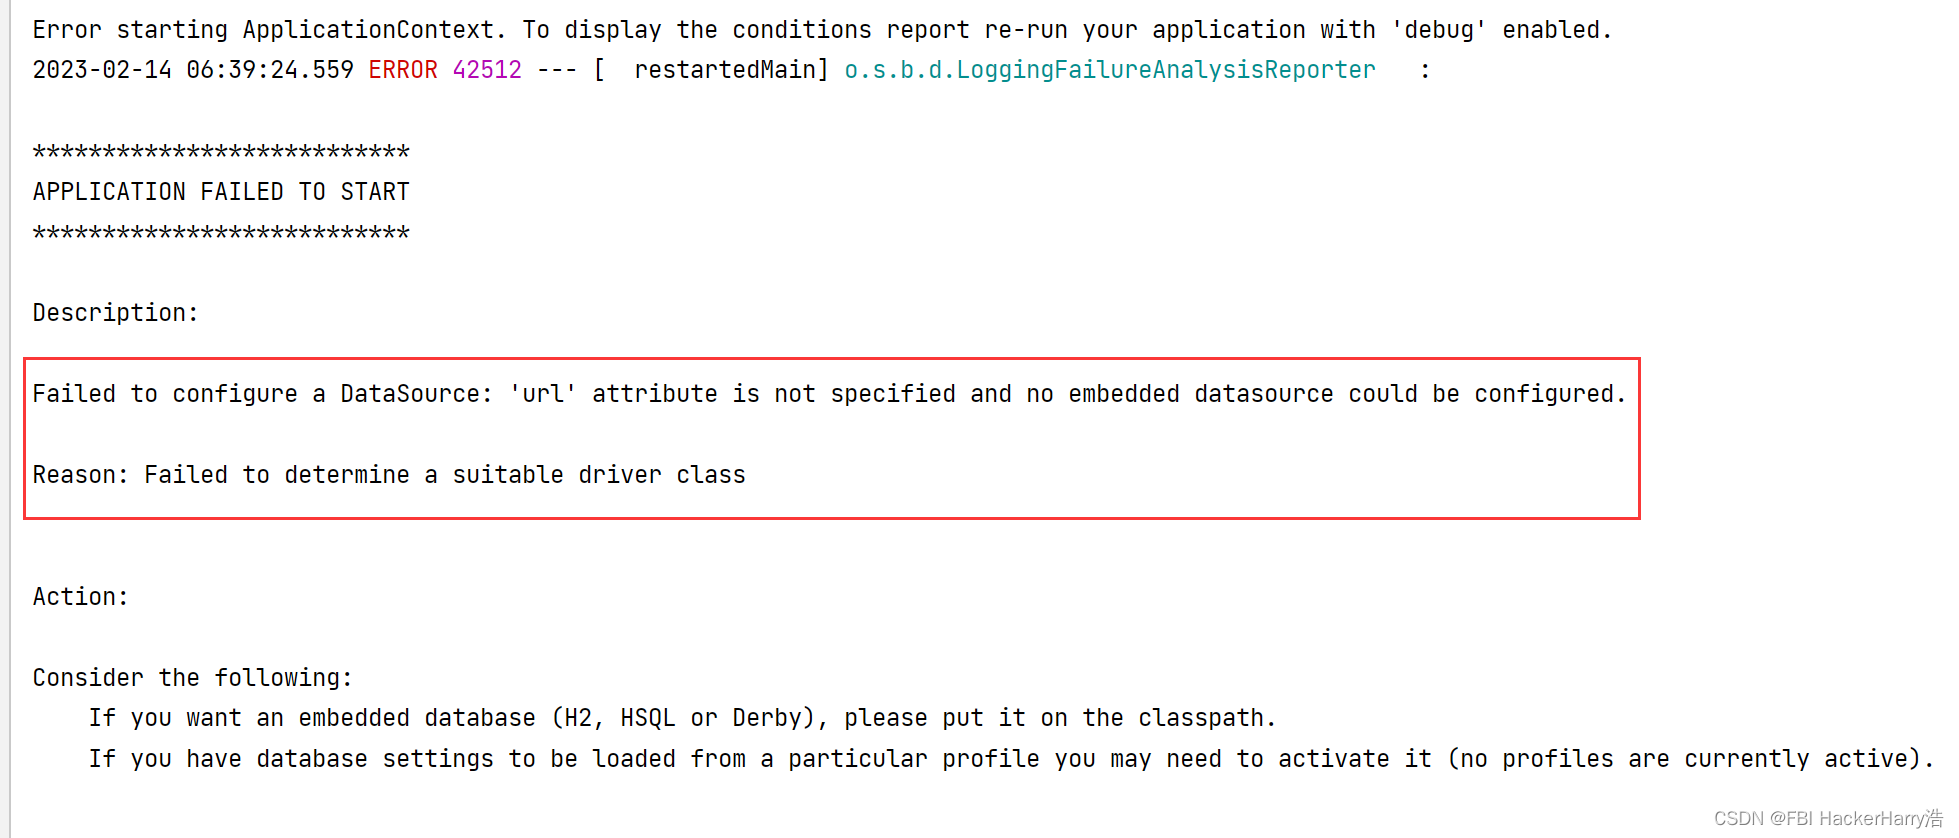
2.9 解决报错
2.9.1 报错1
2.9.1.1 报错信息
Failed to configure a DataSource: ‘url’ attribute is not specified and no embedded datasource could be configured.
2.9.1.2 解决报错办法
请看笔者的另一篇博文《解决报错 Failed to configure a DataSource: ‘url’ attribute is not specified and no embedded datasource could be configured.的三种办法》——https://huanghaoheng.blog.csdn.net/article/details/129020202
2.9.2 报错2
2.9.2.1 报错信息2
Failed to start bean ‘documentationPluginsBootstrapper’; nested exception is java.lang.NullPointerException
2.9.2.2 解决报错方法
请查看笔者的另一篇博文:《解决报错Failed to start bean ‘documentationPluginsBootstrapper‘; nested exception is java.lang.NullPoint》——https://huanghaoheng.blog.csdn.net/article/details/128884811
在application.yml文件下,加如下配置
spring:
  mvc:
    pathmatch:
      matching-strategy: ANT_PATH_MATCHER
2.9.3 修改后的application.yml文件
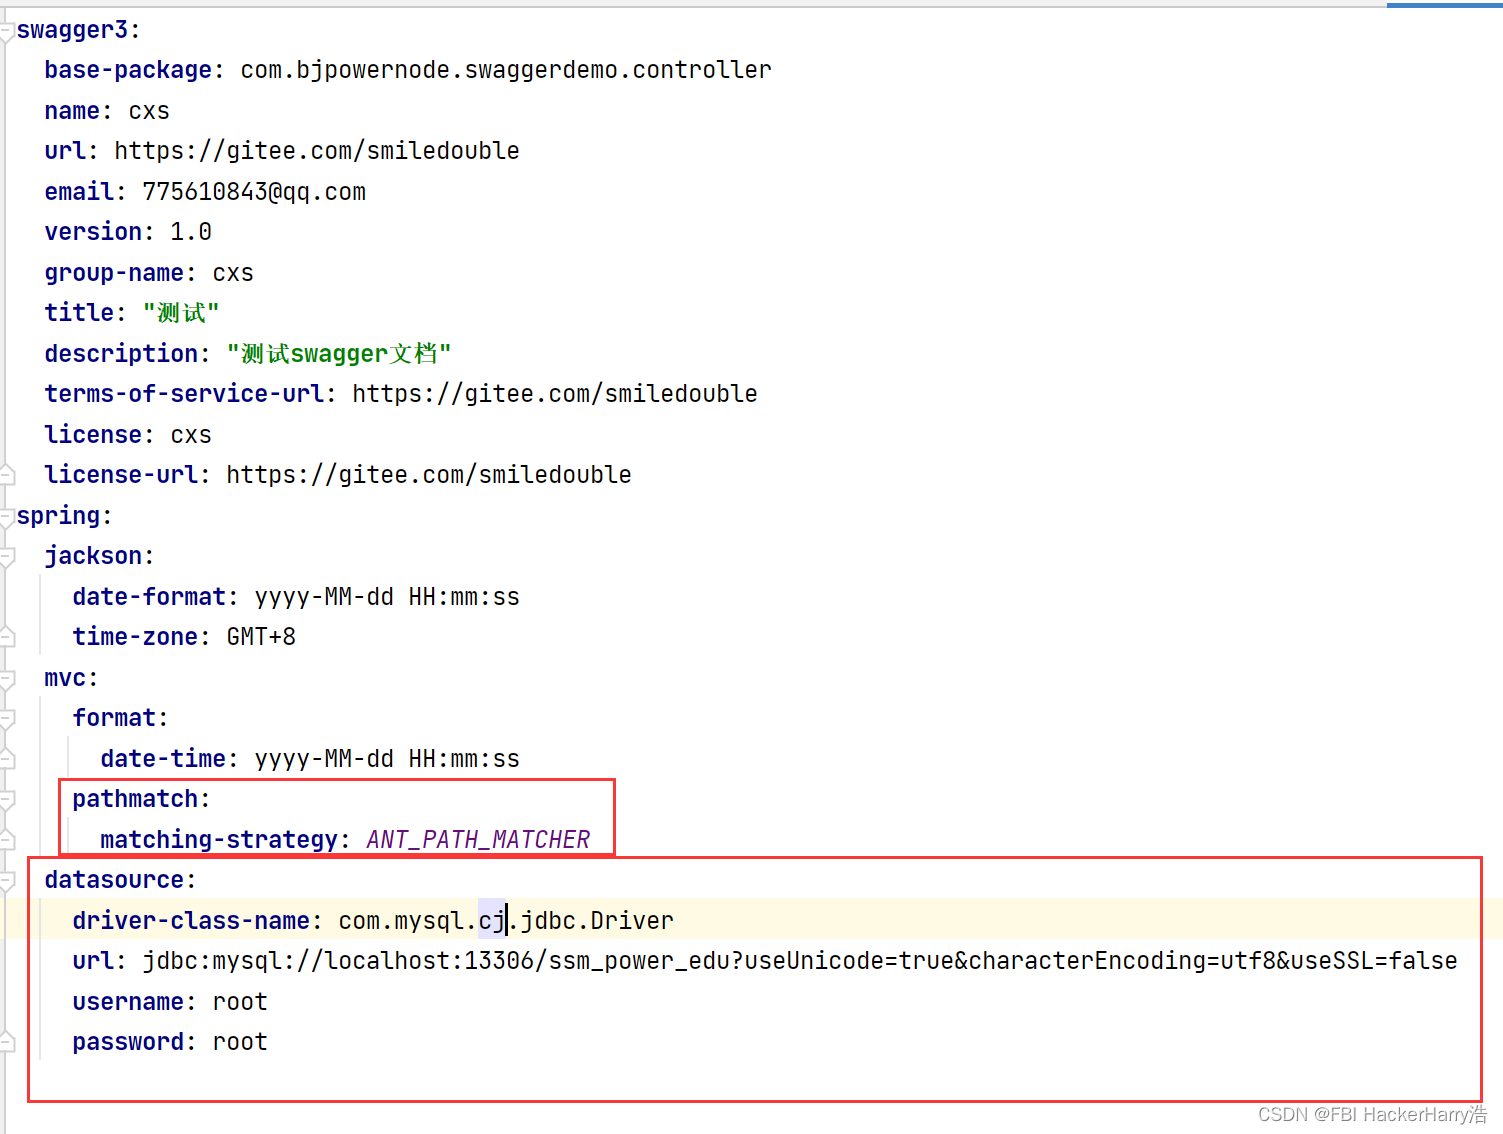
swagger3:
  base-package: com.bjpowernode.swaggerdemo.controller
  name: cxs
  url: https://gitee.com/smiledouble
  email: 775610843@qq.com
  version: 1.0
  group-name: cxs
  title: "测试"
  description: "测试swagger文档"
  terms-of-service-url: https://gitee.com/smiledouble
  license: cxs
  license-url: https://gitee.com/smiledouble
spring:
  jackson:
    date-format: yyyy-MM-dd HH:mm:ss
    time-zone: GMT+8
  mvc:
    format:
      date-time: yyyy-MM-dd HH:mm:ss
    pathmatch:
      matching-strategy: ANT_PATH_MATCHER
  datasource:
    driver-class-name: com.mysql.cj.jdbc.Driver
    url: jdbc:mysql://localhost:13306/ssm_power_edu?useUnicode=true&characterEncoding=utf8&useSSL=false
    username: root
    password: root
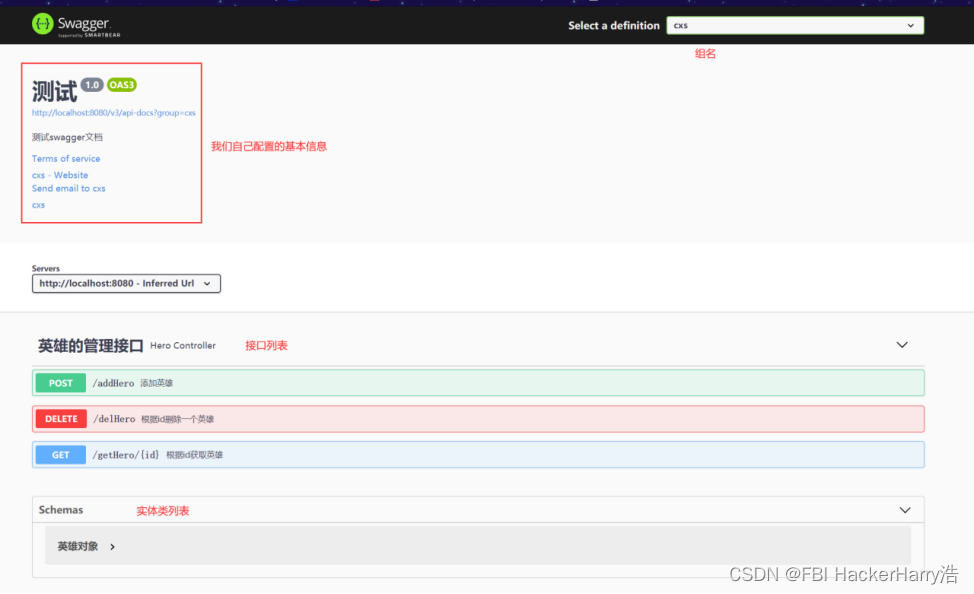
2.10 测试访问文档页面
http://localhost:8080/swagger-ui/index.html
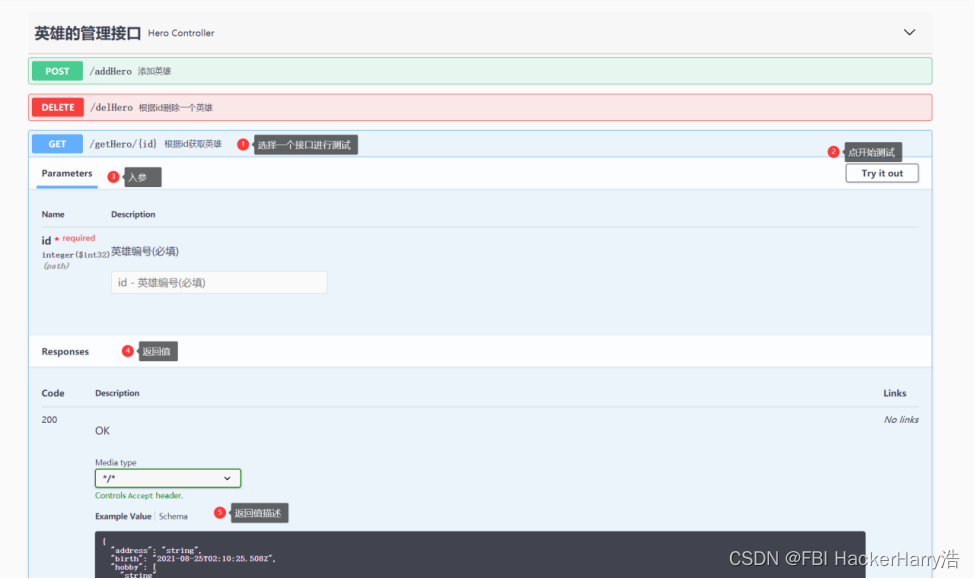
2.11 测试接口
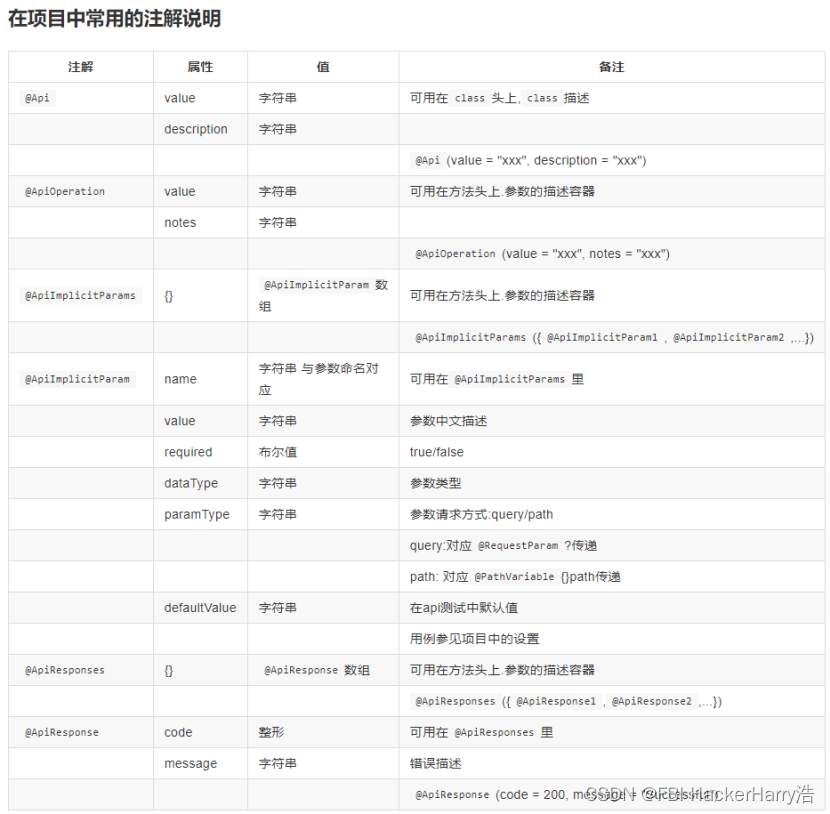
2.12 补充注解说明
https://gumutianqi1.gitbooks.io/specification-doc/content/tools-doc/spring-boot-swagger2-guide.html
三、变式
3.1 引入AjaxResult
com.bjpowernode.swaggerdemo.common.AjaxResult
AjaxResult.java
package com.bjpowernode.swaggerdemo.common;

import lombok.Data;
import lombok.experimental.Accessors;

/**
 * 设计用来以json格式字符串的方式响应给前端的对象
 */
@Data
@Accessors(chain = true)
public class AjaxResult {
    private boolean issuccess;//声明处理请求是否成功
    private Integer code;//声明处理请求响应给前端的状态码
    private String message;//声明响应给前端用来提示用户的信息
    private Object content;//响应给前端用来展示的具体数据

    /**
     * 返回响应成功的AjaxResult对象
     * 指定具体Content
     */
    public static AjaxResult success(Object content){
        AjaxResult ajaxResult = new AjaxResult();

        ajaxResult.setIssuccess(true)
                .setCode(200)
                .setMessage("响应成功")
                .setContent(content);

        return ajaxResult;
    }

    public static AjaxResult success(){
        AjaxResult ajaxResult = new AjaxResult();

        ajaxResult.setIssuccess(true)
                .setCode(200)
                .setMessage("响应成功");
        return ajaxResult;
    }

    /**
     * 返回响应失败的AjaxResult对象
     */
    public static AjaxResult fail(String message){
        AjaxResult ajaxResult = new AjaxResult();
        ajaxResult.setIssuccess(false).setCode(400).setMessage(message);
        return ajaxResult;
    }

}
3.2 controller层的改变
@ApiOperation("根据id获取英雄")
    @ApiImplicitParam(name = "id", value = "英雄编号(必填)", required = true, dataType = "Integer", paramType = "path")
    @ApiResponses({
            @ApiResponse(code = 408, message = "指定业务的报错信息,返回客户端"),
            @ApiResponse(code = 400, message = "请求参数没填好"),
            @ApiResponse(code = 404, message = "请求路径没有或页面跳转路径不对")
    })
    @GetMapping("/getHeroByAjaxResult/{id}")
    public AjaxResult getHeroByIdAndAjaxResult(@PathVariable("id") Integer id) {
        Hero hero = new Hero();

        List<String> hobby = Arrays.asList("游泳", "打乒乓球");

        HashMap<String, String> map = new HashMap<>();
        map.put("技能", "吐丝");

        hero.setId(id).setName("蜘蛛侠").setAddress("美国").setBirth(new Date()).setHobby(hobby).setMap(map);

        return AjaxResult.success(hero);
    }
 @ApiOperation("添加英雄")
    @ApiResponses({
            @ApiResponse(code = 408, message = "指定业务的报错信息,返回客户端"),
            @ApiResponse(code=400,message = "请求参数没填好"),
            @ApiResponse(code = 400,message = "请求路径没有或页面跳转路径不对")
    })
    @PostMapping("/addHeroByAjaxResult")
    public AjaxResult addHeroByAjaxResult(@RequestBody Hero hero) {
        System.out.println(hero);
        return AjaxResult.success(hero);
    }
 @DeleteMapping("/delHeroByAjaxResult")
    @ApiOperation("根据id删除一个英雄")
    @ApiImplicitParam(name = "id",value = "英雄编号",required = true,paramType = "query",dataType = "Integer")
    public AjaxResult delHeroByAjaxResult(@RequestParam Integer id){
        System.out.println(id);
        /*
        * 这里省略删除英雄的业务逻辑代码
        */
        return AjaxResult.success("成功删除id为"+id+"的hero");
    }