基于Webrtc的视频通话录制功能-Android实现
webrtc本身并不支持视频通话的录制。 webrtc的sdk只是暴露了视频数据给开发者,而音频数据并没有向外暴露。 因此如果要进行视频通话的录制,需要修改webrtc的sdk,将音频数据暴露出来。 webrtc的下载和编译可参考之前的文章:WebRtc下载和编译
一、修改SDK,引出音频数据
1. 音频采集数据的提取(mic输入,本地声音)
webrtc的音频数据的采集在audio_device_java.jar包中,具体类为WebRtcAudioRecord,其对应源码中的位置为:
src/modules/audio_device/android/java/src/org/webrtc/voiceengine/WebRtcAudioRecord.java
a) 在该类中添加如下代码:
// tanghongfeng add begin
private static WebRtcAudioRecordCallback mWebRtcAudioRecordCallback;
public static void setWebRtcAudioRecordCallback(WebRtcAudioRecordCallback callback) {
    Logging.d("WebRtcAudioRecord", "Set record callback");
    mWebRtcAudioRecordCallback = callback;
}
public interface WebRtcAudioRecordCallback {
    void onWebRtcAudioRecordInit(int audioSource, int audioFormat,
             int sampleRate, int channels, int bitPerSample,
             int bufferPerSecond, int bufferSizeInBytes);
    void onWebRtcAudioRecordStart();
    void onWebRtcAudioRecording(ByteBuffer buffer, int bufferSize,
             boolean microphoneMute);
    void onWebRtcAudioRecordStop();
}
// tanghongfeng add end
b) 在initRecording方法中添加如下代码:
private int initRecording(int sampleRate, int channels) {
    ......
    logMainParameters();
    logMainParametersExtended();
    // tanghongfeng add begin
    if (mWebRtcAudioRecordCallback != null) {
        mWebRtcAudioRecordCallback
             .onWebRtcAudioRecordInit(audioSource, 2, sampleRate,
                         channels, 16, 100, bufferSizeInBytes);
    }
    // tanghongfeng add end
    return framesPerBuffer;
}
c) 在startRecording方法中添加如下代码:
private boolean startRecording() {
    ......
    try {
        this.audioRecord.startRecording();
        // tanghongfeng add begin
        if (mWebRtcAudioRecordCallback != null) {
            mWebRtcAudioRecordCallback.onWebRtcAudioRecordStart();
        }
        // tanghongfeng add end
    }
    ......
}
d) 在stopRecording方法中添加如下代码:
private boolean stopRecording() {
    ......
    this.releaseAudioResources();
    // tanghongfeng add begin
    if(mWebRtcAudioRecordCallback != null) {
        mWebRtcAudioRecordCallback.onWebRtcAudioRecordStop();
    }
    // tanghongfeng add end
    return true;
}
e) 在内部类AudioRecordThread的run方法中添加如下代码:
@Override
public void run() {
    ......
    while (keepAlive) {
        int bytesRead = audioRecord.read(byteBuffer, byteBuffer.capacity());
        if (bytesRead == byteBuffer.capacity()) {
            ......
            if (keepAlive) {
                nativeDataIsRecorded(bytesRead, nativeAudioRecord);
                // tanghongfeng add begin
                if (mWebRtcAudioRecordCallback != null) {
                    mWebRtcAudioRecordCallback.onWebRtcAudioRecording(byteBuffer,
                                                 bytesRead, microphoneMute);
                }
                // tanghongfeng add end
            }
        } else {
            ......
        }
        ......
    }
}
2. 音频网络数据的提取(网络传入,对方声音)
webrtc的音频网络数据的提取在audio_device_java.jar包中,具体类为WebRtcAudioTrack,其对应源码中的位置为:
src/modules/audio_device/android/java/src/org/webrtc/voiceengine/WebRtcAudioTrack.java
a) 在该类中添加如下代码:
// tanghongfeng add begin
private static WebRtcAudioTrackCallback mWebRtcAudioTrackCallback;;
public static void setWebRtcAudioTrackCallback(WebRtcAudioTrackCallback callback) {
    Logging.d("WebRtcAudioTrack", "Set track callback");
    mWebRtcAudioTrackCallback = callback;
}
public interface WebRtcAudioTrackCallback {
    void onWebRtcAudioTrackInit(int audioFormat, int sampleRate,
                 int channels, int bitPerSample,
                 int bufferPerSecond, int minBufferSizeInBytes);
    void onWebRtcAudioTrackStart();
    void onWebRtcAudioTracking(ByteBuffer byteBuffer, int bytesWritten,
                 boolean speakerMute);
    void onWebRtcAudioTrackStop();
}
// tanghongfeng add end
b) 在initPlayout方法中添加如下代码:
private boolean initPlayout(int sampleRate, int channels) {
    ......
    logMainParameters();
    logMainParametersExtended();
    // tanghongfeng add begin
    if (mWebRtcAudioTrackCallback != null) {
        mWebRtcAudioTrackCallback.onWebRtcAudioTrackInit(2, sampleRate, channels,
                                    16, 100, minBufferSizeInBytes);
    }
    // tanghongfeng add end
    return true;
}
c) 在startPlayout方法中添加如下代码:
private boolean startPlayout() {
    ......
    try {
        audioTrack.play();
        // tanghongfeng add begin
        if (mWebRtcAudioTrackCallback != null) {
            mWebRtcAudioTrackCallback.onWebRtcAudioTrackStart();
        }
        // tanghongfeng add end
    }
    ......
}
d) 在stopPlayout方法中添加如下代码:
private boolean stopPlayout() {
    ......
    // tanghongfeng add begin
    if (mWebRtcAudioTrackCallback != null) {
          mWebRtcAudioTrackCallback.onWebRtcAudioTrackStop();
    }
    // tanghongfeng add end
    return true;
}
e) 在内部类AudioTrackThread的run方法中添加如下代码:
@Override
public void run() {
    ......
    while (keepAlive) {
        ......
        // tanghongfeng add begin
        else if (mWebRtcAudioTrackCallback != null) {
            mWebRtcAudioTrackCallback
                  .onWebRtcAudioTracking(byteBuffer, bytesWritten, speakerMute);
        }
        // tanghongfeng add end
        byteBuffer.rewind();
    }
    ......
}
3. 编译webrtc,复制audio_device_java.jar包到视频通话的项目的libs中
编译生成的audio_device_java.jar包位于:
src/out/Debug/lib.java/modules/audio_device/audio_device_java.jar
二、使用修改后SDK,实现视频通话录制功能
本demo基于WebRtc的android示例APP。该示例APP的源码路径: src/examples/androidapp 本demo完整的代码在github中: https://github.com/thfhongfeng/PineAppRtc
视频通话录制的主要实现类为MediaRecordController
1. 实现方式:
a) 视频数据采集使用MediaProjection+VirtualDisplay b) 双路音频的混音使用平均算法 c) 使用MediaCodec编码,使用MediaMuxer封装成MP4文件
2. 录制流程:
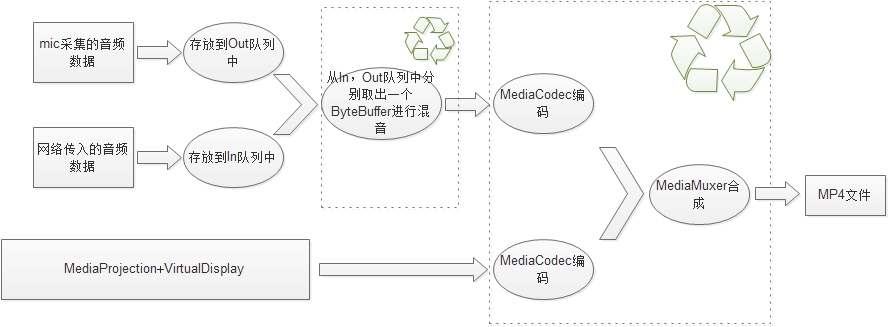
录制流程.jpg
三、搭建WebRtc服务器,完成端对端的WebRtc功能
1. 服务器搭建
参考之前的文章:搭建WebRtc服务器
2. 修改App的房间服务器地址(请读者使用自己搭建的服务器的地址进行设置,示例中的地址为作者本地搭建的服务器地址,外网是无法访问的):
两种方式: a) 修改App源码中的房间服务器的默认地址为自己搭建的房间服务器的地址,修改文件pine_rtc\src\main\res\values\strings.xml:
<string translatable="false" name="pref_room_server_url_default">http://10.10.29.56:7000</string>
修改文件pine_rtc\src\main\AndroidManifest.xml:
<activity android:name=".org.component.ConnectActivity"
          android:label="@string/app_name"
          android:windowSoftInputMode="adjustPan" android:screenOrientation="portrait">
    <intent-filter>
        <action android:name="android.intent.action.VIEW"/>
        <category android:name="android.intent.category.DEFAULT"/>
        <category android:name="android.intent.category.BROWSABLE"/>
        <data android:scheme="https" android:host="10.10.29.56"/>
        <data android:scheme="http" android:host="10.10.29.56"/>
    </intent-filter>
</activity>
重新编译Demo App b) 不修改源码,启动App后直接在设置中修改房间服务器地址为自己搭建的房间服务器的地址。


![[附源码]SSM计算机毕业设计江苏人才信息管理系统JAVA](https://img-blog.csdnimg.cn/1c7fc8ec1c0e407b9236562bf2abbe7f.png)
