目录
- 一、channel的主要作用
- 二、EventLoop处理io任务代码示例
- 2.1、服务端代码示例
- 2.2、客户端代码示例
- 2.3、服务端和客户端查看控制台输出结果
- 三、CloseFuture关闭问题代码示例
- 3.1、服务端代码示例
- 3.2、客户端代码示例
- 3.3、服务端和客户端查看控制台输出结果
- 3.4、CloseFuture关闭问题出现的原因
- 四、CloseFuture关闭问题的处理方式一(获取 CloseFuture 对象,同步处理关闭)
- 4.1、服务端代码示例
- 4.2、客户端代码示例
- 4.3、服务端和客户端查看控制台输出结果
- 五、CloseFuture关闭问题的处理方式二(获取 CloseFuture 对象,异步处理关闭)
- 5.1、服务端代码示例
- 5.2、客户端代码示例
- 5.3、服务端和客户端查看控制台输出结果
一、channel的主要作用
| channel 中的方法 | 作用 |
|---|---|
| close() | 用来关闭 channel |
| closeFuture() | 处理 channel 的关闭,sync 方法作用是同步等待 channel 关闭,addListener 方法是异步等待 channel 关闭 |
| pipeline() | 添加处理器 |
| write() | 将数据写入 |
| writeAndFlush() | 将数据写入并刷出 |
二、EventLoop处理io任务代码示例
2.1、服务端代码示例
-
引入pom依赖
<dependency> <groupId>io.netty</groupId> <artifactId>netty-all</artifactId> <version>4.1.39.Final</version> </dependency> -
服务端
import io.netty.bootstrap.ServerBootstrap;
import io.netty.buffer.ByteBuf;
import io.netty.channel.ChannelHandlerContext;
import io.netty.channel.ChannelInboundHandlerAdapter;
import io.netty.channel.ChannelInitializer;
import io.netty.channel.DefaultEventLoopGroup;
import io.netty.channel.nio.NioEventLoopGroup;
import io.netty.channel.socket.nio.NioServerSocketChannel;
import io.netty.channel.socket.nio.NioSocketChannel;
import lombok.extern.slf4j.Slf4j;

import java.nio.charset.Charset;

/**
 * @description: EventLoop处理io任务 服务端
 * @author: xz
 */
@Slf4j
public class EventLoopServer {
    public static void main(String[] args) {
        //创建一个独立的EventLoopGroup
        DefaultEventLoopGroup normalWorkers = new DefaultEventLoopGroup(2);
        //1、服务端启动器:负责组装netty组件
        new ServerBootstrap()
                //2、将EventLoop分为boss和worker(即将EventLoop分工细化)
                // boss即第1个参数,只负责accept事件; worker即第2个参数,只负责socketChannel上的读写
                .group(new NioEventLoopGroup(1), new NioEventLoopGroup(2))
                //3、选择服务器的 ServerSocketChannel 实现
                .channel(NioServerSocketChannel.class)
                //4、添加服务端处理器
                .childHandler(
                    // 5. channel 代表和客户端进行数据读写的通道 Initializer 初始化,负责添加别的 handler
                    new ChannelInitializer<NioSocketChannel>() {
                    @Override
                    protected void initChannel(NioSocketChannel ch) throws Exception {
                        //6、添加具体 handler
                        ch.pipeline().addLast(normalWorkers,"handler1", new ChannelInboundHandlerAdapter() {
                            @Override
                            public void channelRead(ChannelHandlerContext ctx, Object msg) throws Exception {
                                //msg转ByteBuf
                                ByteBuf buf = (ByteBuf) msg;
                                //ByteBuf转字符串
                                log.debug(buf.toString(Charset.defaultCharset()));
                                //让消息传递给下一个handler
                                ctx.fireChannelRead(msg);
                            }
                        });
                    }
                })
                //7、绑定监听端口
                .bind(8080);
    }
}
2.2、客户端代码示例
-
客户端
import io.netty.bootstrap.Bootstrap;
import io.netty.buffer.ByteBufAllocator;
import io.netty.channel.Channel;
import io.netty.channel.ChannelInitializer;
import io.netty.channel.nio.NioEventLoopGroup;
import io.netty.channel.socket.nio.NioSocketChannel;
import io.netty.handler.codec.string.StringEncoder;
import lombok.extern.slf4j.Slf4j;
import java.net.InetSocketAddress;
/**
 * @description: EventLoop处理io任务 客户端
 * @author: xz
 */
@Slf4j
public class EventLoopClient {
    public static void main(String[] args) throws InterruptedException {
        // 1. 客户端启动器
        Channel channel = new Bootstrap()
                // 2. 添加 EventLoop(事件循环)
                .group(new NioEventLoopGroup(1))
                // 3. 选择客户端的 SocketChannel 实现
                .channel(NioSocketChannel.class)
                // 4. 添加客户端处理器
                .handler(new ChannelInitializer<NioSocketChannel>() {
                    // 在连接建立后被调用
                    @Override
                    protected void initChannel(NioSocketChannel nioSocketChannel) throws Exception {
                        //9. 消息会经过通道 handler 处理,这里是将 String => ByteBuf 发出
                        nioSocketChannel.pipeline().addLast(new StringEncoder());
                    }
                })
                //5. 连接到服务器
                .connect(new InetSocketAddress("localhost", 8080))
                //6. 等待 connect 建立连接完毕
                .sync()
                //7. 连接对象
                .channel();
        System.out.println("打印channel对象==="+channel);
        //8. 发送数据
        channel.writeAndFlush(ByteBufAllocator.DEFAULT.buffer().writeBytes("aaaaaa".getBytes()));
    }
}
2.3、服务端和客户端查看控制台输出结果
- 先启动服务端,再启动客户端,查看客户端控制台输出,结果如下:

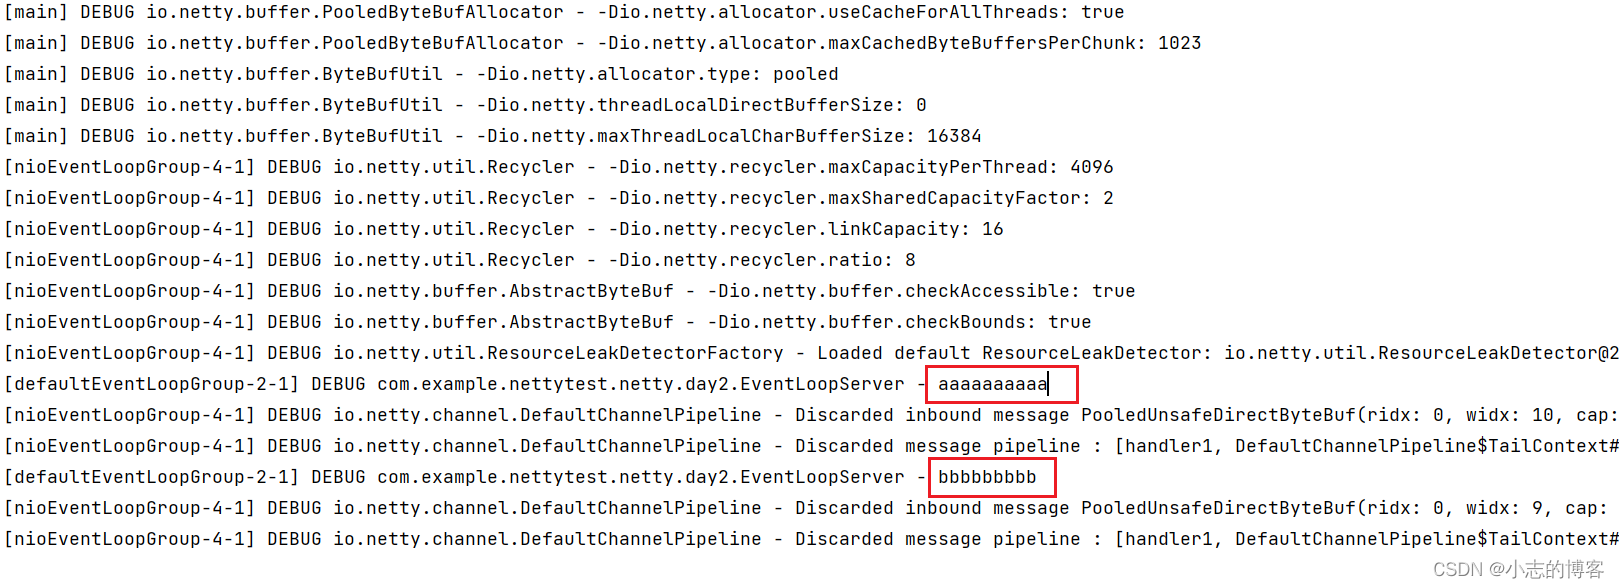
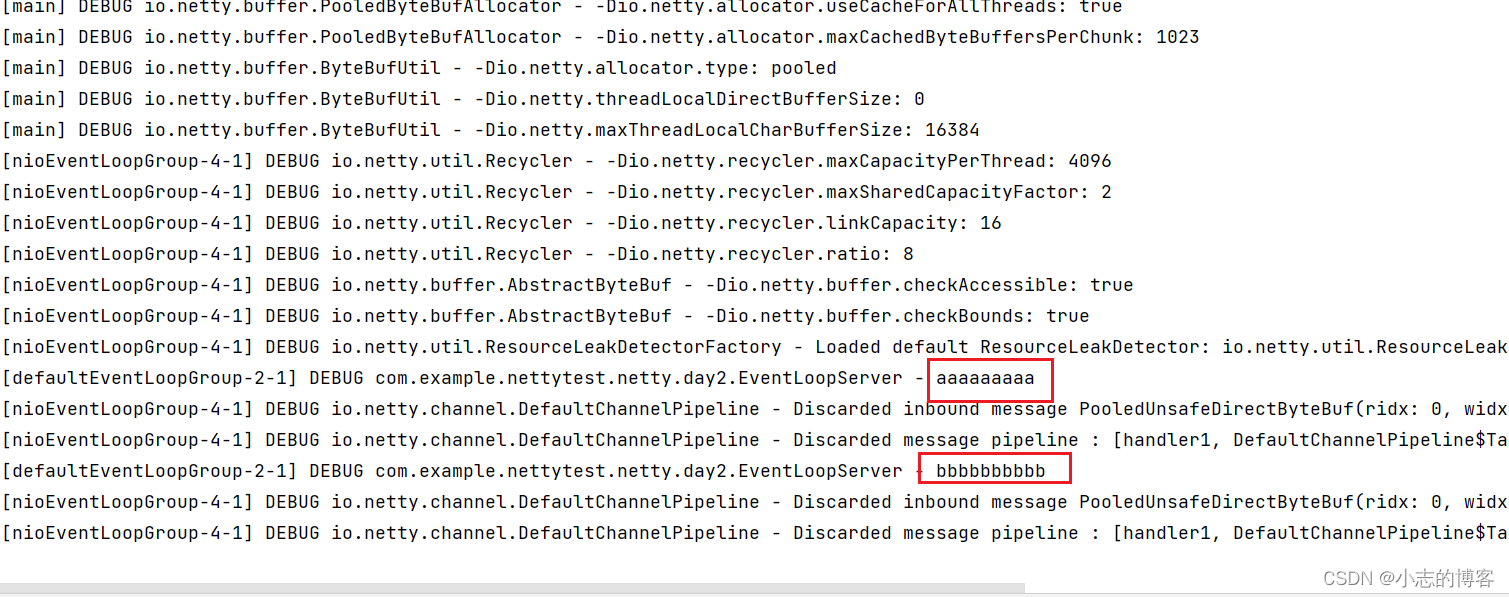
- 再查看服务端控制台输出,结果如下:

三、CloseFuture关闭问题代码示例
3.1、服务端代码示例
- 同步2.1步骤中的代码
3.2、客户端代码示例
-
将2.2步骤中客户端代码拆开,代码如下
import io.netty.bootstrap.Bootstrap;
import io.netty.channel.Channel;
import io.netty.channel.ChannelFuture;
import io.netty.channel.ChannelFutureListener;
import io.netty.channel.ChannelInitializer;
import io.netty.channel.nio.NioEventLoopGroup;
import io.netty.channel.socket.nio.NioSocketChannel;
import io.netty.handler.codec.string.StringEncoder;
import io.netty.handler.logging.LogLevel;
import io.netty.handler.logging.LoggingHandler;
import lombok.extern.slf4j.Slf4j;
import java.net.InetSocketAddress;
import java.util.Scanner;

/**
 * @description: EventLoop处理io任务中CloseFuture连接问题及处理结果
 * @author: xz
 */
@Slf4j
public class CloseFutureClient {
    public static void main(String[] args) throws InterruptedException {
        client1();
    }
    /**
     * 将客户端代码拆开
     * ChannelFuture关闭问题 : 不能保证 log输出的处理关闭之后的操作 一定是在真正的channel.close()之后执行
     * */
    public static void client1() throws InterruptedException {
        ChannelFuture channelFuture = new Bootstrap()
                .group(new NioEventLoopGroup(1))
                .channel(NioSocketChannel.class)
                .handler(new ChannelInitializer<NioSocketChannel>() {
                    @Override
                    protected void initChannel(NioSocketChannel nioSocketChannel) throws Exception {
                        nioSocketChannel.pipeline().addLast(new LoggingHandler(LogLevel.INFO));
                        nioSocketChannel.pipeline().addLast(new StringEncoder());
                    }
                })
                //1、连接到服务器
                //异步非阻塞,main方法发起了调用,真正执行connect是nio线程
                .connect(new InetSocketAddress("localhost", 8080));
        //无阻塞向下执行获取channel
        Channel channel = channelFuture.sync().channel();
        log.info("建立连接后,打印channel对象====={}",channel);

        /**
         * 启动一个新的线程
         * */
        new Thread(()->{
            Scanner scanner = new Scanner(System.in);
            while(true){
                String line = scanner.nextLine();
                if("q".equals(line)){
                    channel.close();// close 异步操作
                    break;
                }
                channel.writeAndFlush(line);
            }
        },"input").start();
		log.debug("处理关闭之后的操作");
    }
}
3.3、服务端和客户端查看控制台输出结果
-
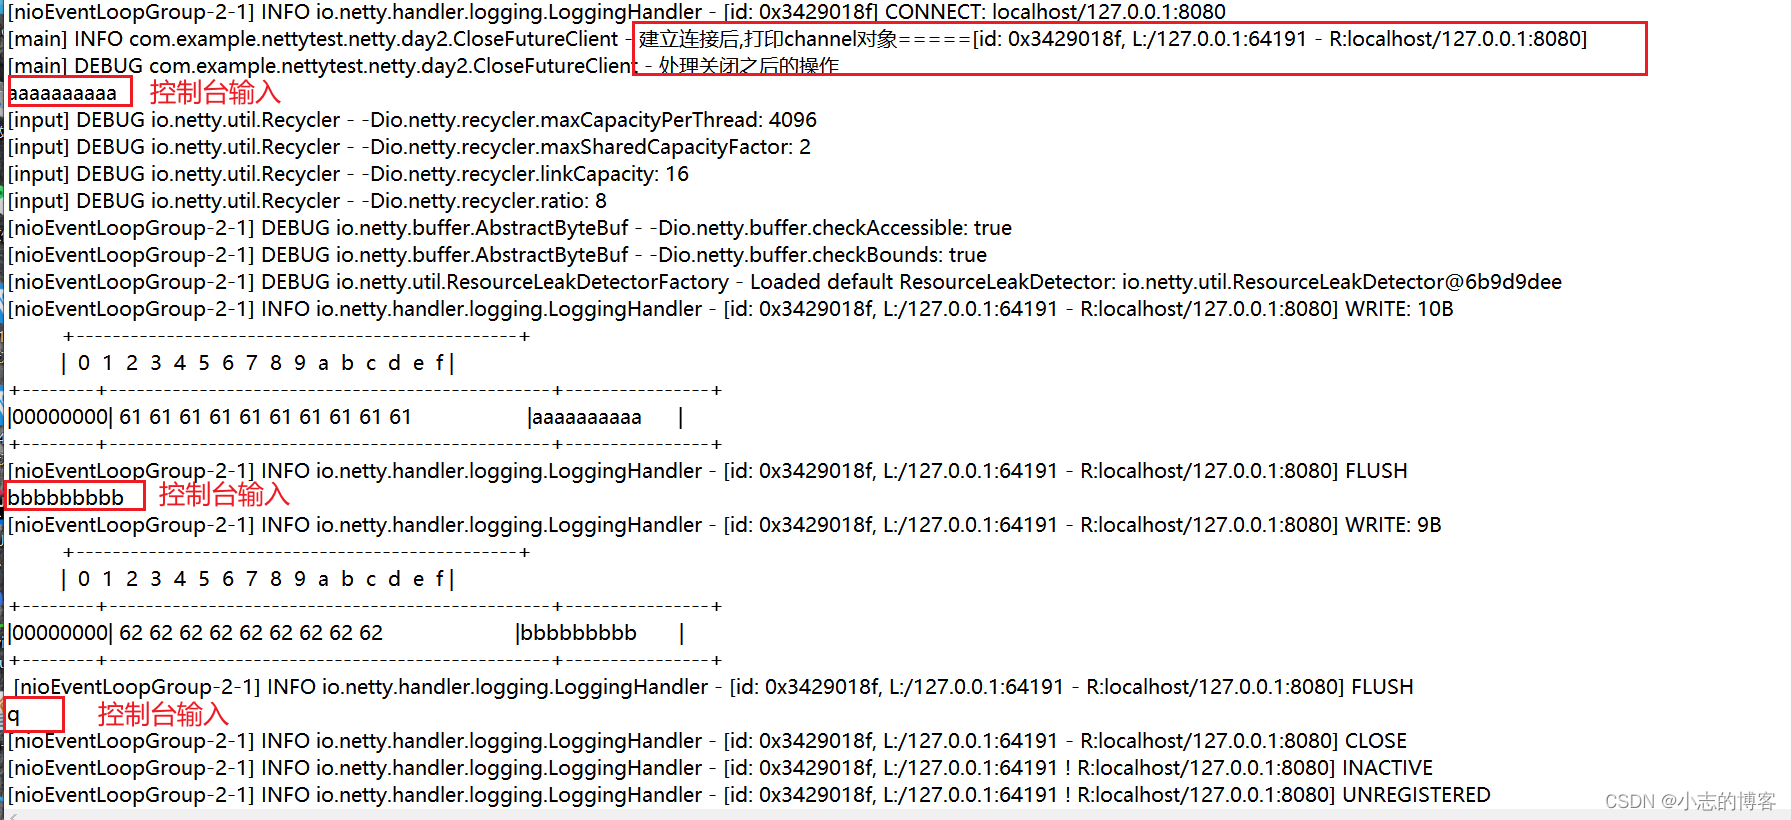
先启动服务端,再启动客户端,查看客户端控制台输出,结果如下:
-
再查看客户端控制台输出,结果如下:
3.4、CloseFuture关闭问题出现的原因
- 由上述代码示例可知,ChannelFuture关闭问题 : 不能保证 log输出的处理关闭之后的操作 一定是在真正的channel.close()之后执行。
四、CloseFuture关闭问题的处理方式一(获取 CloseFuture 对象,同步处理关闭)
4.1、服务端代码示例
- 同步2.1步骤中的代码
4.2、客户端代码示例
-
将3.2步骤中客户端代码进行修改,代码如下
import io.netty.bootstrap.Bootstrap;
import io.netty.channel.Channel;
import io.netty.channel.ChannelFuture;
import io.netty.channel.ChannelFutureListener;
import io.netty.channel.ChannelInitializer;
import io.netty.channel.nio.NioEventLoopGroup;
import io.netty.channel.socket.nio.NioSocketChannel;
import io.netty.handler.codec.string.StringEncoder;
import io.netty.handler.logging.LogLevel;
import io.netty.handler.logging.LoggingHandler;
import lombok.extern.slf4j.Slf4j;
import java.net.InetSocketAddress;
import java.util.Scanner;

/**
 * @description: EventLoop处理io任务中CloseFuture连接问题及处理结果
 * @author: xz
 */
@Slf4j
public class CloseFutureClient {
    public static void main(String[] args) throws InterruptedException {
        client2();
    }
    /**
     * 将客户端代码拆开
     * ChannelFuture关闭问题的处理方式一 :获取 CloseFuture 对象,同步处理关闭
     * */
    public static void client2() throws InterruptedException {
        ChannelFuture channelFuture = new Bootstrap()
                .group(new NioEventLoopGroup(1))
                .channel(NioSocketChannel.class)
                .handler(new ChannelInitializer<NioSocketChannel>() {
                    @Override
                    protected void initChannel(NioSocketChannel nioSocketChannel) throws Exception {
                        nioSocketChannel.pipeline().addLast(new LoggingHandler(LogLevel.INFO));
                        nioSocketChannel.pipeline().addLast(new StringEncoder());
                    }
                })
                //1、连接到服务器
                //异步非阻塞,main方法发起了调用,真正执行connect是nio线程
                .connect(new InetSocketAddress("localhost", 8080));
        //无阻塞向下执行获取channel
        Channel channel = channelFuture.sync().channel();
        log.info("建立连接后,打印channel对象====={}",channel);

        /**
         * 启动一个新的线程
         * */
        new Thread(()->{
            Scanner scanner = new Scanner(System.in);
            while(true){
                String line = scanner.nextLine();
                if("q".equals(line)){
                    channel.close();// close 异步操作
                    break;
                }
                channel.writeAndFlush(line);
            }
        },"input").start();
        // 获取 CloseFuture 对象, 1) 同步处理关闭
        ChannelFuture closeFuture = channel.closeFuture();
        log.debug("waiting close...");
        closeFuture.sync();
        log.debug("处理关闭之后的操作");
    }
}
4.3、服务端和客户端查看控制台输出结果
-
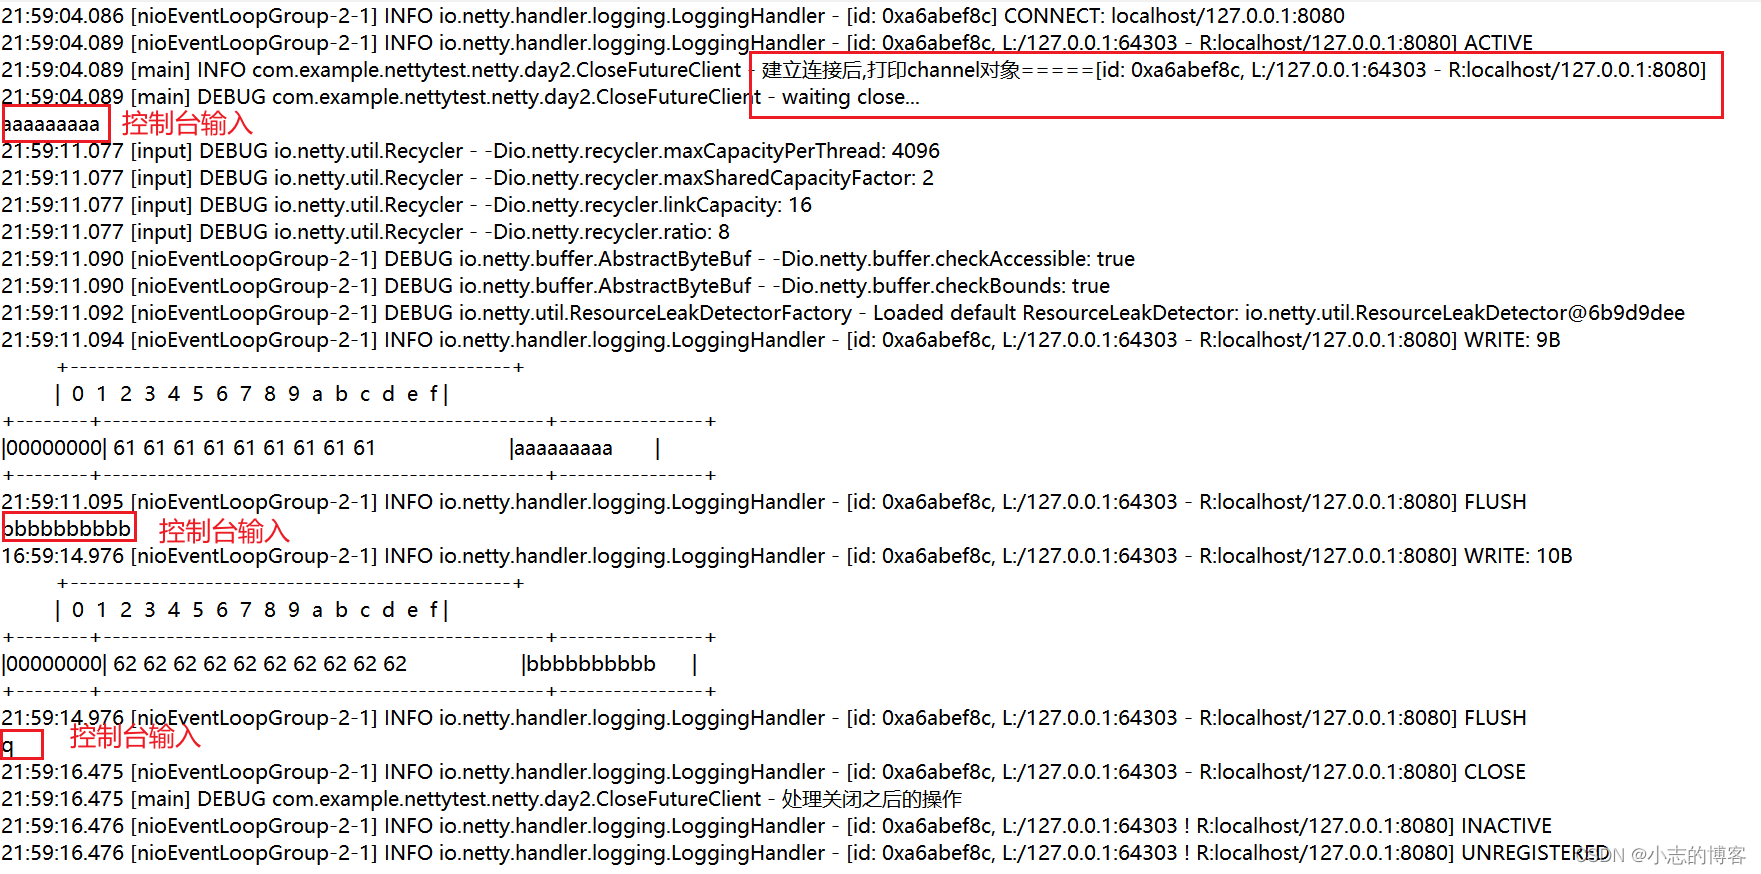
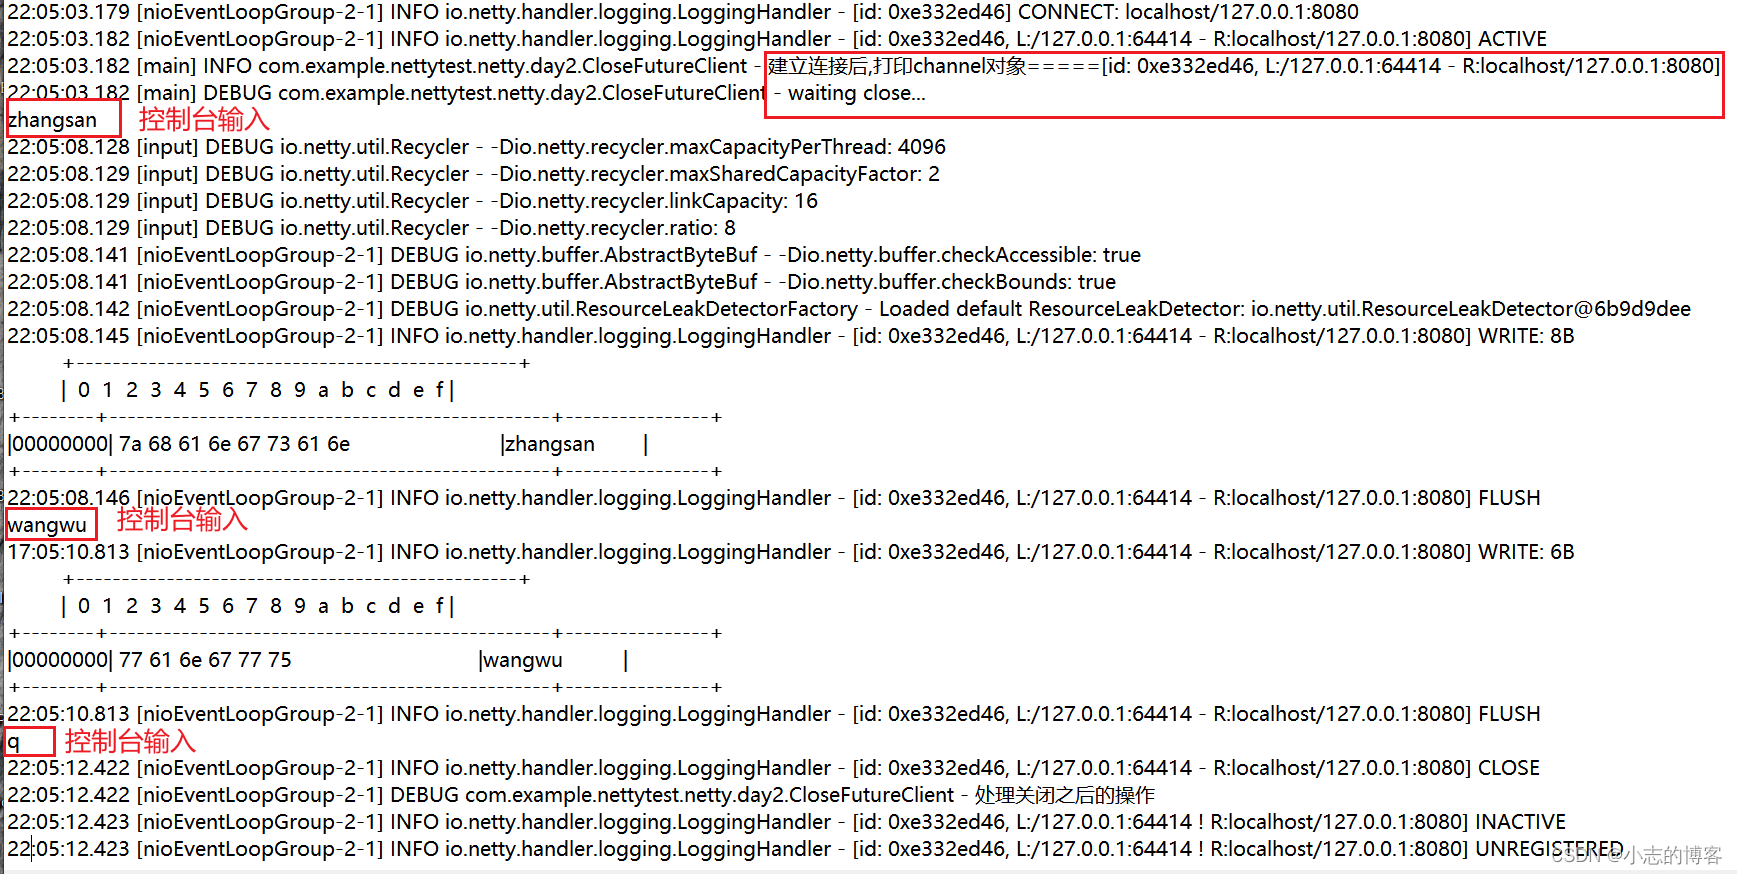
先启动服务端,再启动客户端,查看客户端控制台输出,结果如下:
-
再查看服务端控制台输出,结果如下:
五、CloseFuture关闭问题的处理方式二(获取 CloseFuture 对象,异步处理关闭)
5.1、服务端代码示例
- 同步2.1步骤中的代码
5.2、客户端代码示例
-
将3.2步骤中客户端代码进行修改,代码如下
import io.netty.bootstrap.Bootstrap;
import io.netty.channel.Channel;
import io.netty.channel.ChannelFuture;
import io.netty.channel.ChannelFutureListener;
import io.netty.channel.ChannelInitializer;
import io.netty.channel.nio.NioEventLoopGroup;
import io.netty.channel.socket.nio.NioSocketChannel;
import io.netty.handler.codec.string.StringEncoder;
import io.netty.handler.logging.LogLevel;
import io.netty.handler.logging.LoggingHandler;
import lombok.extern.slf4j.Slf4j;
import java.net.InetSocketAddress;
import java.util.Scanner;

/**
 * @description: EventLoop处理io任务中CloseFuture连接问题及处理结果
 * @author: xz
 */
@Slf4j
public class CloseFutureClient {
    public static void main(String[] args) throws InterruptedException {
        client3();
    }
    /**
     * 将客户端代码拆开
     * ChannelFuture关闭问题的处理方式二 :获取 CloseFuture 对象,异步处理关闭
     * */
    public static void client3() throws InterruptedException {
        ChannelFuture channelFuture = new Bootstrap()
                .group(new NioEventLoopGroup(1))
                .channel(NioSocketChannel.class)
                .handler(new ChannelInitializer<NioSocketChannel>() {
                    @Override
                    protected void initChannel(NioSocketChannel nioSocketChannel) throws Exception {
                        nioSocketChannel.pipeline().addLast(new LoggingHandler(LogLevel.INFO));
                        nioSocketChannel.pipeline().addLast(new StringEncoder());
                    }
                })
                //1、连接到服务器
                //异步非阻塞,main方法发起了调用,真正执行connect是nio线程
                .connect(new InetSocketAddress("localhost", 8080));
        //无阻塞向下执行获取channel
        Channel channel = channelFuture.sync().channel();
        log.info("建立连接后,打印channel对象====={}",channel);

        /**
         * 启动一个新的线程
         * */
        new Thread(()->{
            Scanner scanner = new Scanner(System.in);
            while(true){
                String line = scanner.nextLine();
                if("q".equals(line)){
                    channel.close();// close 异步操作
                    break;
                }
                channel.writeAndFlush(line);
            }
        },"input").start();
        // 获取 CloseFuture 对象, 2) 异步处理关闭
        ChannelFuture closeFuture = channel.closeFuture();
        log.debug("waiting close...");
        closeFuture.addListener(new ChannelFutureListener() {
            @Override
            public void operationComplete(ChannelFuture future) throws Exception {
                log.debug("处理关闭之后的操作");
            }
        });
    }
}
5.3、服务端和客户端查看控制台输出结果
-
先启动服务端,再启动客户端,查看客户端控制台输出,结果如下:
-
再查看服务端控制台输出,结果如下: