Docker技术入门与实战【2.0】
news2026/5/18 10:00:30
11.3 TomcatTomcat服务器是一个免费的开放源代码的Web应用服务器属于轻量级应用服务器在中小型系统和并发访问用户不是很多的场合下普遍使用是开发和调试JSP程序的首选。Tomcat最初是由Sun的软件构架师詹姆斯·邓肯·戴维森开发的。后来在他的帮助下Tomcat成为开源项目并由Sun贡献给Apache软件基金会。当配置正确时Apache为HTML页面服务而Tomcat实际上运行JSP页面和Servlet。另外Tomcat和IIS等Web服务器一样具有处理HTML页面的功能但处理静态HTML的能力不如Apache另外它还是一个Servlet和JSP容器独立的Servlet容器是Tomcat的默认模式。设计Tomcat的Dockerfile首先尝试在Dockerhub上搜索Tomcat相关镜像的个数$ sudo docker search tomcat |wc -l285可以看到已经有285个相关镜像。如是个人开发或测试可以随意选择一个镜像按照提示启动应用即可。若准备在生产环境中使用这些镜像都不是那么合适了。原因有三个方面·项目需要的Tomcat版本可能不同。·项目需要的Tomcat变量不一致。·项目需要的JDK可能不一致。因此比较好的方式应该是由架构师通过Dockerfile或者其他方式构建好统一的镜像然后分发给项目组所有成员来进行。下面以sun_jdk 1.6、tomcat 7.0、ubuntu 14.04为环境介绍如何定制自己的tomcat镜像。准备工作创建tomcat7.0_jdk1.6文件夹从www.oracle.com上下载sun_jdk 1.6压缩包解压为jdk目录。创建Dockerfile和run.sh文件$ mkdir tomcat7.0_jdk1.6 $ cd tomcat7.0_jdk1.6/ $ touch Dockerfile run.sh 下载Tomcat可以到官方网站下载最新的版本也可以直接使用下面链接中给出的版本 $ wget http://mirror.bit.edu.cn/apache/tomcat/tomcat-7/v7.0.56/bin/apache-tomcat-7.0.56.zip --2014-10-27 22:25:23-- http://mirror.bit.edu.cn/apache/tomcat/tomcat-7/v7.0.56/bin/apache-tomcat-7.0.56.zip Resolving mirror.bit.edu.cn (mirror.bit.edu.cn)http://www.hzcourse.com/resource/readBook?path/openresources/teach_ebook/uncompressed/15029/OEBPS/Text/... 219.143.204.117 2001:da8:204: Connecting to mirror.bit.edu.cn (mirror.bit.edu.cn)|219.143.204.117|:80http://www.hzcourse.com/resource/readBook?path/openresources/teach_ebook/uncompressed/15029/OEBPS/Text/... connect HTTP request sent awaiting responsehttp://www.hzcourse.com/resource/readBook?path/openresources/teach_ebook/uncompressed/15029/OEBPS/Text/... 200 OK Length: 9466255 (9.0M) [application/zip] Saving to: apache-tomcat-7.0.56.zip 100%[] 9 466 255 152KB/s in 70s 2014-10-27 22:26:34 (131 KB/s) - apache-tomcat-7.0.56.zip saved [9466255/9466255] 解压后tomcat7.0_jdk1.6目录底下应如下所示多余的压缩包文件已经被删除 $ ls Dockerfile apache-tomcat-7.0.56 jdk run.sh Dockerfile文件和其他脚本文件 Dockerfile文件内容如下 FROM sshd:dockerfile #设置继承自我们创建的sshd镜像 MAINTAINER waitfish from dockerpool.com(dwj_zz163.com) #下面是一些创建者的基本信息 #设置环境变量 所有操作都是非交互式的 ENV DEBIAN_FRONTEND noninteractive RUN echo Asia/Shanghai /etc/timezone \ dpkg-reconfigure -f noninteractive tzdata #注意这里要更改系统的时区设置 因为在Web应用中经常会用到时区这个系统变量 默认的ubuntu会让你的应用程序发生不可思议的效果哦 #安装跟tomcat用户认证相关的软件 RUN apt-get install -yq --no-install-recommends wget pwgen ca-certificates \ apt-get clean \ rm -rf /var/lib/apt/lists/* #设置tomcat的环境变量 若读者有其他的环境变量需要设置 也可以在这里添加。 ENV CATALINA_HOME /tomcat ENV JAVA_HOME /jdk #复制tomcat和jdk文件到镜像中ADD apache-tomcat-7.0.56 /tomcat ADD jdk /jdk ADD create_tomcat_admin_user.sh /create_tomcat_admin_user.sh ADD run.sh /run.sh RUN chmod x /*.sh RUN chmod x /tomcat/bin/*.sh EXPOSE 8080 CMD [/run.sh] 创建tomcat用户和密码脚本文件create_tomcat_admin_user.sh文件内容为 #!/bin/bash if [ -f /.tomcat_admin_created ]; then echo Tomcat admin user already created exit 0 fi #generate password PASS${TOMCAT_PASS:-$(pwgen -s 12 1)} _word$( [ ${TOMCAT_PASS} ] echo preset || echo random ) echo Creating and admin user with a ${_word} password in Tomcat sed -i -r s/\/tomcat-users// ${CATALINA_HOME}/conf/tomcat-users.xml echo role rolenamemanager-gui/ ${CATALINA_HOME}/conf/tomcat-users.xml echo role rolenamemanager-script/ ${CATALINA_HOME}/conf/tomcat-users.xml echo role rolenamemanager-jmx/ ${CATALINA_HOME}/conf/tomcat-users.xml echo role rolenameadmin-gui/ ${CATALINA_HOME}/conf/tomcat-users.xml echo role rolenameadmin-script/ ${CATALINA_HOME}/conf/tomcat-users.xml echo user username\admin\ password\${PASS}\ roles\manager-gui manager-script manager-jmx admin-gui admin-script\/ ${CATALINA_HOME}/conf/tomcat-users.xml echo /tomcat-users ${CATALINA_HOME}/conf/tomcat-users.xml echo Done! touch /.tomcat_admin_created echo echo You can now configure to this Tomcat server using: echo echo admin:${PASS} echo echo 编写run.sh脚本文件内容为 #!/bin/bash if [ ! -f /.tomcat_admin_created ]; then /create_tomcat_admin_user.sh fi /usr/sbin/sshd -D exec ${CATALINA_HOME}/bin/catalina.sh run 创建和测试镜像 通过下面的命令创建镜像tomcat7.0:jdk1.6 $ sudo docker build -t tomcat7.0:jdk1.6 . Sending build context to Docker daemon 234.8 MB Sending build context to Docker daemon Step 0 : FROM sshd:dockerfile --- 570c26a9de68 Step 1 : MAINTAINER waitfish from dockerpool.com(dwj_zz163.com) --- Using cache --- 5c6b90057a1d Step 2 : ENV DEBIAN_FRONTEND noninteractive --- Using cache --- e06feb0790d7 Step 3 : RUN echo Asia/Shanghai /etc/timezone dpkg-reconfigure -f noninteractive tzdata --- Running in 6dba2d312627 Current default time zone: Asia/Shanghai Local time is now: Tue Oct 28 13:47:08 CST 2014. Universal Time is now: Tue Oct 28 05:47:08 UTC 2014. --- a1dccb384edb Removing intermediate container 6dba2d312627 http://www.hzcourse.com/resource/readBook?path/openresources/teach_ebook/uncompressed/15029/OEBPS/Text/... Setting up pwgen (2.06-1ubuntu4) http://www.hzcourse.com/resource/readBook?path/openresources/teach_ebook/uncompressed/15029/OEBPS/Text/... --- e0e4ab118cda Removing intermediate container aee38d8ab936 Step 5 : ENV CATALINA_HOME /tomcat --- Running in 8d0d7176fb7e --- e4d8891f4e86 Removing intermediate container 8d0d7176fb7e Step 6 : ENV JAVA_HOME /jdk --- Running in 53ce1fa9b8a0 --- f17a13a87981 Removing intermediate container 53ce1fa9b8a0 Step 7 : ADD apache-tomcat-7.0.56 /tomcat --- ca1fa71b4130 Removing intermediate container 27e2d96bcb78 Step 8 : ADD jdk /jdk --- d7a595c4c4f9 Removing intermediate container 00d980ad2cad Step 9 : ADD create_tomcat_admin_user.sh /create_tomcat_admin_user.sh --- 5055ca84decc Removing intermediate container 220922d934ce Step 10 : ADD run.sh /run.sh --- da469edb1022 Removing intermediate container f0dde8563174 Step 11 : RUN chmod x /*.sh --- Running in 71564c350a2e --- 5f566293e37c Removing intermediate container 71564c350a2e Step 12 : EXPOSE 8080 --- Running in 055c41de3bd8 --- b1213c1bc920 Removing intermediate container 055c41de3bd8 Step 13 : CMD /run.sh --- Running in 5dbe1220a559 --- ce78537c247d Removing intermediate container 5dbe1220a559 Successfully built ce78537c247d 查看下目前本地拥有的镜像 $ sudo docker images REPOSITORY TAG IMAGE ID CREATED VIRTUAL SIZE tomcat7.0 jdk1.6 ce78537c247d 9 minutes ago 473.3 MB nginx albb 8e333a6f1d10 14 hours ago 567.6 MB nginx stable 4e3936e36e31 15 hours ago 262.3 MB apache ubuntu 06d84c79e905 16 hours ago 263.8 MB sshd dockerfile 570c26a9de68 26 hours ago 246.5 MB sshd ubuntu 7aef2cd95fd0 39 hours ago 255.2 MB debian latest 61f7f4f722fb 7 days ago 85.1 MB busybox latest e72ac664f4f0 3 weeks ago 2.433 MB ubuntu 14.04 ba5877dc9bec 3 months ago 192.7 MB ubuntu latest ba5877dc9bec 3 months ago 192.7 MB启动一个tomcat容器进行测试 $ sudo docker run -d -P tomcat7.0:jdk1.6 3cd4238cb32a713a3a1c29d93fbfc80cba150653b5eb8bd7629bee957e7378ed 通过docker logs得到tomcat的密码aBwN0CNCPckw $ sudo docker logs 3cd Creating and admin user with a random password in Tomcat Done! You can now configure to this Tomcat server using: admin:aBwN0CNCPckw Oct 28 2014 2:02:24 PM org.apache.catalina.core.AprLifecycleListener init INFO: The APR based Apache Tomcat Native library which allows optimal performance in production environments was not found on the java.library.path: /jdk/jre/lib/amd64/server:/jdk/jre/li Oct 28 2014 2:02:24 PM org.apache.coyote.AbstractProtocol init INFO: Initializing ProtocolHandler [http-bio-8080] Oct 28 2014 2:02:24 PM org.apache.coyote.AbstractProtocol init INFO: Initializing ProtocolHandler [ajp-bio-8009] Oct 28 2014 2:02:24 PM org.apache.catalina.startup.Catalina load 查看映射的端口信息 $ sudo docker ps CONTAINER ID IMAGE COMMAND CREATED STATUS PORTS NAMES 3cd4238cb32a tomcat7.0:jdk1.6 /run.sh 4 seconds ago Up 3 seconds 0.0.0.0:49157-22/tcp, 0.0.0.0:49158-8080/tcp cranky_wright 在本地使用浏览器登录Tomcat管理界面请访问http://127.0.0.1:49158如图11-1所示。输入从docker logs中得到的密码如图11-2所示。注意 在实际环境中可以通过使用-v参数来挂载Tomcat的日志文件、程序所在目录、以及与Tomcat相关的配置。11.4 WeblogicWebLogic是一个基于Java EE架构的中间件应用服务器WebLogic由Oracle公司维护。WebLogic是用于开发、集成、部署和管理大型分布式Web应用、网络应用和数据库应用的Java应用服务器。是商业市场上最主要的JavaJ2EE应用服务器软件之一也是世界上第一个成功商业化的J2EE应用服务器。与Tomcat不同的是Weblogic是一个商业软件所以需要有授权才能使用。不过Oracle公司允许开发者在开发模式下使用Weblogic。如果开发者需要在生产环境中使用Weblogic则需要购买Oracle公司的正规商业授权。Weblogic的安装软件可以到Oracle的官方网站下载。Weblogic的基本概念Weblogic域Weblogic域是作为单元进行管理的一组相关的WebLogic服务器资源。一个域包含一个或多个WebLogic服务器实例这些实例可以是群集实例、非群集实例或者群集与非群集实例的组合。一个域可以包含多个群集。域还包含部署在域中的应用程序组件、此域中的这些应用程序组件和服务器实例所需的资源和服务。应用程序和服务器实例使用的资源和服务示例包括计算机定义、可选网络通道、连接器和启动类。Administration服务器域中包含一个特殊的WebLogic服务器实例叫做Administration服务器这是用户配置、管理域中所有资源的核心。Managed服务器通常称加入Domain的其他实例为Managed服务器所有的Web应用、EJB、Web服务和其他资源都部署在这些服务器上。一个典型的Weblogic部署应该如图11-4所示。如果要使用常规的administratornode的方式部署就需要在run.sh脚本中分别写出administartor服务器和node服务器的启动脚本。这样做的优点是可以使用Weblogic的集群、同步等概念。部署一个集群应用程序只需要安装一次应用到集群上即可。缺点是·Docker配置复杂了。·没办法自动扩展集群的计算容量如需添加节点需要在administrator上先创建节点然后再配置新的容器run.sh启动脚本然后再启动容器。笔者推荐将应用程序安装在adminiserver上面需要扩展的时候启动多个adminiserver节点即可将adminiserver当作Manged server使用。这样做的优点和缺点和传统的部署方法恰恰相反。使用docker commitDockerfile方式创建镜像下面笔者将以Weblogic 12.11、jdk 1.6、Ubuntu14.04为例子创建一个带有Weblogic服务的镜像。1.准备工作由于Weblogic的安装、部署方式较为复杂笔者将先通过docker run-ti进入容器完成大部分操作然后通过docker commit将这个容器提交为一个镜像最后再进一步使用Dockerfile来完成最终的Weblogic镜像创建对于一些复杂镜像的创建读者也可以参考这种方法。在本地主机上创建weblogic目录从其他主机上传jdk和weblogic安装文件到该目录下并创建Dockerfile和run.sh脚本文件$ mkdir weblogic_jdk1.6 $ cd weblogic_jdk1.6/ $ touch Dockerfile run.sh $ ls Dockerfile jdk run.sh wls1211_generic.jar 2.安装Weblogic到容器 使用-v-d-P参数运行之前创建的sshd_dockerfile镜像$ sudo docker run -d -v /home/user/weblogic_jdk1.6/wls1211_generic.jar:/wls1211_generic.jar -v /home/user/weblogic_jdk1.6/jdk:/jdk -P sshd:dockerfile 185546d00925d80c5bfa01320feb8939c838fa10429acc648f8850efb8a1e968 在宿主主机查看容器的ssh端口映射情况可以看到映射到了本地的49159端口 dwjubuntu:~/weblogic_jdk1.6$ sudo docker ps CONTAINER ID IMAGE COMMAND CREATED STATUS PORTS NAMES 185546d00925 sshd:dockerfile /run.sh 2 seconds ago Up 1 seconds 0.0.0.0:49159-22/tcp happy_ritchie 通过ssh登录到容器 $ ssh 127.0.0.1 -p 49159 The authenticity of host [192.168.1.134]:49159 ([192.168.1.134]:49159) cant be established. ECDSA key fingerprint is d1:59:f1:09:3b:09:79:6d:19:16:f4:fd:39:1b:be:27. Are you sure you want to continue connecting (yes/no)? yes Warning: Permanently added [192.168.1.134]:49159 (ECDSA) to the list of known hosts. Welcome to Ubuntu 14.04 LTS (GNU/Linux 3.2.0-37-generic x86_64) * Documentation: https://help.ubuntu.com/ The programs included with the Ubuntu system are free software; the exact distribution terms for each program are described in the individual files in /usr/share/doc/*/copyright. Ubuntu comes with ABSOLUTELY NO WARRANTY to the extent permitted by applicable law. 找到映射到容器内的weblogic安装文件 root185546d00925:/# ls -lh total 997M drwxr-xr-x 2 root root 4.0K Jul 17 03:38 bin drwxr-xr-x 2 root root 4.0K Apr 10 2014 boot drwxr-xr-x 4 root root 340 Oct 28 07:53 dev drwxr-xr-x 83 root root 4.0K Oct 28 07:53 etc drwxr-xr-x 2 root root 4.0K Apr 10 2014 home drwxr-xr-x 8 1000 1000 4.0K Oct 28 07:43 jdk drwxr-xr-x 14 root root 4.0K Oct 27 03:01 lib drwxr-xr-x 2 root root 4.0K Jul 17 03:34 lib64 drwxr-xr-x 2 root root 4.0K Jul 17 03:34 media drwxr-xr-x 2 root root 4.0K Apr 10 2014 mnt drwxr-xr-x 2 root root 4.0K Jul 17 03:34 opt dr-xr-xr-x 253 root root 0 Oct 28 07:53 proc drwx------ 5 root root 4.0K Oct 28 07:55 root drwxr-xr-x 8 root root 4.0K Oct 28 07:55 run -rwxr-xr-x 1 root root 30 Oct 27 02:51 run.sh drwxr-xr-x 2 root root 4.0K Jul 21 21:47 sbin drwxr-xr-x 2 root root 4.0K Jul 17 03:34 srv dr-xr-xr-x 13 root root 0 Oct 28 07:53 sys drwxrwxrwt 3 root root 4.0K Oct 28 07:56 tmp drwxr-xr-x 16 root root 4.0K Oct 27 03:01 usr drwxr-xr-x 19 root root 4.0K Oct 28 07:55 var -rw------- 1 1000 1000 997M Oct 28 07:39 wls1211_generic.jar 笔者使用命令行模式在容器内进行weblogic的安装。 以console模式启动weblogic安装默认使用图形界面安装 root185546d00925:/# ./jdk/bin/java -jar wls1211_generic.jar -modeconsole Extracting 0%http://www.hzcourse.com/resource/readBook?path/openresources/teach_ebook/uncompressed/15029/OEBPS/Text/..http://www.hzcourse.com/resource/readBook?path/openresources/teach -------------------- Oracle Installer - WebLogic 12.1.1.0 ------------------- Welcome: -------- This installer will guide you through the installation of WebLogic 12.1.1.0. Type Next or enter to proceed to the next prompt. If you want to change data entered previously type Previous. You may quit the installer at any time by typing Exit. Enter [Exit][Next] 不使用默认的安装位置我们将weblogic安装在opt目录下面 -------------------- Oracle Installer - WebLogic 12.1.1.0 ------------------- Choose Middleware Home Directory: --------------------------------- Middleware Home [Enter new value or use default /root/Oracle/Middleware] Enter new Middleware Home OR [Exit][Previous][Next] /opt/Middleware -------------------- Oracle Installer - WebLogic 12.1.1.0 ------------------- Choose Middleware Home Directory: --------------------------------- Middleware Home [/opt/Middleware] Use above value or select another option: 1 - Enter new Middleware Home 2 - Change to default [/root/Oracle/Middleware] Enter option number to select OR [Exit][Previous][Next] 因为我们这里使用的授权时开发模式的所以选择不接收安全更新。 -------------------- Oracle Installer - WebLogic 12.1.1.0 ------------------- Register for Security Updates: ------------------------------ Provide your email address for security updates and to initiate configuration manager. 1|Email:[] 2|Support Password:[] 3|Receive Security Update:[Yes] Enter index number to select OR [Exit][Previous][Next] 3 -------------------- Oracle Installer - WebLogic 12.1.1.0 ------------------- Register for Security Updates: ------------------------------ Provide your email address for security updates and to initiate configuration manager. Receive Security Update: [Enter new value or use default yes] Enter [Yes][No]? no -------------------- Oracle Installer - WebLogic 12.1.1.0 ------------------- Register for Security Updates: ------------------------------ Provide your email address for security updates and to initiate configuration manager. Receive Security Update: [Enter new value or use default yes] ** Do you wish to bypass initiation of the configuration manager and ** remain uninformed of critical security issues in your configuration? Enter [Yes][No]? yes -------------------- Oracle Installer - WebLogic 12.1.1.0 ------------------- Register for Security Updates: ------------------------------ Provide your email address for security updates and to initiate configuration manager. 1|Email:[] 2|Support Password:[] 3|Receive Security Update:[No] Enter index number to select OR [Exit][Previous][Next] 在这里选择默认的组件。-------------------- Oracle Installer - WebLogic 12.1.1.0 ------------------- Register for Security Updates: ------------------------------ Provide your email address for security updates and to initiate configuration manager. 1|Email:[] 2|Support Password:[] 3|Receive Security Update:[No] Enter index number to select OR [Exit][Previous][Next] -------------------- Oracle Installer - WebLogic 12.1.1.0 ------------------- Choose Install Type: -------------------- Select the type of installation you wish to perform. -1|Typical | Install the following product(s) and component(s): | - WebLogic Server | - Oracle Coherence 2|Custom | Choose software products and components to install and perform optional |configuration. Enter index number to select OR [Exit][Previous][Next] 因为我们是在jdk目录下面使用Java所以weblogic记住了我们的jdk位置选择使用默认的jdk位置后面还需要选择产品安装目录之后即开始安装过程。 -------------------- Oracle Installer - WebLogic 12.1.1.0 ------------------- JDK Selection (Any * indicates Oracle Supplied VM): --------------------------------------------------- JDK(s) chosen will be installed. Defaults will be used in script string-substitution if installed. 1|Add Local Jdk 2|/jdk[x] *Estimated size of installation: 589.7 MB Enter 1 to add or 2 to toggle selection OR [Exit][Previous][Next] -------------------- Oracle Installer - WebLogic 12.1.1.0 ------------------- Choose Product Installation Directories: ---------------------------------------- Middleware Home Directory: [/opt/Middleware] Product Installation Directories: 1|WebLogic Server: [/opt/Middleware/wlserver_12.1] 2|Oracle Coherence: [/opt/Middleware/coherence_3.7] Enter index number to select OR [Exit][Previous][Next] -------------------- Oracle Installer - WebLogic 12.1.1.0 ------------------- The following Products and JDKs will be installed: -------------------------------------------------- WebLogic Platform 12.1.1.0 |_____WebLogic Server | |_____Core Application Server | |_____Administration Console | |_____Configuration Wizard and Upgrade Framework | |_____Web 2.0 HTTP Pub-Sub Server | |_____WebLogic SCA | |_____WebLogic JDBC Drivers | |_____Third Party JDBC Drivers | |_____WebLogic Server Clients | |_____Xquery Support | |_____Evaluation Database |_____Oracle Coherence |_____Coherence Product Files *Estimated size of installation: 589.9 MB Enter [Exit][Previous][Next] Oct 28 2014 7:59:44 AM java.util.prefs.FileSystemPreferences$2 run INFO: Created user preferences directory. -------------------- Oracle Installer - WebLogic 12.1.1.0 ------------------- Installing fileshttp://www.hzcourse.com/resource/readBook?path/openresources/teach_ebook/uncompressed/15029/OEBPS/Text/.. 0% 25% 50% 75% 100% [------------|------------|------------|------------] [***************************************************] Performing String Substitutionshttp://www.hzcourse.com/resource/readBook?path/openresources/teach_ebook/uncompressed/15029/OEBPS/Text/... -------------------- Oracle Installer - WebLogic 12.1.1.0 ------------------- Configuring OCMhttp://www.hzcourse.com/resource/readBook?path/openresources/teach_ebook/uncompressed/15029/OEBPS/Text/... 0% 25% 50% 75% 100% [------------|------------|------------|------------] [***************************************************] -------------------- Oracle Installer - WebLogic 12.1.1.0 ------------------- Installing Patcheshttp://www.hzcourse.com/resource/readBook?path/openresources/teach_ebook/uncompressed/15029/OEBPS/Text/... 0% 25% 50% 75% 100% [------------|------------|------------|------------] [***************************************************] Creating Domainshttp://www.hzcourse.com/resource/readBook?path/openresources/teach_ebook/uncompressed/15029/OEBPS/Text/... -------------------- Oracle Installer - WebLogic 12.1.1.0 ------------------- Installation Complete Congratulations! Installation is complete. Press [Enter] to continue or type [Exit] -------------------- Oracle Installer - WebLogic 12.1.1.0 ------------------- Clean up process in progress http://www.hzcourse.com/resource/readBook?path/openresources/teach_ebook/uncompressed/15029/OEBPS/Text/...完成以上步骤后容器内已成功安装Weblogic服务。3.创建节点接下来笔者将创建默认的weblogic域和Adminserver节点同样使用console模式启动安装并选择新建weblogic域。root185546d00925:/# cd /opt/Middleware/wlserver_12.1/common/bin/ root185546d00925:/opt/Middleware/wlserver_12.1/common/bin# ./config.sh -modeconsole ------------------- Fusion Middleware Configuration Wizard ------------------ Welcome: -------- Choose between creating and extending a domain. Based on your selection the Configuration Wizard guides you through the steps to generate a new or extend an existing domain. -1|Create a new WebLogic domain | Create a WebLogic domain in your projects directory. 2|Extend an existing WebLogic domain | Use this option to add new components to an existing domain and modify |configuration settings. Enter index number to select OR [Exit][Next] ------------------- Fusion Middleware Configuration Wizard ------------------ Select Domain Source: --------------------- Select the source from which the domain will be created. You can create the domain by selecting from the required components or by selecting from a list of existing domain templates. -1|Choose Weblogic Platform components | You can choose the Weblogic component(s) that you want supported in |your domain. 2|Choose custom template | Choose this option if you want to use an existing template. This |could be a custom created template using the Template Builder. Enter index number to select OR [Exit][Previous][Next] 选择默认的weblogic组件。 ------------------- Fusion Middleware Configuration Wizard ------------------ Application Template Selection:------------------------------- Available Templates |_____Basic WebLogic Server Domain - 12.1.1.0 [wlserver_12.1]x |_____Basic WebLogic SIP Server Domain - 12.1.1.0 [wlserver_12.1] [2] |_____WebLogic Advanced Web Services for JAX-RPC Extension - 12.1.1.0 [wlserver_12.1] [3] |_____WebLogic Advanced Web Services for JAX-WS Extension - 12.1.1.0 [wlserver_12.1] [4] Enter number exactly as it appears in brackets to toggle selection OR [Exit][Previous][Next] 设置新建的域名 ------------------- Fusion Middleware Configuration Wizard ------------------ Edit Domain Information: ------------------------ | Name | Value | _|________|_____________| 1| *Name: | base_domain | Enter value for Name OR [Exit][Previous][Next] 使用默认的安装位置 ------------------- Fusion Middleware Configuration Wizard ------------------ Select the target domain directory for this domain: --------------------------------------------------- Target Location [Enter new value or use default /opt/Middleware/user_projects/domains] Enter new Target Location OR [Exit][Previous][Next] 设置用户名和密码 ------------------- Fusion Middleware Configuration Wizard ------------------ Configure Administrator User Name and Password: ----------------------------------------------- Create a user to be assigned to the Administrator role. This user is the default administrator used to start development mode servers. | Name | Value | _|_________________________|_________________________________________| 1| *Name: | weblogic | 2| *User password: | | 3| *Confirm user password: | | 4| Description: | This user is the default administrator. | Use above value or select another option: 1 - Modify Name 2 - Modify User password 3 - Modify Confirm user password 4 - Modify Description Enter option number to select OR [Exit][Previous][Next] 3 ------------------- Fusion Middleware Configuration Wizard ------------------ Configure Administrator User Name and Password: ----------------------------------------------- Create a user to be assigned to the Administrator role. This user is the default administrator used to start development mode servers. *Confirm user password: [] Enter new *Confirm user password: OR [Exit][Reset][Accept] weblogic_test ------------------- Fusion Middleware Configuration Wizard ------------------ Configure Administrator User Name and Password: ----------------------------------------------- Create a user to be assigned to the Administrator role. This user is the default administrator used to start development mode servers. | Name | Value | _|_________________________|_________________________________________| 1| *Name: | weblogic | 2| *User password: | | 3| *Confirm user password: | ************* | 4| Description: | This user is the default administrator. | Use above value or select another option: 1 - Modify Name 2 - Modify User password 3 - Modify Confirm user password 4 - Modify Description 5 - Discard Changes Enter option number to select OR [Exit][Previous][Next] 2 ------------------- Fusion Middleware Configuration Wizard ------------------ Configure Administrator User Name and Password: ----------------------------------------------- Create a user to be assigned to the Administrator role. This user is the default administrator used to start development mode servers. *User password: [] Enter new *User password: OR [Exit][Reset][Accept] weblogic_test ------------------- Fusion Middleware Configuration Wizard ------------------ Configure Administrator User Name and Password: ----------------------------------------------- Create a user to be assigned to the Administrator role. This user is the default administrator used to start development mode servers. | Name | Value | _|_________________________|_________________________________________| 1| *Name: | weblogic | 2| *User password: | ************* | 3| *Confirm user password: | ************* | 4| Description: | This user is the default administrator. | Use above value or select another option: 1 - Modify Name 2 - Modify User password 3 - Modify Confirm user password 4 - Modify Description 5 - Discard Changes Enter option number to select OR [Exit][Previous][Next] 根据授权使用开发模式或生产模式 ------------------- Fusion Middleware Configuration Wizard ------------------ Domain Mode Configuration: -------------------------- Enable Development or Production Mode for this domain. -1|Development Mode 2|Production Mode Enter index number to select OR [Exit][Previous][Next] 2 ------------------- Fusion Middleware Configuration Wizard ------------------ Java SDK Selection: ------------------- -1|Sun SDK 1.6.0_43 /jdk 2|Other Java SDK Enter index number to select OR [Exit][Previous][Next] 选择只安装一个administration server其他服务的安装跟这个一样 ------------------- Fusion Middleware Configuration Wizard ------------------ Select Optional Configuration: ------------------------------ 1|Administration Server [ ] 2|Managed Servers Clusters and Machines [ ]3|RDBMS Security Store [ ] Enter index number to select OR [Exit][Previous][Next] 1 ------------------- Fusion Middleware Configuration Wizard ------------------ Select Optional Configuration: ------------------------------ 1|Administration Server [x] 2|Managed Servers Clusters and Machines [ ] 3|RDBMS Security Store [ ] Enter index number to select OR [Exit][Previous][Next] ------------------- Fusion Middleware Configuration Wizard ------------------ Configure the Administration Server: ------------------------------------ Each WebLogic Server domain must have one Administration Server. The Administration Server is used to perform administrative tasks. | Name | Value | _|__________________|_____________________| 1| *Name: | AdminServer | 2| *Listen address: | All Local Addresses | 3| Listen port: | 7001 | 4| SSL listen port: | N/A | 5| SSL enabled: | false | Use above value or select another option: 1 - Modify Name 2 - Modify Listen address 3 - Modify Listen port 4 - Modify SSL enabled Enter option number to select OR [Exit][Previous][Next] ------------------- Fusion Middleware Configuration Wizard ------------------ Creating Domainhttp://www.hzcourse.com/resource/readBook?path/openresources/teach_ebook/uncompressed/15029/OEBPS/Text/... 0% 25% 50% 75% 100% [------------|------------|------------|------------] [***************************************************] **** Domain Created Successfully
本文来自互联网用户投稿,该文观点仅代表作者本人,不代表本站立场。本站仅提供信息存储空间服务,不拥有所有权,不承担相关法律责任。如若转载,请注明出处:http://www.coloradmin.cn/o/2546572.html
如若内容造成侵权/违法违规/事实不符,请联系多彩编程网进行投诉反馈,一经查实,立即删除!相关文章
SpringBoot-17-MyBatis动态SQL标签之常用标签
文章目录 1 代码1.1 实体User.java1.2 接口UserMapper.java1.3 映射UserMapper.xml1.3.1 标签if1.3.2 标签if和where1.3.3 标签choose和when和otherwise1.4 UserController.java2 常用动态SQL标签2.1 标签set2.1.1 UserMapper.java2.1.2 UserMapper.xml2.1.3 UserController.ja…
wordpress后台更新后 前端没变化的解决方法
使用siteground主机的wordpress网站,会出现更新了网站内容和修改了php模板文件、js文件、css文件、图片文件后,网站没有变化的情况。
不熟悉siteground主机的新手,遇到这个问题,就很抓狂,明明是哪都没操作错误&#x…
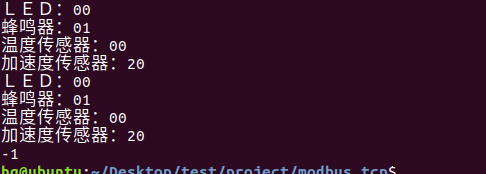
网络编程(Modbus进阶)
思维导图 Modbus RTU(先学一点理论)
概念 Modbus RTU 是工业自动化领域 最广泛应用的串行通信协议,由 Modicon 公司(现施耐德电气)于 1979 年推出。它以 高效率、强健性、易实现的特点成为工业控制系统的通信标准。 包…
UE5 学习系列(二)用户操作界面及介绍
这篇博客是 UE5 学习系列博客的第二篇,在第一篇的基础上展开这篇内容。博客参考的 B 站视频资料和第一篇的链接如下:
【Note】:如果你已经完成安装等操作,可以只执行第一篇博客中 2. 新建一个空白游戏项目 章节操作,重…
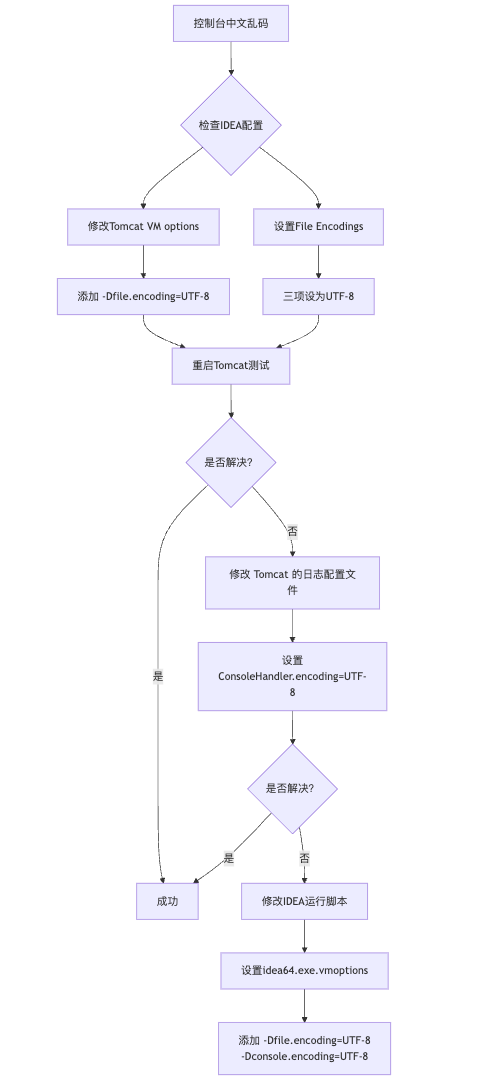
IDEA运行Tomcat出现乱码问题解决汇总
最近正值期末周,有很多同学在写期末Java web作业时,运行tomcat出现乱码问题,经过多次解决与研究,我做了如下整理:
原因:
IDEA本身编码与tomcat的编码与Windows编码不同导致,Windows 系统控制台…
利用最小二乘法找圆心和半径
#include <iostream>
#include <vector>
#include <cmath>
#include <Eigen/Dense> // 需安装Eigen库用于矩阵运算 // 定义点结构
struct Point { double x, y; Point(double x_, double y_) : x(x_), y(y_) {}
}; // 最小二乘法求圆心和半径 …

使用docker在3台服务器上搭建基于redis 6.x的一主两从三台均是哨兵模式
一、环境及版本说明
如果服务器已经安装了docker,则忽略此步骤,如果没有安装,则可以按照一下方式安装: 1. 在线安装(有互联网环境): 请看我这篇文章 传送阵>> 点我查看 2. 离线安装(内网环境):请看我这篇文章 传送阵>> 点我查看
说明:假设每台服务器已…
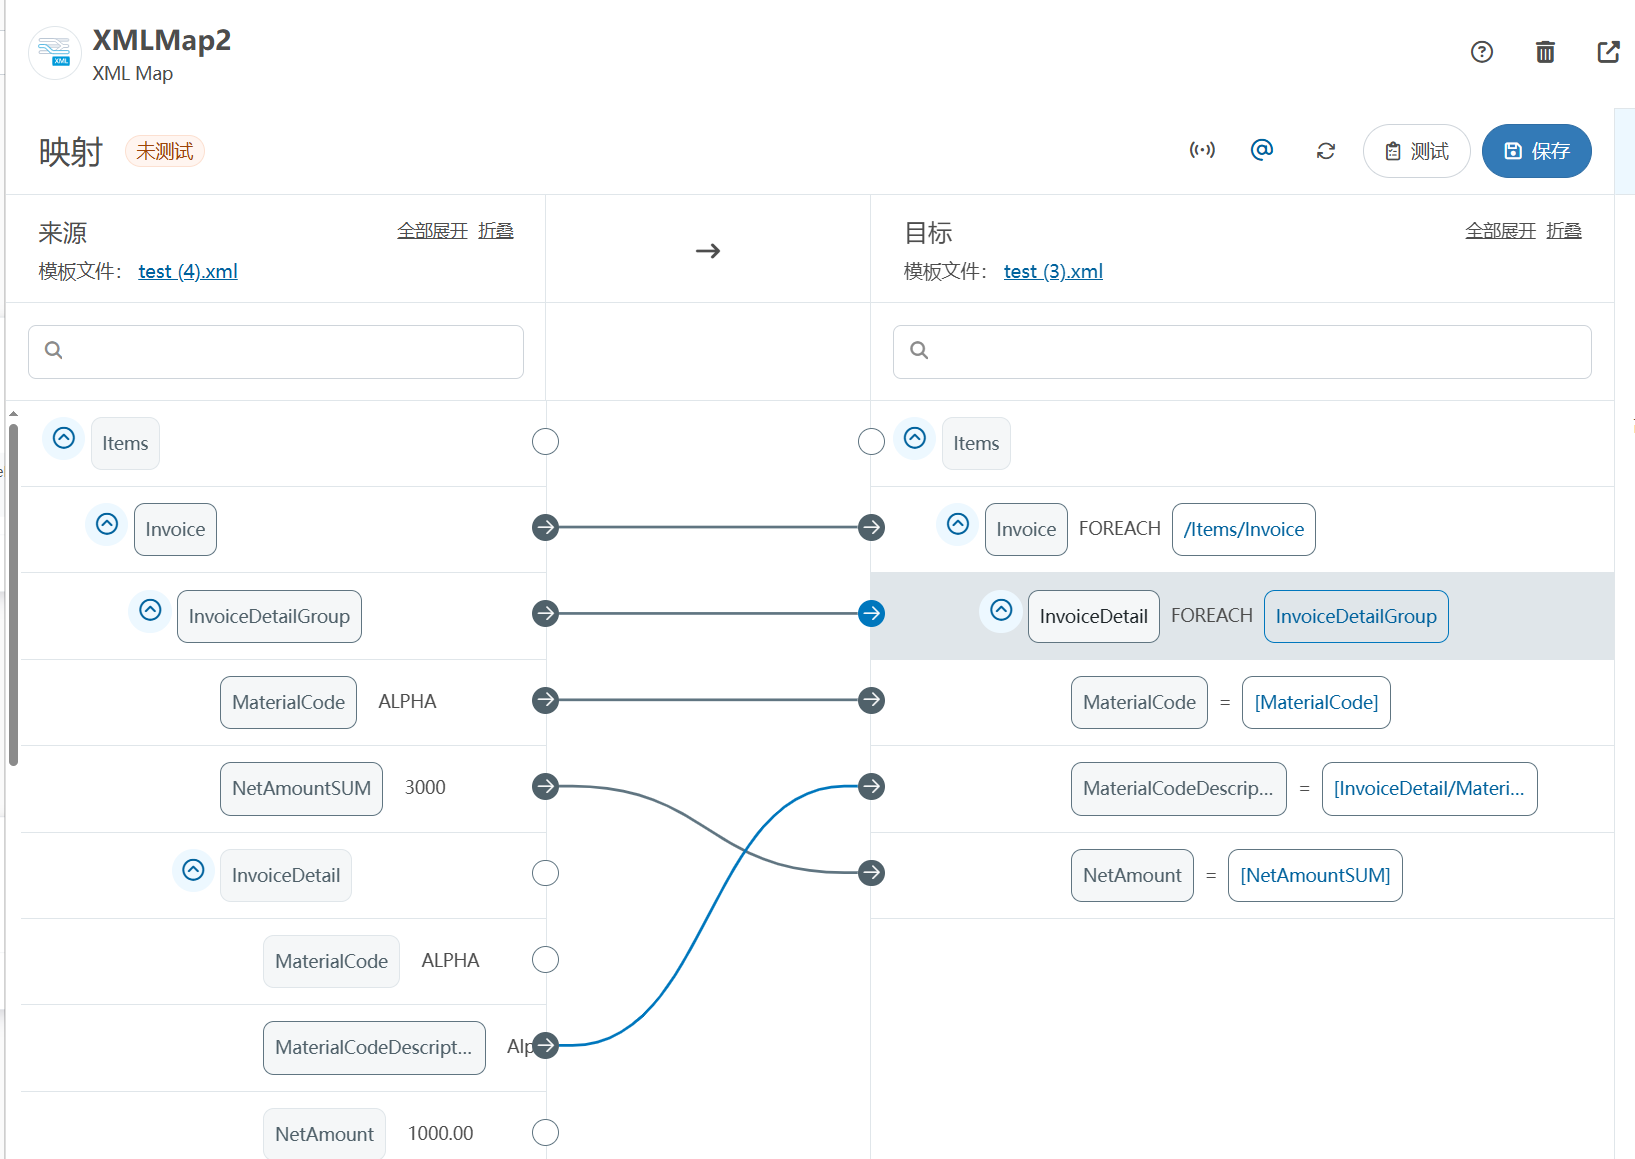
XML Group端口详解
在XML数据映射过程中,经常需要对数据进行分组聚合操作。例如,当处理包含多个物料明细的XML文件时,可能需要将相同物料号的明细归为一组,或对相同物料号的数量进行求和计算。传统实现方式通常需要编写脚本代码,增加了开…
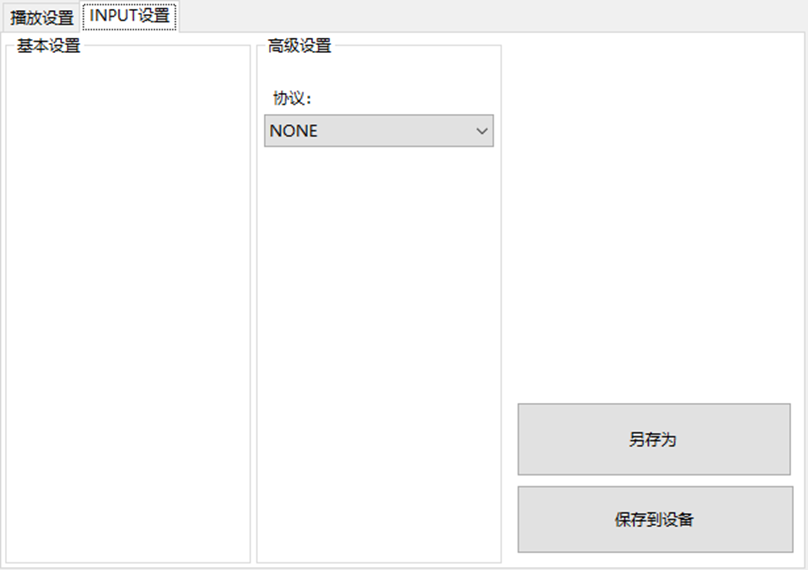
LBE-LEX系列工业语音播放器|预警播报器|喇叭蜂鸣器的上位机配置操作说明
LBE-LEX系列工业语音播放器|预警播报器|喇叭蜂鸣器专为工业环境精心打造,完美适配AGV和无人叉车。同时,集成以太网与语音合成技术,为各类高级系统(如MES、调度系统、库位管理、立库等)提供高效便捷的语音交互体验。
L…
(LeetCode 每日一题) 3442. 奇偶频次间的最大差值 I (哈希、字符串)
题目:3442. 奇偶频次间的最大差值 I 思路 :哈希,时间复杂度0(n)。 用哈希表来记录每个字符串中字符的分布情况,哈希表这里用数组即可实现。
C版本:
class Solution {
public:int maxDifference(string s) {int a[26]…
【大模型RAG】拍照搜题技术架构速览:三层管道、两级检索、兜底大模型
摘要
拍照搜题系统采用“三层管道(多模态 OCR → 语义检索 → 答案渲染)、两级检索(倒排 BM25 向量 HNSW)并以大语言模型兜底”的整体框架: 多模态 OCR 层 将题目图片经过超分、去噪、倾斜校正后,分别用…
【Axure高保真原型】引导弹窗
今天和大家中分享引导弹窗的原型模板,载入页面后,会显示引导弹窗,适用于引导用户使用页面,点击完成后,会显示下一个引导弹窗,直至最后一个引导弹窗完成后进入首页。具体效果可以点击下方视频观看或打开下方…
接口测试中缓存处理策略
在接口测试中,缓存处理策略是一个关键环节,直接影响测试结果的准确性和可靠性。合理的缓存处理策略能够确保测试环境的一致性,避免因缓存数据导致的测试偏差。以下是接口测试中常见的缓存处理策略及其详细说明:
一、缓存处理的核…

龙虎榜——20250610
上证指数放量收阴线,个股多数下跌,盘中受消息影响大幅波动。 深证指数放量收阴线形成顶分型,指数短线有调整的需求,大概需要一两天。 2025年6月10日龙虎榜行业方向分析 1. 金融科技
代表标的:御银股份、雄帝科技
驱动…
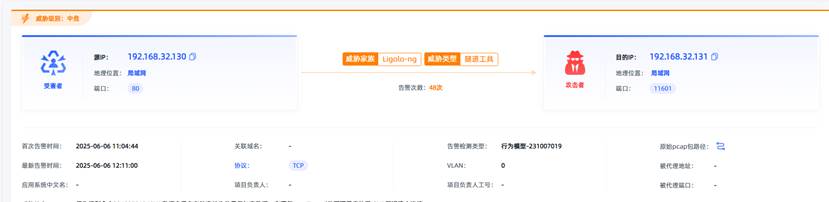
观成科技:隐蔽隧道工具Ligolo-ng加密流量分析
1.工具介绍
Ligolo-ng是一款由go编写的高效隧道工具,该工具基于TUN接口实现其功能,利用反向TCP/TLS连接建立一条隐蔽的通信信道,支持使用Let’s Encrypt自动生成证书。Ligolo-ng的通信隐蔽性体现在其支持多种连接方式,适应复杂网…
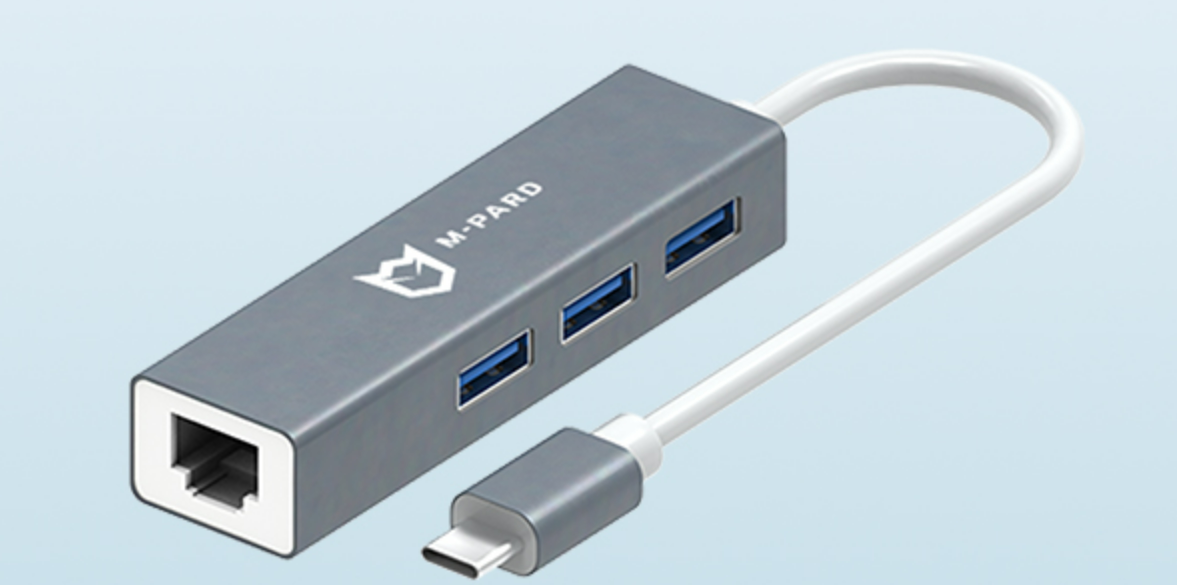
铭豹扩展坞 USB转网口 突然无法识别解决方法
当 USB 转网口扩展坞在一台笔记本上无法识别,但在其他电脑上正常工作时,问题通常出在笔记本自身或其与扩展坞的兼容性上。以下是系统化的定位思路和排查步骤,帮助你快速找到故障原因:
背景:
一个M-pard(铭豹)扩展坞的网卡突然无法识别了,扩展出来的三个USB接口正常。…
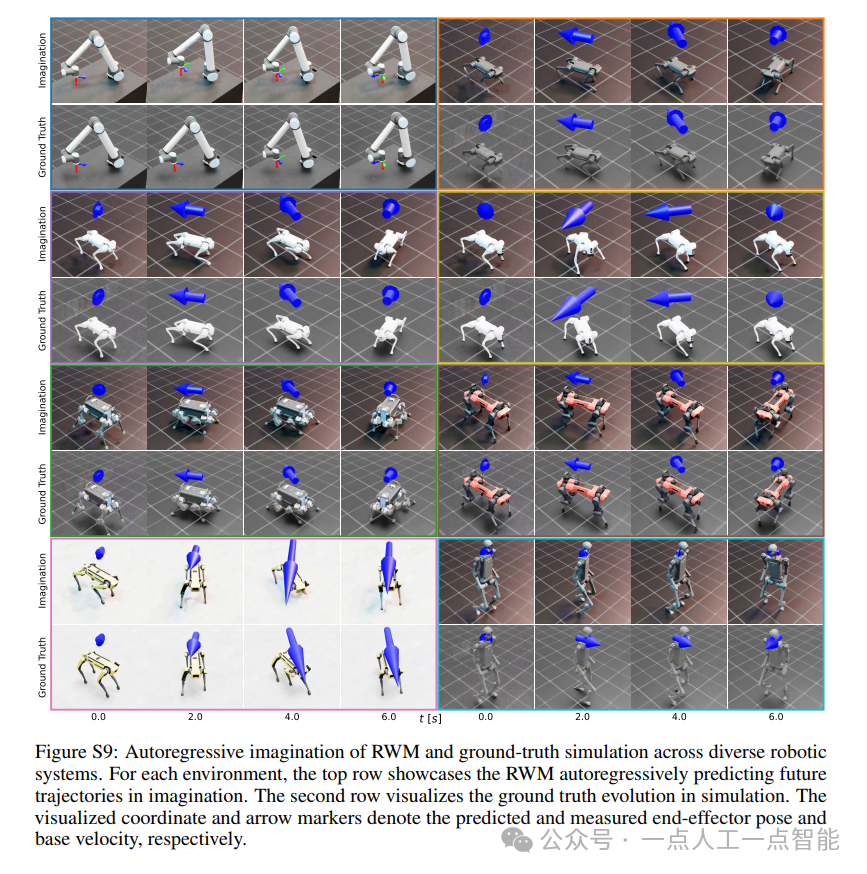
未来机器人的大脑:如何用神经网络模拟器实现更智能的决策?
编辑:陈萍萍的公主一点人工一点智能 未来机器人的大脑:如何用神经网络模拟器实现更智能的决策?RWM通过双自回归机制有效解决了复合误差、部分可观测性和随机动力学等关键挑战,在不依赖领域特定归纳偏见的条件下实现了卓越的预测准…

Linux应用开发之网络套接字编程(实例篇)
服务端与客户端单连接
服务端代码
#include <sys/socket.h>
#include <sys/types.h>
#include <netinet/in.h>
#include <stdio.h>
#include <stdlib.h>
#include <string.h>
#include <arpa/inet.h>
#include <pthread.h>
…

华为云AI开发平台ModelArts
华为云ModelArts:重塑AI开发流程的“智能引擎”与“创新加速器”!
在人工智能浪潮席卷全球的2025年,企业拥抱AI的意愿空前高涨,但技术门槛高、流程复杂、资源投入巨大的现实,却让许多创新构想止步于实验室。数据科学家…
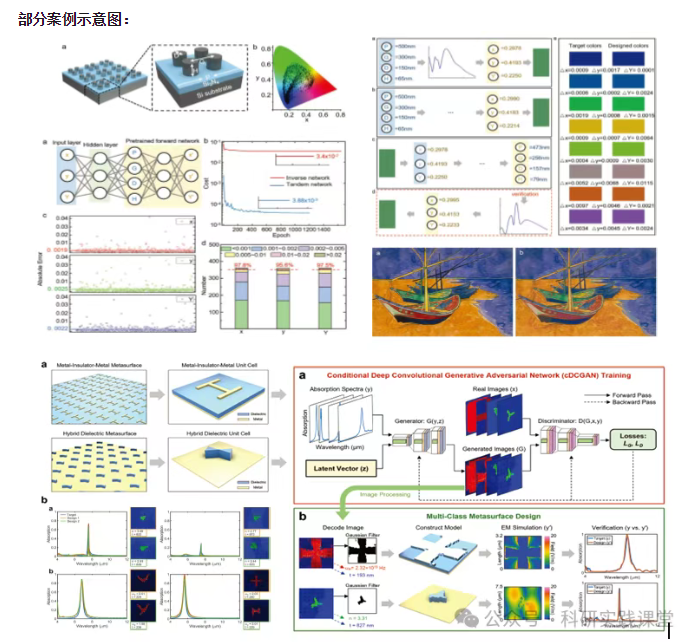
深度学习在微纳光子学中的应用
深度学习在微纳光子学中的主要应用方向
深度学习与微纳光子学的结合主要集中在以下几个方向:
逆向设计 通过神经网络快速预测微纳结构的光学响应,替代传统耗时的数值模拟方法。例如设计超表面、光子晶体等结构。
特征提取与优化 从复杂的光学数据中自…