周期性计划,硬盘分区管理,文件系统基本管理
news2026/4/14 22:44:30
13、周期性计划作业计算机也要定时要完成自己的事情每天巡检系统资源使用情况。每小时检查一次异常日志每天夜里 0:00 备份数据crond 服务提供定制任务功能定期触发执行相应命令。13.1实践实现每分钟同步一次上一章节创建的Pictures目录到server2.前提条件server1可以秘钥登录server2server1上要准备好相应的目录13.2配置秘钥登录[rootserver1 ~ 15:17:51]# ssh-keygen [rootserver1 ~ 15:17:51]# ssh-copy-id rootserver2 [rootserver1 ~ 15:17:51]# ssh server2 hostname注意那我下次忘了我已经生成密钥然后把公钥推送到server2了又进行了一遍生成密钥推送密钥会导致什么1.重复生成密钥旧密钥作废免密临时失效 2.重复推送公钥新公钥追加到远端免密重新恢复 3.不会导致任何故障 / 服务器异常只是多了一条无用的旧公钥记录13.3步骤1确保 crond服务启动[rootserver1 ~ 15:17:51]# systemctl is-active crond active13.4步骤2设置定时任务# 查看当前定时任务 [rootserver1 ~ 15:36:05]# crontab -l no crontab for root # 设置vim作为默认编辑器 [rootserver1 ~ 15:37:12]# export EDITORvim # 编辑定时任务 [rootserver1 ~ 15:36:25]# crontab -e # 弹出vim编辑文件 * * * * * rsync -av Pictures server2:/root # 提前配置好秘钥登录 [rootserver1 ~ 15:40:43]# crontab -l * * * * * rsync -av Pictures server2:/root # 创建一个文件 [rootserver1 ~ 15:40:47]# touch Pictures/snap-7.jpg # 验证-1 查看执行日志 [rootserver1 ~ 15:41:37]# tail -f /var/log/cron Apr 7 15:40:43 centos7 crontab[11739]: (root) END EDIT (root) Apr 7 15:40:47 centos7 crontab[11741]: (root) LIST (root) Apr 7 15:41:01 centos7 CROND[11743]: (root) CMD (rsync -av Pictures server2:/root) Apr 7 15:42:01 centos7 CROND[11773]: (root) CMD (rsync -av Pictures server2:/root) # 验证-2目标服务器查看 [rootserver1 ~ 15:43:01]# ssh server2 ls Pictures/snap-7.jpg snap-7.jpg # 验证-3查看邮件 [rootserver1 ~ 15:59:10]# yum install -y mailx [rootserver1 ~ 15:59:10]# mail ...... N 6 (Cron Daemon) Tue Apr 7 15:46 28/964 Cron rootserver1 rsync -av Pic N 7 (Cron Daemon) Tue Apr 7 15:47 28/964 Cron rootserver1 rsync -av Pic N 8 (Cron Daemon) Tue Apr 7 15:48 28/964 Cron rootserver1 rsync -av Pic N 9 (Cron Daemon) Tue Apr 7 15:49 28/964 Cron rootserver1 rsync -av Pic 10 (Cron Daemon) Tue Apr 7 15:50 28/964 Cron rootserver1 rsync -av Pic N 11 (Cron Daemon) Tue Apr 7 15:51 28/964 Cron rootserver1 rsync -av Pic N 12 (Cron Daemon) Tue Apr 7 15:52 28/964 Cron rootserver1 rsync -av Pic # 查看第9封邮件 9 ...... Date: Tue, 7 Apr 2026 15:49:01 0800 (CST) Status: R sending incremental file list sent 204 bytes received 17 bytes 442.00 bytes/sec total size is 12 speedup is 0.05 # 按q 退出 q默认情况命令的执行结果的标准输出内容以邮件方式通知相应的执行用户。关闭邮件通知将命令的输出结果重定向到文件中示例中使用/var/log/rsync.log。* * * * * rsync -av Pictures server2:/root /var/log/rsync.log关闭邮件服务器(不建议)[rootserver1 ~ 16:53:21]# systemctl stop postfix.service13.5删除计划任务[rootserver1 ~ 16:55:00]# crontab -r [rootserver1 ~ 16:55:02]# crontab -l no crontab for root13.6配置模版[rootserver1 ~ 15:38:05]# cat /etc/crontab SHELL/bin/bash PATH/sbin:/bin:/usr/sbin:/usr/bin MAILTOroot # For details see man 4 crontabs # Example of job definition: # .---------------- minute (0 - 59) # | .------------- hour (0 - 23) # | | .---------- day of month (1 - 31) # | | | .------- month (1 - 12) OR jan,feb,mar,apr ... # | | | | .---- day of week (0 - 6) (Sunday0 or 7) OR sun,mon,tue,wed,thu,fri,sat # | | | | | # * * * * * user-name command to be executed13.7其他示例1.每年2月2日上午9点执行年度备份脚本0 9 2 2 * /usr/local/bin/yearly_backup2.7月每周五9:00-16:00每5分钟发送包含「Chime」的邮件给任务所有者*/5 9-16 * Jul 5 echo Chime3.每个工作日周一至周五23:58执行每日报告脚本58 23 * * 1-5 /usr/local/bin/daily_report4.每个工作日9:00发送邮件给老板%表示换行后续内容为邮件正文0 9 * * 1-5 mutt -s Checking in bossexample.com % Hi boss, just checking in.14.课前思考1.如何手动设置时间和时区设置时区 timedatectl set-timezone Asia/ShanghaitimedatectlCentOS 7 专门管理时间 / 时区 / NTP的系统命令。 Asia/ShanghaiLinux 标准时区名代表东八区中国统一用这个。手动设置时间先关闭自动同步#关闭NTP自动对时否则你手动改时间会被覆盖 timedatectl set-ntp false #设置具体时间 timedatectl set-time 2026-04-08 23:59:00 #把系统时间同步到硬件时钟防止重启后时间丢失 hwclock --systohc # 同步到硬件时钟2.如何设置自动对时CentOS 7 默认用 chrony 做 NTP 时间同步。# 安装一般已装 yum install chrony -y # 启动服务 systemctl start chronyd # 开机自启 systemctl enable chronyd # 开启NTP自动同步关键 timedatectl set-ntp true3.Linux服务网络配置信息主要包括哪些使用哪些命令查看核心配置项 1.IP 地址 2.子网掩码 3.网关默认路由 4.DNS 服务器 5.MAC 地址 6.网卡状态up/down查看命令ip addr # 查看IP、子网掩码、MAC、网卡状态最常用 ip route # 查看网关默认路由 cat /etc/resolv.conf # 查看DNS nmcli device show ens33 # 网卡完整信息4.如何使用nmcli工具给网卡ens33配置静态IPnmcli NetworkManager 命令行工具CentOS 7 推荐。# 1 修改连接配置静态IP nmcli connection modify ens33 \ ipv4.method manual \ ipv4.addresses 192.168.1.100/24 \ ipv4.gateway 192.168.1.1 \ ipv4.dns 223.5.5.5,114.114.114.114 # 2 激活生效 sudo nmcli connection up ens335.如何修改修改系统DNS配置方法 1nmcli永久、推荐nmcli connection modify ens33 ipv4.dns223.5.5.5,223.6.6.6 nmcli connection up ens33方法 2修改网卡配置文件永久vim /etc/sysconfig/network-scripts/ifcfg-ens33 #添加 / 修改 #DNS1223.5.5.5 #DNS2223.6.6.6 #PEERDNSno #PEERDNSno防止 DHCP 自动覆盖 DNS。6.如何实现CentOS7系统之间复制文件和目录基于 SSH 安全传输命令scp、rsync。1.复制文件scp /本地文件 root目标IP:/目标目录2.复制目录必须加-rscp -r /本地目录 root目标IP:/目标目录3.增量同步推荐大文件/多次同步rsync -av /本地目录 root目标IP:/目标目录 -r递归目录。 -a保留权限、属主、时间。 -v显示过程。7.如何实现每周三晚上23:58执行/usr/local/bin/weekly_backup.sh程序用 crontab 定时任务。步骤 1编辑定时任务 crontab -e #添加一行 58 23 * * 3 /usr/local/bin/weekly_backup.sh 步骤 2确保 crond 运行并开机自启 sudo systemctl start crond sudo systemctl enable crond #crontab格式 分 时 日 月 周 命令 58 23 * * 3 /.../weekly_backup.sh 58第 58 分 2323 *每月每日都生效 3周三0 周日1 周一…6 周六15硬盘分区管理大容量的硬盘分区使用C盘系统盘D盘办公E盘娱乐。 类似于买了一个房子100平方隔断主卧、次卧1、次卧2、厨房、卫生间。15.1识别硬盘设备接口类型设备命名示例说明SATA/SAS/USB/SCSI/dev/sda、/dev/sdb...物理机常用的磁盘设备命名virtio-blk虚拟机/dev/vda、/dev/vdb...KVM 虚拟机常用磁盘命名NVMe SSD/dev/nvme0n1、/dev/nvme1n1...高性能 NVMe 固态硬盘命名SD/MMC/eMMC/dev/mmcblk0、/dev/mmcblk1...嵌入式设备常用存储命名15.2虚拟机添加2个硬盘sata 接口20GNVMe接口40G关机添加#查看块block设备清单 [rootcentos7 ~ 09:46:01]# lsblk NAME MAJ:MIN RM SIZE RO TYPE MOUNTPOINT sda 8:0 0 200G 0 disk ├─sda1 8:1 0 1G 0 part /boot └─sda2 8:2 0 199G 0 part ├─centos-root 253:0 0 50G 0 lvm / ├─centos-swap 253:1 0 3.9G 0 lvm [SWAP] └─centos-home 253:2 0 145.1G 0 lvm /home sdb 8:16 0 20G 0 disk #新增的sata硬盘 sr0 11:0 1 4.4G 0 rom nvme0n1 259:0 0 40G 0 disk #新增的NVMe盘 、设备类型块设备b大部分情况下都是存储设备例如光盘、硬盘、U盘。字符设备c一般是输入和输出设备例如终端设备tty1、vty、pts/0等15.3硬盘分区方案直接管理主板上外接设备的系统称之为固件。例如调整设备启动顺序光盘作为第一启动项用来安装系统。分区方案MBR自1982年起主启动记录MBR分区方案成为运行BIOS 固件系统的磁盘分区标准。主分区数量限制最多支持4个主分区。扩展分区与逻辑分区Linux 系统中可通过“主分区扩展分区”的方式突破主分区限制扩展分区仅作为逻辑分区的“容器”不可格式化逻辑分区可格式化使用整体最多可创建15个分区。容量限制MBR 用4个字节存储分区总扇区数按单扇区512字节计算单个分区最大容量不超过2 TiB。GPT全局唯一标识分区表GPT是运行统一可扩展固件接口UEFI系统的磁盘分区标准。容量支持使用8个字节存储分区总扇区数单分区/磁盘最大支持18 ZiB18亿 TiB完全满足大磁盘需求。分区数量默认支持128个分区无需扩展分区/逻辑分区实际使用中建议不超过120个避免格式化异常。数据冗余GPT 分区表包含主表和备份表且自带 CRC32 校验码可自动检测并恢复损坏的分区表。15.4fdisk 工具fdisk 工具用于管理 MBR 分区方案的硬盘新版本的fdisk也可以用来管理GPT。查看硬盘信息# 查看所有块设备进一步过滤出sd相关设备 [rootcentos7 ~ 10:41:15]# fdisk -l|grep sd Disk /dev/sda: 214.7 GB, 214748364800 bytes, 419430400 sectors /dev/sda1 * 2048 2099199 1048576 83 Linux /dev/sda2 2099200 419430399 208665600 8e Linux LVM Disk /dev/sdb: 21.5 GB, 21474836480 bytes, 41943040 sectors # 查看特定硬盘信息 [rootcentos7 ~ 10:46:12]# fdisk -l /dev/sda Disk /dev/sda: 214.7 GB, 214748364800 bytes, 419430400 sectors Units sectors of 1 * 512 512 bytes Sector size (logical/physical): 512 bytes / 512 bytes I/O size (minimum/optimal): 512 bytes / 512 bytes Disk label type: dos Disk identifier: 0x0009e065 Device Boot Start End Blocks Id System /dev/sda1 * 2048 2099199 1048576 83 Linux /dev/sda2 2099200 419430399 208665600 8e Linux LVM # sdb 硬盘没有分区 [rootcentos7 ~ 10:46:42]# fdisk -l /dev/sdb Disk /dev/sdb: 21.5 GB, 21474836480 bytes, 41943040 sectors Units sectors of 1 * 512 512 bytes Sector size (logical/physical): 512 bytes / 512 bytes I/O size (minimum/optimal): 512 bytes / 512 bytes 帮助信息# 交互方式管理sdb硬盘 [rootcentos7 ~ 12:00:11]# fdisk /dev/sdb Welcome to fdisk (util-linux 2.23.2). Changes will remain in memory only, until you decide to write them. Be careful before using the write command. Device does not contain a recognized partition table Building a new DOS disklabel with disk identifier 0x9ca40d6e. # m 查看帮助 Command (m for help): m Command action a toggle a bootable flag b edit bsd disklabel c toggle the dos compatibility flag d delete a partition g create a new empty GPT partition table G create an IRIX (SGI) partition table l list known partition types m print this menu n add a new partition o create a new empty DOS partition table p print the partition table q quit without saving changes s create a new empty Sun disklabel t change a partitions system id u change display/entry units v verify the partition table w write table to disk and exit x extra functionality (experts only) 查看分区表# p 查看分区表 Command (m for help): p Disk /dev/sdb: 21.5 GB, 21474836480 bytes, 41943040 sectors Units sectors of 1 * 512 512 bytes Sector size (logical/physical): 512 bytes / 512 bytes I/O size (minimum/optimal): 512 bytes / 512 bytes Disk label type: dos Disk identifier: 0x9ca40d6e Device Boot Start End Blocks Id System # sdb硬盘是空盘没有分区创建分区# n 新建分区 Command (m for help): n Partition type: p primary (0 primary, 0 extended, 4 free) e extended Select (default p): #回车代表主分区类型 Using default response p Partition number (1-4, default 1): #回车代表分区号 First sector (2048-41943039, default 2048): #回车代表分区起始位置 Using default value 2048 Last sector, sectors or size{K,M,G} (2048-41943039, default 41943039): ^H^H^Hdd^H^H Last sector, sectors or size{K,M,G} (2048-41943039, default 41943039): 5G Partition 1 of type Linux and of size 5 GiB is set #再次查看多了一个分区 Command (m for help): p Disk /dev/sdb: 21.5 GB, 21474836480 bytes, 41943040 sectors Units sectors of 1 * 512 512 bytes Sector size (logical/physical): 512 bytes / 512 bytes I/O size (minimum/optimal): 512 bytes / 512 bytes Disk label type: dos Disk identifier: 0x9ca40d6e Device Boot Start End Blocks Id System /dev/sdb1 2048 10487807 5242880 83 Linux 保存分区表# w 保存修改 Command (m for help): w The partition table has been altered! Calling ioctl() to re-read partition table. Syncing disks. # 再次查看块设备 [rootcentos7 ~ 12:13:22]# lsblk /dev/sdb NAME MAJ:MIN RM SIZE RO TYPE MOUNTPOINT sdb 8:16 0 20G 0 disk └─sdb1 8:17 0 5G 0 part删除分区[rootcentos7 ~ 12:13:58]# fdisk /dev/sdb Welcome to fdisk (util-linux 2.23.2). Changes will remain in memory only, until you decide to write them. Be careful before using the write command. #输入d代表删除分区 Command (m for help): d Selected partition 1 Partition 1 is deleted #输入p代表查看分区表 Command (m for help): p Disk /dev/sdb: 21.5 GB, 21474836480 bytes, 41943040 sectors Units sectors of 1 * 512 512 bytes Sector size (logical/physical): 512 bytes / 512 bytes I/O size (minimum/optimal): 512 bytes / 512 bytes Disk label type: dos Disk identifier: 0x9ca40d6e Device Boot Start End Blocks Id System #w保存修改 Command (m for help): w The partition table has been altered! Calling ioctl() to re-read partition table. Syncing disks. 计算机存储单位。GB1000MBGiB1024MiB15.5 gdisk 工具gdisk 工具用于管理 GPT 分区方案的硬盘。# 安装工具 [rootcentos7 ~ 12:15:38]# yum install -y gdisk 查看硬盘信息[rootcentos7 ~ 13:52:00]# gdisk -l /dev/sdb GPT fdisk (gdisk) version 0.8.10 Partition table scan: MBR: MBR only BSD: not present APM: not present GPT: not present *************************************************************** Found invalid GPT and valid MBR; converting MBR to GPT format in memory. *************************************************************** Disk /dev/sdb: 41943040 sectors, 20.0 GiB Logical sector size: 512 bytes Disk identifier (GUID): D1DD633D-4AE0-4A42-87C2-CA7CB40453FE Partition table holds up to 128 entries First usable sector is 34, last usable sector is 41943006 Partitions will be aligned on 2048-sector boundaries Total free space is 41942973 sectors (20.0 GiB) Number Start (sector) End (sector) Size Code Name 帮助信息[rootcentos7 ~ 13:54:36]# gdisk /dev/sdb GPT fdisk (gdisk) version 0.8.10 Partition table scan: MBR: MBR only BSD: not present APM: not present GPT: not present *************************************************************** Found invalid GPT and valid MBR; converting MBR to GPT format in memory. THIS OPERATION IS POTENTIALLY DESTRUCTIVE! Exit by typing q if you dont want to convert your MBR partitions to GPT format! *************************************************************** Command (? for help): ? b back up GPT data to a file # 备份GPT数据到文件 c change a partitions name # 修改分区名称 d delete a partition # 删除分区 i show detailed information on a partition # 查看分区详细信息 l list known partition types # 列出已知分区类型 n add a new partition # 创建新分区 o create a new empty GUID partition table (GPT) # 创建空GPT分区表 p print the partition table # 打印分区表 q quit without saving changes # 退出不保存 r recovery and transformation options (experts only) # 恢复/转换选项专家模式 s sort partitions # 排序分区 t change a partitions type code # 修改分区类型码 v verify disk # 校验磁盘 w write table to disk and exit # 保存并退出 x extra functionality (experts only) # 扩展功能专家模式 ? print this menu # 打印帮助菜单查看分区表Command (? for help): p Disk /dev/sdb: 41943040 sectors, 20.0 GiB Logical sector size: 512 bytes Disk identifier (GUID): 99E4B223-A573-4545-B3AF-E031694C5C1B Partition table holds up to 128 entries First usable sector is 34, last usable sector is 41943006 Partitions will be aligned on 2048-sector boundaries Total free space is 41942973 sectors (20.0 GiB) Number Start (sector) End (sector) Size Code Name 创建分区Command (? for help): n Partition number (1-128, default 1): First sector (34-41943006, default 2048) or {-}size{KMGTP}: Last sector (2048-41943006, default 41943006) or {-}size{KMGTP}: 10G Current type is Linux filesystem Hex code or GUID (L to show codes, Enter 8300): Changed type of partition to Linux filesystem 保存分区表Command (? for help): w Final checks complete. About to write GPT data. THIS WILL OVERWRITE EXISTING PARTITIONS!! Do you want to proceed? (Y/N): Y OK; writing new GUID partition table (GPT) to /dev/sdb. The operation has completed successfully. # 再次查看 [rootcentos7 ~ 14:01:15]# lsblk /dev/sdb NAME MAJ:MIN RM SIZE RO TYPE MOUNTPOINT sdb 8:16 0 20G 0 disk └─sdb1 8:17 0 10G 0 part删除分区[rootcentos7 ~ 14:02:04]# gdisk /dev/sdb GPT fdisk (gdisk) version 0.8.10 Partition table scan: MBR: protective BSD: not present APM: not present GPT: present Found valid GPT with protective MBR; using GPT. Command (? for help): p Disk /dev/sdb: 41943040 sectors, 20.0 GiB Logical sector size: 512 bytes Disk identifier (GUID): 99E4B223-A573-4545-B3AF-E031694C5C1B Partition table holds up to 128 entries First usable sector is 34, last usable sector is 41943006 Partitions will be aligned on 2048-sector boundaries Total free space is 20971453 sectors (10.0 GiB) Number Start (sector) End (sector) Size Code Name 1 2048 20973567 10.0 GiB 8300 Linux filesystem #d 删除 Command (? for help): d Using 1 #再次确认 Command (? for help): p Disk /dev/sdb: 41943040 sectors, 20.0 GiB Logical sector size: 512 bytes Disk identifier (GUID): 99E4B223-A573-4545-B3AF-E031694C5C1B Partition table holds up to 128 entries First usable sector is 34, last usable sector is 41943006 Partitions will be aligned on 2048-sector boundaries Total free space is 41942973 sectors (20.0 GiB) Number Start (sector) End (sector) Size Code Name #保存退出 Command (? for help): w Final checks complete. About to write GPT data. THIS WILL OVERWRITE EXISTING PARTITIONS!! Do you want to proceed? (Y/N): y OK; writing new GUID partition table (GPT) to /dev/sdb. The operation has completed successfully. #再次查看 [rootcentos7 ~ 14:06:33]# lsblk /dev/sdb NAME MAJ:MIN RM SIZE RO TYPE MOUNTPOINT sdb 8:16 0 20G 0 disk16、文件系统基本管理#提前准备好分区/dev/sdb1、/dev/sdb2[rootcentos7 ~ 14:31:32]# lsblk /dev/sdb NAME MAJ:MIN RM SIZE RO TYPE MOUNTPOINT sdb 8:16 0 20G 0 disk ├─sdb1 8:17 0 5G 0 part └─sdb2 8:18 0 10G 0 part 16.1文件系统格式化硬盘分区不能直接使用需要格式化成相应的文件系统ext4、xfs才能存储文件。# 将sdb1格式化为ext4 [rootcentos7 ~ 14:40:48]# mkfs.ext4 /dev/sdb1 mke2fs 1.42.9 (28-Dec-2013) Filesystem label OS type: Linux Block size4096 (log2) Fragment size4096 (log2) Stride0 blocks, Stripe width0 blocks 327680 inodes, 1310720 blocks 65536 blocks (5.00%) reserved for the super user First data block0 Maximum filesystem blocks1342177280 40 block groups 32768 blocks per group, 32768 fragments per group 8192 inodes per group Superblock backups stored on blocks: 32768, 98304, 163840, 229376, 294912, 819200, 884736 Allocating group tables: done Writing inode tables: done Creating journal (32768 blocks): done Writing superblocks and filesystem accounting information: done # 将sdb2格式化为xfs [rootcentos7 ~ 14:31:36]# mkfs.xfs /dev/sdb2 meta-data/dev/sdb2 isize512 agcount4, agsize655360 blks sectsz512 attr2, projid32bit1 crc1 finobt0, sparse0 data bsize4096 blocks2621440, imaxpct25 sunit0 swidth0 blks naming version 2 bsize4096 ascii-ci0 ftype1 log internal log bsize4096 blocks2560, version2 sectsz512 sunit0 blks, lazy-count1 realtime none extsz4096 blocks0, rtextents016.2文件系统挂载硬盘挂载之后才能使用类似于windows中分配盘符C盘。示例1挂载/dev/sdb1给web应用使用# 准备挂载点目录 [rootcentos7 ~ 14:41:30]# mkdir /mnt/web # 挂载/dev/sdb1到/mnt/web后续写入分区sdb1的数据通过路径/mnt/web引用。 [rootcentos7 ~ 14:43:17]# mount /dev/sdb1 /mnt/web # 查看设备和挂载点关系 [rootcentos7 ~ 14:44:00]# df -h /mnt/web Filesystem Size Used Avail Use% Mounted on /dev/sdb1 4.8G 20M 4.6G 1% /mnt/web # 写入测试 [rootcentos7 ~ 14:44:13]# echo Hello World /mnt/web/web.txt [rootcentos7 ~ 14:44:51]# cat /mnt/web/web.txt Hello World # 此时文件/mnt/web/web.txt存储到/dev/sdb1中。示例2挂载/dev/sdb2给db应用使用[rootcentos7 ~ 14:45:04]# mkdir /mnt/db [rootcentos7 ~ 14:47:58]# mount /dev/sdb2 /mnt/db [rootcentos7 ~ 14:48:25]# df -h /mnt/db Filesystem Size Used Avail Use% Mounted on /dev/sdb2 10G 33M 10G 1% /mnt/db [rootcentos7 ~ 14:48:34]# echo Hello mysql /mnt/db/db.txt [rootcentos7 ~ 14:49:12]# cat /mnt/db/db.txt Hello mysql 16.3、实践部署 web 服务器web 服务器提供 web 页面分享提供一些动态网站例如购物。部署服务流程安装相关软件包准备相关材料配置服务启用并启动服务设置防火墙客户端访问测试# 1. 安装相关软件包 [rootcentos7 ~ 14:49:23]# yum install -y nginx # 2. 准备相关材料 # 使用/mnt/web 作为网站的根目录 [rootcentos7 ~ 15:02:40]# echo Hello World From Nginx /mnt/web/index.html # 可以使用ai生成一个漂亮的欢迎页面 # 3. 配置服务 [rootcentos7 ~ 15:05:39]# cp /etc/nginx/nginx.conf /etc/n [rootcentos7 ~ 15:05:56]# vim /etc/nginx/conf.d/vhost-www.zy.cloud.conf # 4. 启用并启动服务 [rootcentos7 ~ 15:08:57]# systemctl enable nginx --now # 5. 设置防火墙 [rootcentos7 ~ 15:09:09]# systemctl stop firewalld [rootcentos7 ~ 15:09:34]# vim /etc/hosts # 增加域名解析 10.1.8.10 www.laoma.cloud www # 6. 客户端访问测试 [rootcentos7 ~ 15:24:32]# curl http://www.zy.cloud/ Hello World From Nginx # 如果是windows访问则修改C:\Windows\System32\drivers\etc\hosts也添加相应记录16.4文件系统卸载文件系统不使用的时候可以卸载取消目录和设备之间的映射关系。第一种方式卸载挂载点[rootcentos7 ~ 16:24:20]# lsblk /dev/sdb NAME MAJ:MIN RM SIZE RO TYPE MOUNTPOINT sdb 8:16 0 20G 0 disk ├─sdb1 8:17 0 5G 0 part /mnt/web └─sdb2 8:18 0 10G 0 part /mnt/db # 卸载挂载点 [rootcentos7 ~ 16:30:33]# umount /mnt/db [rootcentos7 ~ 16:30:47]# lsblk /dev/sdb2 NAME MAJ:MIN RM SIZE RO TYPE MOUNTPOINT sdb2 8:18 0 10G 0 part 第二种方式卸载挂载点[rootcentos7 ~ 16:31:08]# blkid /dev/sdb2 /dev/sdb2: UUIDfbedbe16-2ead-40ce-8d3e-78197d8ba05bTYPExfs PARTLABELLinux filesystem PARTUUIDdc16fdd5-fc15-4d10-8902-c9007b9c2b28 #可以用以下任意一种方式表达设备; #1./dev/sdb2 #2. UUIDfbedbe16-2ead-40ce-8d3e-78197d8ba05bTYPExfs #3.PARTLABELLinux filesystem #4.PARTUUIDdc16fdd5-fc15-4d10-8902-c9007b9c2b28 # 例如使用 UUID 挂载 [rootcentos7 ~ 16:40:30]# mount UUIDfbedbe16-2ead-40ce-8d3e-78197d8ba05b /mnt/db #验证/mnt/db是否挂载成功 [rootcentos7 ~ 16:41:44]# lsblk /dev/sdb2 NAME MAJ:MIN RM SIZE RO TYPE MOUNTPOINT sdb2 8:18 0 10G 0 part /mnt/db # 例如使用设备名称卸载 [rootcentos7 ~ 16:42:38]# umount /dev/sdb2 #验证/mnt/db是否卸载成功 [rootcentos7 ~ 16:44:10]# lsblk /dev/sdb2 NAME MAJ:MIN RM SIZE RO TYPE MOUNTPOINT sdb2 8:18 0 10G 0 part 16.5文件系统卸载失败模拟占用#tail -f实时监控文件持续占用 /mnt/web 这个挂载点 #把命令放到后台运行不占用终端 #结果/mnt/web 被 tail 进程占用变成忙碌状态 [rootcentos7 ~ 16:44:21]# tail -f /mnt/web/index.html [1] 12377 [rootcentos7 ~ 16:55:47]# Hello World From Nginx [rootcentos7 ~ 16:55:58]# umount /mnt/web umount: /mnt/web: target is busy. (In some cases useful info about processes that use the device is found by lsof(8) or fuser(1)) #卸载文件系统报错: target is busy.说明/mnt/web被占用时不可卸载 #安装工具lsofLinux 专门查看谁在占用文件 / 挂载点的工具 [rootcentos7 ~ 16:56:13]# yum install -y lsof #查找占用挂载点的进程 [rootcentos7 ~ 17:00:06]# lsof /mnt/web COMMAND PID USER FD TYPE DEVICE SIZE/OFF NODE NAME tail 12377 root 3r REG 8,17 23 13 /mnt/web/index.htmlCOMMAND PID USER FD TYPE DEVICE SIZE/OFF NODE NAME tail 12377 root 3r REG 8,17 23 13 /mnt/web/index.html关键字段解释 COMMAND占用的程序 → tail PID进程 ID → 2174杀死进程的唯一编号 NAME占用的文件 → /mnt/web/index.html优雅退出进程或使用kill关闭进程#先关掉上面占用挂载点的进程指定PID使用kill终止该进程 [rootcentos7 ~ 17:05:19]# kill -15 12377 #再次进行卸载发现不报错了 [rootcentos7 ~ 17:05:47]# umount /mnt/web [1] Terminated tail -f /mnt/web/index.html #[1]后台任务编号 1 #Terminated已被正常终止 #就是告诉你tail 进程已经被你 kill -15 关掉了16.6持久化挂载计算机重启后文件系统自动挂载。 /etc/fstab存储了系统自动挂载设备清单。[rootcentos7 ~ 17:05:56]# cat /etc/fstab # # /etc/fstab # Created by anaconda on Tue Apr 7 10:27:26 2026 # # Accessible filesystems, by reference, are maintained under /dev/disk # See man pages fstab(5), findfs(8), mount(8) and/or blkid(8) for more info # /dev/mapper/centos-root / xfs defaults 0 0 UUIDfa080b5f-a9e0-42d1-9462-0ea96bced56c /boot xfs defaults 0 0 /dev/mapper/centos-home /home xfs defaults 0 0 /dev/mapper/centos-swap swap swap defaults 0 0 #备份 /etc/fstab #/etc/fstab 是系统命门文件写错一行 → 开机直接进不去系统 #备份是标准安全操作改错了还能 cp /etc/fstab-0408 /etc/fstab 救回。 [rootcentos7 ~ 17:22:51]# cp /etc/fstab /etc/fstab-0408 #设置/dev/sdb1 自动挂载到 /mnt/web [rootcentos7 ~ 17:24:58]# vim /etc/fstab # 最后添加 #/dev/sdb1 /mnt/web ext4 defaults 0 0/dev/sdb1 /mnt/web ext4 defaults 0 0条目参数说明/dev/sdb1挂载的设备/mnt/web设备挂载点ext4设备的文件系统defaults挂载选项用于控制文件系统属性例如defaults改为ro则文件系统只能读readonly0是否备份现在已弃用可用之为0或者10文件系统监测顺序值越小越优先检查。基本不用#重启测试。 [rootcentos7 ~ 17:28:43]# reboot [rootcentos7 ~ 17:30:21]# lsblk /dev/sdb NAME MAJ:MIN RM SIZE RO TYPE MOUNTPOINT sdb 8:16 0 20G 0 disk ├─sdb1 8:17 0 5G 0 part /mnt/web #挂载点存在 └─sdb2 8:18 0 10G 0 part如果/etc/fstab中具备相应条目则挂载文件系统的时候只需要写一个名称。解释你在 /etc/fstab 里写了一行#/dev/sdb1 /mnt/web ext4 defaults 0 0等于让系统「背下来」/mnt/web 就是 /dev/sdb1格式 ext4参数 defaults。以后你再操作不用重复说一遍系统自己记得[rootcentos7 ~ 17:30:49]# umount /mnt/web [rootcentos7 ~ 17:58:45]# mount /mnt/web #df -h /mnt/web 是干什么的就是只看 /mnt/web 这个目录所在磁盘的「空间使用情况」看看分区有没有挂载成功、还剩多少空间 [rootcentos7 ~ 17:58:54]# df -h /mnt/web Filesystem Size Used Avail Use% Mounted on /dev/sdb1 4.8G 20M 4.6G 1% /mnt/web #出现 /mnt/web 就说明挂上去了。16.7vmware nat 映射映射web端口浏览器访问 http://物理主机IP/例如 http://192.168.42.218:80映射sshd端口
本文来自互联网用户投稿,该文观点仅代表作者本人,不代表本站立场。本站仅提供信息存储空间服务,不拥有所有权,不承担相关法律责任。如若转载,请注明出处:http://www.coloradmin.cn/o/2517893.html
如若内容造成侵权/违法违规/事实不符,请联系多彩编程网进行投诉反馈,一经查实,立即删除!相关文章
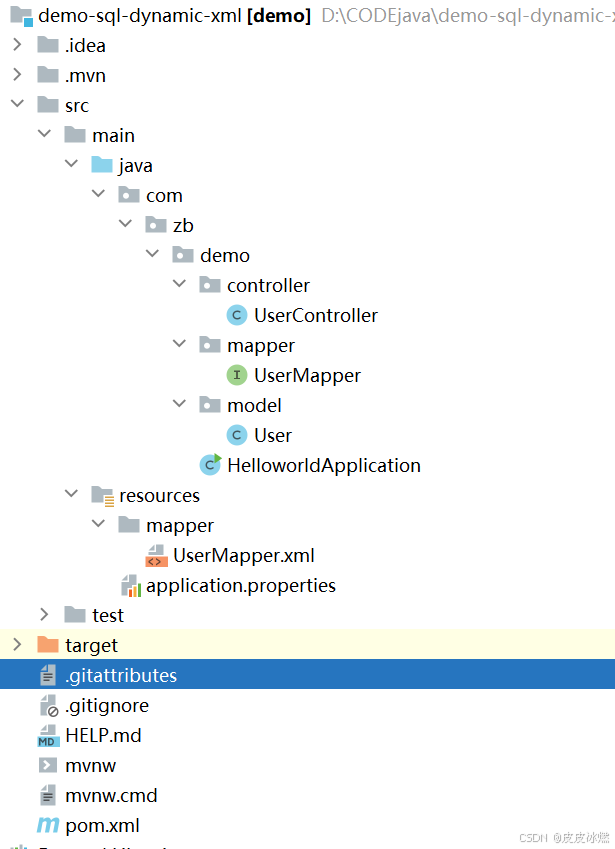
SpringBoot-17-MyBatis动态SQL标签之常用标签
文章目录 1 代码1.1 实体User.java1.2 接口UserMapper.java1.3 映射UserMapper.xml1.3.1 标签if1.3.2 标签if和where1.3.3 标签choose和when和otherwise1.4 UserController.java2 常用动态SQL标签2.1 标签set2.1.1 UserMapper.java2.1.2 UserMapper.xml2.1.3 UserController.ja…
wordpress后台更新后 前端没变化的解决方法
使用siteground主机的wordpress网站,会出现更新了网站内容和修改了php模板文件、js文件、css文件、图片文件后,网站没有变化的情况。
不熟悉siteground主机的新手,遇到这个问题,就很抓狂,明明是哪都没操作错误&#x…
网络编程(Modbus进阶)
思维导图 Modbus RTU(先学一点理论)
概念 Modbus RTU 是工业自动化领域 最广泛应用的串行通信协议,由 Modicon 公司(现施耐德电气)于 1979 年推出。它以 高效率、强健性、易实现的特点成为工业控制系统的通信标准。 包…
UE5 学习系列(二)用户操作界面及介绍
这篇博客是 UE5 学习系列博客的第二篇,在第一篇的基础上展开这篇内容。博客参考的 B 站视频资料和第一篇的链接如下:
【Note】:如果你已经完成安装等操作,可以只执行第一篇博客中 2. 新建一个空白游戏项目 章节操作,重…
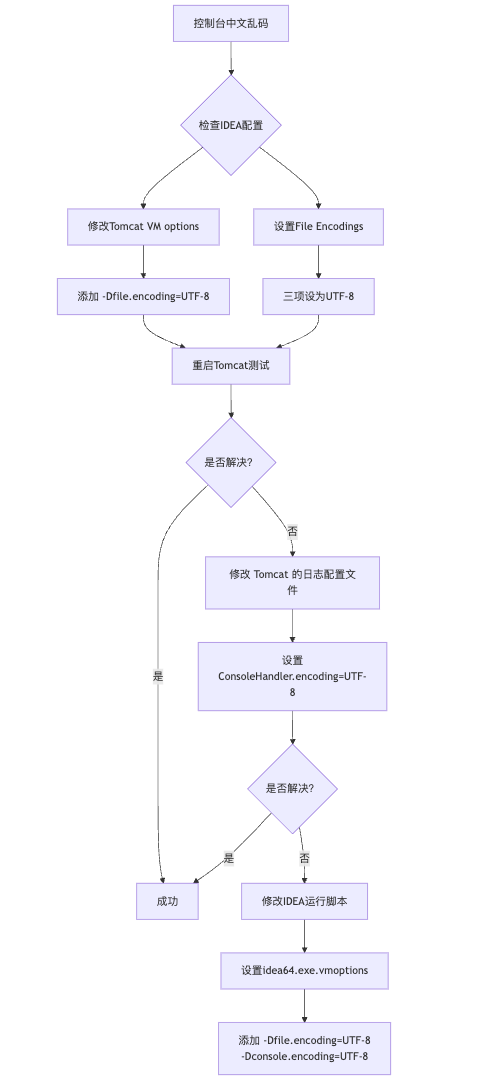
IDEA运行Tomcat出现乱码问题解决汇总
最近正值期末周,有很多同学在写期末Java web作业时,运行tomcat出现乱码问题,经过多次解决与研究,我做了如下整理:
原因:
IDEA本身编码与tomcat的编码与Windows编码不同导致,Windows 系统控制台…
利用最小二乘法找圆心和半径
#include <iostream>
#include <vector>
#include <cmath>
#include <Eigen/Dense> // 需安装Eigen库用于矩阵运算 // 定义点结构
struct Point { double x, y; Point(double x_, double y_) : x(x_), y(y_) {}
}; // 最小二乘法求圆心和半径 …

使用docker在3台服务器上搭建基于redis 6.x的一主两从三台均是哨兵模式
一、环境及版本说明
如果服务器已经安装了docker,则忽略此步骤,如果没有安装,则可以按照一下方式安装: 1. 在线安装(有互联网环境): 请看我这篇文章 传送阵>> 点我查看 2. 离线安装(内网环境):请看我这篇文章 传送阵>> 点我查看
说明:假设每台服务器已…
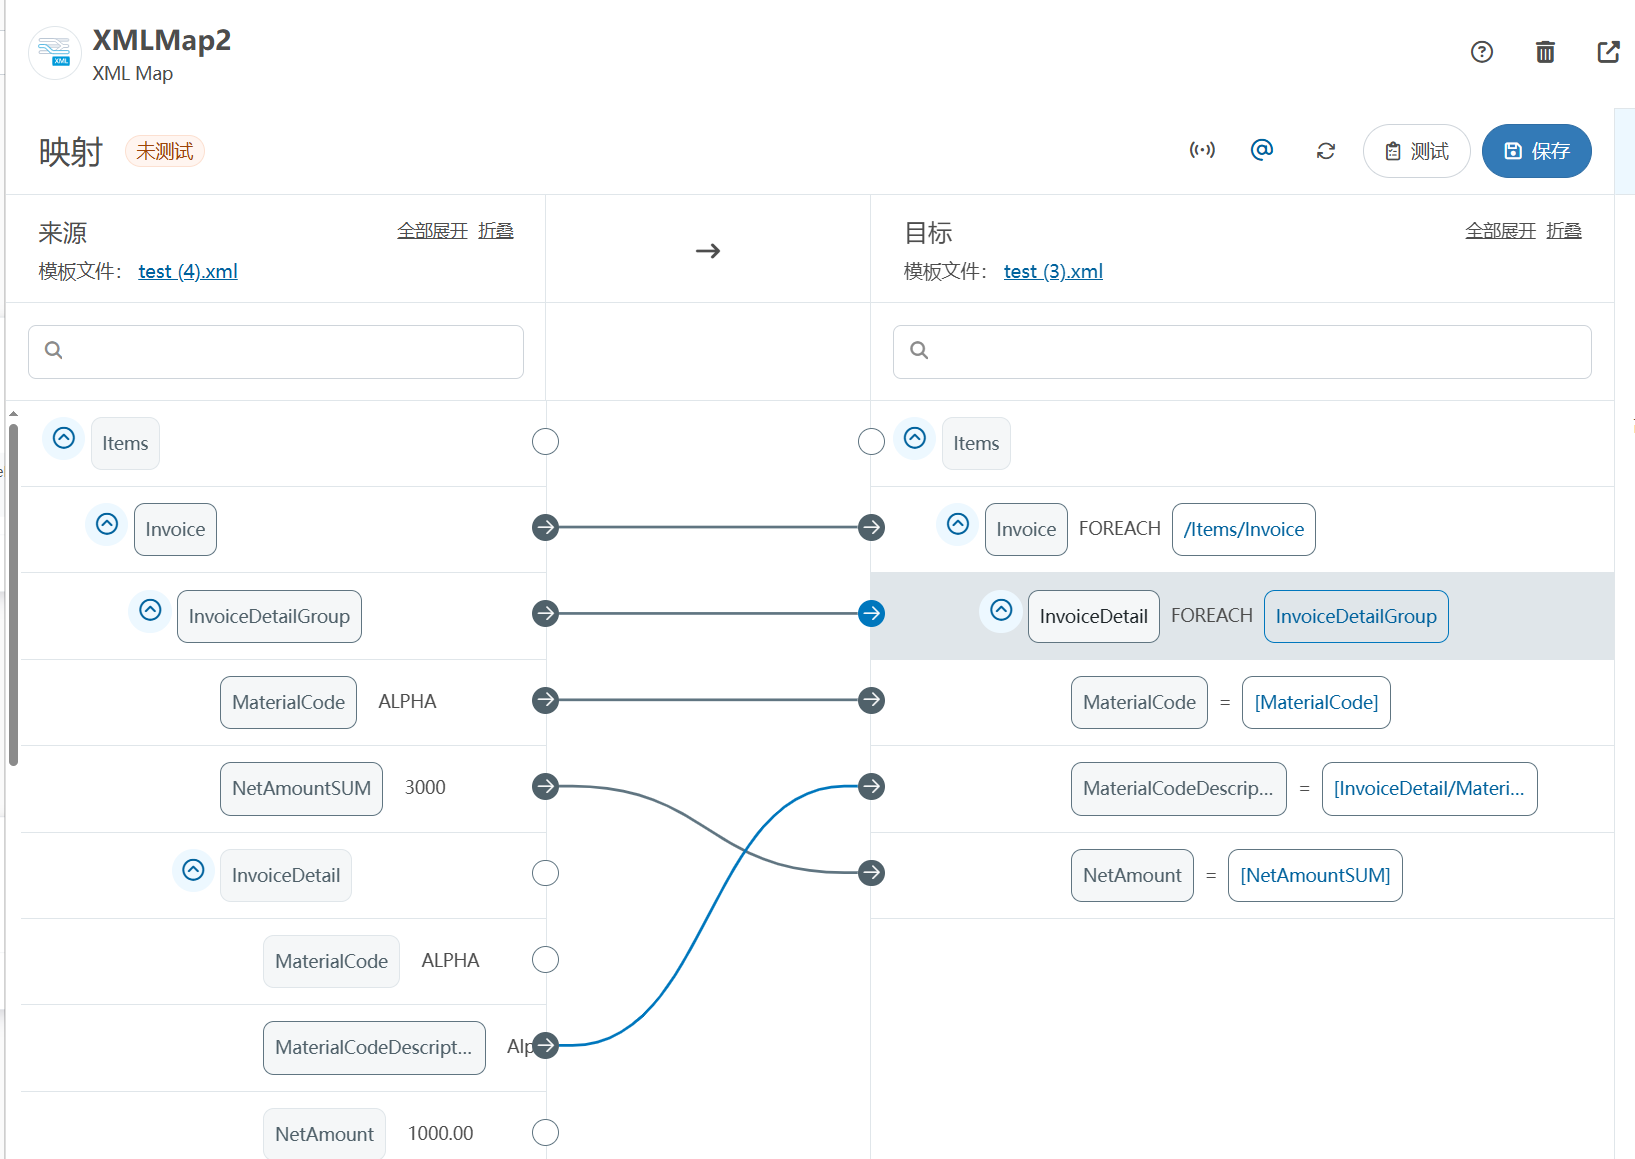
XML Group端口详解
在XML数据映射过程中,经常需要对数据进行分组聚合操作。例如,当处理包含多个物料明细的XML文件时,可能需要将相同物料号的明细归为一组,或对相同物料号的数量进行求和计算。传统实现方式通常需要编写脚本代码,增加了开…
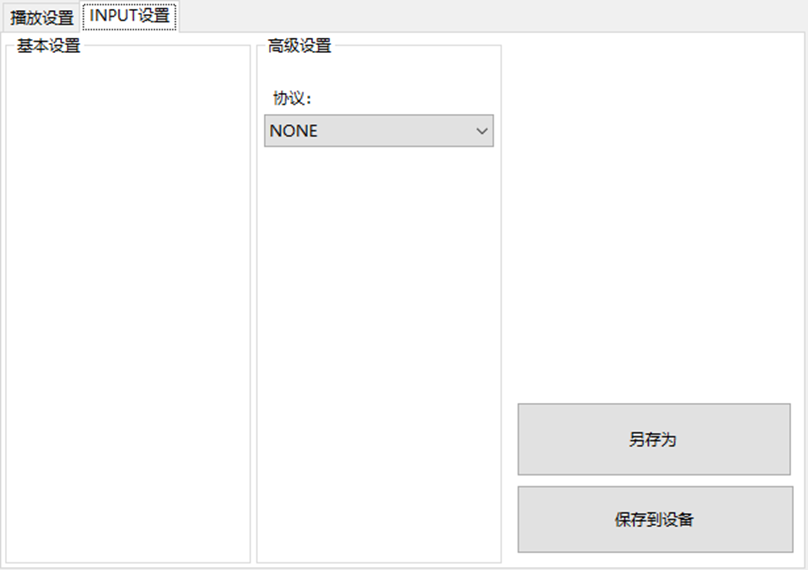
LBE-LEX系列工业语音播放器|预警播报器|喇叭蜂鸣器的上位机配置操作说明
LBE-LEX系列工业语音播放器|预警播报器|喇叭蜂鸣器专为工业环境精心打造,完美适配AGV和无人叉车。同时,集成以太网与语音合成技术,为各类高级系统(如MES、调度系统、库位管理、立库等)提供高效便捷的语音交互体验。
L…
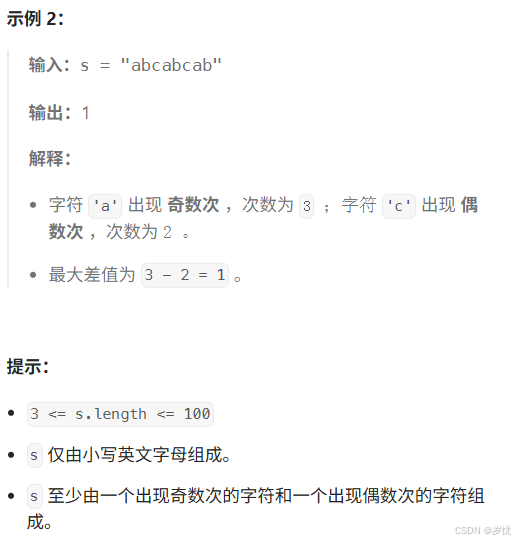
(LeetCode 每日一题) 3442. 奇偶频次间的最大差值 I (哈希、字符串)
题目:3442. 奇偶频次间的最大差值 I 思路 :哈希,时间复杂度0(n)。 用哈希表来记录每个字符串中字符的分布情况,哈希表这里用数组即可实现。
C版本:
class Solution {
public:int maxDifference(string s) {int a[26]…
【大模型RAG】拍照搜题技术架构速览:三层管道、两级检索、兜底大模型
摘要
拍照搜题系统采用“三层管道(多模态 OCR → 语义检索 → 答案渲染)、两级检索(倒排 BM25 向量 HNSW)并以大语言模型兜底”的整体框架: 多模态 OCR 层 将题目图片经过超分、去噪、倾斜校正后,分别用…
【Axure高保真原型】引导弹窗
今天和大家中分享引导弹窗的原型模板,载入页面后,会显示引导弹窗,适用于引导用户使用页面,点击完成后,会显示下一个引导弹窗,直至最后一个引导弹窗完成后进入首页。具体效果可以点击下方视频观看或打开下方…
接口测试中缓存处理策略
在接口测试中,缓存处理策略是一个关键环节,直接影响测试结果的准确性和可靠性。合理的缓存处理策略能够确保测试环境的一致性,避免因缓存数据导致的测试偏差。以下是接口测试中常见的缓存处理策略及其详细说明:
一、缓存处理的核…

龙虎榜——20250610
上证指数放量收阴线,个股多数下跌,盘中受消息影响大幅波动。 深证指数放量收阴线形成顶分型,指数短线有调整的需求,大概需要一两天。 2025年6月10日龙虎榜行业方向分析 1. 金融科技
代表标的:御银股份、雄帝科技
驱动…
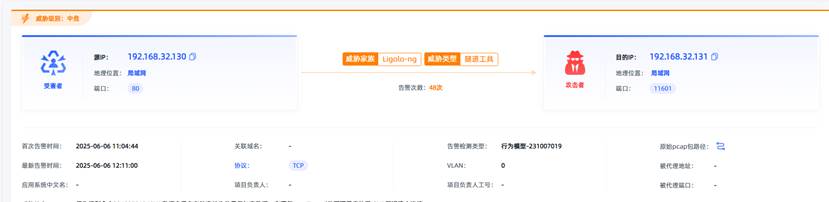
观成科技:隐蔽隧道工具Ligolo-ng加密流量分析
1.工具介绍
Ligolo-ng是一款由go编写的高效隧道工具,该工具基于TUN接口实现其功能,利用反向TCP/TLS连接建立一条隐蔽的通信信道,支持使用Let’s Encrypt自动生成证书。Ligolo-ng的通信隐蔽性体现在其支持多种连接方式,适应复杂网…
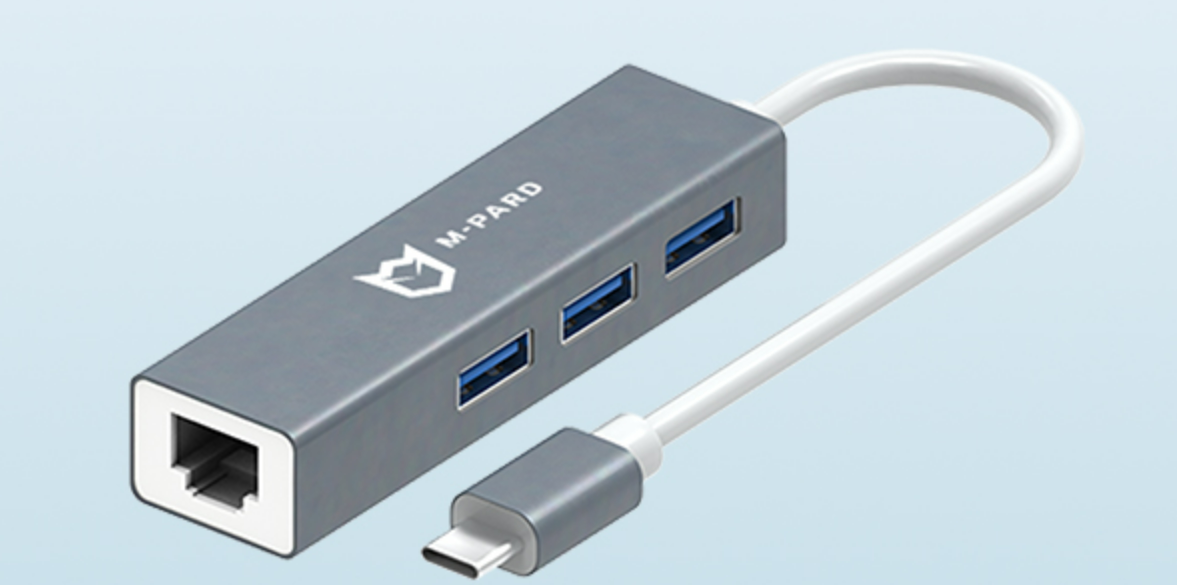
铭豹扩展坞 USB转网口 突然无法识别解决方法
当 USB 转网口扩展坞在一台笔记本上无法识别,但在其他电脑上正常工作时,问题通常出在笔记本自身或其与扩展坞的兼容性上。以下是系统化的定位思路和排查步骤,帮助你快速找到故障原因:
背景:
一个M-pard(铭豹)扩展坞的网卡突然无法识别了,扩展出来的三个USB接口正常。…
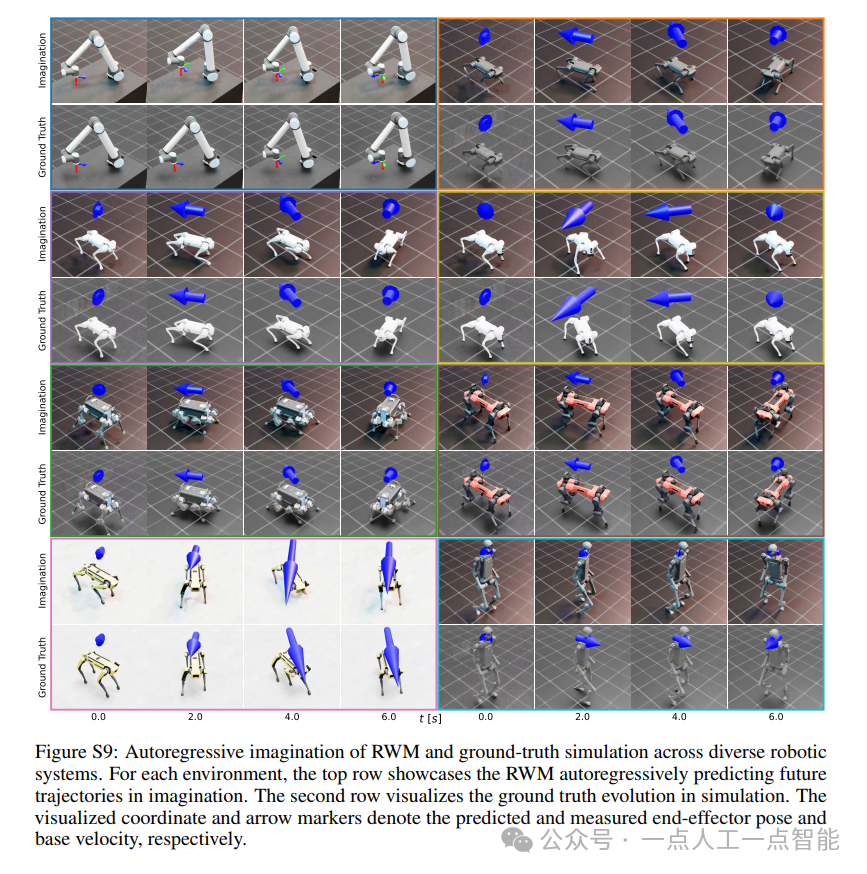
未来机器人的大脑:如何用神经网络模拟器实现更智能的决策?
编辑:陈萍萍的公主一点人工一点智能 未来机器人的大脑:如何用神经网络模拟器实现更智能的决策?RWM通过双自回归机制有效解决了复合误差、部分可观测性和随机动力学等关键挑战,在不依赖领域特定归纳偏见的条件下实现了卓越的预测准…

Linux应用开发之网络套接字编程(实例篇)
服务端与客户端单连接
服务端代码
#include <sys/socket.h>
#include <sys/types.h>
#include <netinet/in.h>
#include <stdio.h>
#include <stdlib.h>
#include <string.h>
#include <arpa/inet.h>
#include <pthread.h>
…

华为云AI开发平台ModelArts
华为云ModelArts:重塑AI开发流程的“智能引擎”与“创新加速器”!
在人工智能浪潮席卷全球的2025年,企业拥抱AI的意愿空前高涨,但技术门槛高、流程复杂、资源投入巨大的现实,却让许多创新构想止步于实验室。数据科学家…
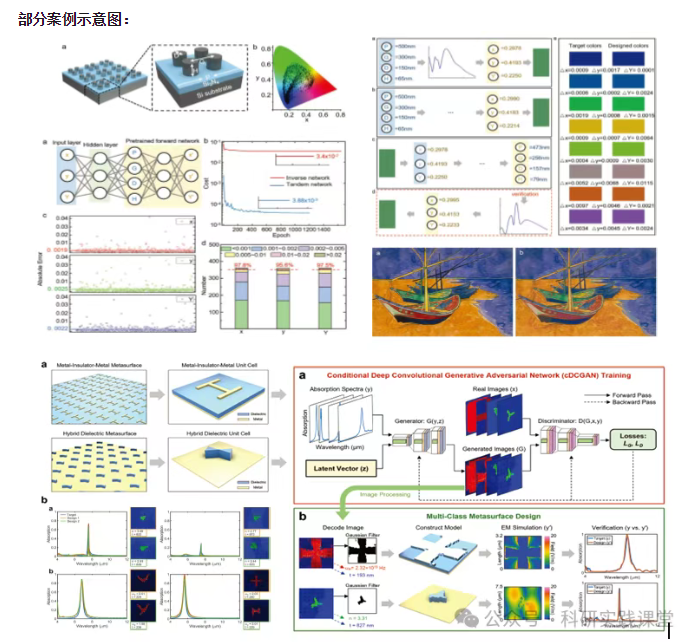
深度学习在微纳光子学中的应用
深度学习在微纳光子学中的主要应用方向
深度学习与微纳光子学的结合主要集中在以下几个方向:
逆向设计 通过神经网络快速预测微纳结构的光学响应,替代传统耗时的数值模拟方法。例如设计超表面、光子晶体等结构。
特征提取与优化 从复杂的光学数据中自…