ssh进阶用法
news2026/4/7 19:44:08
ssh登录与ssh配置文件使用ssh可以从一台设备登录到另一台已开启sshd服务的远程设备。Ubuntu-22.04coliDESKTOP-J45M1NUM:~$ ssh yukari172.28.24.152 The authenticity of host 172.28.24.152 (172.28.24.152) cant be established. ECDSA key fingerprint is SHA256:YSCMU48vJ8btRmdqgWLz8/VhMR3xjUIQn64K4MX/EgE. Are you sure you want to continue connecting (yes/no/[fingerprint])? yes Password: yukariSALICYLIC:~$ ssh_config是存储OpenSSH配置信息的文本文件用户个人的ssh_config配置储存在~/.ssh/config下。一条合法的配置格式如下Host salicHostName 172.28.24.152User yukari其中Host表示配置名HostName表示远程设备地址User表示登录的用户名。在~/.ssh/config中添加上述配置后可以通过设定的配置名进行更为简便的登录Ubuntu-22.04coliDESKTOP-J45M1NUM:~$ vim ~/.ssh/config Host salic HostName 172.28.24.152 User yukari ~ ~ ~ ~ ~ ~ ~ ~ ~ ~ ~ ~ ~ ~ ~ coliDESKTOP-J45M1NUM:~$ ssh salic Password: yukariSALICYLIC:~$ ssh密钥登陆除了使用密码进行登录身份验证之外OpenSSH还支持通过密钥完成登录身份验证。一对ssh密钥由私钥和公钥两个文件组成它们是两段不同的复杂随机文本。一段数据由公钥加密后可以由其对应的私钥解密还原而在没有私钥的情况下仅根据公钥和密文的来推断加密前的数据被认为是不可实现的。因此密钥可被用于身份验证用户在服务器端和客户端分别存储公钥和私钥需要身份验证时服务器端将一段加密后的文本发送到客户端客户端将通过私钥将密文解密后发回服务器端如果服务器端收到的文本与加密前的文本一致那么用户身份得以验证。利用ssh-keygen可以生成一组全新的ssh密钥Ubuntu-22.04coliDESKTOP-J45M1NUM:~$ ssh-keygen Generating public/private rsa key pair. Enter file in which to save the key (/home/coli/.ssh/id_rsa): Enter passphrase (empty for no passphrase): Enter same passphrase again: Your identification has been saved in /home/coli/.ssh/id_rsa Your public key has been saved in /home/coli/.ssh/id_rsa.pub The key fingerprint is: SHA256:NNxg9U2L1XdtcxDVOxfobNrQ5Qf/IBwubrCaSJHUQY coliDESKTOP-J45M1NUM The keys randomart image is: ---[RSA 3072]---- | E.o.. .o| | ooo..oB| | o .oooB**| | .. . o*.o| | .S .. .| | . . o .o| | . . . .. . | | . o . | | o o . . . | ----[SHA256]----- coliDESKTOP-J45M1NUM:~$ ls ~/.ssh $ ls -al ~/.ssh total 8 drwx------ 1 coli coli 4096 Mar 3 08:43 . drwxr-xr-x 1 coli coli 4096 Mar 3 08:43 .. -rw------- 1 coli coli 474 Mar 21 19:50 config -rw------- 1 coli coli 2602 Mar 21 20:01 id_rsa -rw------- 1 coli coli 565 Mar 21 20:01 id_rsa.pub -rw-r--r-- 1 coli coli 222 Mar 21 19:48 known_hosts coliDESKTOP-J45M1NUM:~$ 其中/home/coli/.ssh/id_rsa指定了生成的密钥文件的储存位置passphrase是私钥口令每次使用私钥登录前都需要输入此口令以启用私钥相当于给私钥再设置一个密码。按照其默认配置全部留空生成的私钥文件储存在/home/coli/.ssh/id_rsa公钥文件储存在/home/coli/.ssh/id_rsa.pub。要通过密钥登录到远程设备还需要将公钥复制到远程设备的~/.ssh/authorized_keys下可以通过scp将文件传输到远程设备Ubuntu-22.04coliDESKTOP-J45M1NUM:~$ scp ~/.ssh/id_rsa.pub salic:~/.ssh/id_rsa.pub Password: id_rsa.pub 100% 565 264.4KB/s 00:00 coliDESKTOP-J45M1NUM:~$ ssh salic Password: yukariSALICYLIC:~$ cat ~/.ssh/id_rsa.pub ~/.ssh/authorized_keys yukariSALICYLIC:~$ logout Connection to 172.28.24.152 closed. coliDESKTOP-J45M1NUM:~$ ssh salic yukariSALICYLIC:~$ 配置成功后你即可通过密钥验证的方式直接登录到远程设备而不需要输入密码。需要注意的是只有在.ssh文件夹和密钥文件访问权限配置正确的情况下密钥认证才能正确进行。具体说来本地和远程的.ssh文件夹应当拥有700 rwx------仅本人用户可读写访问权限而本地的私钥文件则应当拥有600 rw-------仅本人用户可读写权限。过于如果相应文件或文件夹的权限过于开放那么ssh会禁用密钥验证。默认情况下OpenSSH会默认用~/.ssh下的id_rsa文件作为私钥尝试登录。如果你有多台远程设备建议你分别使用不同的密钥对。要为不同的远程设备配置不同的密钥你可以在~/.ssh/config中指定IdentityFileHost salicHostName 172.28.24.152User yukariIdentityFile ~/.ssh/salic.id_rsa此后登录salic时ssh客户端将使用~/.ssh/salic.id_rsa为私钥进行身份验证。ssh代理跳板与端口转发ssh代理跳板一些情况下不是所有设备都能够直接访问Ubuntu-22.04coliDESKTOP-J45M1NUM:~$ ssh yukari172.28.24.104 ssh: connect to host 172.28.24.104 port 22: Resource temporarily unavailable coliDESKTOP-J45M1NUM:~$ ssh salic yukariSALICYLIC:~$ ssh yukari172.28.24.104 Password: yukariCITRIC:~$ 在这个例子中你无法通过本地设备直接登录到远程设备172.28.24.104而需要通过另一台设备中转。这可能是由于该设备仅允许来自特定网段的连接而你的本地设备不在允许规则内或者远程设备是一个局域网设备且与你的本地设备不在同一个局域网内。通常用于登录中转的设备被称为代理跳板(proxy jump)。在这种情况下你可以通过ssh选项-J指定ssh代理跳板或者在配置文件中指定ProxyJump项Ubuntu-22.04coliDESKTOP-J45M1NUM:~$ ssh -J salic yukari172.28.24.104 Password: yukariCITRIC:~$ logout Connection to 172.28.24.104 closed. coliDESKTOP-J45M1NUM:~$ vim ~/.ssh/config Host salic HostName 172.28.24.152 User yukari IdentityFile ~/.ssh/salic.id_rsa Host citric HostName 172.28.24.104 User yukari ProxyJump salic ~ ~ ~ ~ ~ ~ ~ ~ ~ coliDESKTOP-J45M1NUM:~$ ssh citric Password: yukariCITRIC:~$ 同样你可以在citric和本地分别配置公钥和私钥从而实现免密码登录。端口转发不同的设备处于不同的网络环境但ssh可以通过端口转发以实现不同设备之间的网络数据交换。ssh的端口转发分为远程转发和本地转发两种类型分别用可于远程设备访问本地网络服务和本地访问远程设备网络服务。下面将介绍端口转发的几种常用场景。远程转发——反向sshscp命令可以在本地设备和远程设备之间传递文件。很多时候我们希望在远程设备的工作目录与本地设备的特定目录之间进行文件交换下载文件。但是在不少情况下远程设备无法通过ip地址连接到本地因此我们只能依靠在本地打开一个新的命令行来传递文件。然而在本地使用scp时需要指定远程文件的绝对路径 很方便。ssh的远程转发可以帮我们解决这个问题。远程转发的ssh命令行参数格式为-R remoteport:localhost:localportssh_config的配置格式为RemoteForward remoteport host:hostport设置远程转发后远程设备中所有发送到remoteport端口的数据将通过ssh隧道转发到本地的localport端口。此时你只需要在本地开启sshd服务即可在通过转发的端口建立反向的ssh通道从而在远程设备上使用scp传输文件Ubuntu-22.04coliDESKTOP-J45M1NUM:~$ mkdir ~/downloads/ coliDESKTOP-J45M1NUM:~$ sudo service ssh start [sudo] password for coli: coliDESKTOP-J45M1NUM:~$ ssh -R 22222:localhost:22 salic yukariSALICYLIC:~$ cd data yukariSALICYLIC:~/data$ scp -P 22222 output.jpg colilocalhost:~/downloads/ output.jpg 100% 2465 463.2KB/s 00:00 yukariSALICYLIC:~/data$ logout Connection to 172.28.24.152 closed. coliDESKTOP-J45M1NUM:~$ ls ~/downloads/ output.jpg coliDESKTOP-J45M1NUM:~$ ⚠注意端口没有用户认证机制建立远程转发后远程设备上的所有用户都能够访问到你所转发的端口从而能够通过ssh试图访问你的本地设备。远程转发——网络服务转发考虑这样一种情况你想在远程设备上使用pip安装一个python包或者安装一个R包但是你的远程设备没有连接到互联网你该如何操作最简单的做法是将先文件下载到本地然后通过scp传输到远程设备最后离线安装。但这对于哪些拥有复杂依赖的包来说十分不方便。幸运的是通过ssh远程端口转发我们可以让远程设备访问到本地的网络服务Ubuntu-22.04coliDESKTOP-J45M1NUM:~$ sudo apt install squid [sudo] password for coli: Preparing to unpack .../4-ssl-cert_1.0.39_all.deb ... Unpacking ssl-cert (1.0.39) ... Selecting previously unselected package squid. Preparing to unpack .../5-squid_4.10-1ubuntu1.5_amd64.deb ... proxy:x:13:13:proxy:/bin:/usr/sbin/nologin Unpacking squid (4.10-1ubuntu1.5) ... Setting up squid-langpack (20191103-1) ... Setting up ssl-cert (1.0.39) ... Setting up libdbi-perl:amd64 (1.643-1ubuntu0.1) ... Setting up libecap3:amd64 (1.0.1-3.2ubuntu1) ... Setting up squid-common (4.10-1ubuntu1.5) ... Setting up squid (4.10-1ubuntu1.5) ... Setcap worked! /usr/lib/squid/pinger is not suid! invoke-rc.d: could not determine current runlevel Created symlink /etc/systemd/system/multi-user.target.wants/squid.service → /lib/systemd/system/squid.service. invoke-rc.d: could not determine current runlevel Processing triggers for ufw (0.36-6) ... Processing triggers for systemd (245.4-4ubuntu3.11) ... Processing triggers for man-db (2.9.1-1) ... Processing triggers for libc-bin (2.31-0ubuntu9.2) ... coliDESKTOP-J45M1NUM:~$ sudo vim /etc/squid/squid.conf # INSERT YOUR OWN RULE(S) HERE TO ALLOW ACCESS FROM YOUR CLIENTS # include /etc/squid/conf.d/* # Example rule allowing access from your local networks. # Adapt localnet in the ACL section to list your (internal) IP networks # from where browsing should be allowed #http_access allow localnet http_access allow localhost # And finally deny all other access to this proxy #http_access deny all http_access allow all # TAG: adapted_http_access # Allowing or Denying access based on defined access lists # # Essentially identical to http_access, but runs after redirectors coliDESKTOP-J45M1NUM:~$ sudo service squid start coliDESKTOP-J45M1NUM:~$ ssh -R 3129:localhost:3128 salic yukariSALICYLIC:~$ export http_proxyhttp://127.0.0.1:3128 yukariSALICYLIC:~$ export https_proxyhttp://127.0.0.1:3128 yukariSALICYLIC:~$ curl www.baidu.com !DOCTYPE html !--STATUS OK--html headmeta http-equivcontent-type contenttext/html;charsetutf-8meta http-equivX-UA-Compatible contentIEEdgemeta contentalways namereferrerlink relstylesheet typetext/css hrefhttp://s1.bdstatic.com/r/www/cache/bdorz/baidu.min.csstitle百度一下你就知道/title/head body link#0000cc div idwrapper div idhead div classhead_wrapper div classs_form div classs_form_wrapper div idlg img hidefocustrue src//www.baidu.com/img/bd_logo1.png width270 height129 /div form idform namef action//www.baidu.com/s classfm input typehidden namebdorz_come value1 input typehidden nameie valueutf-8 input typehidden namef value8 input typehidden namersv_bp value1 input typehidden namersv_idx value1 input typehidden nametn valuebaiduspan classbg s_ipt_wrinput idkw namewd classs_ipt value maxlength255 autocompleteoff autofocus/spanspan classbg s_btn_wrinput typesubmit idsu value百度一下 classbg s_btn/span /form /div /div div idu1 a hrefhttp://news.baidu.com nametj_trnews classmnav新闻/a a hrefhttp://www.hao123.com nametj_trhao123 classmnavhao123/a a hrefhttp://map.baidu.com nametj_trmap classmnav地图/a a hrefhttp://v.baidu.com nametj_trvideo classmnav视频/a a hrefhttp://tieba.baidu.com nametj_trtieba classmnav贴吧/a noscript a hrefhttp://www.baidu.com/bdorz/login.gif?loginamp;tplmnamp;uhttp%3A%2F%2Fwww.baidu.com%2f%3fbdorz_come%3d1 nametj_login classlb登录/a /noscript scriptdocument.write(a hrefhttp://www.baidu.com/bdorz/login.gif?logintplmnu encodeURIComponent(window.location.href (window.location.search ? ? : ) bdorz_come1) nametj_login classlb登录/a);/script a href//www.baidu.com/more/ nametj_briicon classbri styledisplay: block;更多产品/a /div /div /div div idftCon div idftConw p idlh a hrefhttp://home.baidu.com关于百度/a a hrefhttp://ir.baidu.comAbout Baidu/a /p p idcpcopy;2017nbsp;Baidunbsp;a hrefhttp://www.baidu.com/duty/使用百度前必读/anbsp; a hrefhttp://jianyi.baidu.com/ classcp-feedback意见反馈/anbsp;京ICP证030173号nbsp; img src//www.baidu.com/img/gs.gif /p /div /div /div /body /html yukariSALICYLIC:~$ 其中squid是安装在本地的http代理客户端它可以将所有发送到本地3128端口的http请求解析并转发给相应的目标。ssh远程转发-R 3129:localhost:3128使得远程设备上所有发送到3129端口的数据转发到本地的3128端口从而交给squid处理。远程设备上所设置的环境变量http_proxy和https_proxy能够让所有http和https网络请求发送给远程设备的3129端口进而被转发到本地3128端口交由squid处理。你也可以使用3129之外的其他端口只需保证ssh转发的端口和http_proxy转发到的端口一致即可。http_proxy和https_proxy变量的设置是一次性的仅适用于当前命令行。你可以将这两句话添加到~/.bashrc使得每次登录时自动设置这两个变量。这里的ssh远程转发的命令行参数可以在ssh_config中设置为RemoteForward 3129 localhost:3128如果你使用Windows下的OpenSSH客户端登录远程设备那么你需要在Windows下安装squid或其他代理工具并在ssh时指定对应的转发端口。⚠注意端口没有用户认证机制建立远程转发后远程设备上的所有用户都能够访问到你所转发的端口从而能够通过你的本地代理访问网络。本地转发——访问远程设备网络ssh允许本地设备监听远程设备端口准确地说是将远程设备的某些特定端口转发到本地的特定端口。通过这种方法你可以在本地访问远程设备的网络服务。例如python的http.server (python3)或SimpleHTTPServer (python2)模块可以提供非常简单的http服务包括文件索引和下载功能。而且操作异常简单Ubuntu-22.04coliDESKTOP-J45M1NUM:~$ python3 -m http.server 8080 Serving HTTP on 0.0.0.0 port 8080 (http://0.0.0.0:8080/) ...随后打开浏览器访问http://localhost:8080就可以看到类似这样的界面Directory listing for /Directory listing for /.bash_history.bash_logout.bashrc.cache/.config/.ssh/downloads/share/software/这里显示的就是本地~文件夹下的文件和文件夹单击页面上的文件链接会下载文件。如果用ssh本地转发连接到远程设备并在远程设备开启http服务Ubuntu-22.04coliDESKTOP-J45M1NUM:~$ python3 -m http.server 8080 Serving HTTP on 0.0.0.0 port 8080 (http://0.0.0.0:8080/) ... 127.0.0.1 - - [24/May/2022 20:58:27] GET / HTTP/1.1 200 - 127.0.0.1 - - [24/May/2022 21:01:03] GET /downloads/ HTTP/1.1 200 - ^C Keyboard interrupt received, exiting. coliDESKTOP-J45M1NUM:~$ ssh -L 8081:172.28.24.152:8080 salic yukariSALICYLIC:~$ python3 -m http.server 8080 Serving HTTP on 0.0.0.0 port 8080 (http://0.0.0.0:8080/) ...此时打开浏览器访问http://localhost:8081就可以看到服务器上home文件夹的内容Directory listing for /Directory listing for /.bash_history.bash_logout.bash_profile.cache/.config/.ssh/data/software/这里显示的是SALICYLIC远程服务器~文件夹下的文件和文件夹单击页面上的文件链接即可从远程服务器上下载文件。本地转发在ssh_config中的设置格式为LocalForward 8081 172.28.24.152:8080。sshfs将远程存储挂载为文件系统sftp是一种远程文件传输协议能够利用ssh协议在本地和远程之间拷贝文件。较新的scp命令行程序就利用sftp协议传输文件。利用命令行程序传输文件通常较为不便一次只能传输一个完整的文件夹或者需要单独指定每个文件的路径。在远程和本地间选择性传输大量文件时图形化的用户界面能够带来很大的方便。WinSCP和FileZilla是常用的图形化文件管理工具支持sftp远程文件传输协议通常可以满足常规的文件传输需求。这里我们介绍一种基于WSL和sshfs的、更加原生和易用的解决方案。WSL是一种在Windows系统中运行Linux程序的方法其中新版(WSL2)可以运行完整的Linux内核。sshfs是一种文件系统它借助Linux内核的功能将远程存储挂载为本地文件系统。结合Windows对WSL文件系统的支持我们可以Windows的资源管理器下直接访问远程设备存储。在使用之前你需要先安装WSL并确保WSL版本为2。如果你一定要使用WSL1sshfs的安装需要root权限Ubuntu-22.04coliDESKTOP-J45M1NUM:~$ sudo apt install sshfs [sudo] password for coli: Reading package lists... Done Building dependency tree Reading state information... Done The following NEW packages will be installed: sshfs 0 upgraded, 1 newly installed, 0 to remove and 80 not upgraded. Need to get 43.5 kB of archives. After this operation, 123 kB of additional disk space will be used. Get:1 http://mirrors.tuna.tsinghua.edu.cn/ubuntu focal/universe amd64 sshfs amd64 3.6.0repackreally2.10-0ubuntu1 [43.5 kB] Fetched 43.5 kB in 1s (40.8 kB/s) Selecting previously unselected package sshfs. (Reading database ... 52945 files and directories currently installed.) Preparing to unpack .../sshfs_3.6.0repackreally2.10-0ubuntu1_amd64.deb ... Unpacking sshfs (3.6.0repackreally2.10-0ubuntu1) ... Setting up sshfs (3.6.0repackreally2.10-0ubuntu1) ... Processing triggers for man-db (2.9.1-1) ... coliDESKTOP-J45M1NUM:~$ 文件系统的挂载则不需要root权限。例如如果要将远程设备salic的用户文件夹挂载到本地只需要在WSL中执行Ubuntu-22.04coliDESKTOP-J45M1NUM:~$ mkdir ~/mnt coliDESKTOP-J45M1NUM:~$ sshfs salic:/home/yukari ~/mnt coliDESKTOP-J45M1NUM:~$ df Filesystem 1K-blocks Used Available Use% Mounted on /dev/sdc 263174212 4278568 245457488 2% / none 4031704 32 4031672 1% /mnt/wslg none 4031704 4 4031700 1% /mnt/wsl tools 83886076 57364804 26521272 69% /init none 4029656 0 4029656 0% /dev none 4031704 4 4031700 1% /run none 4031704 0 4031704 0% /run/lock none 4031704 0 4031704 0% /run/shm none 4031704 0 4031704 0% /run/user tmpfs 4031704 0 4031704 0% /sys/fs/cgroup drivers 83886076 57364804 26521272 69% /usr/lib/wsl/drivers lib 83886076 57364804 26521272 69% /usr/lib/wsl/lib none 4031704 76 4031628 1% /mnt/wslg/versions.txt none 4031704 76 4031628 1% /mnt/wslg/doc drvfs 83886076 57364804 26521272 69% /mnt/c drvfs 403832828 146119192 257713636 37% /mnt/d salic:/home/yukari 14290771910 9655851976 4634919934 68% /home/coli/mnt coliDESKTOP-J45M1NUM:~$ ls -al ~/mnt total 52 drwxr-xr-x 1 1003 1003 4096 Dec 28 2021 ./ drwxr-xr-x 14 coli coli 4096 Mar 3 08:43 ../ -rw------- 1 1003 1003 8432 Mar 21 22:20 .bash_history -rw-r--r-- 1 1003 1003 220 Dec 28 2021 .bash_logout -rw-r--r-- 1 1003 1003 807 Dec 28 2021 .bash_profile drwxr-xr-x 1 1003 1003 4096 Feb 18 15:20 .config/ drwx------ 1 1003 1003 4096 Mar 21 20:05 .ssh/ drwxrwxrwx 1 1003 1003 4096 Jan 9 15:30 software/ drwxrwxrwx 1 1003 1003 4096 Mar 15 11:34 data/ coliDESKTOP-J45M1NUM:~$ 可以看到远程设备上的存储已经被到挂载wsl文件系统的~/mnt[1]下你可以像本地文件一样编辑、移动或删除其中的文件。[1]sshfs仅支持将远程存储挂载到wsl文件系统下不支持挂载到windows文件系统即wsl中的/mnt/c等下但是你现在还不能从Windows资源管理器中直接访问挂载的文件夹因为Windows和WSL的用户权限不完全相同。要使Windows资源管理器能够直接访问挂载的文件夹你还需要在挂载时添加参数-o allow_otherUbuntu-22.04coliDESKTOP-J45M1NUM:~$ umount ~/mnt coliDESKTOP-J45M1NUM:~$ sshfs -o allow_ohter -o follow_symlinks salic:/home/yukari ~/mnt fusermount: option allow_other only allowed if user_allow_other is set in /etc/fuse.conf coliDESKTOP-J45M1NUM:~$ sudo vi /etc/fuse.conf # /etc/fuse.conf - Configuration file for Filesystem in Userspace (FUSE) # Set the maximum number of FUSE mounts allowed to non-root users. # The default is 1000. #mount_max 1000 # Allow non-root users to specify the allow_other or allow_root mount options. user_allow_other ~ ~ ~ ~ ~ ~ ~ ~ ~ ~ coliDESKTOP-J45M1NUM:~$ sshfs -o allow_other salic:/home/yukari ~/mnt coliDESKTOP-J45M1NUM:~$ umount ~/mnt用于卸载先前挂载在~/mnt的远程文件夹只有在/etc/fuse.conf配置文件中取消注释最后一行#user_allow_other后普通用户才能够启用-o allow_other选项该文件的编辑需要root权限。重新挂载后你可以通过地址\\wsl.localhost\Ubuntu-22.04\home\coli\mnt在资源管理器中直接访问到远程存储并像本地文件一样对远程文件进行新建、编辑、移动或删除[1]。[1]要使远程存储中的链接可用还需要启用-o follow_symlinks选项否则链接将显示为不可打开的文件而非文件夹。于是你就可以在Windows资源管理器内直接完成本地文件和远程文件的交换了。不仅如此你还可以直接使用Windows应用打开或编辑\\wsl.localhost\Ubuntu-22.04\home\coli\mnt下的远程文件或者将文件下载或者保存到该路径所有更改和创建都会直接应用到远程设备上。远程数据访问除了传输文件ssh进行还可以用来直接传输数据。在本地运行ssh userhost command会在远程设备上执行command命令并将结果输出到本地的标准输出。根据这一特性我们可以在R、python等应用程序中通过ssh命令来读取远程设备上的数据。这样可以避免在本地保留大量临时数据并省去数据版本校对和同步的麻烦。Ubuntu-22.04yukariSALICYLIC:~/mydata$ cat data.csv Tree,age,circumference 1,118,30 1,484,58 1,664,87 1,1004,115 1,1231,120 1,1372,142 1,1582,145 2,118,33 2,484,69 2,664,111 2,1004,156 2,1231,172 2,1372,203 2,1582,203 3,118,30 3,484,51 3,664,75 3,1004,108 3,1231,115 3,1372,139 3,1582,140 4,118,32 4,484,62 4,664,112 4,1004,167 4,1231,179 4,1372,209 4,1582,214 5,118,30 5,484,49 5,664,81 5,1004,125 5,1231,142 5,1372,174 5,1582,177 yukariSALICYLIC:~/mydata$ coliDESKTOP-J45M1NUM:~$ ssh citric head -n 5 ~/mydata/data.csv Tree,age,circumference 1,118,30 1,484,58 1,664,87 1,1004,115 coliDESKTOP-J45M1NUM:~$ R --quiet library(data.table) data.table 1.14.3 using 1 threads (see ?getDTthreads). Latest news: r-datatable.com fread(cmdssh citric cat ~/mydata/data.csv) Tree age circumference 1: 1 118 30 2: 1 484 58 3: 1 664 87 4: 1 1004 115 5: 1 1231 120 6: 1 1372 142 7: 1 1582 145 8: 2 118 33 9: 2 484 69 10: 2 664 111 11: 2 1004 156 12: 2 1231 172 13: 2 1372 203 14: 2 1582 203 15: 3 118 30 16: 3 484 51 17: 3 664 75 18: 3 1004 108 19: 3 1231 115 20: 3 1372 139 21: 3 1582 140 22: 4 118 32 23: 4 484 62 24: 4 664 112 25: 4 1004 167 26: 4 1231 179 27: 4 1372 209 28: 4 1582 214 29: 5 118 30 30: 5 484 49 31: 5 664 81 32: 5 1004 125 33: 5 1231 142 34: 5 1372 174 35: 5 1582 177 Tree age circumference q() Save workspace image? [y/n/c]: n coliDESKTOP-J45M1NUM:~$ python Python 3.9.7 (default, Sep 16 2021, 16:59:08) [GCC 7.5.0] on linux Type help, copyright, credits or license for more information. import subprocess subprocess.run([ssh, citric, cat ~/mydata/data.csv], stdoutsubprocess.PIPE).stdout.decode(utf-8) Tree,age,circumference\n1,118,30\n1,484,58\n1,664,87\n1,1004,115\n1,1231,120\n1,1372,142\n1,1582,145\n2,118,33\n2,484,69\n2,664,111\n2,1004,156\n2,1231,172\n2,1372,203\n2,1582,203\n3,118,30\n3,484,51\n3,664,75\n3,1004,108\n3,1231,115\n3,1372,139\n3,1582,140\n4,118,32\n4,484,62\n4,664,112\n4,1004,167\n4,1231,179\n4,1372,209\n4,1582,214\n5,118,30\n5,484,49\n5,664,81\n5,1004,125\n5,1231,142\n5,1372,174\n5,1582,177\n 附录ssh_config配置参考~/.ssh/configHost salicHostName 172.28.24.152User yukariIdentityFile ~/.ssh/salic.id_rsaRemoteForward 3129 localhost:3128Host citricHostName 172.28.24.104User yukariProxyJump salicIdentityFile ~/.ssh/citric.id_rsaRemoteForward 3129 localhost:3128LocalForward 8081 172.28.24.104:8080Host wsl wsl1.succinic wsl2.succinicUser coliIdentityFile ~/.ssh/coli.id_rsaHost wslHostName localhostPort 2233Host wsl1.succinicHostName 172.28.24.169Host wsl2.succinicHostName localhostPort 2233HostKeyAlias wsl2.succinicProxyJump wsl1.succinic该配置文件记录了salic、citric两台远程设备wsl1.succinic、wsl2.succinic两个远程WSL子系统以及一个本地WSL子系统的ssh配置。HostKeyAlias的作用是当HostName冲突例如同为localhost时可以将其指定为两个不同的名称避免指纹冲突。
本文来自互联网用户投稿,该文观点仅代表作者本人,不代表本站立场。本站仅提供信息存储空间服务,不拥有所有权,不承担相关法律责任。如若转载,请注明出处:http://www.coloradmin.cn/o/2484003.html
如若内容造成侵权/违法违规/事实不符,请联系多彩编程网进行投诉反馈,一经查实,立即删除!相关文章
SpringBoot-17-MyBatis动态SQL标签之常用标签
文章目录 1 代码1.1 实体User.java1.2 接口UserMapper.java1.3 映射UserMapper.xml1.3.1 标签if1.3.2 标签if和where1.3.3 标签choose和when和otherwise1.4 UserController.java2 常用动态SQL标签2.1 标签set2.1.1 UserMapper.java2.1.2 UserMapper.xml2.1.3 UserController.ja…
wordpress后台更新后 前端没变化的解决方法
使用siteground主机的wordpress网站,会出现更新了网站内容和修改了php模板文件、js文件、css文件、图片文件后,网站没有变化的情况。
不熟悉siteground主机的新手,遇到这个问题,就很抓狂,明明是哪都没操作错误&#x…
网络编程(Modbus进阶)
思维导图 Modbus RTU(先学一点理论)
概念 Modbus RTU 是工业自动化领域 最广泛应用的串行通信协议,由 Modicon 公司(现施耐德电气)于 1979 年推出。它以 高效率、强健性、易实现的特点成为工业控制系统的通信标准。 包…
UE5 学习系列(二)用户操作界面及介绍
这篇博客是 UE5 学习系列博客的第二篇,在第一篇的基础上展开这篇内容。博客参考的 B 站视频资料和第一篇的链接如下:
【Note】:如果你已经完成安装等操作,可以只执行第一篇博客中 2. 新建一个空白游戏项目 章节操作,重…
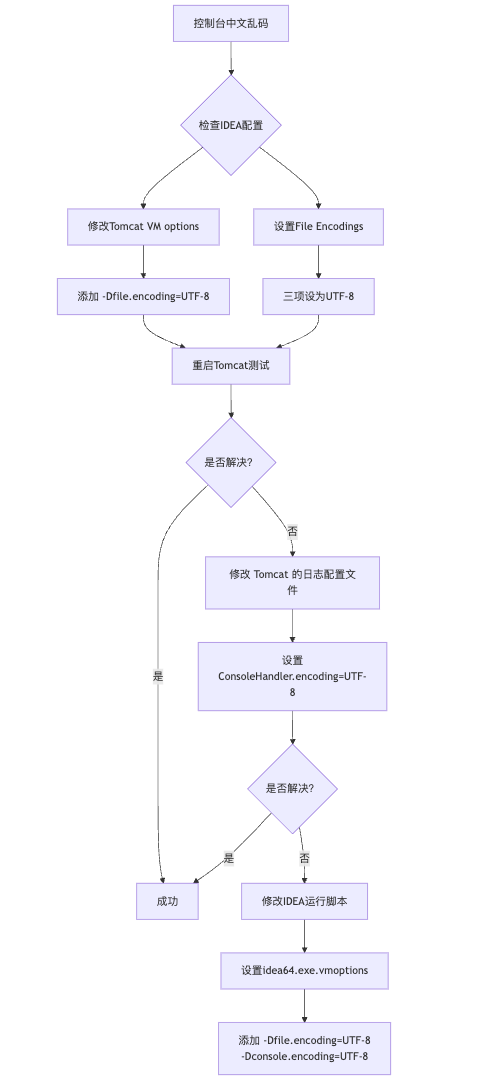
IDEA运行Tomcat出现乱码问题解决汇总
最近正值期末周,有很多同学在写期末Java web作业时,运行tomcat出现乱码问题,经过多次解决与研究,我做了如下整理:
原因:
IDEA本身编码与tomcat的编码与Windows编码不同导致,Windows 系统控制台…
利用最小二乘法找圆心和半径
#include <iostream>
#include <vector>
#include <cmath>
#include <Eigen/Dense> // 需安装Eigen库用于矩阵运算 // 定义点结构
struct Point { double x, y; Point(double x_, double y_) : x(x_), y(y_) {}
}; // 最小二乘法求圆心和半径 …

使用docker在3台服务器上搭建基于redis 6.x的一主两从三台均是哨兵模式
一、环境及版本说明
如果服务器已经安装了docker,则忽略此步骤,如果没有安装,则可以按照一下方式安装: 1. 在线安装(有互联网环境): 请看我这篇文章 传送阵>> 点我查看 2. 离线安装(内网环境):请看我这篇文章 传送阵>> 点我查看
说明:假设每台服务器已…
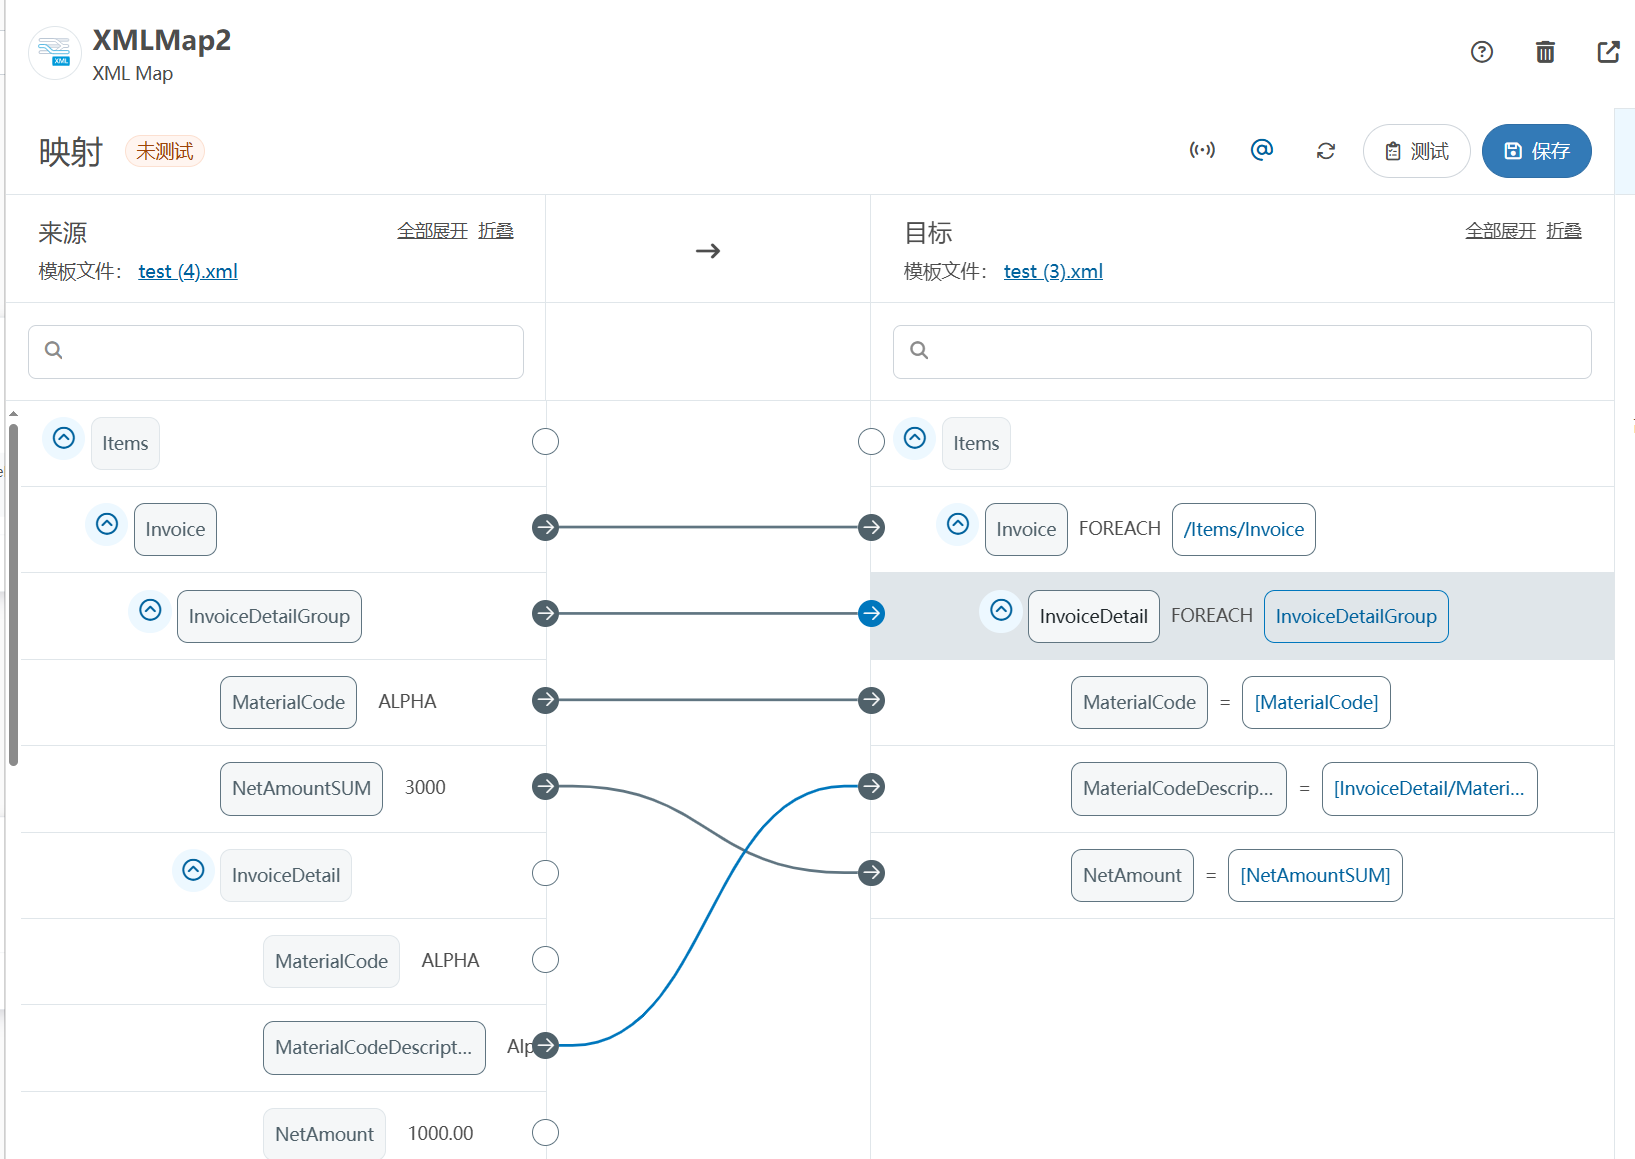
XML Group端口详解
在XML数据映射过程中,经常需要对数据进行分组聚合操作。例如,当处理包含多个物料明细的XML文件时,可能需要将相同物料号的明细归为一组,或对相同物料号的数量进行求和计算。传统实现方式通常需要编写脚本代码,增加了开…
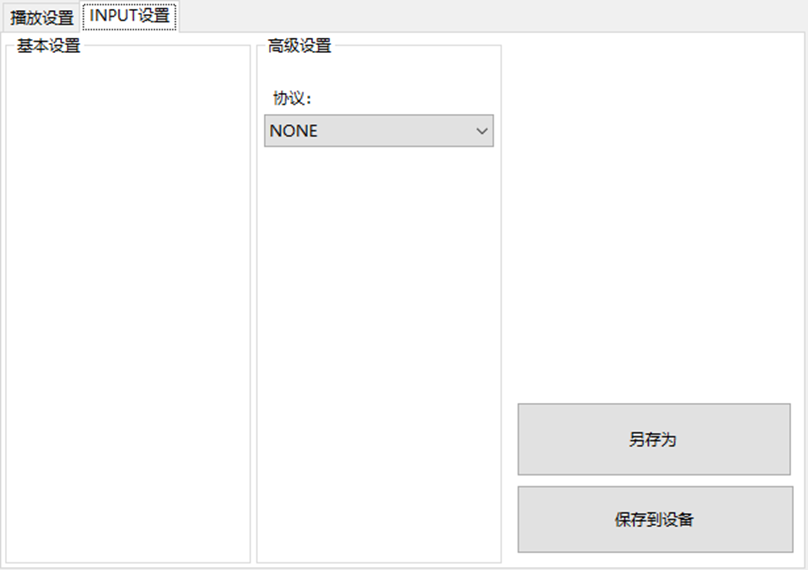
LBE-LEX系列工业语音播放器|预警播报器|喇叭蜂鸣器的上位机配置操作说明
LBE-LEX系列工业语音播放器|预警播报器|喇叭蜂鸣器专为工业环境精心打造,完美适配AGV和无人叉车。同时,集成以太网与语音合成技术,为各类高级系统(如MES、调度系统、库位管理、立库等)提供高效便捷的语音交互体验。
L…
(LeetCode 每日一题) 3442. 奇偶频次间的最大差值 I (哈希、字符串)
题目:3442. 奇偶频次间的最大差值 I 思路 :哈希,时间复杂度0(n)。 用哈希表来记录每个字符串中字符的分布情况,哈希表这里用数组即可实现。
C版本:
class Solution {
public:int maxDifference(string s) {int a[26]…

【大模型RAG】拍照搜题技术架构速览:三层管道、两级检索、兜底大模型
摘要
拍照搜题系统采用“三层管道(多模态 OCR → 语义检索 → 答案渲染)、两级检索(倒排 BM25 向量 HNSW)并以大语言模型兜底”的整体框架: 多模态 OCR 层 将题目图片经过超分、去噪、倾斜校正后,分别用…
【Axure高保真原型】引导弹窗
今天和大家中分享引导弹窗的原型模板,载入页面后,会显示引导弹窗,适用于引导用户使用页面,点击完成后,会显示下一个引导弹窗,直至最后一个引导弹窗完成后进入首页。具体效果可以点击下方视频观看或打开下方…
接口测试中缓存处理策略
在接口测试中,缓存处理策略是一个关键环节,直接影响测试结果的准确性和可靠性。合理的缓存处理策略能够确保测试环境的一致性,避免因缓存数据导致的测试偏差。以下是接口测试中常见的缓存处理策略及其详细说明:
一、缓存处理的核…

龙虎榜——20250610
上证指数放量收阴线,个股多数下跌,盘中受消息影响大幅波动。 深证指数放量收阴线形成顶分型,指数短线有调整的需求,大概需要一两天。 2025年6月10日龙虎榜行业方向分析 1. 金融科技
代表标的:御银股份、雄帝科技
驱动…
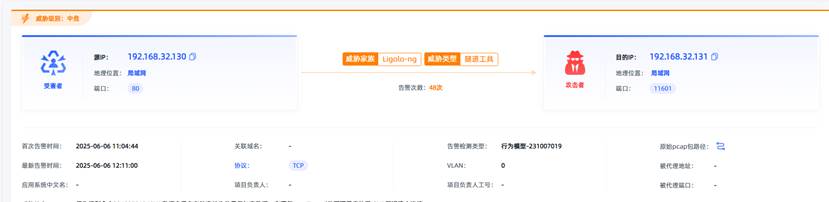
观成科技:隐蔽隧道工具Ligolo-ng加密流量分析
1.工具介绍
Ligolo-ng是一款由go编写的高效隧道工具,该工具基于TUN接口实现其功能,利用反向TCP/TLS连接建立一条隐蔽的通信信道,支持使用Let’s Encrypt自动生成证书。Ligolo-ng的通信隐蔽性体现在其支持多种连接方式,适应复杂网…
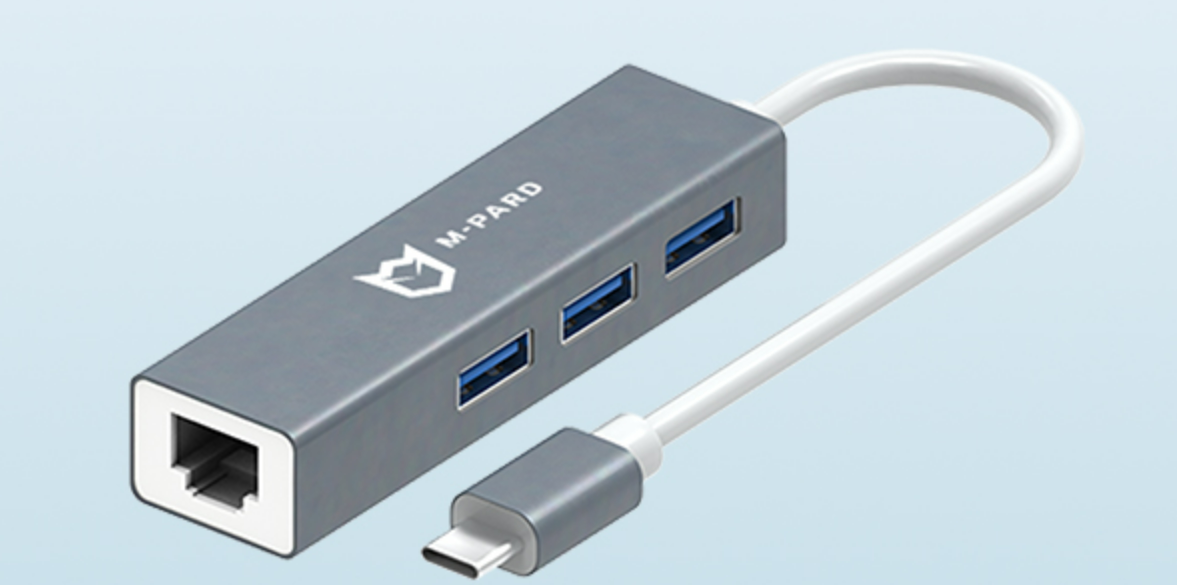
铭豹扩展坞 USB转网口 突然无法识别解决方法
当 USB 转网口扩展坞在一台笔记本上无法识别,但在其他电脑上正常工作时,问题通常出在笔记本自身或其与扩展坞的兼容性上。以下是系统化的定位思路和排查步骤,帮助你快速找到故障原因:
背景:
一个M-pard(铭豹)扩展坞的网卡突然无法识别了,扩展出来的三个USB接口正常。…
未来机器人的大脑:如何用神经网络模拟器实现更智能的决策?
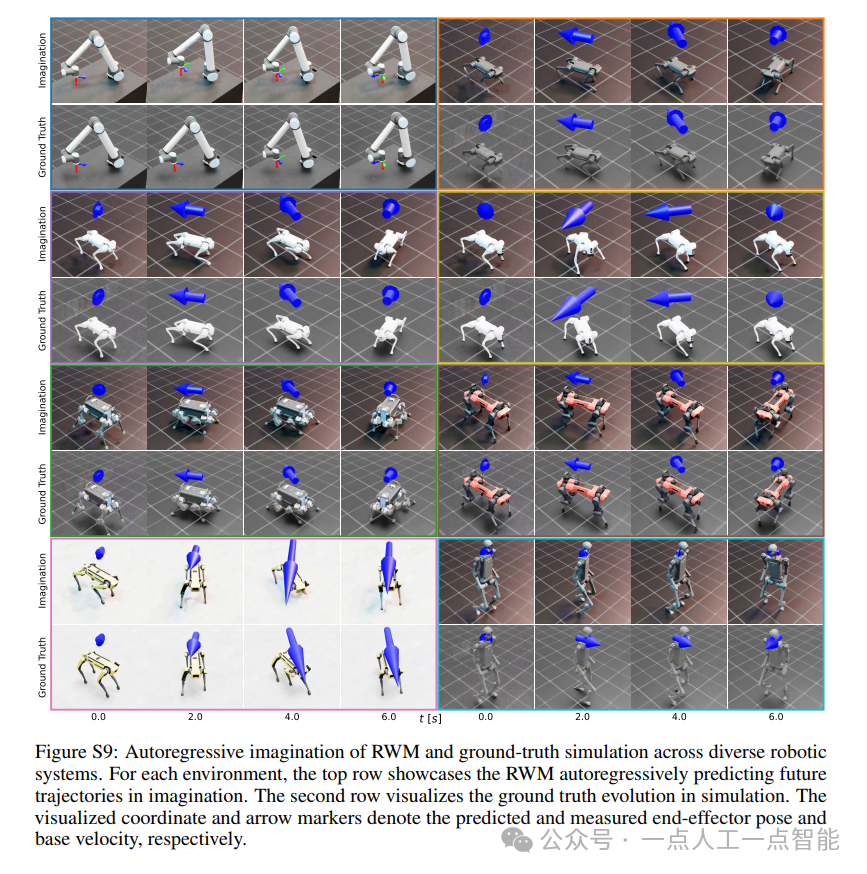
编辑:陈萍萍的公主一点人工一点智能 未来机器人的大脑:如何用神经网络模拟器实现更智能的决策?RWM通过双自回归机制有效解决了复合误差、部分可观测性和随机动力学等关键挑战,在不依赖领域特定归纳偏见的条件下实现了卓越的预测准…

Linux应用开发之网络套接字编程(实例篇)
服务端与客户端单连接
服务端代码
#include <sys/socket.h>
#include <sys/types.h>
#include <netinet/in.h>
#include <stdio.h>
#include <stdlib.h>
#include <string.h>
#include <arpa/inet.h>
#include <pthread.h>
…

华为云AI开发平台ModelArts
华为云ModelArts:重塑AI开发流程的“智能引擎”与“创新加速器”!
在人工智能浪潮席卷全球的2025年,企业拥抱AI的意愿空前高涨,但技术门槛高、流程复杂、资源投入巨大的现实,却让许多创新构想止步于实验室。数据科学家…

深度学习在微纳光子学中的应用
深度学习在微纳光子学中的主要应用方向
深度学习与微纳光子学的结合主要集中在以下几个方向:
逆向设计 通过神经网络快速预测微纳结构的光学响应,替代传统耗时的数值模拟方法。例如设计超表面、光子晶体等结构。
特征提取与优化 从复杂的光学数据中自…