一,概述
1. 目的
将调试信息打印串口由uart0改为uart3。
2. 版本信息
Uboot版本:2014.07;
Kernel版本:Linux-3.10;
二,Uboot
1. sys_config.fex改动
使能uart3(TX:PH00 RX:PH01),并让boot0,uboot的debug串口由uart0改为uart3(TX:PH00 RX:PH01)
diff --git a/pack/chips/sun8iw11p1/configs/a40i-p3/sys_config.fex b/pack/chips/sun8iw11p1/configs/a40i-p3/sys_config.fex index 159d3fa..afe98fe 100755
--- a/pack/chips/sun8iw11p1/configs/a40i-p3/sys_config.fex
+++ b/pack/chips/sun8iw11p1/configs/a40i-p3/sys_config.fex
 @@ -111,9 +111,9 @@ twi_scl         = port:PB0<2><default><default><default>
 twi_sda         = port:PB1<2><default><default><default>

 [uart_para]
 -uart_debug_port = 0
 -uart_debug_tx         = port:PB22<2><1><default><default>
 -uart_debug_rx         = port:PB23<2><1><default><default>
 +uart_debug_port = 3
 +uart_debug_tx         = port:PH00<4><1><default><default>
 +uart_debug_rx         = port:PH01<4><1><default><default>

 [jtag_para]
 jtag_enable     = 1
 @@ -387,7 +387,7 @@ uart2_rx         = port:PI19<7><1><default><default>


 [uart3]
 -uart3_used       = 0
 +uart3_used       = 1
 uart3_port       = 3
 uart3_type       = 2
 uart3_tx         = port:PH00<4><1><default><default>
2. 宏定义改动
在brandy/u-boot-2014.07/include/configs/sunXXX.h路径中,修改如下:
diff --git a/u-boot-2014.07/include/configs/sun8iw11p1.h b/u-boot
2014.07/include/configs/sun8iw11p1.h
index b733162..22390a9 100755
--- a/u-boot-2014.07/include/configs/sun8iw11p1.h
+++ b/u-boot-2014.07/include/configs/sun8iw11p1.h
@@ -282,7 +282,7 @@
#define CONFIG_SYS_NS16550_COM4                SUNXI_UART3_BASE
#define CONFIG_NS16550_FIFO_ENABLE     (1)
-#define CONFIG_CONS_INDEX                      1                       /*
which serial channel for console */
+#define CONFIG_CONS_INDEX                      4                       /*
which serial channel for console */
#define CONFIG_SETUP_MEMORY_TAGS
CONFIG_CONS_INDEX=4,对应serial3 ;如下表:
| 串口通道 | CONFIG_CONS_INDEX |
|---|---|
| serial0 | 1 |
| serial1 | 2 |
| serial2 | 3 |
| serial3 | 4 |
| serial4 | 5 |
| serial5 | 6 |
指定波特率:
#define CONFIG_BAUDRATE 115200
3. 初始化改动
boot0已经限制了仅使用uart0,将这一修改去掉,将会按照sys_config.fex中的uart_debug_port配置的uart端口输出信息。
 diff --git a/u-boot-2014.07/arch/arm/cpu/armv7/sun8iw11p1/spl/serial_spl.c
b/u-boot-2014.07/arch/arm/cpu/armv7/sun8iw11p1/spl/serial_spl.c
 index 3f6c141..70955df 100644--- a/u-boot-2014.07/arch/arm/cpu/armv7/sun8iw11p1/spl/serial_spl.c
 +++ b/u-boot-2014.07/arch/arm/cpu/armv7/sun8iw11p1/spl/serial_spl.c
 @@ -44,10 +44,10 @@ void sunxi_serial_init(int uart_port, void *gpio_cfg,
int gpio_max)
        u32 reg, i;
        u32 uart_clk;
-       if( (uart_port < 0) ||(uart_port > 0) )
-       {
-               return;-       }
 +       // if( (uart_port < 0) ||(uart_port > 0) )
 +       // {
 +       //      return;
 +       // }
        //reset
        reg = readl(CCMU_BUS_SOFT_RST_REG4);
        reg &= ~(1<<(CCM_UART_PORT_OFFSET + uart_port));
4. 打包改动
由于平台适配性问题,在更改了uart_para参数后,会出现采用PhoenixSuit无法烧录固件的情况。由于在pack阶段,会解析sys_confg.fex的uart_para配置项,然后更新boot0,fes1,uboot的头部信息,路径(tools/pack/pack)
update_fes1 fes1.fex sys_config.bin > /dev/null
出现无法烧录的原因是pack更新了fes1的头部信息,导致校验不通过,所以需要屏蔽fes1的更新,修改如下:
diff --git a/pack_tools/update_fes1/update_fes1.c
b/pack_tools/update_fes1/update_fes1.c
index 6134c96..536dfb1 100755
 --- a/pack_tools/update_fes1/update_fes1.c
 +++ b/pack_tools/update_fes1/update_fes1.c
 @@ -230,6 +230,21 @@ int update_for_fes1(char *fes1_name, int storage_type)
                }
        }
 +       fes1_head->prvt_head.uart_port = 0;
 +       fes1_head->prvt_head.uart_ctrl[0].port      = 2;
 +       fes1_head->prvt_head.uart_ctrl[0].port_num  = 22;
 +       fes1_head->prvt_head.uart_ctrl[0].mul_sel   = 2;
 +       fes1_head->prvt_head.uart_ctrl[0].pull      = 1;
 +       fes1_head->prvt_head.uart_ctrl[0].drv_level = -1;
 +       fes1_head->prvt_head.uart_ctrl[0].data      = -1;
 +
 +       fes1_head->prvt_head.uart_ctrl[1].port      = 2;
 +       fes1_head->prvt_head.uart_ctrl[1].port_num  = 23;
 +       fes1_head->prvt_head.uart_ctrl[1].mul_sel   = 2;
 +       fes1_head->prvt_head.uart_ctrl[1].pull      = 1;
 +       fes1_head->prvt_head.uart_ctrl[1].drv_level = -1;
 +       fes1_head->prvt_head.uart_ctrl[1].data      = -1;
 +
        //取出数据进行修正,debugenable参数
        if(!script_parser_fetch("jtag_para", "jtag_enable", value))
        {
更新update_fes1工具:进入brandy/pack_tools/update_fes1/ 目录,执行make命令,用生成的 update_fes1覆盖tools/pack/pctools/linux/mod_update/update_fes1 ,再进行 pack 操作即可。
但这样会造成fes1的输出依然还是uart0,所以我们需要更改fes1的代码,如下:
diff --git a/lichee/brandy/u-boot-2014.07/sunxi_spl/fes_init/main/fes1_main.c b/lichee/brandy/u-boot-2014.07/sunxi_spl/fes_init/main/fes1_main.c
index 31a01017c5..1b794e2010 100755
--- a/lichee/brandy/u-boot-2014.07/sunxi_spl/fes_init/main/fes1_main.c
+++ b/lichee/brandy/u-boot-2014.07/sunxi_spl/fes_init/main/fes1_main.c
@@ -101,9 +101,35 @@ int main(void)
 {
        __s32 dram_size=0;

-       timer_init();
+       timer_init();
+if(CONFIG_CONS_INDEX == 4)
+{
+               boot0_file_head_t fes1_head_fix;
+               fes1_head_fix.prvt_head.uart_port = 3;
+               fes1_head_fix.prvt_head.uart_ctrl[0].port = 8;
+               fes1_head_fix.prvt_head.uart_ctrl[0].port_num  = 0;
+               fes1_head_fix.prvt_head.uart_ctrl[0].mul_sel  = 4;
+               fes1_head_fix.prvt_head.uart_ctrl[0].pull   = 1;
+               fes1_head_fix.prvt_head.uart_ctrl[0].drv_level = -1;
+               fes1_head_fix.prvt_head.uart_ctrl[0].data = -1;
+
+
+               fes1_head_fix.prvt_head.uart_ctrl[1].port  = 8;
+               fes1_head_fix.prvt_head.uart_ctrl[1].port_num  = 0;
+               fes1_head_fix.prvt_head.uart_ctrl[1].mul_sel  = 4;
+               fes1_head_fix.prvt_head.uart_ctrl[1].pull   = 1;
+               fes1_head_fix.prvt_head.uart_ctrl[1].drv_level = -1;
+               fes1_head_fix.prvt_head.uart_ctrl[1].data = -1;
+
+               //serial init
+               sunxi_serial_init(fes1_head_fix.prvt_head.uart_port, (void *)fes1_head_fix.prvt_head.uart_ctrl, 2);
+ }
+ else
+ {
        //serial init
-       sunxi_serial_init(fes1_head.prvt_head.uart_port, (void *)fes1_head.prvt_head.uart_ctrl, 2);
+       sunxi_serial_init(fes1_head_fix.prvt_head.uart_port, (void *)fes1_head_fix.prvt_head.uart_ctrl, 2);
+ }
+
 #ifdef CONFIG_SUNXI_MULITCORE_BOOT
        pmu_init();
        set_pll_voltage(1260);
其中,CONFIG_CONS_INDEX即为brandy/u-boot-2014.07/include/configs/sunXXX.h路径中的宏。
5. 启动参数改动
更改uboot传递给kernel的启动参数,路径pack/chips/sun8iw11p1/configs/default/env.cfg可能
因为配置有所不同
diff --git a/pack/chips/sun8iw11p1/configs/default/env.cfg
b/pack/chips/sun8iw11p1/configs/default/env.cfgindex eb60f41..922057e 100755
--- a/pack/chips/sun8iw11p1/configs/default/env.cfg
+++ b/pack/chips/sun8iw11p1/configs/default/env.cfg
 @@ -1,9 +1,9 @@

 #kernel command arguments
 enforcing=1
 -earlyprintk=sunxi-uart,0x01c28000
 +earlyprintk=sunxi-uart,0x01c28c00
 initcall_debug=0
 -console=ttyS0,115200
 +console=ttyS3,115200
 nand_root=/dev/system
 mmc_root=/dev/mmcblk0p7
 nor_root=/dev/mtdblock2
重新编译boot0,uboot。
三. Kernel
1. config改动
修改 kernel 的 menuconfig 中 uart 的打印端口和基地址:
diff --git a/arch/arm/Kconfig.debug b/arch/arm/Kconfig.debug
 index 4d17934..3aea83e 100644
--- a/arch/arm/Kconfig.debug
+++ b/arch/arm/Kconfig.debug
@@ -443,6 +443,13 @@ choice
                  Say Y here if you want kernel low-level debugging support
                  on Allwinner A1X based platforms on the UART1.

 +       config DEBUG_SUNXI_UART3
 +               bool "Kernel low-level debugging messages via sunXi UART3"
 +               depends on ARCH_SUNXI
 +               help
 +                 Say Y here if you want kernel low-level debugging support
 +                 on Allwinner A1X based platforms on the UART3.
 +
        config DEBUG_TEGRA_UART
                depends on ARCH_TEGRA
                bool "Use Tegra UART for low-level debug"
 @@ -662,7 +669,7 @@ config DEBUG_LL_INCLUDE
                                 DEBUG_MMP_UART3
        default "debug/sirf.S" if DEBUG_SIRFPRIMA2_UART1 ||
DEBUG_SIRFMARCO_UART1
        default "debug/socfpga.S" if DEBUG_SOCFPGA_UART
 -       default "debug/sunxi.S" if DEBUG_SUNXI_UART0 || DEBUG_SUNXI_UART1
 +       default "debug/sunxi.S" if DEBUG_SUNXI_UART0 || DEBUG_SUNXI_UART1 || DEBUG_SUNXI_UART3
        default "debug/tegra.S" if DEBUG_TEGRA_UART
        default "debug/ux500.S" if DEBUG_UX500_UART
        default "debug/vexpress.S" if DEBUG_VEXPRESS_UART0_DETECT || \
diff --git a/arch/arm/include/debug/sunxi.S b/arch/arm/include/debug/sunxi.S
 index 04eb56d..5f66699 100644
 --- a/arch/arm/include/debug/sunxi.S
 +++ b/arch/arm/include/debug/sunxi.S
 @@ -16,6 +16,9 @@
 #elif defined(CONFIG_DEBUG_SUNXI_UART1)
 #define SUNXI_UART_DEBUG_PHYS_BASE 0x01c28400
 #define SUNXI_UART_DEBUG_VIRT_BASE 0xf1c28400
 +#elif defined(CONFIG_DEBUG_SUNXI_UART3)
 +#define SUNXI_UART_DEBUG_PHYS_BASE 0x01c28c00
 +#define SUNXI_UART_DEBUG_VIRT_BASE 0xf1c28c00
 #endif

 .macro  addruart, rp, rv, tmp
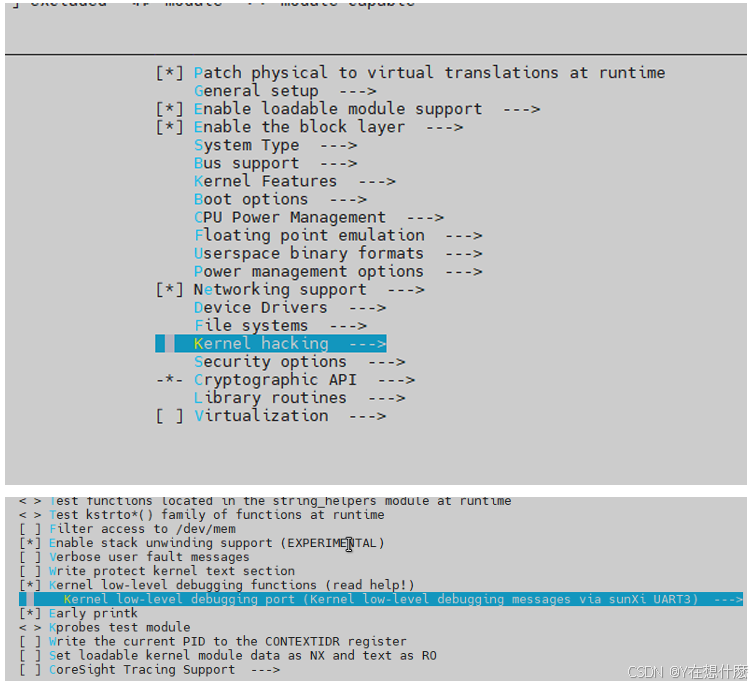
增加DEBUG_SUNXI_UART3后,在menuconfig中选择:
make ARCH=arm menuconfig
2. 设备树改动
dts可改可不改,为了统一,这里的设备树也一起更改,实际上这里的配置会被uboot传递的启动参数覆盖
 diff --git a/arch/arm/boot/dts/sun8iw11p1.dtsi
b/arch/arm/boot/dts/sun8iw11p1.dtsi
 index 526fe29..4e00a86 100755
 --- a/arch/arm/boot/dts/sun8iw11p1.dtsi
 +++ b/arch/arm/boot/dts/sun8iw11p1.dtsi
 @@ -61,7 +61,7 @@
 };
 chosen {
 -               bootargs = "earlyprintk=sunxi-uart,0x01c28000 loglevel=8
initcall_debug=1 console=ttyS0 init=/init";
 +               bootargs = "earlyprintk=sunxi-uart,0x01c28c00 loglevel=8
initcall_debug=1 console=ttyS3 init=/init";
 linux,initrd-start = <0x0 0x0>;
 linux,initrd-end = <0x0 0x0>;
 };
四,文件系统
1. defconfig改动
修改buildroot-201611/configs/sun8iw11p1_defconfig 下的配置:
 diff --git a/configs/sun8iw11p1_defconfig b/configs/sun8iw11p1_defconfig
 index e4b6313..89c9e01 100755
 --- a/configs/sun8iw11p1_defconfig
 +++ b/configs/sun8iw11p1_defconfig
 @@ -273,7 +273,7 @@ BR2_SYSTEM_BIN_SH_BASH=y
 # BR2_SYSTEM_BIN_SH_NONE is not set
 BR2_SYSTEM_BIN_SH="bash"
 BR2_TARGET_GENERIC_GETTY=y-BR2_TARGET_GENERIC_GETTY_PORT="ttyS0"
 +BR2_TARGET_GENERIC_GETTY_PORT="ttyS3"
 # BR2_TARGET_GENERIC_GETTY_BAUDRATE_KEEP is not set
 # BR2_TARGET_GENERIC_GETTY_BAUDRATE_9600 is not set
 # BR2_TARGET_GENERIC_GETTY_BAUDRATE_19200 is not set
注:
执行build.sh编译builroot的过程:
tools/build/mkcommon.sh 会执行buildroot-201611/scripts/mkcommon.sh ,然后在buildroot-201611/scripts/build.sh 的build_buildroot函数中,
会判断是否存在out/sun8iw11p1/linux/common/buildroot/.config ,
如果存在,则使用该配置,否则使用buildroot-201611/configs/sun8iw11p1_defconfig ,所以需要
清空out目录,或者直接删除out/sun8iw11p1/linux/common/buildroot/.config
如果不确定是否配置成功,可以在buildroot-201611/package/skeleton/skeleton.mk 增加打印:
diff --git a/package/skeleton/skeleton.mk b/package/skeleton/skeleton.mk
 index a4788e1..702596b 100644
 --- a/package/skeleton/skeleton.mk
 +++ b/package/skeleton/skeleton.mk
 @@ -223,6 +223,7 @@ endef
 else ifeq ($(BR2_INIT_BUSYBOX),y)
 # Add getty to busybox inittab
 define SKELETON_SET_GETTY
 +       echo "SKELETON_TARGET_GENERIC_GETTY_PORT$(SKELETON_TARGET_GENERIC_GETTY_PORT)"
 $(SED) '/#
GENERIC_SERIAL$$/s~^.*#~$(SKELETON_TARGET_GENERIC_GETTY_PORT)::respawn:/sbin
 /getty -L $(SKELETON_TARGET_GENERIC_GETTY_OPTIONS)
$(SKELETON_TARGET_GENERIC_GETTY_PORT) $(SKELETON_TARGET_GENE
 $(TARGET_DIR)/etc/inittab
 endef
五,整体重新编译打包
./build.sh && ./build.sh pack