1:简单列表(ArrayAdapter)
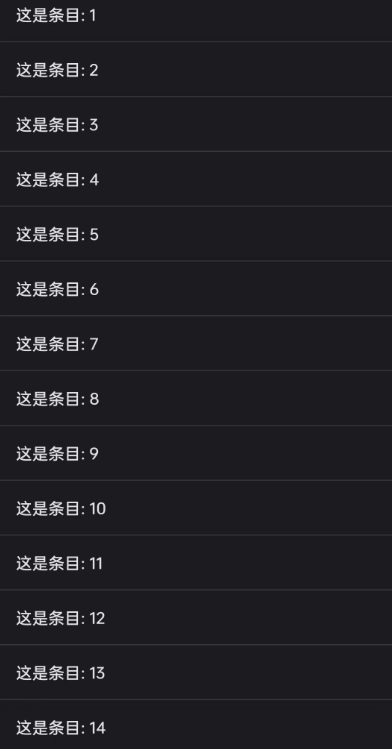
1:运行的结果:
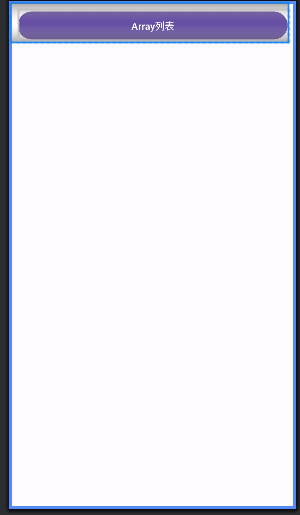
2:首先在MyListView里面创建一个按钮,点击的时候进行跳转。
这里让我吃惊的是,Button里面可以直接设置onClick = .java里面的方法。
也即是点击这个按钮之后就会去调用这个方法。
<?xml version="1.0" encoding="utf-8"?>
<ScrollView xmlns:android="http://schemas.android.com/apk/res/android"
    xmlns:app="http://schemas.android.com/apk/res-auto"
    xmlns:tools="http://schemas.android.com/tools"
    android:id="@+id/main"
    android:layout_width="match_parent"
    android:layout_height="match_parent"
    tools:context=".MyListView">


    <LinearLayout
        android:layout_width="match_parent"
        android:layout_height="match_parent"
        android:layout_marginRight="10dp"
        android:orientation="vertical"
        android:paddingLeft="10dp">


        <Button
            android:layout_width="match_parent"
            android:layout_height="wrap_content"
            android:layout_marginTop="10dp"
            android:text="Array列表"
            android:onClick="toArrayListTest"
            android:textAllCaps="false"/>

    </LinearLayout>
</ScrollView>
3:在MyListView.java里面编写跳转代码
package com.findyou.mylistview;

import android.content.Intent;
import android.os.Bundle;
import android.view.View;

import androidx.activity.EdgeToEdge;
import androidx.appcompat.app.AppCompatActivity;
import androidx.core.graphics.Insets;
import androidx.core.view.ViewCompat;
import androidx.core.view.WindowInsetsCompat;

public class MyListView extends AppCompatActivity {

    @Override
    protected void onCreate(Bundle savedInstanceState) {
        super.onCreate(savedInstanceState);
        setContentView(R.layout.activity_my_list_view);

    }

    public void toArrayListTest(View view) {
        Intent intent = new Intent(this, ArrayListActivity.class);
        startActivity(intent);
    }
}
这里用的也是Intent, 第一个写的这packageContext, 第二个表示你要跳转的目的。然后就开启跳转startActivity(传入intent)。
4:在ArrayListActivity里面先准备好 ListView
<?xml version="1.0" encoding="utf-8"?>
<LinearLayout xmlns:android="http://schemas.android.com/apk/res/android"
    xmlns:app="http://schemas.android.com/apk/res-auto"
    xmlns:tools="http://schemas.android.com/tools"
    android:id="@+id/main"
    android:layout_width="match_parent"
    android:layout_height="match_parent"
    tools:context=".ArrayListActivity"
    android:orientation="vertical"
    >
    <ListView
        android:id="@+id/lv"
        android:layout_width="match_parent"
        android:layout_height="match_parent"/>


</LinearLayout>
5:在ArrayListActivity.java里面编写核心代码
首先去拿到.xml界面里面的ListView,然后创建一个列表进行填充数据。再需要一个适配器,适配器里面需要的参数有,你这个填充的需要什么样的格式?(用的是官方的),以及填充的数据是什么?然后把获得是ListView进行setAdapter,启动。
对ListView里面的Item进行点击和长按监听。里面重写的参数是包括position的。
package com.findyou.mylistview;

import android.os.Bundle;
import android.view.View;
import android.widget.AdapterView;
import android.widget.ArrayAdapter;
import android.widget.ListView;
import android.widget.Toast;

import androidx.appcompat.app.AppCompatActivity;

import java.util.ArrayList;
import java.util.List;

public class ArrayListActivity extends AppCompatActivity {

    private ListView listView;

    // 下面这个去提供数据
    private List<String> mStringList;

    private ArrayAdapter<String> mArrayAdapter; // 需要一个适配器

    @Override
    protected void onCreate(Bundle savedInstanceState) {
        super.onCreate(savedInstanceState);
        setContentView(R.layout.activity_array_list);
        listView = findViewById(R.id.lv);

        // 数据的初始化
        mStringList = new ArrayList<>();
        for(int i = 1; i <= 50;  ++ i ) {
            mStringList.add("这是条目: " + i);
        }
        // 第二个参数表示的是 这个的布局是什么?
        mArrayAdapter = new ArrayAdapter<>(this, android.R.layout.simple_list_item_1, mStringList);
        listView.setAdapter(mArrayAdapter); // 填充数据

        // 设置点击的监听
        listView.setOnItemClickListener(new AdapterView.OnItemClickListener() {
            @Override
            public void onItemClick(AdapterView<?> parent, View view, int position, long id) {
                Toast.makeText(ArrayListActivity.this, "你点击了" + position, Toast.LENGTH_SHORT).show();
            }
        });

        // 设置长按的监听
        listView.setOnItemLongClickListener(new AdapterView.OnItemLongClickListener() {
            @Override
            public boolean onItemLongClick(AdapterView<?> parent, View view, int position, long id) {
                Toast.makeText(ArrayListActivity.this, "你长按了" + position, Toast.LENGTH_SHORT).show();
                return true;
            }
        });
    }
}
2:simpleList列表(图文)
1:运行的结果:

2:首先也是写一个activity_simple_list.xml, 写一个大的ListView先撑大
<?xml version="1.0" encoding="utf-8"?>
<LinearLayout xmlns:android="http://schemas.android.com/apk/res/android"
    xmlns:app="http://schemas.android.com/apk/res-auto"
    xmlns:tools="http://schemas.android.com/tools"
    android:id="@+id/main"
    android:layout_width="match_parent"
    android:layout_height="match_parent"
    tools:context=".SimpleListActivity"
    android:orientation="vertical"
    >


    <ListView
        android:id="@+id/lv"
        android:layout_width="match_parent"
        android:layout_height="match_parent"/>


</LinearLayout>
3:在MyListView.java里面补充跳转代码
    public void toSimplArrayListTest(View view) {
        Intent intent = new Intent(this, SimpleListActivity.class);
        startActivity(intent);
    }
4:在SimpleListActivity.java里面配置适配器(adapter)等
package com.findyou.mylistview;

import android.os.Bundle;
import android.widget.ListView;
import android.widget.SimpleAdapter;
;
import androidx.appcompat.app.AppCompatActivity;

import java.util.ArrayList;
import java.util.HashMap;
import java.util.List;
import java.util.Map;

public class SimpleListActivity extends AppCompatActivity {

    private ListView listView;
    private SimpleAdapter simpleAdapter;
    private List<Map<String, Object> >list; // 存放数据的

    private int[] imags =  {
            R.drawable.test1,
            R.drawable.test2,
            R.drawable.test3,
            R.drawable.test4,
            R.drawable.test5,
            R.drawable.test6,
            R.drawable.test7,
            R.drawable.test8,
            R.drawable.test9,
    };


    @Override
    protected void onCreate(Bundle savedInstanceState) {
        super.onCreate(savedInstanceState);
        setContentView(R.layout.activity_simple_list);
        listView = findViewById(R.id.lv);
        list = new ArrayList<>();
        for(int i = 1; i <= 50; i ++ ) {
            Map<String, Object> mp = new HashMap<>();
            mp.put("img", imags[i % 9]);
            mp.put("title", "标题" + i);
            mp.put("content", "内容" + i);
            list.add(mp); // 存放全部的数据
        }
        simpleAdapter = new SimpleAdapter(this, list,
                R.layout.list_item_layout,
                new String[] {"img", "title", "content"},
                new int[] {
                        R.id.iv_img, R.id.tv_title, R.id.tv_content
                    });


        // 上面的倒数两个参数 表示是 从哪到哪 from to, to 表示的是xml里面的id

        listView.setAdapter(simpleAdapter);

    }
}
这里适配器simpleAdapter,里面的参数
this: 表示的是当前
list: 存放数据的(data), 但是这个里面的要求是List<Map<String, *>> 的形式。
R.layout.list_item_layout: 这个是每一个item的布局是什么样的。
new String[] {"img", "title", "content"}: 表示你data里面的数据注意顺序(from)。
new int[] 表示的R.id,你要插入到的模板里面的哪一个id(to)。
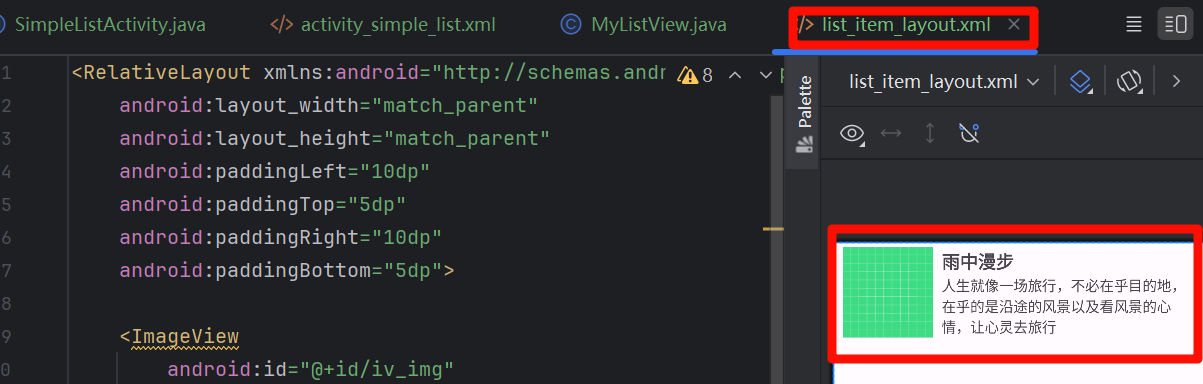
R.layout.list_item_layout里面的代码:
<RelativeLayout xmlns:android="http://schemas.android.com/apk/res/android"
    android:layout_width="match_parent"
    android:layout_height="match_parent"
    android:paddingLeft="10dp"
    android:paddingTop="5dp"
    android:paddingRight="10dp"
    android:paddingBottom="5dp">

    <ImageView
        android:id="@+id/iv_img"
        android:layout_width="100dp"
        android:layout_height="100dp"
        android:scaleType="centerCrop"
        android:src="@drawable/ic_launcher_background"/>


    <TextView
        android:id="@+id/tv_title"
        android:layout_width="match_parent"
        android:layout_height="wrap_content"
        android:layout_marginLeft="10dp"
        android:layout_toRightOf="@id/iv_img"
        android:ellipsize="end"
        android:maxLines="1"
        android:text="雨中漫步"
        android:textSize="20sp"
        android:textStyle="bold"/>

    <TextView
        android:id="@+id/tv_content"
        android:layout_width="match_parent"
        android:layout_height="wrap_content"
        android:layout_below="@id/tv_title"
        android:layout_marginLeft="10dp"
        android:layout_toRightOf="@id/iv_img"
        android:ellipsize="end"
        android:maxLines="3"
        android:text="人生就像一场旅行,不必在乎目的地,在乎的是沿途的风景以及看风景的心情,让心灵去旅行"
        android:textSize="16sp"/>


</RelativeLayout>