首先贴出实现代码:
OcclusionFader.ts
import { AbstractEngine, Material, type Behavior, type Mesh, type PBRMetallicRoughnessMaterial, type Scene } from "@babylonjs/core";
import { OcclusionTester } from "../../OcclusionTester";

export class OcclusionFader  implements Behavior<Mesh>{

	name: string = "OcclusionFader";

	private _mesh:Mesh | null = null;
	private _scene:Scene | null = null;
	private _engine:AbstractEngine | null = null;
	private _meshes:Mesh[] = [];
	private _mat:PBRMetallicRoughnessMaterial | null = null;
	private _visibility:number = 0.1;
	private _occlusionTester : OcclusionTester | null = null;

	constructor(visibility:number = 0.1){
		this._visibility = visibility;
	}

	init(): void {}

	private _attached = false;
	attach(target: Mesh): void {
		if(this._attached)return;
		this._attached = true;
		this._mesh = target;
		this._scene = target.getScene();
		this._engine = this._scene.getEngine();
		this._mat = this._mesh.material?.clone(this._mesh.material.name + "_clone") as PBRMetallicRoughnessMaterial;
		this._mesh.material = this._mat;

		this._occlusionTester = new OcclusionTester(this._scene as Scene);
		this._occlusionTester.setDivisor(8);
		this._occlusionTester.updateMesh(this._meshes, this._mesh);
		this._occlusionTester.onFinishCheckOcclusion.add(this._setIsOccluded.bind(this));
		this._occlusionTester.startCheckOcclusion();
		this._scene.onBeforeRenderObservable.add(this._updateVisibility.bind(this));
	}

	detach(): void {
		this._attached = false;
		this._mesh = null;
	}


	public addMesh(mesh:Mesh):void{
		this._meshes.push(mesh);
		if(this._occlusionTester)this._occlusionTester.updateMesh(this._meshes, this._mesh as Mesh);
	}

	private _isOccluded:boolean = false;
	private _setIsOccluded(isOccluded:boolean):void{
		this._isOccluded = isOccluded;
	}

	private _vUse:number = 1;
	private _updateVisibility():void{
		if(!this._mat){
			console.log("mat is null!");
			return;
		}

		if(!this._occlusionTester){
			console.log("occlusionTester is null!");
			return;
		}

		this._mat.transparencyMode = Material.MATERIAL_ALPHABLEND;

		if(this._isOccluded){
			if(this._vUse > this._visibility){
				this._vUse -= this._engine!.getDeltaTime() * 0.005;
			}
			else{
				this._vUse = this._visibility;
			}
		}
		else{
			if(this._vUse < 1){
				this._vUse += this._engine!.getDeltaTime() * 0.005;
			}
			else{
				this._mat.transparencyMode = Material.MATERIAL_ALPHATEST;
				this._vUse = 1;
			}
		}
		this._mesh!.material!.alpha = this._vUse;

	}

	public dispose(): void {
		this._attached = false;
		this._mesh = null;
		this._occlusionTester?.dispose();
	}
}
OcclusionTester.ts
import { AbstractEngine, Color4, Engine, Mesh, Observable, RenderTargetTexture, Scene, ShaderMaterial, UniversalCamera } from "@babylonjs/core";

export class OcclusionTester {

	private _engine: AbstractEngine;
	private _mainScene: Scene;
	private _tempScene: Scene; // 临时场景(离屏渲染)
	private _tempCam: UniversalCamera;
	private _w: number = 8;
	private _h: number = 8;
	private _mat = this._createDepthMaterial();

	private _depthTexA:RenderTargetTexture | null = null;
	private _depthTexB:RenderTargetTexture | null = null;

	private _divisor:number = 1;

	private options = {
		generateDepthBuffer: true,      // 启用深度缓冲
		generateStencilBuffer: false,   // 禁用模板缓冲
		type: Engine.TEXTURETYPE_FLOAT  // 浮点纹理
	}

	constructor(mainScene: Scene) {
		this._mainScene = mainScene;
		this._engine = mainScene.getEngine();

		// 创建临时场景和相机
		this._tempScene = new Scene(this._engine);
		this._tempCam = mainScene.activeCamera!.clone("tempCamera") as UniversalCamera;
		this._mainScene.removeCamera(this._tempCam);
		this._tempScene.addCamera(this._tempCam);
		this._tempScene.activeCamera = this._tempCam;
		this._tempScene.clearColor  = new Color4(0, 0, 0, 0);

		const size = this.resize();
		this._depthTexA = this.createDepthTex("depthTexA", size);
		this._depthTexB = this.createDepthTex("depthTexB", size);

		this._engine.onResizeObservable.add(()=>{
				const size = this.resize();
				if(this._depthTexA)this._depthTexA.resize(size);
				if(this._depthTexB)this._depthTexB.resize(size);
			}
		);
	}

	public setDivisor(divisor:number):void{
		this._divisor = divisor < 1 ? 1 : divisor;
	}

	public getDivisor():number{
		return this._divisor;
	}

	private createDepthTex(name:string, size:{width: number, height: number}):RenderTargetTexture{
		const depthTex = new RenderTargetTexture(name, size, this._tempScene, this.options);
		depthTex.activeCamera = this._tempCam;
		this._tempScene.customRenderTargets.push(depthTex);
		return depthTex;
	}

	private resize = ():{width: number, height: number} => {
		this._w = Math.floor(this._engine.getRenderWidth() / this._divisor);
		this._h = Math.floor(this._engine.getRenderHeight() / this._divisor);
		return {width: this._w, height: this._h};
	};

	private _meshesCloned:Mesh[] = [];
	private _meshOccCloned:Mesh[] = [];

	public updateMesh(meshes: Mesh[], meshOcc: Mesh): void {
		if(!this._depthTexA)return;
		this._meshesCloned.forEach((mesh)=>{mesh.dispose();});
		this._meshesCloned.length = 0;
		meshes.forEach((mesh)=>{
			const meshClone = this._cloneMeshToTempScene(mesh);
			this._meshesCloned.push(meshClone);
		});
		this._depthTexA.renderList = this._meshesCloned;

		if(!this._depthTexB)return;
		this._meshOccCloned.forEach((mesh)=>{mesh.dispose();});
		this._meshOccCloned.length = 0;
		const meshOccClone = this._cloneMeshToTempScene(meshOcc);
		this._meshOccCloned.push(meshOccClone);
		this._depthTexB.renderList = this._meshOccCloned;
	}

	private _cloneMeshToTempScene(mesh:Mesh):Mesh{
		const meshClone = mesh.clone(mesh.name + "_Cloned");
		this._mainScene.removeMesh(meshClone);
		const occ = meshClone.getBehaviorByName("OcclusionFader");
		if(occ) meshClone.removeBehavior(occ);
		meshClone.material = this._mat;
		this._tempScene.addMesh(meshClone);
		return meshClone;
	};

	private checkEnabled:boolean = true;
	public startCheckOcclusion():void{
		this.checkEnabled = true;
		this.checkOcclusion();
	}

	public stopCheckOcclusion():void{
		this.checkEnabled = false;
	}

	private isOccluded:boolean = false;
	public getIsOccluded():boolean{
		return this.isOccluded;
	}

	public onFinishCheckOcclusion:Observable<boolean> = new Observable<boolean>();
	private async checkOcclusion(): Promise<void> {

		if(!this.checkEnabled)return;

		this.syncCam();

		// 在临时场景中执行离屏渲染
		await new Promise<void>(resolve => {
			this._tempScene.executeWhenReady(() => {
				this._tempScene.render();
				resolve();
			});
		});

		// 读取深度数据
		const depthBufA = await this._depthTexA!.readPixels(
			0,      // faceIndex (立方体贴图用,默认0)
			0,      // level (mipmap级别,默认0)
			null,   // buffer (不预分配缓冲区)
			true,   // flushRenderer (强制刷新渲染器)
			false,  // noDataConversion (允许数据转换)
			0,      // x (起始X坐标)
			0,      // y (起始Y坐标)
			this._w,// width (读取宽度)
			this._h // height (读取高度)
		) as Float32Array; // 关键:声明为Float32Array

		const depthBufB = await this._depthTexB!.readPixels(
			0,      // faceIndex (立方体贴图用,默认0)
			0,      // level (mipmap级别,默认0)
			null,   // buffer (不预分配缓冲区)
			true,   // flushRenderer (强制刷新渲染器)
			false,  // noDataConversion (允许数据转换)
			0,      // x (起始X坐标)
			0,      // y (起始Y坐标)
			this._w,// width (读取宽度)
			this._h // height (读取高度)
		) as Float32Array; // 关键:声明为Float32Array

		// 检查遮挡
		let isOccluded = false;
		for (let i = 0; i < depthBufA.length; i += 4) {
			if (depthBufA[i] > 0 && depthBufB[i] > 0){
				if(depthBufB[i] < depthBufA[i]) {
					isOccluded = true;
					break;
				}
			}
		}

		this.isOccluded = isOccluded;
		this.onFinishCheckOcclusion.notifyObservers(isOccluded);

		// 使用setTimeout来延迟下一次检查,而不是直接递归
    	setTimeout(() => this.checkOcclusion(), 0);
	}

	private syncCam() {
		const mainCam = this._mainScene.activeCamera as UniversalCamera;
		this._tempCam.position.copyFrom(mainCam.position);
		this._tempCam.rotation.copyFrom(mainCam.rotation);
	}

	// 创建深度写入材质
	private _createDepthMaterial(): ShaderMaterial {
		const vertexShader = `
			precision highp float;
			attribute vec3 position;
			uniform mat4 worldViewProjection;
			varying float vDepth;

			void main() {
				vec4 pos = worldViewProjection * vec4(position, 1.0);
				gl_Position = pos;
				vDepth = pos.z / pos.w; // 透视除法后的归一化深度
			}
			`;

		const fragmentShader = `
			precision highp float;
			varying float vDepth;

			void main() {
				gl_FragColor = vec4(vDepth, vDepth, vDepth, 1.0);
			}
			`;

		return new ShaderMaterial(
			"depthMaterial",
			this._tempScene,
			{
				vertexSource: vertexShader,
				fragmentSource: fragmentShader
			},
			{
				attributes: ["position"],
				uniforms: ["worldViewProjection"]
			}
		);
	}

	public dispose() {
		this._tempScene.dispose();
		this._tempScene.customRenderTargets.forEach(rt => rt.dispose());
		this._tempScene.customRenderTargets = [];
		this._tempScene.meshes.forEach(mesh => mesh.dispose());
	}
}
一、核心思路解析
本方案通过结合离屏渲染与深度检测技术,实现了一个动态的物体遮挡透明度控制系统。主要分为两大模块:
-
OcclusionTester:负责执行遮挡检测的核心逻辑
-
OcclusionFader:基于检测结果控制物体透明度的行为组件
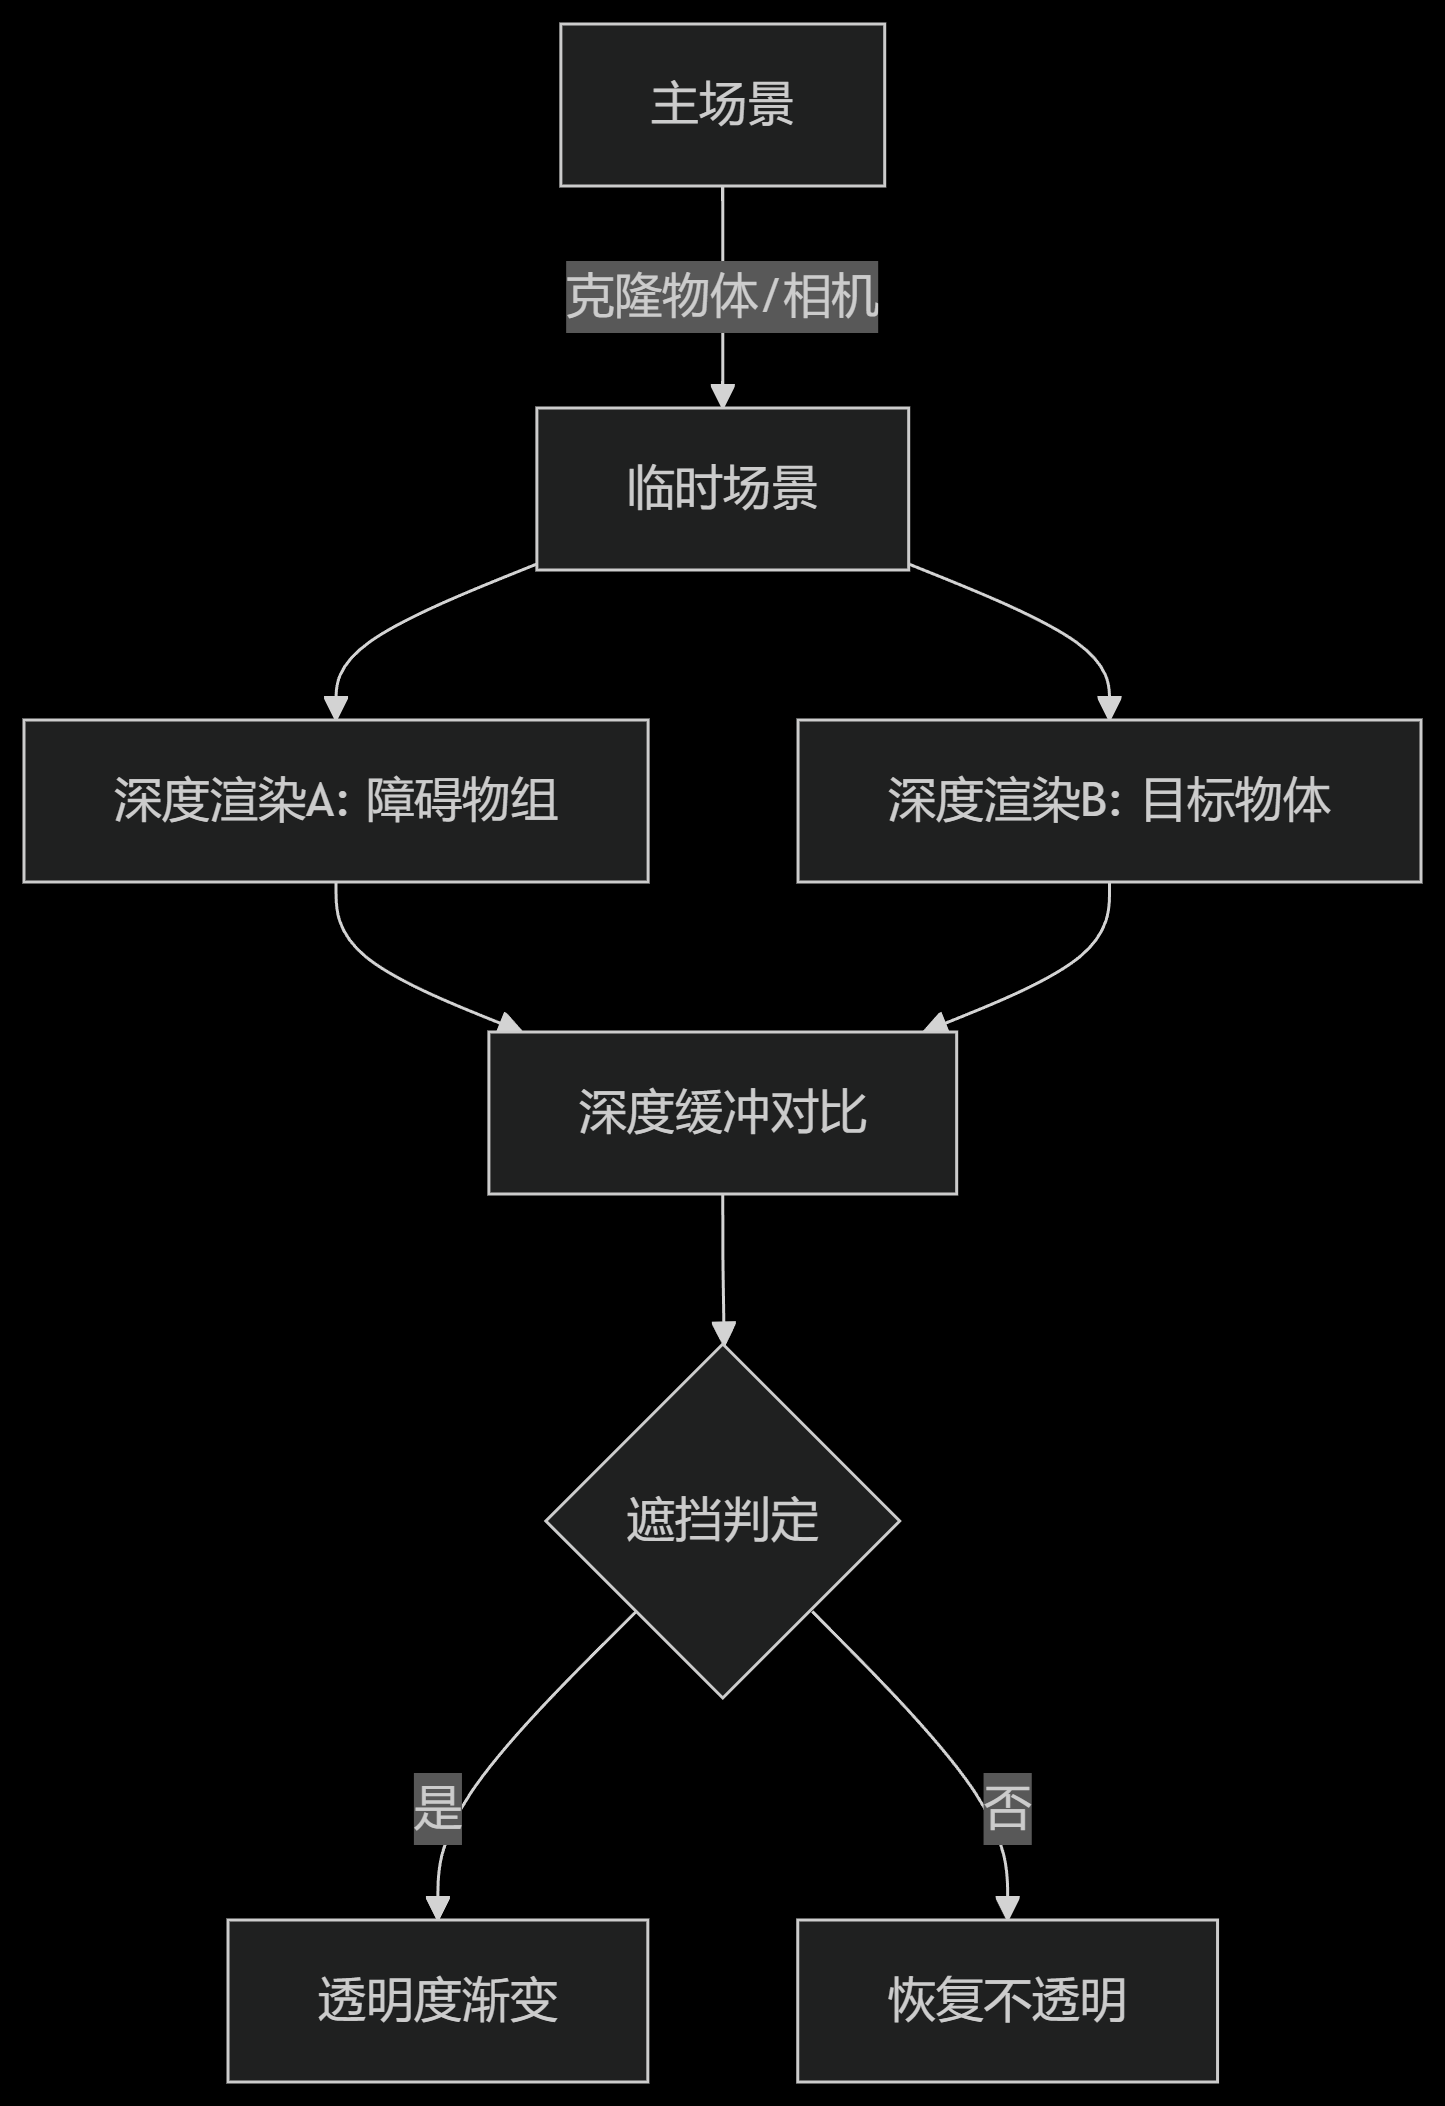
二、关键技术实现
1. 双场景渲染机制
-
主场景:承载实际可见的3D物体
-
临时场景:专门用于离屏深度渲染
-
优势:避免对主场景渲染管线造成干扰
this._tempScene = new Scene(this._engine);2. 深度信息采集
-
使用RenderTargetTexture生成两张深度图:
-
depthTexA:被检测物体组的深度
-
depthTexB:目标物体的深度
-
// 创建深度纹理
createDepthTex(name: string, size: {width: number, height: number}){
    return new RenderTargetTexture(name, size, this._tempScene, {
        generateDepthBuffer: true,
        type: Engine.TEXTURETYPE_FLOAT
    });
}
3. 深度比较算法
for (let i = 0; i < depthBufA.length; i += 4) {
    if (depthBufA[i] > 0 && depthBufB[i] > 0){
        if(depthBufB[i] < depthBufA[i]) {
            isOccluded = true;
            break;
        }
    }
}
4. 透明度渐变控制
// 平滑过渡效果
this._vUse += this._engine!.getDeltaTime() * 0.005;
this._mesh!.material!.alpha = this._vUse;
三、实现步骤详解
步骤1:场景初始化
-
克隆主场景相机到临时场景
-
设置纯黑色背景消除干扰
步骤2:物体克隆
-
克隆待检测物体到临时场景
-
替换为专用深度材质
private _cloneMeshToTempScene(mesh: Mesh){
    const clone = mesh.clone();
    clone.material = this._mat; // 使用深度材质
    return clone;
}
步骤3:异步深度检测
-
使用requestAnimationFrame避免阻塞主线程
-
通过readPixels读取深度缓冲
const depthBuf = await texture.readPixels() as Float32Array;步骤4:结果反馈
-
通过Observable通知透明度控制器
-
实现检测与渲染的解耦
四、性能优化策略
-
分辨率控制:通过divisor参数降低检测精度
setDivisor(8); // 使用1/8分辨率检测 -
异步检测机制:使用setTimeout保持事件循环畅通
-
对象复用:缓存克隆物体避免重复创建
-
按需渲染:仅在需要时启动检测循环
五、应用场景示例
-
AR应用中重要物体的防遮挡
-
3D编辑器中的选中物体高亮
-
游戏中的动态场景元素管理
-
可视化大屏的重点信息保护
六、潜在优化方向
-
WebGL2特性利用:改用深度纹理格式
layout(depth) out float gl_FragDepth; -
GPU加速计算:改用Compute Shader处理深度比较
-
空间分割优化:结合八叉树空间划分
-
LOD策略:动态调整检测精度
七、总结
本方案通过创新的双场景架构,在保证主场景渲染性能的同时,实现了精确的实时遮挡检测。深度信息的对比算法与透明度控制的结合,展现了WebGL在复杂交互场景中的应用潜力。开发者可根据具体需求调整检测精度和响应速度,在视觉效果与性能消耗之间找到最佳平衡点。