nginx 常见模块
第三方模块是对nginx 的功能扩展,第三方模块需要在编译安装nginx 的时候使用参数--
add-module=PATH指定路径添加,有的模块是由公司的开发人员针对业务需求定制
开发的,有的模块是开源爱好者开发好之后上传到github进行开源的模块, nginx支持
第三方模块,需要重新编译源码才能支持
echo-nginx-module
开源的echo模块,实现输出变量等信息
GitHub - openresty/echo-nginx-module: An Nginx module for bringing the power of "echo", "sleep", "time" and more to Nginx's config file
示例:

#yum install git –y
#cd /usr/local/src
#git clone https://github.com/openresty/echo-nginx-module.git
#cd nginx-1.21.0/
#useradd –r –s /sbin/nologin nginx
#yum install gcc pcre-devel openssl-devel zlib-devel perl-ExtUtils-Embed
# ./configure \
--prefix=/apps/nginx \
--user=nginx --group=nginx \
--with-http_ssl_module \
--with-http_v2_module \
--with-http_realip_module \
--with-http_stub_status_module \
--with-http_gzip_static_module \
--with-http_perl_module \
--with-pcre \
--with-stream \
--with-stream_ssl_module \
--with-stream_realip_module \
--add-module=/usr/local/src/echo-nginx-module
# make && make install

#vim /apps/nginx/conf/nginx.conf

 location /echo {
            default_type text/plain
            echo remote_addr: $remote_addr; #存放了客户端的地址,注意是客户端的公网IP
            echo args: $args; #变量中存放了URL中的指令http://www.magedu.net/main/index.do?id=090&partner=search 以上: id=090&partner=search 即为 $args
            echo document_root: $document_root; #保存了针对当前资源的请求的系统根目录,如/apps/nginx/html
            echo cookie_name: $cookie_name; #表示key为 name 的cookie值
            echo document_uri $document_uri; #保存了当前请求中不包含指令的URI,注意是不包含请求的指令,如http://www.magedu.net/main/index.do?id=090&partner=search会被定义为/main/index.do
            echo host: $host; #存放了请求的host名称
            echo http_user_agent: $http_user_agent; #客户端浏览器的详细信息
            echo http_cookie: $http_cookie; #客户端的cookie信息
            echo limit_rate: $limit_rate; #如果nginx服务器使用limit_rate配置了显示网络速率,则会显示,如果没有设置, 则显示0
            echo remote_port: $remote_port; #客户端请求Nginx服务器时客户端随机打开的端口
            echo remote_user: $remote_user; #已经经过Auth Basic Module验证的用户名
            echo request_body_file: $request_body_file; #做反向代理时发给后端服务器的本地资源的名称
            echo reuest_method: $request_method; #请求资源的方式, GET/PUT/DELETE等
            echo request_filename: $request_filename; #当前请求的资源文件的路径名称,由root或alias指令与URI请求生成的文件绝对路径,如/apps/nginx/html/main/index.html
            echo request_uri: $request_uri; #包含请求参数的原始URI,不包含主机名 如: main/index.do?id=090&partner=search。
            echo scheme: $scheme; #请求的协议,如ftp, https, http等
            echo server_protocal: $server_protocol; #请求资源的协议版本,如HTTP/.0, HTTP/., HTTP/.0等
            echo server_addr: $server_addr; #保存了服务器的IP地址
            echo server_name: $server_name; #请求的服务器的主机名
            echo server_port: $server_port; #请求的服务器的端口
    }


#curl 172.25.0.100/echo
remote_addr: 172.25.0.120
args:
document_root: /apps/nginx/html
cookie_name:
document_uri /echo
host: 172.25.0.100
http_user_agent: curl/7.81.0
http_cookie:
limit_rate: 0
remote_port: 59302
remote_user:
request_body_file:
reuest_method: GET
request_filename: /apps/nginx/html/echo
request_uri: /echo
scheme: http
server_protocal: HTTP/1.1
server_addr: 172.25.0.100
server_name: _
server_port: 80
nginx的变量可以在配置文件中引用,作为功能判断或者日志等场景使用,
变量可以分为内置变量和自定义变量,内置变量是由nginx模块自带,通过
变量可以获取到众多的与客户端访问相关的值
常见内置变量
$remote_addr;#存放了客户端的地址,注意是客户端的公网IP

$args; #变量中存放了URL中的指令http://www.apep.com/main/index.do?id=090&partner=search
以上: id=090&partner=search 即为 $args

$document_root; #保存了针对当前资源的请求的系统根目录,如/apps/nginx/html

$cookie_name; #表示key为 name 的cookie值

$document_uri; #保存了当前请求中不包含指令的URI,注意是不包含请求的指令,如

http://www.apep.com/main/index.do?id=090&partner=search会被定义为/main/index.do

$host; #存放了请求的host名称

$http_user_agent; #客户端浏览器的详细信息

$http_cookie; #客户端的cookie信息

$limit_rate; #如果nginx服务器使用limit_rate配置了显示网络速率,则会显示,如果没有设置, 则显示0

$remote_port; #客户端请求Nginx服务器时客户端随机打开的端口

$remote_user; #已经经过Auth Basic Module验证的用户名

$request_body_file; #做反向代理时发给后端服务器的本地资源的名称

$request_method; #请求资源的方式, GET/PUT/DELETE等

$request_filename; #当前请求的资源文件的路径名称,由root或alias指令与URI请求生成的文件绝对路径,如/apps/nginx/html/main/index.html

$request_uri; #包含请求参数的原始URI,不包含主机名如: main/index.do?id=090&partner=search。

$scheme; #请求的协议,如ftp, https, http等

$server_protocol; #请求资源的协议版本,如HTTP/.0, HTTP/., HTTP/.0等

$server_addr; #保存了服务器的IP地址

$server_name; #请求的服务器的主机名

$server_port; #请求的服务器的端口
自定义变量:自定义变量名称和值,使用指令set $variable value
格式如下:
set $variable value;
支持: server, location, if 块
示例:
set $name apep;
echo $name;
set $my_port $server_port;
echo $my_port;
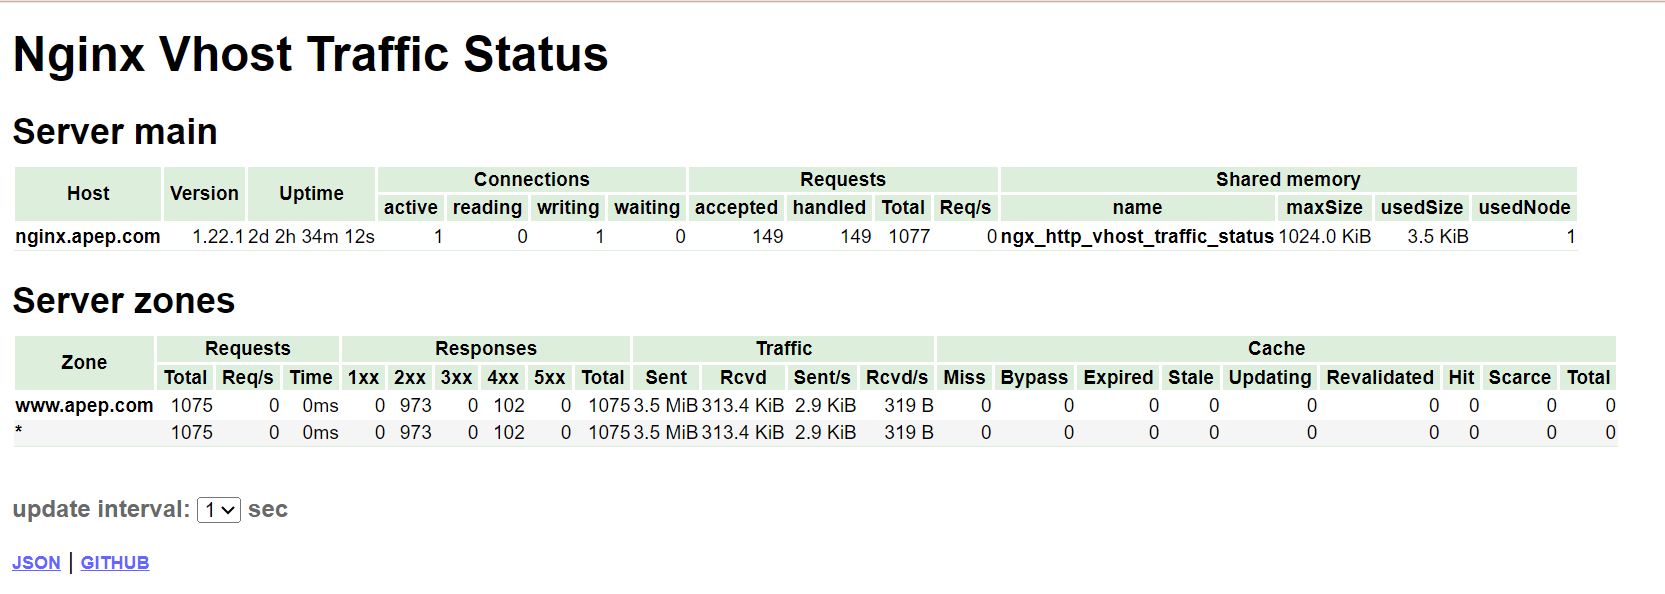
echo "$server_name:$server_port";nginx-module-vts
---------------------------nginx-module-vts----------------------------

第三方监控Nginx模块--vts
https://github.com/vozlt/nginx-module-vts/tree/master

下载并解压,nginx -V 显示之前,
#记得安装编译环境及相关组件

./configure --prefix=/usr/share/nginx \
  --sbin-path=/usr/sbin/nginx \
  --modules-path=/usr/lib64/nginx/modules \
  --conf-path=/etc/nginx/nginx.conf \
  --error-log-path=/var/log/nginx/error.log \
  --http-log-path=/var/log/nginx/access.log \
  --http-client-body-temp-path=/var/lib/nginx/tmp/client_body \
  --http-proxy-temp-path=/var/lib/nginx/tmp/proxy \
  --http-fastcgi-temp-path=/var/lib/nginx/tmp/fastcgi \
  --http-uwsgi-temp-path=/var/lib/nginx/tmp/uwsgi \
  --http-scgi-temp-path=/var/lib/nginx/tmp/scgi \
  --pid-path=/run/nginx.pid \
  --lock-path=/run/lock/subsys/nginx \
  --user=nginx \
  --group=nginx \
  --with-compat \
  --with-debug \
  --with-file-aio \
  --with-http_addition_module \
  --with-http_auth_request_module \
  --with-http_dav_module \
  --with-http_degradation_module \
  --with-http_flv_module \
  --with-http_gunzip_module \
  --with-http_gzip_static_module \
  --with-http_image_filter_module=dynamic \
  --with-http_mp4_module \
  --with-http_perl_module=dynamic \
  --with-http_random_index_module \
  --with-http_realip_module \
  --with-http_secure_link_module \
  --with-http_slice_module \
  --with-http_ssl_module \
  --with-http_stub_status_module \
  --with-http_sub_module \
  --with-http_v2_module \
  --with-http_xslt_module=dynamic \
  --with-mail=dynamic \
  --with-mail_ssl_module \
  --with-pcre \
  --with-pcre-jit \
  --with-stream=dynamic \
  --with-stream_ssl_module \
  --with-stream_ssl_preread_module \
  --with-threads \
  --with-cc-opt='-O2 -g -pipe -Wall -Wp,-D_FORTIFY_SOURCE=2 -fexceptions -fstack-protector-strong --param=ssp-buffer-size=4 -grecord-gcc-switches -specs=/usr/lib/rpm/redhat/redhat-hardened-cc1 -m64 -mtune=generic' \
  --with-ld-opt='-Wl,-z,relro -specs=/usr/lib/rpm/redhat/redhat-hardened-ld -Wl,-E' \
  --add-module=/usr/local/src/nginx-module-vts-master

# 编译并安装
make  &&  make install

#查看nginx当前版本
nginx -v

#在/etc/nginx/conf.d/vhosts下建一个vts.conf

vhost_traffic_status_zone;
server {
    listen 80;
    server_name www.apep.com;

    location /status {
                vhost_traffic_status_display;
                vhost_traffic_status_display_format html;
    }
}
在浏览器打开,如下图所示:
ngx_http_log_module
--------------------------ngx_http_log_module------------
https://nginx.org/en/docs/http/ngx_http_log_module.html#example

log_format 只能在http段配置

Syntax:	log_format name [escape=default|json|none] string ...;
Default:
log_format combined "...";
Context:	http

access_log 在http, server, location, if in location, limit_except段都可以配置

Syntax:	access_log path [format [buffer=size] [gzip[=level]] [flush=time] [if=condition]];
access_log off;
Default:
access_log logs/access.log combined;
Context:	http, server, location, if in location, limit_except

示例:
log_format compression '$remote_addr - $remote_user [$time_local] '
                          '"$request" $status $bytes_sent '
                          '"$http_referer" "$http_user_agent" "$gzip_ratio"';
#调用可以在server段
access_log /var/log/nginx-access.log compression buffer=32k;
自定义json日志格式
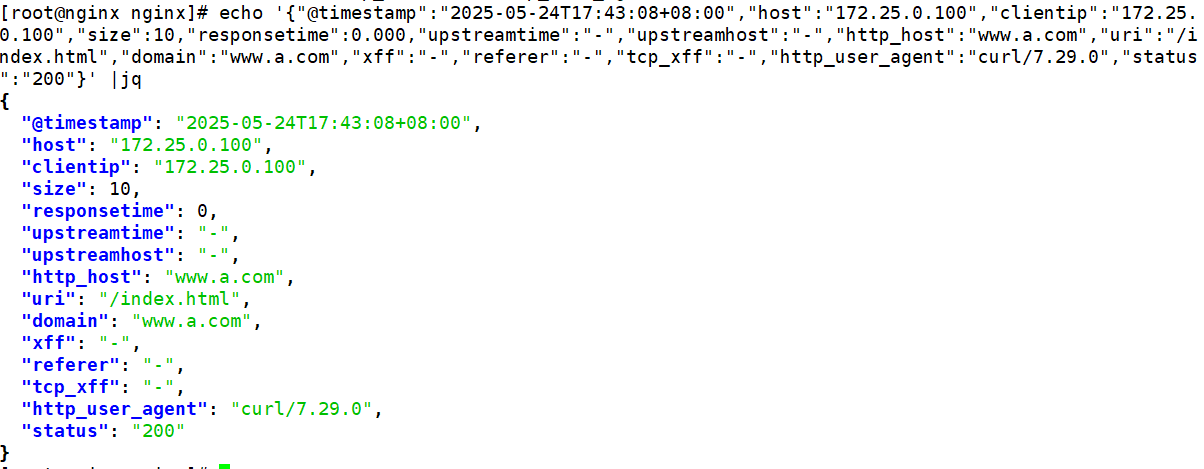
nginx 的默认访问日志记录内容相对比较单一,默认的格式也不方便后期做日志统计分析,生产环境中通常将nginx日志转换为json日志,然后配合使用ELK做日志收集-统计-分析
log_format access_json '{"@timestamp":"$time_iso8601",'
			'"host":"$server_addr",'
			'"clientip":"$remote_addr",'
			'"size":$body_bytes_sent,'
			'"responsetime":$request_time,'
			'"upstreamtime":"$upstream_response_time",'
            '"upstreamhost":"$upstream_addr",'
			'"http_host":"$host",'
			'"uri":"$uri",'
			'"domain":"$host",'
			'"xff":"$http_x_forwarded_for",'
			'"referer":"$http_referer",'
			'"tcp_xff":"$proxy_protocol_addr",'
			'"http_user_agent":"$http_user_agent",'
			'"status":"$status"}';

#在对应server中添加如下
access_log /var/nginx/logs/access_json.log access_json;
查看生成日志中文本,用jq转换一下
使用Python代码统计
#!/usr/bin/env python
#coding:utf-8
status_200= []
status_404= []
log_filename = "/var/log/nginx/access-a.site.com_json.log"
with open(log_filename) as f:
       for line in f.readlines():
           line = eval(line)
           if line.get("status") == "200":
               status_200.append(line.get)
           elif line.get("status") == "404":
               status_404.append(line.get)
           else:
               print("状态码 ERROR")
       f.close()

print "状态码200的有--:",len(status_200)

print "状态码404的有--:",len(status_404)
root@nginx ~]# python nginx_json.py
状态码 ERROR
状态码200的有--: 3
状态码404的有--: 3
ngx_http_gzip_module
---------------------ngx_http_gzip_module---------------
ngx_http_gzip_module
用gzip方法压缩响应数据,节约带宽
gzip on | off;
启用或禁用gzip压缩
gzip_comp_level level;
压缩比由低到高: 1 到 9, 默认: 1
gzip_disable regex ...;
匹配到客户端浏览器不执行压缩
示例: gzip_disable "MSIE[1-6]\.";
gzip_min_length length;
启用压缩功能的响应报文大小阈值
gzip_http_version 1.0 | 1.1;
设定启用压缩功能时,协议的最小版本, 默认: 1.1
gzip_buffers number size;
支持实现压缩功能时缓冲区数量及每个缓存区的大小
默认: 32 4k 或 16 8k
gzip_types mime-type ...;
指明仅对哪些类型的资源执行压缩操作;即压缩过滤器
默认包含有text/html,不用显示指定,否则出错
gzip_vary on | off;
如果启用压缩,是否在响应报文首部插入“Vary: Accept-Encoding”
gzip_proxied off | expired | no-cache | no-store | private |no_last_modified | no_etag | auth | any ...;
nginx充当代理服务器时,对于后端服务器的响应报文,在何种条件下启用压缩功能
off:不启用压缩
expired, no-cache, no-store, private:对后端服务器的响应报文首部cache-Control值任何一个,启用压缩功能
Syntax: gzip on | off;
Default: gzip off;
Context: http, server, location, if in location
实例:
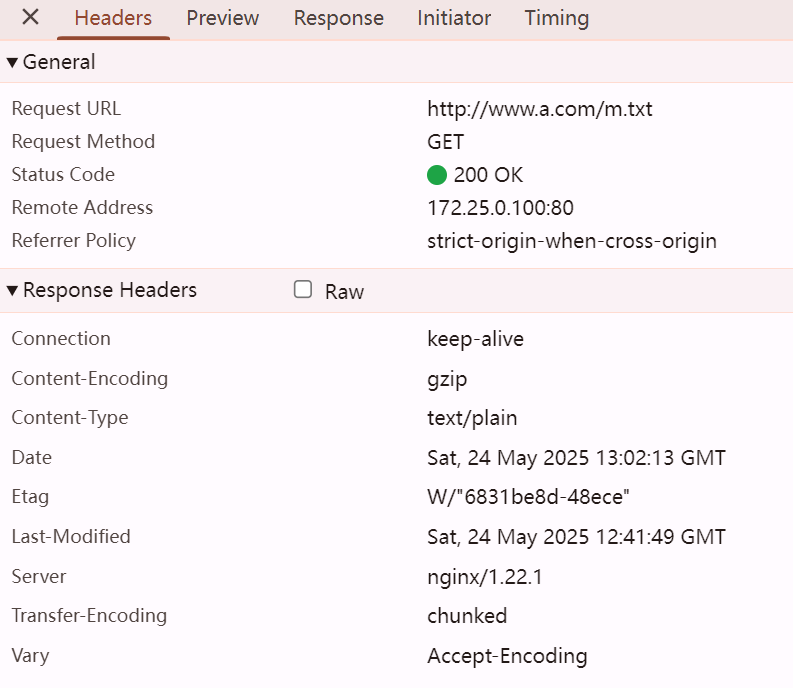
gzip on;
gzip_comp_level 7;
gzip_min_length 1k;
gzip_vary on;
gzip_types text/plain text/xml text/css application/javascript;压缩前:
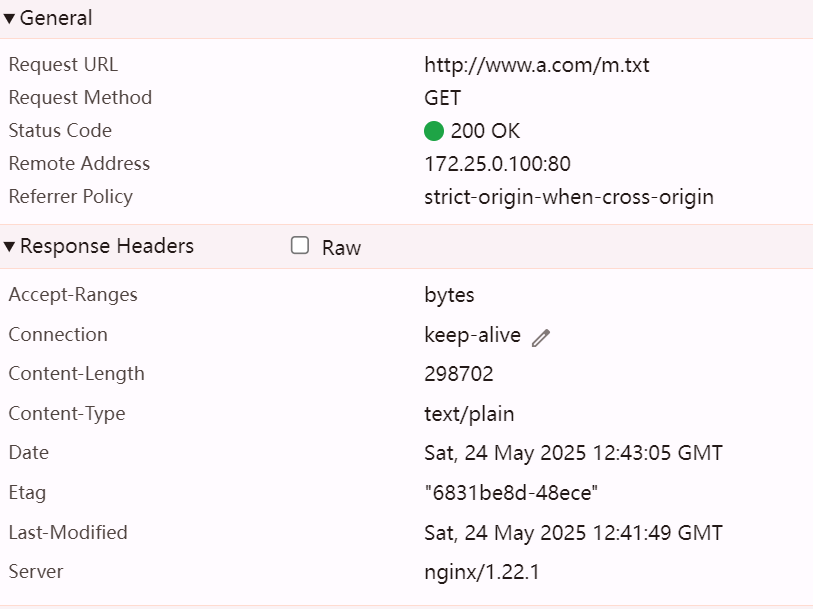
启用压缩后:

ngx_http_ssl_module
ngx_http_ssl_module模块:
ssl on | off; #为指定虚拟机启用HTTPS protocol, 建议用listen指令代替
ssl_certificate file; #当前虚拟主机使用PEM格式的证书文件
ssl_certificate_key file; #当前虚拟主机上与其证书匹配的私钥文件
ssl_protocols [SSLv2] [SSLv3] [TLSv1] [TLSv1.1] [TLSv1.2]; #支持ssl协议版本,默认为后三个
ssl_session_cache off | none | [builtin[:size]] [shared:name:size];
none: 通知客户端支持ssl session cache,但实际不支持
builtin[:size]:使用OpenSSL内建缓存,为每worker进程私有
[shared:name:size]:在各worker之间使用一个共享的缓存
ssl_session_timeout time; #客户端连接可以复用ssl session cache中缓存的有效时长,默认5m
在Nginx上配置自签名SSL证书的完整步骤

以下是为域名 `www.a.com` 配置自签名SSL证书的详细步骤:

1. 生成RSA密钥对

首先创建一个安全的RSA私钥(建议使用2048位或更高):

sudo mkdir -p /etc/ssl/private
sudo chmod 700 /etc/ssl/private
sudo openssl genrsa -out /etc/ssl/private/www.a.com.key 2048


 2. 创建证书签名请求(CSR)

生成包含域名信息的CSR文件:

sudo openssl req -new -key /etc/ssl/private/www.a.com.key -out /etc/ssl/certs/www.a.com.csr


在填写过程中,**Common Name** 必须严格填写为 `www.a.com`

 3. 创建自签名证书

使用私钥和CSR创建有效期为10年的自签名证书:

sudo openssl x509 -req -days 3650 -in /etc/ssl/certs/www.a.com.csr -signkey /etc/ssl/private/www.a.com.key -out /etc/ssl/certs/www.a.com.crt


4. 配置Nginx支持HTTPS

修改Nginx配置文件(通常位于 `/etc/nginx/conf.d/www.a.com.conf`):

nginx
server {
    listen 80;
    server_name www.a.com;
    return 301 https://$host$request_uri;  # 强制跳转HTTPS
}

server {
    listen 443 ssl http2;
    server_name www.a.com;
    root /data/sitea/;

    # SSL证书配置
    ssl_certificate /etc/ssl/certs/www.a.com.crt;
    ssl_certificate_key /etc/ssl/private/www.a.com.key;

    # 优化SSL配置
    ssl_protocols TLSv1.2 TLSv1.3;
    ssl_prefer_server_ciphers on;
    ssl_ciphers "EECDH+AESGCM:EDH+AESGCM:AES256+EECDH:AES256+EDH";
    ssl_session_cache shared:SSL:10m;
    ssl_session_timeout 10m;


}

5. 验证配置并重启Nginx


# 检查配置语法
sudo nginx -t

# 重新加载配置
sudo nginx -s reload


 6. 访问测试

使用浏览器或curl访问:


curl -v https://www.a.com


注意:浏览器会显示安全警告(因为是自签名证书),这是正常现象。在生产环境中,建议使用受信任的CA颁发的证书。
![[Linux]磁盘分区及swap交换空间](https://i-blog.csdnimg.cn/direct/547d4c45490449b7a8882d6e8c372a77.png)


![[Git] 认识 Git 的三大区域 文件的修改和提交](https://i-blog.csdnimg.cn/img_convert/0ef2c66b54fef362afd392623c91faed.png)


![[爬虫知识] IP代理](https://i-blog.csdnimg.cn/direct/71c7109f7dac43bea57149319fc4276b.png)