🧱 一、技术栈与依赖配置
使用 Spring Boot + Redis 实现短信验证码登录,以下是推荐的 Maven 依赖:
<dependencies>
    <!-- Spring Boot Web -->
    <dependency>
        <groupId>org.springframework.boot</groupId>
        <artifactId>spring-boot-starter-web</artifactId>
    </dependency>

    <!-- Redis -->
    <dependency>
        <groupId>org.springframework.boot</groupId>
        <artifactId>spring-boot-starter-data-redis</artifactId>
    </dependency>

    <!-- Validation -->
    <dependency>
        <groupId>org.springframework.boot</groupId>
        <artifactId>spring-boot-starter-validation</artifactId>
    </dependency>

    <!-- Lombok(简化实体类) -->
    <dependency>
        <groupId>org.projectlombok</groupId>
        <artifactId>lombok</artifactId>
        <optional>true</optional>
    </dependency>

    <!-- 如果使用 JWT 登录验证,可引入 -->
    <dependency>
        <groupId>io.jsonwebtoken</groupId>
        <artifactId>jjwt</artifactId>
        <version>0.9.1</version>
    </dependency>
</dependencies>
二、流程概述
✅ 验证码获取流程:
1.校验手机号码
2.如果不符合,直接返回错误信息
3.符合,则生成验证码(有过期时间)
4.将验证码存入redis中
6.发送验证码
注:key为手机号+前缀
value是code(验证码)String类型
    public Result sendCode(String phone, HttpSession session) {
        //1.校验手机号码
        if (RegexUtils.isPhoneInvalid(phone)) {

            //2.如果不符合,直接返回错误信息
            return Result.fail("手机号码格式不正确");
        }

        //3.符合,则生成验证码
        String code = RandomUtil.randomNumbers(6);


//        //4.将验证码存入session中
//        session.setAttribute("code", code);

        //4.将验证码存入redis中
        stringRedisTemplate.opsForValue().set(LOGIN_CODE_KEY + phone, code, LOGIN_CODE_TTL, TimeUnit.MINUTES);

        //6.发送验证码
//        smsService.sendCode(phone, code);
        log.debug(code);


        return Result.ok();
    }
短信验证码登录、注册流程
1.校验手机号
2.如果不符合,返回错误信息
3.校验验证码
从redis中获取验证码
4.如果不符合,返回错误信息
5.一致,根据手机号查询用户
6.判断用户是否存在
不存在,则创建
7 .保存用户信息到redis中
7.1随机生成token,作为登录令牌
7.2将user对象转成哈希存储
7.3将token和用户信息存入redis
8.设置token过期时间
9.返回token
注:
key:随机token+前缀(String)
value:用户信息(采用哈希map存储)
因为UserDTO转map的时候,由于id是Long类型,不能转成String类型 所以我们需要自定义map集合规则
1️⃣
BeanUtil.beanToMap(...)来自 Hutool 工具库,用于将 Java Bean 转换为 Map。例如:
UserDTO { String name = "Tom"; Integer age = 18; }将被转换为:
{ "name": "Tom", "age": 18 }
2️⃣ 第二个参数:
new HashMap<>()用于接收转换后的数据,你可以指定已有的 Map 进行填充,也可以传一个新的空 Map,如这里使用的是新建的
HashMap。
3️⃣
CopyOptions.create():配置拷贝选项
CopyOptions是一个用于控制复制行为的配置类。以下是你使用的两个关键配置项:✅
setIgnoreNullValue(true)
意思是 忽略值为 null 的字段,不把它们放入最终的 Map。
例子:如果
userDTO.getEmail()为 null,则结果 Map 中不会出现"email": null。✅
setFieldValueEditor((fieldName, fieldValue) -> fieldValue.toString())
提供一个字段值编辑器,在放入 Map 之前将每个字段值转换成字符串。
举例:
age = 18→"18"(注意是字符串)
active = true→"true"
fieldName是字段名,比如"age",fieldValue是字段值,比如18⚠️ 注意:这个处理器假设
fieldValue不为 null,否则调用toString()会抛出NullPointerException,所以它通常要和setIgnoreNullValue(true)搭配使用。
✅ 总结作用
这段代码的最终目的是:
将 userDTO 对象转换为一个 Map<String, Object>,只包含非 null 字段,且所有字段值都转为字符串类型。
📌 示例:
假设
userDTO内容如下:
UserDTO { String name = "Alice"; Integer age = 25; String email = null; }执行后
userMap中内容为:
{ "name": "Alice", "age": "25" // 注意:值为字符串类型 // "email" 被忽略,因为是 null }
 Map<String, Object> userMap = BeanUtil.beanToMap(userDTO, new HashMap<>(),
                CopyOptions.create()
                        .setIgnoreNullValue(true)
                        .setFieldValueEditor((fieldName, fieldValue) -> fieldValue.toString()));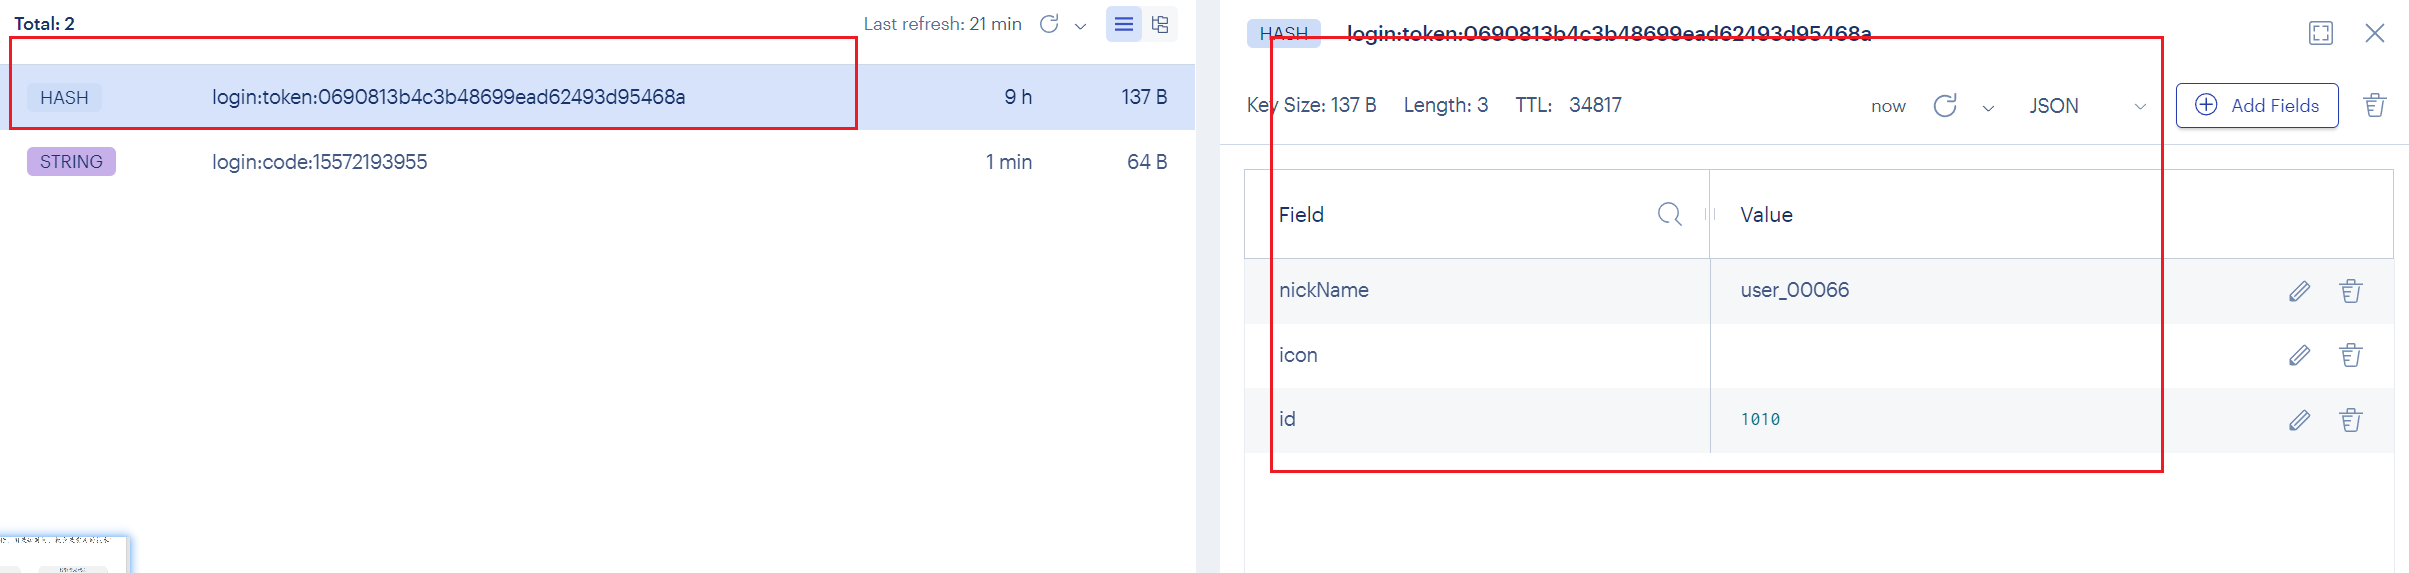
 @Override
    public Result login(LoginFormDTO loginForm, HttpSession session) {
        String phone = loginForm.getPhone();
        // 1.校验手机号
        if (RegexUtils.isPhoneInvalid(phone)) {
            // 2.如果不符合,返回错误信息
            return Result.fail("手机号格式错误");
        }

        //3.校验验证码
//        Object cacheCode = session.getAttribute("code");//从session中获取验证码
        //TODo 3.从redis中获取验证码
        String cacheCode = stringRedisTemplate.opsForValue().get(LOGIN_CODE_KEY + phone);
        String code = loginForm.getCode();//从登录表单中获取验证码(用户输入验证码)
        if (cacheCode == null || !code.equals(cacheCode)) {
            //4.如果不符合,返回错误信息
            return Result.fail("验证码不正确");
        }
        //5.一致,根据手机号查询用户
        User user = query().eq("phone", phone).one();
        //6.判断用户是否存在
        if (user == null) {
            //不存在,则创建
            user = createUserWithPhone(phone);
        }
//        //7.保存用户信息到session中
//        session.setAttribute("user", BeanUtil.copyProperties(user, UserDTO.class));


        //TODo 7 .保存用户信息到redis中


        // TODo 7.1随机生成token,作为登录令牌
        String token = UUID.randomUUID().toString(true);
        //TODo 7.2将user对象转成哈希存储
        UserDTO userDTO = BeanUtil.copyProperties(user, UserDTO.class);
        Map<String, Object> userMap = BeanUtil.beanToMap(userDTO, new HashMap<>(),
                CopyOptions.create()
                        .setIgnoreNullValue(true)
                        .setFieldValueEditor((fieldName, fieldValue) -> fieldValue.toString()));
        ;
        //TODo 7.3将token和用户信息存入redis
        String tokenKey = LOGIN_USER_KEY + token;
        stringRedisTemplate.opsForHash().putAll(tokenKey, userMap);


        //TODo 8.设置token过期时间
        stringRedisTemplate.expire(LOGIN_USER_KEY + token, LOGIN_USER_TTL, TimeUnit.MINUTES);
        //TODo 9.返回token
        return Result.ok(token);
    }

    private User createUserWithPhone(String phone) {

        User user = new User();
        user.setPhone(phone);
        user.setNickName(USER_NICK_NAME_PREFIX + RandomUtil.randomNumbers(5));
        //保存用户信息
        save(user);
        return user;

    }
在这个方案中,他确实可以使用对应路径的拦截,同时刷新登录token令牌的存活时间,但是现在这个拦截器他只是拦截需要被拦截的路径,假设当前用户访问了一些不需要拦截的路径,那么这个拦截器就不会生效,所以此时令牌刷新的动作实际上就不会执行,所以这个方案他是存在问题的
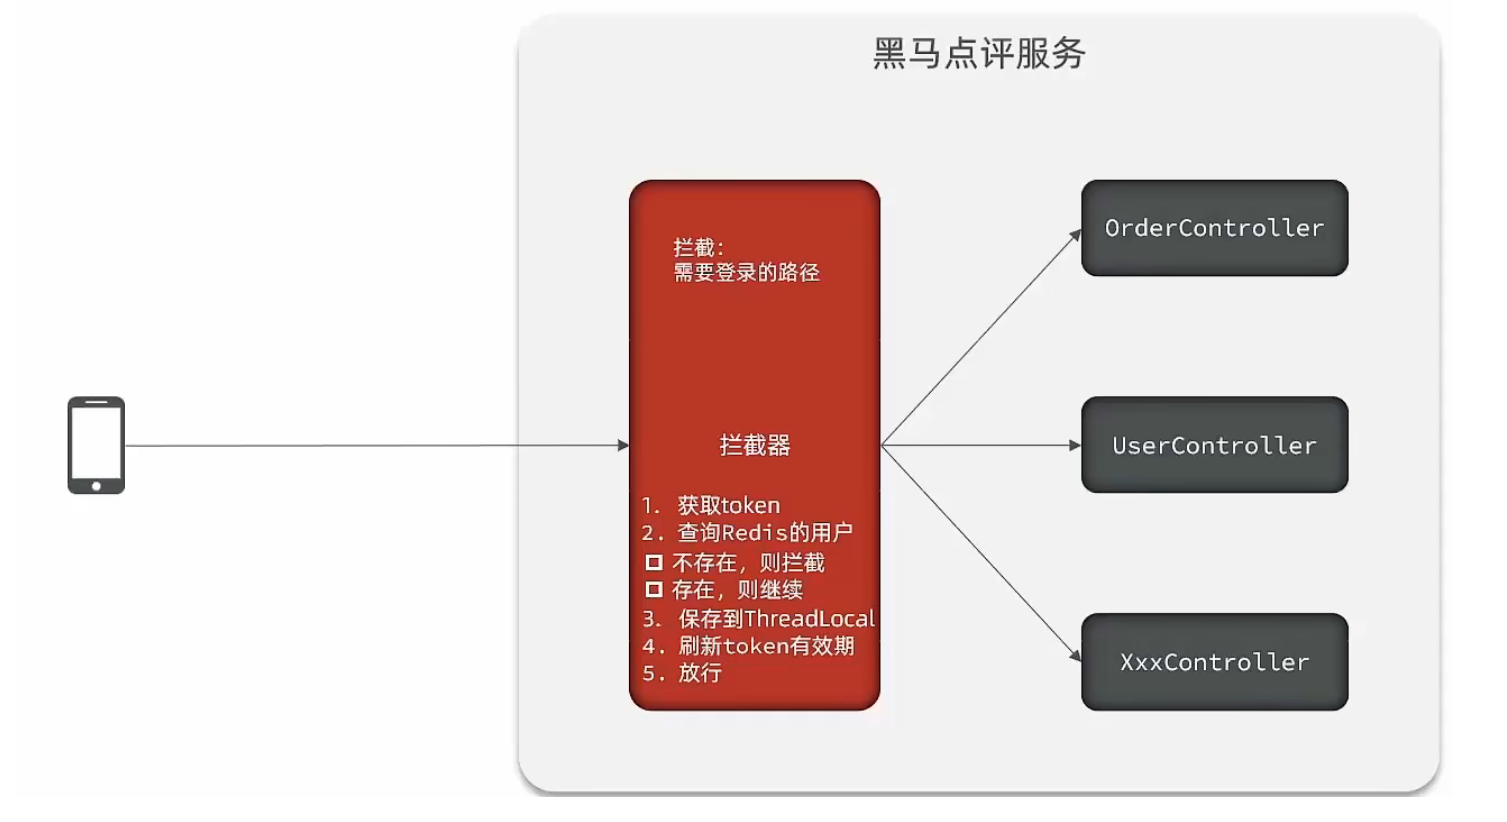
解决状态登录刷新问题
既然之前的拦截器无法对不需要拦截的路径生效,那么我们可以添加一个拦截器,在第一个拦截器中拦截所有的路径,把第二个拦截器做的事情放入到第一个拦截器中,同时刷新令牌,因为第一个拦截器有了threadLocal的数据,所以此时第二个拦截器只需要判断拦截器中的user对象是否存在即可,完成整体刷新功能。
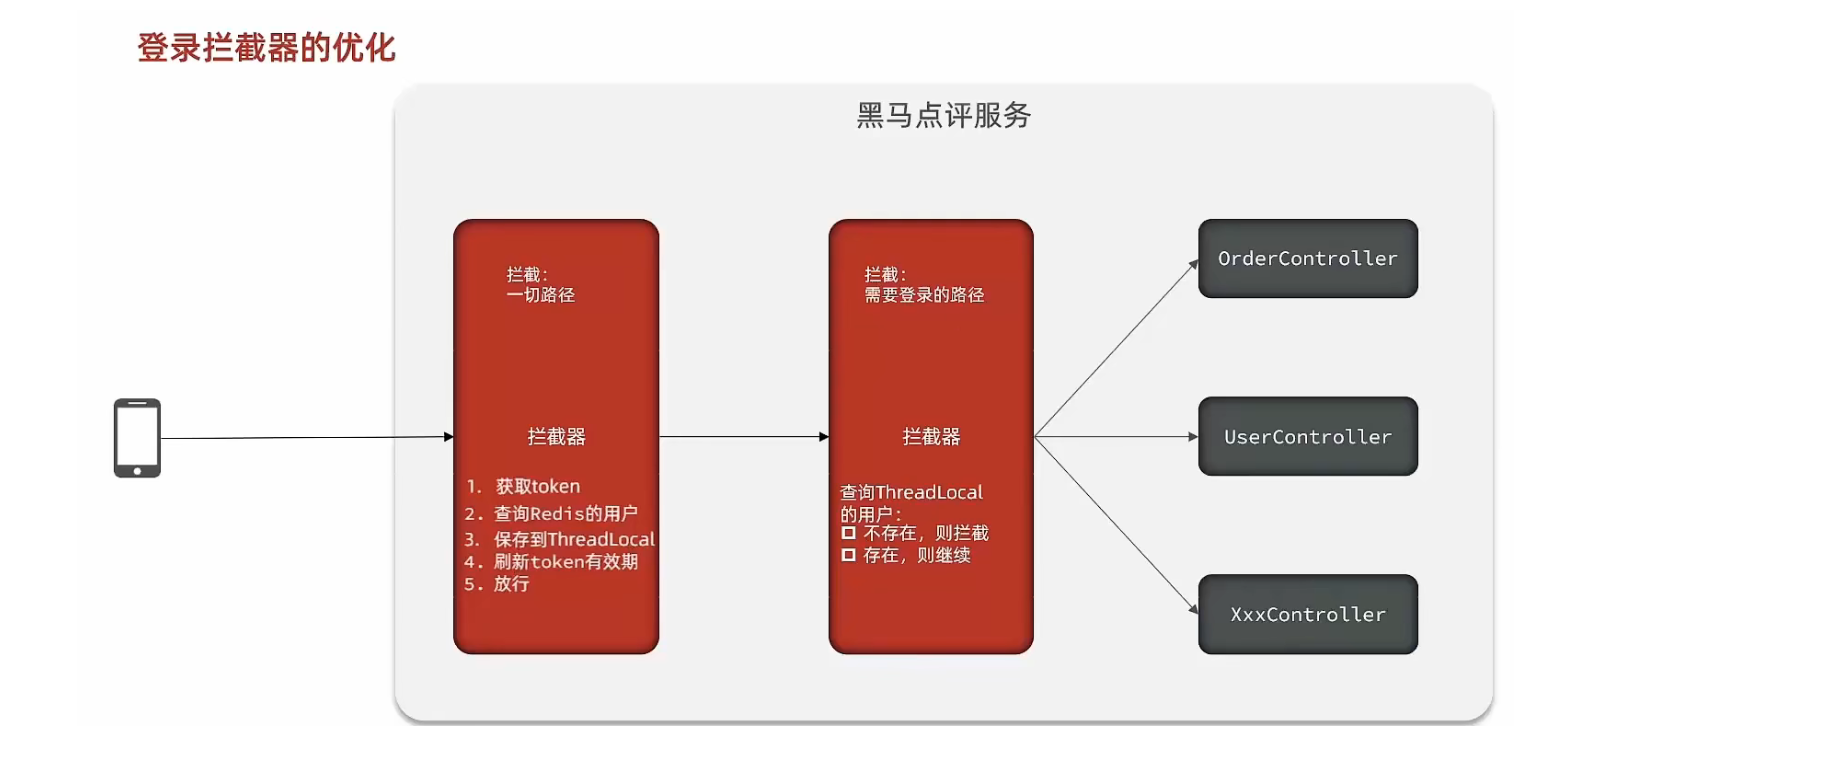
第一个拦截器保存用户信息然后刷新
第二个拦截器就是拦截
package com.hmdp.config;

import com.hmdp.utils.LoginInterceptor;
import com.hmdp.utils.RefreshTokenInterceptor;
import org.springframework.beans.factory.annotation.Autowired;
import org.springframework.context.annotation.Configuration;
import org.springframework.data.redis.core.StringRedisTemplate;
import org.springframework.web.servlet.config.annotation.InterceptorRegistry;
import org.springframework.web.servlet.config.annotation.WebMvcConfigurer;

@Configuration
public class MvcConfig implements WebMvcConfigurer {

    @Autowired
    private LoginInterceptor loginInterceptor;

    @Autowired
    private StringRedisTemplate stringRedisTemplate;

    @Override
    public void addInterceptors(InterceptorRegistry registry) {
        registry.addInterceptor(this.loginInterceptor).addPathPatterns("/**")
                .excludePathPatterns(
                        "/shop/**",
                        "/voucher/**",
                        "/shop-type/**",
                        "/upload/**",
                        "/blog/hot",
                        "/user/code",
                        "/user/login").order(1);

        registry.addInterceptor(new RefreshTokenInterceptor(stringRedisTemplate)).addPathPatterns("/**").order(0);
    }
}