本文为《React Agent:从零开始构建 AI 智能体》专栏系列文章。 专栏地址:https://blog.csdn.net/suiyingy/category_12933485.html。项目地址:https://gitee.com/fgai/react-agent(含完整代码示例与实战源)。完整介绍:https://blog.csdn.net/suiyingy/article/details/146983582。
节点和边是相互依存的关系。边的存在依赖于节点,因为边的起点(source)和终点(target)都是节点的 id。边用于定义节点之间的连接关系,这种关系可以表示流程流向、数据传递方向、依赖关系等。节点通过边与其他节点进行交互,形成一个有机的图表结构。例如,在一个流程图中,节点可能代表不同的任务步骤,边则表示任务之间的执行顺序。
边与节点共同构成 React Flow 图表的核心内容,由 React Flow 容器统一管理。容器负责处理边的布局计算、渲染以及交互响应,确保边能够准确地连接节点,并在节点位置变动、图表缩放等操作下,依然保持正确的连接关系和视觉效果。边的存在使得原本独立的节点形成一个有机整体,赋予图表实际的业务意义和交互价值。
1 基本示例程序
下面是边的基本示例程序。
import React, { useCallback } from 'react';
import {
  ReactFlow,
  useNodesState,
  useEdgesState,
  addEdge,
} from 'reactflow';

import 'reactflow/dist/style.css';

const initialNodes = [
  { id: '1', position: { x: 0, y: 0 }, data: { label: '1' } },
  { id: '2', position: { x: 0, y: 100 }, data: { label: '2' } },
];

const initialEdges = [
  { id: 'e1-2',
    source: '1',
    target: '2',
    type: 'default'
  }
];

export default function App() {
  const [nodes, setNodes, onNodesChange] = useNodesState(initialNodes);
  const [edges, setEdges, onEdgesChange] = useEdgesState(initialEdges);

  const onConnect = useCallback(
    (params) => setEdges((eds) => addEdge(params, eds)),
    [setEdges],
  );

  return (
    <div style={{ height: '500px' }}>
      <ReactFlow
        nodes={nodes}
        edges={edges}
        onNodesChange={onNodesChange}
        onEdgesChange={onEdgesChange}
        onConnect={onConnect}
        fitView
      />
    </div>
  );
}
运行程序后结果如下图所示。
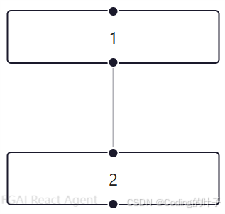
图1 直线边
2 基本属性
2.1 id
id:边的唯一标识符,用于在 React Flow 中识别和管理边。在复杂图表中,通过 id 可以方便地获取、更新或删除特定边。
const edgeWithId = {
    id: 'unique-edge-id-1',
    source: 'node-a',
    target: 'node-b',
    type:'default'
};
2.2 source 和 target
source 和 target:分别指定边的起点和终点节点的 id,是边存在的基础,决定边连接的节点对象。source 是提供输入的节点,target 则是接收输出的节点。
const specificConnectionEdge = {
    id: 'edge-2',
    source: 'node-3',
    target: 'node-4',
    type: 'straight'
};
2.3 sourceHandle 和targetHandle
sourceHandle 和targetHandle:分别指定边的起点和终点节点的连接端点 id。sourceHandle 是提供输入的端点,targetHandle 则是接收输出的端点。
import React, { useCallback } from 'react';
import {
  ReactFlow,
  useNodesState,
  useEdgesState,
  addEdge,
  Handle,
} from 'reactflow';
import 'reactflow/dist/style.css';

const CustomNode = ({ data }) => {
  return (
    <div style={{
      padding: 20,
      border: '1px solid #ddd',
      borderRadius: 5,
      background: '#fff',
    }}>
      <div>{data.label}</div>
      {/* 左侧两个输入句柄 */}
      <Handle
        type="target"
        position="left"
        id="input-1"
        style={{ top: '30%' }}
      />
      <Handle
        type="target"
        position="left"
        id="input-2"
        style={{ top: '70%' }}
      />
      {/* 右侧两个输出句柄 */}
      <Handle
        type="source"
        position="right"
        id="output-1"
        style={{ top: '30%' }}
      />
      <Handle
        type="source"
        position="right"
        id="output-2"
        style={{ top: '70%' }}
      />
    </div>
  );
};

const initialNodes = [
  {
    id: '1',
    position: { x: 0, y: 0 },
    data: { label: '1' },
    type: 'custom',
  },
  {
    id: '2',
    position: { x: 200, y: 100 },
    data: { label: '2' },
    type: 'custom',
  },
];

const initialEdges = [
  {
    id: 'e1-2a',
    source: '1',
    sourceHandle: 'output-1',
    target: '2',
    targetHandle: 'input-2',
  },
  {
    id: 'e1-2b',
    source: '1',
    sourceHandle: 'output-2',
    target: '2',
    targetHandle: 'input-1',
  }
];

const nodeTypes = {
  custom: CustomNode,
};

export default function App() {
  const [nodes, setNodes, onNodesChange] = useNodesState(initialNodes);
  const [edges, setEdges, onEdgesChange] = useEdgesState(initialEdges);

  const onConnect = useCallback(
    (params) => setEdges((eds) => addEdge({
      ...params,
      type: 'default',
    }, eds)),
    [setEdges]
  );

  return (
    <div style={{ height: '500px' }}>
      <ReactFlow
        nodes={nodes}
        edges={edges}
        onNodesChange={onNodesChange}
        onEdgesChange={onEdgesChange}
        onConnect={onConnect}
        nodeTypes={nodeTypes}
        fitView
      />
    </div>
  );
}
运行程序后结果如下图所示。
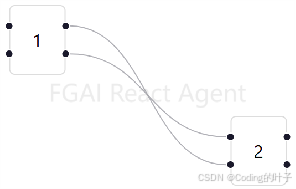
图2 指定连接点
2.4 type
type:指定边的类型,既可以是内置类型,也可以是自定义类型,影响边的渲染方式和默认行为。边的类型丰富多样,默认包含 default、straight、step、smoothstep 等,每一种类型都赋予边独特的形状与视觉呈现,满足不同场景的设计需求。default 类型的边通常会根据节点的相对位置,以自然流畅的曲线形态连接节点,这种曲线过渡柔和,能够在复杂的节点布局中营造出一种和谐、美观的视觉效果,让整个流程图看起来更具艺术感;straight 类型如其名,边呈现为笔直的线条,简洁明了地连接两个节点,这种形状在追求简洁、直观表达连接关系的场景下极为适用,能够快速引导用户理解节点之间的直接关联;step 类型的边则是通过直角转折的方式连接节点,它会以阶梯状的折线形态出现,适合用于表示具有明确步骤、层级关系的连接,为流程图增添清晰的逻辑层次感;smoothstep 类型的边在 step 类型的基础上进行了优化,它同样有转折,但转折处采用了平滑的曲线过渡,在保留逻辑分层感的同时避免了过于生硬的直角,使边的形态更加优雅流畅,在复杂且注重美观与逻辑兼具的流程图中发挥重要作用。
const initialEdges = [
  { id: 'e1-2',
    source: '1',
    target: '2',
    type: 'smoothstep'
  }
];
运行程序后结果如下图所示。

图3 smoothstep 类型
2.5 style
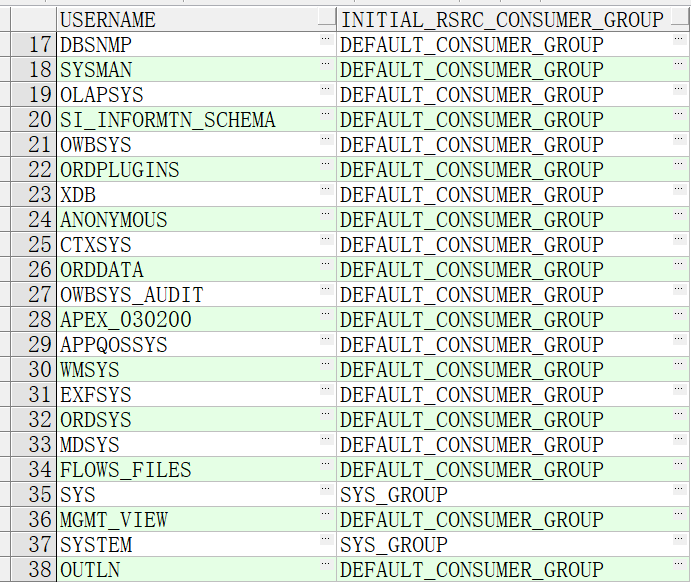
style:用于设置边的内联样式,包括线条颜色、宽度、线型(实线、虚线等)、箭头样式等。例如,将边设置为红色虚线:
const initialEdges = [
  { id: 'e1-2',
    source: '1',
    target: '2',
    type: 'smoothstep',
    style: {
      stroke:'red',
      strokeWidth: 3,
      strokeDasharray: '5, 5',
    }
  }
]
运行程序后结果如下图所示。
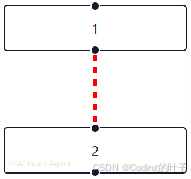
图4 边样式
2.6 animated
animated:设置为true时,边可以启用动画效果,如淡入淡出、路径变化动画等,增强图表的动态展示效果。
const initialEdges = [
  { id: 'e1-2',
    source: '1',
    target: '2',
    type: 'smoothstep',
    animated: true,
    style: {
      stroke:'red',
      strokeWidth: 3,
      strokeDasharray: '5, 5',
    }
  }
];
2.7 selectable
selectable:控制边是否可以被用户选中。选中边后,可以对其进行编辑、删除等操作,或展示相关信息。
const initialEdges = [
  { id: 'e1-2',
    source: '1',
    target: '2',
    type: 'smoothstep',
    animated: true,
    selectable: true,
    style: {
      stroke:'red',
      strokeWidth: 3,
      strokeDasharray: '5, 5',
    }
  }
];
2.8 事件属性
onClick、onMouseEnter等事件属性:与节点类似,边也可以绑定各种事件处理函数,响应用户操作。例如,当用户点击边时,显示边的详细信息:
const initialEdges = [
  { id: 'e1-2',
    source: '1',
    target: '2',
    type: 'smoothstep',
    animated: true,
    selectable: true,
    style: {
      stroke:'red',
      strokeWidth: 3,
      strokeDasharray: '5, 5',
    },
    onClick: () => {
      alert('You clicked the edge!');
    }
  }
];
立即关注获取最新动态
点击订阅《React Agent 开发专栏》,每周获取智能体开发深度教程。项目代码持续更新至React Agent 开源仓库,欢迎 Star 获取实时更新通知!FGAI 人工智能平台:FGAI 人工智能平台


![[Mac] 开发环境部署工具ServBay 1.12.2](https://i-blog.csdnimg.cn/direct/9fe237104c584807b408678d28323340.png)