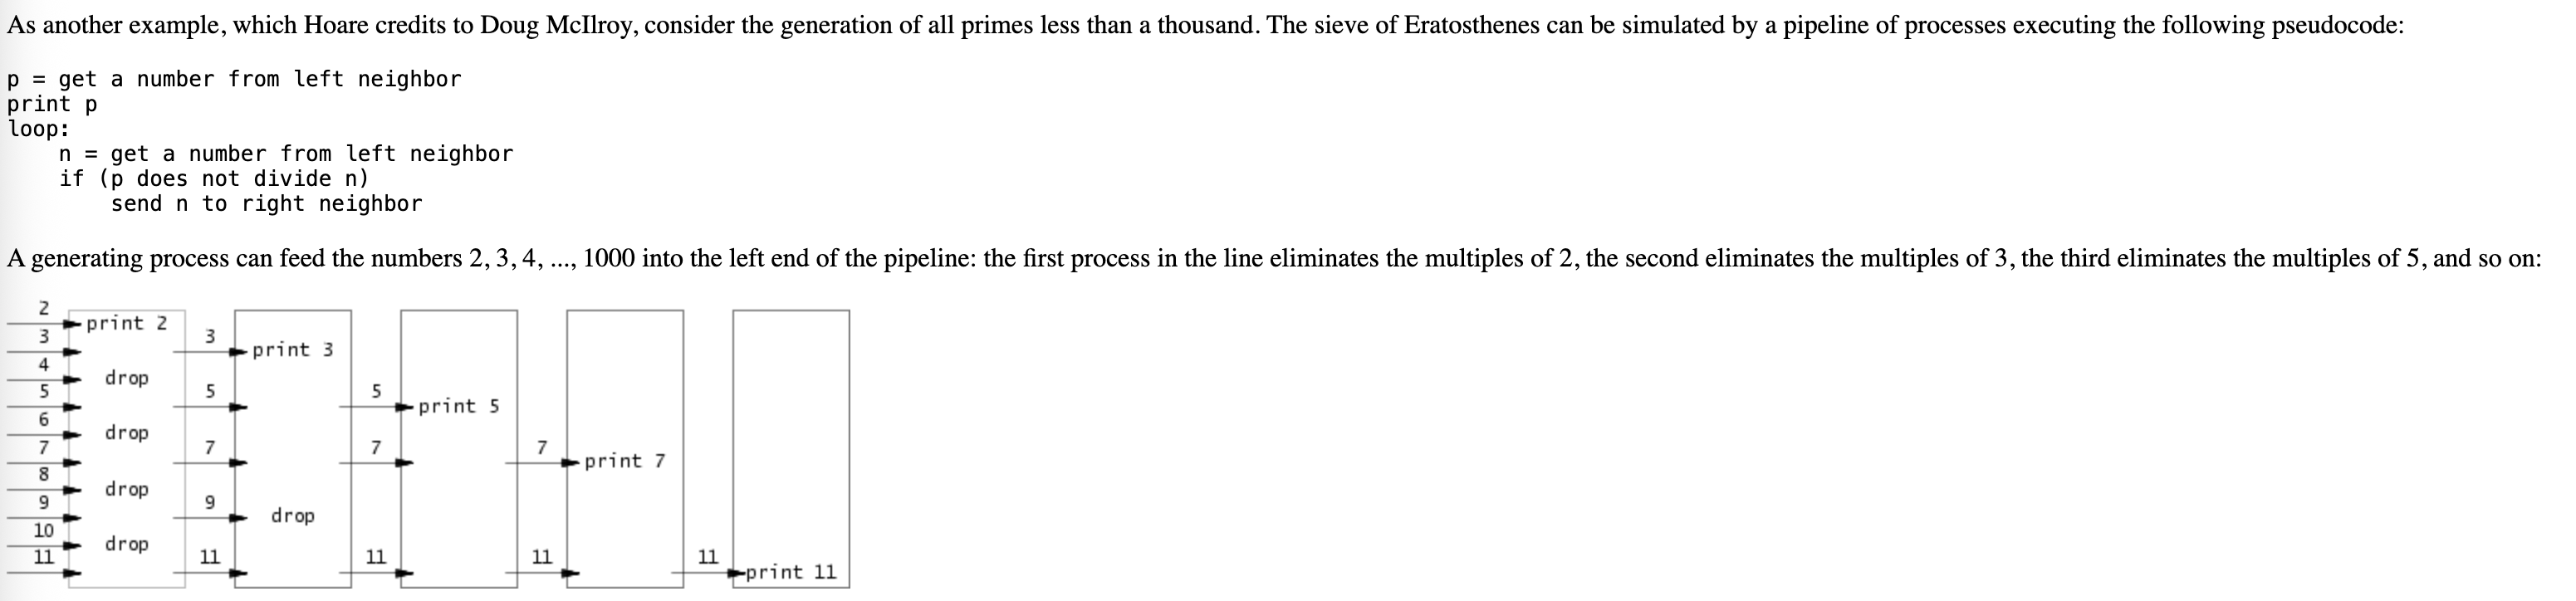
现在我想写一篇Java快速入门WebSocket,就使用 JSR-356的websocket,我想分以下几点,
1. websocket介绍,
1.1 介绍
什么是WebSocket?
WebSocket 是一种基于 TCP 的全双工通信协议,允许客户端和服务器在单个长连接上实时交换数据。它是 HTML5 规范的一部分,通过 JSR-356(Java API for WebSocket) 在 Java 中标准化。
核心特点:
- 双向通信:客户端和服务器可以主动发送消息。
- 低延迟:无需频繁建立/断开连接(HTTP的“握手”仅一次)。
- 轻量级:数据帧(Frame)结构比 HTTP 更高效。
因为是双向通信,因此WebSocket十分适合用于服务端与客户端需要实时通信的场景,如聊天室,游戏,
1.2 他与http有什么不同
| 特性 | WebSocket | HTTP |
|---|---|---|
| 连接模型 | 长连接(持久化) | 短连接(请求-响应后关闭) |
| 通信方向 | 全双工(双向实时通信) | 半双工(客户端主动发起请求) |
| 协议头 | ws:// 或 wss://(加密) | http:// 或 https:// |
| 握手过程 | 首次通过 HTTP 升级协议,之后独立通信 | 每次请求都需完整 HTTP 头 |
| 适用场景 | 实时聊天、股票行情、游戏同步 | 网页浏览、API 调用 |
| 数据格式 | 支持二进制帧和文本帧 | 通常是文本(JSON/XML/HTML) |
关键区别示例:
- HTTP:如果客户端与服务端需要实时通信,由于http需要发起请求才能获得响应,而不能直接获取服务端的消息, 客户端不断轮询服务器(如每秒请求一次) → 高延迟、高负载。
- WebSocket:建立一次连接,服务器可随时推送数据 → 实时性强、资源占用低。
2. 代码实战
2.0 WebSocket 核心事件介绍
websocket主要有onOpen,onMessage,onError,onClose四种事件,由于是双向通信,所以不论是前端还是后端,都需要对这四种事件进行处理
websocket建立连接称之为握手,在握手成功后,才可以互通消息
| 事件名称 | 触发时机 | 前端用途 | 后端用途 | 备注 |
|---|---|---|---|---|
| onOpen | 当WebSocket连接成功建立时(握手完成) | 1. 更新连接状态UI 2. 准备发送初始消息 | 1. 记录连接日志 2. 初始化会话数据 3. 将新连接加入连接池 | 前端和后端都会在连接建立后立即触发 |
| onMessage | 当收到对方发送的消息时 | 1. 处理服务器推送的数据 2. 更新页面内容 3. 触发业务逻辑 | 1. 处理客户端请求 2. 广播消息给其他客户端 3. 执行业务逻辑 | 可以处理文本和二进制数据 |
| onError | 当连接发生错误时 | 1. 显示错误提示 2. 尝试自动重连 3. 记录错误日志 | 1. 记录错误信息 2. 清理异常连接 3. 发送警报通知 | 错误可能来自网络问题或程序异常 |
| onClose | 当连接关闭时 | 1. 更新连接状态UI 2. 显示断开原因 3. 决定是否重连 | 1. 清理会话资源 2. 从连接池移除 3. 记录断开日志 | 可能是主动关闭或被动断开 |
同时后端还有一个较为核心的概念 session 你可以将其理解为双端之间的连接
由于在后端会同时存在多个与客户端的连接(来自不同客户端) ,后端发送消息时候,需要去获取到对应的session,才能将消息发送到指定的客户端
2.1 环境准备
- JDK 8+(JSR-356 需要 Java EE 7 或 Jakarta EE 8)
- 支持 WebSocket 的服务器(如 Tomcat 9+、Jetty 9+、WildFly)
- Maven/Gradle 依赖(以 Tomcat 为例):
        <dependency>
            <groupId>org.springframework.boot</groupId>
            <artifactId>spring-boot-starter-websocket</artifactId>
        </dependency>
2.2编写后端代码
后端代码中有一些您可能当前看的比较疑惑,但是后续我会讲,主要先关注websocket的核心事件即可
1.编写ServerEndpoint
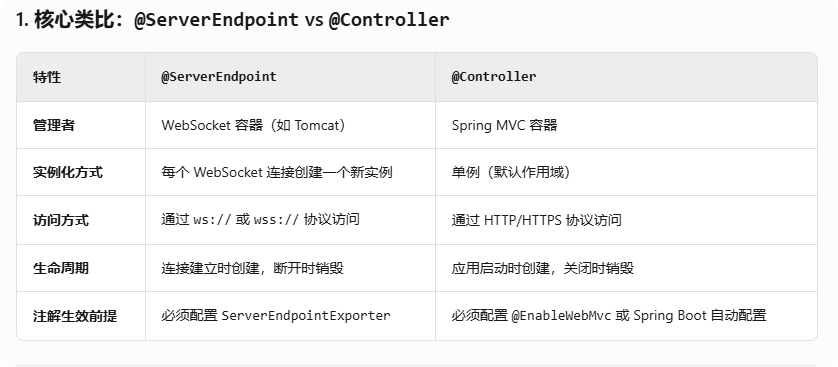
ServerEndpoint,他可以类比于SpringMVC中的Controller, 在括弧中的字符串即为websocket通讯的地址,不同于Controller的是
import org.springframework.beans.factory.annotation.Autowired;
import org.springframework.stereotype.Component;
import javax.websocket.OnClose;
import javax.websocket.OnMessage;
import javax.websocket.OnOpen;
import javax.websocket.Session;
import javax.websocket.server.PathParam;
import javax.websocket.server.ServerEndpoint;
import java.io.IOException;
import java.util.concurrent.ConcurrentHashMap;

@ServerEndpoint("/test_path/websocket/{userId}/{channel}")
@Component
public class WebSocketServer {
    private Long userId;
    // 静态变量保存SessionMap
    private final static ConcurrentHashMap<Long, Session> sessions = new ConcurrentHashMap<>();

    @Autowired testController testController;


    private static testController testController2;
    @Autowired
    public void setMyService(testController controller) {
        WebSocketServer.testController2 = controller; // 静态变量中转
    }

    @OnOpen
    public void onOpen(Session session,
                       @PathParam("userId") Long userId,
                       @PathParam("channel") String channel){
        System.out.println(testController);
        System.out.println(testController2);
        this.userId = userId;
        System.out.println("连接已经建立: id="+userId+" channel="+channel);
        addSession(userId,session);
    }

    @OnClose
    public void onClose(Session session){
        System.out.println("连接关闭了: id="+ userId);
        removeSession(userId);
    }

    @OnMessage
    public void onMessage(String message,Session session){
        System.out.println(message);
        try {
            session.getBasicRemote().sendText("你传来的消息是"+message);
        } catch (IOException e) {
            throw new RuntimeException(e);
        }
    }

    // 添加Session
    public void addSession(Long userId, Session session) {
        sessions.put(userId, session);
    }

    // 移除Session
    public static void removeSession(Long userId) {
        sessions.remove(userId);
    }

    // 获取Session
    public static Session getSession(Long userId) {
        return sessions.get(userId);
    }

    // 向指定用户发送消息
    public static void sendMessageToUser(Long userId, String message) throws IOException {
        Session session = sessions.get(userId);
        if (session != null && session.isOpen()) {
            session.getBasicRemote().sendText(message);
        }
    }

    // 广播消息给所有用户
    public static void broadcast(String message) {
        sessions.forEach((id, session) -> {
            try {
                if (session.isOpen()) {
                    session.getBasicRemote().sendText(message);
                }
            } catch (IOException e) {
                removeSession(id); // 发送失败时移除失效session
            }
        });
    }
}
其中 @ServerEndpoint注解的类下的 @OnOpen,@OnClose,@OnMessage,@OnError会被自动识别,客户端一旦连接,发送消息,关闭等,会自动触发对应的方法
@OnMessage可以在多个方法上标注,但是需要传参类型不同,消息进来后会自动进入对应参数的方法(类似于方法的多个重写,需要参数不同)
这里由于客户端与服务端之间的操作主要由session完成,我通过userId将session存进了map
2.编写WebSocketConfig
配置文件中, ServerEndpointExporter是最重要的,它不是 WebSocket 容器本身,而是 Spring 与 WebSocket 容器之间的桥梁。它的核心职责是让 Spring 能感知并管理标准 JSR-356(Java WebSocket API)定义的端点。
在 Spring 中扫描 @ServerEndpoint类, 并向 WebSocket 容器注册这些端点
import org.springframework.context.annotation.Bean;
import org.springframework.context.annotation.Configuration;
import org.springframework.web.socket.server.standard.ServerEndpointExporter;

@Configuration
public class WebSocketConfig {
    @Bean
    public ServerEndpointExporter serverEndpointExporter(){
        return new ServerEndpointExporter();
    }
}
2.3 编写前端代码
前端通过websocket与服务端连接的方法非常简单,只需要
new WebSocket(服务端路径);
一旦连接成功,连接会一直存在,不会断开,直至一方主动断开,这样中途通讯不需要新建立连接
前端代码一样需要实现onopen,onmessage,onerror,onclose
<!DOCTYPE html>
<html>
<head>
    <meta charset="UTF-8">
    <title>WebSocket 消息通信</title>
    <style>
        #content {
            width: 500px;
            height: 300px;
            border: 1px solid #ccc;
            padding: 10px;
            overflow-y: auto;
            font-family: Arial, sans-serif;
        }
        .message {
            margin: 5px 0;
            padding: 8px;
            border-radius: 5px;
            max-width: 70%;
            word-wrap: break-word;
        }
        .sent {
            background: #e3f2fd;
            margin-left: auto;
            text-align: right;
        }
        .received {
            background: #f1f1f1;
            margin-right: auto;
            text-align: left;
        }
        #text {
            width: 400px;
            padding: 8px;
        }
        #button {
            padding: 8px 15px;
            background: #4CAF50;
            color: white;
            border: none;
            cursor: pointer;
        }
    </style>
</head>
<body>
<div id="content"></div>
<input type="text" id="text" placeholder="输入要发送的消息">
<input type="button" id="button" value="发送">
</body>
</html>
<script>
    // 随机生成用户ID (1-10000)
    function generateRandomId() {
        return Math.floor(Math.random() * 10000) + 1;
    }
    const channels = ["pc", "Android", "ios"];

    // 从数组中随机选择一个channel
    function getRandomChannel() {
        return channels[Math.floor(Math.random() * channels.length)];
    }

    let socket;
    const contentDiv = document.getElementById('content');

    // 在content div中追加消息
    function appendMessage(text, isSent) {
        const messageDiv = document.createElement('div');
        messageDiv.className = `message ${isSent ? 'sent' : 'received'}`;
        messageDiv.textContent = text;
        contentDiv.appendChild(messageDiv);
        contentDiv.scrollTop = contentDiv.scrollHeight; // 自动滚动到底部
    }

    // 建立WebSocket连接
    function connectWebSocket() {
        const userId = generateRandomId();
        const channel = getRandomChannel();

        // 构建带参数的WebSocket URL
        const wsUrl = `ws://localhost:8080/test_path/websocket/${userId}/${channel}`;
        console.log(`连接参数: userId=${userId}, channel=${channel}`);
        appendMessage(`系统: 连接建立中 (用户ID: ${userId}, 设备: ${channel})`, false);

        socket = new WebSocket(wsUrl);

        socket.onopen = () => {
            appendMessage('系统: WebSocket连接已建立', false);
        };

        socket.onmessage = (event) => {
            appendMessage(`服务器: ${event.data}`, false);
        };

        socket.onerror = (error) => {
            appendMessage(`系统错误: ${error.message}`, false);
        };

        socket.onclose = () => {
            appendMessage('系统: 连接已关闭', false);
        };
    }

    // 发送消息函数
    function sendMessage() {
        const message = document.getElementById('text').value.trim();
        if (!message) {
            alert('请输入要发送的消息');
            return;
        }

        if (socket && socket.readyState === WebSocket.OPEN) {
            socket.send(message);
            appendMessage(`我: ${message}`, true);
            document.getElementById('text').value = '';
        } else {
            appendMessage('系统: 连接未准备好,请稍后再试', false);
        }
    }

    // 页面初始化
    window.onload = function() {
        connectWebSocket();

        // 按钮点击事件
        document.getElementById('button').addEventListener('click', sendMessage);

        // 回车键发送
        document.getElementById('text').addEventListener('keypress', function(e) {
            if (e.key === 'Enter') {
                sendMessage();
            }
        });
    };
</script>
2.4 额外测试代码
写一个Controller来主动向前端发送消息, 其中WebSocketServer中调用的静态方法
@RestController
public class testController {

    @PostMapping("/testPush")
    public void testPush(String text,Long userId) throws IOException {
        WebSocketServer.sendMessageToUser(userId,text);
    }

    @PostMapping("/testBroadcast")
    public void testBroadcast(String text) throws IOException {
        WebSocketServer.broadcast(text);
    }
}
在@ServerEndpoint类中, 我们尝试一下注入其他的Bean
public class WebSocketServer {
    // .......
    @Autowired testController testController;

    private static testController testController2;

    @Autowired
    public void setMyService(testController controller) {
         WebSocketServer.testController2 = controller; // 静态变量中转
    }
    // 在onOpen中来测试一下
    @OnOpen
    public void onOpen(Session session,
                       @PathParam("userId") Long userId,
                       @PathParam("channel") String channel){
        System.out.println(testController);
        System.out.println(testController2);
        this.userId = userId;
        System.out.println("连接已经建立: id="+userId+" channel="+channel);
        addSession(userId,session);
    }
}
3.测试结果
服务端发送至客户端的消息将呈现在左侧,而客户端的消息将呈现在右侧
3.1 握手
启动项目,在打开前端页面时,会随机出id与channel,并自动连接服务端, 可以清晰的见到发起的握手请求
同时通过服务端控制台可以看到,直接@autowire注入的Controller失败了,而静态变量注入的成功了
3.2 发送消息
在服务端的onMessage接收到消息后,代码中直接使用session向客户端发送了一条收到xx消息的推送,可以看到成功通信了
我们再来试一试从Controller中获取到session,主动从服务端向客户端发送消息呢
可以看到获取到了指定的session,然后发送至了指定的客户端了
4.本人写的时候的疑惑
4.1ServerEndpointExporter的作用
ServerEndpointExporter 是 Spring 整合标准 WebSocket(JSR-356)的关键桥梁,它相当于 WebSocket 版的 "路由注册器"它的存在解决了以下核心问题:
端点注册:将 @ServerEndpoint 类暴露给 WebSocket 容器 生态整合:让非 Spring 管理的 WebSocket 实例能使用部分Spring功能
没有它,@ServerEndpoint 就只是一个普通的注解,不会产生任何实际效果。
ServerEndpointExporter 可以让@ServerEndpoint 类调用部分Spring的功能
如通过静态变量获取 Bean....... 其余请自行查阅
4.2为什么不能使用依赖注入
在Controller或者其他可能存在的bean中,为什么我不能通过@autowire 来注入被@ServerEndpoint注解的类呢? 在@ServerEndpoint注解的类中,又为什么不能使用@autowire注入其他bean呢
即使加了 @Component 注解,@ServerEndpoint 类也不会被 Spring 完全管理,这是由 WebSocket 的实现机制决定的。以下是关键点解析:
根本原因:双重生命周期管理 JSR-356(标准 WebSocket)和 Spring 是两套独立的规范。
@ServerEndpoint 的实例化由 WebSocket 容器(如 Tomcat)创建和管理,不是通过 Spring 容器创建的。
@Component 的局限性
虽然加了 @Component,但 Spring 只会将其注册为 Bean,不会接管它的生命周期,因此: Spring 的依赖注入(如 @Autowired)不会自动生效 Spring AOP、@PostConstruct 等 Spring 特性无法使用
5.源码分享
Gitee: LiJing/websocketDemo


![[项目总结] 抽奖系统项目技术应用总结](https://i-blog.csdnimg.cn/direct/d01896bda0774fd68623d4d7c9fbb8b2.png)