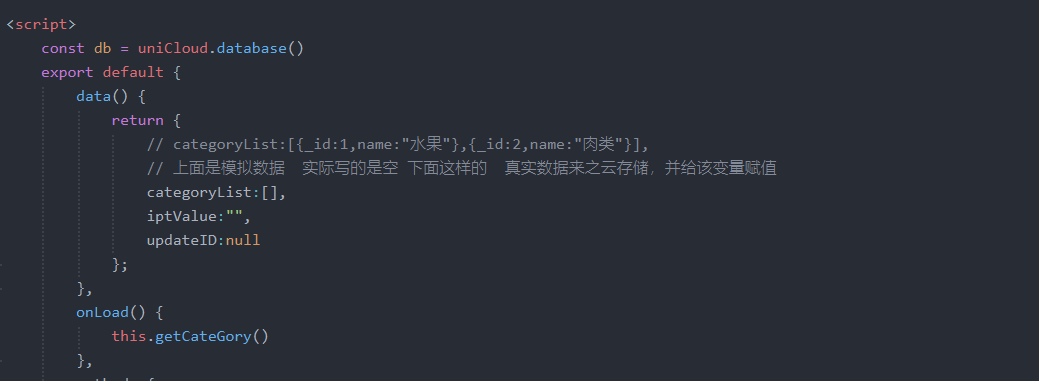
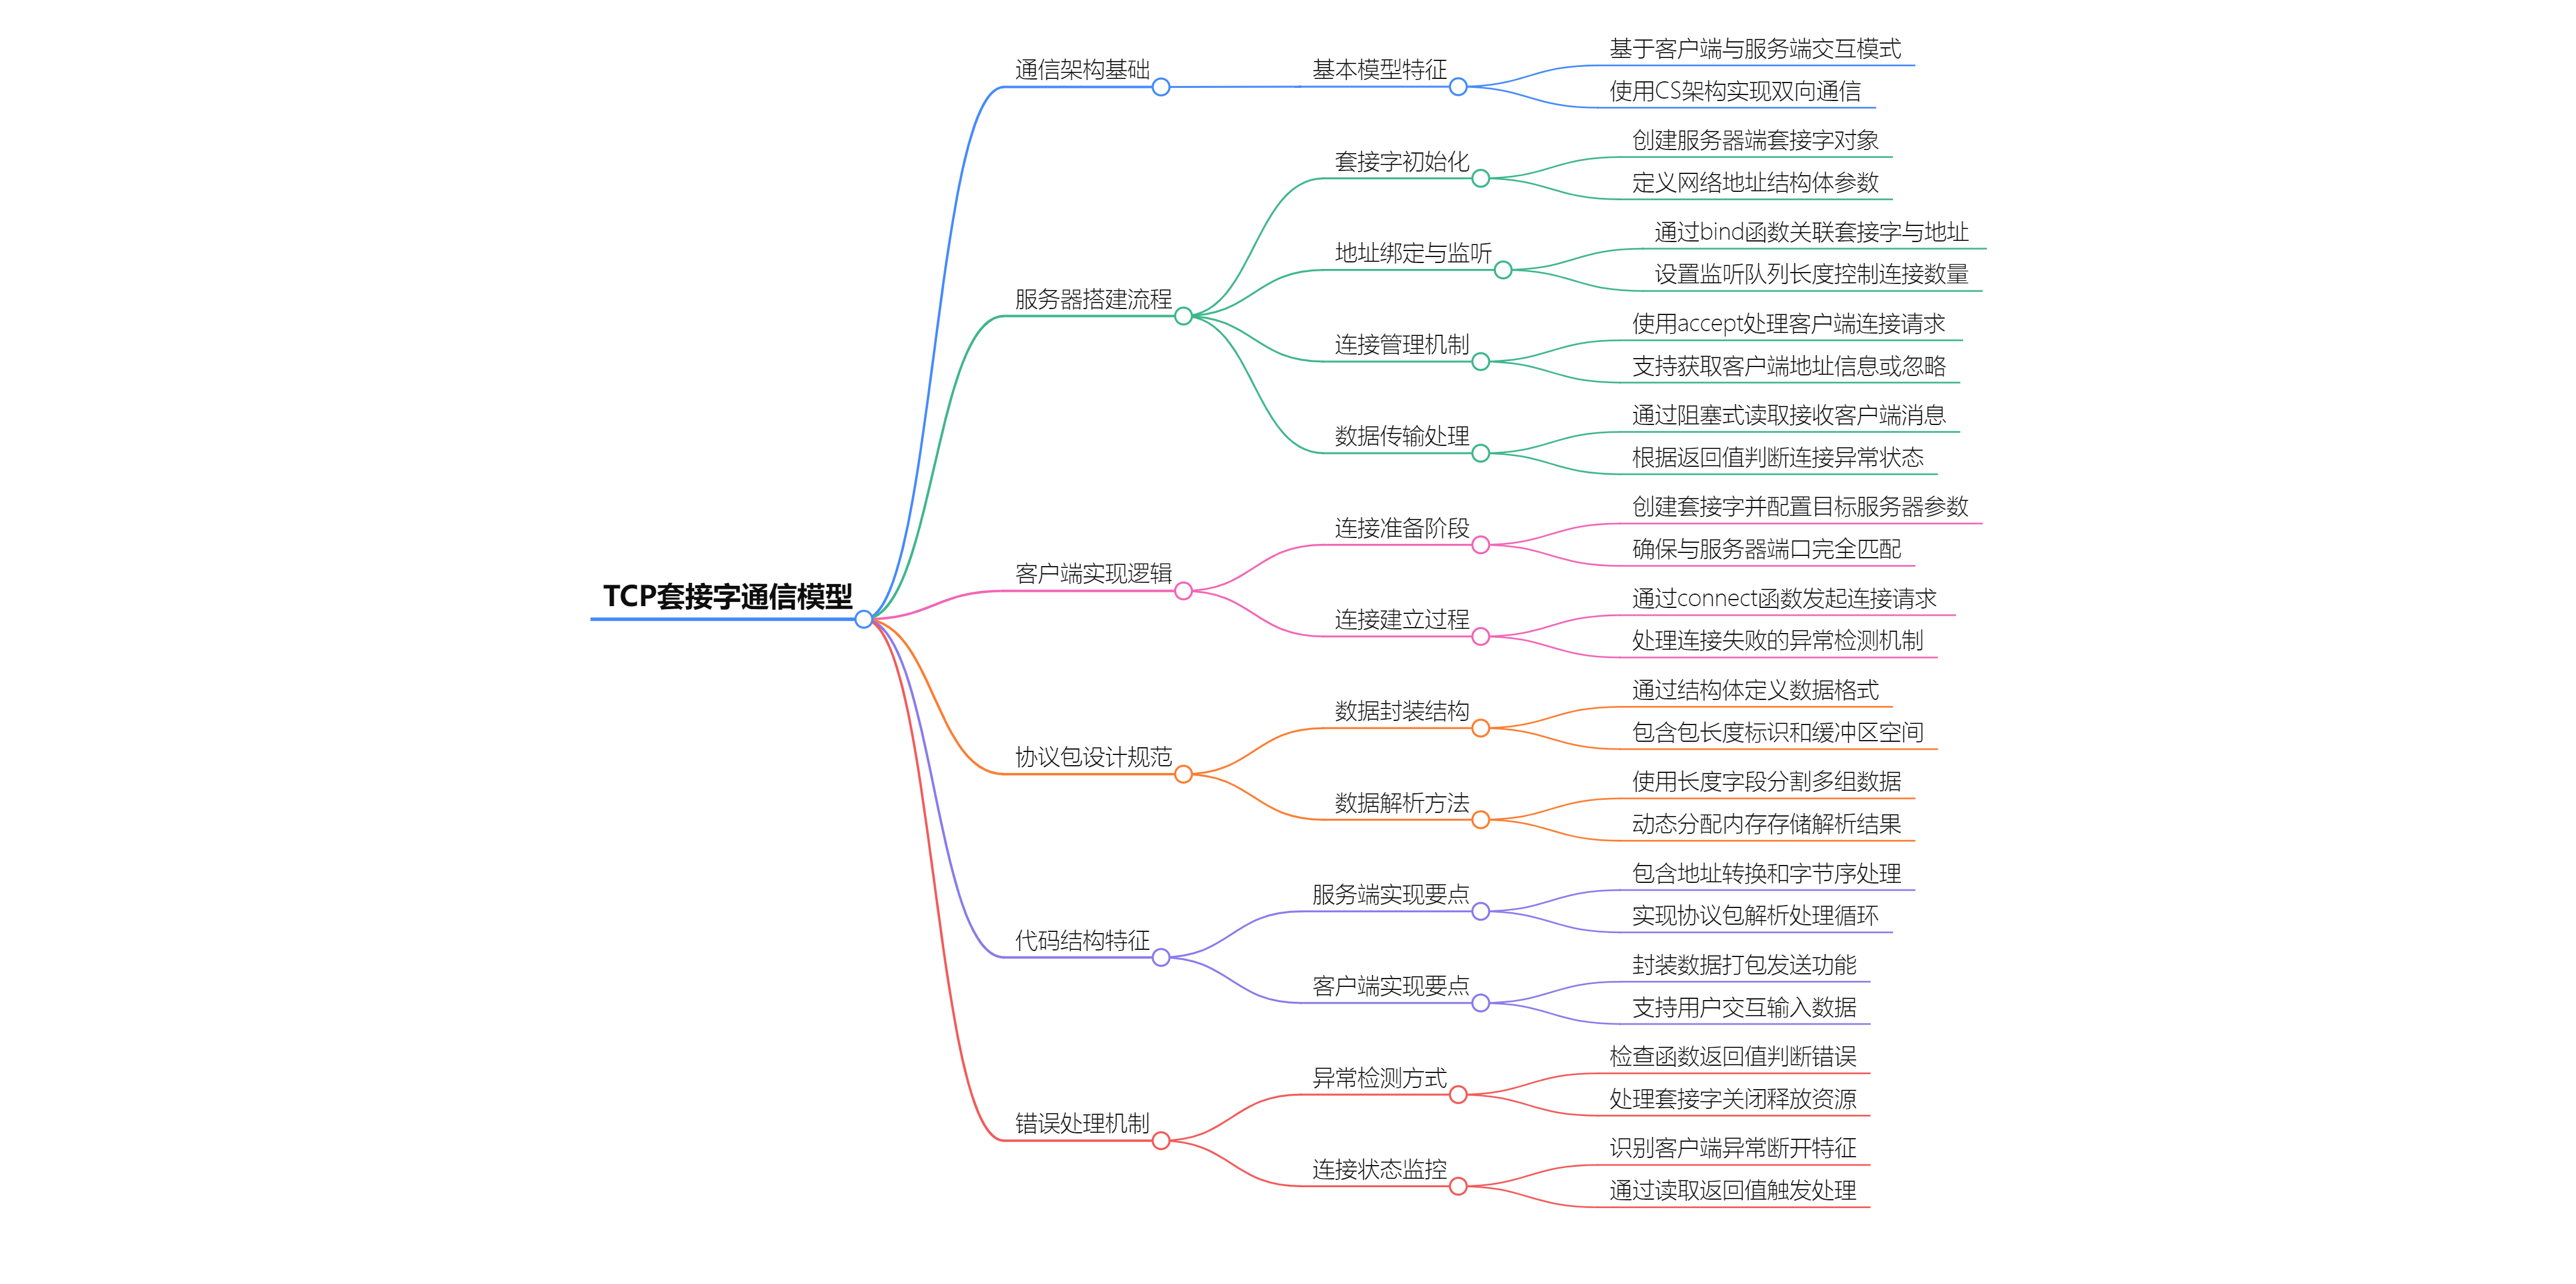
在第46章节中,我们为后台数据创建了分类的数据表结构schema,使得可以通过后台添加数据并保存,同时使用云函数进行数据库数据的读取。文章详细介绍了如何通过前端代码实现分类管理功能,包括获取数据、添加、更新和删除分类。主要代码展示了如何使用uniCloud.database()进行数据库操作,并通过uni-popup组件实现弹出窗口进行数据的添加和更新。此外,文章还说明了如何定义和获取页面数据,以及如何通过onLoad方法在页面加载时获取数据并展示。最后,文章总结了数据库的读写删除修改权限的开启方法。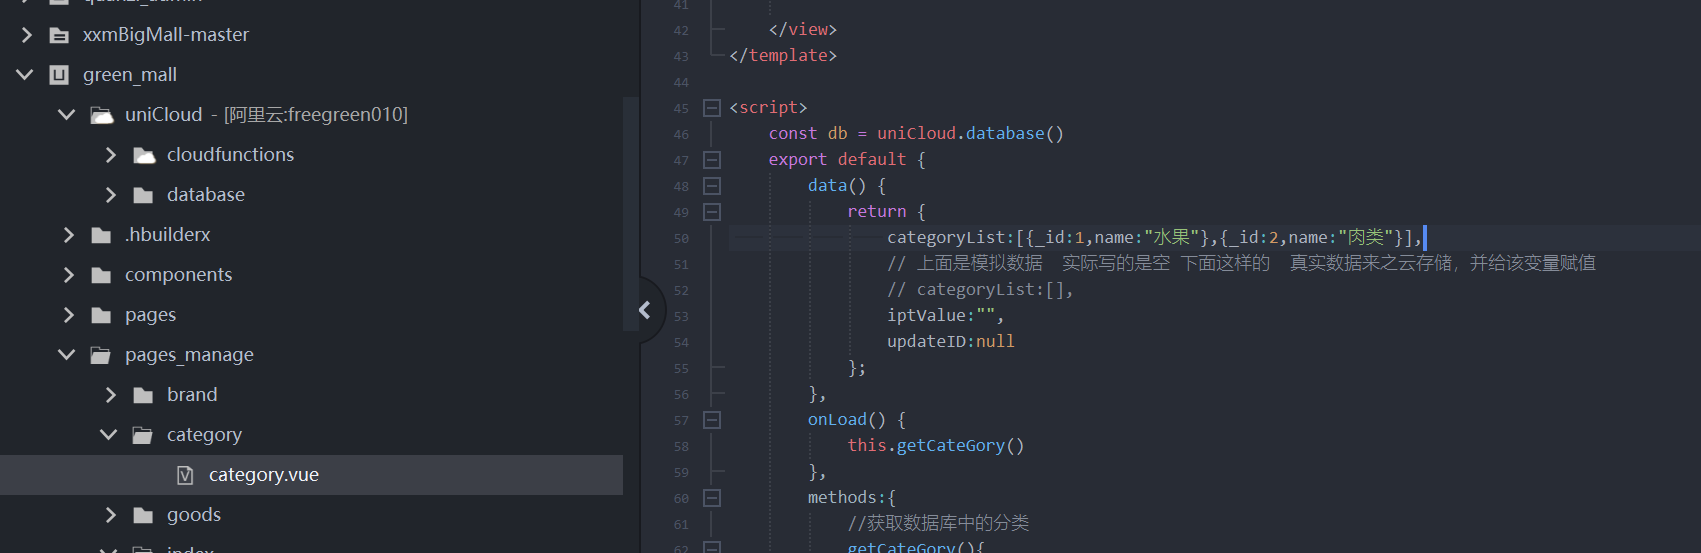
获取分来,来至于数据库
1、后台分类功能
在前面的章节已经说了,这里来看看
包含 获取数据
点击添加
更新和删除
1.1 主要代码:
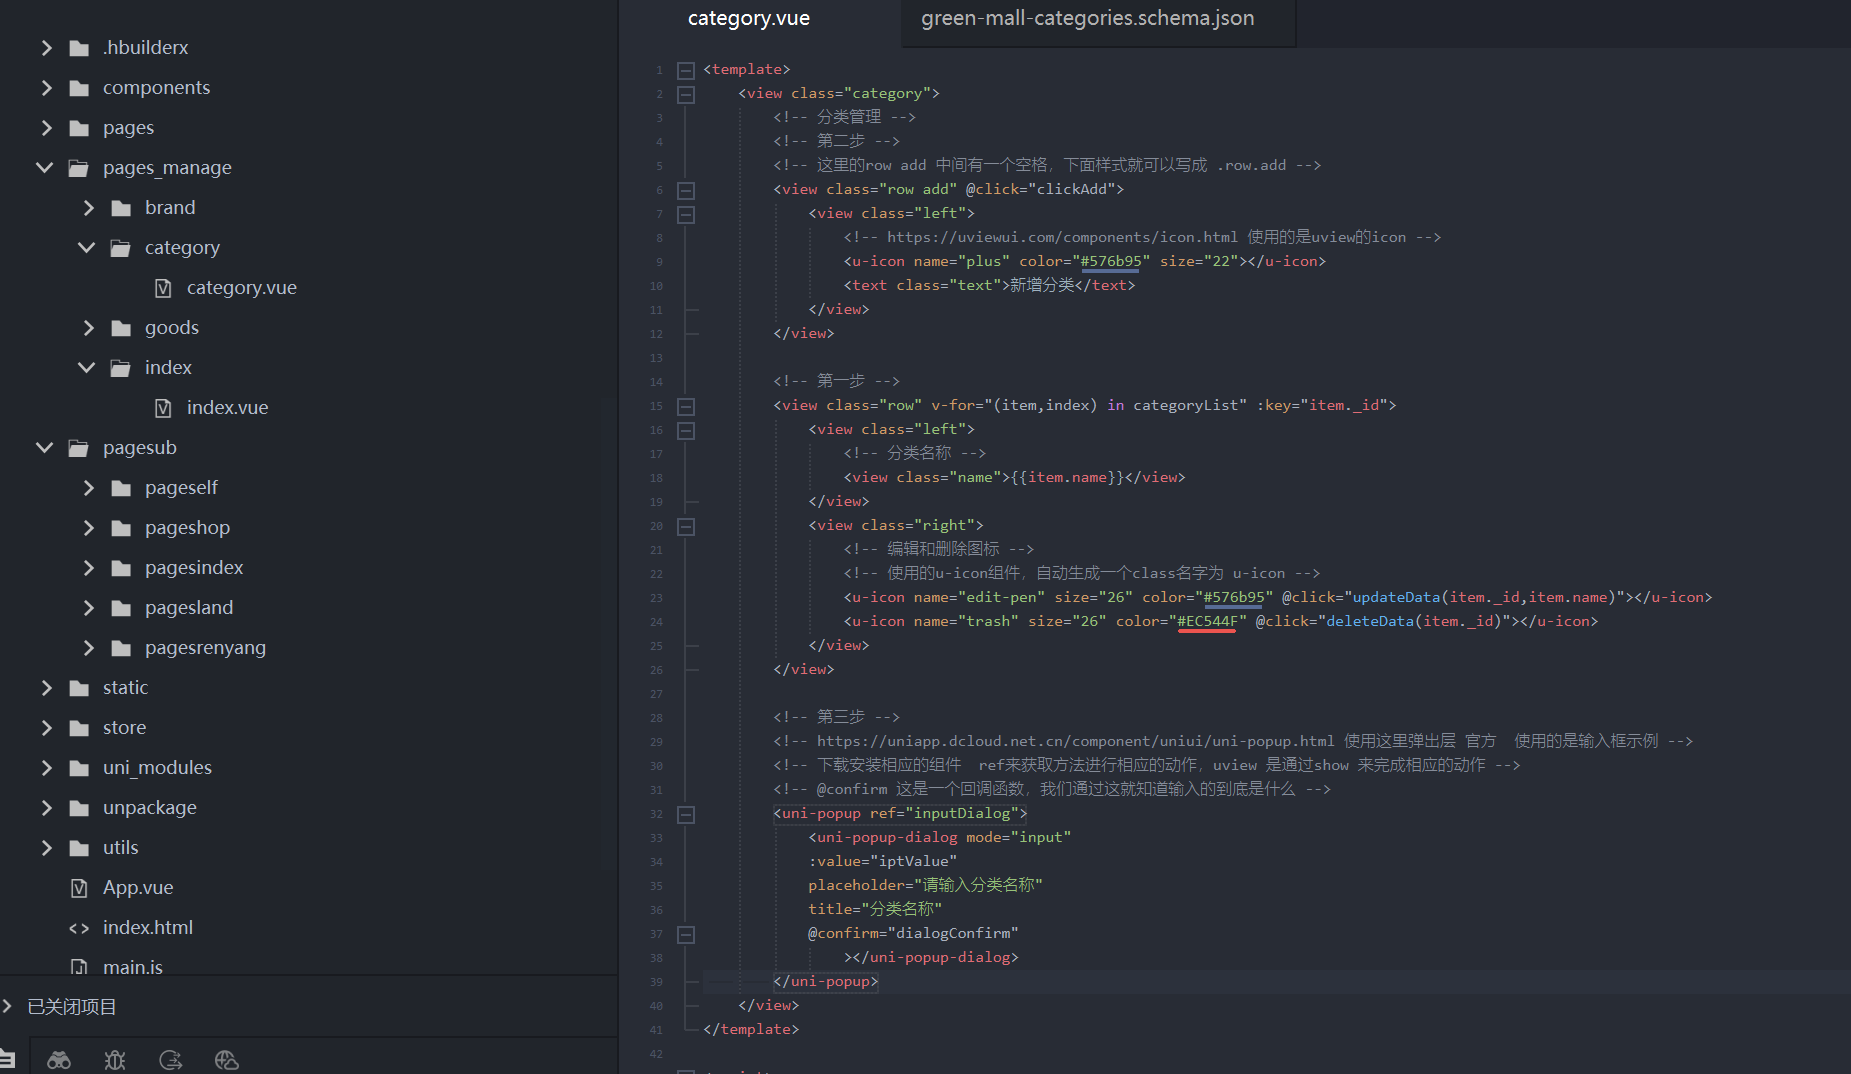
<template>
<view class="category">
<!-- 分类管理 -->
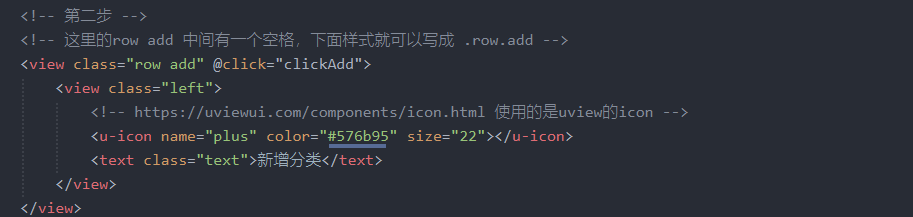
<!-- 第二步 -->
<!-- 这里的row add 中间有一个空格,下面样式就可以写成 .row.add -->
<view class="row add" @click="clickAdd">
<view class="left">
<!-- https://uviewui.com/components/icon.html 使用的是uview的icon -->
<u-icon name="plus" color="#576b95" size="22"></u-icon>
<text class="text">新增分类</text>
</view>
</view>
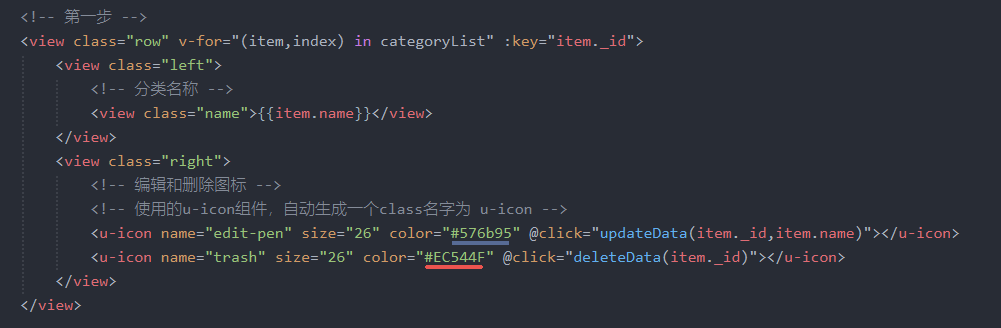
<!-- 第一步 -->
<view class="row" v-for="(item,index) in categoryList" :key="item._id">
<view class="left">
<!-- 分类名称 -->
<view class="name">{{item.name}}</view>
</view>
<view class="right">
<!-- 编辑和删除图标 -->
<!-- 使用的u-icon组件,自动生成一个class名字为 u-icon -->
<u-icon name="edit-pen" size="26" color="#576b95" @click="updateData(item._id,item.name)"></u-icon>
<u-icon name="trash" size="26" color="#EC544F" @click="deleteData(item._id)"></u-icon>
</view>
</view>
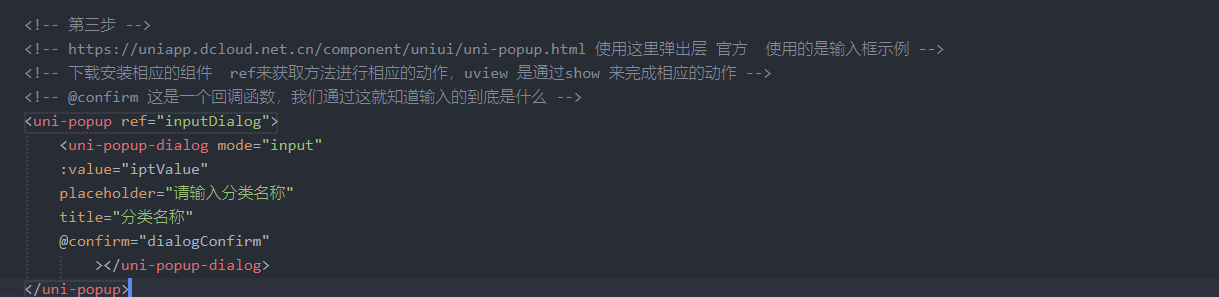
<!-- 第三步 -->
<!-- https://uniapp.dcloud.net.cn/component/uniui/uni-popup.html 使用这里弹出层 官方 使用的是输入框示例 -->
<!-- 下载安装相应的组件 ref来获取方法进行相应的动作,uview 是通过show 来完成相应的动作 -->
<!-- @confirm 这是一个回调函数,我们通过这就知道输入的到底是什么 -->
<uni-popup ref="inputDialog">
<uni-popup-dialog mode="input"
:value="iptValue"
placeholder="请输入分类名称"
title="分类名称"
@confirm="dialogConfirm"
></uni-popup-dialog>
</uni-popup>
</view>
</template>
<script>
const db = uniCloud.database()
export default {
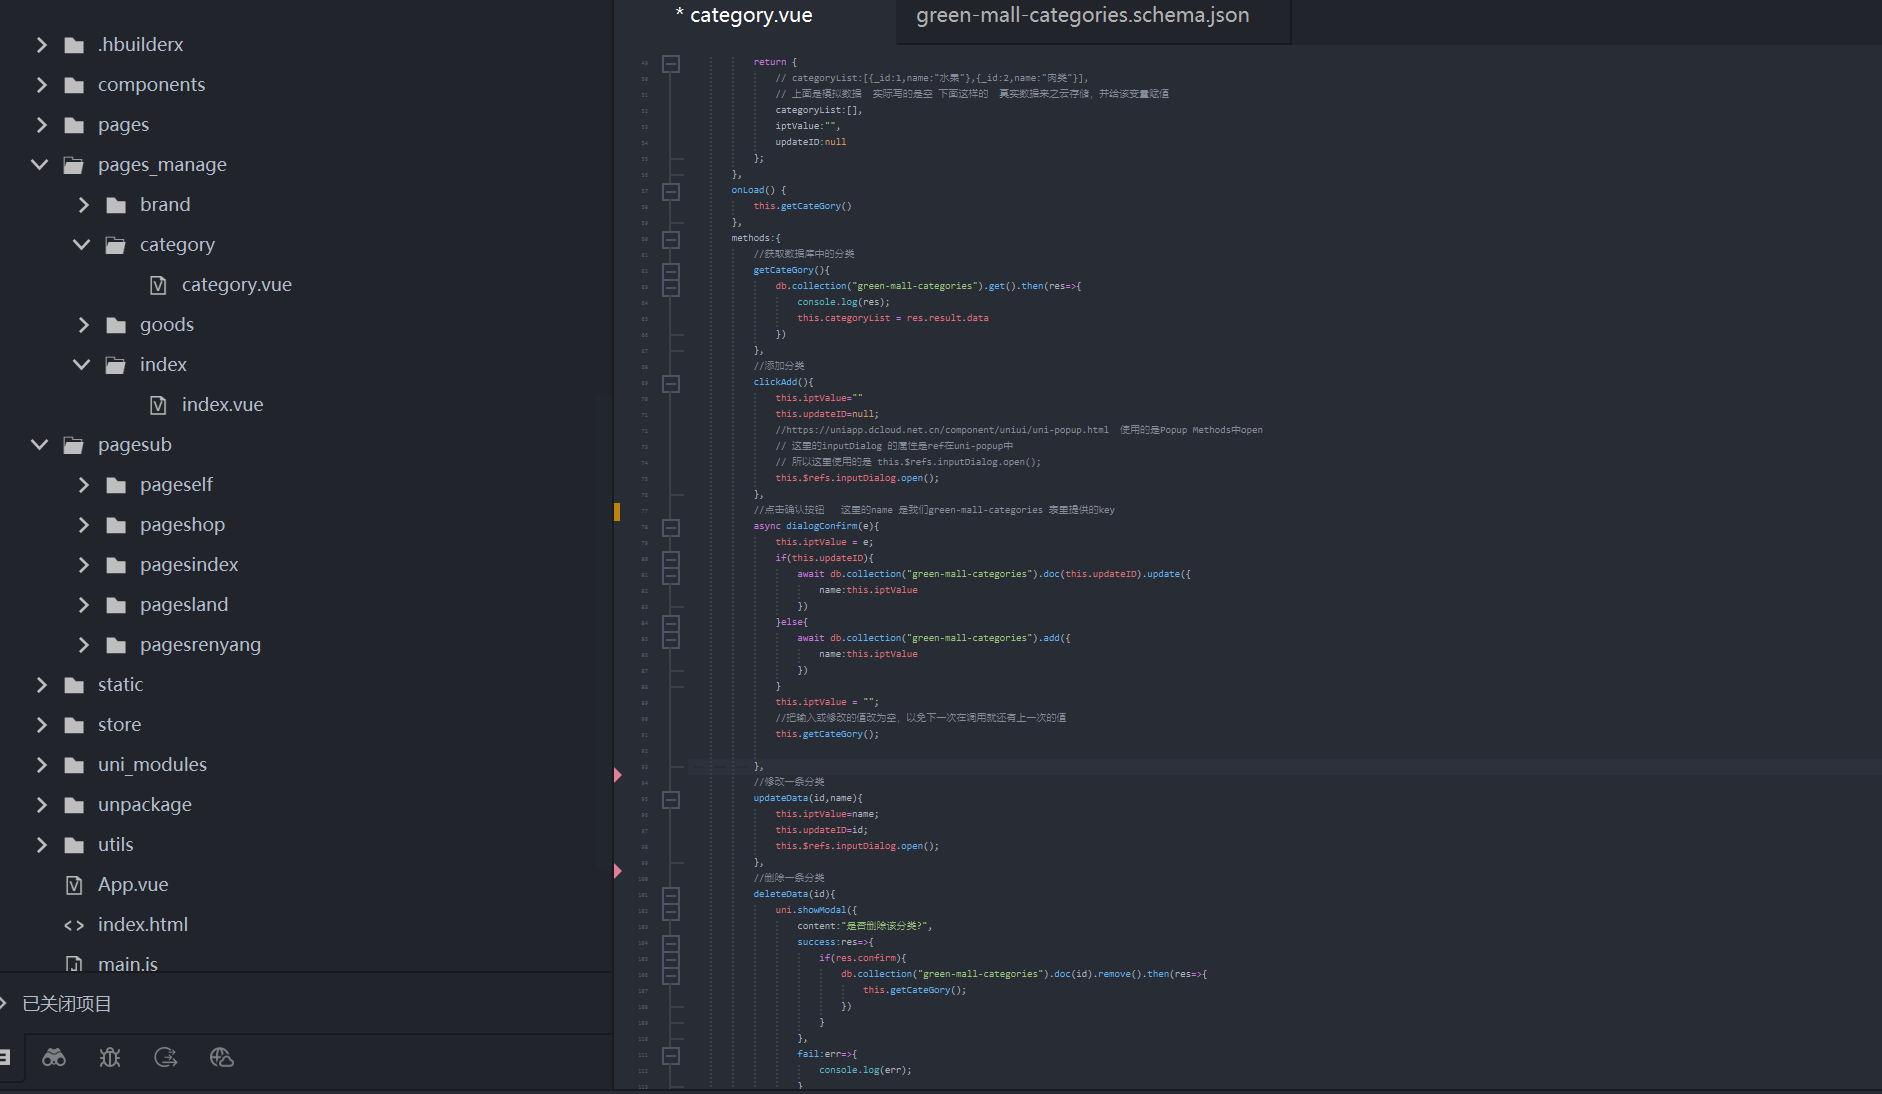
data() {
return {
// categoryList:[{_id:1,name:"水果"},{_id:2,name:"肉类"}],
// 上面是模拟数据 实际写的是空 下面这样的 真实数据来之云存储,并给该变量赋值
categoryList:[],
iptValue:"",
updateID:null
};
},
onLoad() {
this.getCateGory()
},
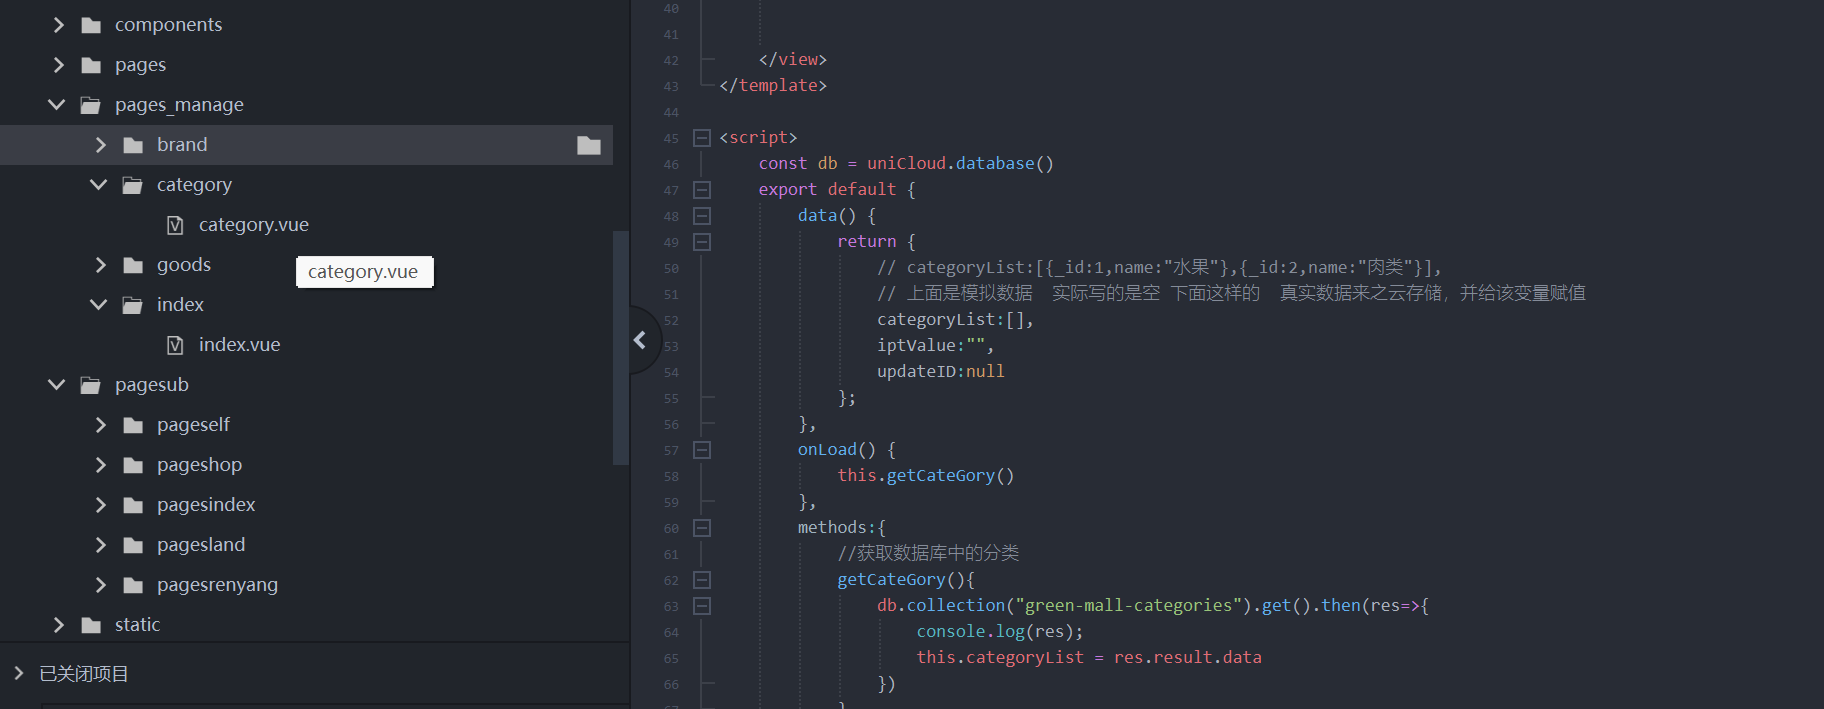
methods:{
//获取数据库中的分类
getCateGory(){
db.collection("green-mall-categories").get().then(res=>{
console.log(res);
this.categoryList = res.result.data
})
},
//添加分类
clickAdd(){
this.iptValue=""
this.updateID=null;
//https://uniapp.dcloud.net.cn/component/uniui/uni-popup.html 使用的是Popup Methods中open
// 这里的inputDialog 的属性是ref在uni-popup中
// 所以这里使用的是 this.$refs.inputDialog.open();
this.$refs.inputDialog.open();
},
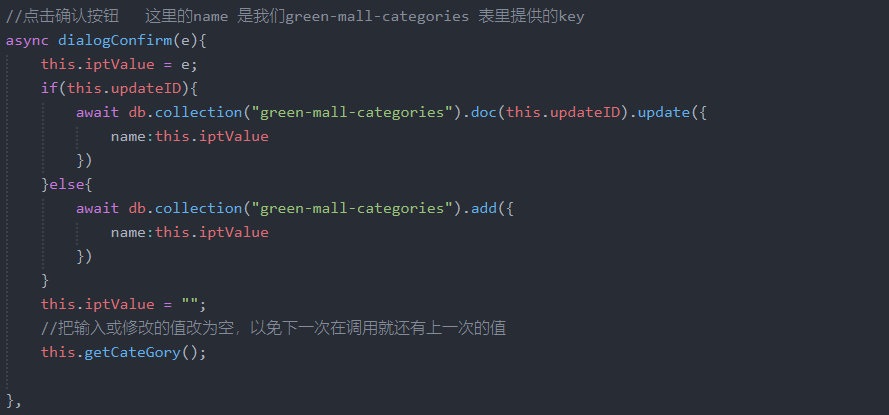
//点击确认按钮 这里的name 是我们green-mall-categories 表里提供的key
async dialogConfirm(e){
this.iptValue = e;
if(this.updateID){
await db.collection("green-mall-categories").doc(this.updateID).update({
name:this.iptValue
})
}else{
await db.collection("green-mall-categories").add({
name:this.iptValue
})
}
this.iptValue = "";
//把输入或修改的值改为空,以免下一次在调用就还有上一次的值
this.getCateGory();
},
//修改一条分类
updateData(id,name){
this.iptValue=name;
this.updateID=id;
this.$refs.inputDialog.open();
},
//删除一条分类
deleteData(id){
uni.showModal({
content:"是否删除该分类?",
success:res=>{
if(res.confirm){
db.collection("green-mall-categories").doc(id).remove().then(res=>{
this.getCateGory();
})
}
},
fail:err=>{
console.log(err);
}
})
}
}
}
</script>
<style lang="scss">
.category{
padding:30rpx;
.row{
@include flex-box();
border-bottom: 1px solid $border-color-light;
padding:26rpx 0;
.left{
font-size: 34rpx;
}
.right{
@include flex-box();
//使用的u-icon组件,自动生成一个class名字为 u-icon
.u-icon{
margin-left:30rpx;
}
}
}
// 对应的class 就是 row add
.row.add{
.left{
color:$brand-theme-color-aux;
@include flex-box();
.text{
font-size: 36rpx;
padding-left:10rpx;
}
}
}
}
</style>
2 使用数据库获取数据
2.1 页面代码
2.2 主要方法
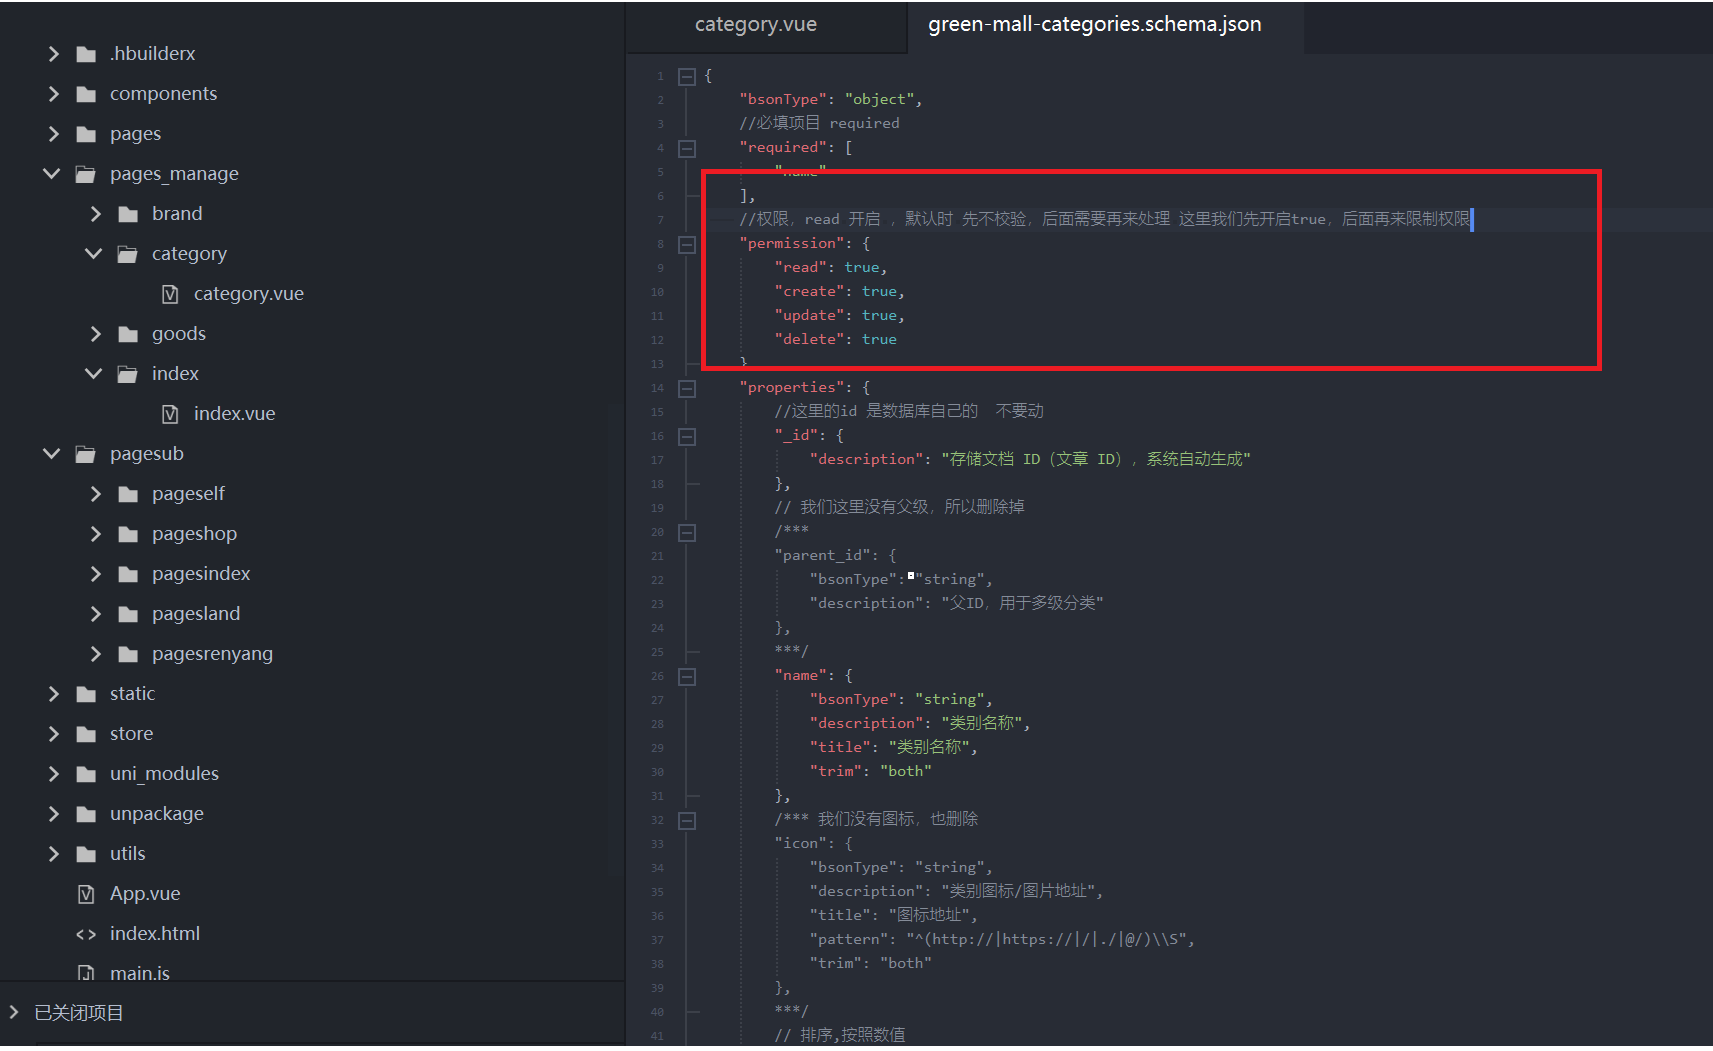
2.3 开启数据库的读写删除修改权限
这里暂时开启,后面会对权限进行显示
3、 方法说明
3.1 页面展示数据
3.2 添加 增加的按钮
3.3 使用弹出窗口进行增加(点击修改或者新增 后 页面上展示)
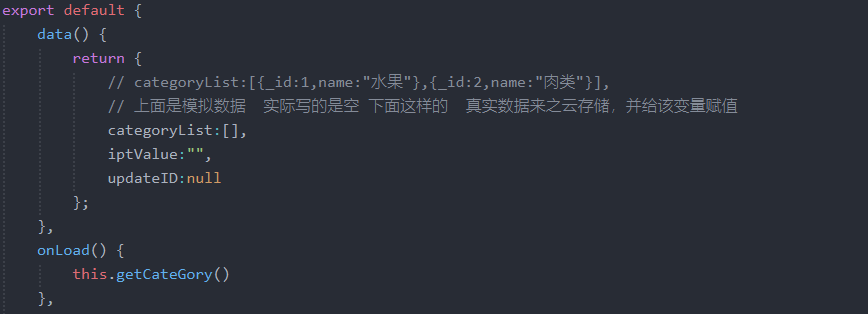
3.4 页面数据定义和获取(进入页面时)
定义的数据是用来进行数据的存储;
onload 是用来进入页面时 进行数据的获取并传递给data ,然后再展示到页面上。
3.5 方法说明
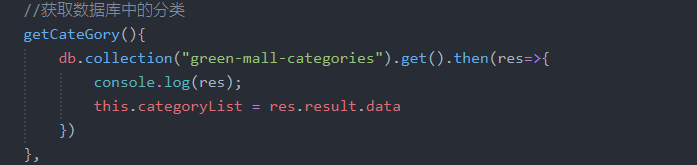
3-5-1 、方法1 获取数据 getcatgory
3-5-2、 方法2 添加数据 add
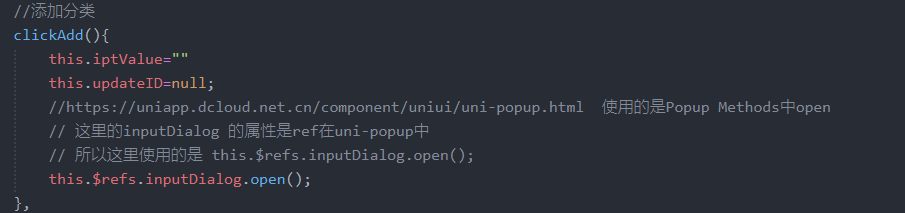
//https://uniapp.dcloud.net.cn/component/uniui/uni-popup.html 使用的是Popup Methods中open
// 这里的inputDialog 的属性是ref在uni-popup中
// 所以这里使用的是 this.$refs.inputDialog.open();
3-5-3、 方法3 更新数据 update
//https://uniapp.dcloud.net.cn/component/uniui/uni-popup.html 使用的是Popup Methods中open
// 这里的inputDialog 的属性是ref在uni-popup中
// 所以这里使用的是 this.$refs.inputDialog.open();

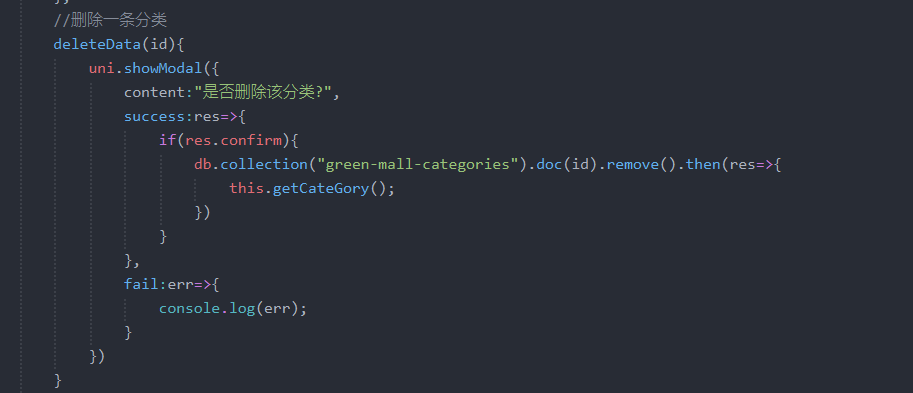
3-5-4、 方法4 删除数据 delete
3-5-6、弹出层中的事件处理,主要是添加和更新数据的操作
@confirm="dialogConfirm" 弹出层定义的动作。再add 和update 中使用了 所以这里使用的是 this.$refs.inputDialog.open();
//https://uniapp.dcloud.net.cn/component/uniui/uni-popup.html 使用的是Popup Methods中open
// 这里的inputDialog 的属性是ref在uni-popup中
// 所以这里使用的是 this.$refs.inputDialog.open();
3-5-7 、这里要定义数据库(相当于导入数据库,没有使用jql方法,使用的是传统方法)
const db = uniCloud.database()