自动部署
实战流程
下边使用jenkins实现CI/CD的流程。
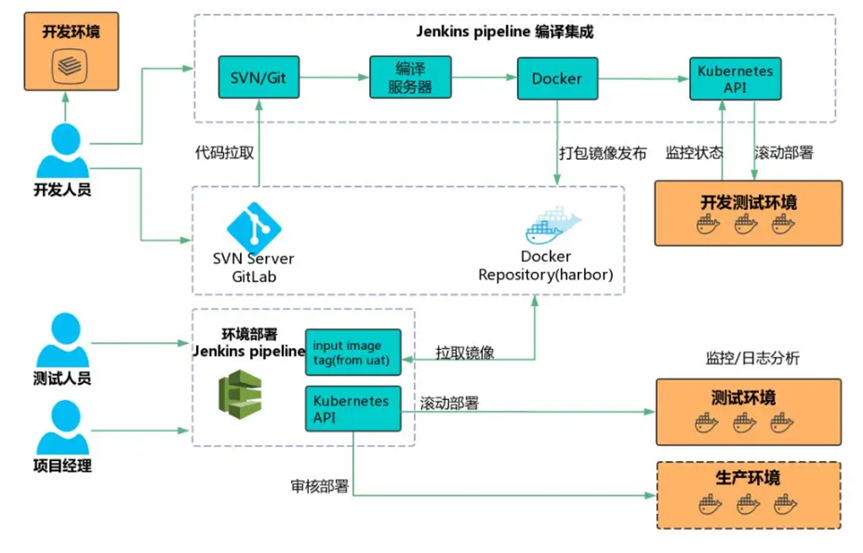
1、将代码使用Git托管
2、在jenkins创建任务,从Git拉取代码。
3、拉取代码后进行自动构建:测试、打包、部署。
首先将代码打成镜像包上传到docker私服。
自动创建容器、启动容器。
4、当有代码push到git实现自动构建。
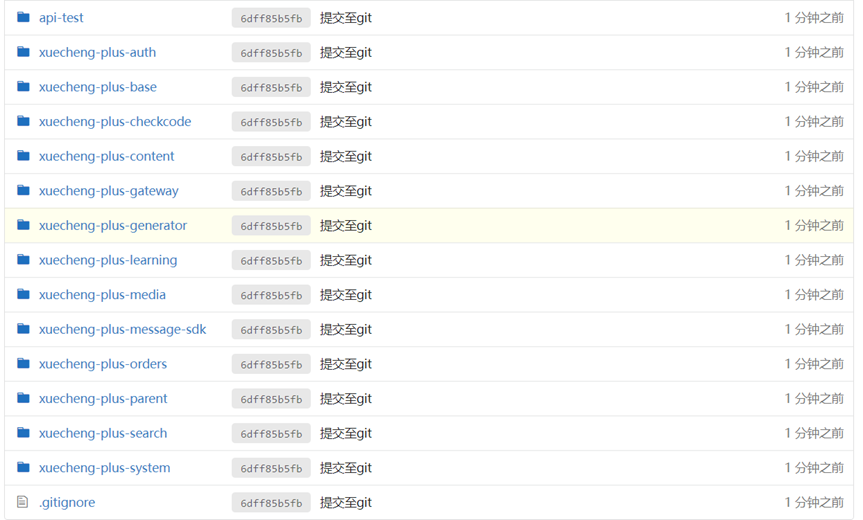
代码提交至Git
修改pom.xml文件
在pom.xml添加docker-maven-plugin插件实现将springboot工程创建镜像,此pom.xml添加docker-maven-plugin插件用于生成镜像。
分别修改system-api、content-api、media-api、gateway、auth、checkcode服务的pom.xml文件。
插件的坐标如下:
<dependency>
    <groupId>com.spotify</groupId>
    <artifactId>docker-maven-plugin</artifactId>
    <version>1.2.2</version>
</dependency>
修改pom.xml文件,以xuecheng-plus-checkcode为例,如下:
<build>
<finalName>${project.artifactId}-${project.version}</finalName>
<plugins>
<plugin>
<groupId>org.springframework.boot</groupId>
<artifactId>spring-boot-maven-plugin</artifactId>
<version>${spring-boot.version}</version>
<executions>
<execution>
<goals>
<goal>repackage</goal>
</goals>
</execution>
</executions>
</plugin>
<plugin>
<groupId>com.spotify</groupId>
<artifactId>docker-maven-plugin</artifactId>
<version>1.2.2</version>
<configuration>
<!--修改imageName节点的内容,改为私有仓库地址和端口,再加上镜像id和 TAG,我们要直接传到私服-->
<!--配置最后生成的镜像名,docker images里的,我们这边取项目名:版本-->
<!--<imageName>${project.artifactId}:${project.version}</imageName>-->
<imageName>192.168.101.65:5000/${project.artifactId}:${project.version}</imageName>
<!--也可以通过以下方式定义image的tag信息。 -->
<!-- <imageTags>
<imageTag>${project.version}</imageTag>
<!–build 时强制覆盖 tag,配合 imageTags 使用–>
<forceTags>true</forceTags>
<!–build 完成后,push 指定 tag 的镜像,配合 imageTags 使用–>
<pushImageTag>true</pushImageTag>
</imageTags>-->
<baseImage>java:8u20</baseImage>
<maintainer>docker_maven docker_maven@email.com</maintainer>
<workdir>/root</workdir>
<cmd>["java", "-version"]</cmd>
<!--来指明Dockerfile文件的所在目录,如果配置了dockerDirectory则忽略baseImage,maintainer等配置-->
<!--<dockerDirectory>./</dockerDirectory>-->
<!--2375是docker的远程端口,插件生成镜像时连接docker,这里需要指定docker远程端口-->
<dockerHost>http://192.168.101.65:2375</dockerHost>
<!--入口点,project.build.finalName就是project标签下的build标签下 的filename标签内容,testDocker-->
<!--相当于启动容器后,会自动执行java -jar ...-->
<entryPoint>["java", "-Dfile.encoding=utf-8","-jar", "/root/${project.build.finalName}.jar"]</entryPoint>
<!--是否推送到docker私有仓库,旧版本插件要配置maven的settings文件。 -->
<pushImage>true</pushImage>
<registryUrl>192.168.101.65:5000</registryUrl> <!-- 这里是复制 jar 包到 docker 容器指定目录配置 -->
<resources>
<resource>
<targetPath>/root</targetPath>
<directory>${project.build.directory}</directory>
<!--把哪个文件上传到docker,相当于Dockerfile里的add app.jar /-->
<include>${project.build.finalName}.jar</include>
</resource>
</resources>
</configuration>
</plugin>
</plugins>
</build>
其中system-api服务的bootstrap.yml修改如下:
server:
  servlet:
    context-path: /system
  port: 63110
#微服务配置
spring:
  application:
    name: system-api
  datasource:
    driver-class-name: com.mysql.cj.jdbc.Driver
    url: jdbc:mysql://192.168.101.65:3306/xcplus_system?serverTimezone=UTC&userUnicode=true&useSSL=false&
    username: root
    password: mysql
  cloud:
    nacos:
      server-addr: 192.168.101.65:8848
      discovery:
        namespace: dev166
        group: xuecheng-plus-project
# 日志文件配置路径
logging:
  config: classpath:log4j2-dev.xml

# swagger 文档配置
swagger:
  title: "学成在线系统管理"
  description: "系统管理接口"
  base-package: com.xuecheng.system
  enabled: true
  version: 1.0.0
在system-api工程添加nacos的依赖:
<dependency>
    <groupId>com.alibaba.cloud</groupId>
    <artifactId>spring-cloud-starter-alibaba-nacos-discovery</artifactId>
</dependency>
删除system-service工程下的配置文件。
以上内容修改完毕再次提交Git.
自动构建测试
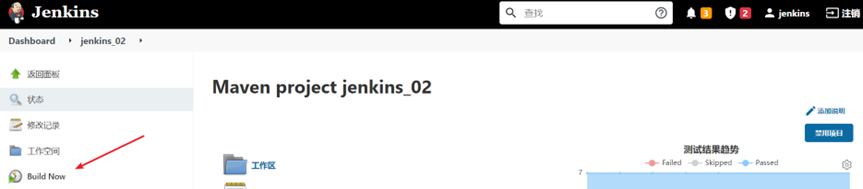
找到jenkins_02任务,配置源码管理
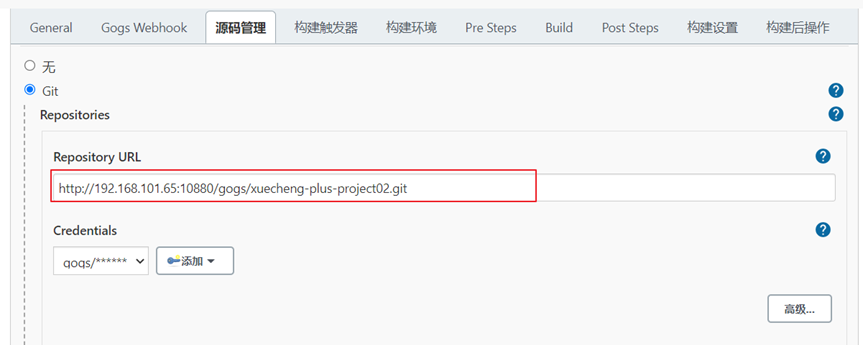
配置完毕,开始构建
通过控制台输出日志观察构建情况
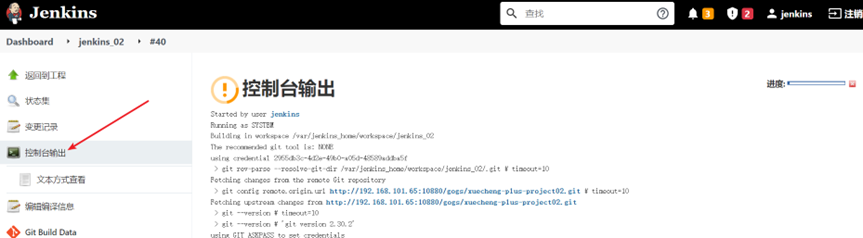
如果控制台有报错,根据错误信息进行调试。
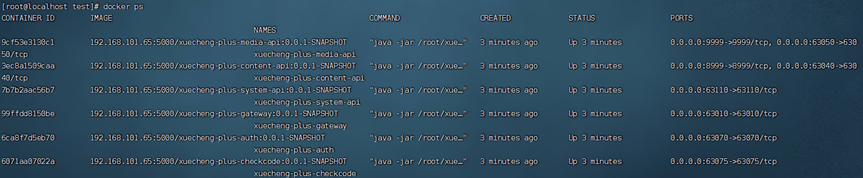
部署成功后,进入服务器查看docker容器是否启动成功
部署前端门户
在虚拟机的docker中已经部署了nginx,修改nginx.conf的配置文件
#user  nobody;
worker_processes  1;

#error_log  logs/error.log;
#error_log  logs/error.log  notice;
#error_log  logs/error.log  info;

#pid        logs/nginx.pid;


events {
    worker_connections  1024;
}


http {
     server_names_hash_bucket_size 64;
     client_max_body_size 100M; # 设置客户端请求体最大值
     client_body_buffer_size 128k; # 设置请求体缓存区大小
    include       mime.types;
    default_type  application/octet-stream;

    #log_format  main  '$remote_addr - $remote_user [$time_local] "$request" '
    #                  '$status $body_bytes_sent "$http_referer" '
    #                  '"$http_user_agent" "$http_x_forwarded_for"';

    #access_log  logs/access.log  main;

    sendfile        on;
    #tcp_nopush     on;

    #keepalive_timeout  0;
    keepalive_timeout  65;
   #文件服务
  upstream fileserver{
    server 192.168.101.65:9000 weight=10;
  }
     #后台网关
  upstream gatewayserver{
    server 192.168.101.65:63010 weight=10;
  }
    #gzip  on;

    server {
        listen       80;
        server_name  www.51xuecheng.cn localhost;
        #rewrite ^(.*) https://$server_name$1 permanent;
        #charset koi8-r;
        ssi on;
        ssi_silent_errors on;
        #access_log  logs/host.access.log  main;

        location / {
            alias   /etc/nginx/html/;
            index  index.html index.htm;
        }
        #api
        location /api/ {
                proxy_pass http://gatewayserver/;
        }
        #静态资源
        location /static/img/ {
                alias  /etc/nginx/html/img/;
        }
        location /static/css/ {
                alias   /etc/nginx/html/css/;
        }
        location /static/js/ {
                alias   /etc/nginx/html/js/;
        }
        location /static/plugins/ {
                alias   /etc/nginx/html/plugins/;
                add_header Access-Control-Allow-Origin http://ucenter.51xuecheng.cn;
                add_header Access-Control-Allow-Credentials true;
                add_header Access-Control-Allow-Methods GET;
        }
        location /plugins/ {
                alias   /etc/nginx/html/plugins/;
        }
        location /course/preview/learning.html {
                alias /etc/nginx/html/course/learning.html;
        }
        location /course/search.html {
                root   /etc/nginx/html;
        }
        location /course/learning.html {
                root   /etc/nginx/html;
        }
        location /course/ {
                proxy_pass http://fileserver/mediafiles/course/;
        }
        #openapi
        location /open/content/ {
                proxy_pass http://gatewayserver/content/open/;
        }
        location /open/media/ {
                proxy_pass http://gatewayserver/media/open/;
        }

        #error_page  404              /404.html;

        # redirect server error pages to the static page /50x.html
        #
        error_page   500 502 503 504  /50x.html;
        location = /50x.html {
            root   html;
        }

        # proxy the PHP scripts to Apache listening on 127.0.0.1:80
        #
        #location ~ \.php$ {
        #    proxy_pass   http://127.0.0.1;
        #}

        # pass the PHP scripts to FastCGI server listening on 127.0.0.1:9000
        #
        #location ~ \.php$ {
        #    root           html;
        #    fastcgi_pass   127.0.0.1:9000;
        #    fastcgi_index  index.php;
        #    fastcgi_param  SCRIPT_FILENAME  /scripts$fastcgi_script_name;
        #    include        fastcgi_params;
        #}

        # deny access to .htaccess files, if Apache's document root
        # concurs with nginx's one
        #
        #location ~ /\.ht {
        #    deny  all;
        #}
    }

   server {
        listen       80;
        server_name  file.51xuecheng.cn;
        #charset koi8-r;
        ssi on;
        ssi_silent_errors on;
        #access_log  logs/host.access.log  main;
        location /video {
            proxy_pass   http://fileserver;
        }

        location /mediafiles {
            proxy_pass   http://fileserver;
        }
   }

   server {
        listen       80;
        server_name  teacher.51xuecheng.cn;
        #charset koi8-r;
        ssi on;
        ssi_silent_errors on;
        #access_log  logs/host.access.log  main;
        location / {
            alias   /etc/nginx/html/dist/;
            index  index.html index.htm;
        }
        #location / {
        #    proxy_pass   http://uidevserver;
        #}

        location /api/ {
                proxy_pass http://gatewayserver/;
        }


   }

    server {
        listen       80;
        server_name  ucenter.51xuecheng.cn;
        #charset koi8-r;
        ssi on;
        ssi_silent_errors on;
        #access_log  logs/host.access.log  main;
        location / {
            alias   /etc/nginx/html/ucenter/;
            index  index.html index.htm;
        }
        location /include {
            proxy_pass   http://192.168.101.65;
        }
        location /img/ {
            proxy_pass   http://192.168.101.65/static/img/;
        }
        location /api/ {
                proxy_pass http://gatewayserver/;
        }
   }
    # another virtual host using mix of IP-, name-, and port-based configuration
    #
    #server {
    #    listen       8000;
    #    listen       somename:8080;
    #    server_name  somename  alias  another.alias;

    #    location / {
    #        root   html;
    #        index  index.html index.htm;
    #    }
    #}


    # HTTPS server
    #
    #server {
    #    listen       443 ssl;
    #    server_name  localhost;

    #    ssl_certificate      cert.pem;
    #    ssl_certificate_key  cert.key;

    #    ssl_session_cache    shared:SSL:1m;
    #    ssl_session_timeout  5m;

    #    ssl_ciphers  HIGH:!aNULL:!MD5;
    #    ssl_prefer_server_ciphers  on;

    #    location / {
    #        root   html;
    #        index  index.html index.htm;
    #    }
    #}

}
将前端门户的静态页面拷贝到 /data/soft/nginx/xuecheng_portal_static
启动nginx容器:
docker start nginx修改本机hosts文件:
192.168.101.65 www.51xuecheng.cn 51xuecheng.cn ucenter.51xuecheng.cn teacher.51xuecheng.cn file.51xuecheng.cn将本机的nginx服务停掉,访问www.51xuecheng.cn。
部署机构端前端
将机构端的前端工程打包,运行yarn build
打包成功在工程目录生成dist目录
将此目录的内容拷贝到虚拟机的/data/soft/nginx/xuecheng_portal_static/dist
配置触发器
当向gogs提交代码时进行自动构建
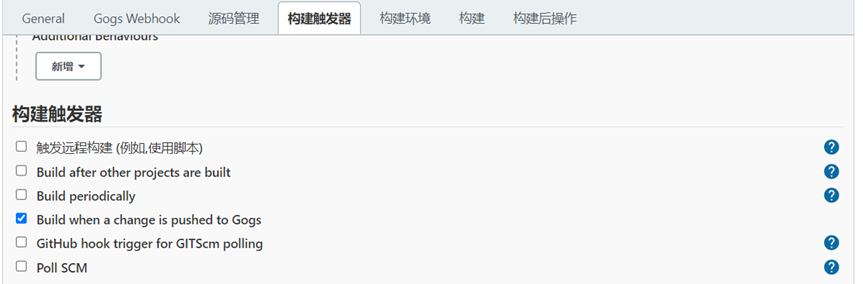
在gogs配置钩子
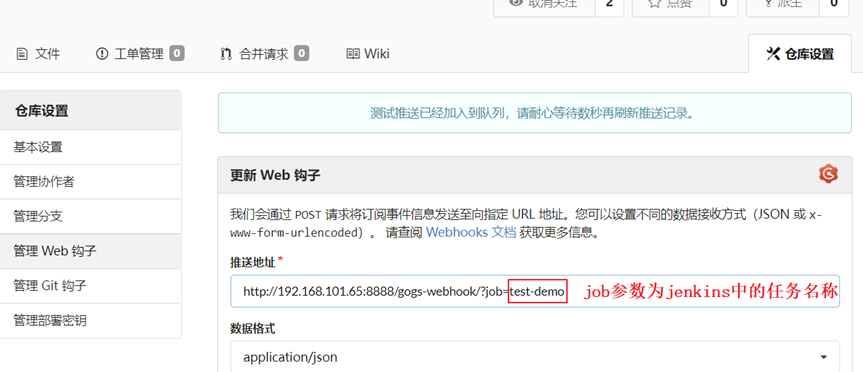
推送地址设置jenkins的接口:
http://192.168.101.65:8888/gogs-webhook/?job=jenkins_02
配置好可以测试一下:
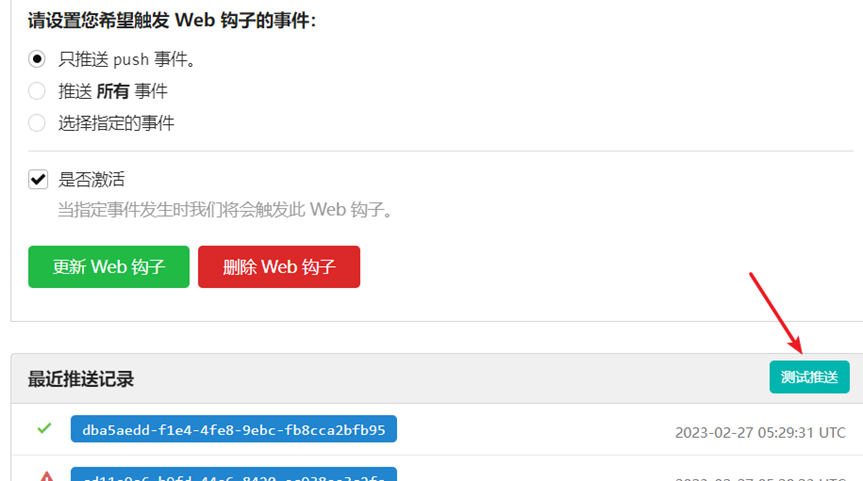
测试后观察jenkina是否重新构建任务。
提交代码测试:
修改代码提交到gogs,观察jenkins是否自动构建任务
功能测试
测试认证功能
部署成功后对功能进行测试。
1、首先测试认证功能
进入www.51xuecheng.cn,点击登录,输入账号和密码进行登录。
账号和密码:t1/111111
测试内容管理
1、测试课程列表
出现 Request failed with status code 503 错误
通过nacos排查,进入服务列表
缺少system-api
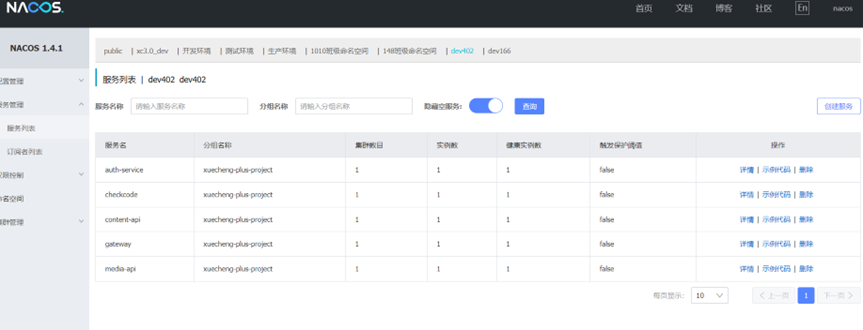
排查system-api工程的bootstrap.yml配置文件、依赖包等内容。
修改代码后重新提交git
再次进行jenkins构建。
2、测试上传课程图片
首先测试修改课程,上传一个新图片。
3、测试课程发布
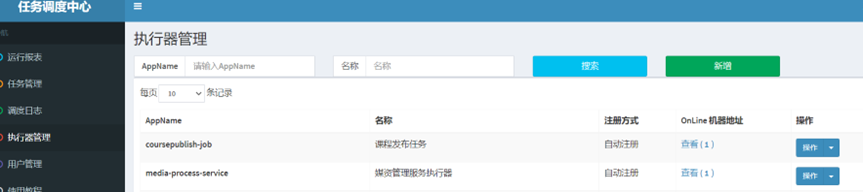
首先观察xxl-job调度中心是否成功注册执行器
启动课程发布任务
发布一门课程,观察content-api容器的日志
错误日志:
java.io.FileNotFoundException: file:/root/xuecheng-plus-content-api-0.0.1-SNAPSHOT.jar!/BOOT-INF/classes!/templates does not exist.无法找到静态化的模板
屏蔽原来的方式,改如下方式
//            String classpath = this.getClass().getResource("/").getPath(); //打包jar无法获取模板
//            configuration.setDirectoryForTemplateLoading(new File(classpath + "/templates/"));
        //更改为如下方式
        configuration.setTemplateLoader(new ClassTemplateLoader(this.getClass().getClassLoader(),"/templates"));
测试媒资管理
1、配置ffmpeg的目录
将linux版本的ffmpeg拷贝到 /data/soft/service 下,在nacos配置ffmpeg 的地址:
Ffmpeg linux版本下载地址:https://johnvansickle.com/ffmpeg/
videoprocess:
 ffmpegpath: /root/soft/ffmpeg
2、测试上传视频


![[蓝桥杯 2023 国 Python B] 划分 Java](https://i-blog.csdnimg.cn/direct/2d1c2fa0c51746d79270d89994680c43.png)