兰生幽谷,不为莫服而不芳;
君子行义,不为莫知而止休。
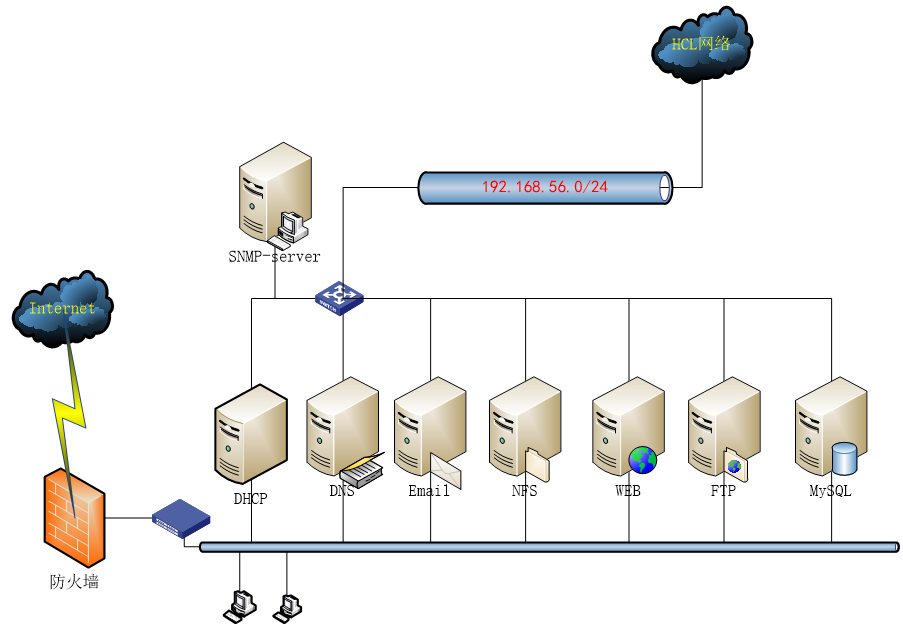
应用拓扑图
3.0准备工作
所有Linux服务器上(服务器和Agent端)安装下列工具
| yum -y install net-snmp net-snmp-utils |
保证所有的HCL网络设备和服务器相互间能够连通。
为了方便辨识,服务器对HCL的一台路由器、一台Centos7.9服务器进行管理:
| 角色 | ip | 操作系统 | |
| SNMP 服务器 | 192.168.56.220 | OpenEuler22.03sp4 | |
| SNMP agent | 192.168.56.22 | CentOS7.9 | |
| R1路由器 | 192.168.56.11 | H3C Comware |
3.1 读取参数
华三网络设备就按缺省配置。其他snmp agent端需要配置一下。红色部分是需要添加或更改的:
| [root@cts-zbxagt ~]# vi /etc/snmp/snmpd.conf …… rwcommunity private 192.168.56.0/24 //定义读写community及网段 rwcommunity public 192.168.56.0/24 com2sec writeAccess 192.168.56.0/24 private com2sec writeAccess 192.168.56.0/24 public rwuser snmpuser auth -V 2c //不同版本应用 …… #view systemview included .1.3.6.1.2.1.1 #view systemview included .1.3.6.1.2.1.25.1.1 view systemview included .1 …… ############################################################################### # System contact information # It is also possible to set the sysContact and sysLocation system # variables through the snmpd.conf file: syslocation Building No.7 7907 //定义设备所在位置 syscontact Wu Zhengzhong <1531036898@qq.com> //定义设备管理联系方式 …… |
保存后,重启snmp:systemctl restart snmpd
下面我们将按照MIB-2结构逐一读取HCL网络设备和Linux服务器的相关信息。
在上一章,我们已经在HCL里面对路由器R1进行了SNMP-AGENT设置,下面我们将按照MIB-2的体系,读取HCL网络设备R1和Linux服务器信息
3.1.1 读取Mib-2 1系统system功能组数据
1)读取HCL路由器
前面服务器上已经安装snmp工具,可以直接在服务器上读取、管理网络设备的相关参数。
| [root@zbx624oe2203 ~]# snmpbulkwalk -v 2c -c wuzhengzhong 192.168.56.11 .1.3.6.1.2.1.1 SNMPv2-MIB::sysDescr.0 = STRING: H3C Comware Platform Software, Software Version 7.1.064, Release 0427P22 H3C MSR36-20 Copyright (c) 2004-2021 New H3C Technologies Co., Ltd. All rights reserved. SNMPv2-MIB::sysObjectID.0 = OID: SNMPv2-SMI::enterprises.25506 DISMAN-EVENT-MIB::sysUpTimeInstance = Timeticks: (286073) 0:47:40.73 SNMPv2-MIB::sysContact.0 = STRING: Dr. Wu-Tel:15523242551 SNMPv2-MIB::sysName.0 = STRING: r1 SNMPv2-MIB::sysLocation.0 = STRING: Lab. Building No.7907 SNMPv2-MIB::sysServices.0 = INTEGER: 78=1111000 //ISO七层结构里面提供了哪些服务 |
2)读取Linux服务器信息
| [root@zbx624oe2203 ~]# snmpbulkwalk -v 2c -c public 192.168.56.22 system.1 SNMPv2-MIB::sysDescr.0 = STRING: Linux cts-zbxagt 3.10.0-1160.119.1.el7.x86_64 #1 SMP Tue Jun 4 14:43:51 UTC 2024 x86_64 [root@zbx624oe2203 ~]# snmpbulkwalk -v 2c -c public 192.168.56.22 system.2 SNMPv2-MIB::sysObjectID.0 = OID: NET-SNMP-MIB::netSnmpAgentOIDs.10 [root@zbx624oe2203 ~]# snmpbulkwalk -v 2c -c public 192.168.56.22 system.3 DISMAN-EVENT-MIB::sysUpTimeInstance = Timeticks: (15969) 0:02:39.69 [root@zbx624oe2203 ~]# snmpbulkwalk -v 2c -c public 192.168.56.22 system.4 SNMPv2-MIB::sysContact.0 = STRING: Wu Zhengzhong <1531036898@qq.com> [root@zbx624oe2203 ~]# snmpbulkwalk -v 2c -c public 192.168.56.22 system.5 SNMPv2-MIB::sysName.0 = STRING: WuSnmpAgent [root@zbx624oe2203 ~]# snmpbulkwalk -v 2c -c public 192.168.56.22 system.6 SNMPv2-MIB::sysLocation.0 = STRING: Building No.7 7907 [root@zbx624oe2203 ~]# snmpbulkwalk -v 2c -c public 192.168.56.22 system.7 SNMPv2-MIB::sysServices = No Such Instance currently exists at this OID |
辨析题:从上面读取的HCL路由器和Linux服务器数据看出了什么结果?
| 王东在snmp服务器上分别读取了华三路由器192.168.56.11和Linux服务器192.168.56.22的系统功能组system.7的数据,分别得到如下数据: [root@zbx624oe2203 ~]# snmpbulkwalk -v 2c -c public 192.168.56.22 system.7 SNMPv2-MIB::sysServices = No Such Instance currently exists at this OID [root@zbx624oe2203 ~]# snmpbulkwalk -v 2c -c wuzhengzhong 192.168.56.11 system.7 SNMPv2-MIB::sysServices.0 = INTEGER: 78 回答下面问题:
2. 该参数是什么意思?路由器该参数为78表示什么意思? |
3.1.2 读取Mib-2 2接口if功能组数据
接口功能组一共有22参数。我们选择性的看看2、3和7的数据
1)读取HCL路由器
| [root@zbx624oe2203 ~]# snmpbulkwalk -v 2c -c wuzhengzhong 192.168.56.11 ifEntry.2 IF-MIB::ifDescr.1 = STRING: GigabitEthernet0/0 …… IF-MIB::ifDescr.131 = STRING: Register-Tunnel0 [root@zbx624oe2203 ~]# snmpbulkwalk -v 2c -c wuzhengzhong 192.168.56.11 ifEntry.3 IF-MIB::ifType.1 = INTEGER: ethernetCsmacd(6) …… IF-MIB::ifType.4 = INTEGER: ppp(23) …… IF-MIB::ifType.8 = INTEGER: ethernetCsmacd(6) …… IF-MIB::ifType.129 = INTEGER: other(1) IF-MIB::ifType.130 = INTEGER: softwareLoopback(24) IF-MIB::ifType.131 = INTEGER: other(1) [root@zbx624oe2203 ~]# snmpbulkwalk -v 2c -c wuzhengzhong 192.168.56.11 ifEntry.7 IF-MIB::ifAdminStatus.1 = INTEGER: up(1) …… IF-MIB::ifAdminStatus.131 = INTEGER: up(1) |
2)读取Linux服务器信息
| [root@zbx624oe2203 ~]# snmpbulkwalk -v 2c -c public 192.168.56.22 ifEntry.2 IF-MIB::ifDescr.1 = STRING: lo IF-MIB::ifDescr.2 = STRING: ens33 IF-MIB::ifDescr.3 = STRING: ens36 IF-MIB::ifDescr.4 = STRING: ens37 IF-MIB::ifDescr.5 = STRING: ens38 [root@zbx624oe2203 ~]# snmpbulkwalk -v 2c -c public 192.168.56.22 ifEntry.3 IF-MIB::ifType.1 = INTEGER: softwareLoopback(24) IF-MIB::ifType.2 = INTEGER: ethernetCsmacd(6) IF-MIB::ifType.3 = INTEGER: ethernetCsmacd(6) IF-MIB::ifType.4 = INTEGER: ethernetCsmacd(6) IF-MIB::ifType.5 = INTEGER: ethernetCsmacd(6) [root@zbx624oe2203 ~]# snmpbulkwalk -v 2c -c public 192.168.56.22 ifEntry.7 IF-MIB::ifAdminStatus.1 = INTEGER: up(1) IF-MIB::ifAdminStatus.2 = INTEGER: up(1) IF-MIB::ifAdminStatus.3 = INTEGER: up(1) IF-MIB::ifAdminStatus.4 = INTEGER: up(1) IF-MIB::ifAdminStatus.5 = INTEGER: up(1) |
3.1.3 读取Mib-2 3地址转换at功能组数据
1)读取HCL路由器
| [root@zbx624oe2203 ~]# snmpbulkwalk -v 2c -c wuzhengzhong 192.168.56.11 at Timeout: No Response from 192.168.56.11 |
2)读取Linux服务器信息
| [root@zbx624oe2203 ~]# snmpbulkwalk -v 2c -c public 192.168.56.22 at UCD-SNMP-MIB::laIndex.1 = INTEGER: 1 UCD-SNMP-MIB::laIndex.2 = INTEGER: 2 UCD-SNMP-MIB::laIndex.3 = INTEGER: 3 UCD-SNMP-MIB::laNames.1 = STRING: Load-1 UCD-SNMP-MIB::laNames.2 = STRING: Load-5 UCD-SNMP-MIB::laNames.3 = STRING: Load-15 UCD-SNMP-MIB::laLoad.1 = STRING: 0.00 UCD-SNMP-MIB::laLoad.2 = STRING: 0.01 UCD-SNMP-MIB::laLoad.3 = STRING: 0.05 UCD-SNMP-MIB::laConfig.1 = STRING: 12.00 UCD-SNMP-MIB::laConfig.2 = STRING: 14.00 UCD-SNMP-MIB::laConfig.3 = STRING: 14.00 UCD-SNMP-MIB::laLoadInt.1 = INTEGER: 0 UCD-SNMP-MIB::laLoadInt.2 = INTEGER: 1 UCD-SNMP-MIB::laLoadInt.3 = INTEGER: 5 UCD-SNMP-MIB::laLoadFloat.1 = Opaque: Float: 0.000000 UCD-SNMP-MIB::laLoadFloat.2 = Opaque: Float: 0.010000 UCD-SNMP-MIB::laLoadFloat.3 = Opaque: Float: 0.050000 UCD-SNMP-MIB::laErrorFlag.1 = INTEGER: noError(0) UCD-SNMP-MIB::laErrorFlag.2 = INTEGER: noError(0) UCD-SNMP-MIB::laErrorFlag.3 = INTEGER: noError(0) UCD-SNMP-MIB::laErrMessage.1 = STRING: UCD-SNMP-MIB::laErrMessage.2 = STRING: UCD-SNMP-MIB::laErrMessage.3 = STRING: |
3.1.4 读取Mib-2 4 IP功能组数据
ip组一共23个值,分别读取节选值如下
1)读取HCL路由器
| [root@zbx624oe2203 ~]# snmpbulkwalk -v 2c -c wuzhengzhong 192.168.56.11 ip.1 IP-MIB::ipForwarding.0 = INTEGER: forwarding(1) [root@zbx624oe2203 ~]# snmpbulkwalk -v 2c -c wuzhengzhong 192.168.56.11 ip.2 IP-MIB::ipDefaultTTL.0 = INTEGER: 255 [root@zbx624oe2203 ~]# snmpbulkwalk -v 2c -c wuzhengzhong 192.168.56.11 ip.6 IP-MIB::ipForwDatagrams.0 = Counter32: 5 [root@zbx624oe2203 ~]# snmpbulkwalk -v 2c -c wuzhengzhong 192.168.56.11 ip.21 IP-MIB::ip.21.1.1.0.0.0.0 = IpAddress: 0.0.0.0 IP-MIB::ip.21.1.1.21.21.21.0 = IpAddress: 21.21.21.0 …… IP-MIB::ip.21.1.13.255.255.255.255 = OID: SNMPv2-SMI::zeroDotZero [root@zbx624oe2203 ~]# snmpbulkwalk -v 2c -c wuzhengzhong 192.168.56.11 ip.20 IP-MIB::ipAdEntAddr.21.21.21.1 = IpAddress: 21.21.21.1 //IP地址和mac地址对应 [root@zbx624oe2203 ~]# snmpbulkwalk -v 2c -c wuzhengzhong 192.168.56.11 ip.22 IP-MIB::ipNetToMediaIfIndex.1.192.168.56.1 = INTEGER: 1 IP-MIB::ipNetToMediaIfIndex.1.192.168.56.220 = INTEGER: 1 IP-MIB::ipNetToMediaPhysAddress.1.192.168.56.1 = STRING: a:0:27:0:0:d IP-MIB::ipNetToMediaPhysAddress.1.192.168.56.220 = STRING: 0:c:29:ea:d2:35 IP-MIB::ipNetToMediaNetAddress.1.192.168.56.1 = IpAddress: 192.168.56.1 IP-MIB::ipNetToMediaNetAddress.1.192.168.56.220 = IpAddress: 192.168.56.220 IP-MIB::ipNetToMediaType.1.192.168.56.1 = INTEGER: dynamic(3) IP-MIB::ipNetToMediaType.1.192.168.56.220 = INTEGER: dynamic(3) |
2)读取Linux服务器信息
| [root@zbx624oe2203 ~]# snmpbulkwalk -v 2c -c public 192.168.56.22 ip.20 IP-MIB::ipAdEntAddr.127.0.0.1 = IpAddress: 127.0.0.1 …… IP-MIB::ipAdEntIfIndex.127.0.0.1 = INTEGER: 1 IP-MIB::ipAdEntIfIndex.192.168.0.22 = INTEGER: 2 IP-MIB::ipAdEntIfIndex.192.168.56.22 = INTEGER: 5 IP-MIB::ipAdEntIfIndex.192.168.100.22 = INTEGER: 3 IP-MIB::ipAdEntIfIndex.202.112.113.22 = INTEGER: 4 IP-MIB::ipAdEntNetMask.127.0.0.1 = IpAddress: 255.0.0.0 IP-MIB::ipAdEntNetMask.192.168.0.22 = IpAddress: 255.255.255.0 IP-MIB::ipAdEntNetMask.192.168.56.22 = IpAddress: 255.255.255.0 IP-MIB::ipAdEntNetMask.192.168.100.22 = IpAddress: 255.255.255.0 IP-MIB::ipAdEntNetMask.202.112.113.22 = IpAddress: 255.255.255.0 IP-MIB::ipAdEntBcastAddr.127.0.0.1 = INTEGER: 0 IP-MIB::ipAdEntBcastAddr.192.168.0.22 = INTEGER: 1 IP-MIB::ipAdEntBcastAddr.192.168.56.22 = INTEGER: 1 IP-MIB::ipAdEntBcastAddr.192.168.100.22 = INTEGER: 1 IP-MIB::ipAdEntBcastAddr.202.112.113.22 = INTEGER: 1 [root@zbx624oe2203 ~]# snmpbulkwalk -v 2c -c public 192.168.56.22 ip.21 IP-MIB::ip.21.1.1.0.0.0.0 = IpAddress: 0.0.0.0 IP-MIB::ip.21.1.1.192.168.0.0 = IpAddress: 192.168.0.0 IP-MIB::ip.21.1.1.192.168.56.0 = IpAddress: 192.168.56.0 IP-MIB::ip.21.1.1.192.168.100.0 = IpAddress: 192.168.100.0 IP-MIB::ip.21.1.1.202.112.113.0 = IpAddress: 202.112.113.0 IP-MIB::ip.21.1.2.0.0.0.0 = INTEGER: 2 IP-MIB::ip.21.1.2.192.168.0.0 = INTEGER: 2 IP-MIB::ip.21.1.2.192.168.56.0 = INTEGER: 5 IP-MIB::ip.21.1.2.192.168.100.0 = INTEGER: 3 IP-MIB::ip.21.1.2.202.112.113.0 = INTEGER: 4 IP-MIB::ip.21.1.3.0.0.0.0 = INTEGER: 1 IP-MIB::ip.21.1.3.192.168.0.0 = INTEGER: 0 IP-MIB::ip.21.1.3.192.168.56.0 = INTEGER: 0 IP-MIB::ip.21.1.3.192.168.100.0 = INTEGER: 0 IP-MIB::ip.21.1.3.202.112.113.0 = INTEGER: 0 IP-MIB::ip.21.1.7.0.0.0.0 = IpAddress: 192.168.0.1 IP-MIB::ip.21.1.7.192.168.0.0 = IpAddress: 0.0.0.0 IP-MIB::ip.21.1.7.192.168.56.0 = IpAddress: 0.0.0.0 IP-MIB::ip.21.1.7.192.168.100.0 = IpAddress: 0.0.0.0 IP-MIB::ip.21.1.7.202.112.113.0 = IpAddress: 0.0.0.0 IP-MIB::ip.21.1.8.0.0.0.0 = INTEGER: 4 IP-MIB::ip.21.1.8.192.168.0.0 = INTEGER: 3 IP-MIB::ip.21.1.8.192.168.56.0 = INTEGER: 3 IP-MIB::ip.21.1.8.192.168.100.0 = INTEGER: 3 IP-MIB::ip.21.1.8.202.112.113.0 = INTEGER: 3 IP-MIB::ip.21.1.9.0.0.0.0 = INTEGER: 2 IP-MIB::ip.21.1.9.192.168.0.0 = INTEGER: 2 IP-MIB::ip.21.1.9.192.168.56.0 = INTEGER: 2 IP-MIB::ip.21.1.9.192.168.100.0 = INTEGER: 2 IP-MIB::ip.21.1.9.202.112.113.0 = INTEGER: 2 IP-MIB::ip.21.1.11.0.0.0.0 = IpAddress: 0.0.0.0 IP-MIB::ip.21.1.11.192.168.0.0 = IpAddress: 255.255.255.0 IP-MIB::ip.21.1.11.192.168.56.0 = IpAddress: 255.255.255.0 IP-MIB::ip.21.1.11.192.168.100.0 = IpAddress: 255.255.255.0 IP-MIB::ip.21.1.11.202.112.113.0 = IpAddress: 255.255.255.0 IP-MIB::ip.21.1.13.0.0.0.0 = OID: SNMPv2-SMI::zeroDotZero IP-MIB::ip.21.1.13.192.168.0.0 = OID: SNMPv2-SMI::zeroDotZero IP-MIB::ip.21.1.13.192.168.56.0 = OID: SNMPv2-SMI::zeroDotZero IP-MIB::ip.21.1.13.192.168.100.0 = OID: SNMPv2-SMI::zeroDotZero IP-MIB::ip.21.1.13.202.112.113.0 = OID: SNMPv2-SMI::zeroDotZero |
3.1.5 读取Mib-2 5 ICMP功能组数据
ICMP一共26个值
1)读取HCL路由器
| [root@zbx624oe2203 ~]# snmpbulkwalk -v 2c -c wuzhengzhong 192.168.56.11 icmp IP-MIB::icmpInMsgs.0 = Counter32: 1 IP-MIB::icmpInErrors.0 = Counter32: 0 IP-MIB::icmpInDestUnreachs.0 = Counter32: 0 IP-MIB::icmpInTimeExcds.0 = Counter32: 0 IP-MIB::icmpInParmProbs.0 = Counter32: 0 IP-MIB::icmpInSrcQuenchs.0 = Counter32: 0 IP-MIB::icmpInRedirects.0 = Counter32: 0 IP-MIB::icmpInEchos.0 = Counter32: 1 IP-MIB::icmpInEchoReps.0 = Counter32: 0 IP-MIB::icmpInTimestamps.0 = Counter32: 0 IP-MIB::icmpInTimestampReps.0 = Counter32: 0 IP-MIB::icmpInAddrMasks.0 = Counter32: 0 IP-MIB::icmpInAddrMaskReps.0 = Counter32: 0 IP-MIB::icmpOutMsgs.0 = Counter32: 1 IP-MIB::icmpOutErrors.0 = Counter32: 0 IP-MIB::icmpOutDestUnreachs.0 = Counter32: 0 IP-MIB::icmpOutTimeExcds.0 = Counter32: 0 IP-MIB::icmpOutParmProbs.0 = Counter32: 0 IP-MIB::icmpOutSrcQuenchs.0 = Counter32: 0 IP-MIB::icmpOutRedirects.0 = Counter32: 0 IP-MIB::icmpOutEchos.0 = Counter32: 0 IP-MIB::icmpOutEchoReps.0 = Counter32: 1 IP-MIB::icmpOutTimestamps.0 = Counter32: 0 IP-MIB::icmpOutTimestampReps.0 = Counter32: 0 IP-MIB::icmpOutAddrMasks.0 = Counter32: 0 IP-MIB::icmpOutAddrMaskReps.0 = Counter32: 0 …… |
2)读取Linux服务器信息
| [root@zbx624oe2203 ~]# snmpbulkwalk -v 2c -c public 192.168.56.22 icmp IP-MIB::icmpInMsgs.0 = Counter32: 3028 IP-MIB::icmpInErrors.0 = Counter32: 1402 IP-MIB::icmpInDestUnreachs.0 = Counter32: 3022 IP-MIB::icmpInTimeExcds.0 = Counter32: 0 IP-MIB::icmpInParmProbs.0 = Counter32: 0 IP-MIB::icmpInSrcQuenchs.0 = Counter32: 0 IP-MIB::icmpInRedirects.0 = Counter32: 0 IP-MIB::icmpInEchos.0 = Counter32: 5 IP-MIB::icmpInEchoReps.0 = Counter32: 1 IP-MIB::icmpInTimestamps.0 = Counter32: 0 IP-MIB::icmpInTimestampReps.0 = Counter32: 0 IP-MIB::icmpInAddrMasks.0 = Counter32: 0 IP-MIB::icmpInAddrMaskReps.0 = Counter32: 0 IP-MIB::icmpOutMsgs.0 = Counter32: 3008 IP-MIB::icmpOutErrors.0 = Counter32: 0 IP-MIB::icmpOutDestUnreachs.0 = Counter32: 3002 IP-MIB::icmpOutTimeExcds.0 = Counter32: 0 IP-MIB::icmpOutParmProbs.0 = Counter32: 0 IP-MIB::icmpOutSrcQuenchs.0 = Counter32: 0 IP-MIB::icmpOutRedirects.0 = Counter32: 0 IP-MIB::icmpOutEchos.0 = Counter32: 1 IP-MIB::icmpOutEchoReps.0 = Counter32: 5 IP-MIB::icmpOutTimestamps.0 = Counter32: 0 IP-MIB::icmpOutTimestampReps.0 = Counter32: 0 IP-MIB::icmpOutAddrMasks.0 = Counter32: 0 IP-MIB::icmpOutAddrMaskReps.0 = Counter32: 0 …… |
3.1.6 读取Mib-2 6 TCP功能组数据
TCP一共15个值
1)读取HCL路由器
| [root@zbx624oe2203 ~]# snmpbulkwalk -v 2c -c wuzhengzhong 192.168.56.11 tcp TCP-MIB::tcpRtoAlgorithm.0 = INTEGER: vanj(4) TCP-MIB::tcpRtoMin.0 = INTEGER: 1000 milliseconds TCP-MIB::tcpRtoMax.0 = INTEGER: 64000 milliseconds TCP-MIB::tcpMaxConn.0 = INTEGER: -1 TCP-MIB::tcpActiveOpens.0 = Counter32: 0 TCP-MIB::tcpPassiveOpens.0 = Counter32: 0 TCP-MIB::tcpAttemptFails.0 = Counter32: 0 TCP-MIB::tcpEstabResets.0 = Counter32: 0 TCP-MIB::tcpCurrEstab.0 = Gauge32: 0 TCP-MIB::tcpInSegs.0 = Counter32: 0 TCP-MIB::tcpOutSegs.0 = Counter32: 0 TCP-MIB::tcpRetransSegs.0 = Counter32: 0 TCP-MIB::tcpConnState.0.0.0.0.23.0.0.0.0.0 = INTEGER: listen(2) TCP-MIB::tcpConnLocalAddress.0.0.0.0.23.0.0.0.0.0 = IpAddress: 0.0.0.0 TCP-MIB::tcpConnLocalPort.0.0.0.0.23.0.0.0.0.0 = INTEGER: 23 TCP-MIB::tcpConnRemAddress.0.0.0.0.23.0.0.0.0.0 = IpAddress: 0.0.0.0 TCP-MIB::tcpConnRemPort.0.0.0.0.23.0.0.0.0.0 = INTEGER: 0 TCP-MIB::tcpInErrs.0 = Counter32: 0 TCP-MIB::tcpOutRsts.0 = Counter32: 0 IPV6-TCP-MIB::ipv6TcpConnState.'................'.23.'................'.0.0 = INTEGER: listen(2) TCP-MIB::tcpListenerProcess.ipv4."0.0.0.0".23 = Gauge32: 10911 TCP-MIB::tcpListenerProcess.ipv6."00:00:00:00:00:00:00:00:00:00:00:00:00:00:00:00".23 = Gauge32: 10911 |
2)读取Linux服务器信息
| [root@zbx624oe2203 ~]# snmpbulkwalk -v 2c -c public 192.168.56.22 tcp TCP-MIB::tcpRtoAlgorithm.0 = INTEGER: other(1) TCP-MIB::tcpRtoMin.0 = INTEGER: 200 milliseconds TCP-MIB::tcpRtoMax.0 = INTEGER: 120000 milliseconds TCP-MIB::tcpMaxConn.0 = INTEGER: -1 TCP-MIB::tcpActiveOpens.0 = Counter32: 1440 TCP-MIB::tcpPassiveOpens.0 = Counter32: 14 TCP-MIB::tcpAttemptFails.0 = Counter32: 1394 TCP-MIB::tcpEstabResets.0 = Counter32: 8 TCP-MIB::tcpCurrEstab.0 = Gauge32: 4 TCP-MIB::tcpInSegs.0 = Counter32: 11052 TCP-MIB::tcpOutSegs.0 = Counter32: 11081 TCP-MIB::tcpRetransSegs.0 = Counter32: 1458 TCP-MIB::tcpConnState.0.0.0.0.22.0.0.0.0.0 = INTEGER: listen(2) TCP-MIB::tcpConnState.0.0.0.0.3306.0.0.0.0.0 = INTEGER: listen(2) TCP-MIB::tcpConnState.0.0.0.0.10050.0.0.0.0.0 = INTEGER: listen(2) TCP-MIB::tcpConnState.127.0.0.1.25.0.0.0.0.0 = INTEGER: listen(2) TCP-MIB::tcpConnState.127.0.0.1.199.0.0.0.0.0 = INTEGER: listen(2) TCP-MIB::tcpConnState.192.168.56.22.22.192.168.56.1.58070 = INTEGER: established(5) TCP-MIB::tcpConnState.192.168.56.22.22.192.168.56.1.58080 = INTEGER: established(5) TCP-MIB::tcpConnState.192.168.56.22.22.192.168.56.1.62954 = INTEGER: established(5) TCP-MIB::tcpConnState.192.168.56.22.22.192.168.56.1.62960 = INTEGER: established(5) TCP-MIB::tcpConnLocalAddress.0.0.0.0.22.0.0.0.0.0 = IpAddress: 0.0.0.0 TCP-MIB::tcpConnLocalAddress.0.0.0.0.3306.0.0.0.0.0 = IpAddress: 0.0.0.0 TCP-MIB::tcpConnLocalAddress.0.0.0.0.10050.0.0.0.0.0 = IpAddress: 0.0.0.0 TCP-MIB::tcpConnLocalAddress.127.0.0.1.25.0.0.0.0.0 = IpAddress: 127.0.0.1 TCP-MIB::tcpConnLocalAddress.127.0.0.1.199.0.0.0.0.0 = IpAddress: 127.0.0.1 TCP-MIB::tcpConnLocalAddress.192.168.56.22.22.192.168.56.1.58070 = IpAddress: 192.168.56.22 TCP-MIB::tcpConnLocalAddress.192.168.56.22.22.192.168.56.1.58080 = IpAddress: 192.168.56.22 TCP-MIB::tcpConnLocalAddress.192.168.56.22.22.192.168.56.1.62954 = IpAddress: 192.168.56.22 TCP-MIB::tcpConnLocalAddress.192.168.56.22.22.192.168.56.1.62960 = IpAddress: 192.168.56.22 TCP-MIB::tcpConnLocalPort.0.0.0.0.22.0.0.0.0.0 = INTEGER: 22 TCP-MIB::tcpConnLocalPort.0.0.0.0.3306.0.0.0.0.0 = INTEGER: 3306 TCP-MIB::tcpConnLocalPort.0.0.0.0.10050.0.0.0.0.0 = INTEGER: 10050 TCP-MIB::tcpConnLocalPort.127.0.0.1.25.0.0.0.0.0 = INTEGER: 25 TCP-MIB::tcpConnLocalPort.127.0.0.1.199.0.0.0.0.0 = INTEGER: 199 TCP-MIB::tcpConnLocalPort.192.168.56.22.22.192.168.56.1.58070 = INTEGER: 22 TCP-MIB::tcpConnLocalPort.192.168.56.22.22.192.168.56.1.58080 = INTEGER: 22 TCP-MIB::tcpConnLocalPort.192.168.56.22.22.192.168.56.1.62954 = INTEGER: 22 TCP-MIB::tcpConnLocalPort.192.168.56.22.22.192.168.56.1.62960 = INTEGER: 22 TCP-MIB::tcpConnRemAddress.0.0.0.0.22.0.0.0.0.0 = IpAddress: 0.0.0.0 TCP-MIB::tcpConnRemAddress.0.0.0.0.3306.0.0.0.0.0 = IpAddress: 0.0.0.0 TCP-MIB::tcpConnRemAddress.0.0.0.0.10050.0.0.0.0.0 = IpAddress: 0.0.0.0 TCP-MIB::tcpConnRemAddress.127.0.0.1.25.0.0.0.0.0 = IpAddress: 0.0.0.0 TCP-MIB::tcpConnRemAddress.127.0.0.1.199.0.0.0.0.0 = IpAddress: 0.0.0.0 TCP-MIB::tcpConnRemAddress.192.168.56.22.22.192.168.56.1.58070 = IpAddress: 192.168.56.1 TCP-MIB::tcpConnRemAddress.192.168.56.22.22.192.168.56.1.58080 = IpAddress: 192.168.56.1 TCP-MIB::tcpConnRemAddress.192.168.56.22.22.192.168.56.1.62954 = IpAddress: 192.168.56.1 TCP-MIB::tcpConnRemAddress.192.168.56.22.22.192.168.56.1.62960 = IpAddress: 192.168.56.1 TCP-MIB::tcpConnRemPort.0.0.0.0.22.0.0.0.0.0 = INTEGER: 0 TCP-MIB::tcpConnRemPort.0.0.0.0.3306.0.0.0.0.0 = INTEGER: 0 TCP-MIB::tcpConnRemPort.0.0.0.0.10050.0.0.0.0.0 = INTEGER: 0 TCP-MIB::tcpConnRemPort.127.0.0.1.25.0.0.0.0.0 = INTEGER: 0 TCP-MIB::tcpConnRemPort.127.0.0.1.199.0.0.0.0.0 = INTEGER: 0 TCP-MIB::tcpConnRemPort.192.168.56.22.22.192.168.56.1.58070 = INTEGER: 58070 TCP-MIB::tcpConnRemPort.192.168.56.22.22.192.168.56.1.58080 = INTEGER: 58080 TCP-MIB::tcpConnRemPort.192.168.56.22.22.192.168.56.1.62954 = INTEGER: 62954 TCP-MIB::tcpConnRemPort.192.168.56.22.22.192.168.56.1.62960 = INTEGER: 62960 TCP-MIB::tcpInErrs.0 = Counter32: 0 TCP-MIB::tcpOutRsts.0 = Counter32: 21 TCP-MIB::tcpConnectionState.ipv4."192.168.56.22".22.ipv4."192.168.56.1".58070 = INTEGER: established(5) TCP-MIB::tcpConnectionState.ipv4."192.168.56.22".22.ipv4."192.168.56.1".58080 = INTEGER: established(5) TCP-MIB::tcpConnectionState.ipv4."192.168.56.22".22.ipv4."192.168.56.1".62954 = INTEGER: established(5) TCP-MIB::tcpConnectionState.ipv4."192.168.56.22".22.ipv4."192.168.56.1".62960 = INTEGER: established(5) TCP-MIB::tcpConnectionProcess.ipv4."192.168.56.22".22.ipv4."192.168.56.1".58070 = Gauge32: 4541 TCP-MIB::tcpConnectionProcess.ipv4."192.168.56.22".22.ipv4."192.168.56.1".58080 = Gauge32: 4543 TCP-MIB::tcpConnectionProcess.ipv4."192.168.56.22".22.ipv4."192.168.56.1".62954 = Gauge32: 4298 TCP-MIB::tcpConnectionProcess.ipv4."192.168.56.22".22.ipv4."192.168.56.1".62960 = Gauge32: 4300 TCP-MIB::tcpListenerProcess.ipv4."0.0.0.0".22 = Gauge32: 1135 TCP-MIB::tcpListenerProcess.ipv4."0.0.0.0".3306 = Gauge32: 1407 TCP-MIB::tcpListenerProcess.ipv4."0.0.0.0".10050 = Gauge32: 1160 TCP-MIB::tcpListenerProcess.ipv4."127.0.0.1".25 = Gauge32: 1507 TCP-MIB::tcpListenerProcess.ipv4."127.0.0.1".199 = Gauge32: 4488 TCP-MIB::tcpListenerProcess.ipv6."00:00:00:00:00:00:00:00:00:00:00:00:00:00:00:00".22 = Gauge32: 1135 TCP-MIB::tcpListenerProcess.ipv6."00:00:00:00:00:00:00:00:00:00:00:00:00:00:00:01".25 = Gauge32: 1507 |
3.1.7 读取Mib-2 7 UDP功能组数据
1)读取HCL路由器
| [root@zbx624oe2203 ~]# snmpbulkwalk -v 2c -c wuzhengzhong 192.168.56.11 udp UDP-MIB::udpInDatagrams.0 = Counter32: 36 UDP-MIB::udpNoPorts.0 = Counter32: 19 UDP-MIB::udpInErrors.0 = Counter32: 0 UDP-MIB::udpOutDatagrams.0 = Counter32: 31 UDP-MIB::udpLocalAddress.0.0.0.0.161 = IpAddress: 0.0.0.0 UDP-MIB::udpLocalAddress.0.0.0.0.520 = IpAddress: 0.0.0.0 UDP-MIB::udpLocalAddress.0.0.0.0.4992 = IpAddress: 0.0.0.0 UDP-MIB::udpLocalPort.0.0.0.0.161 = INTEGER: 161 UDP-MIB::udpLocalPort.0.0.0.0.520 = INTEGER: 520 UDP-MIB::udpLocalPort.0.0.0.0.4992 = INTEGER: 4992 IPV6-UDP-MIB::ipv6UdpIfIndex.'................'.161.0 = INTEGER: 0 UDP-MIB::udpEndpointProcess.ipv4."0.0.0.0".161.ipv4."0.0.0.0".0.2565952204 = Gauge32: 10910 UDP-MIB::udpEndpointProcess.ipv4."0.0.0.0".520.ipv4."0.0.0.0".0.15749836 = Gauge32: 10908 UDP-MIB::udpEndpointProcess.ipv4."0.0.0.0".4992.ipv4."0.0.0.0".0.3371455180 = Gauge32: 10910 UDP-MIB::udpEndpointProcess.ipv6."00:00:00:00:00:00:00:00:00:00:00:00:00:00:00:00".161.ipv6."00:00:00:00:00:00:00:00:00:00:00:00:00:00:00:00".0.821252812 = Gauge32: 10910 |
2)读取Linux服务器信息
| [root@zbx624oe2203 ~]# snmpbulkwalk -v 2c -c public 192.168.56.22 udp UDP-MIB::udpInDatagrams.0 = Counter32: 937 UDP-MIB::udpNoPorts.0 = Counter32: 2 UDP-MIB::udpInErrors.0 = Counter32: 0 UDP-MIB::udpOutDatagrams.0 = Counter32: 1232 UDP-MIB::udpLocalAddress.0.0.0.0.161 = IpAddress: 0.0.0.0 UDP-MIB::udpLocalAddress.127.0.0.1.323 = IpAddress: 127.0.0.1 UDP-MIB::udpLocalPort.0.0.0.0.161 = INTEGER: 161 UDP-MIB::udpLocalPort.127.0.0.1.323 = INTEGER: 323 UDP-MIB::udpEndpointProcess.ipv4."0.0.0.0".161.ipv4."0.0.0.0".0.989713 = Gauge32: 4488 UDP-MIB::udpEndpointProcess.ipv4."127.0.0.1".323.ipv4."0.0.0.0".0.18115 = Gauge32: 689 UDP-MIB::udpEndpointProcess.ipv6."00:00:00:00:00:00:00:00:00:00:00:00:00:00:00:01".323.ipv6."00:00:00:00:00:00:00:00:00:00:00:00:00:00:00:00".0.18116 = Gauge32: 689 |
3.1.8 读取Mib-2 8 EGP功能组数据
(暂时没时间设置,所以读不出数据来。以后有时间再完善)
1)读取HCL路由器
2)读取Linux服务器信息
3.1.9 读取Mib-2 9传输Dot 3功能组数据
1)读取HCL路由器
| [root@zbx624oe2203 ~]# snmpbulkwalk -v 2c -c wuzhengzhong 192.168.56.11 Dot 3 EtherLike-MIB::dot3StatsIndex.1 = INTEGER: 1 …… EtherLike-MIB::dot3StatsAlignmentErrors.1 = Counter32: 0 …… EtherLike-MIB::dot3StatsFCSErrors.1 = Counter32: 0 …… EtherLike-MIB::dot3StatsSingleCollisionFrames.1 = Counter32: 0 …… EtherLike-MIB::dot3StatsSQETestErrors.1 = Counter32: 0 …… EtherLike-MIB::dot3StatsDeferredTransmissions.1 = Counter32: 0 …… EtherLike-MIB::dot3StatsLateCollisions.1 = Counter32: 0 …… EtherLike-MIB::dot3StatsExcessiveCollisions.1 = Counter32: 0 …… EtherLike-MIB::dot3StatsInternalMacTransmitErrors.1 = Counter32: 0 …… EtherLike-MIB::dot3StatsCarrierSenseErrors.1 = Counter32: 0 …… EtherLike-MIB::dot3StatsFrameTooLongs.1 = Counter32: 0 …… EtherLike-MIB::dot3StatsInternalMacReceiveErrors.1 = Counter32: 0 …… EtherLike-MIB::dot3StatsEtherChipSet.1 = OID: SNMPv2-SMI::zeroDotZero …… EtherLike-MIB::dot3StatsSymbolErrors.1 = Counter32: 0 …… EtherLike-MIB::dot3StatsDuplexStatus.1 = INTEGER: unknown(1) …… EtherLike-MIB::dot3StatsRateControlAbility.1 = INTEGER: false(2) …… EtherLike-MIB::dot3StatsRateControlStatus.1 = INTEGER: unknown(3) …… EtherLike-MIB::dot3CollFrequencies.1.1 = Counter32: 0 …… EtherLike-MIB::dot3CollFrequencies.2.1 = Counter32: 0 …… EtherLike-MIB::dot3CollFrequencies.3.1 = Counter32: 0 …… EtherLike-MIB::dot3CollFrequencies.8.1 = Counter32: 0 …… EtherLike-MIB::dot3CollFrequencies.9.1 = Counter32: 0 …… EtherLike-MIB::dot3CollFrequencies.10.1 = Counter32: 0 …… EtherLike-MIB::dot3CollFrequencies.11.1 = Counter32: 0 …… EtherLike-MIB::dot3ControlFunctionsSupported.1 = BITS: 00 …… EtherLike-MIB::dot3ControlInUnknownOpcodes.1 = Counter32: 0 …… EtherLike-MIB::dot3HCControlInUnknownOpcodes.1 = Counter64: 0 …… EtherLike-MIB::dot3PauseAdminMode.1 = INTEGER: disabled(1) …… EtherLike-MIB::dot3PauseOperMode.1 = INTEGER: disabled(1) …… EtherLike-MIB::dot3InPauseFrames.1 = Counter32: 0 …… EtherLike-MIB::dot3OutPauseFrames.1 = Counter32: 0 …… EtherLike-MIB::dot3HCInPauseFrames.1 = Counter64: 0 …… EtherLike-MIB::dot3HCInPauseFrames.11 = Counter64: 0 …… EtherLike-MIB::dot3HCStatsAlignmentErrors.1 = Counter64: 0 …… EtherLike-MIB::dot3HCStatsFCSErrors.1 = Counter64: 0 …… EtherLike-MIB::dot3HCStatsInternalMacTransmitErrors.1 = Counter64: 0 …… EtherLike-MIB::dot3HCStatsFrameTooLongs.1 = Counter64: 0 …… EtherLike-MIB::dot3HCStatsInternalMacReceiveErrors.1 = Counter64: 0 …… EtherLike-MIB::dot3HCStatsSymbolErrors.1 = Counter64: 0 …… |
2)读取Linux服务器信息
| [root@zbx624oe2203 ~]# snmpbulkwalk -v 2c -c public 192.168.56.22 Dot 3 EtherLike-MIB::dot3StatsIndex.2 = INTEGER: 2 …… EtherLike-MIB::dot3StatsAlignmentErrors.2 = Counter32: 0 …… EtherLike-MIB::dot3StatsFCSErrors.2 = Counter32: 0 …… EtherLike-MIB::dot3StatsSingleCollisionFrames.2 = Counter32: 0 …… EtherLike-MIB::dot3StatsMultipleCollisionFrames.2 = Counter32: 0 …… EtherLike-MIB::dot3StatsDeferredTransmissions.2 = Counter32: 0 …… EtherLike-MIB::dot3StatsLateCollisions.2 = Counter32: 0 …… EtherLike-MIB::dot3StatsInternalMacTransmitErrors.2 = Counter32: 0 …… EtherLike-MIB::dot3StatsCarrierSenseErrors.2 = Counter32: 0 …… EtherLike-MIB::dot3StatsFrameTooLongs.2 = Counter32: 0 …… EtherLike-MIB::dot3StatsInternalMacReceiveErrors.2 = Counter32: 0 …… EtherLike-MIB::dot3StatsDuplexStatus.2 = INTEGER: fullDuplex(3) …… |
3.2 服务器设置agent
一)更改HCL网络设备名称
snmpset -v 1 -c wuzhengzhong 192.168.56.11 .1.3.6.1.2.1.1.5.0 s wusR1
| [root@zbx624oe2203 ~]# snmpset -v 1 -c wuzhengzhong 192.168.56.11 .1.3.6.1.2.1.1.5.0 s wusR1 SNMPv2-MIB::sysName.0 = STRING: wusR1 [root@zbx624oe2203 ~]# snmpget -v 1 -c wuzhengzhong 192.168.56.11 .1.3.6.1.2.1.1.5.0 SNMPv2-MIB::sysName.0 = STRING: wusR1 |
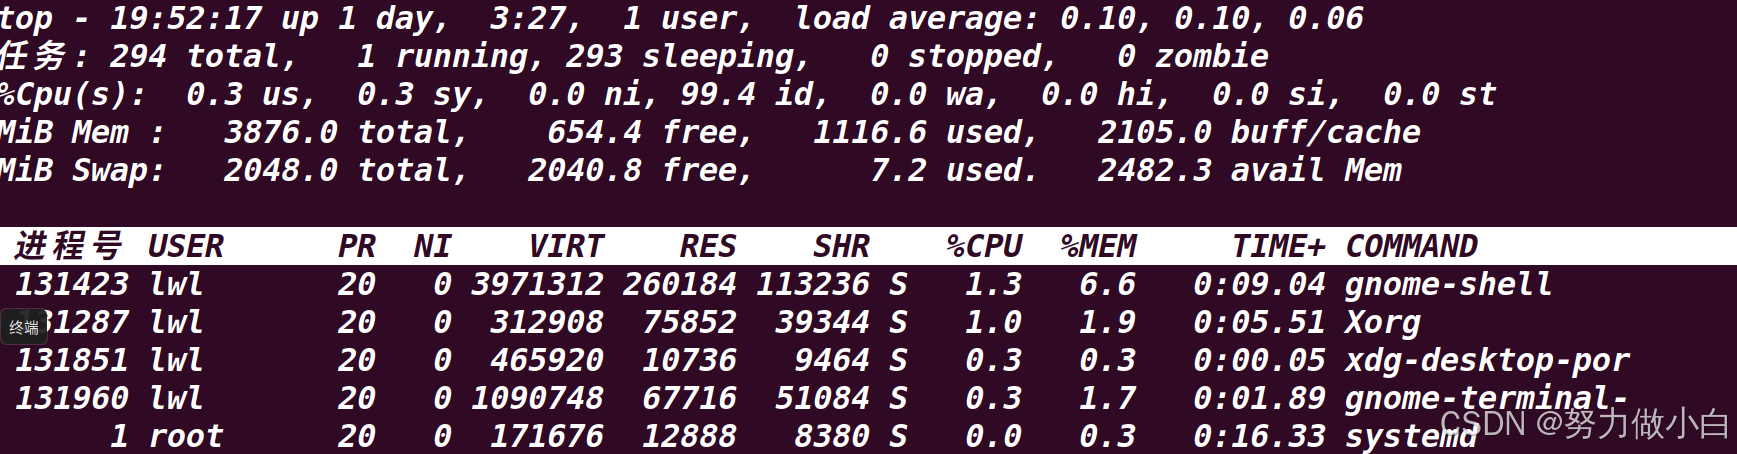
到HCL平台上的客户端验证
| [r1]save The current configuration will be written to the device. Are you sure? [Y/N]:y Please input the file name(*.cfg)[flash:/startup.cfg] (To leave the existing filename unchanged, press the enter key): flash:/startup.cfg exists, overwrite? [Y/N]:y Validating file. Please wait... Configuration is saved to device successfully. [wusR1]display current-configuration | include sysname sysname wusR1 |
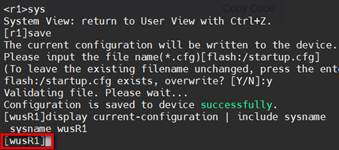
图3- 1
二)更改Linux服务器名称
确保在snmp客户端(192.168.56.22)上配置可写
| #修改配置文件 …… rwcommunity private com2sec writeAccess 192.168.56.0/24 private rwuser snmpuser auth -V 2c …… |
重启systemctl restart snmpd
在服务器端(192.168.56.220)更改agent系统名称
| [root@zbx624oe2203 ~]# snmpset -v 1 -c private 192.168.56.22 .1.3.6.1.2.1.1.5.0 s WuSnmpAgent SNMPv2-MIB::sysName.0 = STRING: WuSnmpAgent |
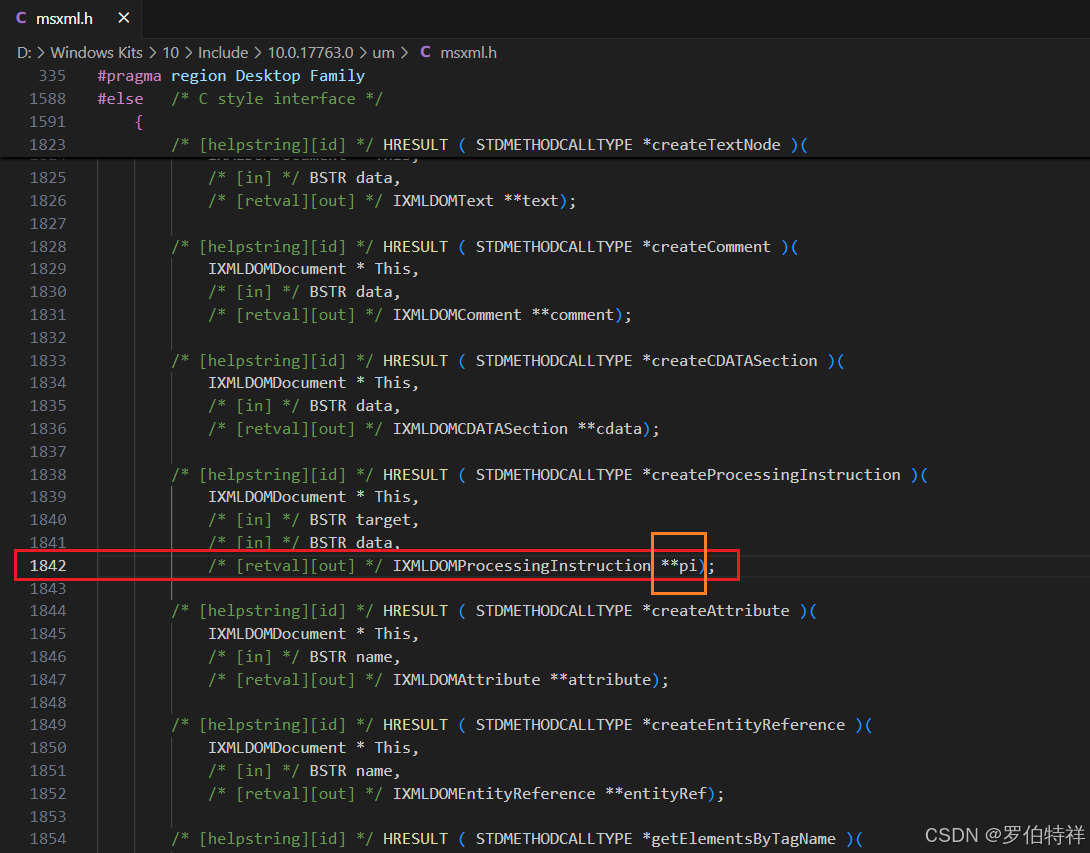
到agent客户端验证
| [root@cts-zbxagt ~]# snmpget -v 2c -c private 192.168.56.22 1.3.6.1.2.1.1.5.0 SNMPv2-MIB::sysName.0 = STRING: WuSnmpAgent |
![]()
图3- 2
![STM32单片机入门学习——第8节: [3-4] 按键控制LED光敏传感器控制蜂鸣器](https://i-blog.csdnimg.cn/direct/da85933268f34306b34e84f60557622b.png)