目录
📂 前言
AR 眼镜系统版本
拍照/录像动效切换
1. 🔱 技术方案
1.1 技术方案概述
1.2 实现方案
1)第一阶段动效
2)第二阶段动效
2. 💠 默认代码配置
2.1 XML 初始布局
2.2 监听滑动对 View 改变
3. ⚛️ 拍照/录像动效切换实现
3.1 第一阶段动效
1)左移右边部分的 View
2)放大右边部分的 View
3.2 第二阶段动效
1)动态调整右边部分的约束
2)缩小右边部分的 View
3)从左往右移动左边部分
4)从 0 到 1 透明度增加左边部分
5)动画集实现
6)还原默认约束
4. ✅ 小结
附录1:动效帮助类代码
📂 前言
AR 眼镜系统版本
W517 Android9。
拍照/录像动效切换

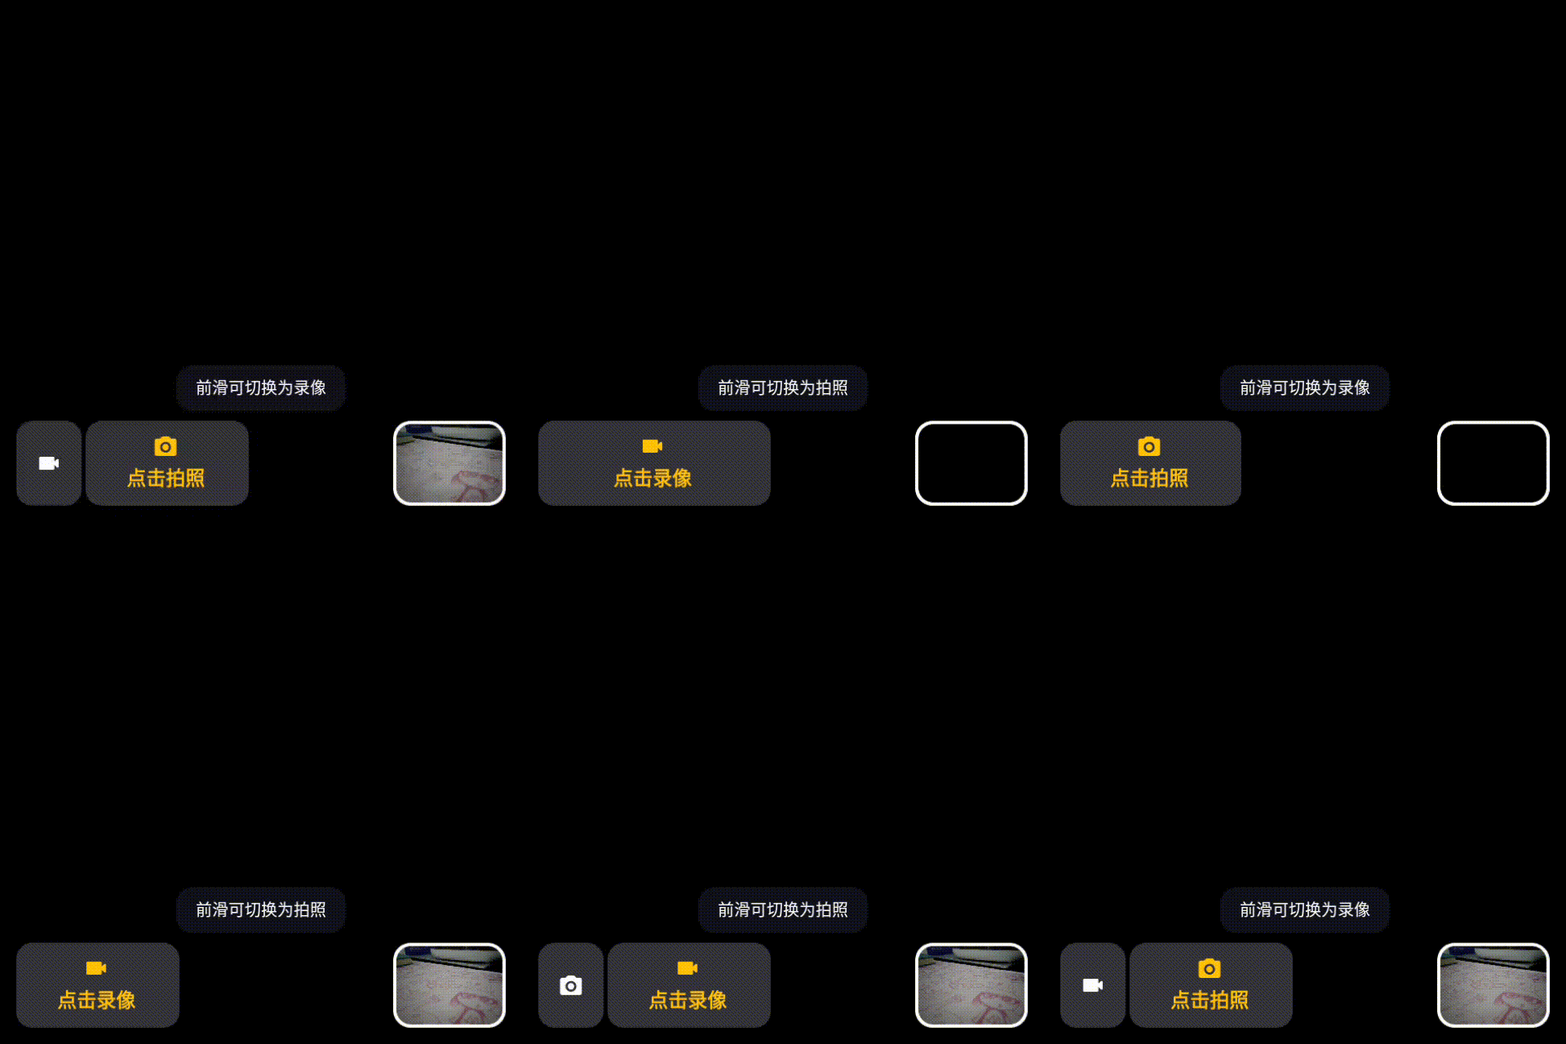
实现效果如上 GIF 的左下角所示,我们看到主要分为:两部分、两阶段。
两部分:左边部分为 Normal 状态 View,右边部分为带有文字描述的 View。
两阶段:右边部分,分为变大阶段、缩小阶段;在右边部分的第二缩小阶段时,会触发左边部分的从左往右移动阶段、从 0 到 1 透明度增加阶段。
1. 🔱 技术方案
1.1 技术方案概述
拍照/录像动效切换主要使用属性动画完成,同时对于放大和缩小的参考方向不同,所以需要动态调整约束,动态调整约束时还需注意 maigin 值,因为文字改变尺寸也会变化。
1.2 实现方案
1)第一阶段动效
-
左移右边部分的 View;
-
放大右边部分的 View。
2)第二阶段动效
-
动态调整右边部分的约束;
-
缩小右边部分的 View;
-
从左往右移动左边部分;
-
从 0 到 1 透明度增加左边部分。
2. 💠 默认代码配置
2.1 XML 初始布局
norIcon 是左边部分 View,focLayout 是右边部分 View。
<?xml version="1.0" encoding="utf-8"?>
<androidx.constraintlayout.widget.ConstraintLayout xmlns:android="http://schemas.android.com/apk/res/android"
    xmlns:app="http://schemas.android.com/apk/res-auto"
    xmlns:tools="http://schemas.android.com/tools"
    android:id="@+id/parent"
    android:layout_width="match_parent"
    android:layout_height="match_parent"
    android:keepScreenOn="true">

    <ImageView
        android:id="@+id/norIcon"
        android:layout_width="80dp"
        android:layout_height="104dp"
        android:layout_marginStart="24dp"
        android:layout_marginBottom="24dp"
        android:background="@drawable/shape_34343a_corner_20dp"
        android:contentDescription="@null"
        android:paddingHorizontal="24dp"
        android:paddingVertical="36dp"
        android:src="@drawable/ic_camera_video_nor"
        app:layout_constraintBottom_toBottomOf="parent"
        app:layout_constraintStart_toStartOf="parent" />

    <LinearLayout
        android:id="@+id/focLayout"
        android:layout_width="wrap_content"
        android:layout_height="104dp"
        android:layout_marginStart="110dp"
        android:background="@drawable/shape_34343a_corner_20dp"
        android:gravity="center"
        android:minWidth="200dp"
        android:orientation="vertical"
        android:paddingStart="12dp"
        android:paddingEnd="16dp"
        app:layout_constraintBottom_toBottomOf="@id/norIcon"
        app:layout_constraintStart_toStartOf="parent">

        <ImageView
            android:id="@+id/focIcon"
            android:layout_width="32dp"
            android:layout_height="32dp"
            android:contentDescription="@null"
            android:src="@drawable/ic_camera_picture_foc" />

        <com.agg.ui.AGGTextView
            android:id="@+id/focText"
            android:layout_width="wrap_content"
            android:layout_height="wrap_content"
            android:layout_marginTop="6dp"
            android:gravity="center"
            android:singleLine="true"
            android:text="@string/tap_to_photo"
            android:textColor="#FCC810"
            android:textSize="24sp"
            app:UITypeface="Bold" />
    </LinearLayout>
</androidx.constraintlayout.widget.ConstraintLayout>
2.2 监听滑动对 View 改变
    /**
     * 往前滑动:切换为录像模式/拍照模式
     */
    override fun scrollForward() {
        if (AnimatorSwitchHelper.isAnimating) {
            Log.e(TAG, "scrollForward: 滑动过快")
            return
        }

        Log.i(TAG, "scrollForward: model=$mIsVideoModel,isRecordingVideo=${isRecording()}")

        if (mIsVideoModel) {
            if (isRecording()) stopRecord()

            switchToPhoto()
            mIsVideoModel = false
            binding.tips.text = getString(R.string.swipe_forward_to_video_model)
            binding.norIcon.setImageResource(R.drawable.ic_camera_video_nor)
            binding.focIcon.setImageResource(R.drawable.ic_camera_picture_foc)
            binding.focText.text = getString(R.string.tap_to_photo)
        } else {
            switchToVideo()
            mIsVideoModel = true
            binding.tips.text = getString(R.string.swipe_forward_to_photo_model)
            binding.norIcon.setImageResource(R.drawable.ic_camera_picture_nor)
            binding.focIcon.setImageResource(R.drawable.ic_camera_video_foc)
            binding.focText.text = getString(R.string.tap_to_record)
        }
        binding.tips.visibility = VISIBLE

        AnimatorSwitchHelper.startAnimator(binding)
    }
3. ⚛️ 拍照/录像动效切换实现
3.1 第一阶段动效
1)左移右边部分的 View
binding.focLayout.x = binding.focLayout.x - 862)放大右边部分的 View
val defWidth = binding.focLayout.width
val focBgBigAnim = ValueAnimator.ofInt(defWidth, defWidth + 86).apply {
            addUpdateListener { animation ->
                val width = animation.animatedValue as Int
                val layoutParams = binding.focLayout.layoutParams as ViewGroup.LayoutParams
                layoutParams.width = width
                binding.focLayout.layoutParams = layoutParams
            }
        }
3.2 第二阶段动效
1)动态调整右边部分的约束
第一阶段在 XML 中默认配置的是 layout_constraintStart_toStartOf="parent",能保证放大时以左边为锚点从左往右放大;而第二阶段缩小时需要以右边为锚点,此时需要动态改变约束如下:
private fun changeConstraint(binding: ActivityMainBinding) {
    Log.i(TAG, "changeConstraint: ")
    val focLayoutId = R.id.focLayout
    val constraintLayout = binding.parent
    ConstraintSet().apply {
        // 修改约束
        clone(constraintLayout)
        // 清除原有的约束
        clear(focLayoutId, ConstraintSet.START)
        // 设置新的约束
        connect(
            focLayoutId,
            ConstraintSet.END,
            ConstraintSet.PARENT_ID,
            ConstraintSet.END,
            (binding.focLayout.context.resources.displayMetrics.widthPixels - binding.focLayout.x - binding.focLayout.width - 86).toInt()
        )
        // 自动播放过渡动画——取消播放,与自定义动画重复
//            TransitionManager.beginDelayedTransition(constraintLayout)
        // 应用新的约束
        applyTo(constraintLayout)
    }
}
2)缩小右边部分的 View
val focBgSmallAnim = ValueAnimator.ofInt(defWidth + 86, defWidth).apply {
    addUpdateListener { animation ->
        val width = animation.animatedValue as Int
        val layoutParams = binding.focLayout.layoutParams as ViewGroup.LayoutParams
        layoutParams.width = width
        binding.focLayout.layoutParams = layoutParams
    }
    addListener(object : AnimatorListenerAdapter() {
        override fun onAnimationEnd(p0: Animator) {
            Log.i(TAG, "onAnimationEnd: focBgSmallAnim")
            isAnimating = false
        }
    })
}
3)从左往右移动左边部分
val norBgTransAnim = ObjectAnimator.ofFloat(binding.norIcon, "translationX", -80f, 0f)4)从 0 到 1 透明度增加左边部分
val norBgAlphaAnim = ObjectAnimator.ofFloat(binding.norIcon, "alpha", 0f, 1f)5)动画集实现
AnimatorSet().apply {
    playSequentially(focBgBigAnim, focBgSmallAnim)
    playTogether(focBgSmallAnim, norBgTransAnim, norBgAlphaAnim)
    duration = 1000
    start()
}
6)还原默认约束
动效做完后需要还原默认约束,保证下次动效的正常进行。
if (!isFirstSwitch) restoreConstraint(binding)

private fun restoreConstraint(binding: ActivityMainBinding) {
    Log.i(TAG, "restoreConstraint: ")
    val focLayoutId = R.id.focLayout
    val constraintLayout = binding.parent
    ConstraintSet().apply {
        clone(constraintLayout)
        clear(focLayoutId, ConstraintSet.END)
        connect(
            focLayoutId, ConstraintSet.START, ConstraintSet.PARENT_ID, ConstraintSet.START, 110
        )
        applyTo(constraintLayout)
    }
}
具体动效类的代码,参考附录1。
4. ✅ 小结
对于拍照/录像动效切换,本文只是一个基础实现方案,更多业务细节请参考产品逻辑去实现。
另外,由于本人能力有限,如有错误,敬请批评指正,谢谢。
附录1:动效帮助类代码
object AnimatorSwitchHelper {

    private val TAG = AnimatorSwitchHelper::class.java.simpleName
    var isAnimating = false
    var isFirstSwitch = true

    fun startAnimator(binding: ActivityMainBinding) {
        Log.i(TAG, "startAnimator: isAnimating=$isAnimating,isFirstSwitch=$isFirstSwitch")
        isAnimating = true
        val defWidth = binding.focLayout.width
        if (!isFirstSwitch) restoreConstraint(binding)
        if (isFirstSwitch) binding.focLayout.x = binding.focLayout.x - 86

        // 1. 放大Foc的View
        val focBgBigAnim = ValueAnimator.ofInt(defWidth, defWidth + 86).apply {
            addUpdateListener { animation ->
                val width = animation.animatedValue as Int
                val layoutParams = binding.focLayout.layoutParams as ViewGroup.LayoutParams
                layoutParams.width = width
                binding.focLayout.layoutParams = layoutParams
            }
            addListener(object : AnimatorListenerAdapter() {
                override fun onAnimationEnd(p0: Animator) {
                    Log.i(TAG, "onAnimationEnd: focBgBigAnim")
                    // 为绘制反向动画,需修改约束方向
                    changeConstraint(binding)
                    isFirstSwitch = false
                }
            })
        }
        // 2.1 缩小Foc的View
        val focBgSmallAnim = ValueAnimator.ofInt(defWidth + 86, defWidth).apply {
            addUpdateListener { animation ->
                val width = animation.animatedValue as Int
                val layoutParams = binding.focLayout.layoutParams as ViewGroup.LayoutParams
                layoutParams.width = width
                binding.focLayout.layoutParams = layoutParams
            }
            addListener(object : AnimatorListenerAdapter() {
                override fun onAnimationEnd(p0: Animator) {
                    Log.i(TAG, "onAnimationEnd: focBgSmallAnim")
                    isAnimating = false
                }
            })
        }
        // 2.2 从左往右移动Nor的View
        val norBgTransAnim = ObjectAnimator.ofFloat(binding.norIcon, "translationX", -80f, 0f)
        // 2.3 透明度渐显Nor的View
        val norBgAlphaAnim = ObjectAnimator.ofFloat(binding.norIcon, "alpha", 0f, 1f)

        AnimatorSet().apply {
            playSequentially(focBgBigAnim, focBgSmallAnim)
            playTogether(focBgSmallAnim, norBgTransAnim, norBgAlphaAnim)
            duration = 1000
            start()
        }
    }

    private fun changeConstraint(binding: ActivityMainBinding) {
        Log.i(TAG, "changeConstraint: ")
        val focLayoutId = R.id.focLayout
        val constraintLayout = binding.parent
        ConstraintSet().apply {
            // 修改约束
            clone(constraintLayout)
            // 清除原有的约束
            clear(focLayoutId, ConstraintSet.START)
            // 设置新的约束
            connect(
                focLayoutId,
                ConstraintSet.END,
                ConstraintSet.PARENT_ID,
                ConstraintSet.END,
                (binding.focLayout.context.resources.displayMetrics.widthPixels - binding.focLayout.x - binding.focLayout.width - 86).toInt()
            )
            // 自动播放过渡动画——取消播放,与自定义动画重复
//            TransitionManager.beginDelayedTransition(constraintLayout)
            // 应用新的约束
            applyTo(constraintLayout)
        }
    }

    private fun restoreConstraint(binding: ActivityMainBinding) {
        Log.i(TAG, "restoreConstraint: ")
        val focLayoutId = R.id.focLayout
        val constraintLayout = binding.parent
        ConstraintSet().apply {
            clone(constraintLayout)
            clear(focLayoutId, ConstraintSet.END)
            connect(
                focLayoutId, ConstraintSet.START, ConstraintSet.PARENT_ID, ConstraintSet.START, 110
            )
            applyTo(constraintLayout)
        }
    }

}


