文章目录
- 概述
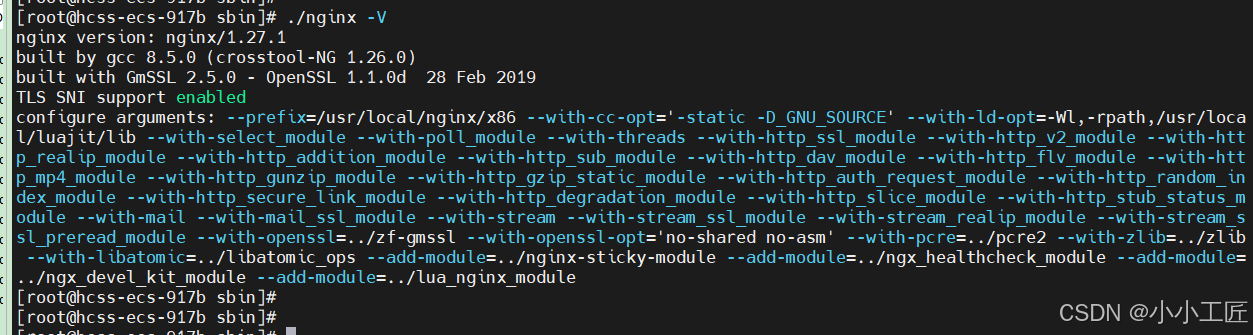
- 步骤 1: 安装 Nginx 和 Lua 模块
- 步骤 2: 创建 Lua 脚本用于参数校验
- 步骤 3: 配置 Nginx 使用 Lua 脚本
- 写法二: 状态码
- 写法三 : 返回自定义JSON
- 复杂的正则校验
- 步骤 4: 测试和验证
- ngx.HTTP_* 枚举值

概述
一个不使用 OpenResty 的 Nginx 集成 Lua 脚本的方案,用于对 POST 请求参数进行校验。
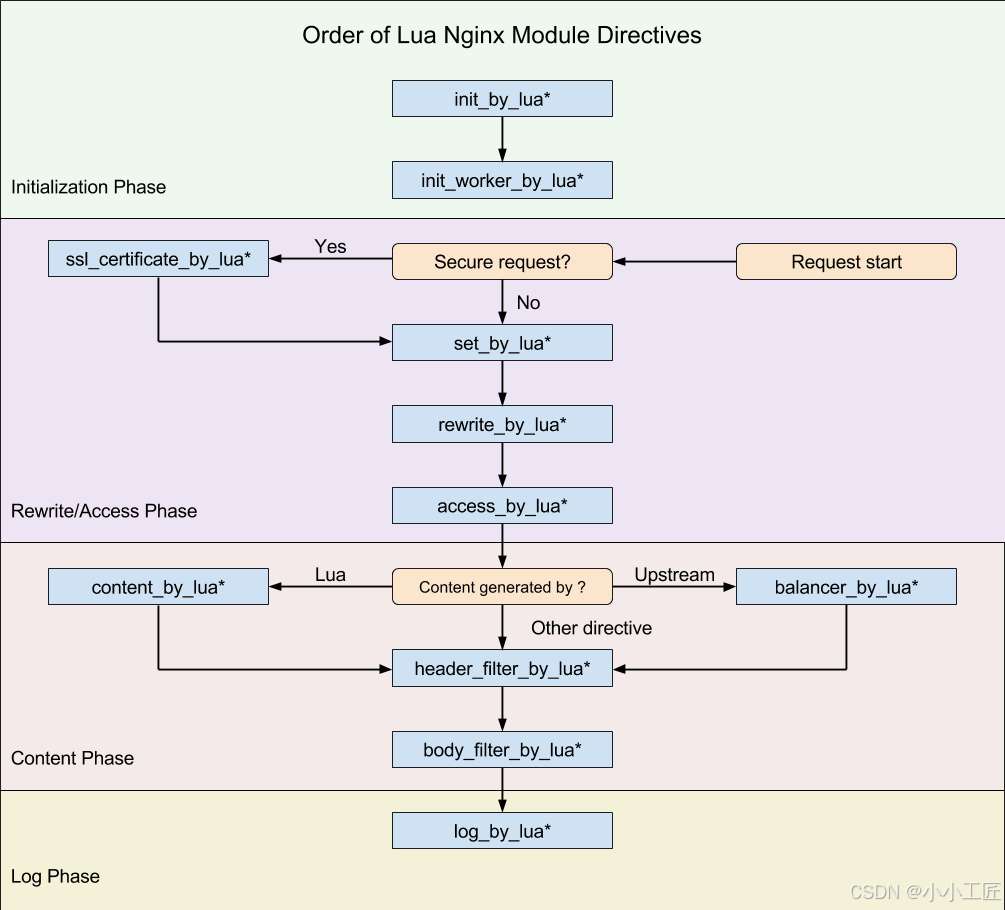
| 指令 | 所处处理阶段 | 使用范围 | 解释 |
|---|---|---|---|
init_by_lua / init_by_lua_file | loading-config | http | Nginx Master进程加载配置时执行;通常用于初始化全局配置/预加载Lua模块 |
init_worker_by_lua / init_worker_by_lua_file | starting-worker | http | 每个Nginx Worker进程启动时调用的计时器,如果Master进程不允许则只会在init_by_lua之后调用;通常用于定时拉取配置/数据,或者后端服务的健康检查 |
set_by_lua / set_by_lua_file | rewrite | server, server if, location, location if | 设置Nginx变量,可以实现复杂的赋值逻辑;此处是阻塞的,Lua代码要做到非常快。 |
rewrite_by_lua / rewrite_by_lua_file | rewrite | http, server, location, location if | rewrite阶段处理,可以实现复杂的转发/重定向逻辑。 |
access_by_lua / access_by_lua_file | access | http, server, location, location if | 请求访问阶段处理,用于访问控制。 |
content_by_lua / content_by_lua_file | content | location, location if | 内容处理器,接收请求处理并输出响应。 |
header_filter_by_lua / header_filter_by_lua_file | output-header-filter | http, server, location, location if | 设置header和cookie。 |
body_filter_by_lua / body_filter_by_lua_file | output-body-filter | http, server, location, location if | 对响应数据进行过滤,比如截断、替换。 |
log_by_lua / log_by_lua_file | log | http, server, location, location if | log阶段处理,比如记录访问量/统计平均响应时间。 |
步骤 1: 安装 Nginx 和 Lua 模块
玩转 Nginx 之:使用 Lua 扩展 Nginx 功能
步骤 2: 创建 Lua 脚本用于参数校验
创建一个 Lua 脚本,位于 /opt/nginx/lib/lua/validate_params.lua(路径根据nginx.conf中的位置调整):
 -- validate_params.lua
local function validate_post_params()
    ngx.req.read_body()
    local args = ngx.req.get_post_args()

    if not args.username or #args.username < 3 then
        ngx.status = ngx.HTTP_BAD_REQUEST
        ngx.say("Username must be at least 3 characters long")
        return false
    end

    if not args.password or #args.password < 6 then
        ngx.status = ngx.HTTP_BAD_REQUEST
        ngx.say("Password must be at least 6 characters long")
        return false
    end

    return true
end

return {
    validate_post_params = validate_post_params
}
步骤 3: 配置 Nginx 使用 Lua 脚本
在 Nginx 配置文件中,使用 Lua 脚本来校验 POST 请求参数。修改 nginx.conf` ,增加 Lua 配置:
user  root;
worker_processes  1;

#error_log  logs/error.log;
#error_log  logs/error.log  notice;
#error_log  logs/error.log  info;

#pid        logs/nginx.pid;


events {
    worker_connections  1024;
}


http {
    include       mime.types;
    default_type  application/octet-stream;

    lua_package_path "/opt/nginx/lib/lua/?.lua;;";

    lua_need_request_body on;  # 启用请求体读取


    log_format  main  '$remote_addr - $remote_user [$time_local] "$request" '
                      '$status $body_bytes_sent "$http_referer" '
                      '"$http_user_agent" "$http_x_forwarded_for"';

    access_log  logs/access.log  main;
    error_log  logs/error.log ;


    sendfile        on;

    keepalive_timeout  65;


    server {
        listen       28443;
        server_name  localhost;

        access_log  logs/host.access.log  main;

        location / {
            root   html;
            index  index.html index.htm;
        }


   location /api {
    content_by_lua_block {
        local validator = require("validate_params")
        if validator.validate_post_params() then
            ngx.say("Validation passed")
        end
        }
      }
   }
}
写法二: 状态码
lua
-- validate_params.lua
local function validate_post_params()
    ngx.req.read_body()
    local args = ngx.req.get_post_args()

    -- 验证用户名
    if not args.username or #args.username < 3 then
        return ngx.HTTP_BAD_REQUEST, "Invalid username"
    end

    -- 验证密码
    if not args.password or #args.password < 6 then
        return ngx.HTTP_BAD_REQUEST, "Invalid password"
    end

    -- 验证通过
    return ngx.HTTP_OK, "Validation successful"
end

return {
    validate = validate_post_params
}
nginx.conf location config
  location /api {
    content_by_lua_block {
        local validator = require("validate_params")
        local status, message = validator.validate()

        ngx.status = status
        ngx.say(status)
        ngx.say(message)

        if status ~= ngx.HTTP_OK then
            ngx.exit(status)
        end

        -- 继续后续业务逻辑
    }
  }

写法三 : 返回自定义JSON
如果不使用 cjson 库,我们可以手动构造 JSON 字符串。这种方法虽然不如使用专门的 JSON 库灵活,但对于简单的情况来说是足够的。
 -- validate_params.lua
local function validate_post_params()
    ngx.req.read_body()
    local args = ngx.req.get_post_args()

    if not args.username or #args.username < 3 then
        ngx.status = ngx.HTTP_BAD_REQUEST
        ngx.say("Username must be at least 3 characters long")
        return false
    end

    if not args.password or #args.password < 6 then
        ngx.status = ngx.HTTP_BAD_REQUEST
        -- 创建 JSON 字符串
        local json_response = string.format('{"status":"%s","message":"%s"}',ngx.status,  "Password must be at least 6 characters long")

        -- 设置响应头为 JSON
        ngx.header.content_type = "application/json"

        -- 输出 JSON 响应
        ngx.say(json_response)

        return false
    end

    return true
end

return {
    validate_post_params = validate_post_params
}
这段代码会返回相同格式的 JSON:
{
    "status": "400",
    "message": "Password must be at least 6 characters long"
}

几点说明:
-
使用 Lua 的
string.format()函数来构造 JSON 字符串。这种方法适用于简单的 JSON 结构。 -
注意要正确处理字符串中的特殊字符,特别是引号。在这个例子中,我们的消息没有特殊字符,但在实际应用中可能需要进行转义。
-
仍然设置响应头的 content-type 为 “application/json”。
-
使用
ngx.say()输出构造的 JSON 字符串。
这种方法的优点是不依赖额外的库,缺点是对于复杂的 JSON 结构可能会变得难以维护。如果需要处理更复杂的 JSON 数据,或者需要频繁地进行 JSON 操作,最好还是使用专门的 JSON 库(如 cjson 或 dkjson)。
 location /api {
    content_by_lua_block {
        local validator = require("validate_params")
        if validator.validate_post_params() then
            ngx.say("Validation passed")
        end
        }
      }
复杂的正则校验
-- validate_params.lua

-- 用户名验证函数
local function validate_username(username)
    -- 基础检查
    if not username or username == "" then
        return false, "Username cannot be empty"
    end

    -- 长度检查
    local length = string.len(username)
    if length < 3 then
        return false, "Username is too short (minimum 3 characters)"
    end
    if length > 20 then
        return false, "Username is too long (maximum 20 characters)"
    end

    -- 检查是否包含空格
    if string.find(username, "%s") then
        return false, "Username cannot contain spaces"
    end

    -- 正则表达式检查(只允许字母、数字、下划线,必须以字母开头)
    local pattern = "^[A-Za-z][A-Za-z0-9_]*$"
    if not ngx.re.match(username, pattern) then
        return false, "Username must start with a letter and can only contain letters, numbers and underscore"
    end

    -- 检查保留字
    local reserved_words = {
        "admin", "root", "system", "user",
        "moderator", "administrator"
    }

    local username_lower = string.lower(username)
    for _, word in ipairs(reserved_words) do
        if username_lower == word then
            return false, "This username is reserved"
        end
    end

    return true, nil
end

-- JSON响应函数
local function send_json_response(status, message)
    ngx.status = status
    ngx.header.content_type = "application/json"
    local json_response = string.format('{"status":"%s","message":"%s"}', status, message)
    ngx.say(json_response)
end

-- 主验证函数
local function validate_post_params()
    ngx.req.read_body()
    local args = ngx.req.get_post_args()

    -- 验证用户名
    if not args.username then
        send_json_response(ngx.HTTP_BAD_REQUEST, "Username is required")
        return false
    end

    local is_valid, error_message = validate_username(args.username)
    if not is_valid then
        send_json_response(ngx.HTTP_BAD_REQUEST, error_message)
        return false
    end

    -- 验证密码
    if not args.password or #args.password < 6 then
        send_json_response(ngx.HTTP_BAD_REQUEST, "Password must be at least 6 characters long")
        return false
    end

    return true
end

-- 导出模块
return {
    validate_post_params = validate_post_params
}
    location /api {
    content_by_lua_block {
        local validator = require("validate_params")
        if validator.validate_post_params() then
            ngx.say("Validation passed")
        end
        }
      }
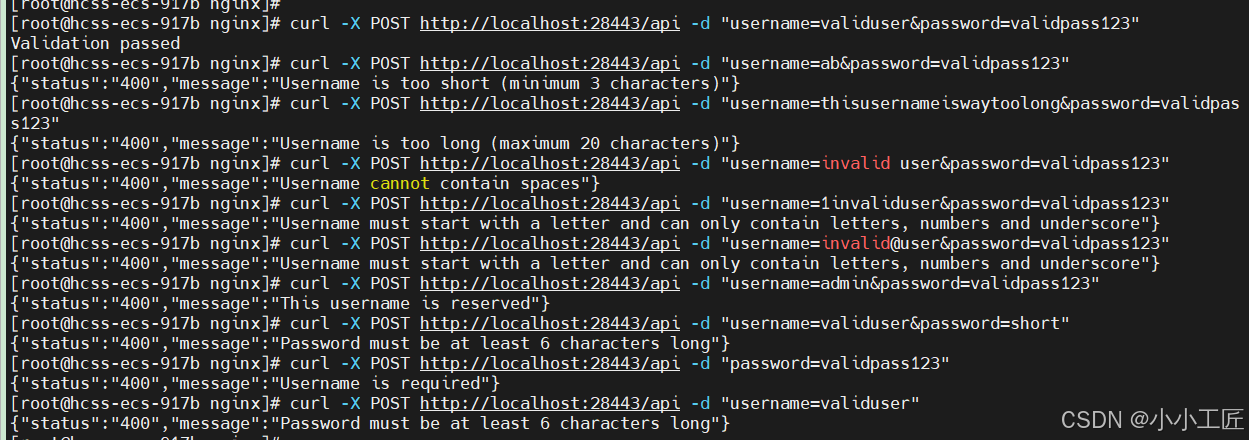
- 有效的用户名和密码:
curl -X POST http://localhost:28443/api -d "username=validuser&password=validpass123"
预期结果:成功(具体响应取决于你的成功处理逻辑)
- 用户名太短:
curl -X POST http://localhost:28443/api -d "username=ab&password=validpass123"
预期结果:
{"status":"400","message":"Username is too short (minimum 3 characters)"}
- 用户名太长:
curl -X POST http://localhost:28443/api -d "username=thisusernameiswaytoolong&password=validpass123"
预期结果:
{"status":"400","message":"Username is too long (maximum 20 characters)"}
- 用户名包含空格:
curl -X POST http://localhost:28443/api -d "username=invalid user&password=validpass123"
预期结果:
{"status":"400","message":"Username cannot contain spaces"}
- 用户名不以字母开头:
curl -X POST http://localhost:28443/api -d "username=1invaliduser&password=validpass123"
预期结果:
{"status":"400","message":"Username must start with a letter and can only contain letters, numbers and underscore"}
- 用户名包含非法字符:
curl -X POST http://localhost:28443/api -d "username=invalid@user&password=validpass123"
预期结果:
{"status":"400","message":"Username must start with a letter and can only contain letters, numbers and underscore"}
- 用户名是保留字:
curl -X POST http://localhost:28443/api -d "username=admin&password=validpass123"
预期结果:
{"status":"400","message":"This username is reserved"}
- 密码太短:
curl -X POST http://localhost:28443/api -d "username=validuser&password=short"
预期结果:
{"status":"400","message":"Password must be at least 6 characters long"}
- 缺少用户名:
curl -X POST http://localhost:28443/api -d "password=validpass123"
预期结果:
{"status":"400","message":"Username is required"}
- 缺少密码:
curl -X POST http://localhost:28443/api -d "username=validuser"
预期结果:
{"status":"400","message":"Password must be at least 6 characters long"}
步骤 4: 测试和验证
-
重启 Nginx:
sudo systemctl restart nginx -
发送 POST 请求:
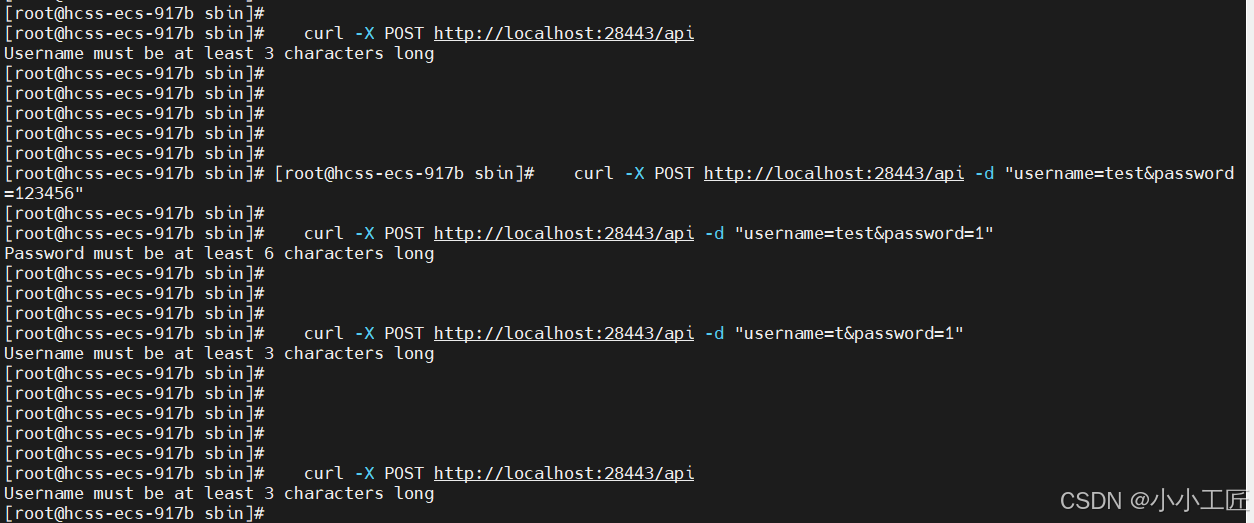
可以使用curl或 Postman 测试:
[root@hcss-ecs-917b sbin]#    curl -X POST http://localhost:28443/api -d "username=test&password=123456"
Validation passed
[root@hcss-ecs-917b sbin]#
[root@hcss-ecs-917b sbin]#
[root@hcss-ecs-917b sbin]#
[root@hcss-ecs-917b sbin]#    curl -X POST http://localhost:28443/api -d "username=test&password=1"
Password must be at least 6 characters long
[root@hcss-ecs-917b sbin]#
[root@hcss-ecs-917b sbin]#
[root@hcss-ecs-917b sbin]#
[root@hcss-ecs-917b sbin]#    curl -X POST http://localhost:28443/api -d "username=t&password=1"
Username must be at least 3 characters long
[root@hcss-ecs-917b sbin]#
[root@hcss-ecs-917b sbin]#
[root@hcss-ecs-917b sbin]#
[root@hcss-ecs-917b sbin]#
[root@hcss-ecs-917b sbin]#
[root@hcss-ecs-917b sbin]#    curl -X POST http://localhost:28443/api
Username must be at least 3 characters long
[root@hcss-ecs-917b sbin]#
[root@hcss-ecs-917b sbin]#
ngx.HTTP_* 枚举值
在 OpenResty/Nginx 中,ngx.HTTP_* 常用的状态码枚举值如下:
- 成功类状态码:
ngx.HTTP_OK                 -- 200 成功
ngx.HTTP_CREATED            -- 201 已创建
ngx.HTTP_NO_CONTENT         -- 204 无内容
- 重定向类:
ngx.HTTP_MOVED_TEMPORARILY  -- 302 临时重定向
ngx.HTTP_MOVED_PERMANENTLY  -- 301 永久重定向
ngx.HTTP_SEE_OTHER          -- 303 其他位置
ngx.HTTP_NOT_MODIFIED       -- 304 未修改
- 客户端错误类:
ngx.HTTP_BAD_REQUEST        -- 400 错误请求
ngx.HTTP_UNAUTHORIZED       -- 401 未授权
ngx.HTTP_FORBIDDEN          -- 403 禁止访问
ngx.HTTP_NOT_FOUND          -- 404 未找到
ngx.HTTP_METHOD_NOT_ALLOWED -- 405 方法不允许
ngx.HTTP_REQUEST_TIMEOUT    -- 408 请求超时
ngx.HTTP_CONFLICT           -- 409 冲突
ngx.HTTP_GONE               -- 410 资源已不存在
- 服务器错误类:
ngx.HTTP_INTERNAL_SERVER_ERROR  -- 500 内部服务器错误
ngx.HTTP_NOT_IMPLEMENTED        -- 501 未实现
ngx.HTTP_BAD_GATEWAY            -- 502 网关错误
ngx.HTTP_SERVICE_UNAVAILABLE    -- 503 服务不可用
ngx.HTTP_GATEWAY_TIMEOUT        -- 504 网关超时
常用示例:
-- 成功响应
ngx.status = ngx.HTTP_OK
ngx.say("Success")

-- 参数错误
ngx.status = ngx.HTTP_BAD_REQUEST
ngx.say("Invalid parameters")

-- 未授权
ngx.status = ngx.HTTP_UNAUTHORIZED
ngx.say("Authentication required")

-- 服务器错误
ngx.status = ngx.HTTP_INTERNAL_SERVER_ERROR
ngx.say("Server error occurred")
推荐使用场景:
- 验证类:使用 400-409
- 身份认证:使用 401-403
- 资源相关:使用 404-410
- 服务器错误:使用 500-504
建议根据具体业务场景选择最精准的状态码。


