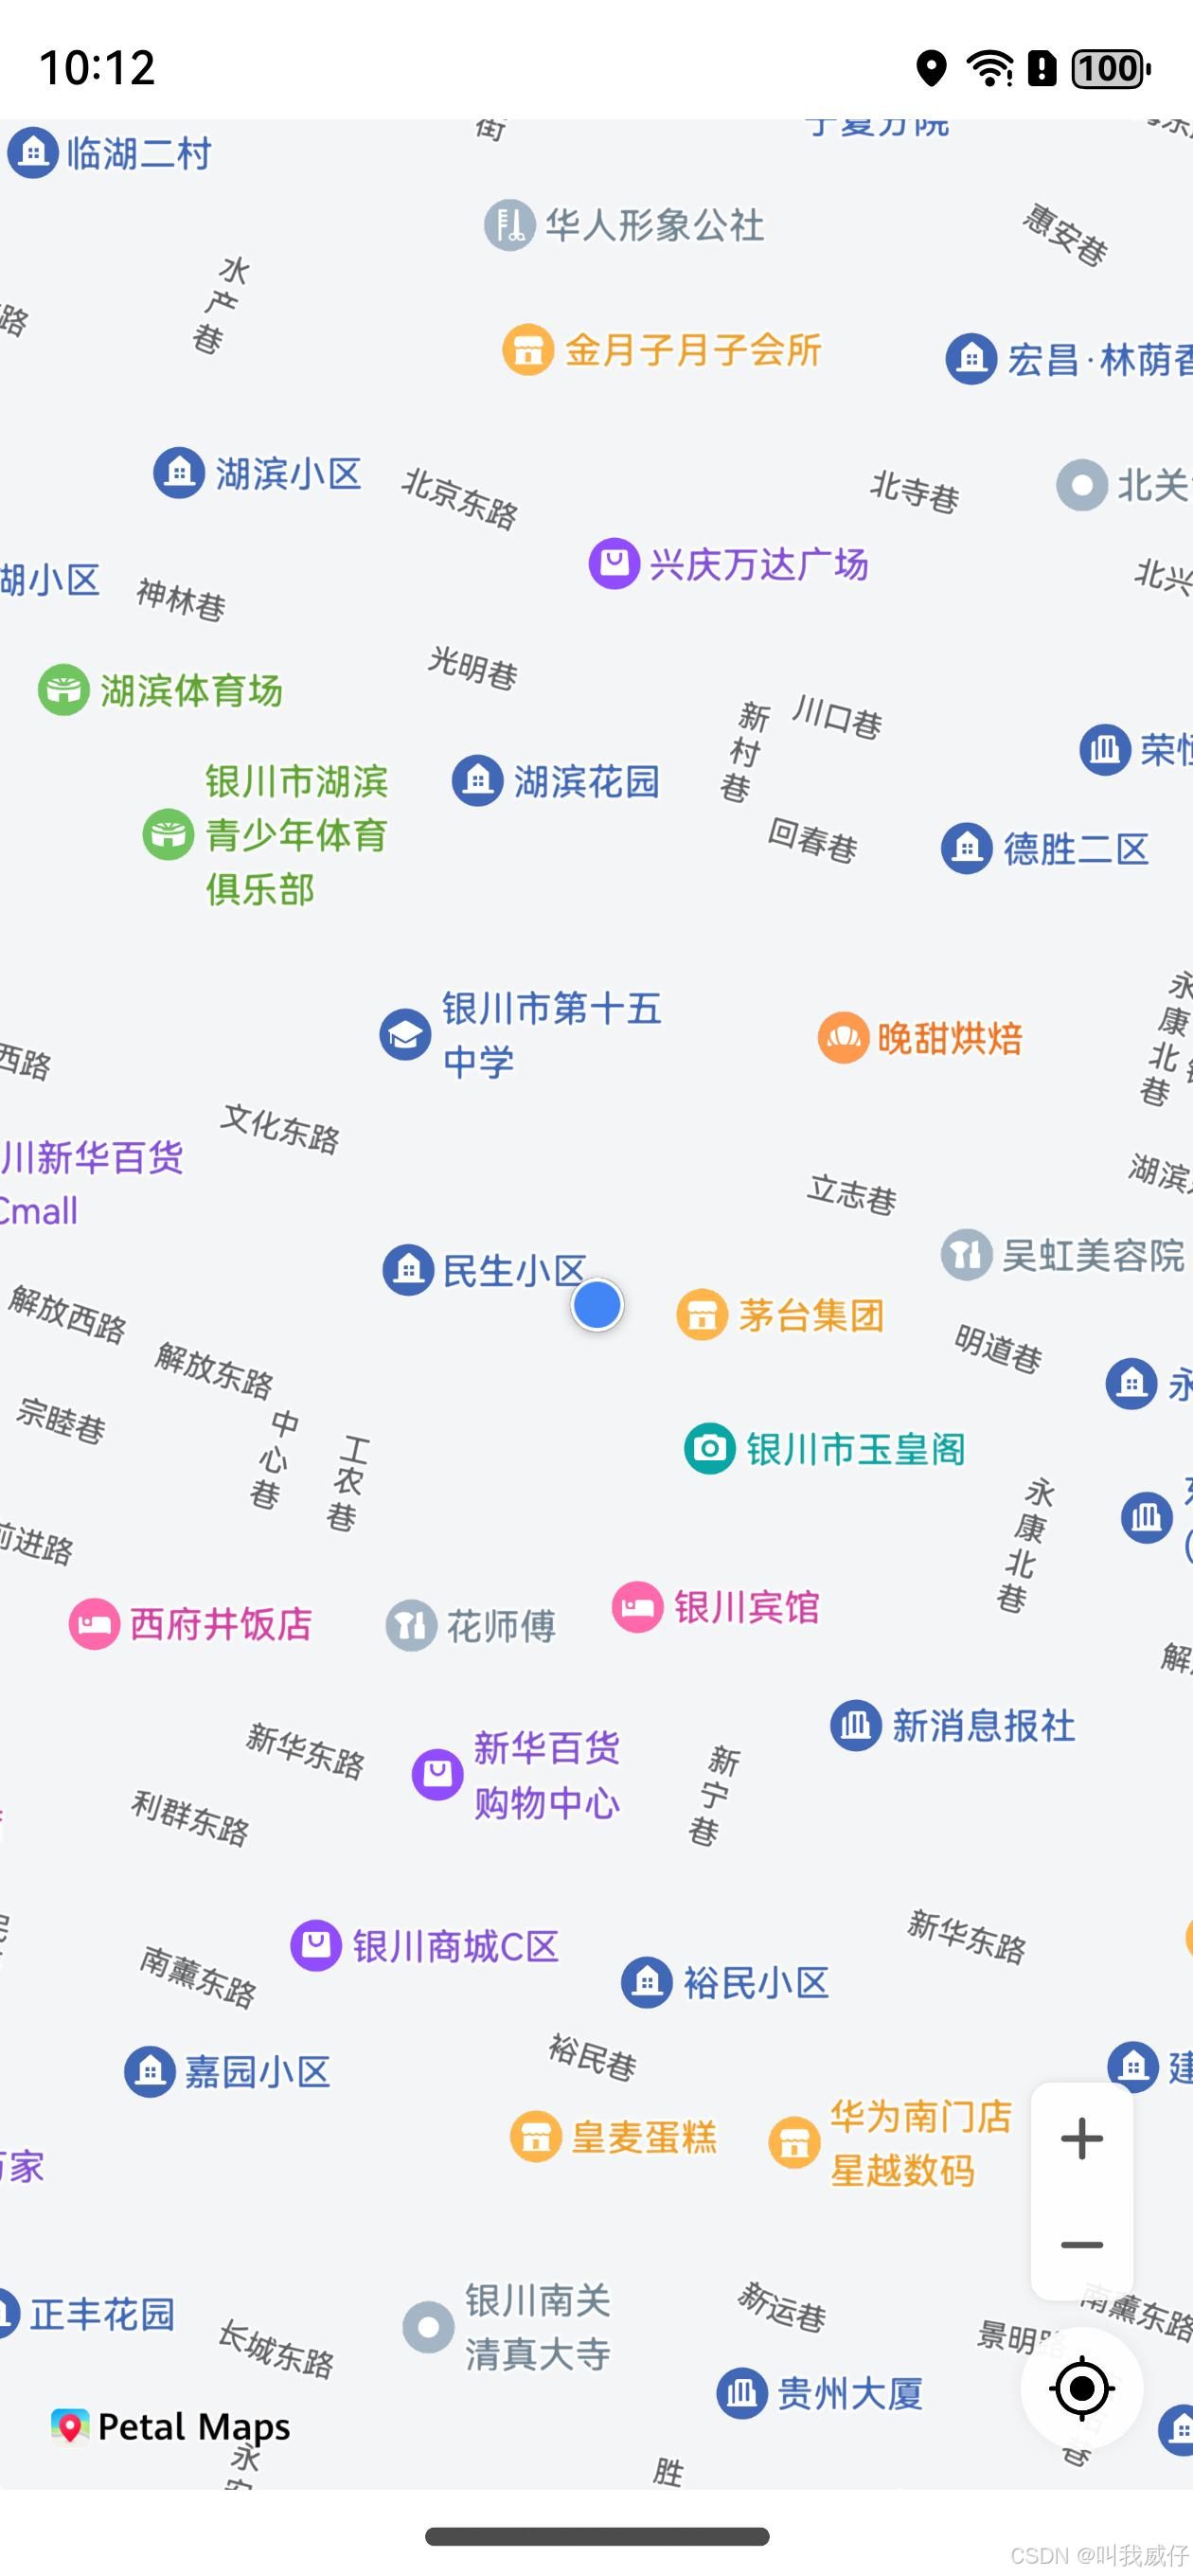
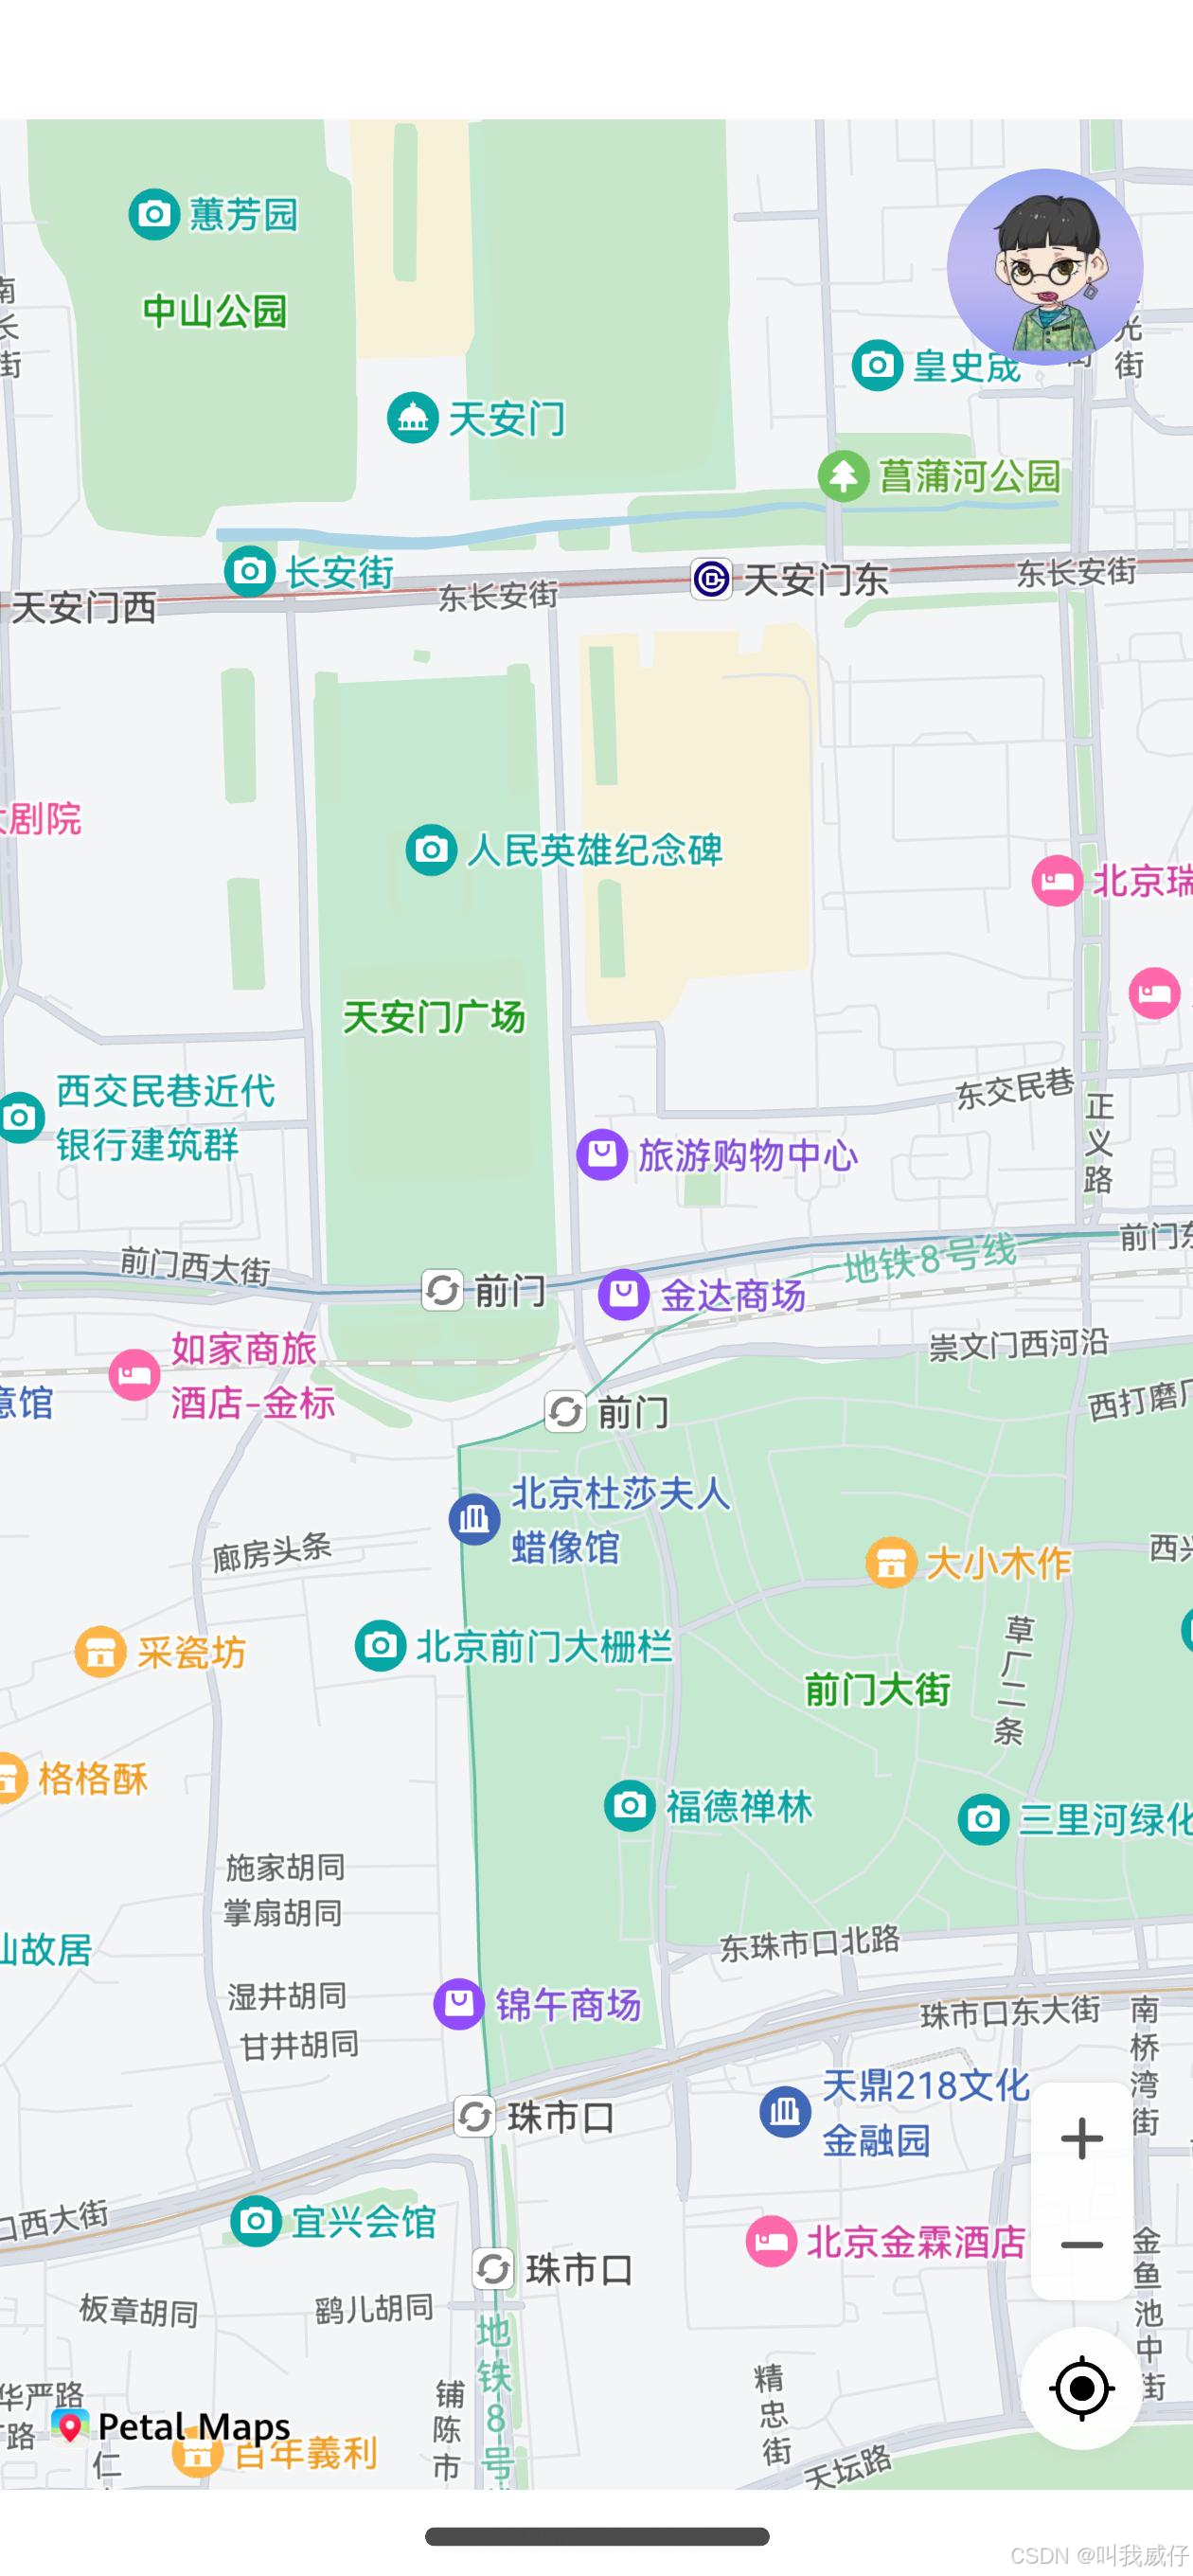
1 案例截图
2 开发准备
本项目需要一台NEXT真机,并完成以下准备工作。
在AppGallery Connect(简称AGC)上,参考创建项目和创建应用完成HarmonyOS应用的创建,从而使用各类服务。
添加应用包名要注意:与新建DevEco Studio的工程Bundle Name要保持一致。

3 创建工程
使用DevEco Studio开发工具选择以下其中一种方式创建坚果单车工程。
- 方式一:当前未打开任何工程,可以在DevEco Studio的欢迎页,选择Create Project打开新工程创建向导。
- 方式二:已打开新工程,可以在菜单栏选择“File > New > Create Project”打开新工程创建向导。
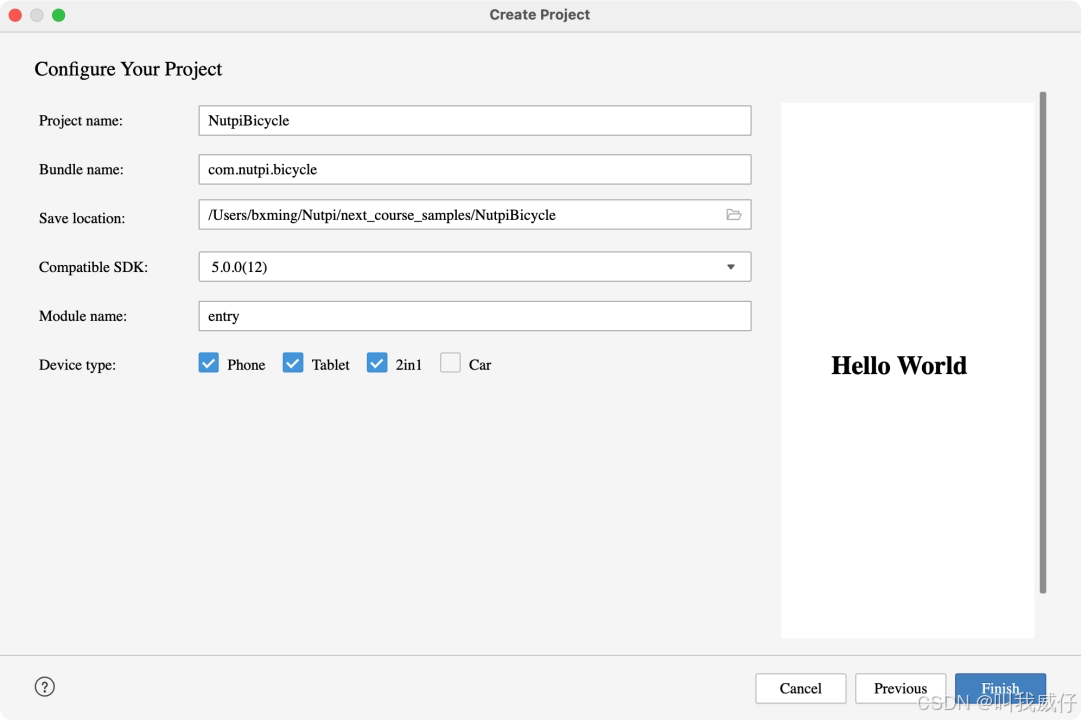
注:创建工程时Bundle name需与AGC平台创建应用时的应用包名一致,坚果单车为com.nutpi.bicycle(此处可替换为你在AGC上项目的包名)。
3.1 添加公钥指纹
使用华为账号服务(Account Kit)、地图服务(Map Kit)、推送服务(Push Kit),为了正常调试运行应用,需要预先添加公钥指纹(生效时间为10分钟)。
添加公钥指纹步骤:
- 工程进行自动签名。
- 在AGC上对应的应用里,添加公钥指纹。
3.2 配置Client ID
坚果单车使用华为账号服务(Account Kit)、地图服务(Map Kit)、推送服务(Push Kit),需要登录AGC平台,在“我的项目”中选择目标应用,获取“项目设置 > 常规 > 应用”的Client ID。
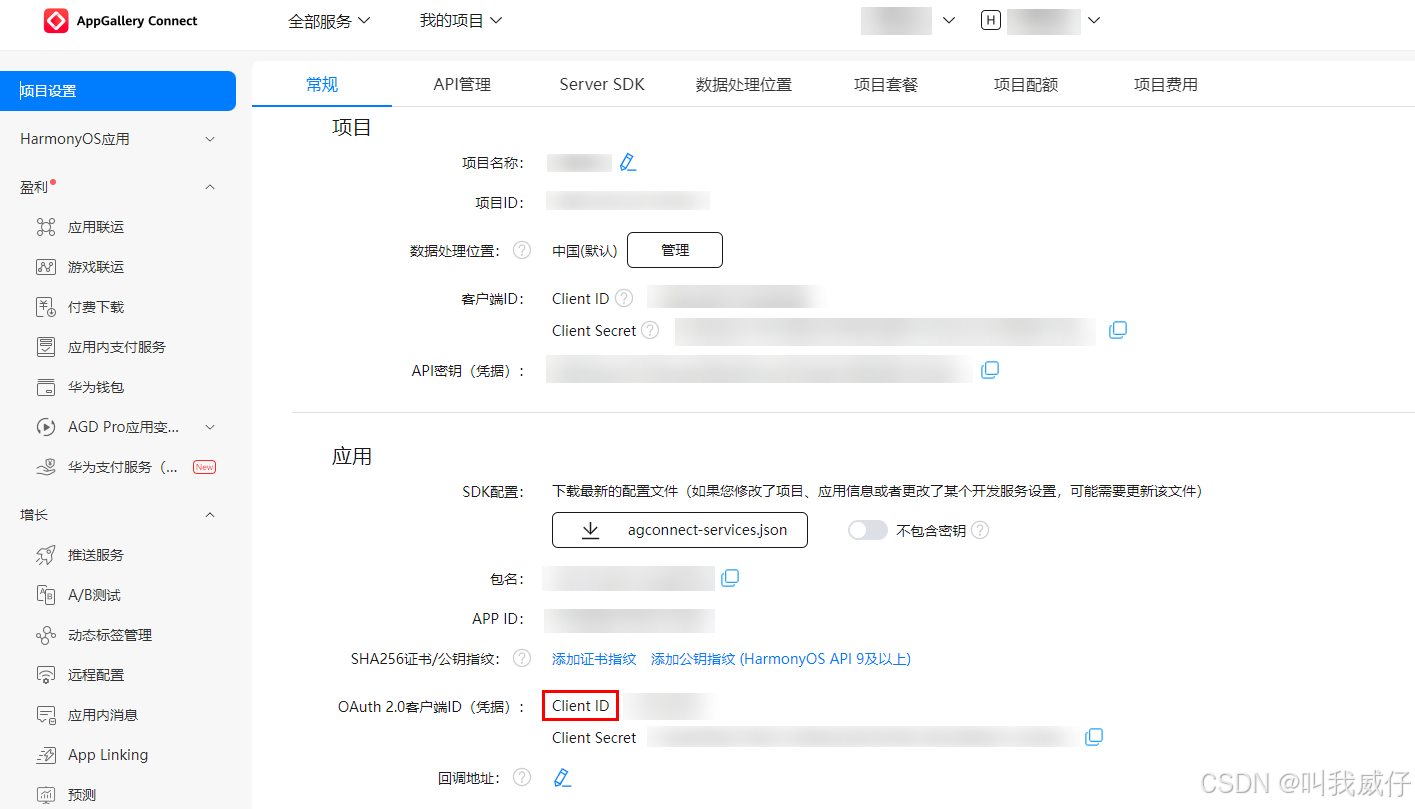
注:需要获取应用的Client ID,而不是项目的Client ID。
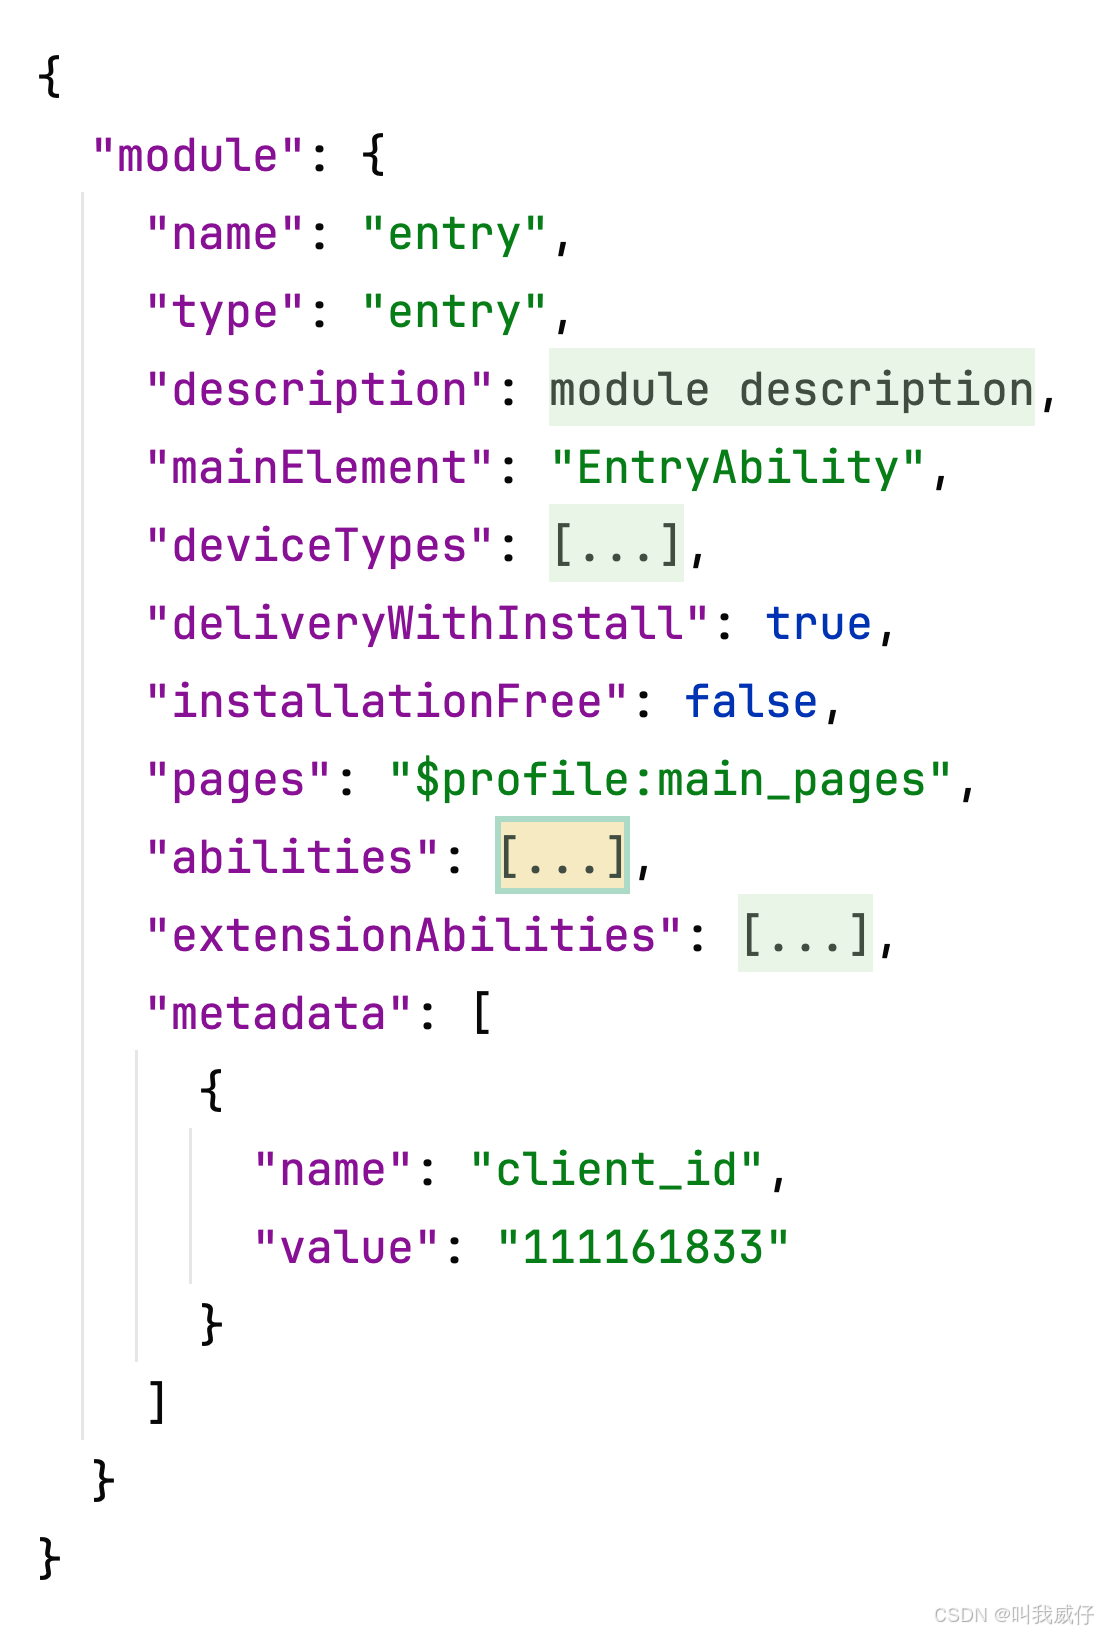
在工程entry模块中的module.json5配置文件中,新增metadata标签,配置name为client_id,value为Client ID的值。
4.1 配置scope权限
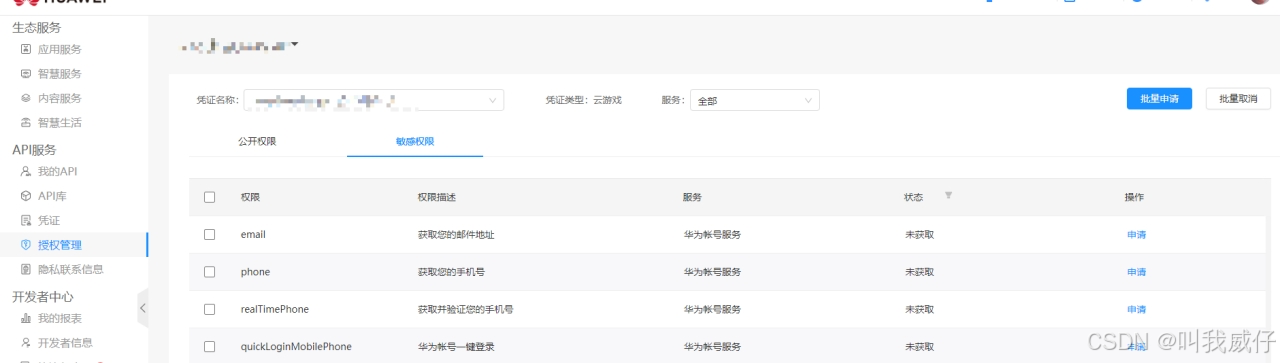
坚果单车需要用到华为账号服务(Account Kit),需要登录开发者联盟,选择“管理中心 > API服务 > 授权管理”,选择目标应用的应用名称,服务选择“华为账号服务”,选择“敏感权限”,再根据应用的需要,选择对应的权限,点击“申请”。点击申请后选择对应“服务类型”选项,根据应用实际情况填写使用场景,使用场景类型和业务描述类型参见表1。提交申请成功后,查看状态“待审核”,5个工作日内审核结果会通过站内消息的形式发送到消息中心,请注意查收。
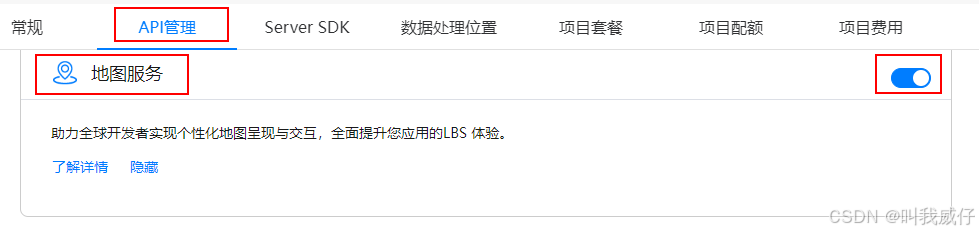
4.2 开通地图服务
登录AGC平台,选择“我的项目”,在项目列表中找到目标项目,在项目下的应用列表中选择需要打开地图服务的应用。选择API管理,找到地图服务开关,打开开关。
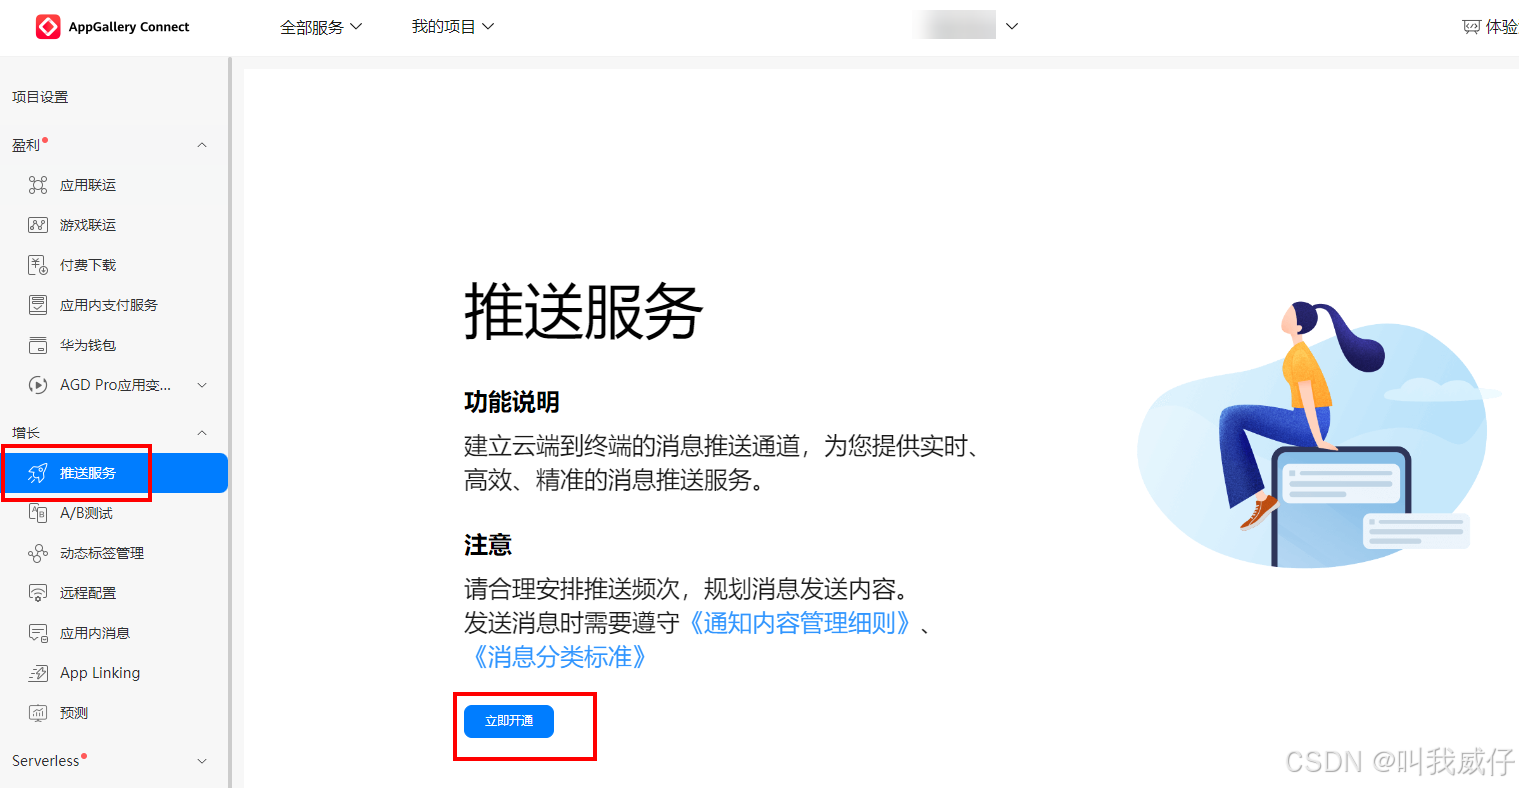
4.3 开通推送服务
登录AGC平台,选择“我的项目”,在项目列表中找到目标项目,在项目下的应用列表中选择需要打开地图服务的应用。在左侧导航栏选择“增长 > 推送服务”,点击“立即开通”,在弹出的提示框中点击“确定”。
5 向用户申请权限
- 位置服务(Location Kit)需要申请
ohos.permission.LOCATION、ohos.permission.APPROXIMATELY_LOCATION权限(静态配置),并封装PermissionsUtil用户动态向用户申请权限。
// module.json5配置文件中配置权限
{
  "module": {
    "name": "entry",
    "type": "entry",
    ...
    "requestPermissions": [
      {
        "name": "ohos.permission.INTERNET"
      },
      {
        "name": "ohos.permission.LOCATION",
        "reason": "$string:location_reason",
        "usedScene": {
          "when": "inuse"
        }
      },
      {
        "name": "ohos.permission.APPROXIMATELY_LOCATION",
        "reason": "$string:location_reason",
        "usedScene": {
          "when": "inuse"
        }
      }
    ]
  }
}
// PermissionsUtil.ets
import { abilityAccessCtrl, bundleManager, common, PermissionRequestResult, Permissions } from '@kit.AbilityKit'
import { BusinessError } from '@kit.BasicServicesKit';
import { NBConstants } from '../constants/NBConstants';
import { JSON } from '@kit.ArkTS';

const context = getContext(this) as common.UIAbilityContext;

export class PermissionsUtil {
  // 检查是否授权
  static checkAccessToken(permission: Permissions): abilityAccessCtrl.GrantStatus {
    const atManager = abilityAccessCtrl.createAtManager();
    let grantStatus = abilityAccessCtrl.GrantStatus.PERMISSION_DENIED;
    let tokenId: number = 0;
    try {
      const bundleInfo = bundleManager
        .getBundleInfoForSelfSync(bundleManager.BundleFlag.GET_BUNDLE_INFO_WITH_APPLICATION);
      const appInfo = bundleInfo.appInfo;
      tokenId = appInfo.accessTokenId;
      grantStatus = atManager.checkAccessTokenSync(tokenId, permission);
    } catch (error) {
      const err = error as BusinessError;
      console.error(`${NBConstants.TAG} checkAccessToken Failed. Cause: ${JSON.stringify(err)}`);
    }
    return grantStatus;
  }

  // 动态申请权限
  static async reqPermissionsFromUser(permissions: Permissions[]): Promise<number[]> {
    console.info(`${NBConstants.TAG} reqPermissionsFromUser start.`);
    const atManager = abilityAccessCtrl.createAtManager();
    let result: PermissionRequestResult = { permissions: [], authResults: [] };
    try {
      result = await atManager.requestPermissionsFromUser(context, permissions);
    } catch (error) {
      const err = error as BusinessError;
      console.error(`${NBConstants.TAG} reqPermissionsFromUser Failed. Cause: ${JSON.stringify(err)}`);
    }
    return result.authResults;
  }
}
7 开启“我的位置”按钮
确保应用可以获取用户定位,即ohos.permission.LOCATION和ohos.permission.APPROXIMATELY_LOCATION权限在module.json5配置文件中声明。
 private locationPermissions: Array<Permissions> =
    ['ohos.permission.LOCATION', 'ohos.permission.APPROXIMATELY_LOCATION'];

// 确保权限声明,并在获得用户授权后开启“我的位置”功能 Index.ets > aboutToAppear()
// 地图初始化回调
this.callback = async (err, mapController) => {
  if (!err) {
    ...
    const grantStatus = await this.checkPermissions();
    if (!grantStatus) {
      await PermissionsUtil.reqPermissionsFromUser(this.locationPermissions);
      this.mapController?.setMyLocationEnabled(true);
    }
  }
}


// 校验应用是否被授予定位权限
async checkPermissions(): Promise<boolean> {
  for (const permission of this.locationPermissions) {
    const grantStatus: abilityAccessCtrl.GrantStatus = PermissionsUtil.checkAccessToken(permission);
    if (grantStatus === abilityAccessCtrl.GrantStatus.PERMISSION_GRANTED) {
      this.mapController?.setMyLocationEnabled(true);
      this.mapController?.setMyLocationControlsEnabled(true);
      return true;
    }
  }
  return false;
}
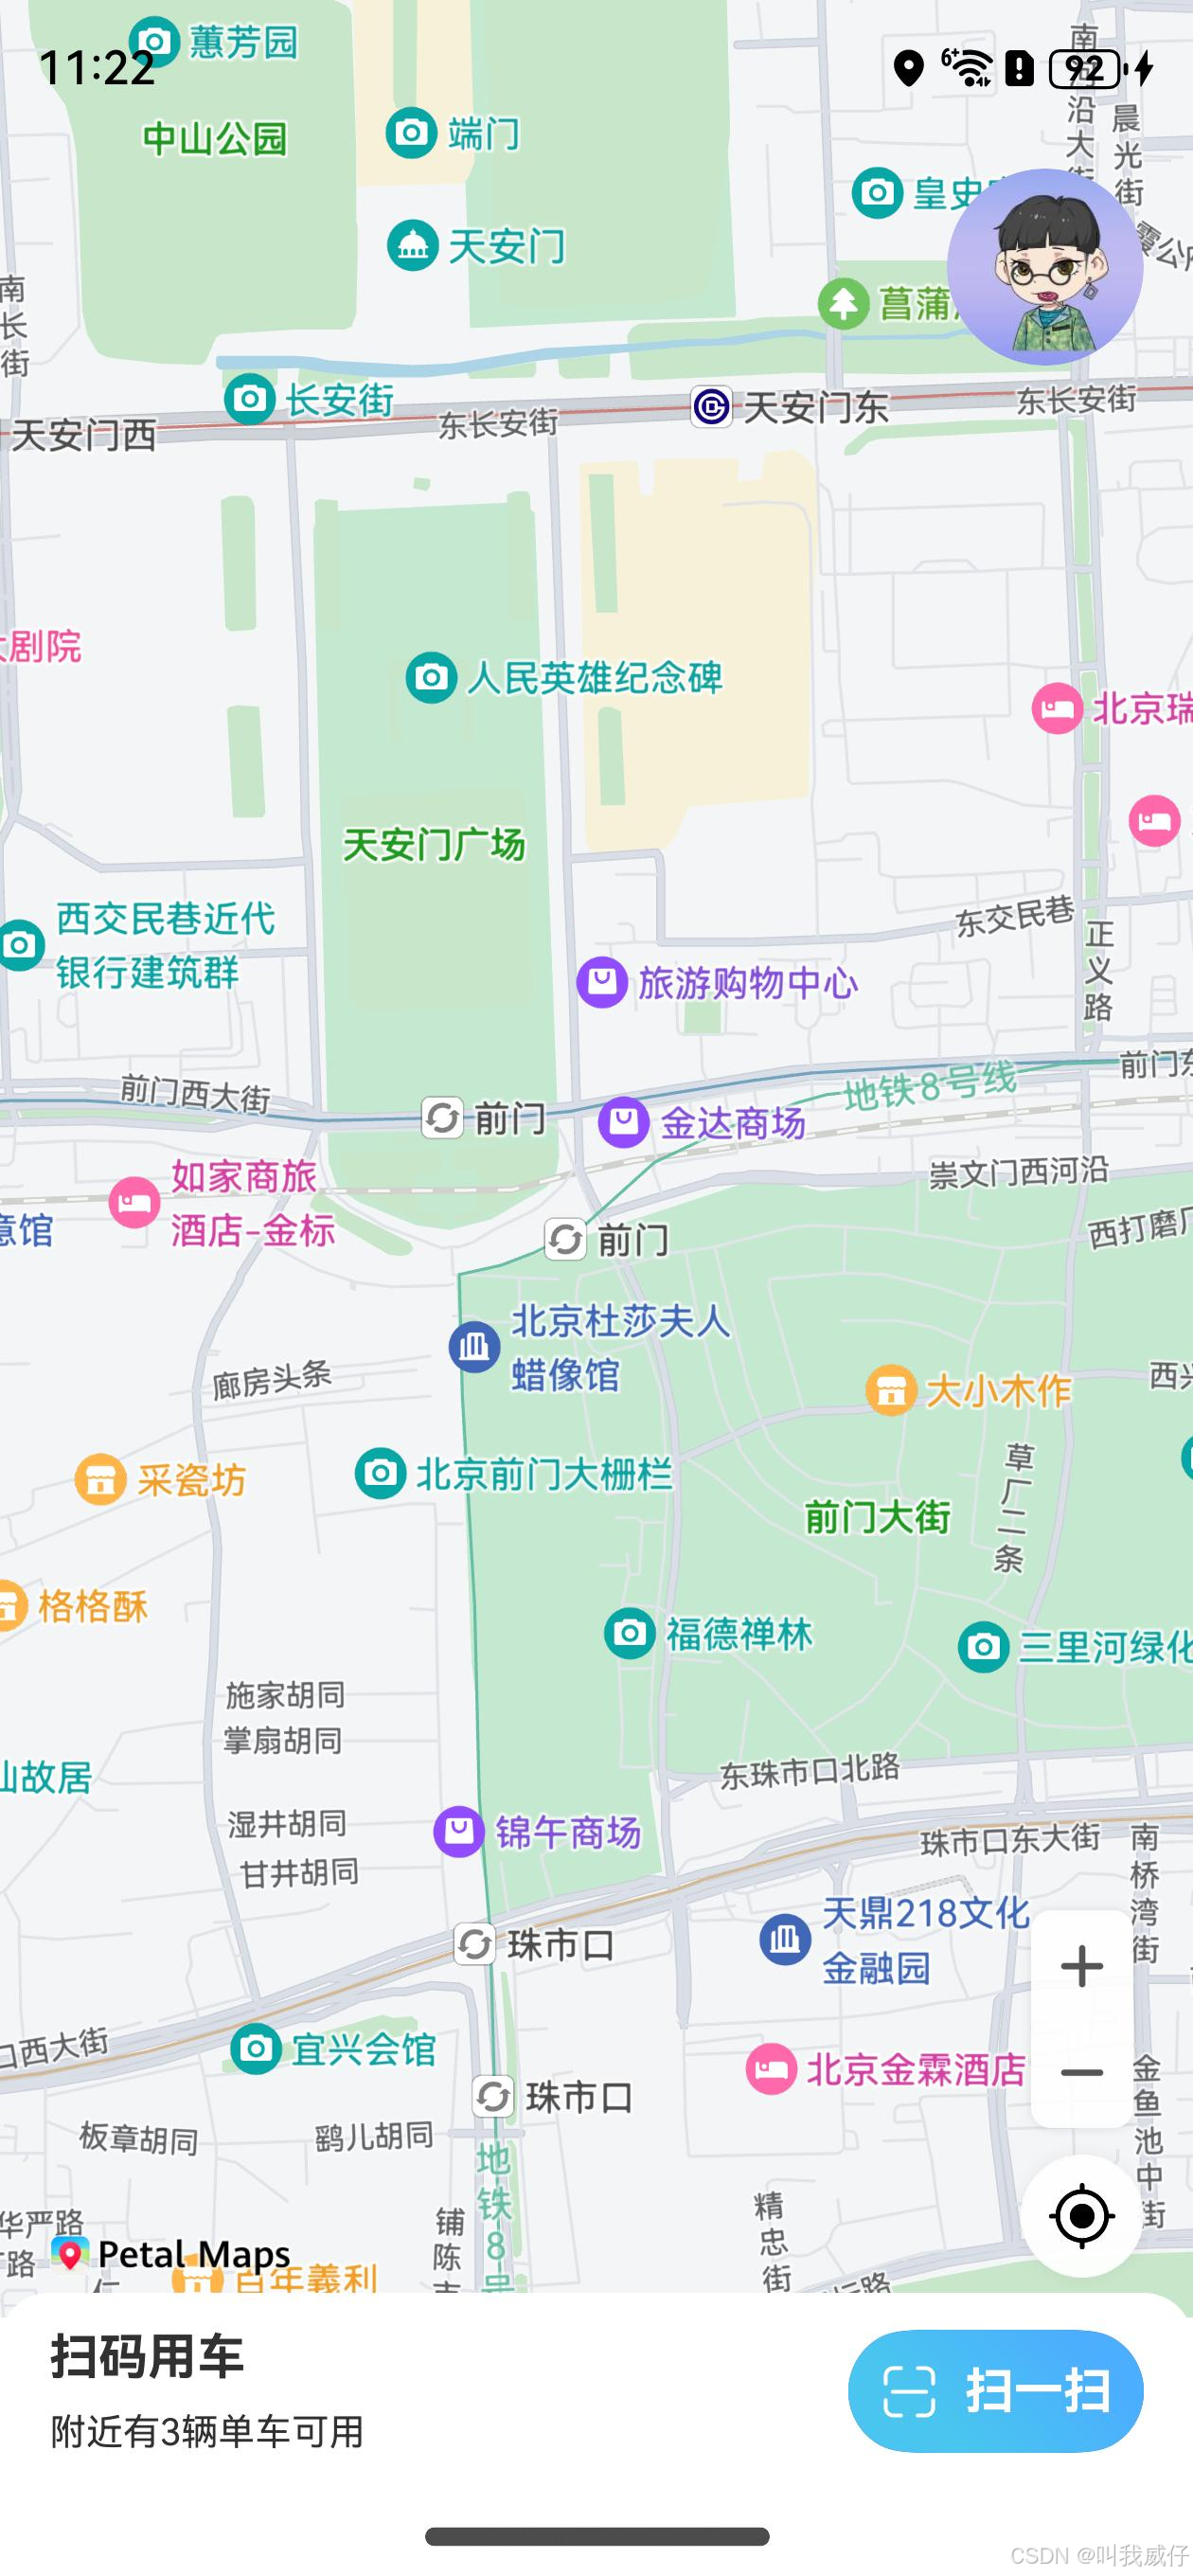
我的位置
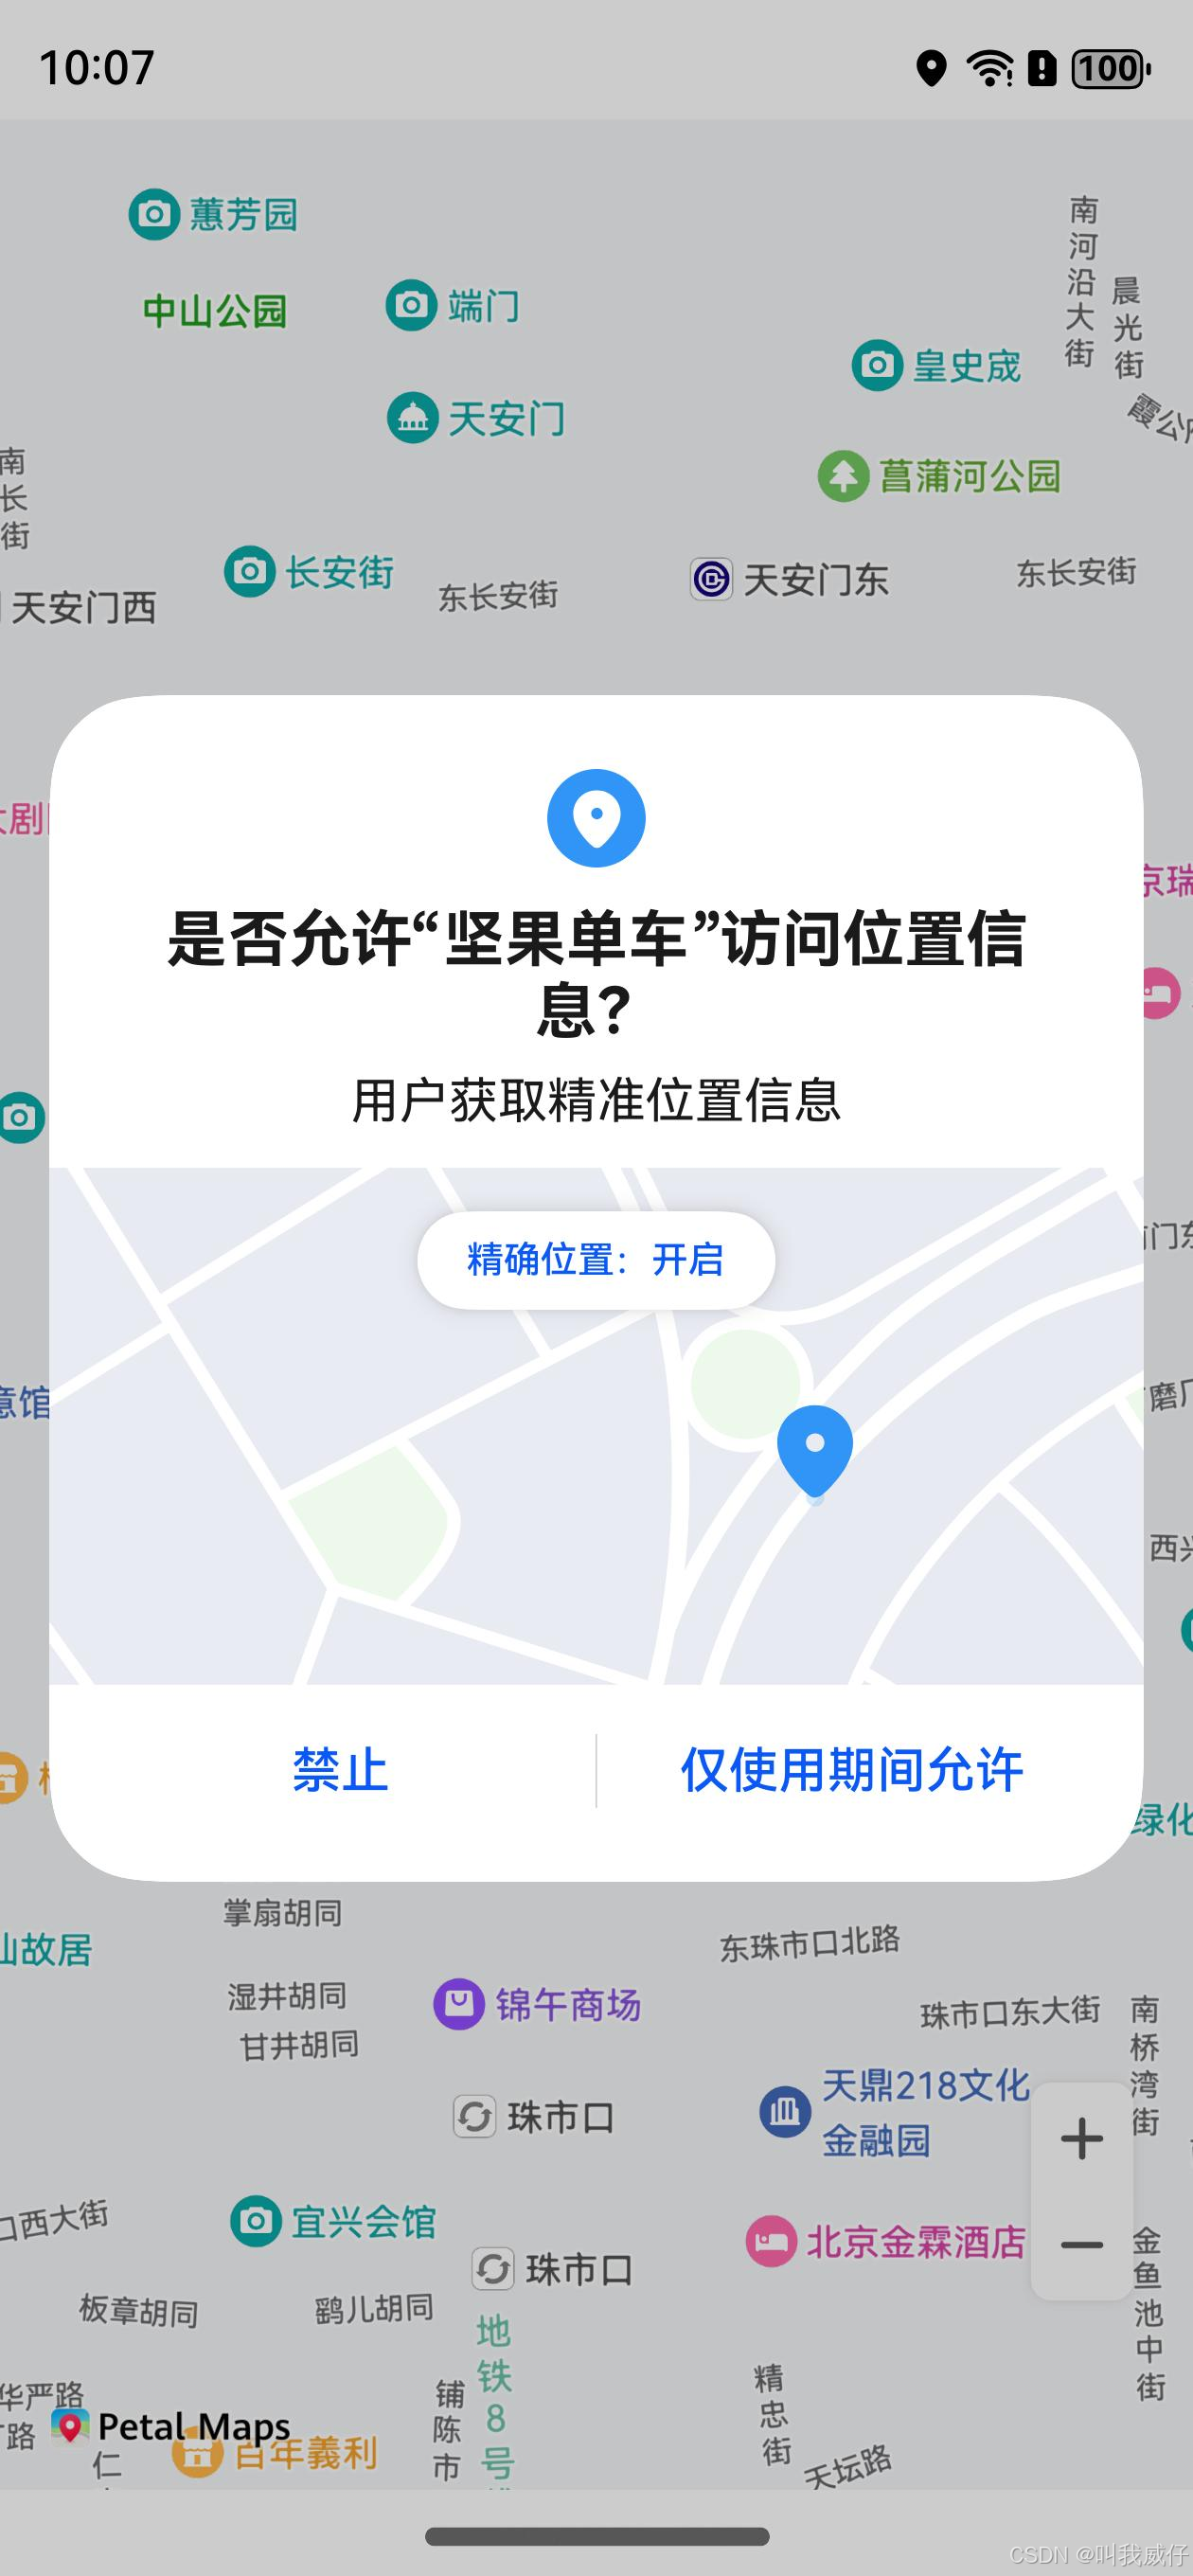
Map Kit默认使用系统的连续定位能力,如果开发者希望定制显示频率或者精准度,可以调用geoLocationManager相关接口获取用户位置坐标(WGS84坐标系)
注意访问设备的位置信息,必须申请ohos.permission.LOCATION和ohos.permission.APPROXIMATELY_LOCATION权限,并且获得用户授权。在获取到用户坐标后,调用mapController对象的setMyLocation设置用户的位置。
// LocationUtil.ets

// 导入geoLocationManager模块
import { geoLocationManager } from '@kit.LocationKit';
import { BusinessError } from '@kit.BasicServicesKit';
import { NBConstants } from '../constants/NBConstants';
import { JSON } from '@kit.ArkTS';

export class LocationUtil {

  // 获取当前位置
  static async currentLocation(): Promise<geoLocationManager.Location | undefined> {
    const request: geoLocationManager.SingleLocationRequest = {
      'locatingPriority': geoLocationManager.LocatingPriority.PRIORITY_LOCATING_SPEED,
      'locatingTimeoutMs': 10000
    };
    let location: geoLocationManager.Location | undefined = undefined;
    try {
      location = await geoLocationManager.getCurrentLocation(request);
      console.log(`${NBConstants.TAG} getLastLocation succeeded. Data: ${JSON.stringify(location)}`);
    } catch (error) {
      const err = error as BusinessError;
      console.error(`${NBConstants.TAG} getLastLocation failed. Cause: ${JSON.stringify(err)}`);
    }
    return location;
  }
}


// 获取我的位置 Index.ets
async getMyLocation() {
  const location: geoLocationManager.Location | undefined = await LocationUtil.currentLocation();
  if (location !== undefined) {
    this.mapController?.setMyLocation(location);
    this.mapController?.animateCamera(map.newLatLng({
      latitude: location.latitude,
      longitude: location.longitude
    }, 15), 200)
  }
}

// 监听“我的位置”按钮点击事件 Index.ets > aboutToAppear()
this.mapController?.on('myLocationButtonClick', () => {
  this.getMyLocation();
});
我的位置
Map Kit默认使用系统的连续定位能力,如果开发者希望定制显示频率或者精准度,可以调用geoLocationManager相关接口获取用户位置坐标(WGS84坐标系)
注意访问设备的位置信息,必须申请ohos.permission.LOCATION和ohos.permission.APPROXIMATELY_LOCATION权限,并且获得用户授权。在获取到用户坐标后,调用mapController对象的setMyLocation设置用户的位置。
// LocationUtil.ets

// 导入geoLocationManager模块
import { geoLocationManager } from '@kit.LocationKit';
import { BusinessError } from '@kit.BasicServicesKit';
import { NBConstants } from '../constants/NBConstants';
import { JSON } from '@kit.ArkTS';

export class LocationUtil {

  // 获取当前位置
  static async currentLocation(): Promise<geoLocationManager.Location | undefined> {
    const request: geoLocationManager.SingleLocationRequest = {
      'locatingPriority': geoLocationManager.LocatingPriority.PRIORITY_LOCATING_SPEED,
      'locatingTimeoutMs': 10000
    };
    let location: geoLocationManager.Location | undefined = undefined;
    try {
      location = await geoLocationManager.getCurrentLocation(request);
      console.log(`${NBConstants.TAG} getLastLocation succeeded. Data: ${JSON.stringify(location)}`);
    } catch (error) {
      const err = error as BusinessError;
      console.error(`${NBConstants.TAG} getLastLocation failed. Cause: ${JSON.stringify(err)}`);
    }
    return location;
  }
}


// 获取我的位置 Index.ets
async getMyLocation() {
  const location: geoLocationManager.Location | undefined = await LocationUtil.currentLocation();
  if (location !== undefined) {
    this.mapController?.setMyLocation(location);
    this.mapController?.animateCamera(map.newLatLng({
      latitude: location.latitude,
      longitude: location.longitude
    }, 15), 200)
  }
}

// 监听“我的位置”按钮点击事件 Index.ets > aboutToAppear()
this.mapController?.on('myLocationButtonClick', () => {
  this.getMyLocation();
});
9 使用华为账号服务(Account Kit)获取头像
Account Kit开放头像昵称授权能力,用户允许应用获取头像昵称后,可快速完成个人信息填写。
// Index.ets
// 默认用户头像
@State avatarUri: ResourceStr = $r('app.media.nutpi_logo');
// 获取用户头像
async getAvatarAndNickName(): Promise<void> {
  // 创建授权请求,并设置参数
  let authRequest = new authentication.HuaweiIDProvider().createAuthorizationWithHuaweiIDRequest();
  // 获取头像昵称需要的参数
  authRequest.scopes = ['profile'];
  // 用户是否需要登录授权,该值为true且用户未登录或未授权时,会拉起用户登录或授权页面
  authRequest.forceAuthorization = true;
  authRequest.state = util.generateRandomUUID();
  try {
    let controller = new authentication.AuthenticationController(getContext(this));
    let response: authentication.AuthorizationWithHuaweiIDResponse = await controller.executeRequest(authRequest);
    if (response) {
      this.avatarUri = response.data?.avatarUri as string;
    }
  } catch (error) {
    console.error('getAvatarAndNickName failed. Cause: ' + JSON.stringify(error));
  }
}
// 头像显示在页面右上角
Stack({ alignContent: Alignment.TopEnd }) {
  Stack({ alignContent: Alignment.Bottom }) {
    // 调用MapComponent组件初始化地图
    MapComponent({
      mapOptions: this.mapOption,
      mapCallback: this.callback
    })
      .width($r('app.string.full_page'))
      .height($r('app.string.full_page'))
  }
  .width($r('app.string.full_page'))
  .height($r('app.string.full_page'))

  Image(this.avatarUri)
    .width(64)
    .height(64)
    .borderRadius(32)
    .margin({ top: 16, right: 16 })
    .onClick(async () => {
      await this.getAvatarAndNickName();
    })
}
.width($r('app.string.full_page'))
.height($r('app.string.full_page'))
10 页面底部添加“扫一扫”按钮,用于扫码开锁
// Index.ets
// 为了防止底部信息栏覆盖地图右下角按钮,使用offset属性在y轴方向上移56
Stack({ alignContent: Alignment.Bottom }) {
  // 调用MapComponent组件初始化地图
  MapComponent({
    mapOptions: this.mapOption,
    mapCallback: this.callback
  })
    .width($r('app.string.full_page'))
    .height($r('app.string.full_page'))
    .offset({ y: -56 })

  Row() {
    Column({ space: 8 }) {
      Text('扫码用车')
        .fontSize(16)
        .fontWeight(FontWeight.Bold)
      Text('附近有3辆单车可用')
        .fontSize(12)
        .fontWeight(FontWeight.Normal)
    }
    .height($r('app.string.full_page'))
    .justifyContent(FlexAlign.Center)
    .alignItems(HorizontalAlign.Start)
    Button() {
      Row({ space: 8 }) {
        Image($r('app.media.ic_line_viewfinder'))
          .width(20)
          .height(20)
          .fillColor(Color.White)
        Text('扫一扫')
          .fontSize(16)
          .fontWeight(FontWeight.Bold)
          .fontColor(Color.White)
      }
    }
    .height(40)
    .type(ButtonType.Capsule)
    .padding({ left: 10, right: 10 })
    .linearGradient({
      angle: 45,
      colors: [[0x49c5ef, 0.3], [0x4caefe, 0.8]]
    })
  }
  .width($r('app.string.full_page'))
  .height(64)
  .justifyContent(FlexAlign.SpaceBetween)
  .borderRadius({
    topLeft: 16,
    topRight: 16
  })
  .backgroundColor(Color.White)
  .padding({
    left: 16,
    right: 16
  })
}
.width($r('app.string.full_page'))
.height($r('app.string.full_page'))

11 点击“扫一扫”按钮,判断华为账号登录状态
步骤一: 导入authentication模块及相关公共模块。
import { authentication } from '@kit.AccountKit';
import { hilog } from '@kit.PerformanceAnalysisKit';
import { BusinessError } from '@kit.BasicServicesKit';
步骤二: 创建授权请求并设置参数。
// 创建请求参数
let stateRequest: authentication.StateRequest = {
  idType: authentication.IdType.UNION_ID,
  idValue: 'xxx' // 该值可以通过华为帐号登录接口获取
}
步骤三: 调用getHuaweiIDState方法获取华为账号登录状态。
// 判断华为账号登录状态
async getLoginState() {

  if (this.idValue != '') { //如果已经获取过id
    const stateRequest: authentication.StateRequest = {
      idType: authentication.IdType.UNION_ID,
      idValue: this.idValue
    };
    try {
      // 执行获取华为账号登录状态请求
      const result = await new authentication
        .HuaweiIDProvider().getHuaweiIDState(stateRequest);
      if (result.state === authentication.State.UNLOGGED_IN
        || result.state === authentication.State.UNAUTHORIZED) { // 未登录
        this.loginState = false;
      } else {
        this.loginState = true;
      }
    } catch (error) {
      const err = error as BusinessError;
      console.error(`${NBConstants.TAG} getLoginState Failed. Cause: ${JSON.stringify(err)}`);
    }
  }
}


// 在“扫一扫”点击事件中添加判断华为账号登录状态方法
Button() {
  Row({ space: 8 }) {
    Image($r('app.media.ic_line_viewfinder'))
      .width(20)
      .height(20)
      .fillColor(Color.White)
    Text('扫一扫')
      .fontSize(16)
      .fontWeight(FontWeight.Bold)
      .fontColor(Color.White)
  }
}
.height(40)
.type(ButtonType.Capsule)
.padding({ left: 10, right: 10 })
.linearGradient({
  angle: 45,
  colors: [[0x49c5ef, 0.3], [0x4caefe, 0.8]]
})
.onClick(async () => {
  await this.getLoginState();
})
12 华为账号未登录,使用按钮实现一键登录
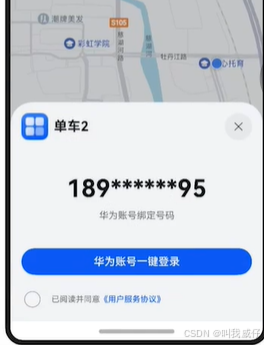
// 在“扫一扫”点击事件中添加华为账号登录状态判断
Stack() {
  Row() {
    Column({ space: 8 }) {
      Text('扫码用车')
        .fontSize(16)
        .fontWeight(FontWeight.Bold)
      Text('附近有3辆单车可用')
        .fontSize(12)
        .fontWeight(FontWeight.Normal)
    }
    .height($r('app.string.full_page'))
    .justifyContent(FlexAlign.Center)
    .alignItems(HorizontalAlign.Start)
    Button() {
      Row({ space: 8 }) {
        Image($r('app.media.ic_line_viewfinder'))
          .width(20)
          .height(20)
          .fillColor(Color.White)
        Text('扫一扫')
          .fontSize(16)
          .fontWeight(FontWeight.Bold)
          .fontColor(Color.White)
      }
    }
    .height(40)
    .type(ButtonType.Capsule)
    .padding({ left: 10, right: 10 })
    .linearGradient({
      angle: 45,
      colors: [[0x49c5ef, 0.3], [0x4caefe, 0.8]]
    })
    .onClick(async () => {  //点击后检查登录并扫码(稍后抽取为函数)
        await this.getLoginState();
        if (this.loginState) {  // 已登录
          this.getAvatarAndNickName() //获取头像
          await this.startScan();
        } else { // 未登录
          // 调用华为账号一键登录
          this.showPanel = true;
        }
    })
  }
  .width($r('app.string.full_page'))
  .height(64)
  .justifyContent(FlexAlign.SpaceBetween)
  .borderRadius({
    topLeft: 16,
    topRight: 16
  })
  .backgroundColor(Color.White)
  .padding({
    left: 16,
    right: 16
  })
}
.width($r('app.string.full_page'))
Stack() {
  LoginPanelComponent({ showPanel: this.showPanel, idValue: this.idValue })
}

//抽取登录和扫码的点击事件为一个函数
  async loginToScan(){
    await this.getLoginState();
    if (this.loginState) {  // 已登录
      this.getAvatarAndNickName() //获取头像
      await this.startScan();
    } else { // 未登录
      // 调用华为账号一键登录
      this.showPanel = true;
    }
  }

  // 用户登录获取的UnionID; 当id发生变化时,触发登录
  @State @Watch('loginToScan') idValue: string = ""
13 一键登录面板的自定义
// LoginPanelCompoent.ets
/**
 * @description 自定义登录组件
 */
import { LoginPanel, loginComponentManager, authentication } from '@kit.AccountKit';
import { JSON, util } from '@kit.ArkTS';
import { BusinessError } from '@kit.BasicServicesKit';
import { promptAction } from '@kit.ArkUI';
import { NBConstants } from '../constants/NBConstants';

@Component
export struct LoginPanelComponent {
  // 是否展示LoginPanel组件
  @Link showPanel: boolean;
  // 用户登录获取的UnionID
  @Link idValue: string;

  // 定义LoginPanel展示的隐私文本
  privacyText: loginComponentManager.PrivacyText[] = [{
    text: '已阅读并同意',
    type: loginComponentManager.TextType.PLAIN_TEXT
  }, {
    text: '《用户服务协议》',
    tag: '用户服务协议',
    type: loginComponentManager.TextType.RICH_TEXT
  }];

  // 构造LoginPanel组件的控制器
  controller = new loginComponentManager.LoginPanelController()
    .onClickLoginWithHuaweiIDButton((error: BusinessError, response: loginComponentManager.HuaweiIDCredential) => {
      if (error) {
        console.error(NBConstants.TAG + "onClickLoginWithHuaweiIDButton failed. Cause: " + JSON.stringify(error));
        return;
      }
      console.log(NBConstants.TAG + "onClickLoginWithHuaweiIDButton ==> " + JSON.stringify(response));
      this.idValue = response.unionID;
      this.showPanel = false //登录成功,隐藏登录面板
    })
  @State phoneNum: string = "";
  // 获取华为账号的匿名手机号
  async getQuickLoginAnonymousPhone() {
    // 创建授权请求,并设置参数
    let authRequest = new authentication.HuaweiIDProvider().createAuthorizationWithHuaweiIDRequest();
    // 获取手机号需要传申请的scope
    authRequest.scopes = ['quickLoginAnonymousPhone'];
    // 用于防跨站点请求伪造,非空字符即可
    authRequest.state = util.generateRandomUUID();

    if (this.idValue == '' || this.showPanel) { //未登录 或 展示面板时
      // 用户是否需要登录授权,该值为true且用户未登录或未授权时,会拉起用户登录或授权页面
      authRequest.forceAuthorization = true
    } else {
      authRequest.forceAuthorization = false
    }

    let controller = new authentication.AuthenticationController(getContext(this));
    try {
      let response: authentication.AuthorizationWithHuaweiIDResponse = await controller.executeRequest(authRequest);
      let anonymousPhone = response.data?.extraInfo?.quickLoginAnonymousPhone;
      if (anonymousPhone) {
        this.phoneNum = anonymousPhone as string;
      }
    } catch (error) {
      console.error(NBConstants.TAG + 'getQuickLoginAnonymousPhone failed. Cause: ' + JSON.stringify(error));
    }
  }

  async aboutToAppear() {
    await this.getQuickLoginAnonymousPhone();
  }

  build() {
    if (this.showPanel) {
      // 构造LoginPanel UI组件参数
      Stack({ alignContent: Alignment.Bottom }) {
        LoginPanel({
          show: this.showPanel,
          params: {
            appInfo: {
              appIcon: $r('app.media.nutpi_logo'),
              appName: $r('app.string.app_name'),
              appDescription: $r('app.string.module_desc')
            },
            anonymousPhoneNumber: this.phoneNum,
            privacyText: this.privacyText,
            loginType: loginComponentManager.LoginType.QUICK_LOGIN
          },
          controller: this.controller
        })
      }
      .width('100%')
      .height('100%')
    }
  }
}
14 华为账号已登录,调用统一扫码服务(Scan Kit)进行扫码解锁
步骤一: 导入默认界面扫码模块
import { scanCore, scanBarcode } from '@kit.ScanKit';
// 导入默认界面需要的日志模块和错误码模块
import { hilog } from '@kit.PerformanceAnalysisKit';
import { BusinessError } from '@kit.BasicServicesKit';
步骤二: 调用startScanForResult方法拉起默认扫码界面
// 启用默认扫码界面
async startScan() {
  console.info(NBConstants.TAG + "默认界面扫码开始。");
  // 定义扫码参数options
  const options: scanBarcode.ScanOptions = {
    scanTypes: [scanCore.ScanType.ALL],
    enableMultiMode: true,
    enableAlbum: true
  };
  try {
    const result = await scanBarcode.startScanForResult(getContext(this), options);
    console.info(NBConstants.TAG + "Succeed. Data: " + JSON.stringify(result));
    promptAction.showToast({
      message: "开锁成功!",
      duration: 5000
    })
  } catch (error) {
    const e: BusinessError = error as BusinessError;
    console.error(NBConstants.TAG + "Failed. Cause: " + JSON.stringify(e));
  }
}
步骤三: 在“扫一扫”点击事件中添加华为账号已登录,开启扫码方法
Button() {
  Row({ space: 8 }) {
    Image($r('app.media.ic_line_viewfinder'))
      .width(20)
      .height(20)
      .fillColor(Color.White)
    Text('扫一扫')
      .fontSize(16)
      .fontWeight(FontWeight.Bold)
      .fontColor(Color.White)
  }
}
.height(40)
.type(ButtonType.Capsule)
.padding({ left: 10, right: 10 })
.linearGradient({
  angle: 45,
  colors: [[0x49c5ef, 0.3], [0x4caefe, 0.8]]
})
.onClick(async () => {
  await this.loginToScan()
})
15 通过AGC平台推送服务向坚果单车应用推送消息
步骤一: 获取Push Token。在应用的UIAbility(例如EntryAbility)的onCreate方法中调用getToken()获取Push Token并上报到开发者的服务端,方便开发者的服务端向终端推送消息。
// 导入pushService模块
import { pushService } from '@kit.PushKit';

// onCreate方法中调用getToken()接口获取Push Token
async onCreate(want: Want, launchParam: AbilityConstant.LaunchParam) {
  hilog.info(0x0000, 'testTag', '%{public}s', 'Ability onCreate');
  try {
    const pushToken: string = await pushService.getToken();
    // 上报Push Token
    console.info(`${NBConstants.TAG} Push Token: ${pushToken}`);
  } catch (error) {
    const e: BusinessError = error as BusinessError;
    console.error(NBConstants.TAG + "Failed. Cause: " + JSON.stringify(e));
  }
}
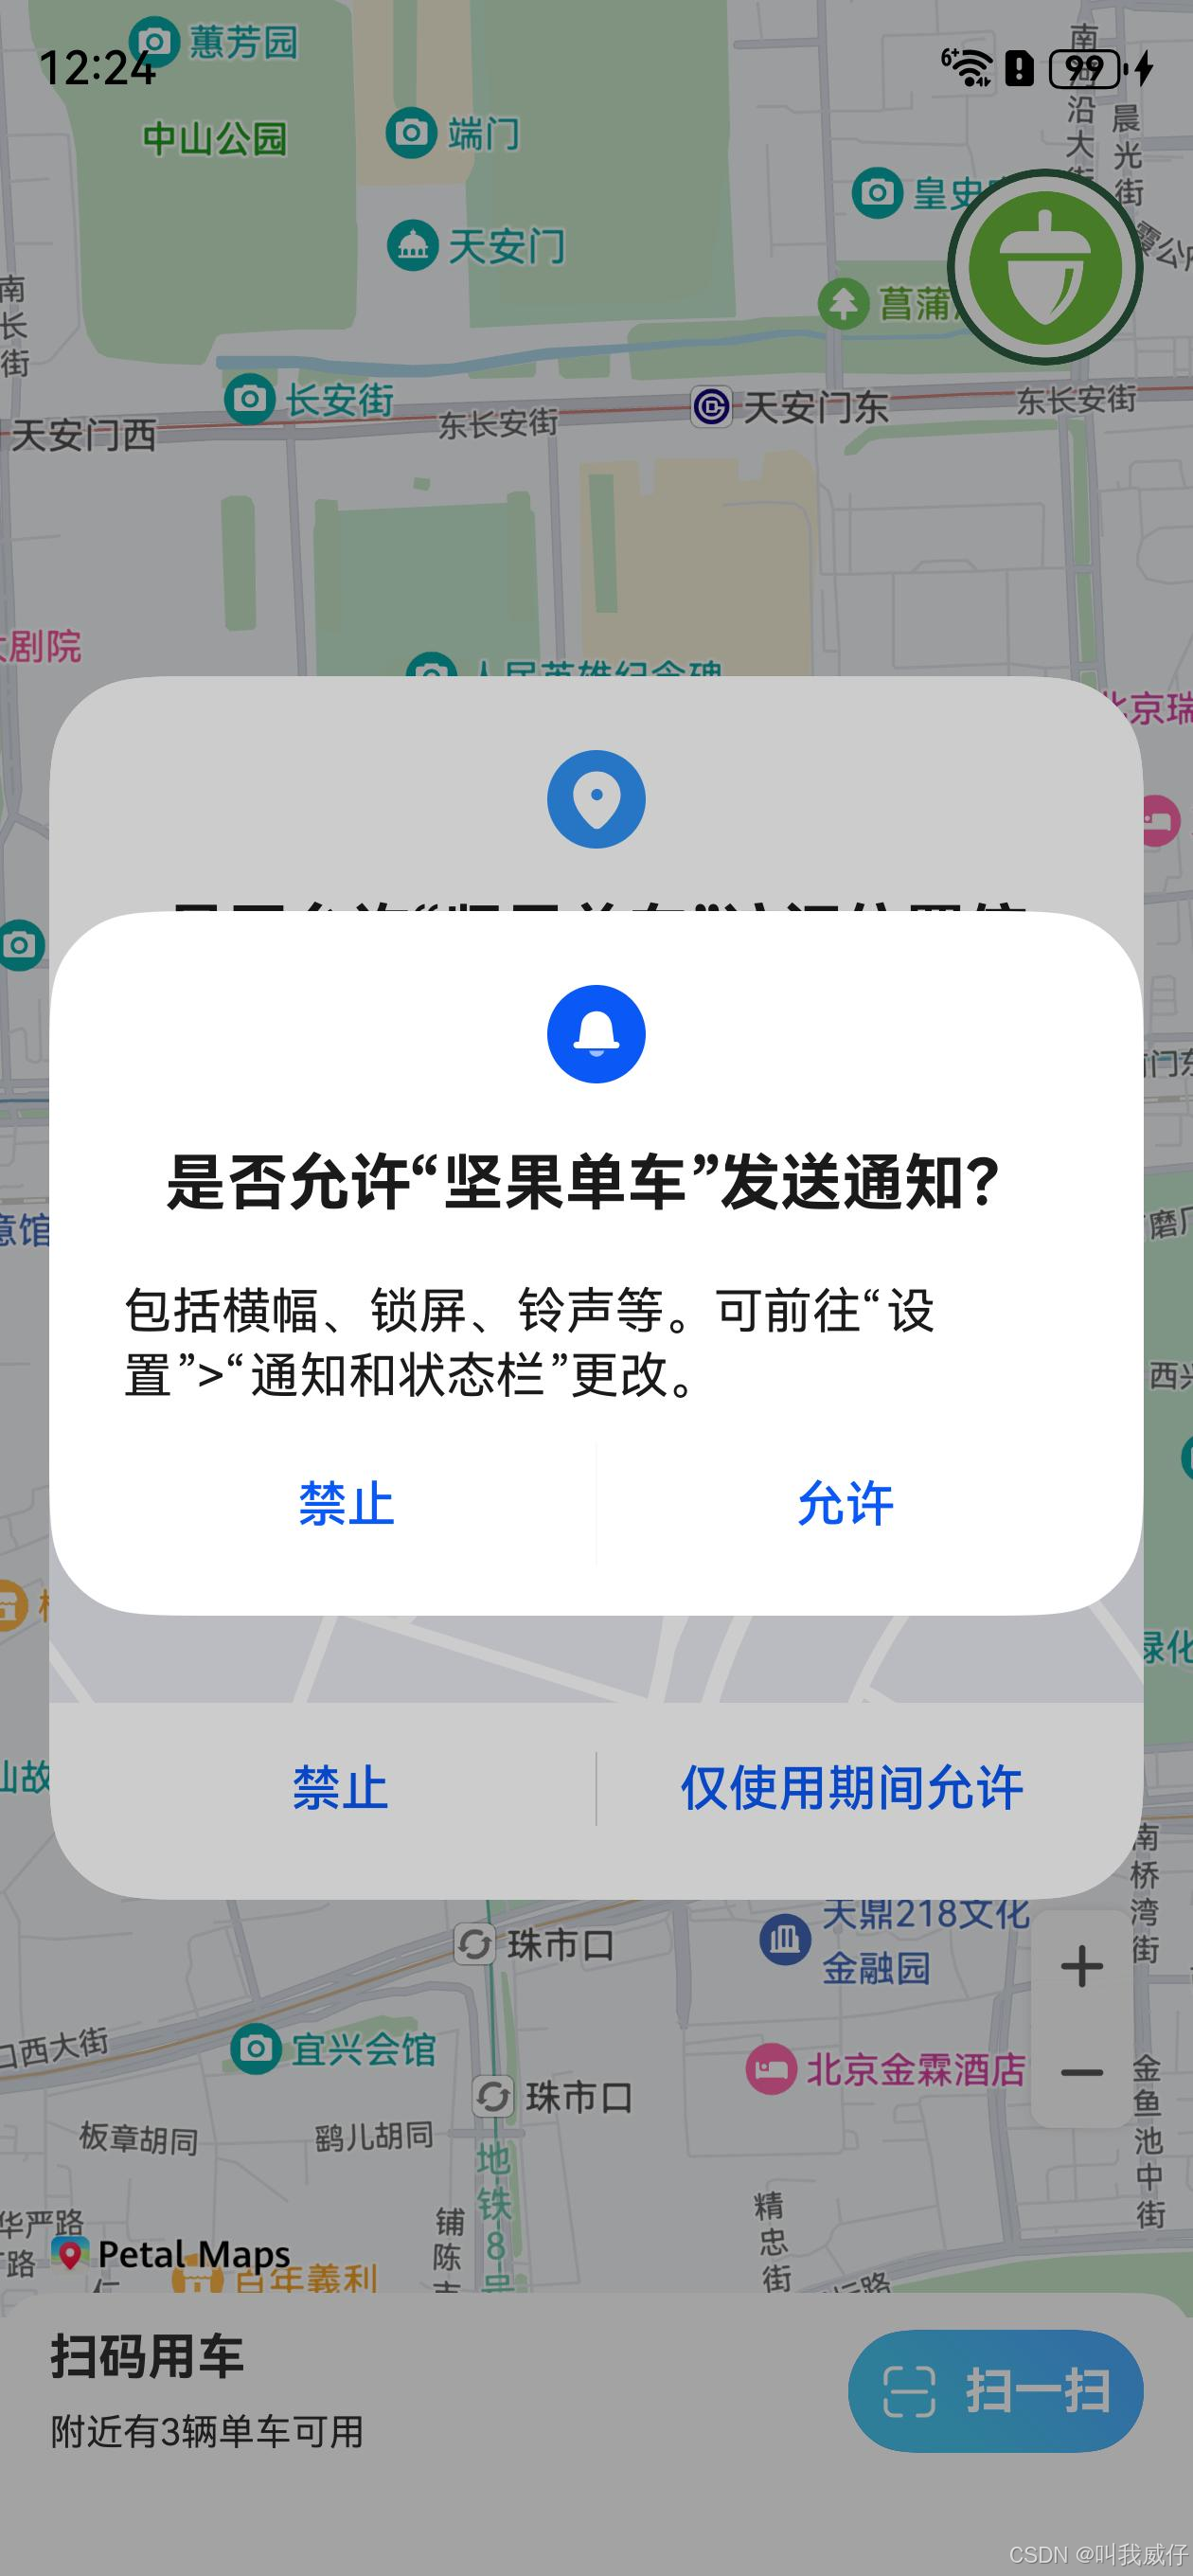
步骤二: 请求通知授权
async onCreate(want: Want, launchParam: AbilityConstant.LaunchParam) {
  hilog.info(0x0000, 'testTag', '%{public}s', 'Ability onCreate');
  try {
    const pushToken: string = await pushService.getToken();
    // 上报Push Token
    console.info(`${NBConstants.TAG} Push Token: ${pushToken}`);
    this.requestNotification();
  } catch (error) {
    const e = error as BusinessError;
    console.error(NBConstants.TAG + "Failed. Cause: " + JSON.stringify(e));
  }
}

// 请求通知授权
async requestNotification() {
  try {
    console.info("requestNotification: 请求通知授权开始。");
    // 查询通知是否授权
    const notificationEnabled: boolean = await notificationManager.isNotificationEnabled();
    console.info("requestNotification: " + (notificationEnabled ? '已' : '未') + "授权");
    if (!notificationEnabled) {
      // 请求通知授权
      await notificationManager.requestEnableNotification();
    }
  } catch (error) {
    const e: BusinessError = error as BusinessError;
    console.error("requestNotification failed. Cause: " + JSON.stringify(e));
  }
}
16 服务端发推测试
登录AGC平台,在“我的项目”中选择目标应用,点击左侧菜单栏“增长 > 推送服务”,点击页面中“添加通知”按钮,进入推送通知详情页面,填写相关信息,点击“提交”按钮发送。
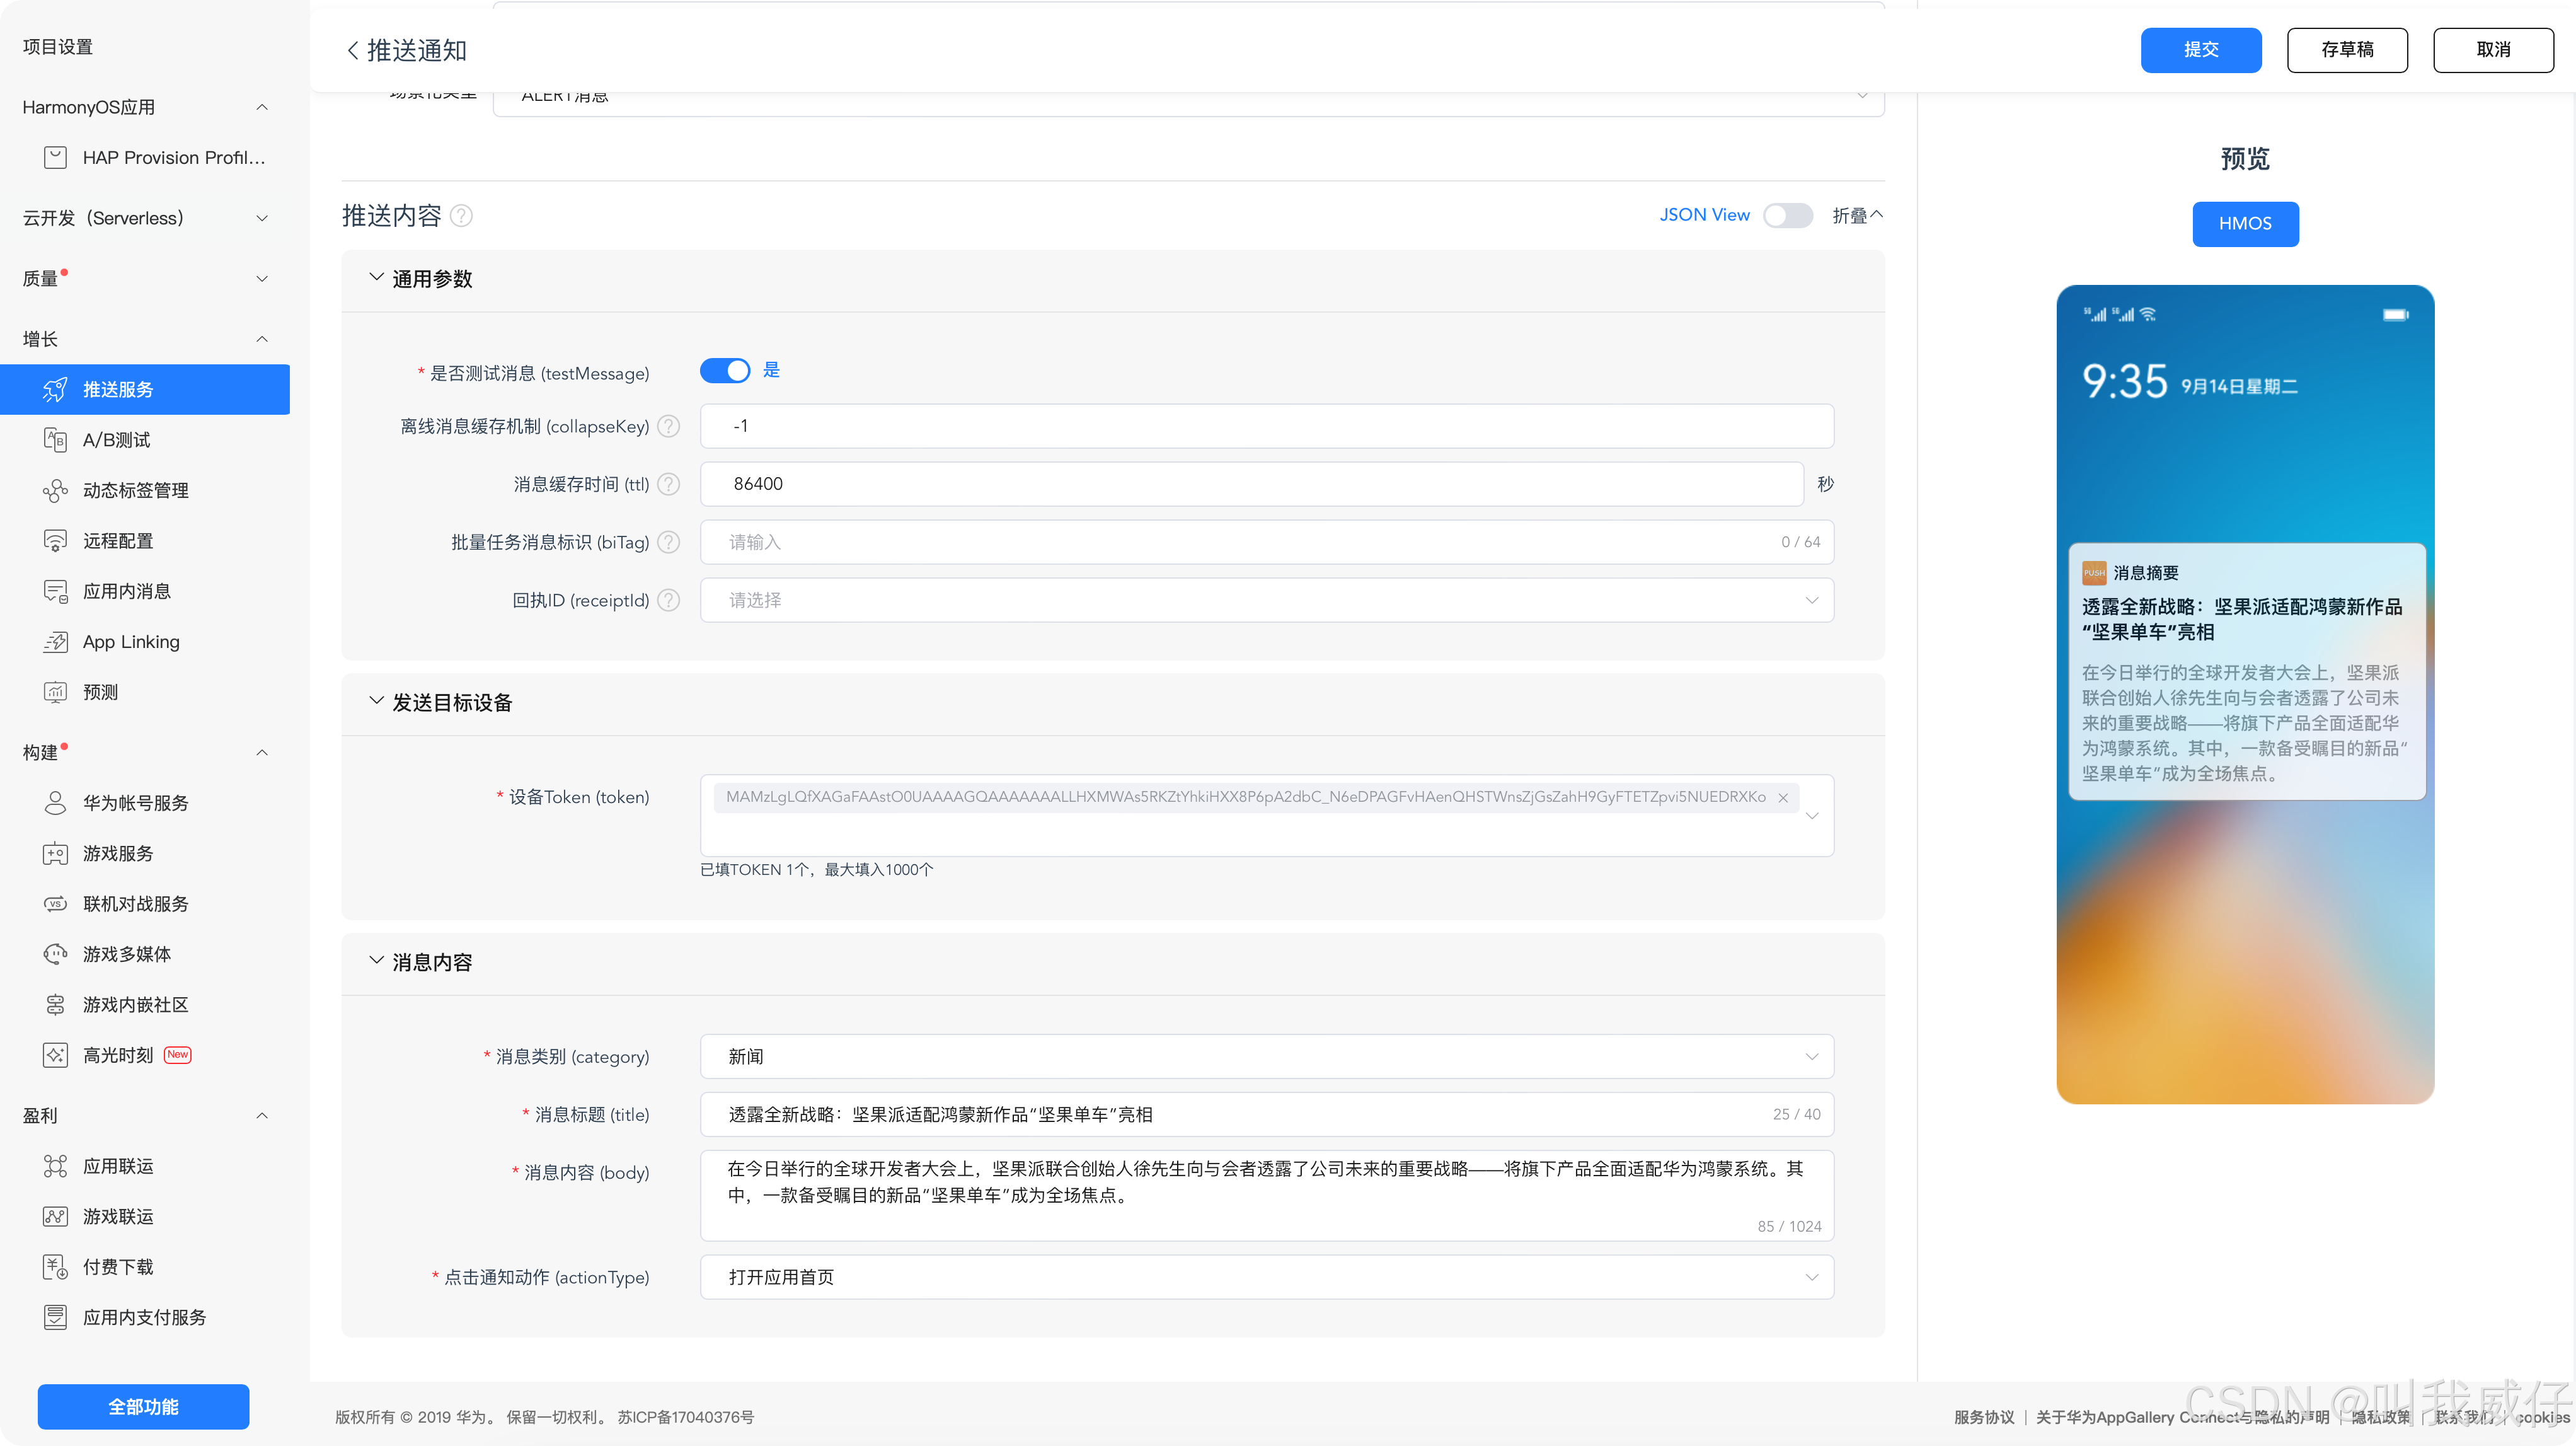
步骤四: 下拉通知信息页面,查看是否接受到发送的通知消息。


