Segment Anything with AMD GPUs — ROCm Blogs

作者: Sean Song
发布日期:2024年6月4日
介绍
分割任务——识别图像中哪些像素属于某对象——是计算机视觉中的一个基础任务,应用广泛,从科学图像分析到照片编辑。Segment Anything 模型(SAM)是一个先进的图像分割模型,它通过提示分割(promptable segmentation)实现了前所未有的多功能性,使图像分析任务变得更加简单。SAM 可以用于帮助在需要查找和分割图像中任何对象的领域内应用。对于AI研究社区和其他相关领域,SAM 很有可能成为大型AI系统中的关键组件,在多模态环境中实现对世界的全面理解。
在这篇博客中,我们将演示如何在使用 ROCm 的 AMD GPU 上运行 Segment Anything 模型。
SAM
SAM经过训练可以根据各种提示返回有效的**分割掩码**,这些提示包括前景和背景**点**、大致的**框**或**掩码**、非结构化的**文本**,或任何其他指示图像中要分割内容的标识。对有效掩码的要求仅仅意味着即使提示是模糊的,可能指向多个物体(例如,衣服上的一个点可能表示衣服或穿衣服的人),输出结果也应是这些物体中的一个合理掩码。
SAM的先进设计使其能够在没有事先知识的情况下适应新的图像分布和任务——这种特性被称为零样本迁移。SAM是在庞大的SA-1B 数据集上进行训练的,该数据集包含超过10亿个掩码,分布在1100多万张精心挑选的图像上(见下方来自SAM论文的示例),已经展示了令人印象深刻的零样本性能,在许多情况下超越了之前的全监督结果。
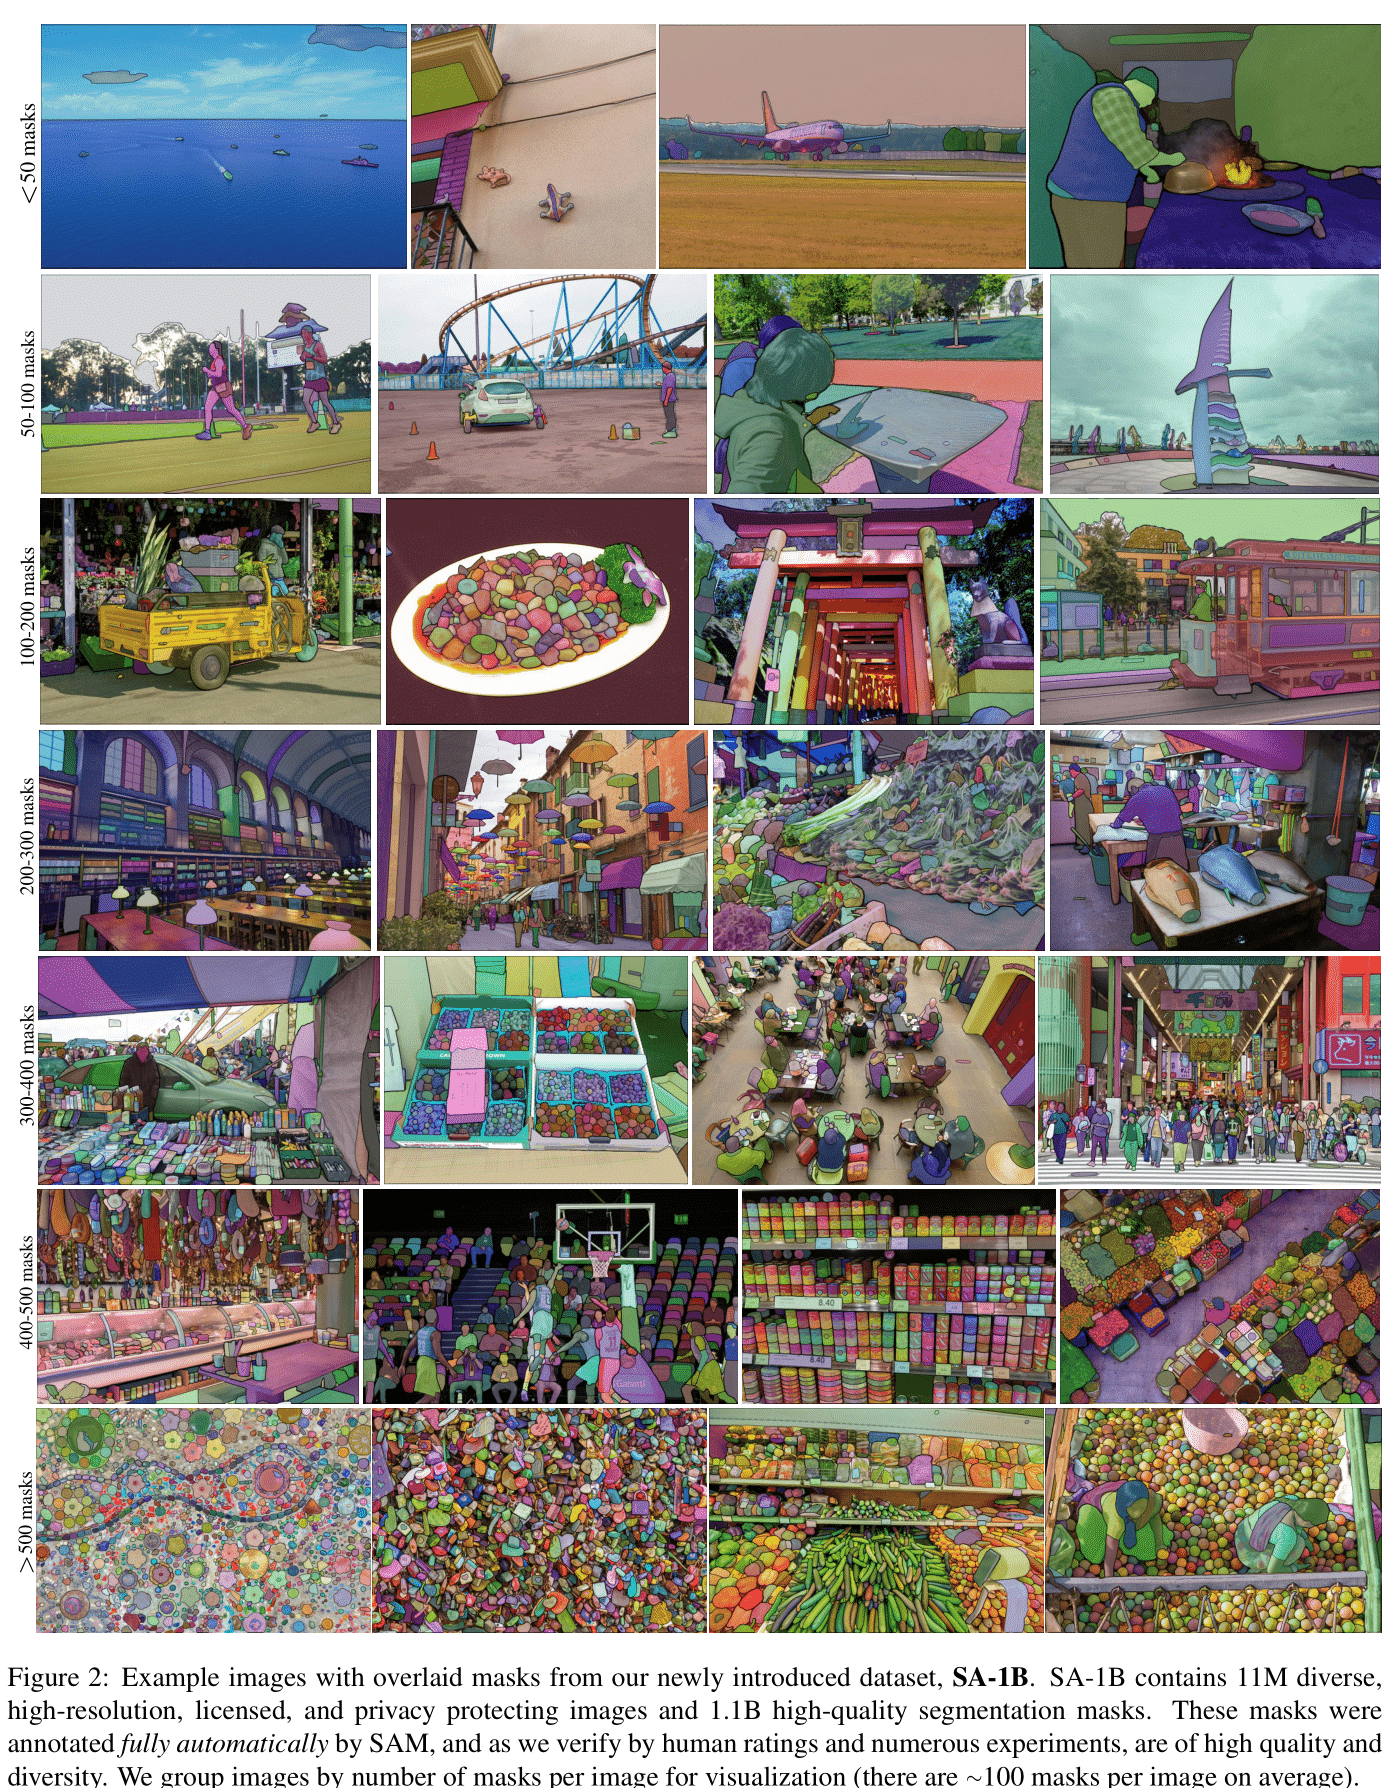
图片来源:Segment Anything(Kirillov et al.)。
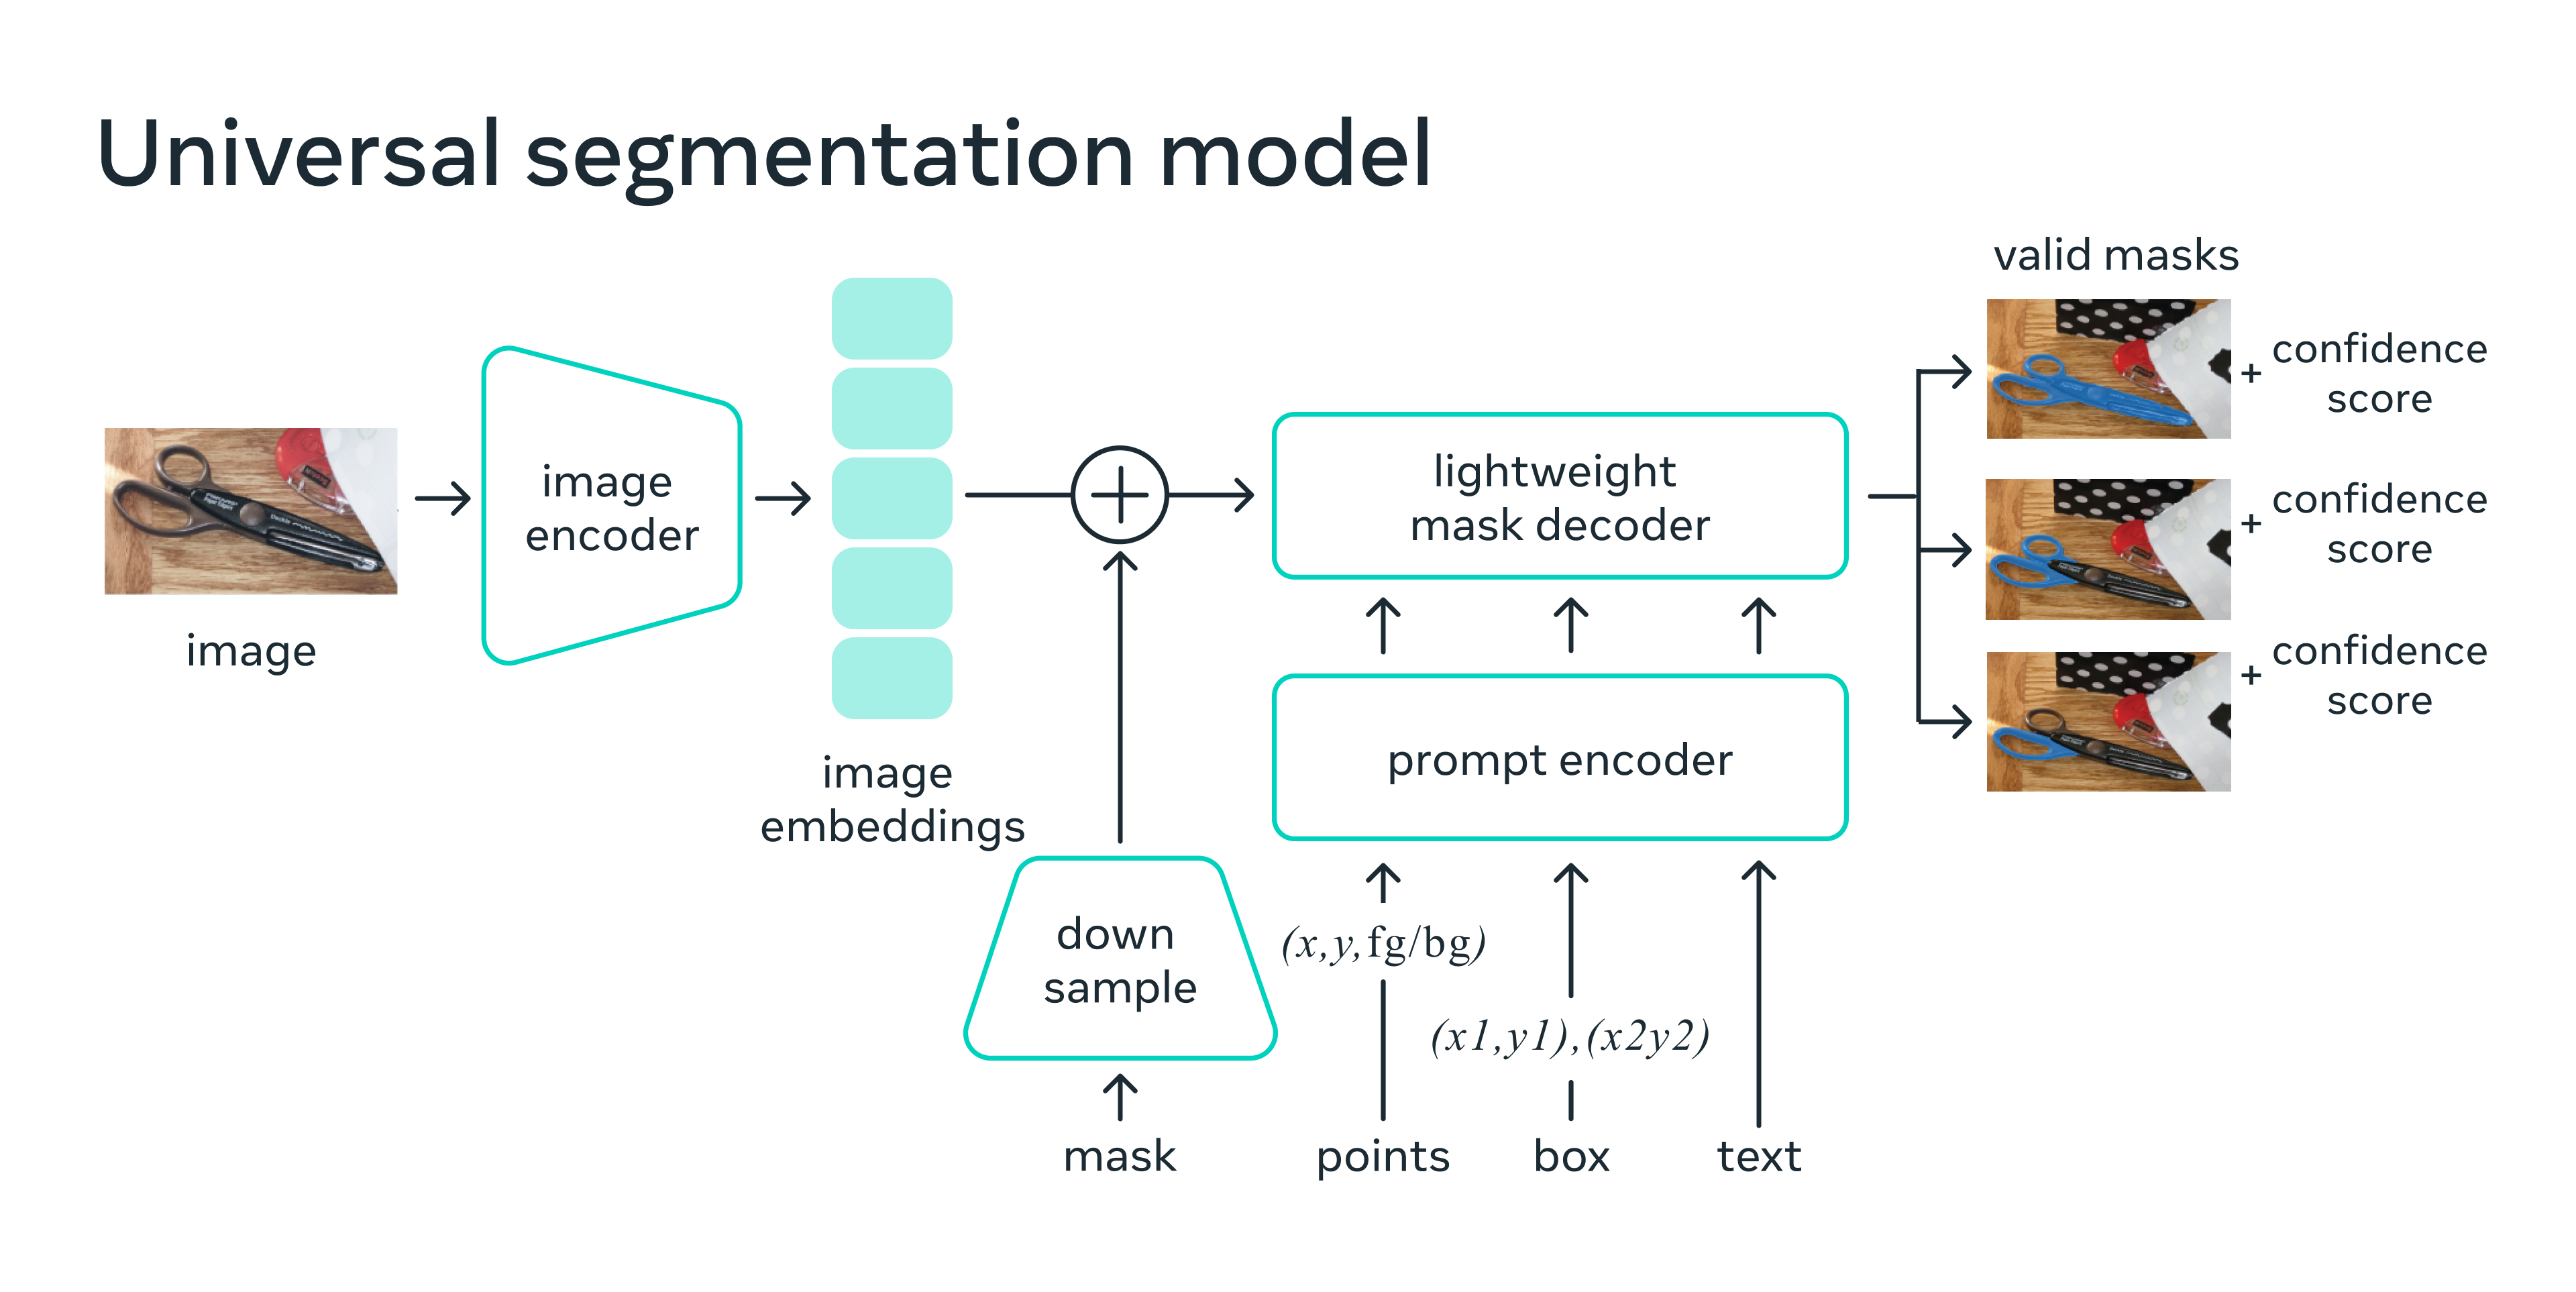
图片来源:Introducing Segment Anything (Meta Research)。
SAM 模型由三个关键模块组成:
-
图像编码器: 为了实现可扩展性和强大的预训练方法,SAM 采用经过 Masked AutoEncoder (MAE) 预训练的 Vision Transformer (ViT),经过最小化调整后以处理输入图像。图像编码器每个图像只运行一次,可以在提示模型之前应用。
-
提示编码器: SAM 考虑了两组提示:稀疏提示(点、框、文本)和密集提示(掩码)。它通过位置编码加上每种提示类型的学习嵌入来表示点和框,并使用来自 CLIP 的开箱即用文本编码器对自由文本进行编码。密集提示(即掩码)使用卷积进行嵌入,并与图像嵌入按元素相加。
-
掩码解码器: 掩码解码器高效地将图像嵌入、提示嵌入和输出令牌映射到掩码。这一设计采用修改后的 transformer 解码器块,随后是动态掩码预测头。修改后的解码器块使用提示自注意力和交叉注意力(从提示到图像嵌入和反之亦然)来更新所有嵌入。之后,模型对图像嵌入进行上采样,并通过多层感知机(MLP)将输出令牌映射到动态线性分类器,然后计算每个图像位置的掩码前景概率。
接下来,我们将在三个部分中展示 Segment Anything 模型在具有 ROCm 的 AMD GPU 上的流畅执行:
-
自动生成所有对象的掩码
-
使用点作为提示生成掩码
-
使用框作为提示生成掩码
注意:在撰写此博客时,尽管 SAM 论文中探讨了文本提示的功能,但此功能尚未完全发布。本文不涉及文本提示。
我们在本博客文章中引用了 SAM 的 GitHub 代码仓库。可以在 facebookresearch/segment-anything 找到模型的源代码。
设置
本演示使用以下硬件和软件环境。有关全面的支持详细信息,请参阅 ROCm 文档。
-
硬件 & 操作系统:
-
AMD Instinct GPU
-
Ubuntu 22.04.3 LTS
-
-
软件:
-
ROCm 5.7.0+
-
PyTorch 2.0+
-
准备
首先让我们安装所需的包。
pip install git+https://github.com/facebookresearch/segment-anything.git
pip install matplotlib opencv-python
添加必要的导入
import numpy as np
import torch
import matplotlib.pyplot as plt
import cv2
检查测试图像
image = cv2.imread('./images/truck.jpg')
image = cv2.cvtColor(image, cv2.COLOR_BGR2RGB)
plt.figure(figsize=(10,10))
plt.imshow(image)
plt.axis('on')
plt.show()

下载检查点
Meta 提供了三个预训练模型,其中 vit_h 具有它们中最强大的视觉编码器。点击以下链接来下载对应模型类型的检查点。
-
vit_h(默认): ViT-H SAM model. -
vit_l: ViT-L SAM model. -
vit_b: ViT-B SAM model.
在这个演示中,我们使用最大的 vit_h 模型。
wget https://dl.fbaipublicfiles.com/segment_anything/sam_vit_h_4b8939.pth
自动掩码生成
运行自动掩码生成时,需要将 SAM 模型提供给 SamAutomaticMaskGenerator 类。将 SAM 检查点的路径在下方设置。
from segment_anything import sam_model_registry, SamAutomaticMaskGenerator, SamPredictor

sam_checkpoint = "sam_vit_h_4b8939.pth"
model_type = "vit_h"

sam = sam_model_registry[model_type](checkpoint=sam_checkpoint)
sam.to(device="cuda")
mask_generator = SamAutomaticMaskGenerator(sam)
检查 sam 模型。
print(sam)
输出:
    Sam(
      (image_encoder): ImageEncoderViT(
        (patch_embed): PatchEmbed(
          (proj): Conv2d(3, 1280, kernel_size=(16, 16), stride=(16, 16))
        )
        (blocks): ModuleList(
          (0-31): 32 x Block(
            (norm1): LayerNorm((1280,), eps=1e-06, elementwise_affine=True)
            (attn): Attention(
              (qkv): Linear(in_features=1280, out_features=3840, bias=True)
              (proj): Linear(in_features=1280, out_features=1280, bias=True)
            )
            (norm2): LayerNorm((1280,), eps=1e-06, elementwise_affine=True)
            (mlp): MLPBlock(
              (lin1): Linear(in_features=1280, out_features=5120, bias=True)
              (lin2): Linear(in_features=5120, out_features=1280, bias=True)
              (act): GELU(approximate='none')
            )
          )
        )
        (neck): Sequential(
          (0): Conv2d(1280, 256, kernel_size=(1, 1), stride=(1, 1), bias=False)
          (1): LayerNorm2d()
          (2): Conv2d(256, 256, kernel_size=(3, 3), stride=(1, 1), padding=(1, 1), bias=False)
          (3): LayerNorm2d()
        )
      )
      (prompt_encoder): PromptEncoder(
        (pe_layer): PositionEmbeddingRandom()
        (point_embeddings): ModuleList(
          (0-3): 4 x Embedding(1, 256)
        )
        (not_a_point_embed): Embedding(1, 256)
        (mask_downscaling): Sequential(
          (0): Conv2d(1, 4, kernel_size=(2, 2), stride=(2, 2))
          (1): LayerNorm2d()
          (2): GELU(approximate='none')
          (3): Conv2d(4, 16, kernel_size=(2, 2), stride=(2, 2))
          (4): LayerNorm2d()
          (5): GELU(approximate='none')
          (6): Conv2d(16, 256, kernel_size=(1, 1), stride=(1, 1))
        )
        (no_mask_embed): Embedding(1, 256)
      )
      (mask_decoder): MaskDecoder(
        (transformer): TwoWayTransformer(
          (layers): ModuleList(
            (0-1): 2 x TwoWayAttentionBlock(
              (self_attn): Attention(
                (q_proj): Linear(in_features=256, out_features=256, bias=True)
                (k_proj): Linear(in_features=256, out_features=256, bias=True)
                (v_proj): Linear(in_features=256, out_features=256, bias=True)
                (out_proj): Linear(in_features=256, out_features=256, bias=True)
              )
              (norm1): LayerNorm((256,), eps=1e-05, elementwise_affine=True)
              (cross_attn_token_to_image): Attention(
                (q_proj): Linear(in_features=256, out_features=128, bias=True)
                (k_proj): Linear(in_features=256, out_features=128, bias=True)
                (v_proj): Linear(in_features=256, out_features=128, bias=True)
                (out_proj): Linear(in_features=128, out_features=256, bias=True)
              )
              (norm2): LayerNorm((256,), eps=1e-05, elementwise_affine=True)
              (mlp): MLPBlock(
                (lin1): Linear(in_features=256, out_features=2048, bias=True)
                (lin2): Linear(in_features=2048, out_features=256, bias=True)
                (act): ReLU()
              )
              (norm3): LayerNorm((256,), eps=1e-05, elementwise_affine=True)
              (norm4): LayerNorm((256,), eps=1e-05, elementwise_affine=True)
              (cross_attn_image_to_token): Attention(
                (q_proj): Linear(in_features=256, out_features=128, bias=True)
                (k_proj): Linear(in_features=256, out_features=128, bias=True)
                (v_proj): Linear(in_features=256, out_features=128, bias=True)
                (out_proj): Linear(in_features=128, out_features=256, bias=True)
              )
            )
          )
          (final_attn_token_to_image): Attention(
            (q_proj): Linear(in_features=256, out_features=128, bias=True)
            (k_proj): Linear(in_features=256, out_features=128, bias=True)
            (v_proj): Linear(in_features=256, out_features=128, bias=True)
            (out_proj): Linear(in_features=128, out_features=256, bias=True)
          )
          (norm_final_attn): LayerNorm((256,), eps=1e-05, elementwise_affine=True)
        )
        (iou_token): Embedding(1, 256)
        (mask_tokens): Embedding(4, 256)
        (output_upscaling): Sequential(
          (0): ConvTranspose2d(256, 64, kernel_size=(2, 2), stride=(2, 2))
          (1): LayerNorm2d()
          (2): GELU(approximate='none')
          (3): ConvTranspose2d(64, 32, kernel_size=(2, 2), stride=(2, 2))
          (4): GELU(approximate='none')
        )
        (output_hypernetworks_mlps): ModuleList(
          (0-3): 4 x MLP(
            (layers): ModuleList(
              (0-1): 2 x Linear(in_features=256, out_features=256, bias=True)
              (2): Linear(in_features=256, out_features=32, bias=True)
            )
          )
        )
        (iou_prediction_head): MLP(
          (layers): ModuleList(
            (0-1): 2 x Linear(in_features=256, out_features=256, bias=True)
            (2): Linear(in_features=256, out_features=4, bias=True)
          )
        )
      )
    )
要生成掩码,请在图像上运行生成过程。
masks = mask_generator.generate(image)
print(masks[0])
输出:
{'segmentation': array([[False, False, False, ..., False, False, False],
       [False, False, False, ..., False, False, False],
       [False, False, False, ..., False, False, False],
       ...,
       [False, False, False, ..., False, False, False],
       [False, False, False, ..., False, False, False],
       [False, False, False, ..., False, False, False]]), 'area': 632681, 'bbox': [86, 282, 1621, 566], 'predicted_iou': 1.0396634340286255, 'point_coords': [[1378.125, 581.25]], 'stability_score': 0.9835065603256226, 'crop_box': [0, 0, 1800, 1200]}
掩码生成返回一个掩码列表,每个掩码是一个包含各种数据的字典。键包括:
-
segmentation: 二值掩码,表示感兴趣的区域。 -
area: 掩码在图像中的面积。 -
bbox: 掩码的矩形边界,包括它的左上角坐标 (X, Y) 及其宽度 (W) 和高度 (H),格式为 (X, Y, W, H)。 -
predicted_iou:模型预测的交并比值,表示掩码的质量。 -
point_coords: 生成此掩码的输入点。 -
stability_score: 用于评估掩码质量的附加指标或分数。 -
crop_box: 用于生成此掩码的原始图像裁剪区域,以 XYWH 格式。
将所有掩码叠加显示在图像上。
def process_annotations(annotations):
    if len(annotations) == 0:
        return
    sorted_annotations = sorted(annotations, key=(lambda x: x['area']), reverse=True)
    ax = plt.gca()
    ax.set_autoscale_on(False)

    img = np.ones((sorted_annotations[0]['segmentation'].shape[0], sorted_annotations[0]['segmentation'].shape[1], 4))
    img[:,:,3] = 0
    for annotations in sorted_annotations:
        m = annotations['segmentation']
        img[m] = np.concatenate([np.random.random(3), [0.35]])
    ax.imshow(img)

plt.figure(figsize=(20,20))
plt.imshow(image)
plt.axis('off')
process_annotations(masks)
plt.show()
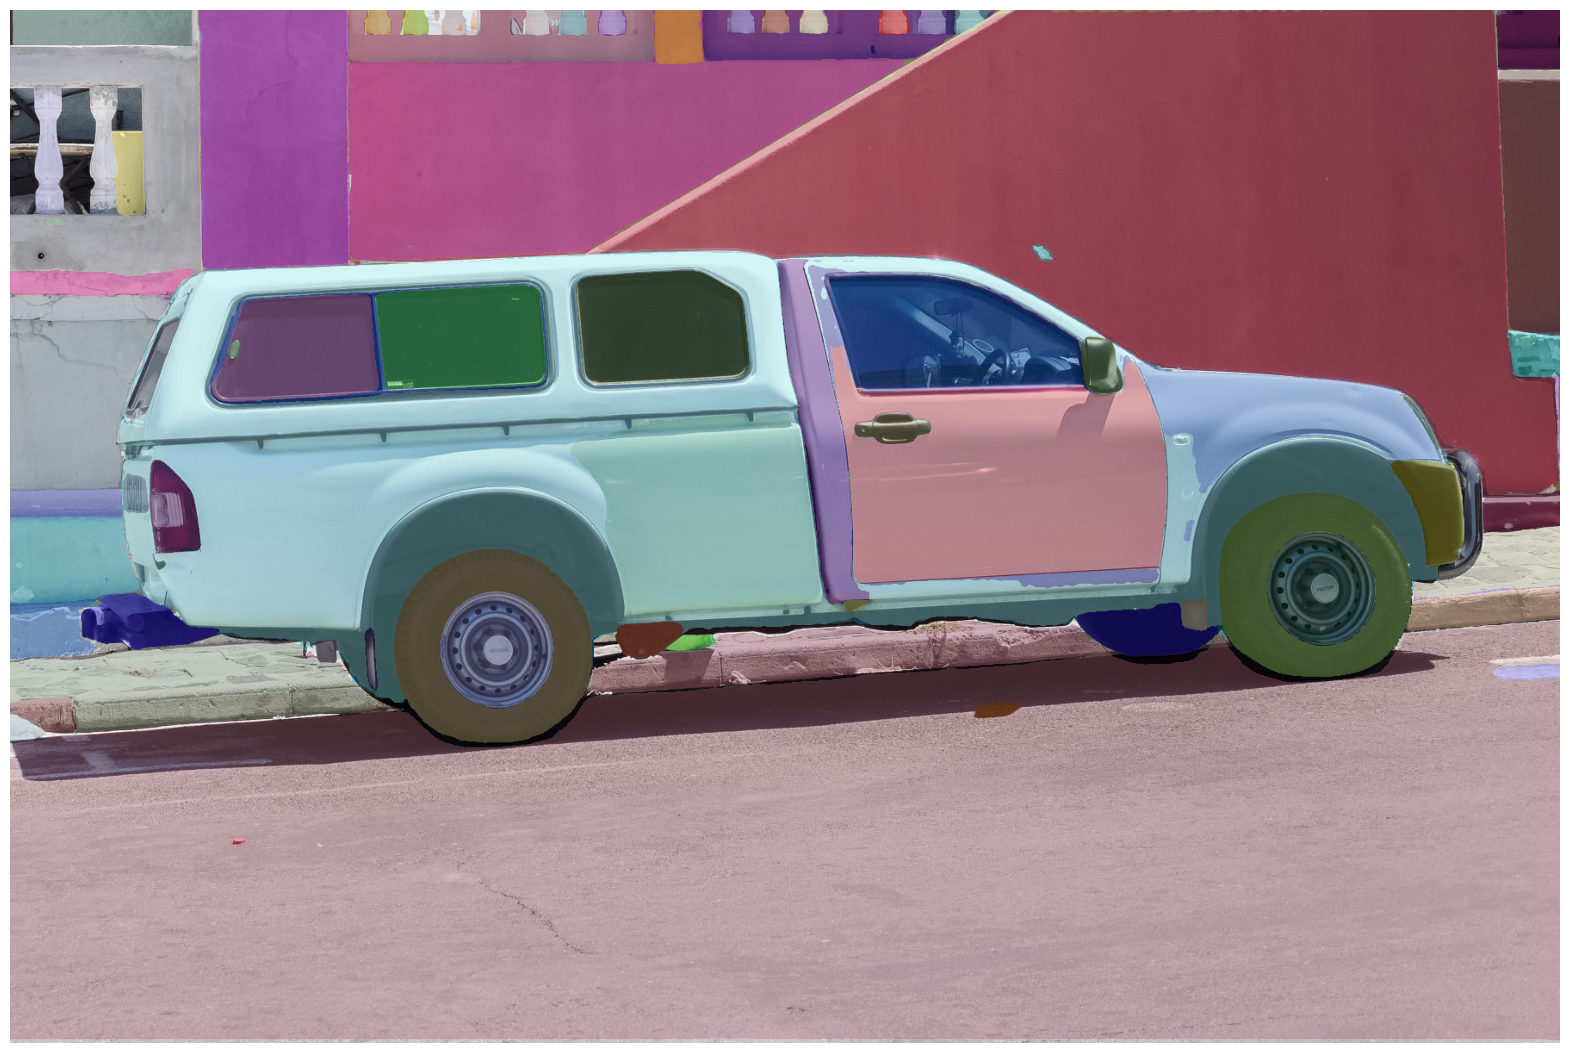
自动掩码生成有多个可调参数,这些参数控制如何密集采样点以及删除低质量或重复掩码的阈值。你可以在 文档中找到关于设定参数的更多细节。
使用点作为提示进行掩码生成
通过调用 SamPredictor.set_image 处理图像以生成图像嵌入。`SamPredictor` 会记住这个嵌入,并将其用于后续的掩码预测。
predictor = SamPredictor(sam)
predictor.set_image(image)
要选择卡车,请在其上选择一个点。点以 (x, y) 格式输入模型,并带有标签 1(前景点)或 0(背景点)。可以提供多个点,尽管这里我们只使用一个。所提供的点将显示为图像上的星号。
input_point = np.array([[500, 375]])
input_label = np.array([1]) # A length N array of labels for the point prompts. 1 indicates a foreground point and 0 indicates a background point.
使用 SamPredictor.predict 进行预测。模型返回掩码、这些掩码的质量预测以及可以传递到下一次预测迭代的低分辨率掩码 logits。
masks, scores, logits = predictor.predict(
    point_coords=input_point,
    point_labels=input_label,
    multimask_output=True,
)
当 multimask_output=True(默认设置)时,SAM 输出 3 个掩码,其中 scores 提供模型自己对这些掩码质量的评估。此设置旨在处理模棱两可的输入提示,帮助模型区分与提示一致的不同对象。当设置为 False 时,它将返回一个掩码。对于单点等模糊提示,即使只需要一个掩码,也建议使用 multimask_output=True;通过选择 scores 返回的最高得分的掩码,可以得到最好的单个掩码。
def display_points(coords, labels, ax, marker_size=375):
    pos_points = coords[labels==1]
    neg_points = coords[labels==0]
    ax.scatter(pos_points[:, 0], pos_points[:, 1], color='green', marker='*', s=marker_size, edgecolor='white', linewidth=1.25)
    ax.scatter(neg_points[:, 0], neg_points[:, 1], color='red', marker='*', s=marker_size, edgecolor='white', linewidth=1.25)

def display_mask(mask, ax, random_color=False):
    if random_color:
        color = np.concatenate([np.random.random(3), np.array([0.6])], axis=0)
    else:
        color = np.array([30/255, 144/255, 255/255, 0.6])
    h, w = mask.shape[-2:]
    mask_image = mask.reshape(h, w, 1) * color.reshape(1, 1, -1)
    ax.imshow(mask_image)

for i, (mask, score) in enumerate(zip(masks, scores)):
    plt.figure(figsize=(10,10))
    plt.imshow(image)
    display_mask(mask, plt.gca())
    display_points(input_point, input_label, plt.gca())
    plt.title(f"Mask {i+1}, Score: {score:.3f}", fontsize=18)
    plt.axis('off')
    plt.show()
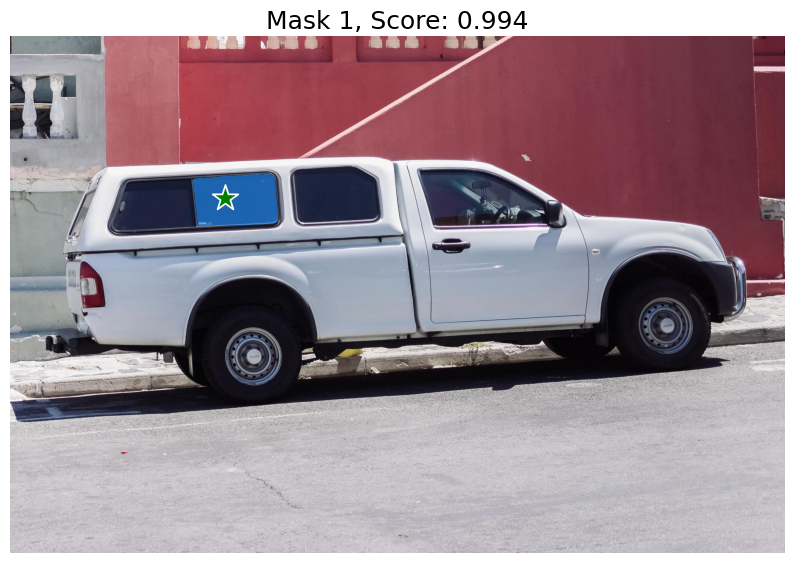
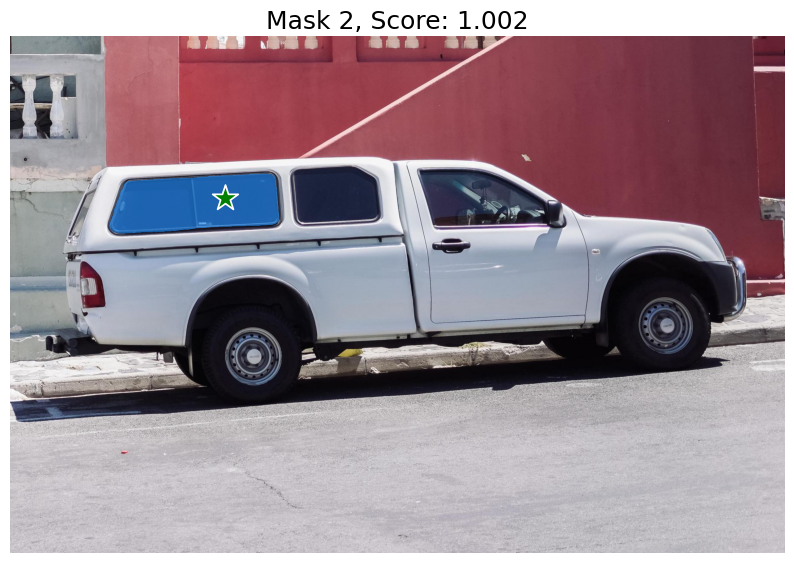
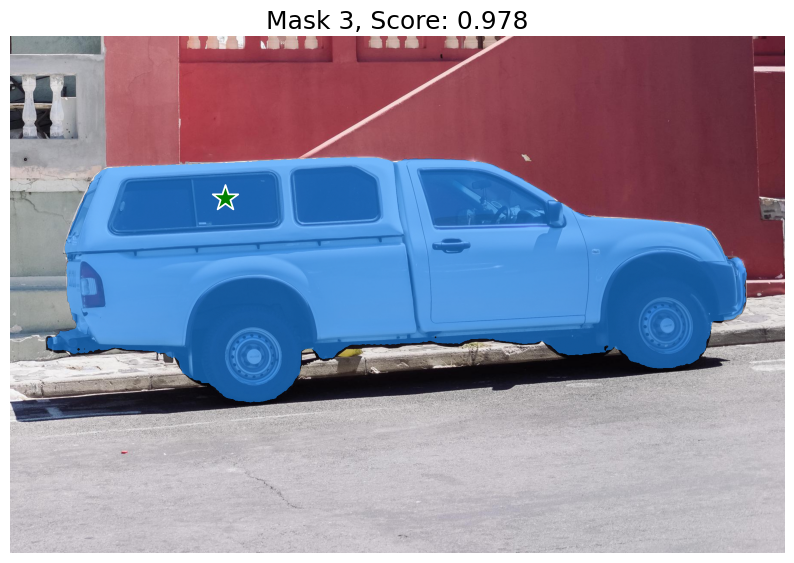
单个输入点是模糊的,模型返回了与该点一致的多个对象。要获取单个对象,可以提供多个点。有关更高级的用法,请参阅 facebookresearch/segment-anything。
使用框生成蒙版
SamPredictor可以处理多个指定格式为 (x_min, y_min, x_max, y_max) 的边界框输入,用于给定图像的处理。
此方法假设输入点已经表示为 torch 张量,并且已经转换以匹配输入框架。
import torch
input_boxes = torch.tensor([
    [75, 275, 1725, 850],
    [425, 600, 700, 875],
    [1375, 550, 1650, 800],
    [1240, 675, 1400, 750],
], device=predictor.device)
将边界框转换到输入框架,然后预测蒙版。
masks, _, _ = predictor.predict_torch(
    point_coords=None,
    point_labels=None,
    boxes=predictor.transform.apply_boxes_torch(input_boxes, image.shape[:2]),
    multimask_output=False,
)
def display_box(box, ax):
    x0, y0 = box[0], box[1]
    w, h = box[2] - box[0], box[3] - box[1]
    ax.add_patch(plt.Rectangle((x0, y0), w, h, edgecolor='green', facecolor=(0,0,0,0), lw=2))

plt.figure(figsize=(10, 10))
plt.imshow(image)
for mask in masks:
    display_mask(mask.cpu().numpy(), plt.gca(), random_color=True)
for box in input_boxes:
    display_box(box.cpu().numpy(), plt.gca())
plt.axis('off')
plt.show()
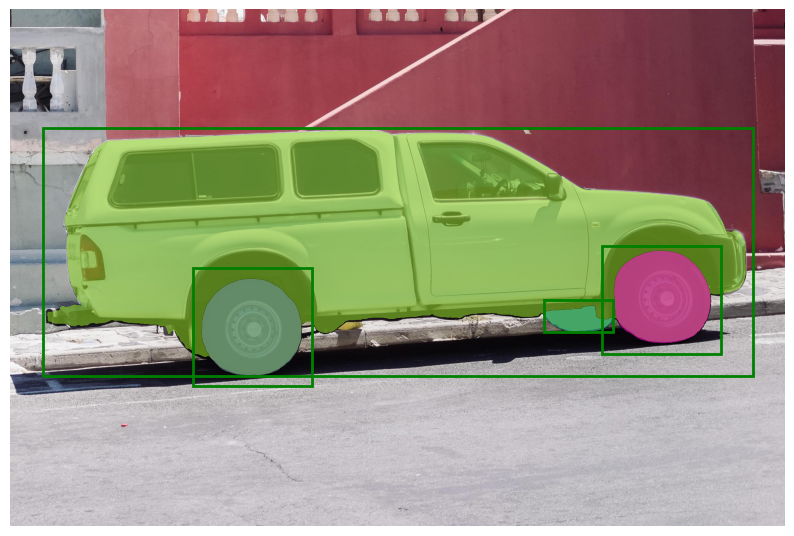
在上图中,我们发现三个边界框已被适当地用于分割汽车的不同区域。