spring boot(学习笔记第二十课)
- vue + spring boot前后端分离项目练习
学习内容:
- 后端程序构建
- 前端程序构建
1. 后端程序构建
- 前后端分离结构
前后端就是前端程序和后端程序独立搭建,通过Restful API进行交互,进行松耦合的设计。
- 后端程序构建
在网上看到高手构建的示例程序,边学习边在本地构筑。
光看不练,永远都是停留在表面学习- 高手的示例程序。在此感谢高手(江南一点雨)的分享
示例程序lenve。一个示例的前后端分离示例。 - copy该工程到本地,之后看到分别的
前端构建和后端构建,这里为了使学习过程单纯一点,基本流用后端的构建。前端进行从头的构建练习。
- 理解
后端构建的module结构。
maven project->maven module->maven project。通过maven module的定义,可以- 在父
maven project里面,定义子的maven module,作为maven sub project。 - 在各个子
maven sub project,可以定义dependency关系。

- 在父
- 本地构建
mysql数据库。- 本地数据需要建立一系列的表,DDL在DDL定义。注意由于
vhr.sql没有考虑表之间的依赖关系,所有不调整顺序的话,在mysql数据库中执行会报错。 - 调整好的版本调整版,在mysql中执行,创建必要的表。

- 本地数据需要建立一系列的表,DDL在DDL定义。注意由于
- 为数据库的连接用户赋予系统表的
select权限。
GRANT SELECT ON performance_schema.user_variables_by_thread TO 'finlay'@'localhost';
否则,spring boot执行的时候会报错。 disable flyway
设置spring.flyway.enabled=false在文件application.yml中。

- 重新配置
vhr-web这个module的SecurityConfig.java

@Configuration @EnableGlobalMethodSecurity(prePostEnabled=true) public class SecurityConfig extends WebSecurityConfigurerAdapter { @Autowired HrService hrService; @Autowired CustomFilterInvocationSecurityMetadataSource customFilterInvocationSecurityMetadataSource; @Autowired CustomUrlDecisionManager customUrlDecisionManager; @Autowired AuthenticationDeniedHandler authenticationDeniedHandler; @Bean PasswordEncoder passwordEncoder() { return new BCryptPasswordEncoder(); } @Override protected void configure(AuthenticationManagerBuilder auth) throws Exception { auth.userDetailsService(hrService); } @Override public void configure(WebSecurity web) throws Exception { web.ignoring().antMatchers( "/css/**", "/js/**", "/index.html", "/img/**", "/fonts/**", "/favicon.ico", "/verifyCode"); } @Bean SessionRegistryImpl sessionRegistry() { return new SessionRegistryImpl(); } @Override protected void configure(HttpSecurity http) throws Exception { http.authorizeRequests() .withObjectPostProcessor(new ObjectPostProcessor<FilterSecurityInterceptor>() { @Override public <O extends FilterSecurityInterceptor> O postProcess(O object) { object.setAccessDecisionManager(customUrlDecisionManager); object.setSecurityMetadataSource(customFilterInvocationSecurityMetadataSource); return object; } }) .and() .formLogin().loginPage("/login_p").loginProcessingUrl("/login") .usernameParameter("username").passwordParameter("password") .failureHandler(new AuthenticationFailureHandler() { @Override public void onAuthenticationFailure(HttpServletRequest request, HttpServletResponse response, AuthenticationException exception) throws IOException, ServletException { response.setContentType("application/json;charset=utf-8"); RespBean respBean = null; if(exception instanceof BadCredentialsException || exception instanceof UsernameNotFoundException){ respBean = RespBean.error("用户名或者密码输入错误"); }else if(exception instanceof LockedException) { respBean = RespBean.error("用户名被锁定,请联系管理员"); }else { respBean = RespBean.error("登陆失败"); } respBean.setStatus(401); ObjectMapper om = new ObjectMapper(); PrintWriter printWriter = response.getWriter(); printWriter.write(om.writeValueAsString(respBean)); printWriter.flush(); printWriter.close(); } }) .successHandler(new AuthenticationSuccessHandler() { @Override public void onAuthenticationSuccess(HttpServletRequest request, HttpServletResponse response, Authentication authentication) throws IOException, ServletException { response.setContentType("application/json;charset=utf-8"); RespBean respBean = RespBean.ok("登陆成功", HrUtils.getCurrentHr()); ObjectMapper om = new ObjectMapper(); PrintWriter printWriter = response.getWriter(); printWriter.write(om.writeValueAsString(respBean)); printWriter.flush(); printWriter.close(); } }) .permitAll() .and() .csrf().disable().exceptionHandling() //没有认证时,在这里处理结果,不要重定向 .accessDeniedHandler(authenticationDeniedHandler); } } - 认证处理如下所示。

- 在
mailserver中加入必要的依赖。<dependency> <groupId>junit</groupId> <artifactId>junit</artifactId> <version>4.13.2</version> <scope>test</scope> </dependency> - 启动后端程序需要的
redissudo -i systemctl restart redis - 配置
redis
application.yml(spring.redis)redis: host: 192.168.12.135 database: 0 port: 6379 password: 123456
- 启动后端程序
vhr
注意端口使用8081,之后的前端端口默认8080避免冲突 * 首先启动
postman进行测试,使用admin这个user

- 高手的示例程序。在此感谢高手(江南一点雨)的分享
2. 前端程序构建
- 构建前端工程
前端采用Vue进行构建。- 执行
npm进行搭建
执行以下命令,建立vue工程
默认是npm install -g vue-cli vue init webpack vuehr cd vuehr npm run dev8080端口 注意,后端工程的端口必须和前端工程的端口分开,这里后端采用的是8081
- 执行
- 构建前端的认证画面和路由
- 前端使用
Element(画面表示)和Axios(Ajax后端交互)npm i element-ui -S npm i axios -S - 修改
axios的默认版数
默认的axios版数,在之后的练习中会编译错误,所以改修成"axios": "^0.19.0"
修改"dependencies": { "axios": "^0.19.0", }, ```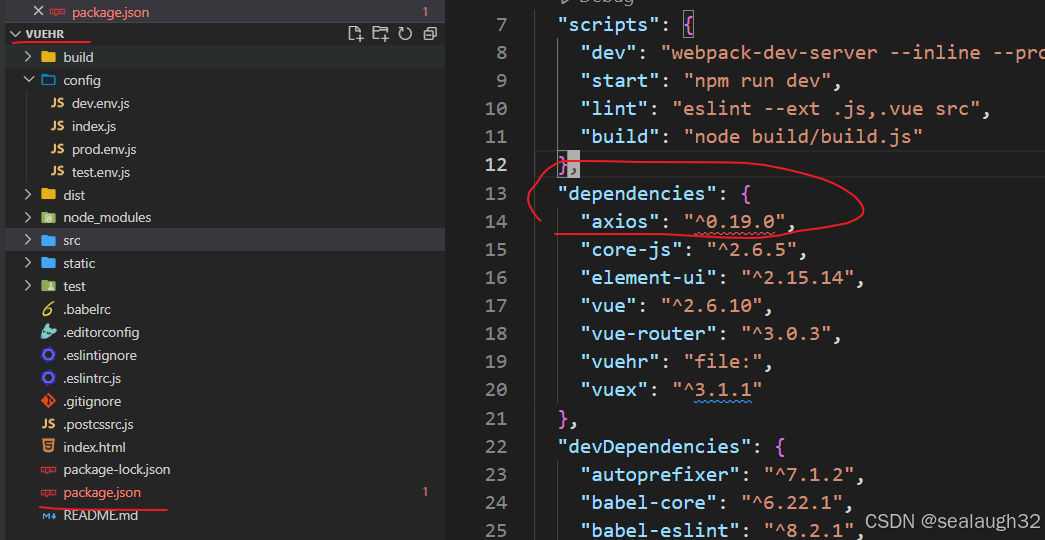 - 导入必要的代码
- 在main.js中加入
Elementimport ElementUI from 'element-ui' import 'element-ui/lib/theme-chalk/index.css' Vue.use(ElementUI) - 在项目中加入
/utils/api
从前面clone下来的代码中,将utils/api这个代码,都copy到新的代码段中。
- 在main.js中加入
/utils/api
import { getRequest, postRequest, deleteRequest, putRequest } from './utils/api' Vue.prototype.getRequest = getRequest Vue.prototype.postRequest = postRequest Vue.prototype.deleteRequest = deleteRequest Vue.prototype.putRequest = putRequest- 开发
login页面
<template> <el-form :rules="rules" class="login-container" label-position="left" label-width="0px" v-loading="loading"> <h3 class="login_title">系统登陆</h3> <el-form-item prop="account"> <el-input type="text" v-model="loginForm.username" auto-complete="off" placeholder="账号"></el-input> </el-form-item> <el-form-item prop="checkPass"> <el-input type="password" v-model="loginForm.password" auto-complete="off" placeholder="密码"> </el-input> </el-form-item> <el-checkbox class="login_remember" v-model="checked" label-position="left">记住密码</el-checkbox> <el-form-item style="width: 100%"> <el-button type="primary" style="width: 100%" @click="submitClick">登录</el-button> </el-form-item> </el-form> </template> <script> export default{ data () { return { rules: { account: [{required: true, message: '请输入用户名', trigger: 'blur'}], checkPass: [{required: true, message: '请输入密码', trigger: 'blur'}] }, checked: true, loginForm: { username: 'admin', password: '123' }, loading: false } }, methods: { submitClick: function () { var _this = this this.loading = true this.postRequest("/login?username=" + this.loginForm.username + "&password=" + this.loginForm.password ).then((resp) => { _this.loading = false if (resp && resp.status === 200) { var data = resp.data //_this.$store.commit('login', data.obj) var path = _this.$route.query.redirect _this.$router.replace({ path: path === '/' || path === undefined ? '/home' : path }) } }) } } } </script> <style> .login-container { border-radius: 15px; background-clip: padding-box; margin: 150px auto; width: 350px; padding: 35px 35px 15px 35px; background: #fff; border: 1px solid #cac6c6; box-shadow: 0 0 25px #cac6c6; } .login_title { margin: 0px auto 40px auto; text-align: center; color: #505458; } .login_remember { margin: 0px 0px 35px 0px; text-align: left; } </style>- 修改路由表
route/index.js
import Vue from 'vue' import Router from 'vue-router' import HelloWorld from '@/components/HelloWorld' import Login from '@/components/Login' Vue.use(Router) export default new Router({ routes: [ { path: '/', name: 'Login', component: Login, hidden: true }, { path: '/home', name: '主页', component: HelloWorld } ] })- 修改主程序入口
src/App.vue
<template> <div id="app"> <router-view/> </div> </template> <script> export default { name: 'App' } </script> <style> #app { font-family: 'Avenir', Helvetica, Arial, sans-serif; -webkit-font-smoothing: antialiased; -moz-osx-font-smoothing: grayscale; text-align: center; color: #2c3e50; margin-top: 60px; } </style>- 配置前端转发
config/index.js
前端8080和后端8081在不同的端口,这里必须要在前端设置后端的端口。
proxyTable: { '/': { target: 'http://localhost:8081', changeOrigin: true, pathRewrite: { '^/': '' } }, '/ws/*': { target: 'ws://127.0.0.1:8081', ws: true } }, - 在main.js中加入
- 在main.js中加入
- 启动前端程序
shell npm run dev

- 输入和数据库
hr表里面的用户名和密码
登录成功,进入到home画面。
hr表的用户名和密码,登录系统。
- 输入和数据库
- 前端
Vue工程的结构

接下来对系统管理的菜单页面进行练习。
- 前端使用


![[Redis][List]详细讲解](https://i-blog.csdnimg.cn/direct/2b32231c7dcc419f821fd5b3114708d6.png)