作者:IT邦德
中国DBA联盟(ACDU)成员,10余年DBA工作经验,
Oracle、PostgreSQL ACE
CSDN博客专家及B站知名UP主,全网粉丝10万+
擅长主流Oracle、MySQL、PG、高斯及Greenplum备份恢复,
安装迁移,性能优化、故障应急处理
微信:jem_db
QQ交流群:587159446
公众号:IT邦德
文章目录
- 前言
- 1.PITR说明
- 2.开归档
- 3.PITR恢复要点
- 4.全量物理备份
- 5.准备测试数据(源库)
- 6.还原点恢复
- 7.XID恢复
- 8.恢复至lsn
- 10.总结
前言
国产数据库使用的过程中,基于PITR的恢复非常的重要,这里给大家分享openGauss 基于PITR的恢复
1.PITR说明
当数据库崩溃或希望回退到数据库之前的某一状态时,opengauss的即时恢复功能( Point-In-Time Recovery,简称PITR ),可以支持恢复到备份归档数据之后的任意时间点。
仅主节点可以进行PITR恢复,备机需要进行全量build达成与主机数据同步。
2.开归档
1.使用omm用户登录主库确认归档是否开启
查看当前归档日志相关参数,查看当前openGauss数据库管理系统的归档设置:

openGauss=# select name,setting from pg_settings
where name like 'archive%' or name = 'wal_level';

       name       |   setting
------------------+-------------
 archive_command  | (disabled)
 archive_dest     |
 archive_interval | 1
 archive_mode     | off
 archive_timeout  | 0
 wal_level        | hot_standby
(6 rows)


说明:可以看出,数据库在非归档方式(参数archive_mode的值为off)。


vi $PGDATA/postgresql.conf

# 修改archive_mode的值需要重启动数据库
archive_mode=on
# 修改archive_command的值不需要重启动数据库,只需要reload
archive_command = 'cp %p /archivelog/%f'
# 修改archive_time:归档周期,900表示每900秒(15分钟)切换一次
archive_timeout = 900

用Linux用户omm,执行下面的命令,启动openGauss数据库:
gs_om -t restart

再次查看归档日志相关参数
执行下面的命令,查看当前openGauss数据库的归档设置:
[omm@centos79 ~]$ gsql -c
"select name,setting from pg_settings where name like 'archive%' or name = 'wal_level'"

       name       |       setting
------------------+----------------------
 archive_command  | cp %p /archivelog/%f
 archive_dest     |
 archive_interval | 1
 archive_mode     | on
 archive_timeout  | 900
 wal_level        | hot_standby
(6 rows)
3.PITR恢复要点
PITR恢复流程:
1.将物理备份的文件替换目标数据库目录。
2.删除数据库目录下pg_xlog/中的所有文件。
3.将归档的WAL日志文件复制到pg_xlog文件中
4.在数据库目录下创建恢复命令文件recovery.conf,指定数据库恢复的程度。
5.启动数据库。
6.连接数据库,查看是否恢复到希望预期的状态。
7.若已经恢复到预期状态,通过pg_xlog_replay_resume()指令使主节点对外提供服务。


####  归档恢复配置  ####
## 该SHELL命令获取已归档的WAL文件。
restore_command = 'cp /gauss/bak/archive/%f %p'
## 清理备库WAL归档日志的shell命令,每次重启时会执行
archive_cleanup_command = 'pg_archivecleanup /gauss/bak/archive %r'

#### 恢复目标设置(四选一) ####
## 还原到一个使用pg_create_restore_point()创建的还原点
recovery_target_name = 'restore_point_1'
## 还原到一个指定时间戳
recovery_target_time = '2020-01-01 12:00:00'
 ## 还原到一个事务ID
recovery_target_xid = '3000'
 ## 还原到日志的指定LSN点
recovery_target_lsn = '0/0FFFFFF'
 ## 声明是否在指定恢复目标之后停止(true) 或 之前停止(false),不支持recovery_target_name 配置
recovery_target_inclusive = true
## 注意:如果不配置任何恢复目标 或 配置目标不存在,则默认恢复到最新的WAL日志点。
4.全量物理备份
#使用gs_basebackup全量备份
创建备份文件存储目录,gs_basebackup备份
数据库需要处于开启状态

[omm@centos79 ~]$ mkdir -p /home/omm/gs_bak
[omm@centos79 ~]$ gs_basebackup -D /home/omm/gs_bak -p 15400
INFO:  The starting position of the xlog copy of the full build is: 0/E000028. The slot minimum LSN is: 0/0. The disaster slot minimum LSN is: 0/0. The logical slot minimum LSN is: 0/0.
[2024-09-19 05:49:45]:begin build tablespace list
[2024-09-19 05:49:45]:finish build tablespace list
[2024-09-19 05:49:45]:begin get xlog by xlogstream
[2024-09-19 05:49:45]: check identify system success
[2024-09-19 05:49:45]: send START_REPLICATION 0/E000000 success
[2024-09-19 05:49:45]: keepalive message is received
[2024-09-19 05:49:45]: keepalive message is received
[2024-09-19 05:49:50]:gs_basebackup: base backup successfully
5.准备测试数据(源库)
1)记录操作的起始位置
--创建测试数据
openGauss=# \c testdb
testdb=# \dt
                          List of relations
 Schema |  Name   | Type  | Owner |             Storage
--------+---------+-------+-------+----------------------------------
 public | test    | table | omm   | {orientation=row,compression=no}
 public | testbak | table | omm   | {orientation=row,compression=no}
(2 rows)
-- 创建一个还原点restore_point_1
testdb=# select pg_create_restore_point('restore_point_1');
 pg_create_restore_point
-------------------------
0/F00B638
(1 row)

2)创建测试数据t1表(源库),切日志
drop table t1;
create table t1(name varchar(50));
insert into t1 values('This is restore_point_1');

testdb=# select pg_switch_xlog();
 pg_switch_xlog
----------------
 0/F016398
(1 row)

testdb=# select pg_switch_xlog();
 pg_switch_xlog
----------------
 0/10000A68
(1 row)

3)记录第一次数据插入后的数据库位置
testdb=# \x
Expanded display is on.
testdb=# select * from pg_get_variable_info();
-[ RECORD 1 ]------------+-----------
node_name                | dn_6001
next_oid                 | 16417
next_xid                 | 45588
oldest_xid               | 12666
xid_vac_limit            | 4000012666
oldest_xid_db            | 15649
last_extend_csn_logpage  | 63
start_extend_csn_logpage | 0
next_commit_seqno        | 3298
latest_completed_xid     | 45587
startup_max_xid          | 45154

-- 查看最近提交的XID(latestCompletedXid-->45587 || nextXid-->45588)

4)创建测试数据t2表(源库)
-- 创建表t2并插入数据
create table t2(name varchar(50));
insert into t2 values('This is insert into t2');

testdb=# select pg_current_xlog_location();
 pg_current_xlog_location
--------------------------
 0/1100BE28
(1 row)

testdb=# select pg_switch_xlog();
 pg_switch_xlog
----------------
 0/1100D060
(1 row)

testdb=# select pg_switch_xlog();
 pg_switch_xlog
----------------
 0/12001368
(1 row)


5)记录第二次数据插入后的数据库位置
-- 查询当前LSN 数据库t1、t2
testdb=# select pg_current_xlog_location();
 pg_current_xlog_location
--------------------------
 0/13002E60
(1 row)
6.还原点恢复
配置recovery.conf文件(基于还原点restore_point_1恢复)
#创建recovery.conf文件

cd /home/omm/data/db1/

cat> recovery.conf<<EOF
restore_command = 'cp /archivelog/%f %p'
archive_cleanup_command = 'pg_archivecleanup /archivelog  %r'
recovery_target_name = 'restore_point_1'   ## 恢复到指定的还原点restore_point_1,此时还没有创建表t1和t2
recovery_target_inclusive = true
EOF

#由于在本机操作,关闭源数据库,避免port冲突
$ gs_om -t stop
#启动恢复目标数据库并查看数据,数据目录: /home/omm/data/db1
$ gs_ctl start -D  /home/omm/data/db1

-- 检查当前数据库是否处于恢复状态
gsql -r -d testdb

openGauss=# select pg_is_in_recovery();
 pg_is_in_recovery
-------------------
 t
(1 row)


openGauss=# select pg_current_xlog_location();
ERROR:  recovery is in progress
HINT:  WAL control functions cannot be executed during recovery.
CONTEXT:  referenced column: pg_current_xlog_location
openGauss=# drop table t1;
ERROR:  cannot execute DROP TABLE in a read-only transaction

恢复说明:
表t1和t2都不存在,且处于恢复状态数据库无法使用函数查看LSN位置,该数据库只读

#查看日志中的恢复情况
cd /openGauss/log/omm/omm/pg_log/dn_6001

grep -C 3 "restore_point_1"  /openGauss/log/omm/omm/pg_log/dn_6001/postgresql-2024-09-19_060448.log

7.XID恢复
-- 修改recovery_target,继续往前恢复
cd /home/omm/data/db1/
mv recovery.done recovery.conf
vi recovery.conf
--------------------------
# 根据前面的信息得知,xid=19251这个事务完毕时,仅有t1表,没有t2表
# 我们这一阶段仅恢复t1表即可
# 修改:
recovery_target_xid = '45587'
--------------------------
-- 重启恢复测试数据
gs_ctl restart -D /home/omm/data/db1/
-- 检查当前数据库是否处于恢复状态
gsql -r -d testdb
openGauss=# select pg_is_in_recovery();
pg_is_in_recovery
-------------------
t
(1 row)
testdb=# \dt
List of relations
Schema | Name | Type | Owner | Storage
--------+---------+-------+-------+------------------------------------------------------
public | t1 | table | omm | {orientation=row,compression=no,storage_type=USTORE}
public | test | table | omm | {orientation=row,compression=no}
public | testbak | table | omm | {orientation=row,compression=no}
(3 rows)
testdb=# select * from t1;
name
-------------------------
This is restore_point_1
(1 row)
恢复说明:此时数据仅恢复了表t1,并未恢复表t2,实验结果满足预期目标 ^
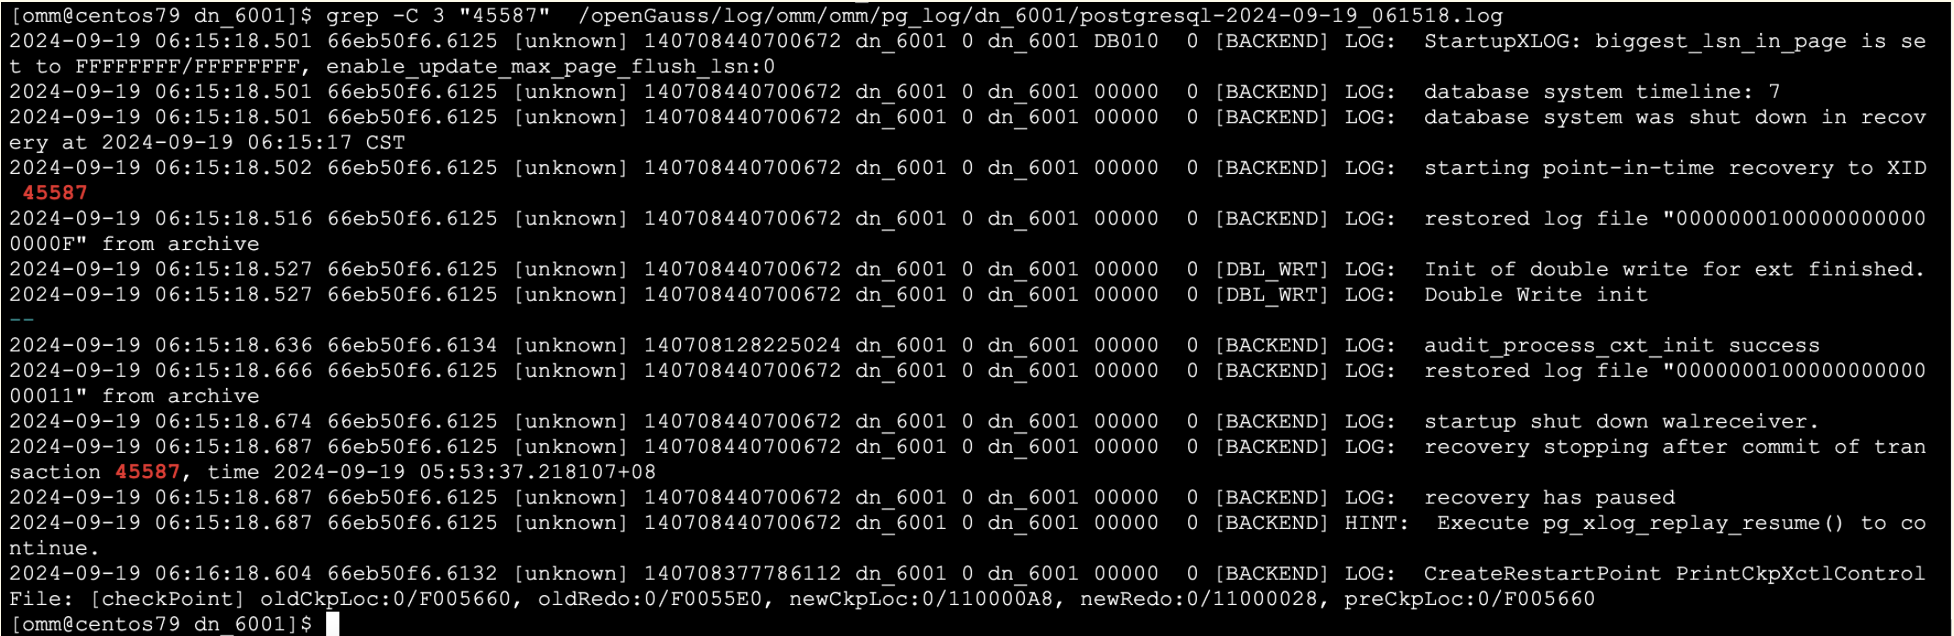
-- 从日志中我们也可以看到,数据库恢复至xid=45587后
#查看日志中的恢复情况
cd /openGauss/log/omm/omm/pg_log/dn_6001
grep -C 3 "45587" /openGauss/log/omm/omm/pg_log/dn_6001/postgresql-2024-09-19_061518.log
8.恢复至lsn
-- 修改recovery_target,继续往前恢复

cd /home/omm/data/db1/
mv recovery.done recovery.conf
vi recovery.conf


# 根据前面的信息得知,lsn='0/13002E60'这个LSN位置时,t1表和t2表已经创建完毕
# 修改:
recovery_target_lsn = '0/13002E60'

-- 重启恢复测试数据
gs_ctl restart -D /home/omm/data/db1/

-- 检查当前数据库是否处于恢复状态
gsql -r -d testdb

openGauss=# select pg_is_in_recovery();
 pg_is_in_recovery
-------------------
 t
(1 row)

testdb=# \dt
                                    List of relations
 Schema |  Name   | Type  | Owner |                       Storage
--------+---------+-------+-------+------------------------------------------------------
 public | t1      | table | omm   | {orientation=row,compression=no,storage_type=USTORE}
 public | t2      | table | omm   | {orientation=row,compression=no,storage_type=USTORE}
 public | test    | table | omm   | {orientation=row,compression=no}
 public | testbak | table | omm   | {orientation=row,compression=no}
(4 rows)

testdb=# select * from t1;
          name
-------------------------
 This is restore_point_1
(1 row)

testdb=# select * from t2;
          name
------------------------
 This is insert into t2
(1 row)


-- 从日志中我们也可以看到,数据库恢复至LSN=0/13002E60后,
检测到Double-write日志后续内容为空(Empty),则认为数据库已恢复至最新状态,此时恢复任务结束(Finish)


#查看日志中的恢复情况
cd /openGauss/log/omm/omm/pg_log/dn_6001
grep -A 5 "0/13002E60"  /openGauss/log/omm/omm/pg_log/dn_6001/postgresql-2024-09-19_062157.log

9.结束PITR
当未将数据库恢复至最新时刻状态时,此时需要手动结束PITR恢复任务。

-- 查询数据库恢复状态
testdb=# select pg_is_in_recovery();
 pg_is_in_recovery
-------------------
 t
(1 row)

-- 结束恢复,使机器对外提供读写服务
testdb=# select pg_xlog_replay_resume();
 pg_xlog_replay_resume
-----------------------

-- 查询数据库恢复状态(已结束)
testdb=# select pg_is_in_recovery();
 pg_is_in_recovery
-------------------
 f
(1 row)

--可以看到目前数据库可以读写了
testdb=# drop table testbak;
DROP TABLE
10.总结
%f即归档检索中的文件名,%p即复制目的地的路径名,%r最新可用重启点的文件名
如果多个备机从相同的归档路径恢复时,需要确保该路径存在所有备机恢复所需要的WAL文件。
整个恢复的过程为了方式端口被占用,请关闭原库