使用注解可以更简单的存储Bean对象和读取Bean对象。
存储Bean对象
在使用注解之前,需要做一些前置工作:
<?xml version="1.0" encoding="UTF-8"?>
<beans xmlns="http://www.springframework.org/schema/beans"
       xmlns:xsi="http://www.w3.org/2001/XMLSchema-instance"
       xmlns:content="http://www.springframework.org/schema/context"
       xsi:schemaLocation="http://www.springframework.org/schema/beans
       http://www.springframework.org/schema/beans/spring-beans.xsd
       http://www.springframework.org/schema/context
       https://www.springframework.org/schema/context/spring-context.xsd">
    <content:component-scan base-package="(包名)">
    </content:component-scan>

</beans>
包名可以类似于com.XXX.
注解有两类:类注解和方法注解。
类注解:@Controller(控制器注解)、@Service(服务注解)、@Repository(仓库注解)、@Component(组件注解)、@Configuration(配置注解)。
方法注解:@Bean
类注解
@Controller(控制器注解)
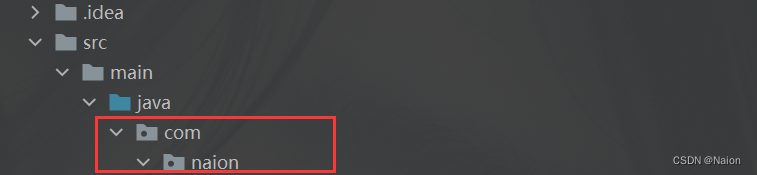
如图,在naion包下建立一个controller包,用来存放controller注解的类,类中写了一个UserController。
类注解需要将注解写在类上。结果如下:
@Controller
public class UserController {

    public void sayHi() {
        System.out.println("Hi~");
    }
}
然后在com的包下建立一个启动类,命名为StartUp。

启动类中仍然是老规矩,获取spring上下文,从spring上下文获取Bean对象,使用Bean。要注意xml文件是否正确。
public class StartUp {

    public static void main(String[] args) {
        ApplicationContext applicationContext =
                new ClassPathXmlApplicationContext("spring-config.xml");
        UserController userController = applicationContext.getBean("userController", UserController.class);
        userController.sayHi();
    }
}
要注意的一点就是getBean中,类名第一个字母应该小写,而不是大写,否则报错。


@Service(服务存储)
使用方法和@Controller类似。你可以新创建一个类添加注解,也可以将@Controller注解改为@Service。
@Service
public class UserService {

    public void sayHi() {
        System.out.println("Hi~");
    }
}
public class StartUp {

    public static void main(String[] args) {
        ApplicationContext applicationContext =
                new ClassPathXmlApplicationContext("spring-config.xml");
        UserService userService = applicationContext.getBean("userService", UserService.class);
        userService.sayHi();
    }
}
其他的三个类注解用法上相似,这里不在累述。五大类注解功能相似,为什么不用一个,而是要分开,主要的原因就是让人们看到类注解之后,直观了解当前类是干嘛的。比如@Controller表示也业务逻辑层、@Service表示服务层、@Repository表示持久层、@Configuration表示配置层。
前面说,sprin存储类时,类名第一个字母要小写。如果是这样的情况,就不一样了。
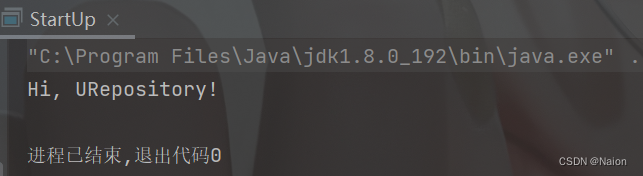
@Repository
public class URepository {

    public void sayHi() {
        System.out.println("Hi, URepository!");
    }
}
public class StartUp {
public static void main(String[] args) {
ApplicationContext applicationContext =
new ClassPathXmlApplicationContext("spring-config.xml");
//类名第一个字母和第二个字母都大写
URepository uRepository = applicationContext.getBean("uRepository", URepository.class);
uRepository.sayHi();
}
}
报错了,这是特殊的情况。我们查看源代码就可以发现问题:
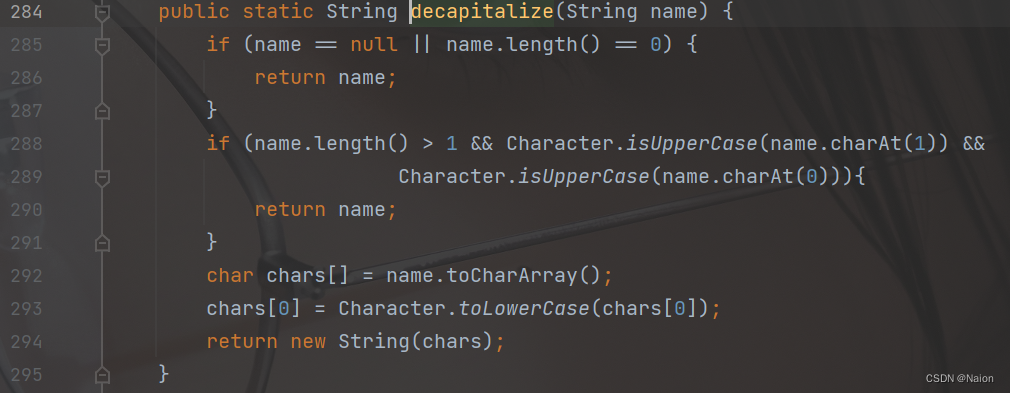 288行表示,如果第一个字符是大写,且第二个字符也是大写,直接返回该name;否则第一个字符小写后返回。所以,改成下面的代码就不会报错了。

@Bean方法注解
@Bean注解需要搭配类注解来使用。@Bean注解,将注解写在方法上。@Bean注解会告诉Spring这个方法将会返回一个对象,该对象要注册为Spring应用上下文中的bean,所以,我们需要先写一个对象出来
public class User {

    private int id;
    private String name;
    private int age;

    public int getId() {
        return id;
    }

    public void setId(int id) {
        this.id = id;
    }

    public String getName() {
        return name;
    }

    public void setName(String name) {
        this.name = name;
    }

    public int getAge() {
        return age;
    }

    public void setAge(int age) {
        this.age = age;
    }

    @Override
    public String toString() {
        return "User{" +
                "id=" + id +
                ", name='" + name + '\'' +
                ", age=" + age +
                '}';
    }
}
然后使用@Bean来返回该对象给spring。
@Component
public class UserBeans {

    @Bean
    public User user() {
        User user = new User();
        user.setName("a");
        user.setAge(1);
        user.setId(1);
        return user;
    }
}
public class StartUp {
public static void main(String[] args) {
ApplicationContext applicationContext =
new ClassPathXmlApplicationContext("spring-config.xml");
User user = applicationContext.getBean("user", User.class);
System.out.println(user);
}
}
获取Bean对象
获取bean对象,把对象取出来放到某个类中。也叫对象装配、对象注入。对象装配有三种方式:属性注入、setter注入、构造方法注入。
注解有@Autowired和@Resource。
属性注入
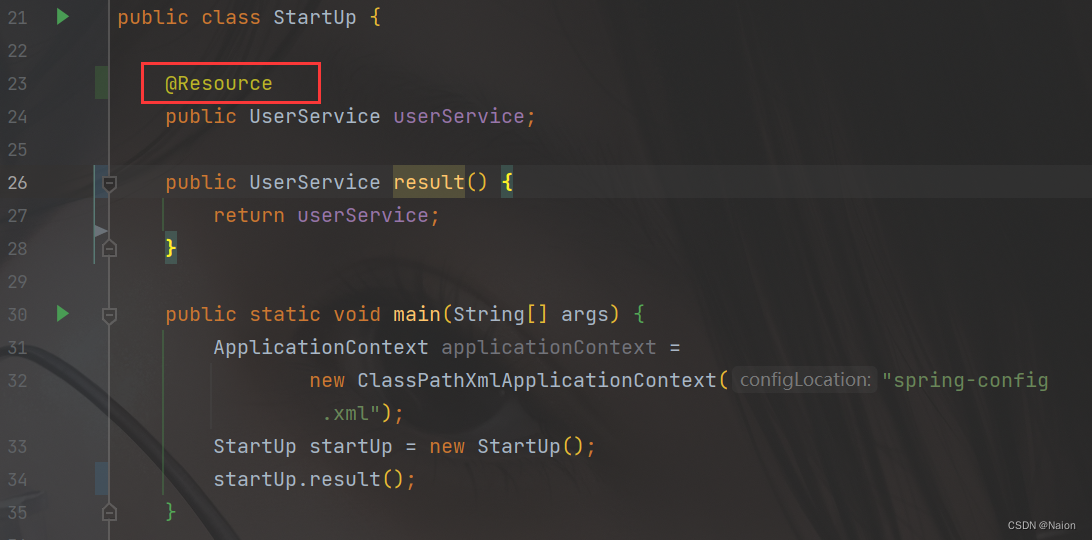
现在,我想获取UserService。可以直接在启动类中使用@Autowired注解获取到该对象。
@Service
public class UserService {

    public void sayHi() {
        System.out.println("Hi~");
    }
}
public class StartUp {
@Autowired
public UserService userService;
public UserService result() {
return userService;
}
public static void main(String[] args) {
ApplicationContext applicationContext =
new ClassPathXmlApplicationContext("spring-config.xml");
StartUp startUp = new StartUp();
startUp.result();
}
}
属性注入的优点:简洁,使用很方便。缺点:只能使用在IoC容器上;不能被final修饰;更容易违背单一设计原则。
Setter注入
使用set和get方法。
public class StartUp {

    public UserService userService;

    public UserService getUserService() {
        return userService;
    }

    @Autowired
    public void setUserService(UserService userService) {
        this.userService = userService;
    }

    public static void main(String[] args) {
        ApplicationContext applicationContext =
                new ClassPathXmlApplicationContext("spring-config.xml");
        StartUp startUp = new StartUp();
        startUp.setUserService(startUp.userService);
    }
}
setter注入的优点:符合单一设计原则。缺点:不能被final修饰;注入的对象可以被修改。
构造方法注入
public class StartUp {

    public static UserService userService;

    @Autowired
    public StartUp(UserService userService) {
        this.userService = userService;
    }

    public static void main(String[] args) {
        ApplicationContext applicationContext =
                new ClassPathXmlApplicationContext("spring-config.xml");
        StartUp startUp = new StartUp(userService);
    }
}
构造方法注入优点:可以注入被final修饰的对象;注入的对象不会像setter注入那样被修改;可以完全被初始化;通用性更好,不仅仅使用在IoC容器上。
@Resource
@Resource不能使用在构造方法上。
@Autowired和@Resource之间的一些区别:
(1)出身不同,前者来自spring,后者来自jdk;
(2)@Resource支持更多的参数;
(3)@Resource不支持构造方法注入。


![面向OLAP的列式存储DBMS-9-[ClickHouse]的常用日期时间操作](https://img-blog.csdnimg.cn/eb26a059229745fca6ad17a9d8ed5090.png)