1. flip函数介绍(翻转)
void cv::flip(InputArray src, OutputArray dst, int flipCode )src:输入图像。
dst:输出图像,与 src 具有相同的大小、数据类型及通道数。
flipCode:翻转方式标志。数值大于 0 表示绕 y 轴进行翻转;数值等于 0,表示绕 x 轴进行翻转;数值小于 0,表示绕两个轴翻转。
1.1 代码示例:
#include <opencv2/opencv.hpp>
#include <iostream>

using namespace std;
using namespace cv;

int main()
{
    Mat img = imread("../pic/gril_1.jpg");
    if (img.empty())
    {
        cout << "请确认图像文件名称是否正确" << endl;
        return -1;
    }

    Mat img_x, img_y, img_xy;
    flip(img, img_x, 0); //以 x 轴对称
    flip(img, img_y, 1); //以 y 轴对称
    flip(img, img_xy, -1); //先以 x 轴对称,再以 y 轴对称
    imshow("img", img);
    imshow("img_x", img_x);
    imshow("img_y", img_y);
    imshow("img_xy", img_xy);
    waitKey(0);
    return 0;
}
1.2 结果:

2. 图像仿射变换
2.1 getRotationMatrix2D()函数介绍
Mat cv::getRotationMatrix2D (Point2f center, double angle, double scale )center:图像旋转的中心位置。
angle:图像旋转的角度,单位为度,正值为逆时针旋转。
scale:两个轴的比例因子,可以实现旋转过程中的图像缩放,不缩放则输入1。
该函数输入旋转角度和旋转中心,返回图像旋转矩阵,返回值的数据类型为
Mat
类,是一个2×
3
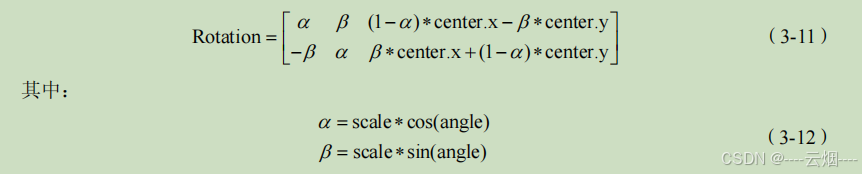
的矩阵。如果我们已知图像旋转矩阵,那么可以自己生成旋转矩阵而不调用该函数。该函数生成的旋转矩阵与旋转角度和旋转中心的关系如下:
2.2 warpAffine()函数介绍
void cv::warpAffine(InputArray src, OutputArray dst, InputArray M, Size dsize,
int flags = INTER_LINEAR, int borderMode = BORDER_CONSTANT, const Scalar&
borderValue = Scalar() )
src:输入图像。
dst:仿射变换后输出图像,与src数据类型相同,尺寸与dsize相同。
M: 2×3的变换矩阵。
dsize:输出图像的尺寸。
flags:插值方法标志,。
borderMode:像素边界外推方法标志。
borderValue:填充边界使用的数值,默认情况下为0。
插值方法标志

边界外推的方法标志

这个函数使用仿射变换来将输入图像映射到输出图像。仿射变换包括旋转、缩放、平移等操作,但不包括扭曲和剪切。这个函数非常有用,特别是在需要将图像映射到另一个大小或以特定方式旋转或倾斜图像时。
warpAffine函数可以参考:
【C++】【Opencv】cv::warpAffine()仿射变换函数详解,实现平移、缩放和旋转等功能-CSDN博客
2.3 getAffineTransform函数介绍
Mat cv::getAffineTransform(const Point2f src[], const Point2f dst[] )src[]:源图像中的 3 个像素坐标。
dst[] :目标图像中的 3 个像素坐标
该函数两个输入量都是存放浮点坐标的数组,在生成数组的时候,与像素点的输入顺序无关, 但是需要保证像素点的对应关系,函数的返回值是一个 2
×
3
的变换矩阵。有了前面变换矩阵的取,就可以利用 warpAffine()
函数实现矩阵的仿射变换。
2.4 代码示例:
#include <opencv2/opencv.hpp>
#include <iostream>
#include <vector>

using namespace std;
using namespace cv;

int main()
{
    Mat img = imread("../pic/gril_1.jpg");
    if (img.empty())
    {
        cout << "请确认图像文件名称是否正确" << endl;
        return -1;
    }

    Mat rotation0, rotation1, img_warp0, img_warp1,img_warp2;
    double angle = -90; //设置图像旋转的角度
    Size dst_size(img.rows, img.cols); //设置输出图像的尺寸
    Point2f center(img.rows / 2.0, img.cols / 2.0); //设置图像的旋转中心
    rotation0 = getRotationMatrix2D(center, angle, 1); //计算仿射变换矩阵

    //cout << "rotation0 : \n" <<  rotation0 << endl;
    warpAffine(img, img_warp0, rotation0, dst_size); //进行仿射变换
    imshow("img_warp0", img_warp0);
    //根据定义的 3 个点进行仿射变换
    Point2f src_points[3];
    Point2f dst_points[3];
    src_points[0] = Point2f(0, 0); //原始图像中的 3 个点
    src_points[1] = Point2f(0, (float)(img.cols - 1));
    src_points[2] = Point2f((float)(img.rows - 1), (float)(img.cols - 1));
    //仿射变换后图像中的 3 个点
    dst_points[0] = Point2f((float)(img.rows)*0.1, (float)(img.cols)*0.10);
    dst_points[1] = Point2f((float)(img.rows)*0.1, (float)(img.cols)*0.80);
    dst_points[2] = Point2f((float)(img.rows)*0.81, (float)(img.cols)*0.8);
    rotation1 = getAffineTransform(src_points, dst_points); //根据对应点求取仿射变换矩阵
    //cout << "rotation1 : \n" <<  rotation1 << endl;
    warpAffine(img, img_warp1, rotation1, dst_size); //进行仿射变换
    warpAffine(img, img_warp2, rotation1, dst_size,WARP_FILL_OUTLIERS,BORDER_REPLICATE,10); //进行仿射变换
    imshow("img_warp1", img_warp1);
    imshow("img_warp2", img_warp2);
    waitKey(0);
    return 0;
}
2.5 结果:


![[Spring] SpringBoot统一功能处理与图书管理系统](https://i-blog.csdnimg.cn/direct/3e5d61d075e145db9ec359b0284a9406.png)