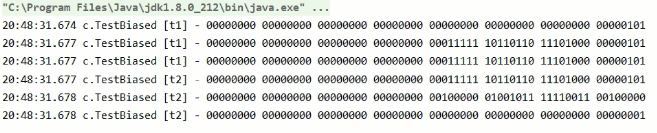
简单时钟
介绍
本示例通过使用@ohos.display接口以及Canvas组件来实现一个简单的时钟应用。
效果预览

使用说明
1.界面通过setInterval实现周期性实时刷新时间,使用Canvas绘制时钟,指针旋转角度通过计算得出。
例如:"2 * Math.PI / 60 * second"是秒针旋转的角度。
具体实现
- 本示例展示简单时钟的方法主要封装在Index中,源码参考:[Index.ets] 。
/*
 * Copyright (c) 2022 Huawei Device Co., Ltd.
 * Licensed under the Apache License, Version 2.0 (the "License");
 * you may not use this file except in compliance with the License.
 * You may obtain a copy of the License at
 *
 *     http://www.apache.org/licenses/LICENSE-2.0
 *
 * Unless required by applicable law or agreed to in writing, software
 * distributed under the License is distributed on an "AS IS" BASIS,
 * WITHOUT WARRANTIES OR CONDITIONS OF ANY KIND, either express or implied.
 * See the License for the specific language governing permissions and
 * limitations under the License.
 */
import { display } from '@kit.ArkUI';
import Logger from '../utils/Logger';
import DrawClock from '../utils/DrawClock';
import CommonConstants from '../common/CommonConstants';

const HEIGHT_ADD: number = CommonConstants.HEIGHT_ADD; // 表盘下面需要绘制时间,canvas高度是宽度加150
const TAG: string = 'Index';

@Entry
@Component
struct Clock {
  @State canvasWidth: number = CommonConstants.DEFAULT_WATCH_SIZE; // 300是表盘默认大小
  private settings: RenderingContextSettings = new RenderingContextSettings(true);
  private context: CanvasRenderingContext2D = new CanvasRenderingContext2D(this.settings);
  private radius: number = CommonConstants.DEFAULT_WATCH_RADIUS; // 默认表盘半径
  private intervalId: number = 0;
  private drawClock: DrawClock = new DrawClock();
  updateTime = () => {
    this.context.clearRect(0, 0, this.canvasWidth, this.canvasWidth + HEIGHT_ADD);
    let nowTime = new Date();
    let hour = nowTime.getHours();
    let minute = nowTime.getMinutes();
    let second = nowTime.getSeconds();
    let time = `${this.fillTime(hour)}:${this.fillTime(minute)}:${this.fillTime(second)}`;
    this.drawClock.drawClock(this.context, this.radius, this.canvasWidth, hour, minute, second, time)
    this.context.translate(-this.radius, -this.radius);
  }

  fillTime(time: number) {
    return time < CommonConstants.NUMBER_TEN ? `0${time}` : `${time}`;
  }

  onPageShow(): void {
    this.updateTime();
    this.intervalId = setInterval(this.updateTime, CommonConstants.INTERVAL_TIME)
  }

  onPageHide() {
    clearInterval(this.intervalId);
  }

  aboutToAppear() {
    this.getSize();
  }

  // 获取设备宽高计算表盘大小
  async getSize() {
    let mDisplay = display.getDefaultDisplaySync();
    Logger.info(TAG, `getDefaultDisplay mDisplay = ${JSON.stringify(mDisplay)}`);
    this.canvasWidth = px2vp(mDisplay.width > mDisplay.height ? mDisplay.height * CommonConstants.CONVERSION_RATE :
      mDisplay.width * CommonConstants.CONVERSION_RATE);
    this.radius = this.canvasWidth / CommonConstants.NUMBER_TWO;
  }

  build() {
    Stack({ alignContent: Alignment.Center }) {
      Canvas(this.context)
        .padding({ top: $r('app.float.canvas_padding_top') })
        .width(this.canvasWidth)
        .height(this.canvasWidth + HEIGHT_ADD)
        .onReady(() => {
          this.updateTime();
          this.intervalId = setInterval(this.updateTime, CommonConstants.INTERVAL_TIME);
        })
    }
    .width(CommonConstants.FULL_PERCENTAGE)
    .height(CommonConstants.FULL_PERCENTAGE)
  }
}
- 设置表盘大小:通过Index中的display.getDefaultDisplay()方法来获取设备宽高计算表盘大小;
- 获取当前时间:调用updateTime函数,执行new Date().getHours()、new Date().getMinutes()、new Date().getSeconds()获取当前时间。
- 绘制表盘内容:通过CanvasRenderingContext2D来画表盘背景、时针、分针、秒针、圆心以及表盘下方文本;
- 启动时钟:添加setInterval定时器,每隔1s执行一次updateTime函数。
以上就是本篇文章所带来的鸿蒙开发中一小部分技术讲解;想要学习完整的鸿蒙全栈技术。可以在结尾找我可全部拿到!
下面是鸿蒙的完整学习路线,展示如下:

除此之外,根据这个学习鸿蒙全栈学习路线,也附带一整套完整的学习【文档+视频】,内容包含如下:
内容包含了:(ArkTS、ArkUI、Stage模型、多端部署、分布式应用开发、音频、视频、WebGL、OpenHarmony多媒体技术、Napi组件、OpenHarmony内核、鸿蒙南向开发、鸿蒙项目实战)等技术知识点。帮助大家在学习鸿蒙路上快速成长!
鸿蒙【北向应用开发+南向系统层开发】文档
鸿蒙【基础+实战项目】视频
鸿蒙面经

为了避免大家在学习过程中产生更多的时间成本,对比我把以上内容全部放在了↓↓↓想要的可以自拿喔!谢谢大家观看!